


In the second part of this series, published in the September/October issue (https://www.codemag.com/Article/1909081/Nest.js-Step-by-Step-Part-2), I linked the To Do REST API to a real database by making use of PostgreSQL, TypeORM, and an @nestjs/Typeorm module. Now, for every To Do item created by the API, there must be a valid Owner. The Owner is the user who's currently logged in.
This article, Part 3 in the series, introduces a new Users Module that allows the application to create a user and to locate them in the database. To support user authentication, you'll add the Auth Module that exposes two endpoints and allows users to Register new accounts and log in.
Related Articles
- NestJS Step-by-Step (Part 1)
- NestJS Step-by-Step (Part 2)
- NestJS Step-by-Step: Connecting NestJS with Angular (Part 4)
For user authentication, I've chosen to use the Passport.js module. By far, this is the most popular and flexible Node.js authentication module because it supports a variety of authentication strategies ranging from Local Strategy, to JWT Strategy to Google Authentication Strategy and other Social Media authentication strategies.
Nest.js embraces Passport.js and wraps it inside the @nestjs/passport library. This library integrates the Passport.js module into the Nest.js Dependency Injection system, giving you a smooth and Nest-native experience in authenticating users using Passport.js authentication module.
Let's start by introducing Passport.js and how it works, then explore how Nest.js integrates with the Passport.js module via the @nestjs/passport library. Finally, the step-by-step demonstration shows you how I introduced the concept of users into the To Do REST API, how users register themselves, and how they can authenticate via JWT tokens generated by the application in response to successful authentications.
You can find the source code of this article and the rest of this series here: https://github.com/bhaidar/nestjs-todo-app.
What Is Passport.js?
Passport.js is a mature, popular, and flexible Node.js authentication middleware that offers more than 300 Request Authentication strategies. All of these strategies can be accessed via this URL: http://www.passportjs.org.
Passport.js handles user authentication based on selected strategies in your application. For the To Do REST API, I've selected the JWT Strategy that's implemented by the passport-jwt library.
Why JWT? JSON Web Tokens is an authentication standard that works by generating and signing tokens, passing them around between the client-side and server-side applications, passed around via query strings, authorization headers, or other mediums. Having such a valid and non-expired token, extracted from an HTTP Request, signals the fact that the user is authenticated and is allowed to access protected resources. You can read more about JWT by following this URL: https://jwt.io/.
The ultimate benefit for using JWTs is going stateless by removing the need to track session data on the server and cookies on the client, which is, at today's standards, an outdated practice.
In brief, a token consists of several sections. The most important section is the body of the token. The JWT body is called the JWT payload. It's the application's duty to decide what goes into the payload. The recommendation is always not to overload it and to keep the relevant information that identifies the user when they login next. It's of utmost importance to not include sensitive data or private data like passwords in your payload.
The authentication cycle with Passports.js involves a few steps that give the user access to protected parts of your app.
- The user submits their registration to the back-end app for validation.
- If the user is successful:
- The app creates the token.
- The app signs the token using the
jsonwebtokenlibrary that you download as an NPM package (https://www.npmjs.com/package/jsonwebtoken). - The back-end app returns a response to the client-side app including the signed token and any relevant information.
- The client-side app usually stores the token inside
LocalStorage,SessionStorage, or inside a cookie in some cases. - On each subsequent request sent to the server, the client-side app includes the token stored locally in an authorization header, or in other parts of the request, in the form of
Bearer {Token}. - The back-end app, using the Passport.js JWT strategy:
- Extracts the token.
- Validates the token to make sure it was signed by this app and wasn’t tampered with.
- Hands in the validation of the user, whose information is contained inside the token payload.
- Prompts the back-end app to ensure that the user in the payload is stored in the database and has a real account.
That, in brief, is how users are authenticated using Passport.js and JWTs.
How Nest Framework Integrates with Passport.js
The @nestjs/passport package wraps the Passport.js authentication middleware, configures, and uses the Passport.js on your behalf, gives you a way to customize the Passport.js default configurations, and, in return, it exposes the AuthGuard() decorator that you can use in your application to protect any Route Handler or Controller class and force the user to be authenticated before accessing the resource.
The @nestks/passport package integrates the Passport.js middleware into the Nest.js Dependency Injection system by providing the PassportModule.register() and PassportModule.registerAsync() methods that you have to import to your Auth Module in your application to provide any configuration needed by Passport.js middleware.
In addition, the package provides the Passport Strategy class that you extend when creating your own Passport Strategy to be used for authenticating users in your application. For any custom strategy you create, you have to provide the Passport Strategy class in the AuthModule so that @nestjs/passport is aware of it, to pass over to the Passport.js middleware later on. Listing 1 shows a sample AuthModule setup.
Listing 1: AuthModule setup
@Module({
    imports: [    ...,
        PassportModule.register({
            defaultStrategy: 'jwt',
            property: 'user',
            session: false,
        }),    ...
    ],
    controllers: [AuthController],
    providers: [AuthService, JwtStrategy],
    exports: [PassportModule],
})
export class AuthModule {}
The PassportModule.register() takes an instance of the AuthModuleOptions as input. The most important property to configure on the PassportModule is to specify the AuthModuleOptions.defaultStrategy property. Without it, the PassportModule throws an exception.
By default, the PassportModule, once it runs the Passport.js Strategy, extends the Request object and appends a new property pointing to the authenticated user (or whatever is placed in the JWT Payload). The property name added to the Request object is user by default. You can change this default behavior by assigning a new property name to the AuthModuleOptions.property property. In addition, the PassportModule, by default, disables storing any authentication information in the Server Session. This can be changed by enabling the AuthModuleOptions.session property.
Remember to export the PassportModule from your AuthModule. The reason for this is that in every module where you want to make use of AuthGuard(), you have to import the AuthModule and import the PassportModule.
To protect any Router Handler or Controller use the @UseGuards() decorator provided by Nest.js as follows:
// Controller
@UseGuards(AuthGuards())
export class FeatureController { ... }

// Route Handler
@Post()
@UseGuards(AuthGuards())
public async createTodo(...):
Promise<any> { ...}
You can check the source code for this package by following this URL: https://github.com/nestjs/passport.
Demo
Let's start by installing the required NPM packages.
Step 1: Add the following NPM packages that you need to use throughout building the AuthModule:
yarn add bcrypt @nestjs/passport @nestjs/jwt
passport passport-jwt
In addition, you need to install some dev-dependencies for the types of the above non-Nest.js packages.
yarn add @types/bcrypt @types/passport
@types/passport-jwt -D
Step 2: Create the Users Module that will eventually hold all code related to Users and their management, by running the command:
nest g m user
The command creates a new folder and places the new UsersModule inside it. In addition, this module is imported by default on the AppModule.
Step 3: Create the /users/entity/user.entity.ts class. Listing 2 shows the source code for the UserEntity.
Listing 2: User Entity
@Entity('user')
export class UserEntity {
    @PrimaryGeneratedColumn('uuid') id: string;
    @Column({
        type: 'varchar',
        nullable: false,
        unique: true
    })
    username: string;
    @Column({
        type: 'varchar',
        nullable: false
    })
    password: string;  @Column({
        type: 'varchar',
        nullable: false
    })

    email: string;
    @BeforeInsert()  async hashPassword() {
        this.password = await bcrypt.hash(this.password, 10);
    }
}
The UserEntity class holds only the basic information needed to authenticate a user in your application. If you were to build a full user management module, of course, you'd capture more user information.
Notice the @BeforeInsert() hook that the code uses from TypeORM module. This hook runs and gives the developer the opportunity to run any code before saving the Entity in the database. In this case, the code hashes the original password entered by the user so that you don't store any plain text passwords. For this purpose, the code makes use of a bcyrpt package to do so.
Finally, make sure that you import the TypeORM module into the UsersModule and provide the UserEntity so that @nestjs/TypeOrm can generate a corresponding Repository class that you're going to use later when you build the UsersService class.
@Module({
    imports:
    [TypeOrmModule.forFeature([UserEntity])],  ...
}) export class UsersModule {}
Step 4: Generate a TypeORM migration to create the user table inside the database by running the following command:
yarn run "migration:generate" AddUserTable
The next time you run the application, the migrations are checked and if there are any pending migrations, the application runs them automatically, ensuring that the database structure is always in sync with the entity structure in your application.
Step 5: Create the DTO objects the application needs.
Listing 3 shows the source code for the CreateUserDto class.
Listing 3: CreateUserDto class
export class CreateUserDto {
    @IsNotEmpty()  username: string;
    @IsNotEmpty()  password: string;
    @IsNotEmpty()  @IsEmail()  email: string;
}
The CreateUserDto class is used to pass the information provided by the user upon registering a new account.
Listing 4 shows the source code for the UserDto class:
Listing 4: UserDto class
export class UserDto {
    @IsNotEmpty()  id: string;
    @IsNotEmpty()  username: string;
    @IsNotEmpty()  @IsEmail()  email: string;
}
The UserDto is used when you want to return the User information. Notice how the password field is omitted from this class because you don't ever want to return the user's stored password.
The last DTO you need for the application is the LoginUserDto class that the application uses to verify the user's credentials when they are trying to login.
export class LoginUserDto {
    @IsNotEmpty()  readonly username: string;
    @IsNotEmpty()  readonly password: string;
}
Step 6: Create the /users/users.services.ts class by running this command:
nest g s users
The command creates the UsersService class and imports it automatically to the UsersModule.
You're going to build only the necessary pieces you need to facilitate the user authentication process in the To Do application.
Step 7: Locate the /src/shared/mapper.ts file and add a new mapper utility function to map a UserEntity to UserDto instance. Listing 5 shows the source code for the toUserDto() mapping function.
Listing 5: toUserDto helper method
export const toUserDto = (data: UserEntity): UserDto => {
    const { id, username, email } = data;
    let userDto: UserDto = { id, username, email,  };
    return userDto;
};
Step 8: Generate the /users/users.service.ts class by running the command:
nest g s users
This command creates the UsersService class and automatically provides this service inside the UsersModule.
Step 9: Inject the UsesRepository class into the constructor of the UsersService class as follows:
 constructor(
    @InjectRepository(UserEntity)
    private readonly userRepo: Repository<UserEntity>, ) {}
Step 10: Add the findOne() function to the service as follows:
async findOne(options?: object): Promise<UserDto> {
    const user =  await this.userRepo.findOne(options);
    return toUserDto(user);
}
This function is a building block for other functions. As input, it accepts an object that accepts any valid TypeORM Filter object structure.
The function uses the repository to find a single user record in the database and returns the user in the form of a UserDto.
Step 11: Add the findbyLogin() function to the service.
Listing 6 shows the complete source code. This function is used later when the user wants to log in to the application. It accepts the user's username and password. It starts by querying for the user and then comparing the user's stored hashed passport to the one passed to the function. If the user isn't found or the passwords don't match, the function throws an Unauthorized HttpException.
Listing 6: findByLogin() method
async findByLogin({ username, password }: LoginUserDto): Promise<UserDto> {
    const user = await this.userRepo.findOne({ where: { username } });

    if (!user) {
        throw new HttpException('User not found', HttpStatus.UNAUTHORIZED);
    }

    // compare passwords
    const areEqual = await comparePasswords(user.password, password);

    if (!areEqual) {
        throw new HttpException('Invalid credentials', HttpStatus.UNAUTHORIZED);
    }

    return toUserDto(user);
}
Step 12: Add the findbyPayload() function to the service as follows:
async findByPayload({ username }: any): Promise<UserDto> {
    return await this.findOne({
        where:  { username } });
}
Once Passport.js, validates the JWT on the current Request and if the token is valid, it then calls a Callback function, defined by your application, to check for the user in the database (maybe check if the user is not locked, etc.). The callback function then passes the user object back to the Passport.js middleware so that it can append it to the current Request object.
Step 13: Add the create() function to the service. Listing 7 shows the complete source code for this function. It's used to register a new user in the application and makes sure that the user is a new one.
Listing 7: create() method
async create(userDto: CreateUserDto): Promise<UserDto> {
    const { username, password, email } = userDto;

    // check if the user exists in the db
    const userInDb = await this.userRepo.findOne({
        where: { username }
    });
    if (userInDb) {
        throw new HttpException('User already exists', HttpStatus.BAD_REQUEST);
    }

    const user: UserEntity = await this.userRepo.create({ username, password, email, });
    await this.userRepo.save(user);
    return toUserDto(user);
}
Step 14: Finally, make sure to export the UsersService on the UsersModule so that other modules, specifically the AuthModule, can communicate with the database to perform its function via an access to UsersService.
@Module({ ... exports: [UsersService],})export class UsersModule {}
The UsersService is now ready.
Building the AuthModule
Let's switch gears and start building the AuthModule.
Step 1: Create the Auth Module that will eventually expose the /auth endpoint to allow user registration, login, and privacy protection in your application. Generate the module by running the following command:
nest g m auth
The command creates a new folder and inside it, the new AuthModule. In addition, this module is imported by default on the AppModule.
Step 2: Configure the AuthModule to use the @nestjs/passport and configure a few settings in Passport.js middleware.
Listing 8 shows the complete source code for the AuthModule.
Listing 8: AuthModule class
@Module({
    imports: [
        UsersModule,
        PassportModule.register({
            defaultStrategy: 'jwt',
            property: 'user',
            session: false,
        }),
        JwtModule.register({
            secret: process.env.SECRETKEY, signOptions: {
                expiresIn: process.env.EXPIRESIN,
            },
        }),
    ],
    controllers: [AuthController],
    providers: [AuthService, JwtStrategy],
    exports: [
        PassportModule,
        JwtModule
    ],
})
export class AuthModule {}
The module:
- Imports the UsersModule to enable the use of UsersService.
- Imports the PassportModule provided by @nestjs/passport package. It also configures this module by explicitly specifying the default strategy to use to authenticate users, in this case, it's the jwt strategy.
- Imports the JwtModule provided by @nestjs/jwt package. This module provides utility functions related to JWT authentication. The only function you're interested in from this module is the
sign()function that you'll use to sign the tokens with. The module requires setting the JWT expiry time and the secret code that's used to sign the token. - Provides the
JwtStrategyclass. The implementation of this class will be discussed very shortly. - Exports the PassportModule and JwtModule so that other modules in the application can import the AuthModule and make use of the
AuthGuard()decorator to protect Route Handlers or entire Controllers.
Step 3: Add the /auth/jwt.strategy.ts class. Listing 9 shows the complete source code for the JwtStrategy class.
Listing 9: JwtStrategy class
import { PassportStrategy } from '@nestjs/passport';
import { ExtractJwt, Strategy } from 'passport-jwt';

@Injectable()
export class JwtStrategy extends PassportStrategy(Strategy) {
    constructor(private readonly authService: AuthService) {
        super({
            jwtFromRequest: ExtractJwt.fromAuthHeaderAsBearerToken(),
            secretOrKey: process.env.SECRETKEY,
        });
    }

    async validate(payload: JwtPayload): Promise<UserDto> {
        const user = await this.authService.validateUser(payload);
        if (!user) {
            throw new HttpException('Invalid token', HttpStatus.UNAUTHORIZED);
        }
        return user;
    }
}
The JwtStrategy class is defined as an @Injectable() service. Hence, Nest.js can inject it anywhere this service is needed via its Dependency Injection system.
The class extends the PassportStrategy class defined by @nestjs/passport package. The PassportStrategy class takes as input a Passport.js strategy. In this case, you're passing the JWT Strategy defined by the passport-jwt Node.js package.
The constructor of this service injects the AuthService class. This service will be implemented in a moment.
In addition, the constructor calls the PassportStrategy's constructor and passes two important options.
jwtFromRequest:
ExtractJwt.fromAuthHeaderAsBearerToken()
This configures the Strategy (imported from passport-jwt package) to look for the JWT in the Authorization Header of the current Request passed over as a Bearer token.
secretOrKey: process.env.SECRETKEY
This configures the secret key that JWT Strategy will use to decrypt the JWT token in order to validate it and access its payload.
Make sure to pass the same secret key in the JWT Strategy and the JwtModule once it's imported into AuthModule.
What actually happens is that the JWT Strategy extracts the token and validates it. If the token is invalid, the current Request is stopped and 401 Unauthorized response is returned to the user. Otherwise, the validate() function is called passing it to the JWT token, to allow your application to check whether the user exists in the database (maybe also check that the user isn't locked, etc.).
The validate() function should throw an Unauthorized exception if the user isn't valid. Otherwise, it should return the user back to the PassportModule. The PassportModule, in return, appends the user object returned by the validate() function into the current Request object.
You are free to return any information on the User object to be appended on the current Request object so that you can retrieve them later inside the Route Handlers.
The JwtPayload object is a helper object to hold the content of the JWT payload and is defined as follows:
export interface JwtPayload { username: string;}
Step 4: Generate the /auth/auth.service.ts class by running this command:
nest g s auth
The command creates the AuthService class and automatically provides this service inside the AuthModule.
Step 5: Inject the UsersService and JwtService classes into the constructor of the AuthService class as follows:
constructor(private readonly usersService: UsersService, private readonly jwtService: JwtService, ) {}
The JwtService is imported from @nestjs/jwt package. This service exposes utilities to help sign a JWT payload.
Step 6: Add the register() function to the service. Listing 10 shows the complete source code for the register() function. This function takes the CreateUserDto as an input parameter and delegates the actual user creation to the UsersService.create() function. It returns a RegistrationStatus to indicate a success or fail user creation.
Listing 10: register() method
async register(userDto: CreateUserDto):
Promise<RegistrationStatus> {
    let status: RegistrationStatus = {
        success: true,
        message: 'user registered',
    };
    try {
        await this.usersService.create(userDto);
    } catch (err) {
        status = {
            success: false,
            message: err,
        };
    }
    return status;
}
The RegistrationStatus helper class is defined as:
export interface RegistrationStatus {
    success: boolean;
    message: string;
}
Step 7: Add the login() function to the service. Listing 11 shows the complete source code for the login() function. The function receives the LoginUserDto as an input parameter. Internally, it uses the UsersService.findByLogin() function to validate the user credentials.
Listing 11: login()
async login(loginUserDto: LoginUserDto): Promise<LoginStatus> {
    // find user in db
    const user = await this.usersService.findByLogin(loginUserDto);

    // generate and sign token
    const token = this._createToken(user);

    return {
        username: user.username, ...token,
    };
}

private _createToken({ username }: UserDto): any {
    const user: JwtPayload = { username };
    const accessToken = this.jwtService.sign(user);
    return {
        expiresIn: process.env.EXPIRESIN,
        accessToken,
    };
}
It then prepares the JWT payload and signs this payload using the JwtService.sign() function. Finally, it returns the signed token together with the username of the current user. You must return the signed token and you can also return any arbitrary user fields you wish to return to the client-side app upon a successful login.
Step 8: Add the validateUser() function to the service. Listing 12 shows the complete source code for the validateUser() function. The function receives the JWT payload as input and it retrieves the user from the database via UsersService.findByPayload() function.
Listing 12: validateUser() method
async validateUser(payload: JwtPayload): Promise<UserDto> {
    const user = await this.usersService.findByPayload(payload);
    if (!user) {
        throw new HttpException('Invalid token', HttpStatus.UNAUTHORIZED);
    }
    return user;
}
Remember that from above, this function is called by the JwtStrategy.validate() function once a token is validated by Passport.js middleware.
Step 9: Generate the /auth/auth.controller.ts class by running this command:
nest g c auth
The command creates the AuthController class and automatically adds it into the controllers property on the AuthModule.
Step 10: Configure the controller's endpoint name by giving it a prefix of auth:
@Controller('auth')
export class AuthController { ... }
Step 11: Inject the AuthService into the constructor of this controller:
constructor(private readonly authService:
AuthService) {}
Step 12: Add the register() route handler. Listing 13 shows the complete source code for this route handler. The register() route handler is a POST route handler that receives an instance of CreateUserDto object and delegates creating a new user to the AuthService.register() function. Depending on the status of registration, this route handler might either throw a BAD_REQUEST exception or the actual registration status.
Listing 13: register() action
@Post('register')
public async register(@Body() createUserDto: CreateUserDto,  ): Promise<RegistrationStatus> {
    const result:
    RegistrationStatus = await this.authService.register(createUserDto,);
    if (!result.success) {
        throw new HttpException(result.message, HttpStatus.BAD_REQUEST);
    }
    return result;
}
Step 13: Add the login() route handler as follows:
@Post('login')
public async login(@Body() loginUserDto: LoginUserDto): Promise<LoginStatus> {
    return await this.authService.login(loginUserDto);
}
The login() route handler simply returns the response of the call to AuthService.login() function. Basically, if the user credentials are valid, this route handler returns a signed JWT to the calling app.
The application is now ready to register users and authenticate them with JWT.
Let's register a new user by sending a “POST /auth/register” request with a payload, using Postman client as in Figure 1.
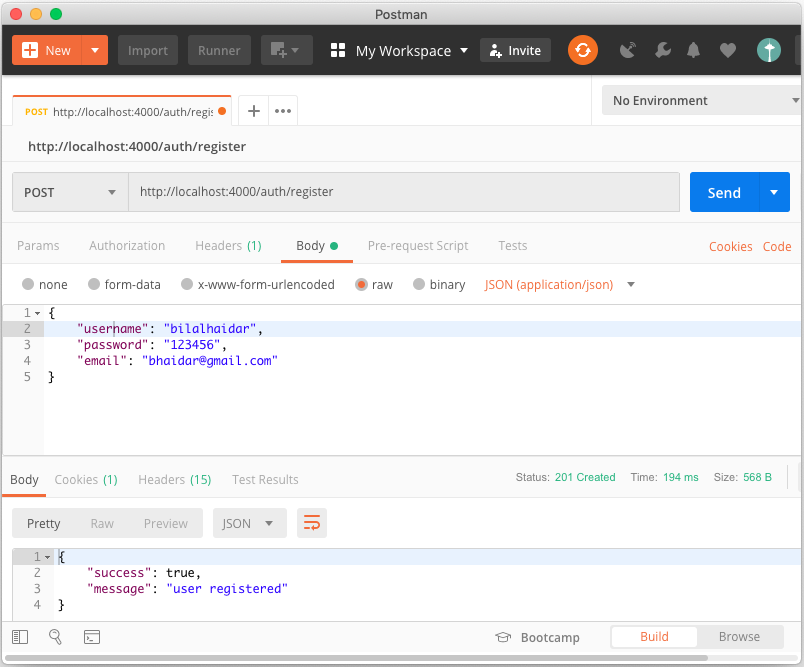
Make sure that you add the Content-Type: application/json request header; otherwise, Nest.js won't be able to read your request payload.
The application successfully registers the user. Let's now log into the application by sending a “POST /auth/login” request with a payload, as in Figure 2.
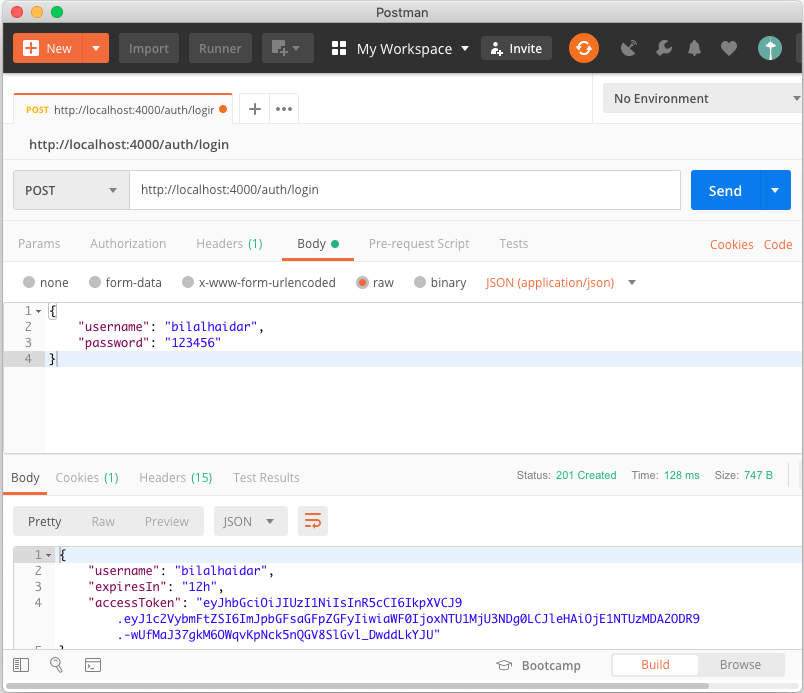
The response of a successful login returns the Access Token (JWT) together with other information that the application sends with it such as username and expiresIn fields.
Users Must Be Logged-In to Create a New To-Do Item
Now that authentication works in the application, let's switch to the TodoModule and ensure that users must be logged in before they can create any To Do or Task items.
Step 1: Import the UsersModule and AuthModule into the TodoModule as follows:
@Module({
    imports: [
        UsersModule,
        AuthModule,
        TypeOrmModule.forFeature([
            TodoEntity, TaskEntity, UserEntity]),
        ], ...
})

export class TodoModule {}
By importing the AuthModule, you'll be able to make use of AuthGuard() to protect the Route Handlers and force a logged-in user.
Also notice that the code injects the UserEntity class into the TypeOrmModule so that the TodoModule can access it to retrieve a User entity from the database.
Step 2: Extend the UserEntity class by adding the Owner property:
@ManyToOne(type => UserEntity)owner?: UserEntity;
The owner property is of type UserEntity. The @ManyToOne() decorates this new property to signal to TypeORM module to store the User ID on the Todo table and configure it as a Foreign Key. Every user can own one or more To Do items and in return, every To Do is owned by one and only one user.
Step 3: Generate a TypeORM migration to add the owner column on the todo table inside the database by running the following command:
yarn run "migration:generate"
AddOwnerColumnToTodoTable
The next time you run the application, the migrations are checked and if there are any pending ones, the application runs them automatically, ensuring that the database structure is always in sync with the entity structure in your application.
Step 4: Protect the route handlers to force a logged-in user. Listing 14 shows how to require the AuthGuard inside the TodoController.
Listing 14: User AuthGuard
@Post()
@UseGuards(AuthGuard())
async create(@Body() createTodoDto: CreateTodoDto, @Req() req: any, ): Promise<TodoDto> {
    const user = <UserDto>req.user;
    return await this.todoService.createTodo(user, createTodoDto);
}
The JWT Authentication Strategy kicks in whenever the create() route handler is called to validate the JWT and the user. If it succeeds in doing so, the create() router handler is executed.
Note how the code makes use of @UseGuards(AuthGuard()) and also injects the @Req() req as an input parameter to the create() route handler.
The body of the route handler retrieves the logged-in user via req.user. This information was injected into the current Request object by Passport.js middleware. It then passes this information to the TodoService.createTodo() function.
Step 5: Query for the user inside the TodoService.createTodo() function. Listing 15 shows the complete source code for the createTodo() function. The function queries the database for the logged-in user via UsersService.findOne() function. It then sets the owner property on the UserEntity to the value of the user object. Finally, it saves the new To Do item into the database.
Listing 15: createTodo() method
async createTodo({ username }: UserDto, createTodoDto: CreateTodoDto, ): Promise<TodoDto> {
    const { name, description } = createTodoDto;

    // get the user from db
    const owner = await this.usersService.findOne({ where: { username } });
    const todo: TodoEntity = await this.todoRepo.create({ name, description, owner, });
    await this.todoRepo.save(todo);
    return toTodoDto(todo);
}
Let's create a new To Do item sending a POST /api/todos/ request with a payload, using the Postman client, as in Figure 3.
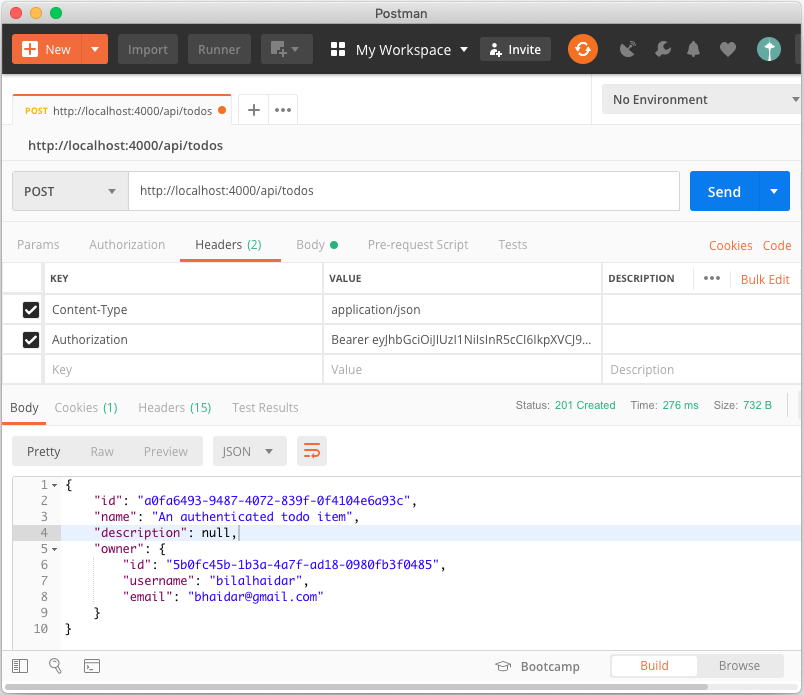
Make sure that you add the Content-Type: application/json request header, otherwise, Nest.js won't be able to read your request payload.
Also, add the Authorization request header, otherwise, Nest.js won't be able to find the token and it won't authenticate the request. The authorization header should look similar to this (except without the line breaks forced by the printing process):
Authorization Bearer eyJhbGciOiJIUzI1
NiIsInR5cCI6IkpXVCJ9.eyJ1c2VybmFtZSI6ImJpbGFsa
GFpZGFyIiwiaWF0IjoxNTU1MjU3NDg0LCJleHAiOjE1NTUz
MDA2ODR9.-wUfMaJ37gkM6OWqvKpNck5nQGV8SlGvl_Dwdd
LkYJU
The application responds with 200 OK response signaling the success of creating a new To Do item. Notice how the owner property is now populated on the To Do item with the currently logged-in user details.
Let's try to create a new To Do item without supplying an authorization request header, as in Figure 4.
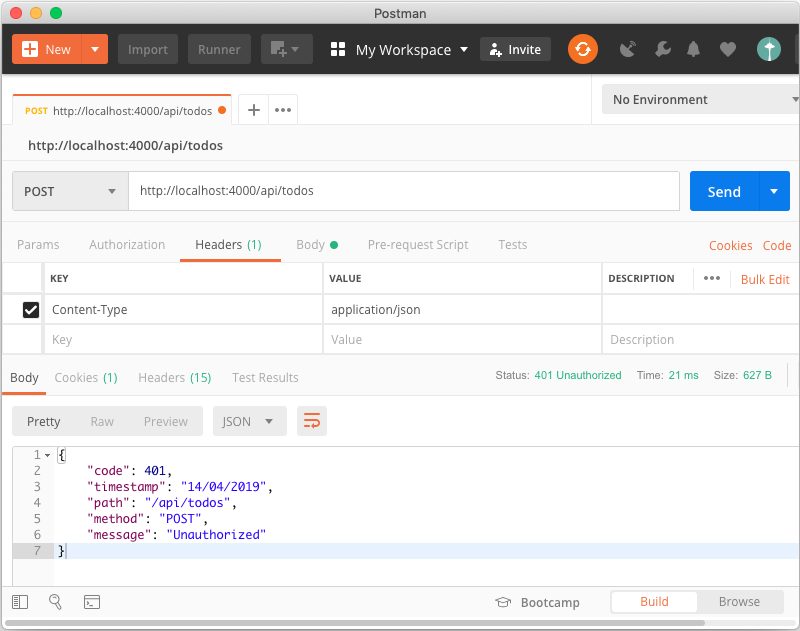
The application now responds with a 401 Unauthorized response signaling the failure of creating a new To Do item because the application had no access to the user token and couldn't validate the request.
You can go deeper into the source code accompanying this article to see where else in the application source code I've made use of the @UseGuards(AuthGuard()) to protect other route handlers to force a logged-in user before being able to execute route handlers.
You can find the source code of this article and the rest of this series here: https://github.com/bhaidar/nestjs-todo-app.
Conclusion
You've seen how easy it is to add authentication to your Nest.js application using the famous and flexible Node.js authentication middleware and the Passport.js package.
Soon, you'll be looking at integrating Swagger into your Nest.js application to provide full documentation of the To Do REST API and adding an Angular client-side application that connects to the REST API and allows the user to register, login, and manage To Do items via a Web app instead of counting only on Postman.
Happy Nesting!
