


Search. It's so ubiquitous, so easy, yet so difficult. Users expect to see that friendly search box in their applications. They seem to really like it, because it's so simple to use. You don't need a user manual to figure out search. In fact, if your application doesn't have search, you'll be pelted with negative reviews. No wonder you see search in so many applications. Yet, search is hard. It's very difficult to implement. We all know it's more than just simple text matching. Even simple text matching isn't easy. Those of us with database backgrounds know that searching for “prefix” is a lot easier than searching for “suffix”. And users want to do all sorts of weird searches like run, which should match ran, or shrunken or brunt, or - you get the idea. Quick search results and performance are important, as is accuracy and ranking. You almost have to read the user's mind. And then there's the whole idea of keeping your search results fresh. Not an easy task, is it?
What's amazing is that all that complexity barely scratches the surface of the endless possibilities. About 70% of the data on the Internet is visual. Photos and videos. Another big part is audio. Wouldn't it be useful to be able to search through audio and video as well?
Have you ever thought yourself asking a question such as, “I have this tune stuck in my head, what song is that?” Yes, we know there are apps that'll do that on your phone. But what if that power was brought to your corporate world. Say, “Someone said xyz in a meeting or perhaps an email, or maybe it was document, I wish I could find out easily where xyz was said and by whom.” Personally, I struggle with this deluge of information every day. Finding that needle in the haystack when my boss is on the call with me is something I deal with far too often.
Search is incredibly powerful. It saves the user's time. In this article, I'll show you how you can build an application with a very gentle learning curve that allows you build such functionality and more.
But first, let's start with clarifying the various search products available in the Microsoft space.
Search Products
In the Microsoft ecosystem, there are multiple search products with overlapping names. The Microsoft Department of Confusing Naming can sometimes do a great job, so it is best to clarify them first.
Microsoft has three search products.
The first is Bing, which you can find at www.bing.com. It's an Internet-facing search engine, it's free to use, and searches execute against the open, anonymous Internet.
The second is search under Cognitive Services, not to be confused with cognitive search under Azure search, which is an entirely different product. You can read more about Cognitive Services search at https://azure.microsoft.com/en-us/services/cognitive-services/directory/search/. But, to put it simply, this is your way to tap into the power of Bing, to create an ad-free search experience, completely brandable to your requirements, available as a paid offering.
Finally, there's Azure Search, which is the focus of this article. Azure Search is one of the products under the Azure umbrella. It allows you to create your own private search corpus in the cloud. It's best viewed as a cloud-hosted, Internet scale, search-as-a-service solution. It allows you to search your data, in an index you define, with documents you put in the index, at a schedule you define. All this, but with none of the complexity that's typically paired with an enterprise-class search product. Microsoft Azure manages all of the infrastructure complexity, and, as I mentioned earlier, I assure you, the learning curve here, is indeed quite gentle.
One pretty amazing capability of Azure Search is the ability to enhance it with the power of AI using the cognitive capabilities of Azure Search. The typical process of search is to define the index, import data, and execute queries. Cognitive capabilities allow you to make further sense of the imported data. For instance, a video could be further deciphered into the people appearing in the video, and text-to-speech capabilities could make the spoken text in the video searchable. Or you could use OCR capabilities to make the text in the images searchable. I'll show you how to do all of this in this article.
Again, I assure you, the learning curve is quite gentle.
Create a Simple Search Engine
The best way to learn how to swim is to dive in. Without much further ado, let's go ahead and build a simple search engine. I'll do it using Azure Search, and I'll explain the important concepts as I go along.
The first thing I'll need is the data I wish to search. There are two ways to put data in an Azure Search index: Push and Pull.
Push Data into Azure Search
The first way to get data into your Azure Search index is by pushing data into it. Azure Search comes with a REST API, or .NET and Java SDKs. You can choose to push any searchable data in the index using this push-based mechanism. Certainly, this has its advantages. You can now make almost anything searchable, as long as you can programmatically push the data in. Also, you control how and when new data becomes searchable. This means that if you have a specific requirement where new data must become searchable with a very short latency, the push-based mechanism is what you need.
At a high level, the process of pushing data involves you defining an index first. When you define an index, you get to define a lot of details, such as what columns in the entity are searchable, which columns are retrievable in search results, which you can perform facets on, etc. Once you define such an index, you can push documents in that match that data structure.
Have Azure Search Pull Data
Azure search can also pull data in using indexers. An indexer in Azure Search is a crawler that extracts searchable data and metadata from an external Azure data source and populates an index based on field-to-field mappings between the index and your data source. There are indexers available for Azure SQL, Azure Cosmos DB, Azure Blob Storage, and Azure Table Storage.
The process of using indexers is fairly straightforward. You first need a data source matching one of the supported data sources for which indexers are available. Then you can either define an index or set up an import data job. As a part of import data, the indexer can query the data structure and suggest an index structure to you, which you can tweak further. And then you can perform a one-time import or set up a recurring schedule for newer data to become available in search results.
The obvious advantage of having Azure Search pull data is that you can set it up with simple point and click. The disadvantage is that you can only pull data for data sources from whom an indexer is available. And you have to wait for the indexer to run again for newer data to show up in search results.
Although, it's also important to consider that while indexers are commonly set up to run on a scheduled job, it's also possible to run an indexer on demand using the REST API and the command shown below.
POST https://[service name].search.windows.net/indexers/[indexer name]/run?api-version=2019-05-06api-key: [Search service admin key]
You can also get the status of the current running indexer easily, as shown below.
GET https://[service name].search.windows.net/indexers/[indexer name]/status?api-version=2019-05-06api-key: [Search service admin key]
Although these operations give you some flexibility, they won't be as efficient as just pushing a document into an index, like the push mechanism allows you to do. That's because when kick-starting an index and getting the status of an index, it still has to find all new changes and then pull them in, one by one. But hey, it's a good middle ground between increasing indexing results, and not having to write a lot of code.
Set Up a Data Source
For the purposes of this article, I'll index the Northwind database. Yes, that old tired, boring Northwind database. You can grab the script for the Northwind database from here, https://github.com/Microsoft/sql-server-samples/tree/master/samples/databases/northwind-pubs. Why did I pick Northwind? Well I didn't have to. I just want a data source. But feel free to target any other similar content source.
Once I set up the data source, I see the usual Northwind tables. One of those tables is the Customers table that I intend to make searchable. This table is rather interesting. It contains information about the customers' names, their companies, contact names, contact titles, and so much more. Of special interest is the country column. It has 21 countries. Perhaps it would be useful to treat this column differently. For instance, maybe I want to issue queries for “sales representative” in Brazil.
But, before you can do any of that, you need to set up a search instance.
Create a Search Instance
Creating a search instance is rather simple. You simply attempt to create an instance of “Azure Search.” It'll ask you the usual questions, such as what resource group you wish to put this search into, the name of the search instance, the location, etc. The most important question it'll ask is what pricing tier you'd like to put this search instance into.
Search can be provisioned in free, basic, standard, or storage optimized tiers. Free is fine for this tutorial or testing simple systems. The biggest downside of the free tier is that you can't scale it. Basic, standard, and storage optimized can be scaled, but storage optimized is optimized more for storage - your indexing is quicker, but your query latency is poorer. You scale the search instances via search units, which is a combination of replicas and partitions.
Partitions provide index storage, and IO for read/write operations. The more partitions, the quicker the indexing. Replicas, on the other hand, are instances of your search service. They're used to load balance your query operations. Each replica always hosts once copy of an index. If you have six replicas, you'll have six copies of every index loaded onto the service.
It is important to realize that:
- There's no feature set difference between free, basic, standard, and storage optimized.
- The only difference is scale.
- Replicas aren't your answer for disaster recovery. For proper disaster recovery, you need to create a separate and identical search instance in another data center.
There is another tier, the S3HD tier. S3HD is designed for multi-tenant environments and it has a feature set difference. Indexers are not available in S3HD.
For the purposes of this article, go ahead and provision an instance of Azure Search under the free tier.
Once inside Azure Search, you'll see a number of interesting things. Right through the portal, you can choose to scale it. Because you went with the free tier, this will be disabled. All tiers, including free tier, give you access to keys. There are two kinds of keys: admin and query. The admin key can be used to programmatically affect search service configuration. You can create up to a maximum of two equivalent keys. Or you can create up to 50 query keys, which only let you query data. An admin key also lets you query data but an admin key is a lot more powerful than a query key; therefore you should use query keys for pure querying functions.
Import Data and Create an Index
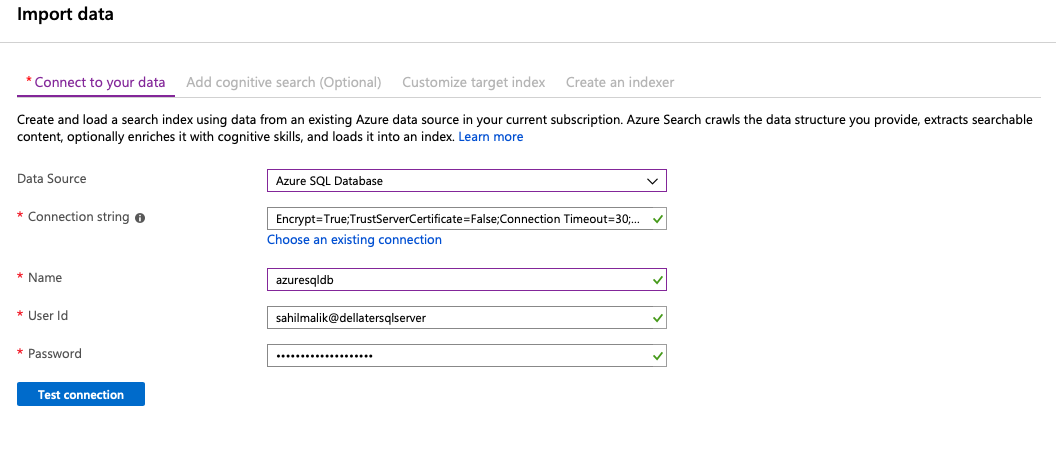
Right through the Azure portal, at the very top, you'll also see a button to import data. This can be seen in Figure 1.

Clicking on that import button gives you a simple form to fill in, where you can point this indexer to your SQL server. Feel free to explore what other indexers are available to you.
You can see the configuration information I provided, in Figure 2.
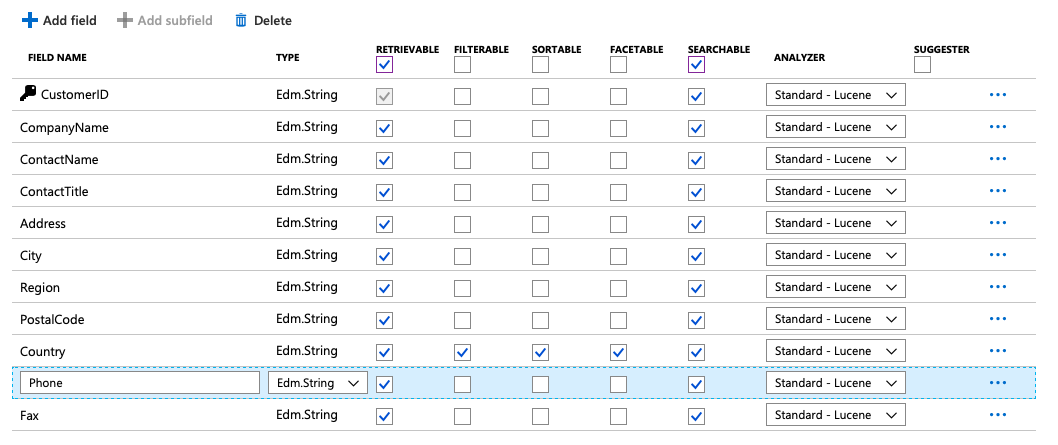
Once you click the Test connection button, you'll see a drop-down appear with all the tables and views that can be indexed. Click the next button - for now, I'll skip all settings, including Cognitive Services details, and go to Customize target index. Here, you can define which columns are returned in search results, which columns are searchable, and you can even define which columns are filterable, sortable, and facetable. The Country column is a great candidate for these because there are fewer and more well-defined distinct values in this column. You can see how I've set up my index in Figure 3.
Clicking Next creates the index and starts the first crawl to put data into the index. You can examine the progress of your search instance on the overview page. If you wish to dive into the details of any particular indexer, you can view it under the indexer's tab on the overview page. Certainly, all this information is also accessible via the API.
Because the Customer's table has only 91 records, in almost no time, you'll see the indexing operation completed.
Execute Search Queries
You can execute search queries directly through the Azure portal. Remember this is for you, the administrator, to test the queries. To integrate searches within your applications, you need to make a REST call to a request URL, with the api-key header. The value of the header is the query key.
Here's a little tip. You'll pay for data egress costs, but you only pay for what leaves the data center. So, if you have a Web front-end for the search results, place it in the same data center as your search instance. That way, you only pay for the data egress once.
Let's execute some search queries now. Under the search explorer button, as can be seen in Figure 1, type in a search query. For instance, I'm trying to search for “London.” This can be seen in Figure 4.
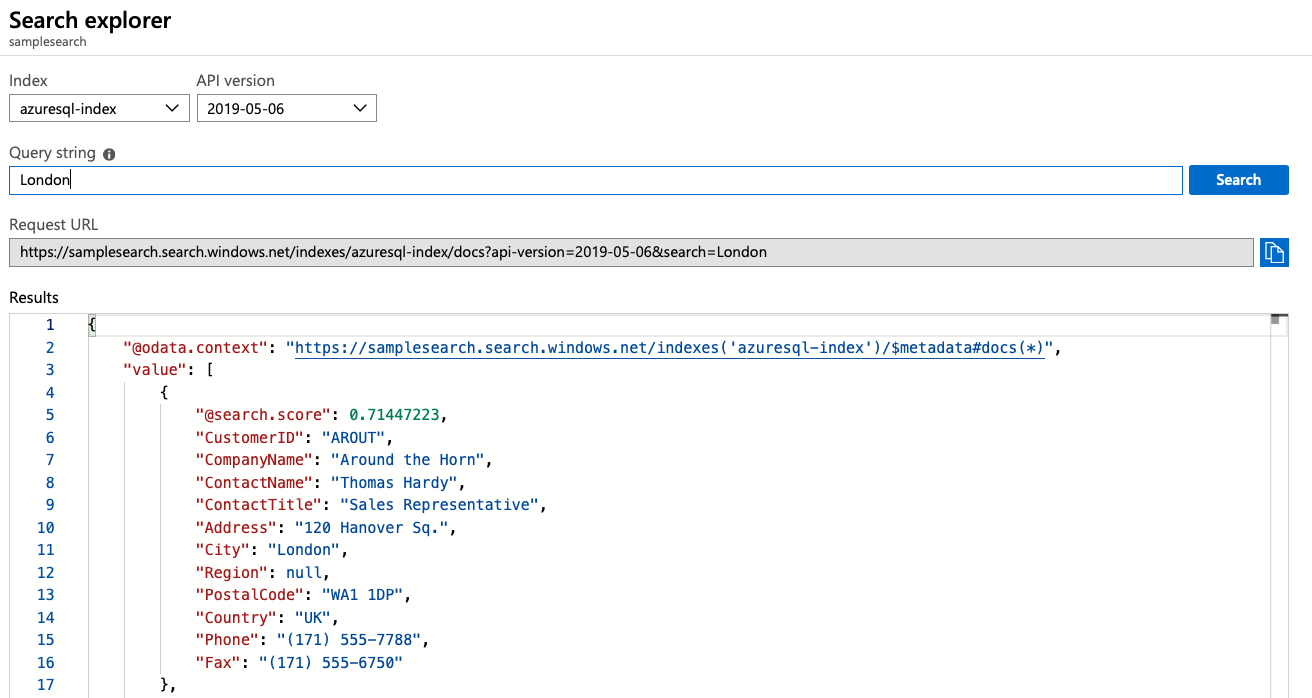
That's fantastic! Just like that, I was able to search for all customers that had the word “London” anywhere in their entity.
I can even do some wildcard searches; for instance, try searching for AR*. You'll see that all of the objects returned have “ar” somewhere in the object. Also note that the returned object, as can be seen in Figure 4, contains all of the columns that you marked as retrievable when defining the index.
Remember that the Country field was special? You made it filterable. Can you search for AR* in just the UK? Sure, just use the search query like this:
AR*&$filter=Country eq 'UK'
This simple query should now show you the customers with the pattern AR only from UK. Integrating this within your application is also quite trivial. All you need to do is pick the request URL from Figure 4 and execute a simple REST call to that URL with your query key in the api-key header.
Congratulations, you've just made yourself a neat little search engine with your data.
Leveraging the Power of AI
You have a neat little search engine and it wasn't too hard to create. Everything I showed via the Azure portal can also be built using the REST API or the .NET or Java SDKs. And remember, this example that I showed used an indexer to query the Northwind database. What if you don't have an indexer for the objects you wish to have made searchable. For instance, what if the data resides in an ERP system that has a weird arcane Web API? You can still push the objects in, in a neat and clean JSON format that matches your index.
“Neat and clean JSON format.” Did that make you hiccup? We all know that the real world is hardly neat and clean. The real world is messy. So in my next example, I'm going to leverage the power of AI to make sense of unstructured data via search.
In order to do so, I'll use a fantastic capability of search called Cognitive Search. Put simply, Cognitive Search is a bunch of skillsets that leverage the power of AI to make sense out of unstructured data. For instance, you can OCR text out of images and make those images searchable. You can submit a bunch of pictures and have AI recognize celebrities in those pictures. Or you can do speech to text and so much more. Where the out-of-the-box abilities fall short, you're welcome to write your own skill.
For this part of the article, I had a hard time coming up with a good example, so I just took a screenshot of this article I am writing. Seriously, the text you see here, unedited so far by the editor, is a screenshot I took of it and decided to make it searchable. The goal is, via OCR, I want to be able to search through the text of this article. You're welcome to make this more compelling by uploading pictures of other kinds, such as landmarks, celebrities, your dog - whatever floats your boat.
Back in the search service instance, go ahead and delete the previous index. I'm doing that just to keep my search results clean.
Now choose to click on “Import data” as shown in Figure 1 and choose Azure blob storage as the data source. Choose to go with the default parsing mode and choose to extract Content and Metadata and point it to wherever your image is located.
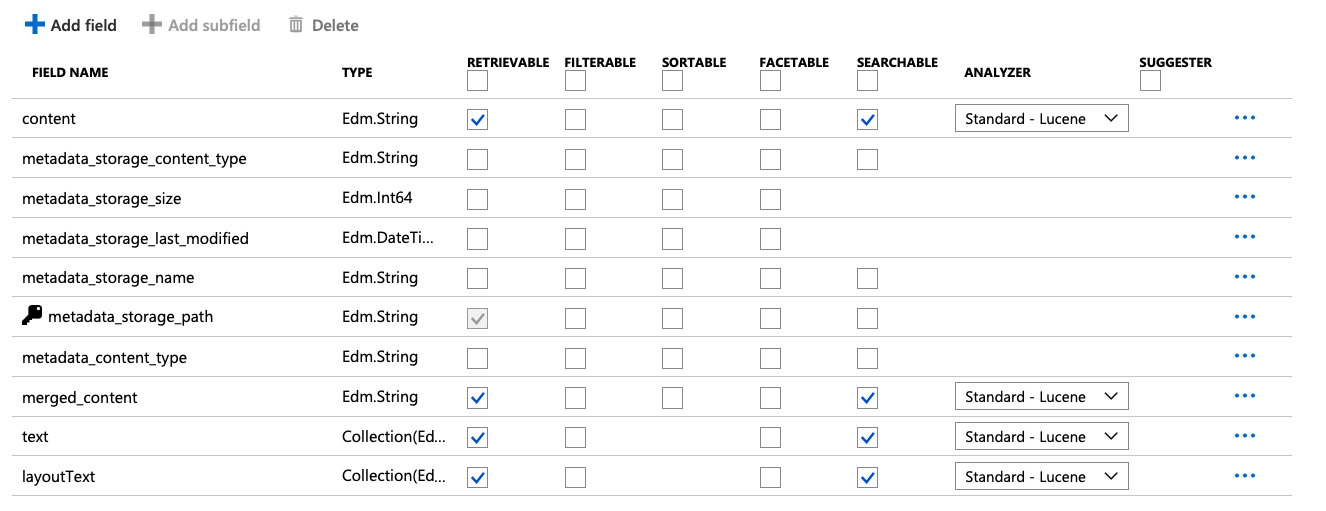
Click Next to add cognitive skills. Here's where things become interesting. Under the Add enrichments section, choose to Enable OCR and merge all text into merged_content field as shown in Figure 5.

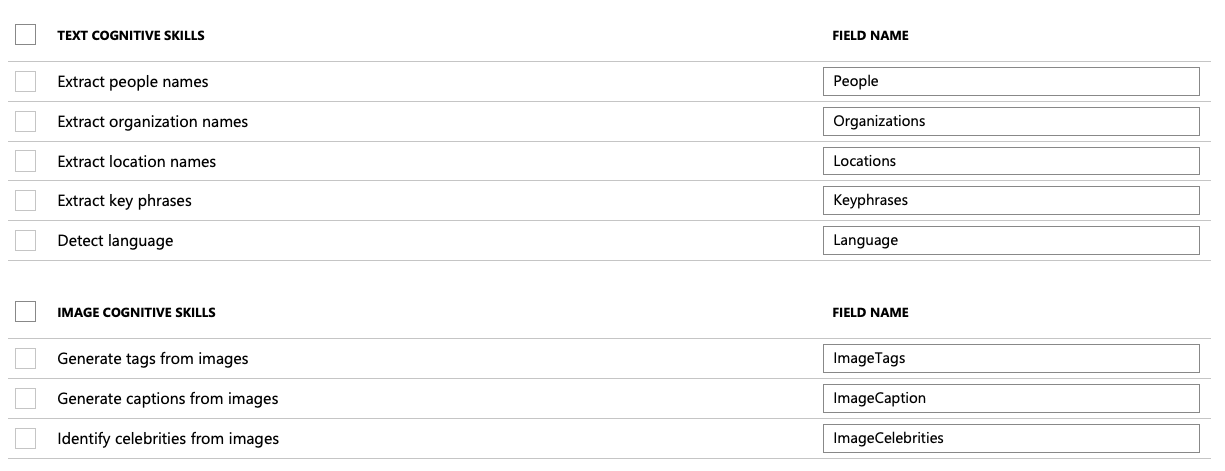
Notice the other capabilities you can tap into, as shown in Figure 6.
I know my data is a simple screenshot of this article with just text, so I'll skip checking all those textboxes. Depending upon your input data, which may be more than just images, feel free to check whatever seems fit.
Next, choose to customize the target index. I'll simply accept the defaults, as shown in Figure 7.
Finally, choose to create the index.
Clicking the submit button causes the search engine to crawl the document. In my case, it's a simple screenshot of one page of text, so it shouldn't take too long. You can click the Refresh button you see in Figure 1 to keep up to date with your progress.
Once the search crawling is done, visit the search explorer and execute a search. For instance, I used the phrase “Seriously, the text you see here”, so let me just search for the word Seriously.
The search results can be seen in Figure 8.
This is truly mind-blowing. I just did an OCR search of an image. And it doesn't even begin to scratch the surface of the possibilities here. For instance, if you were a media company and all your photos, audio, and video were in Azure BLOB storage, just through a simple point-and-click, you could make all that media searchable.
Then you could issue a search query such as “Picture of Satya Nadella” and it'll show pictures of Satya Nadella, assuming your media library had such pictures. Or you could search “a dog lying on grass” and it'll match the pictures. Or you could even issue queries in English, and it'll match non-English documents via the magical powers of AI-powered language translation.
Summary
Search is a great feature to have. Users find it useful. So much so that they almost demand to see it in your applications. But building a search engine is a non-trivial task. There are products out there that will help, but they're expensive to both buy and to run. And they need hardware, expensive and powerful hardware. Azure Search eliminates all such complexity by providing you with a search-as-a-service solution, hosted in the cloud. This means that you can now bring the power of search into your applications with ease. Did you notice that there was no code in this article? Well, everything I showed can be done via the SDK or the REST APIs. That's the gentle learning curve of Azure Search putting all that power in your hands with such ease.
And then you add AI to the mix and the power multiplies exponentially. Now you can search any kind of content. You can issue search queries in various languages. You can make sense of completely unstructured data. Have you ever run into a law firm saying, “we have so many documents and we wish we could search through them easily” and they wish to keep their data private?
Azure search is your answer, and it's an answer to many other commonly heard problems.
How will you use Azure Search? Do let me know.
Until next time, happy searching!
