


For a number of years, mobile developers have had to grapple with maintaining multiple code bases of their apps - one for each platform. And for a number of years, that meant developing simultaneously for iOS, Android, Windows Phone, and even Blackberry. Fortunately, that didn't last. Today, the mobile platform wars yielded two winners: iOS and Android. Even so, developers dread having to maintain dual code bases for their apps unless it's totally necessary. Companies are also trying to avoid maintaining multiple code bases; otherwise they need to have separate teams of developers specializing in each platform.
In recent years, cross-platform development frameworks have emerged as the life savers for developers, with Xamarin taking the lead with its Xamarin suite of development frameworks for cross-platform mobile development. And more recently, Facebook's React Native proves to be a hit with mobile developers, allowing developers to create mobile apps using JavaScript, a language that's already familiar to a lot of full-stack developers.
Not wanting to be left out of the burgeoning mobile market, in late 2018, Google announced Flutter 1.0, its latest cross-platform framework for developing iOS and Android apps. In this article, I'll give you an introduction to Flutter. By the end of this article, you ‘ll be on your way to developing some exciting mobile apps using Flutter!
Getting Started with Flutter
Flutter is Google's portable UI toolkit for building natively compiled mobile, Web, and desktop apps using Google's Dart programming language.
Flutter has the following major components:
- Flutter engine: Written in C++, provides low-level rendering support using Google's Skia graphics library
- Foundation Library: Written in Dart, provides a base layer of functionality for apps and APIs to communicate with the engine
- Widgets: Basic building blocks for UI
In the next couple of sections, I'll show you how to install Flutter and start writing your first Flutter application. Once you've gotten started with the basics, you'll create a news reader application that demonstrates how easy it is to write compelling mobile apps with Flutter.
Installing Flutter
To develop cross-platform iOS and Android mobile apps with Flutter, you need to use a Mac. For this article, I'm going to base my examples on the Mac. Before you get started, you need to ensure that you have the following components installed:
- Xcode
- Android Studio
To install Flutter on your Mac, head over to this page: https://flutter.dev/docs/get-started/install/macos. The instructions on this page are pretty clear and self-explanatory, and I won't repeat them here.
For the development environment, you can use Android Studio or Visual Studio Code. I prefer Visual Studio Code. To configure Visual Studio Code to support your Flutter development, check out this page: https://flutter.dev/docs/development/tools/vs-code.
Creating Your First Flutter Project
Once the SDK and tools are set up, you are ready to create your first Flutter application. The easiest way is to type the following command in Terminal:
$ flutter create hello_world
Note that Flutter project names must be in lower case and you can use the underscore character (_) if you need to use a separator for the project name (just don't use camel case). The above command creates a folder named hello_world containing a number of files forming your project.
To examine the content of the Flutter project created for you, open the hello_world project using Visual Studio Code.
You can open up your Flutter project by dragging the project folder into Visual Studio Code.
Figure 1 shows the content of the Flutter project.
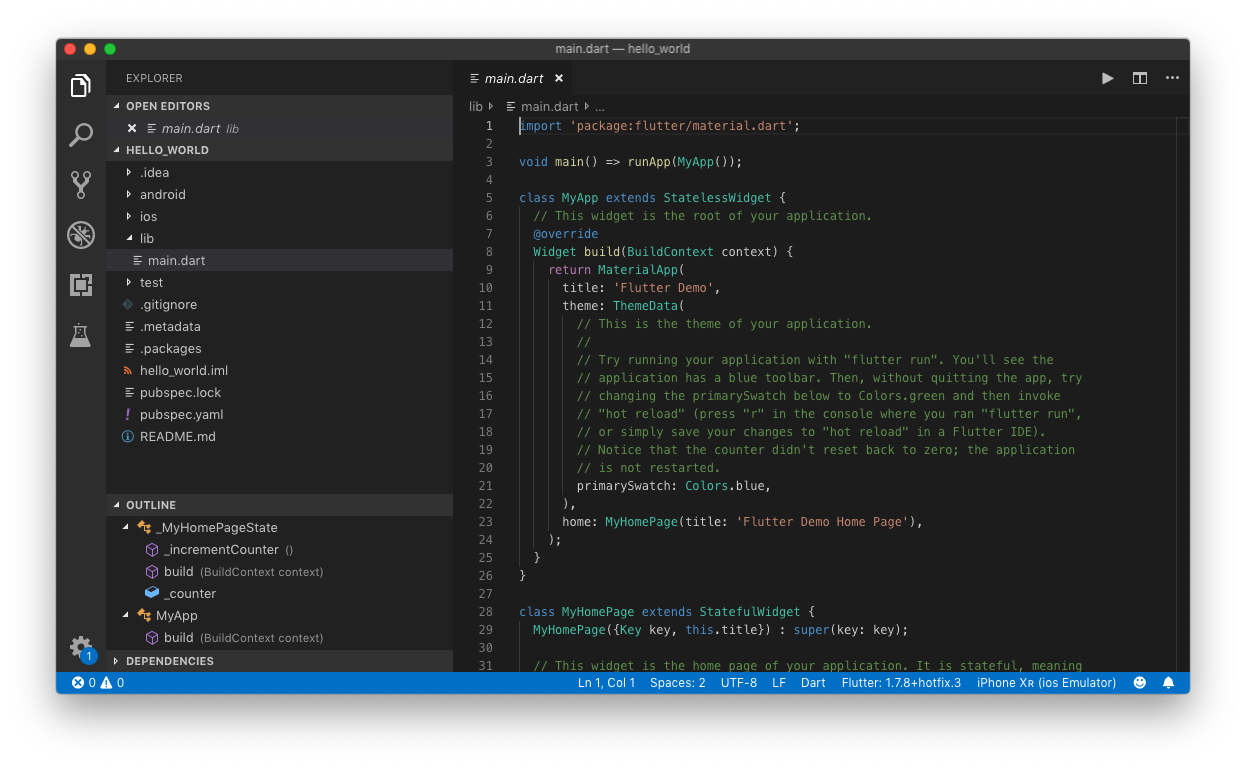
Of particular interest are the following files/folders:
- The main.dart file in the lib folder: This is the main file of your Flutter application.
- The ios folder: This is the shell iOS application that runs on your iOS device/simulator.
- The android folder: This is the shell Android application that runs on your Android device/emulator.
- The pubspec.yaml file: This file contains references to the various packages needed by your application.
To run the application, you need the following:
- iOS Simulator(s) and/or Android emulator(s)
- iOS device(s) and/or Android devices(s)
The easiest way to test the application is to use the iOS Simulator and Android emulator. For the Android emulator, open Android Studio and create an AVD. For iOS Simulator, the simplest way to launch it is to use the following command in Terminal:
import '$ open -a simulator
Once the iOS Simulator and Android emulator are launched, you can run the flutter application using the following command:
$ cd hello_world
$ flutter run -d all
The above command runs the application on all connected devices/simulators/emulators. If you want to know which devices/simulators/emulators are connected, use the following command:
$ flutter devices
You should see something like the following:
import 'pack2 connected devices:
Android SDK built for x86
  • emulator-5554
  • android-x86
  • Android 9 (API 28) (emulator)

**iPhone X**
  • 95080E0D-F31B-4938-9CE7-01830B07F7D0
  • ios
  • com.apple.CoreSimulator.SimRuntime.iOS-12-2 (simulator)
        ),
      ),
    ),
  ),
);
To run the application on a particular device, use the following command:
$ flutter run -d <device_id>
The <device_id> is highlighted.
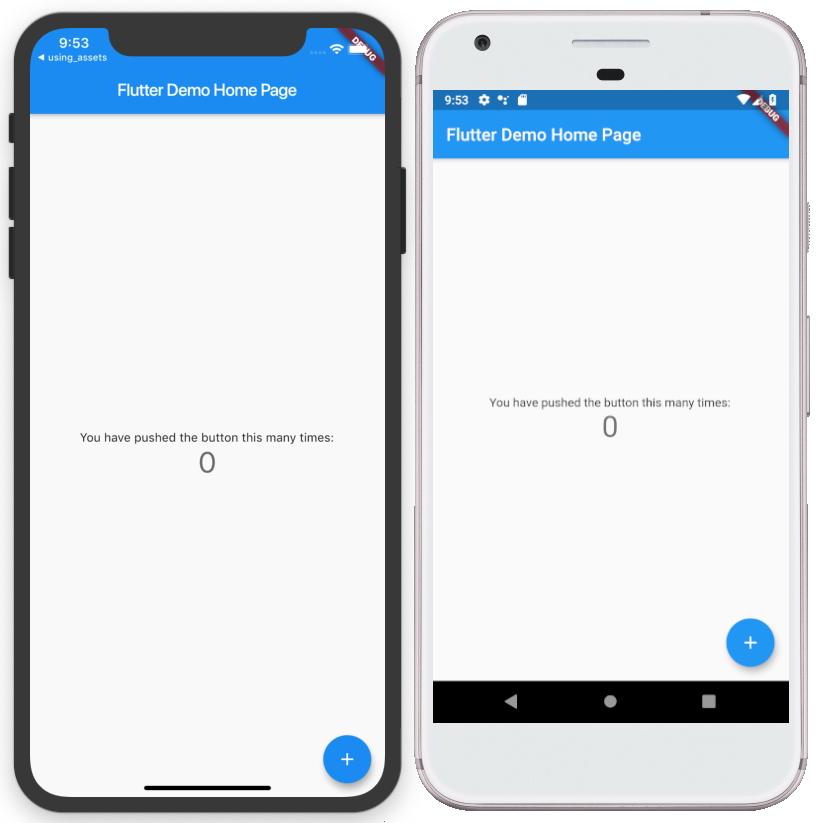
When the application has successfully loaded onto the simulator and emulator, you should see them, as shown in Figure 2.
Understanding How Flutter Works
To learn how Flutter works, it's good to look at the main.dart file in the hello_world project and see how the various components work. Frankly, it's not the easiest way to learn Flutter because the various statements in the file can be quite overwhelming for the beginning developer. That's why I'll start off with the bare minimum and build up the application from scratch.
Widgets
Unlike other cross-platform development frameworks (like Xamarin and React Native), Flutter doesn't use the platform's native widgets. For example, in React Native, the <view> element is translated natively into the UIView element on iOS and the View element on Android. Instead, Flutter provides a set of widgets (including Material Design and Cupertino - iOS - widgets), managed and rendered directly by Flutter's framework and engine.
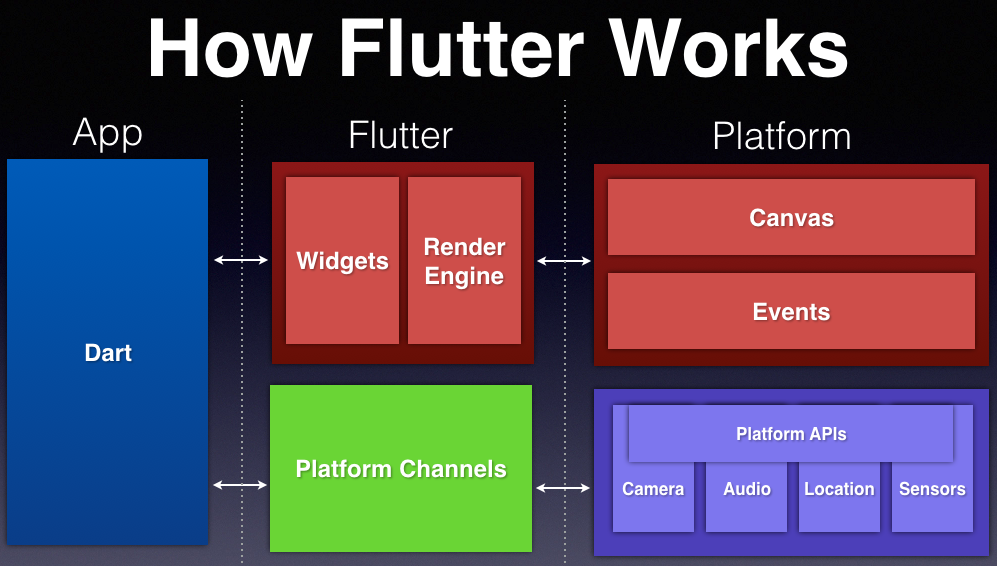
Figure 3 shows how Flutter works. Widgets are rendered onto a Skia canvas and sent to the platform. The platform displays the canvas and sends events back to the app.
Flutter doesn't rely on the device's OEM widgets. It renders every view's components using its own high-performance rendering engine.
In Flutter, UI are represented as widgets. Widgets describe how the view should look, given its current configuration and state. When the state changes, the widget rebuilds its description and the framework compares it with the previous description to determine the minimal changes needed to update the UI.
Types of Widgets
In Flutter, there are two main types of widgets:
- Stateless widgets: Changing the properties of stateless widgets has no effect on the rendering of the widget.
- Stateful widgets: Changing the properties of stately widgets triggers the life cycle hooks and updates its UI using the new state.
Before you look at how to create stateless and stateful widgets, let's erase the entire content of the main.dart file and replace it with the following statements:
import 'package:flutter/material.dart';
void main() => runApp(
    Center(
        child: Container(
            margin: const EdgeInsets.all(10.0),
            color: Color(0xFFFFBF00),
            width: 300.0,
            height: 100.0,
            child: Center(
                child:Text('Hello, CODE Mag!',
                textDirection: TextDirection.ltr,
                style:TextStyle(
                    color:Color(0xFF000000),
                    fontSize:32,
                    )
                ),
            ),
        ),
    ),
);
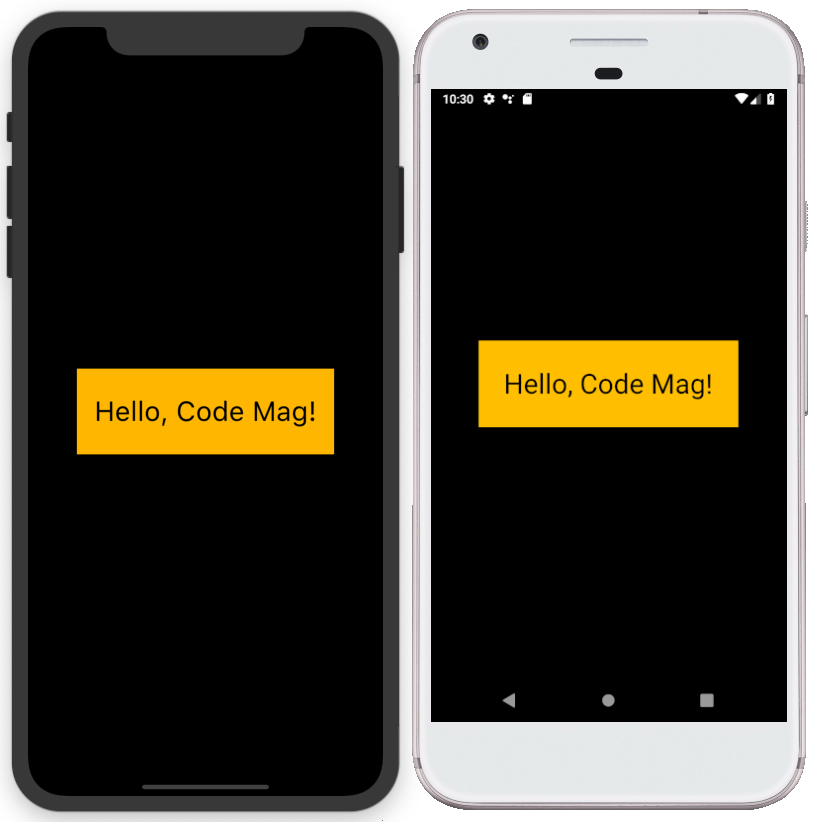
The main() function is the main entry point for your application. The runApp() function has a widget argument; this argument will become the root widget for the whole app. In this example, Container (which is a widget) is the root widget of the application. As the name implies, the Container widget is used to contain other widgets, and in this case, it contains the Center widget, which, in turn, contains the Text widget and displays the string “Hello, CODE Mag!”
Hot-reload has no effect on the root widget; in general, when you perform a hot-reload, the
main()function won't be re-executed and no changes will be observed.
If you've run the application previously from Terminal, you don't need to stop the application in order for the application to be updated. Flutters supports two types of update:
- Hot reload (press “r” in Terminal). This option allows you to update the UI without restarting the application.
- Hot restart (press “R” in Terminal). This option allows you to restart the application.
Figure 4 shows what happens when you press “R” to hot-restart the application. For this example, hot-reload has no effect as all of the UIs are defined in the root widget. You'll see hot-reload in action later on when I discuss stateless and stateful widgets.
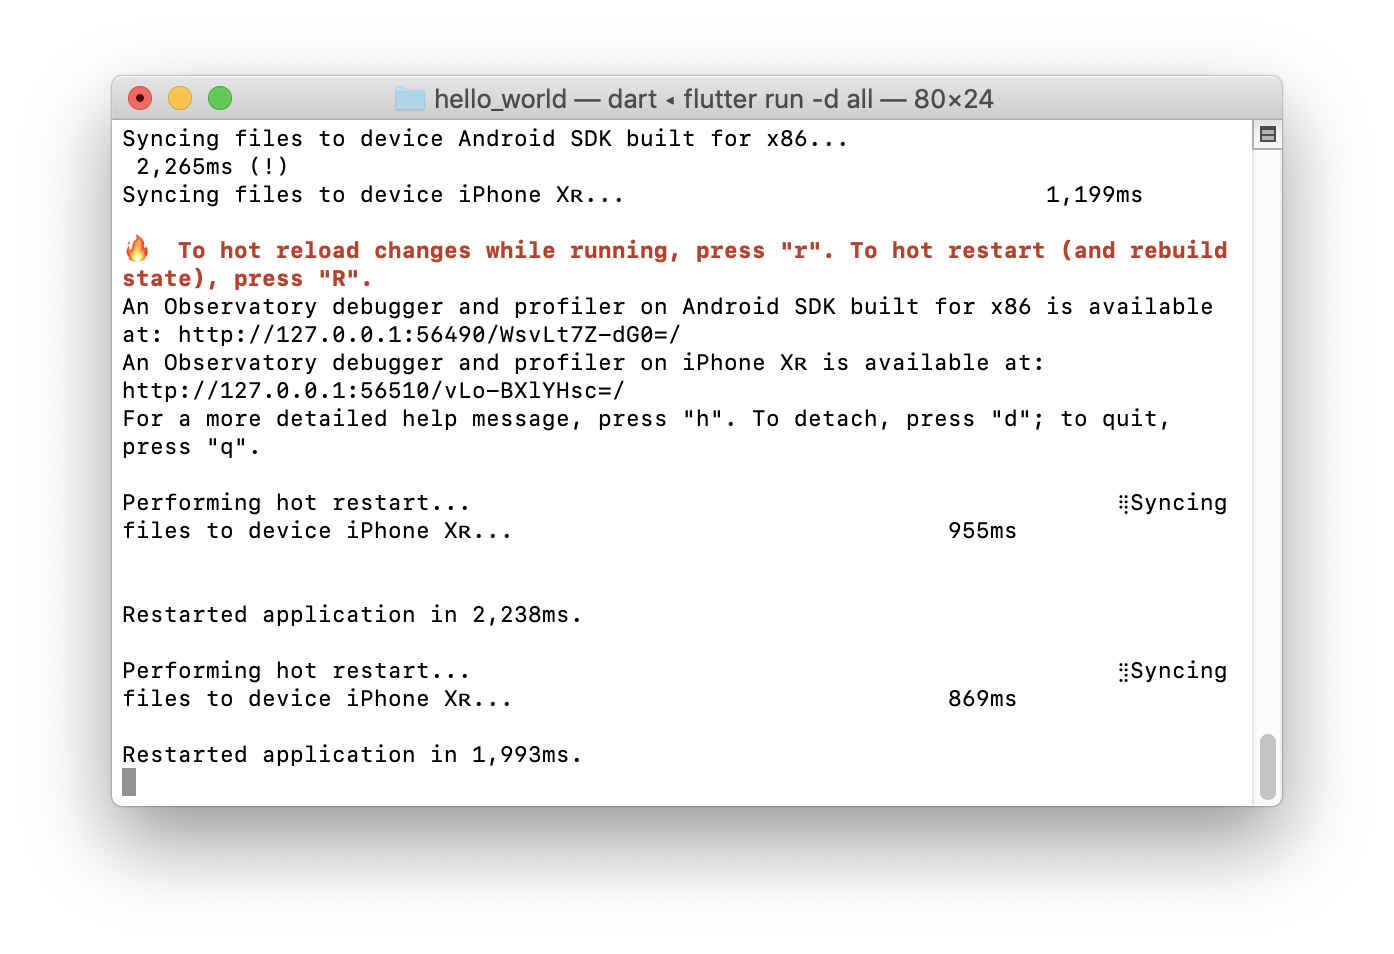
Figure 5 shows the application running on the simulator and emulator.
Using the MaterialApp and CupertinoApp Classes
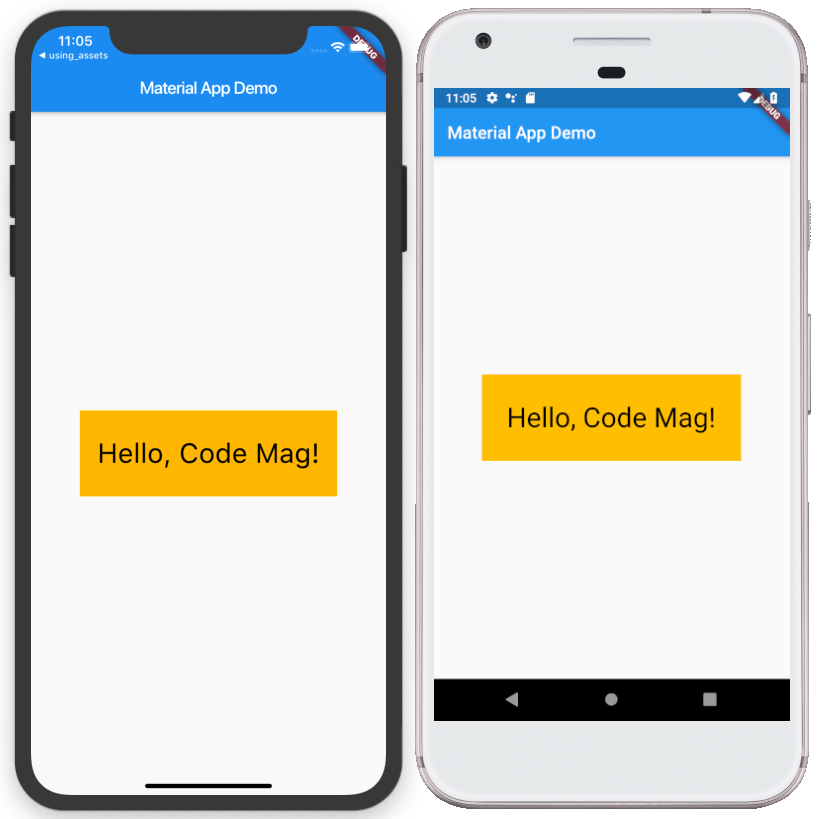
The example in the previous section has a dark background and doesn't look like a traditional iOS or Android application. Flutter provides two main convenience widgets that wrap your widgets in the design styles for the iOS and Android platforms:
- MaterialApp: The MaterialApp class represents an application that uses material design. It implements the Material design language for iOS, Android, and Web.
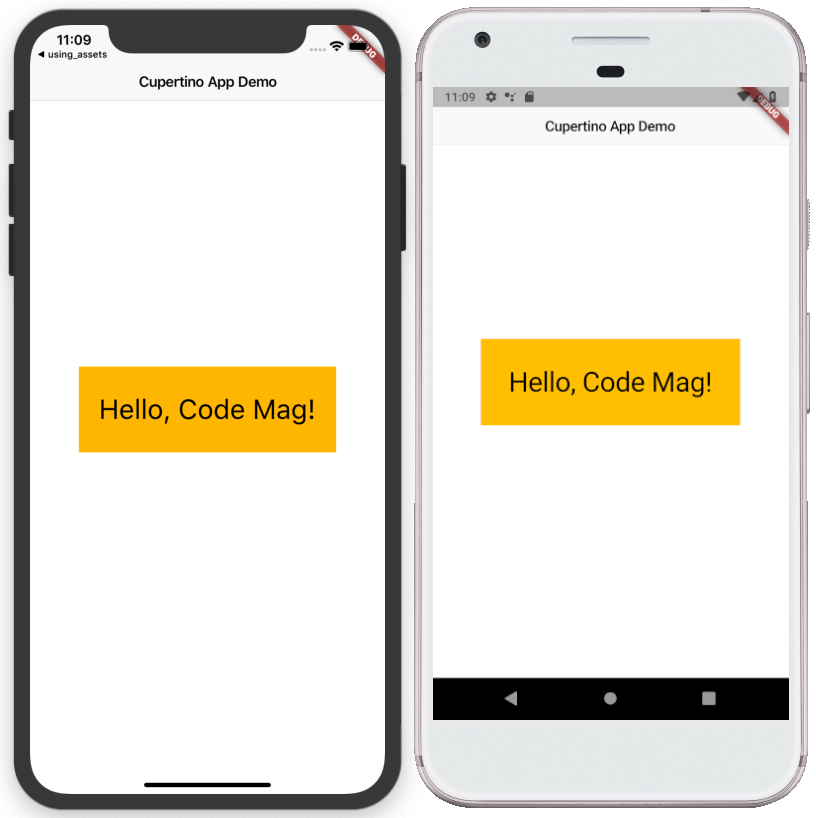
- CupertinoApp: The CupertinoApp class represents an application that uses Cupertino design. It implements the current iOS design language based on Apple's Human Interface Guidelines.
Let's now wrap the widget using the MaterialApp class:
import 'package:flutter/material.dart';
void main() => runApp(
    MaterialApp(
        title: 'Material App Demo',
        home: Scaffold(
            appBar: AppBar(
            title: Text('Material App Demo'),
            ),
            body:
                Center(
                child: Container(
                    margin: const EdgeInsets.all(10.0),
                    color: Color(0xFFFFBF00),
                    width: 300.0,
                    height: 100.0,
                    child: Center(
                        child:Text('Hello, CODE Mag!',
                            textDirection: TextDirection.ltr,
                            style:TextStyle(
                                color:Color(0xFF000000),
                                fontSize:32,
                            )
                        ),
                    ),
                ),
            ),
        ),
    ));
Hot restarting the app shows the application displayed in MaterialApp style (see Figure 6).
In addition to the MaterialApp, you can also use the CupertinoApp class to make your application look like a native iOS application:
import 'package:flutter/cupertino.dart';
void main() => runApp(
    CupertinoApp(
        title: 'Cupertino App Demo',
        home: CupertinoPageScaffold(
            navigationBar: CupertinoNavigationBar(
                middle: const Text('Cupertino App Demo'),
            ),
            child:
                Center(
                    child: Container(
                        margin: const EdgeInsets.all(10.0),
                        color: Color(0xFFFFBF00),
                        width: 300.0,
                        height: 100.0,
                        child: Center(
                            child:Text('Hello, CODE Mag!',
                                textDirection: TextDirection.ltr,
                                style:TextStyle(
                                    color:Color(0xFF000000),
                                    fontSize:32,
                                )
                            ),
                        ),
                    ),
                ),
            )
        ),
    );
Figure 7 shows how the application looks when you use the CupertinoApp class.
Stateless Widgets
So far, you have a pretty good idea of how UI in Flutter is created using widgets. In the previous section, the UI was created all in the runApp() function. A much better way to build the UI is to “componentize” the widget into independent widgets so that they can be reused. So now let's try to reorganize the code so that the UI is written as a stateless widget.
To create a stateless widget:
- Name the new Widget class and extend it from
StatelessWidget. - Implement the
build()method, with one argument of typeBuildContextand return type of Widget.
Here is the template for a stateless widget:
class MyCustomWidget extends StatelessWidget {
    @override
    Widget build(BuildContext context) {
        return Center(
            ...
        );
    }
}
Listing 1 shows the previous UI rewritten as a stateless widget.
Listing 1. Creating a stateless widget
import 'package:flutter/cupertino.dart';
void main() => runApp(
    CupertinoApp(
        title: 'Cupertino App Demo',
        home: CupertinoPageScaffold(
            navigationBar: CupertinoNavigationBar(
                middle: const Text('Cupertino App Demo'),
            ),
            child:
                Column(
                    mainAxisAlignment: MainAxisAlignment.center,
                    children: <Widget>[
                        MyCustomWidget("CODE Mag"),
                    ],
                ),
        )
    ),
);
class MyCustomWidget extends StatelessWidget {
    //---all properties in stateless widget must
    // declare with final or const---
    final String name;

    //---class constructor---
    MyCustomWidget(this.name);

    @override
    Widget build(BuildContext context) {
    return
        Center(
        child: Container(
            margin: const EdgeInsets.all(10.0),
            color: Color(0xFFFFBF00),
            width: 300.0,
            height: 100.0,
            child: Center(
                child:Text('Hello, $name!',
                    textDirection: TextDirection.ltr,
                    style:TextStyle(
                        color:Color(0xFF000000),
                        fontSize:32,
                    )
                ),
            ),
        ),
    );
    }
}
Hot restart the application and you should see the same output as shown in Figure 7.
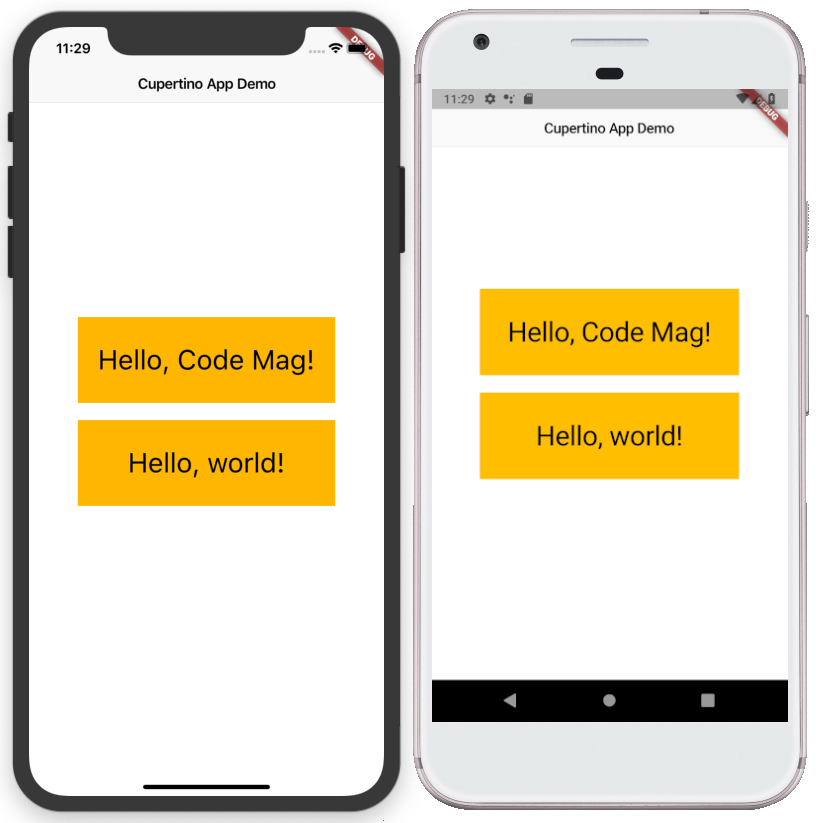
Now, add another instance of the MyCustomWidget to the main.dart file:
void main() => runApp(
    CupertinoApp(
        title: 'Cupertino App Demo',
        home: CupertinoPageScaffold(
            navigationBar: CupertinoNavigationBar(
                middle: const Text('Cupertino App Demo'),
            ),
            child:
                Column(
                    mainAxisAlignment: MainAxisAlignment.center,
                    children: <Widget>[
                        MyCustomWidget("CODE Mag"),
                        MyCustomWidget("world"),
                    ],
                ),
            )
    ),
);
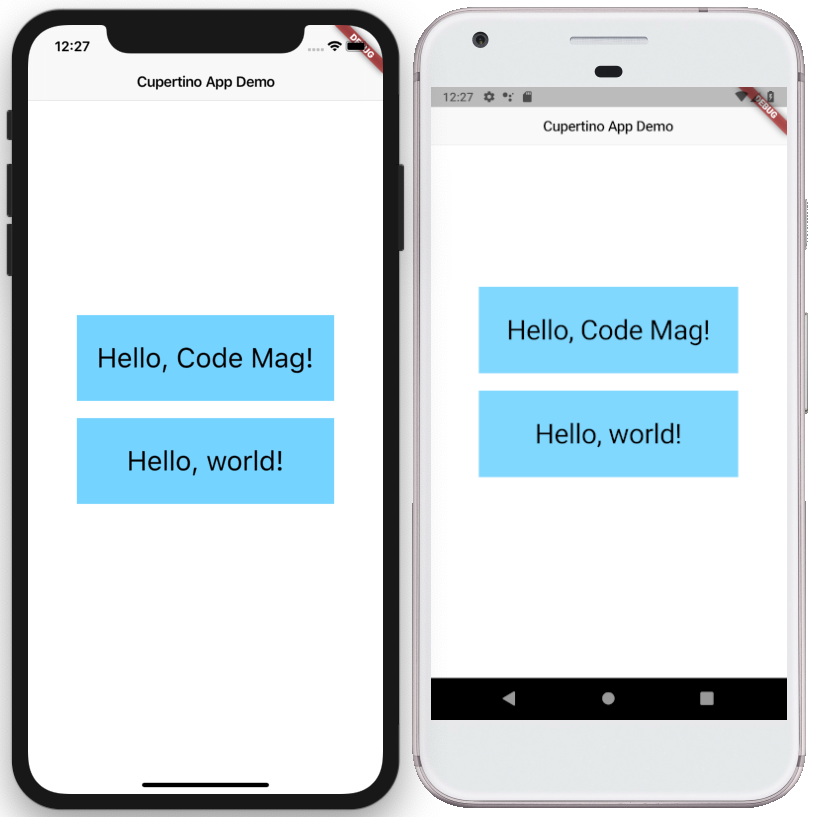
Hot restart the application and you should see that there are now two instances of MyCustomWidget (see Figure 8).
Do you still remember about the hot-reload that I mentioned earlier? Modify the color in the stateless widget as follows:
@override
  Widget build(BuildContext context) {
      return
          Center(
               child: Container(
               margin: const EdgeInsets.all(10.0),
               color: Color(0xFF80D8FF),
               width: 300.0,
               height: 100.0,
               child: Center(
                  child:Text(
                      'Hello, $name!',
                      textDirection: TextDirection.ltr,
                          style:TextStyle(
                          color:Color(0xFF000000),
                          fontSize:32,
                          )
                  ),
               ),
              ),
          );
  }
When you now hot reload the app (press “r” in Terminal), you'll see the colors of the MyCustomWidget change immediately (see Figure 9).
Stateful Widgets
Stateless widgets are useful for displaying UI elements that don't change during runtime. However, if you need to dynamically change the UI during runtime, you need to create stateful widgets.
Stateful widgets don't exist by themselves: They require an extra class to store the state of the widget. To create a stateful widget:
- Name the new
Widgetclass and extend it from StatefulWidget. - Create another class that extends from the
Stateclass, of the type that extends from theStatefulWidgetbase class. This class will implement thebuild()method, with one argument of typeBuildContextand return type ofWidget. This class will maintain the state for the UI to be updated dynamically. - Override the
createState()function in theStatefulWidgetsubclass and return an instance of theStatesubclass (created in the previous step).
The following shows the template for creating a stateful widget:
class MyCustomStatefulWidget extends StatefulWidget {

    //---constructor with named argument: country---
    MyCustomStatefulWidget(
        {Key key, this.country}) : super(key: key);

    //---used in _DisplayState---
    final String country;

    @override
    _DisplayState createState() => _DisplayState();
}

class _DisplayState extends
    State<MyCustomStatefulWidget> {

    @override
    Widget build(BuildContext context) {
        return Center(
            //---country defined in StatefulWidget
            // subclass---
            child: Text(widget.country),
        );
        }
    }
Using the earlier example, let's now create a stateful widget by appending the code and match (as shown in Listing 2) to main.dart.
Listing 2. Creating a stateful widget
class MyCustomStatefulWidget extends StatefulWidget {
    MyCustomStatefulWidget({Key key, this.country}) :
        super(key: key);
    final String country;

    @override  _DisplayState createState() => _DisplayState();
}

class _DisplayState extends State<MyCustomStatefulWidget> {
    int counter = 0;

    @override
    Widget build(BuildContext context) {
        return Center(
            child: Container(
                margin: const EdgeInsets.all(10.0),
                color: Color(0xFFFFBF00),
                width: 300.0,
                height: 100.0,
                child: Center(
                    child: Column(
                        mainAxisAlignment: MainAxisAlignment.center,
                        children: <Widget>[
                            Text(
                                widget.country,
                                textDirection: TextDirection.ltr,
                                style:TextStyle(
                                    color: Color(0xFF000000),
                                    fontSize:32,
                                )
                            ),
                            Center(
                                child: GestureDetector(
                                    onTap: () {
                                        setState(() {                                                      ++counter;
                                        });
                                    },
                                    child: Container(
                                    decoration: BoxDecoration(
                                        shape: BoxShape.rectangle,
                                        color: Color(0xFF17A2B8),
                                    ),
                                    child: Center(
                                        child: Text('$counter',
                                        style: TextStyle(fontSize: 25.0),
                                        ),
                                    ),
                                    ),
                                ),
                            ),
                        ],
                    ),
                ),
            )
        );
    }}
To make use of the stateful widget, add it to the runApp() function, like this:
import 'package:flutter/cupertino.dart';

void main() => runApp(

CupertinoApp(
    title: 'Cupertino App Demo',
    home: CupertinoPageScaffold(
        navigationBar: CupertinoNavigationBar(middle:
            const Text('Cupertino App Demo'),
        ),
        child: Column(mainAxisAlignment:MainAxisAlignment.center,
        children: <Widget>[MyCustomWidget("Code Mag"),
            MyCustomWidget("world"),
            MyCustomStatefulWidget(key:Key("1"),
            country:"Singapore"),
            MyCustomStatefulWidget(key:Key("2"),
            country:"USA"),
        ],),
    )
),);
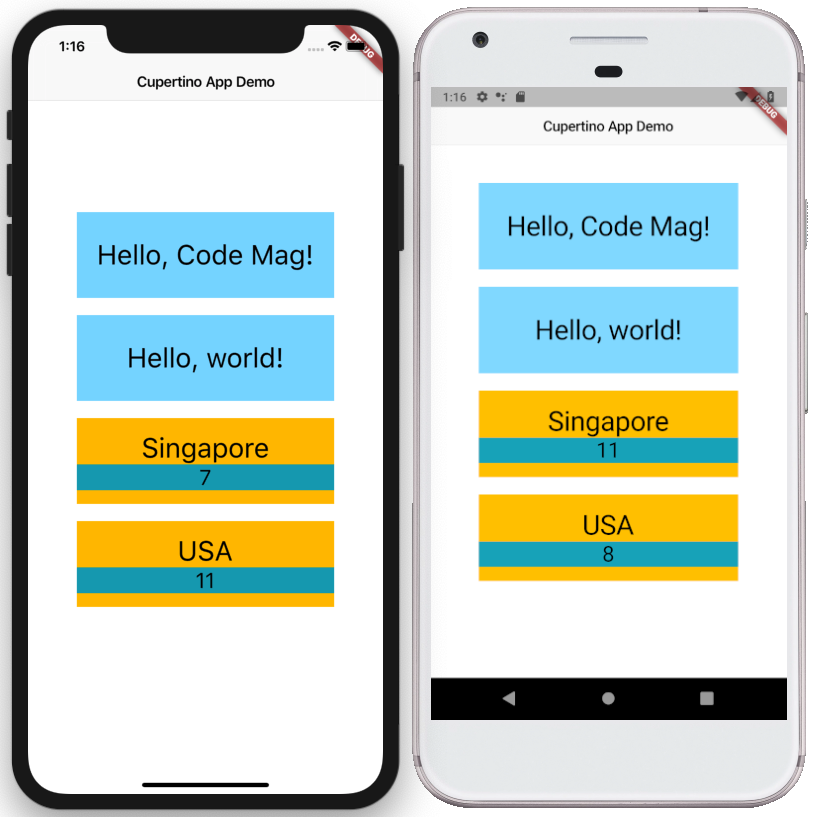
Performing a hot restart yields the UI, as shown in Figure 10. Clicking on the blue strip increments the counter.
Observe the following:
- The
MyCustomStatefulWidgetclass has a property namedcountry. This value is initialized through the named argument in the constructor:MyCustomStatefulWidget({Key key, this.country}). - The
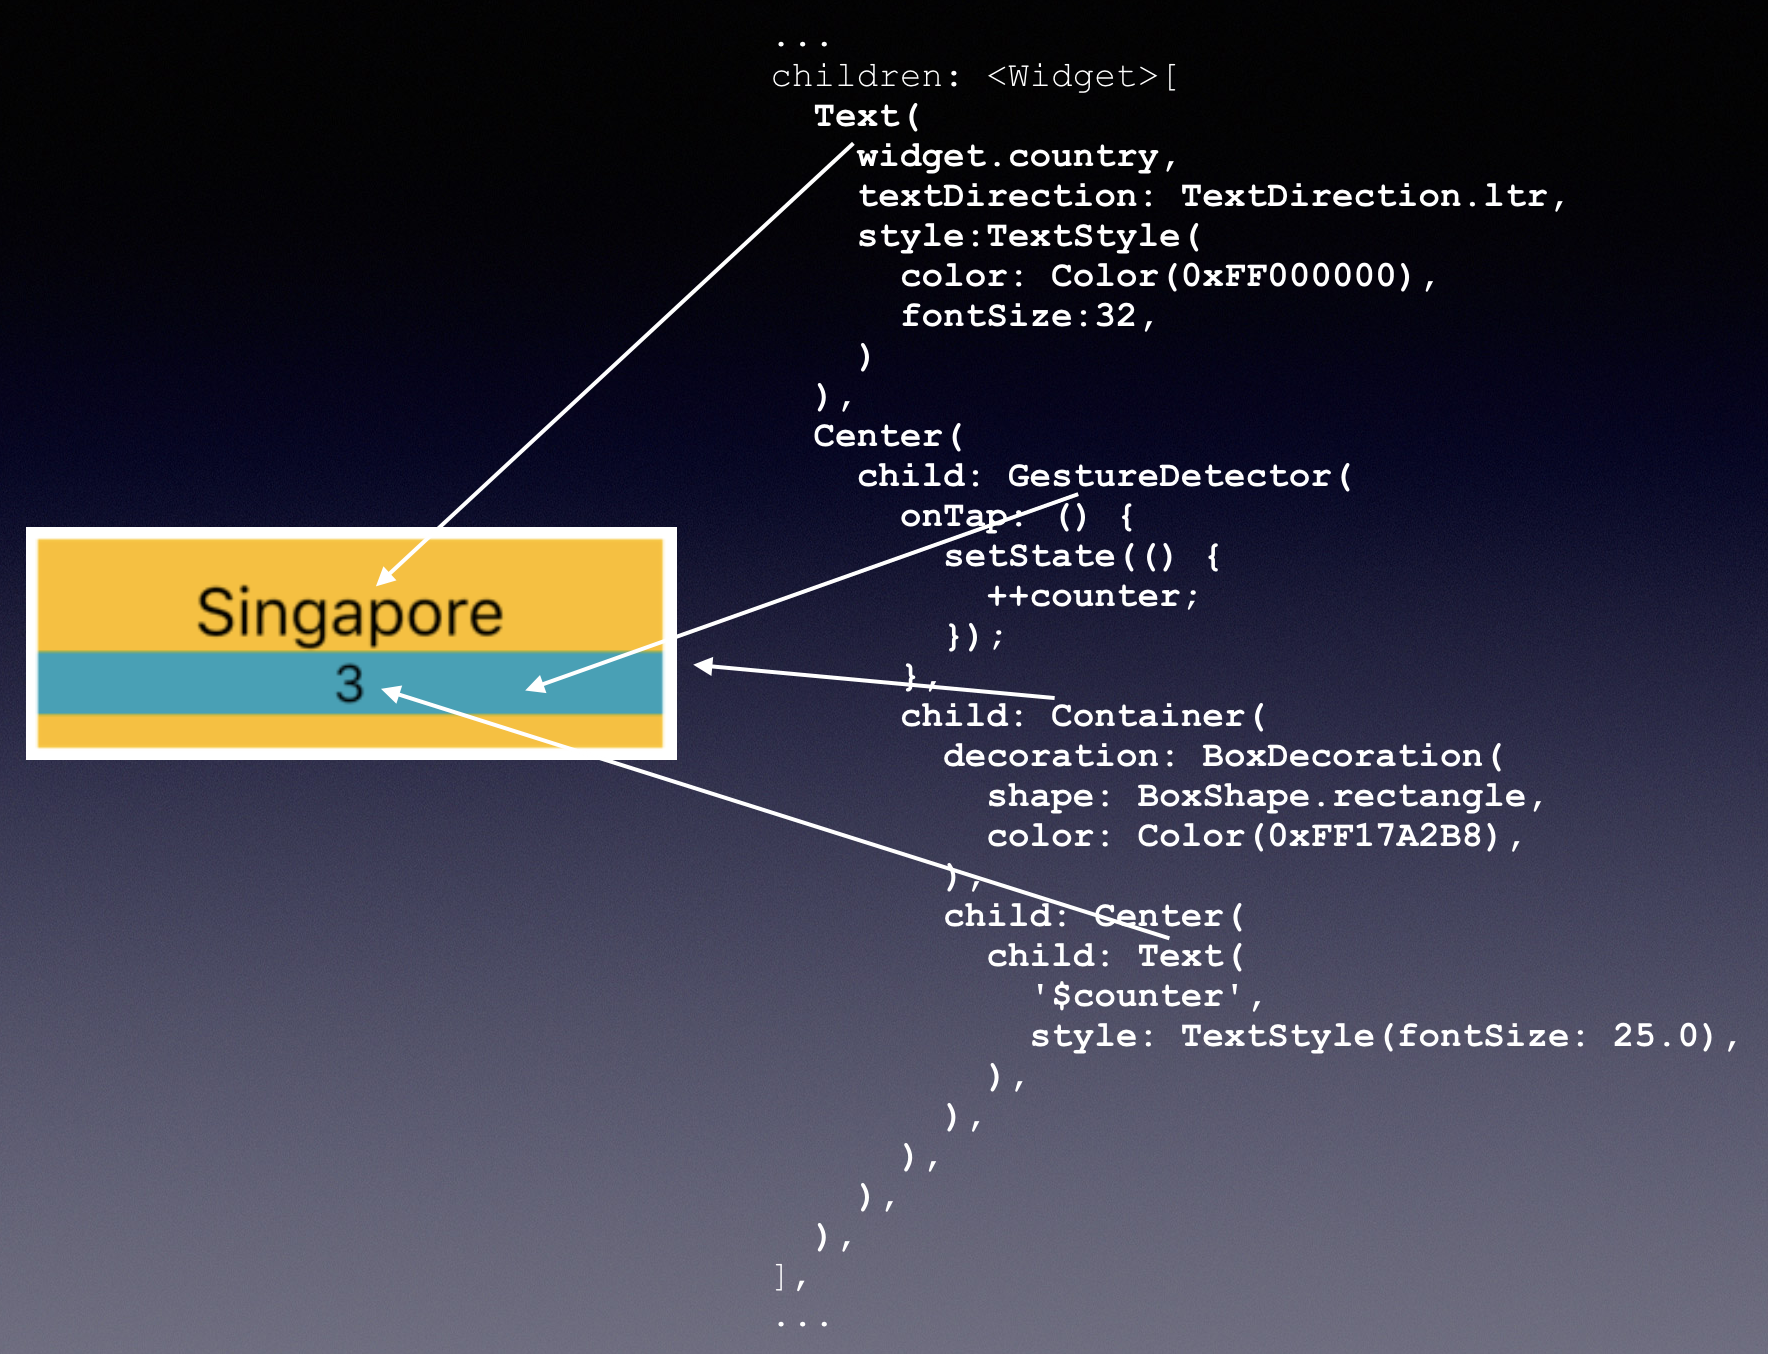
countryproperty is used in the_DisplayStateclass, and it can be referenced by prefixing it with thewidgetkeyword. - Our stateful widget tree contains the widgets, as shown in Figure 11.
- The value of
counteris displayed within theTextwidget. When theGestureDetectordetects a tap on the blue strip on the widget, it calls thesetState()function to change the value ofcounter. - Modifying the value of
counterusing thesetState()function causes thebuild()function to be called again; and those widgets that reference the counter variable are updated automatically.
Building the News Reader Project
By now, you should have a good understanding of how Flutter works. The best way to learn a new framework is to build a sample app and see how the various components fall in place, so let's now build a complete working application.
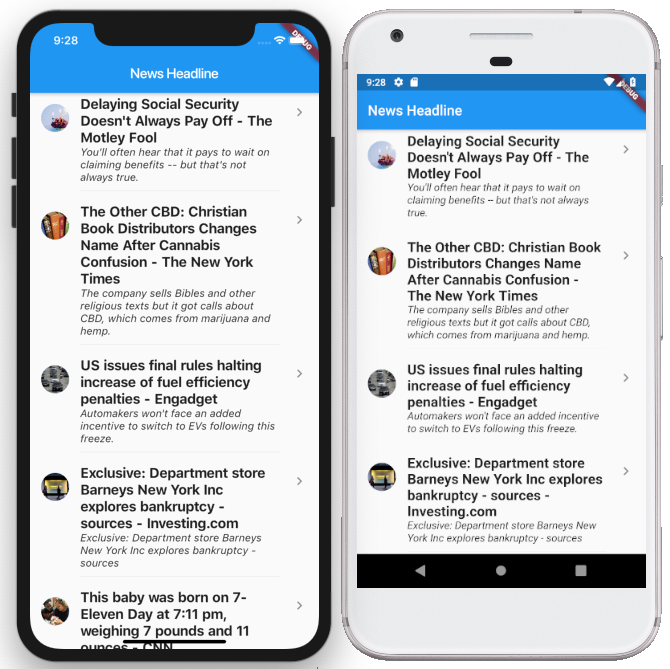
For this project, you'll create a news application that displays the news headline in a ListView, as shown in Figure 12.
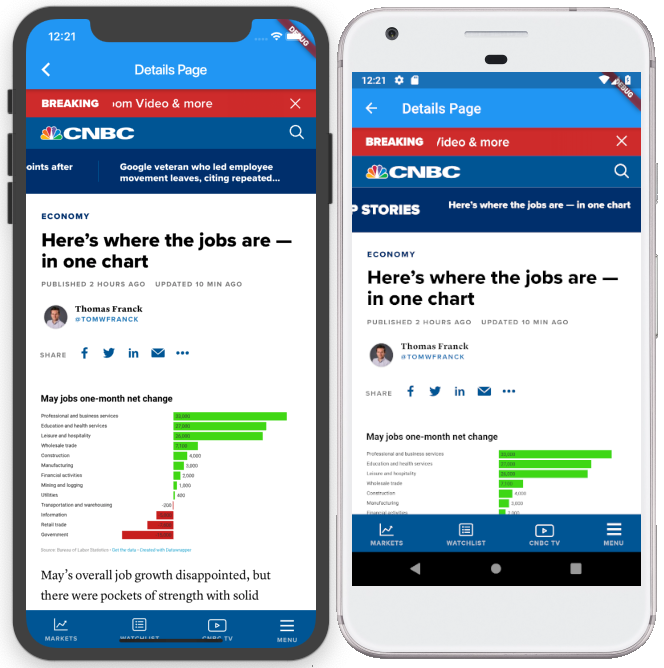
When the user taps on a particular headline, the application navigates to another page and loads the details of the news in a WebView (see Figure 13).
For fetching the news headlines, you can use the following API: https://newsapi.org/v2/top-headlines?country=us&category=business&apiKey=<api_key>
You can apply for your own free News API key from https://newsapi.org.
Creating the Project
Let's first start by creating the project:
$ cd ~
$ flutter create news_reader
Adding the Package
For this project, you need to use the HTTP package so that you can connect to the News API. Add the following statement to the pubspec.yaml file:
dependencies:
    flutter:
        sdk: flutter
    http:
Once you save the changes to the pubspec.yaml file, Visual Studio automatically fetches the package and installs it on your local drive. Alternatively, you can use the following command to manually download the packages:
$ flutter packages get
Importing the Packages
In the main.dart file, add the following statements:
import 'package:flutter/material.dart';

// for Future class
import 'dart:async';

// for http
import 'package:http/http.dart' as http;

// for JSON parsing
import 'dart:convert';
Updating the Title of the App
Make the following modifications to the main.dart file:
void main() => runApp(MyApp());

class MyApp extends StatelessWidget {

    @override
    Widget build(BuildContext context) {

        return MaterialApp(
            title: 'News Headline',
            theme: ThemeData(
                primarySwatch: Colors.blue,
            ),
            home: MyHomePage(title: 'News Headline'),
        );
    }
}
Accessing the News API
The News API returns a JSON string containing a summary of the various news headlines. The first thing you need to do is to examine the structure of the JSON result returned and see which of the parts you need to retrieve for your application.
Access the News API using https://newsapi.org/v2/top-headlines?country=us&category=business&apiKey=<api_key>.
Once the result is obtained, paste the result into a JSON formatter, such as http://jsonlint.com. Figure 14 shows the JSON result formatted.
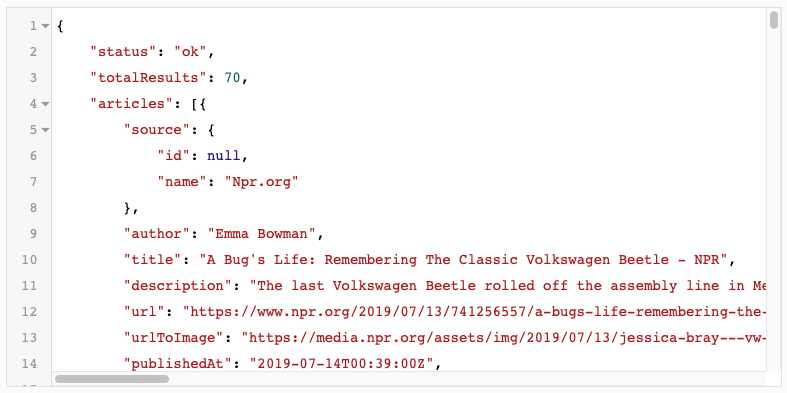
In particular, you're interested in extracting the following:
- All of the articles referenced by the articles key
- For each article, extract the values of title, description, url, and urlToImage
Populating the ListView
Add the statements matching the main.dart file as shown in Listing 3.
Listing 3. Populating the ListView
class _MyHomePageState extends State<MyHomePage> {
    int _counter = 0;

    Map _news = {"articles":[]};

    @override
    void initState() {
        super.initState();
        downloadHeadlines();  // download from News API
    }

Future<http.Response> fetchNews(String url) {
    return http.get(url);
}

convertToJSON(http.Response response) {
    if (response.statusCode == 200) {
        setState(() => {
            _news = jsonDecode(response.body)
        });
    }
}

downloadHeadlines() {
    fetchNews('https://newsapi.org/v2/top-headlines?' +
        'country=us&category=' +
    'business&apiKey=<api_key>')
    .then( (response) => {
    convertToJSON(response)
    });
}

ListTile _buildItemsForListView(
    BuildContext context, int index) {
    return ListTile(
        title: _news['articles'][index]['urlToImage'] == null ?
            // default image
            Image.network('https://bit.ly/2WtOm6N') :
            // news image
            Image.network(_news['articles'][index]['urlToImage']),
        subtitle: _news['articles'][index]['title'] == null ?
            Text("Loading...") :
            Text(_news['articles'][index]['title'],
                style: TextStyle(fontSize: 15, fontWeight:FontWeight.bold)),
    );
    }

void _incrementCounter() {
    setState(() {_counter++;});
}

@override
Widget build(BuildContext context) {
    return Scaffold(
        appBar: AppBar(
            title: Text(widget.title),
        ),
        body:ListView.builder(
            itemCount: _news['articles'].length,
            itemBuilder: _buildItemsForListView,
        ),
        //---comment out the following statements---
        /*
        floatingActionButton: FloatingActionButton(
            onPressed: _incrementCounter,
            tooltip: 'Increment',
            child: Icon(Icons.add),
        ),
        */
    );
}}
A Future object represents the results of asynchronous operations
Here is what you've added to the main.dart file:
- You created a variable named
_newsand initialized it as a map object with the one key,articles, and set it to an empty list. Later you'll connect it to the News API, retrieve the news article that you want, and assign the values to the_newsvariable. - You overrode the
initState()function so that when the page is loaded, it calls thedownloadHeadlines()function to download the content from the News API. - The
fetchNews()function connects to the News API and returns aFutureobject of type http.Response. - The
convertToJSON()function converts the content downloaded from the News API and encodes it into a JSON object. - The
_buildItemsForListView()function returns aListTilecontaining the UI for each row in theListView. At this point, each row contains an image and a title for the news. - You use the
ListView.builder()function to build the ListView, passing it the number of rows to create, as well as the function (_buildItemsForListView) that populates each row of the ListView.
The
ListTileclass represents a row in the ListView. The title argument typically takes in a Text widget, but it can take any widget.
You can now test the application on the iOS Simulator and Android emulator. Type the following command in Terminal:
$ cd news_reader$ flutter run -d all
The applications should now look like Figure 15.

Implementing Pull-to-Refresh
The next thing to do is to implement pull-to-refresh so that you can update the news feed by pulling down the ListView and then releasing it. Add the statements matching the main.dart file as shown in Listing 4.
Listing 4. Adding pull-to-refresh support
void _incrementCounter() {
    setState(() {_counter++;});
}

    Future<Null> _handleRefresh() async {
        downloadHeadlines();
        return null;
    }

@override
Widget build(BuildContext context) {
    return Scaffold(
        appBar: AppBar(
            title: Text(widget.title),
            ),
            body:RefreshIndicator(
            child: ListView.builder(
                itemCount: _news['articles'].length,
                itemBuilder: _buildItemsForListView,
            ),
            onRefresh: _handleRefresh,
        ),
    //---comment out the following statements---
    /*
        floatingActionButton: FloatingActionButton(
            onPressed: _incrementCounter,
            tooltip: 'Increment',
            child: Icon(Icons.add),
        ),
    */
    );
}}
To ensure that the ListView supports pull-to-refresh, use the RefreshIndicator widget and set its child to the ListView.builder() function. Then, set its onRefresh argument to the _handleRefresh() function, which calls the downloadHeadlines() function again to download the news content.
Customizing the Content of the ListTile
Instead of displaying an image and the news title on each row, it would be better to display the news title and its description, followed by a smaller image.
Add the statements matching the main.dart file as shown in Listing 5.
Listing 5. Customizing the content of the ListTile
ListTile _buildItemsForListView(
    BuildContext context, int index) {
    return ListTile(
        leading: _news['articles'][index]['urlToImage'] == null ?
            CircleAvatar(backgroundImage:
                NetworkImage('https://bit.ly/31l2Q7Q')) :
            CircleAvatar(backgroundImage:
                NetworkImage(_news['articles'][index]['urlToImage'])),
            title: Column(children: <Widget>[

               _news['articles'][index]['title'] == null ?
                   Text("", style: TextStyle(fontSize: 20,
                   fontWeight: FontWeight.bold)) :
                   Text(_news['articles'][index]['title'], style:
                       TextStyle(fontSize: 20,
                       fontWeight: FontWeight.bold)),

               _news['articles'][index]['description'] == null ?
                   Text("", style: TextStyle(fontSize: 15,
                   fontStyle: FontStyle.italic))            :            Text(_news['articles'][index]['description'], style:
                       TextStyle(fontSize: 15, fontStyle:
                           FontStyle.italic)),

               Divider(height: 20.0,)

            ]),
        trailing: Icon(Icons.keyboard_arrow_right),
    );
    }
Here, you use the leading argument of ListTile class to display an icon using the CircleAvatar class. The title argument is then set to a Column object, which in turn contains the title and description of the article. You also added a Divider object, which displays a faint line between the rows.
Perform a hot-reload of the app. You should now see updated ListView, as shown in Figure 16.
Converting to a Navigational Application
Now that the ListView displays the list of articles, it would be nice if the user could tap on an article to read more about it. For this, you're going to create a details page that will be used to display the content of the article.
Add the following statements to match the main.dart file:
import 'package:flutter/material.dart';

// for Future class
import 'dart:async';

// for http
import 'package:http/http.dart' as http;

// for JSON parsing
import 'dart:convert';

// to store the data to pass to another widget
class NewsContent {
    final String url;
    NewsContent(this.url);}

void main() => runApp(MyApp());...
The NewsContent class is used to store the URL of the article so that it can be passed to the details page. Append the following block of code to the end of the main.dart file:
class DetailsPage extends StatelessWidget {
    // to hold the data passed into this page
    final NewsContent data;

    // create a constructor for the page with
    // the data parameter
    DetailsPage({Key key, @required this.data}) :
    super(key:key);

@override
Widget build(BuildContext context) {
    String url = data.url;
    return Scaffold(
        appBar: AppBar(
            title: Text("Details Page"),
        ),
        body: Center(
            child:  Text('$url'),
        ),
    );
}}
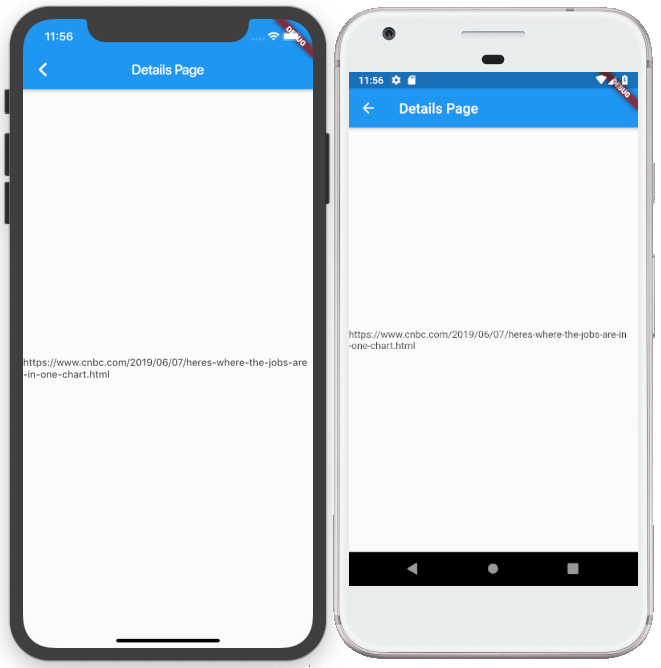
The DetailsPage takes in the data passed into it (which is the URL of the article) and displays it in the center of the page.
Add the statements to match the main.dart file as shown in Listing 6.
Listing 6. Creating the Details Page
ListTile _buildItemsForListView(
    BuildContext context, int index) {
    return ListTile(
        leading: _news['articles'][index]['urlToImage'] == null ?
            CircleAvatar(backgroundImage: NetworkImage('https://bit.ly/31l2Q7Q'))
            :
            CircleAvatar(backgroundImage:
                NetworkImage(_news['articles'][index]['urlToImage'])),
        title: Column(children: <Widget>[

        _news['articles'][index]['title'] == null ?
            Text("", style: TextStyle(fontSize: 20,
                fontWeight: FontWeight.bold)) :
            Text(_news['articles'][index]['title'], style:
                TextStyle(fontSize: 20,
                fontWeight: FontWeight.bold)),

        _news['articles'][index]['description'] == null ?
            Text("", style: TextStyle(fontSize: 15,
                fontStyle: FontStyle.italic)) :
                Text(_news['articles'][index]['description'], style:
                    TextStyle(fontSize: 15, fontStyle:
                        FontStyle.italic)),

        Divider(height: 20.0,)

        ]),
        trailing: Icon(Icons.keyboard_arrow_right),

         onTap: () {
             Navigator.push(
                 context,
                 MaterialPageRoute(builder: (context) => DetailsPage(
                     data: NewsContent(_news['articles'][index]['url']),)),
            );
         },
    );
    }
The onTap argument specifies that when the user taps on a row in the Listview, it navigates (using the Navigator.push() function) to the next page (DetailsPage) and passes it the data (NewsContent).
Redeploy the application. Select a particular news headline and you should see the details page as shown in Figure 17.

Adding a WebView
Displaying the URL of the article in the details page is not very useful to the reader. What you really want to do is to use a WebView to display the content of the article.
Add the following statement to the pubspec.yaml file:
dependencies:
    flutter:
        sdk: flutter
    http:
    webview_flutter:
The above statement adds the webview_flutter package to the project.
To use WebView on iOS, you need to add the following statements to the Info.plist file located in the ios/Runner folder:
<?xml version="1.0" encoding="UTF-8"?>
<!DOCTYPE plist PUBLIC "-//Apple//DTD PLIST 1.0//EN" "http://www.apple.com/DTDs/PropertyList-1.0.dtd">
<plist version="1.0">
<dict>
    ...
    <key>UIViewControllerBasedStatusBarAppearance</key>
    <false/>
    <key>io.flutter.embedded_views_preview</key>
    <true/>
</dict>
</plist>
Add the following statements to the main.dart file:
import 'package:flutter/material.dart';

// for Future class
import 'dart:async';

// for http
import 'package:http/http.dart' as http;

// for JSON parsing
import 'dart:convert';

import 'package:webview_flutter/webview_flutter.dart';

// to store the data to pass to another widget
class NewsContent {
    final String url;
    NewsContent(this.url);
}

...

class DetailsPage extends StatelessWidget {
    // to hold the data passed into this page
    final NewsContent data;

    // create a constructor for the page with
    // the data parameter
    DetailsPage({Key key, @required this.data}) :
        super(key:key);

@override
Widget build(BuildContext context) {
    String url = data.url;
    return Scaffold(
        appBar: AppBar(
            title: Text("Details Page"),
        ),
        body: Center(
            child:  WebView(initialUrl: url,
            javascriptMode:JavascriptMode.unrestricted,)
        ),
    );
}}
Redeploy the application. Select a particular news headline and you should see the news loaded in the WebView (see Figure 18).
Displaying a Spinner
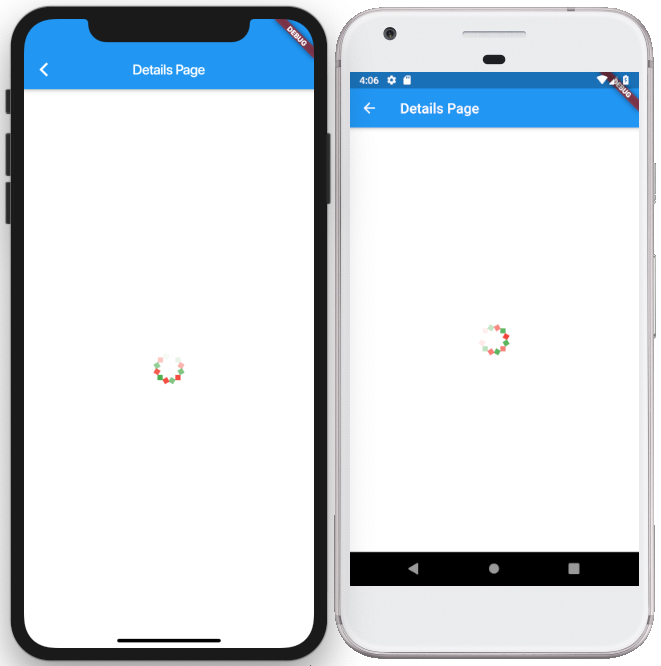
Now that the app is almost complete, let's add a final touch to it. When the article is loading in the WebView, let's display a spinner so that the user can be visually aware that the page is still loading. Once the entire article is loaded, the spinner disappears. For this purpose, you can use the flutter_spinkit package, which is a collection of loading indicators written for Flutter. In particular, let's use the SpinKitFadingCircle widget.
Add the following statement to the pubspec.yaml file:
dependencies:
    flutter:
        sdk: flutter
    http:
    webview_flutter:
    flutter_spinkit:
To display the spinner, use the Stack widget to overlay the WebView widget with the Container widget, which in turn contains the SpinKitFadingCircle widget when the WebView is loading, and an empty Container widget when the loading is complete, like this:
Stack(
    children: <Widget>[
        WebView(
            //---access data in the statefulwidget---
            initialUrl: widget.data.url,
            javascriptMode: JavascriptMode.unrestricted,

            //---when the loading of page is done---
            onPageFinished: (url) {
                setState(() {
                    displaySpinner = false;
                });
            },
        ),
        Container(
            child: displaySpinner ?
                SpinKitFadingCircle(
                    itemBuilder: (_, int index) {
                        return DecoratedBox(
                            decoration: BoxDecoration(
                                color: index.isEven ?
                                    Colors.red : Colors.green,
                            ),
                        );
                    },
                ):
                Container()
        )
    ])
Because of the need to dynamically hide the SpinKitFadingCircle widget when the WebView has finished loading, it's necessary to rewrite the DetailsPage class as a StatefulWidget.
Add the following statements to the main.dart file from Listing 7.
Listing 7. Rewriting DetailsPage as a stateful widget
import 'package:flutter/material.dart';

// for Future class
import 'dart:async';

// for http
import 'package:http/http.dart' as http;

// for JSON parsing
import 'dart:convert';

import 'package:webview_flutter/webview_flutter.dart';
import 'package:flutter_spinkit/flutter_spinkit.dart';

...

class DetailsPage extends StatefulWidget {
    final NewsContent data;
    DetailsPage({Key key, @required this.data}) : super(key:key);

    @override
    _DetailsPageState createState() => _DetailsPageState();
}

class _DetailsPageState extends State<DetailsPage> {
    bool displaySpinner = true;

    @override
    Widget build(BuildContext context) {
        return Scaffold(
            appBar: AppBar(
                title: Text("Details Page"),
            ),
            body:
                Stack(
                    children: <Widget>[
                        WebView(
                            //---access data in the statefulwidget---
                            initialUrl: widget.data.url,
                            javascriptMode: JavascriptMode.unrestricted,

                            //---when the loading of page is done---
                            onPageFinished: (url) {
                                setState(() {
                                    displaySpinner = false;
                                });
                            },
                        ),
                        Container(
                            child: displaySpinner ?
                                SpinKitFadingCircle(
                                    itemBuilder: (_, int index) {
                                        return DecoratedBox(
                                            decoration: BoxDecoration(
                                                color: index.isEven ?
                                                    Colors.red : Colors.green,
                                            ),
                                        );
                                    },
                                ):
                            Container()
                        )
                    ]
                )
            );
    }}
Redeploy the application. Select a particular news headline and you should see the SpinKitFadingCircle widget displaying (see Figure 19).
Summary
Learning a new framework is always challenging. But I do hope that this article has made it easier for you to get started with Flutter. Let me know what you are using now (Xcode, Android Studio, Xamarin, or React Native) and if you plan to switch over to Flutter. You can reach me on Twitter @weimenglee or email me at weimenglee@learn2develop.net.
