


For years, Windows has been far behind Linux in terms of bringing DevOps tools to its platform. One aspect of automation that's been lacking until recently is the use of modern package management in Windows, for instance, the ability to use specific software versions in configuration management code was once far from trivial.
Windows software has traditionally been an experience focusing on a graphical user interface to accomplish installation. In DevOps, installing software with a GUI by clicking through buttons goes against the principle of automation. Automation is built around the idea of letting computers do the work based on logic without human intervention, creating simpler flows of processes. With the advent of Chocolatey, Windows now has a solution to better manage and automate software on all of its operating systems.
What is Chocolatey?
To understand the basic idea behind Chocolatey, you need only to peer over at the Linux operating system. The basic functionality of Chocolatey is quite similar to YUM or apt-get, as it provides a unified interface to managing software. The Chocolatey client software allows users to connect to software repositories, such as Chocolatey's community repository, as its main source of software, the same as YUM or apt-get. The main difference behind Chocolatey and a YUM or apt-get is the technologies that are behind Chocolatey: NuGet and PowerShell. NuGet is a Microsoft-created package framework for the purposes of bundling code into “packages.” Chocolatey uses this same framework but then adds PowerShell as the means to add functionality (install, updating, uninstalling) packages.
Chocolatey is quite similar to YUM or apt-get, providing a unified interface to managing software.
The beauty of Chocolatey is that with a unified CLI, it allows users to manage software regardless of the installer type (MSI, EXE, etc.) with the same commands. With Chocolatey, there's no longer a need to run msiexec.exe or another installer executable directly from the command line.
There are a few different versions of Chocolatey. First, there's the open-sourced version, which is completely free and can be customized and extended. There are also professional and business versions that require paid licensing but also give advanced features that aren't found by default in the open-sourced version. As a user of the business license, I can say that many features are quite handy, such as automated package creation and a method to internalize community packages to local repositories.
The beauty of Chocolatey is that with a unified CLI, users can manage software regardless of the installer type.
Why Use Chocolatey?
Back in 2011, Rob Reynolds, the founder of Chocolatey, was a Puppet engineer working on the Windows team in addition to being a non-Microsoft team member for NuGet. In discussing the origin of Chocolatey, Rob says, “It really started as a way to provide a machine-level installation of tools. As a non-Microsoft employee, we had talked about whether NuGet would ever be a machine-level package manager and the joke at the time was that if it ever did support that, those would not be vanilla NuGet packages, they would be chocolatey.”
Chocolatey was created to fill the need in the Windows world of a method to better manage software in Windows. For users who've ever installed software on a Linux CLI, it's plain to see this is the ideal way to install software on an operating system. One command can accept arguments, if needed, to perform unattended installations.
Although there are other solutions for managing software in the enterprise available, Chocolatey is one of the few that's geared towards automation and DevOps. With over 6,000 community packages available through the community repository for use, it's a no-brainer that this is the best solution to use for Windows DevOps.
Chocolatey Components
For organizations using Chocolatey, there are two main components: the Chocolatey client software (CLI) and a software repository. Software repositories can be as simple as a UNC share but are ordinarily Web servers that host Chocolatey packages.
Packages
Technically speaking, a Chocolatey package is nothing more than a fancy zip file. The three main components that make up a package are a NuGet specification file, installer files, and a PowerShell script that orchestrates the installation of the installer files.
A look inside a NuSpec specification file provides details about a specific package. Metadata such as package version, project URL, dependencies, and the package name can all be included. Here's a snippet of a NuSpec specification file for Google Chrome that shows some of these attributes.
<metadata>
    <id>GoogleChrome</id>
    <version>70.0.3538.7700</version>
    <title>Google Chrome</title>
    <authors>Google Inc.</authors>
    <owners>Google Inc.</owners>
The chocolateyInstall.ps1 file is a PowerShell script that adds the functionality of installing a package. In this script, the locations of the installer files, package name, checksum, silent arguments necessary, and valid exit codes are all specified. All of this is kept in a configurable PowerShell hash table. The installer location is either a URL (which Chocolatey uses to download first before installing) or a directory location, usually embedded in the package itself. Checksums are included in the package so that comparisons can be made to installer files during runtime to ensure security.
Silent arguments are a key aspect of the chocolateyinstall script as they ensure that the unattended install of the software can be done. Listing 1 shows a sample of a typical chocolateyInstall.ps1 script.
Listing 1: The chocolateyInstall.ps1 PowerShell script
$packageArgs = @{
    packageName = 'googlechrome'
    fileType = 'MSI'
    url = 'https://dl.google.com/tag/s/dl/chrome/install/googlechromestandaloneenterprise.msi'
    url64bit = 'https://dl.google.com/tag/s/dl/chrome/install/googlechromestandaloneenterprise64.msi'
    checksum = '653fdf0e84c9c88791813bcd9184188941b9df482ef0bf99a01c5ed836b7e0a7'
    checksum64 = 'f6f20072d55b34f435a13f625be6b836d4d57d6ebe4cf81d38ab3c38adae61fb'
    checksumType  = 'sha256'
    checksumType64 = 'sha256'
    silentArgs  = "/quiet /norestart /l*v `"$($env:TEMP)\$($env:chocolateyPackageName).$($env:chocolateyPackageVersion).MsiInstall.log`""
    validExitCodes = @(0)
}

  Install-ChocolateyPackage @packageArgs
Chocolatey Client Software
The Chocolatey client software itself has a very small footprint at less than 15MB. If installing from Chocolatey.org, it can be done with just one PowerShell command (line broken to accommodate printing):
Set-ExecutionPolicy Bypass -Scope Process -Force; iex ((New-Object System.Net.WebClient).DownloadString('https://chocolatey.org/install.ps1'))
By default, the Chocolatey client is installed into the C:\ProgramData\Chocolatey local directory on the Windows computer. Within this folder, you'll find other notable directories used by Chocolatey (see Table 1).
Chocolatey uses shimming to add executables from packages into the PATH by adding them to the default directory of C:\ProgramData\chocolatey\bin. It works like a symlink, as a small binary is created that then calls the executable.
All execution in Chocolatey is done through choco.exe. To view the list of arguments to use with choco.exe, --help is used, as Listing 2 shows.
Listing 2: Chocolatey help command
PS C:\> choco --help
This is a listing of all of the different things you can pass to choco.

Commands

 * search - searches remote or local packages (alias for list)
 * list - lists remote or local packages
 * info - retrieves package information. Shorthand for choco search pkgname --exact --verbose
 * install - installs packages from various sources
 * pin - suppress upgrades for a package
 * outdated - retrieves packages that are outdated. Similar to upgrade all --noop
 * upgrade - upgrades packages from various sources
 * uninstall - uninstalls a package
 * pack - packages up a nuspec to a compiled nupkg
 * push - pushes a compiled nupkg
 * new - generates files necessary for a choco latey package from a template
 * source - view and configure default sources
 * sources - view and configure default sources (alias for source)
 * config - Retrieve and configure config file settings
 * features - view and configure choco features (alias for feature)
 * feature - view and configure choco features
 * setapikey - retrieves or saves an apikey for a particular source (alias for apikey)
 * apikey - retrieves or saves an apikey for a particular source
 * unpackself - have chocolatey set itself up
 * version - [DEPRECATED] will be removed in v1 - use `choco outdated` or `cup <pkg|all> -whatif` instead
 * update - [DEPRECATED] RESERVED for future use (you are looking for upgrade, these are not the droids you are looking for)
 * support - provides support information
 * download - downloads packages – optionally internalizing all remote resources
 * sync - synchronizes against system installed software - generates missing packages
 * synchronize - synchronizes against system installed software - generates missing packages
 * optimize - optimizes installation, reducing space usage
Chocolatey GUI
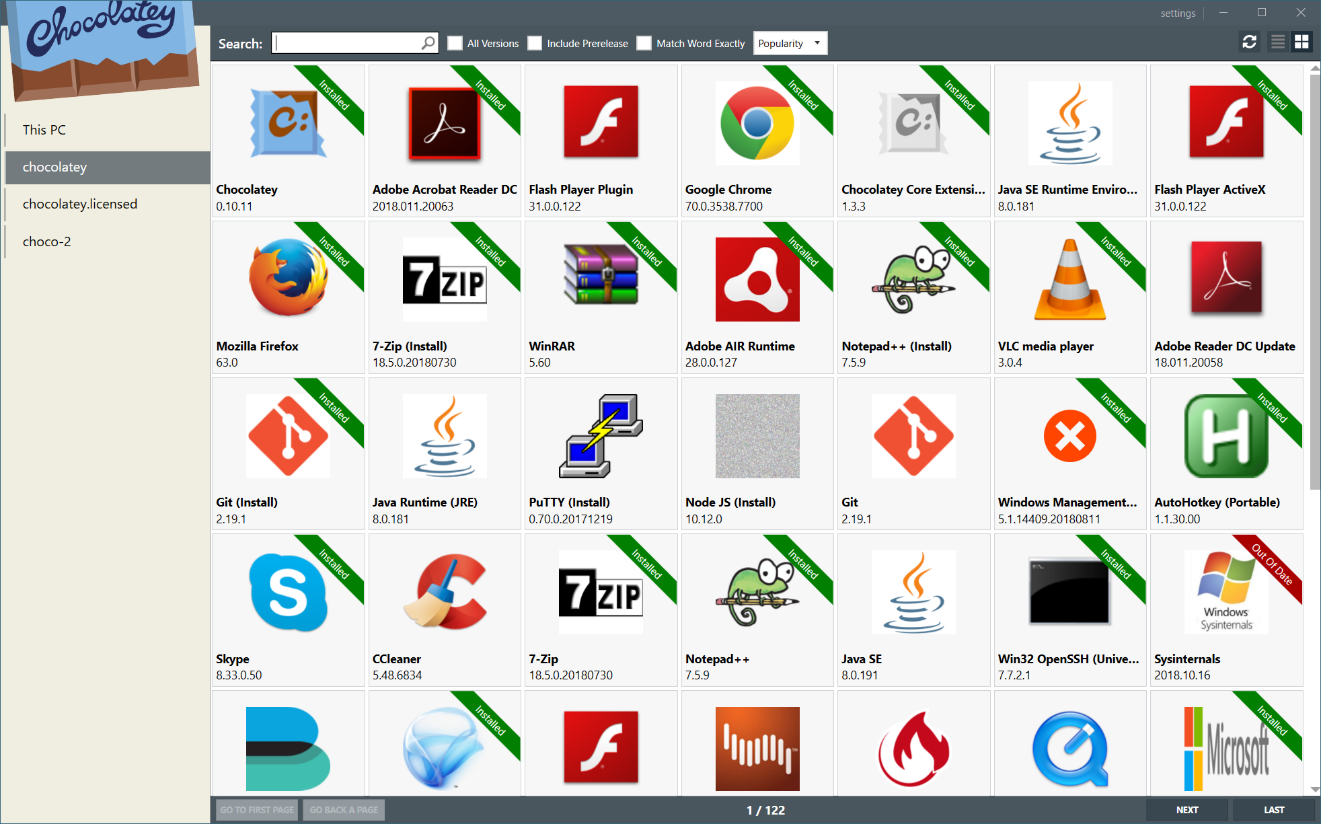
Although the majority of its users probably prefer using a CLI, Chocolatey also provides “Chocolatey GUI” which is a package that can be installed with Chocolatey. Within the Chocolatey GUI, users can perform the majority of the same tasks that the CLI provides. The real use case for Chocolatey GUI is for end users who aren't familiar with a CLI.
When combined with the Chocolatey agent, the Chocolatey GUI allows non-administrator users to install software. The latest version of Chocolatey GUI even shows icons for the packages (shown in Figure 1) which increases the visual appeal of the tool.
Repositories
Technically speaking, packages can be installed from local file systems or folder shares, but for the most part, it will be remote Web servers that are NuGet OData repositories. There are several solutions available that provide this functionality without having to do much legwork, such as ProGet and Artifactory.
One solution that Chocolatey supports directly is Chocolatey Server, which is an IIS-backed repository. Even better, it's available as a Chocolatey package from the community repository.
To install the Chocolatey Server package, just specify the chocolatey.server package name:
PS C:\> choco install chocolatey.server -y
Adding a new repository to a Chocolatey client is done with the choco source command. Here, I add a new source named choco-2 with the URL of the Web server to use.
PS C:\>choco source add -n=choco-2 --source='https://test/chocolatey'
Using the Chocolatey Command line
You'll want to list, install, upgrade, uninstall, create and internalize packages. Here's how.
Listing Packages
To view packages installed locally and also the packages available on repositories, the choco list command is used. To view whether the firefox package is installed locally, choco list can be used with the --lo argument (which means local only). Notice that in Figure 2, I also specify the -r argument with this command, which then limits the output to only essential information. In this case, only the name of the package and version are printed.
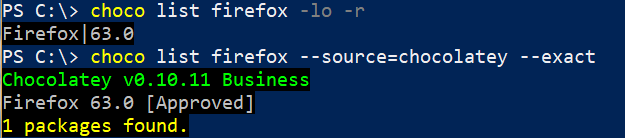
The second command in Figure 2 shows that choco list searches the chocolatey repository for firefox as well. The --exact argument is added so that only the package name is searched. Without this argument, package tags also searched for the firefox string, which can print more results.
Installing Packages
Perhaps the most commonly used argument for choco.exe is install, which calls Chocolatey to install a package. In most instances, choco install first downloads a package from a repository, unzips the Chocolatey package locally, and then proceeds to use PowerShell to install the software.
Here's a more detailed look into what happens behind the scenes of a package installation.
- The Chocolatey client uses NuGet.Core.dll to obtain a package from the source repository.
- The package contents are installed into c:\programdata\chocolatey\lib<package id>.
- Chocolatey takes a registry snapshot to compare later.
- If there are automation scripts (usually PowerShell), they run at this time.
- Chocolatey compares the previous snapshot for uninstaller information and saves it as a .reg file.
- Chocolatey snapshots the folder based on all files in the package directory.
- Chocolatey generates shims from all the executable files used by the package. They are placed into c:\programdata\chocolatey\bin.
Chocolatey allows users to install one or several multiple packages in the same command. Here, I install Git and Node.js:
PS C:\> choco install git nodejs -y --source=chocolatey
Notice that the source used is chocolatey, which is the name of the community repository.
Upgrading Software
Chocolatey uses software version comparison in order to find packages available for upgrade. There are two commands that allow a user to view what packages can be upgraded: choco outdated and choco upgrade all -noop. The --noop argument refers to running the choco upgrade without performing the upgrade operation on any packages.
To upgrade a local package, choco upgrade <package name> is used. Like choco install, adding the -y argument automatically accepts any prompts during the installation of the software.
Here, I upgrade my local version of Git to the latest version and point to an internal repository named choco-2:
PS C:\> choco upgrade git -y -r -source=choco-2
Upgrading the following packages: git
By upgrading you accept licenses for the packages.
git|2.19.0|2.19.1|false
The upgrade of git was successful.
Chocolatey upgraded 1/1 packages.
Uninstall Software
When it comes to uninstalling software through Chocolatey, the choco uninstall command is used. Keep in mind that Chocolatey is attempting to do two distinct tasks. First, it uninstalls the software from the operating system, then it removes the package from Chocolatey so that it's no longer being tracked. What is installed on the operating system and what Chocolatey tracks as being installed can be different at times. When using Chocolatey, it's a best practice to install and uninstall all software with Chocolatey so it's accurately tracked.
Chocolatey packages are either uninstalled using a ChocolateyUninstall.ps1 PowerShell script that's contained within the package, or by using the automatic uninstaller feature, which obtains information automatically to see how software should be uninstalled.
PS C:\> choco uninstall vlc -y
Creating Packages
The creation of packages can be done with the open-sourced or licensed versions of Chocolatey, although the licensed version automates many of the tasks that are necessary to have a finished package. For instance, simply pointing Chocolatey to an installer file automatically adds silent arguments in the chocolateyInstall.ps1 file with the licensed version.
In this example, I create the package test using the installer file test.msi. I add the --automaticpackage argument so that the .nupkg file is created in the process.
PS C:\> choco new test --file=.\test.msi --automaticpackage
Chocolatey v0.10.11 Business
Creating a new package specification at C:\package\test
Generating package from custom template at 'C:\ProgramData\chocolatey\templates\NewFileInstaller'.
Generating template to a file at 'C:\package\test\test.nuspec'
Generating template to a file at 'C:\package\test\tools\chocolateyInstall.ps1'
Successfully generated test (automatic) package specification file at 'C:\package\test'
During this process, Chocolatey first creates the necessary contents of the package, such as the NuGet specification file, tools directory, and chocolateyInstall.ps1 script, and moves the test.msi installer file into the tools folder, which is the default location for installer files.
PS C:\> Get-ChildItem -Path C:\package\test | Select-Object
Name

Name
----
icons
tools
test.2.1.3.111.nupkg
test.nuspec
PS C:\> Get-ChildItem -Path C:\package\test\tools\ | Select-Object Name

Name
----
chocolateyInstall.ps1
test.msi
Internalizing Community Packages
When using Chocolatey for organizational purposes, the recommended practice is that Chocolatey clients don't use community packages directly for installation. This is due to distribution rights of installers, a dependency on the internet for software, not to mention trust and control issues because packages are sometimes maintained by people not affiliated with the software. Fortunately, users can recompile (or internalize) community packages to use on internal repositories. The process is downloading installers from the internet and then embedding them inside the package. The vast majority of community packages download installers at runtime from their distribution points on the internet. With internalization, there's no longer a dependency on the internet for downloading installer files.
This is another feature that the licensed version of Chocolatey offers that makes paying for Chocolatey well worth it.
C:\temp> choco download urbackup-client -internalize -r
Progress: Downloading urbackup-client 2.2.6... 100%

urbackup-client v2.2.6
Found internalizable Chocolatey functions. Inspecting values for remote resources.

Recompiling package.
Recompiled package files available at 'C:\temp\download\urbackup-client'
Recompiled nupkg available in 'C:\temp'
To install the internalized urbackup-client package, the --source parameter can be used to point to the local directory where the package is stored.
C:\> choco install urbackup-client -source=C:\temp\ -y
Security
There's a considerable amount of security baked into Chocolatey. The Chocolatey client itself is verified against VirusTotal and 70 antivirus scanners in addition to being authenticode signed. There's no telemetry or data collection in Chocolatey. Chocolatey makes an effort to ensure that the package a user is installing is very secure.
The Chocolatey client software has a very small footprint at less than 15MB.
Package Moderation
Chocolatey community packages are heavily vetted, moderated and approved by humans before allowing consumption of the package. Crapware and malware are removed from software if found during this process, in addition to anything malicious or devious found in code. Each package must meet certain standardization requirements, such as containing the necessary NuSpec specification attributes.
Part of the moderation process is testing the installation of the package on test computers. For package maintainers, Chocolatey provides a Vagrant box that's similar to the one used on their servers. Packages failing moderation are kicked back to maintainers for additional information or adjustments.
CDN
For licensed customers, Chocolatey features a private CDN hosted with Chocolatey that includes all cached download content for packages in the event that they're internalizing or installing community packages. This also decreases 404 errors when installer files are moved on Web servers.
In this output (Figure 3), Chocolatey uses private CDN instead of the original URL of the installer files.

Antivirus Integration
Runtime protection during package installation is another licensed feature that improves the security of using Chocolatey. Users are given the option to either use VirusTotal to scan software installers or integrate it with installed antivirus software. When using VirusTotal, users can configure the threshold to use with the virusCheckMinimumPositives configuration command.
PS C:\> choco config set virusCheckMinimumPositives 5
Chocolatey v0.10.11 Business
Updated virusCheckMinimumPositives = 5
Auditing
With the choco list -lo command, users can view installed Chocolatey packages. An additional feature for licensed users is adding the --audit argument to choco list. This provides information such as the user who installed the package, the domain of that user, and the time of installation.
PS C:\> choco list git --exact -lo --audit
Chocolatey v0.10.11 Business
git 2.19.1 User:dan
Domain:TESTDOMAIN Original User:dan InstallDateUtc:2018-10-30 12:26:58Z
1 packages installed.
Integration with DevOps Tools
Another great benefit of using Chocolatey is its easy integration into DevOps tooling such as Puppet, Chef, and Ansible. Chocolatey has modules that work with the major players in configuration management, allowing it to be the de facto package manager for Windows on these platforms.
For instance, this is a sample of a Puppet manifest to install Git with Chocolatey as the package provider:
package { 'Git':
        ensure => '2.19.1',
        provider => 'chocolatey',
        source => 'https://myserver/api/v2',
}
Notice that Puppet allows a specific version to be used in a configuration. In my opinion, this is a huge reason why Chocolatey is so important to DevOps in Windows. Many times, dependency software is a specific version for applications being deployed. Chocolatey allows that to be very simple, which no other Windows software management does.
In Chef, the same configuration in Puppet is similar to this:
chocolatey_package 'git' do
  action :install
  version '2.19.1'
  source 'https://myserver/api/v2'
end
Because Chocolatey is used completely with a CLI or configuration management, it can also be used with other solutions, such as HashiCorp's Vagrant and Packer.
Conclusion
After using Chocolatey, it's clear that Windows desperately needed a solution to make software management simpler and more efficient. With the rise of DevOps on the Windows platform, Chocolatey has come along at the perfect time to fill this need. Everything in Chocolatey can be accomplished in a CLI or in configuration code, instantly making it a must-use tool for IT professionals and developers.
Table 1: Directories used by Chocolatey
| Directory Name | Description of Contents |
| Bin | Directory of shimmed executables of packages installed |
| Config | XML configuration files for Chocolatey client |
| Extensions | Chocolatey PowerShell extensions |
| Lib | Successfully installed packages |
| Lib-bad | Failed packages |
| Logs | Log directory for the Chocolatey client. |
| Tools | Tools used by Chocolatey such as 7zip, shim, and checksum |
