


Over the last few years, Markdown has become a ubiquitous text-entry model for HTML text. It's creeping up in more and more places and has become a standard for documents that are shared and edited for documentation purposes on the Web. If you're using Git and GitHub in particular, you're already using Markdown for formatting your README.md files and likely all other documentation-related documents that you write for your software development projects. Most developer-related documentation you see online today, whether it's commercial documentation from companies like Microsoft, Google, and so on, or generic documentation solutions like ReadTheDocs or KavaDocs, they're all created and maintained with Markdown.
Markdown All the Things
Because Markdown is text based, it's easy and very fast to write in. It's easy to compare and merge for change tracking using built in merge features in source control tools like Git, and it doesn't require a special editor create it - it's plain text and works with a textbox.
Markdown has quickly become a widely used standard for documentation and Web-based extended text entry.
Although Markdown provides only a limited set of HTML features, it provides the most common features that are needed for most writing purposes. Unlike WYSIWYG HTML editors that are usually difficult to write efficiently in due to their messy formatting and lagging performance, Markdown is only text and can be entered in a simple text box. Markdown has no support for layout features, but almost exclusively focuses on inline markup for text. Headers, text bolding, italics, underlines, links, and images, and slightly more complex structures like lists and tables, can all be expressed with very short and terse but easily remembered markup characters. The reason Markdown has become so popular is that it's very simple and can be easily learned within a few minutes of reviewing the basics. It's mostly logically flowing text with a little bit of markup.
Markdown is addictive too. Once you start writing with Markdown, you'll want to use it everywhere. So much so that I often find myself typing Markdown text in places where I wish it worked but doesn't - in emails, Skype text, or inputs on various websites.
Markdown is also getting more mainstream - you see Markdown cropping up in all sorts of document solutions these days and if you're building documentation of any kind, it's very likely that Markdown is part of that process. But Markdown extends much further than just documentation: You can also use it in your own applications to hold rich text content for things like product descriptions, interactive discussions, notes, and any other “memo” type of text that can benefit from a little bit of formatting to make it easier to read.
Putting Markdown to Work in Your Applications
In this article, I'll introduce a number of Markdown features that you can add to your ASP.NET Core applications. I'll start with what you need to parse Markdown text into HTML using a simple library that lets you use Markdown easily in code and in your ASP.NET Core MVC Razor pages. This is all you need to render your own Markdown text from application data into your applications. I'll also show a couple of useful content helpers that allow you to embed static Markdown Islands text into Razor pages using a Markdown TagHelper, and a handy Markdown middleware component that allows you to easily serve Markdown pages as HTML content in the context of your application's Web UI.
If you're impatient, you can jump straight to the NuGet package or the GitHub repository to get going. Otherwise read on.
- Install-Package Westwind.AspnetCore.Markdown
- Westwind.AspnetCore Repository on GitHub (https://github.com/RickStrahl/Westwind.AspNetCore)
Markdown Parsing in .NET
The first thing needed is a way to parse Markdown to HTML in .NET. This is surprisingly easy as there are a number of Markdown parsers available for .NET. The one I like to use is called MarkDig (https://github.com/lunet-io/markdig), a relative newcomer that's very fast and provides a nice extensibility pipeline, making it possible to build custom Markdown extensions.
MarkDig is open source and available as a NuGet package to add to your .NET Core or full framework projects:
Install-Package Markdig
Using MarkDig in its simplest form, you can do the following:
public static class Markdown
{
    public static string Parse(string markdown)
    {
        var pipeline = new MarkdownPipelineBuilder()
            .UseAdvancedExtensions()
            .Build();
        return Markdown.ToHtml(markdown, pipeline);
    }
}
MarkDig uses a configuration pipeline of support features that you can add on top of the base parser. The .UseAdvancedExtensions() method adds a number of common extensions (like GitHub-Flavored Markdown, List Extensions, etc.), but you can also add each of the components you want and customize exactly how you want Markdown to be parsed.
The code works, but it's not very efficient as the pipeline is recreated for each parse operation. It's much better to build a small abstraction layer around the Markdown parser, so the parser can be cached for better performance. You can check out the code to create a MarkdownParserFactory and a customized MarkdownParser implementation on GitHub that includes an IMarkdownParser interface containing a .Parse(markdown) method that's ultimately used to handle the rendering.
To make this functionality easily accessible from anywhere, a static Markdown class wraps the factory and parses functions like this:
public static class Markdown
{
    public static string Parse(string markdown, bool usePragmaLines = false, bool forceReload = false)
    {
        if (string.IsNullOrEmpty(markdown))
            return "";

        var parser = MarkdownParserFactory.GetParser(usePragmaLines, forceReload);
        return parser.Parse(markdown);
    }

    public static HtmlString ParseHtmlString(string markdown, bool usePragmaLines = false, bool forceReload = false)
    {
        return new HtmlString(Parse(markdown, usePragmaLines, forceReload));
    }
}
This Markdown class can then be used in the application and the components I describe later to access Markdown functionality. The Markdown middleware configuration also allows using dependency injection for accessing these components that I'll describe later.
With this class in hand, you can now easily parse Markdown to HTML. To parse Markdown in code and retrieve the string, you can use:
string html = Markdown.Parse(markdownText)
To parse Markdown and get back a Razor embeddable HTML string, you can use the .ParseHtmlString() method:
<div>
    @Markdown.ParseHtmlString(Model.ProductInfoMarkdown)
</div>
These simple helpers make it easy to turn stored Markdown into HTML in your applications.
Markdown is addictive: Once you start writing with it, you'll want to use it everywhere.
Markdown as Static Content in a Dynamic Website
When building dynamic Web applications, we often don't think about static content much. Because there's usually not a lot of static content, we go ahead and code up pages like About, Contact us, Privacy Policy, etc., using plain old HTML. Most of these pages are completely static and usually don't contain anything more than basic text with a few headers and lists and other simple paragraph formatting.
Wouldn't it be nice to replace these plain text portions of a Web page with a block of static Markdown text that's embedded in the content? Or, even better, have a very simple way to serve Markdown files directly inside your website just like other static files?
To make this happen, I created two additional components:
- Markdown Islands: A TagHelper to embed Markdown blocks into Razor views. The TagHelper supports embedding static or model-bound Markdown islands into any Razor View or Page. Using the TagHelper lets you replace longer HTML text blocks with easier-to-edit Markdown blocks in a natural way.
- Middleware to serve Markdown files as full content pages. The middleware allows you to configure a folder or the entire site to serve .md files as self-contained content pages. The middleware works by converting
.mdfile content on disk and merging it into a configured Markdown Page template that you create. The Markdown gets rendered into this template, producing a page that matches the UI of the rest of your site.
Let's take a look how to build both of these components and, in the process, see how two important ASP.NET Core concepts, TagHelpers and Middleware, work and how you can create your own implementations.
Markdown Islands are blocks of Markdown text embedded in a larger HTML document.
Using a TagHelper to Embed Markdown into a View
The Markdown TagHelper's main purpose is to take a bit of Markdown text either from its embedded content or from a Model, turn it into HTML, and embed it into the Razor output. The Markdown TagHelper allows you to embed static Markdown text into a Razor view or page using a <markdown> tag:
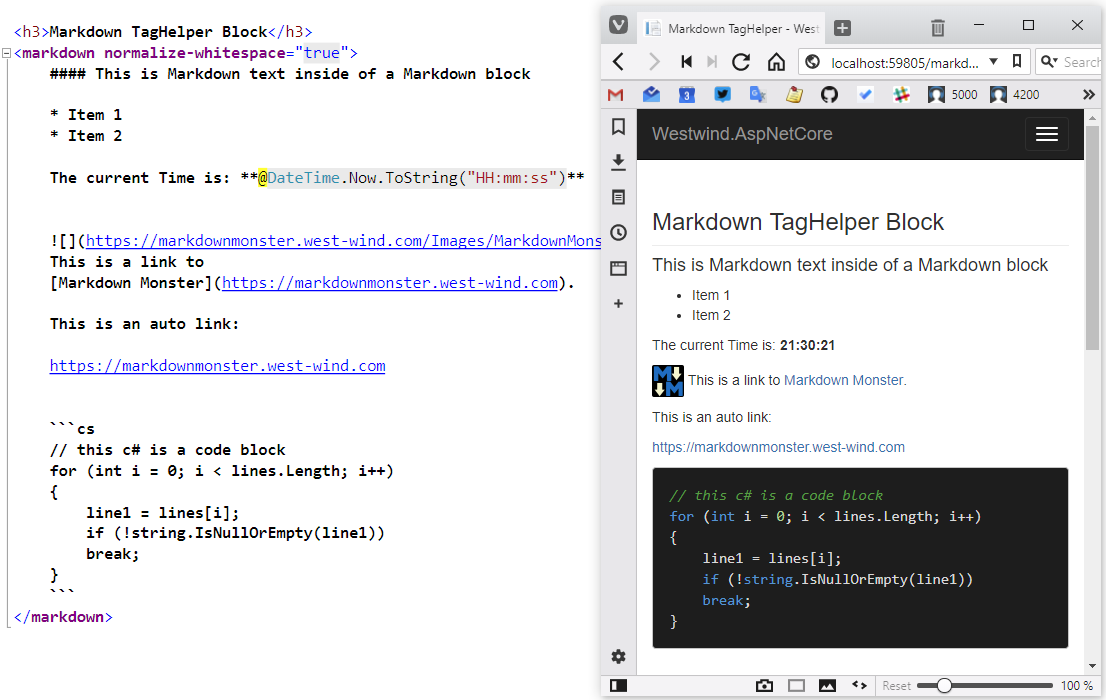
<h3>Markdown TagHelper Block</h3>

<markdown normalize-whitespace="true">
    ## Markdown Text
    * Item 1
    * Item 2

    The current Time is: **@DateTime.Now.ToString("HH:mm:ss")**
</markdown>
The text between the tags is evaluated and turned from Markdown into HTML, which looks something like Figure 1. Notice that the Markdown snippet contains an embedded Razor expression that's evaluated and embedded before the Markdown parsing occurs. This is quite powerful, as you can use Razor logic inside of the Markdown content, which effectively gives you a way to automate Markdown text. This embedded Markdown parsing is free, courtesy of the Razor parser in ASP.NET Core, and it opens up a lot of opportunities for making it easier to create text-based formatting for things like merges and form letters.
The tag helper also supports Model binding using a markdown attribute on the tag where MarkdownText is a property on the passed-in Model object:
@model MarkdownModel

<markdown markdown="MarkdownText"/>
Before you can use the tag helper, you have to register it. You do this in the __ViewImports.cshtml special Razor View or Page so that the TagHelper is available in all pages of the application. Please note that both MVC Views and Razor Pages use separate sets of pages and if you mix and match, you need to add the following to both locations.
@addTagHelper *, Westwind.AspNetCore.Markdown
Creating the Markdown TagHelper
Let's take a look and see how to create this TagHelper. The interface to create a TagHelper is primarily a single method process interface that takes a TagHelper Context to hold the element, tag, and content information that you can then use to generate an output string to replace the TagHelper tag and embed into the Razor content. It's a very simple interface that's easy to understand and work with and often doesn't require very much code. Case in point: This Markdown TagHelper is very small and most of the code is helper code that has nothing to do with the actual Markdown logic.
A TagHelper encapsulates rendering logic via a very simple ProcessAsync() method interface that renders a chunk of HTML content into the page at the location where the TagHelper is defined. The ProcessAsync() method takes a TagHelper Context as input to let you get at the element and attributes for input, and provides an output to which you can write string output and generate your embedded content.
To use TagHelpers, they have to be registered with MVC, either in the page or, more likely, in the _ViewImports.cshtml page of the project.
To create a TagHelper:
- Create a new Class and Inherit from
TagHelper - Create your TagHelper implementation via
ProcessAsync()orProcess()
To use the TagHelper in your application:
- Register your TagHelper in
_ViewImports.cshtml - Embed
<markdown> </markdown>blocks into your pages - Rock on!
For the <markdown> TagHelper, I need to create a content control whose content can be retrieved as Markdown and then be converted into HTML. Optionally, you can also use a Markdown property to bind Markdown text for rendering, so if you have Markdown as part of data in your model, you can bind it to this property/attribute in lieu of static content you provide.
Listing 1 shows the base code for the MarkdownTagHelper class that accomplishes these tasks.
Listing 1: A Markdown TagHelper to parse embeded Markdown Content
[HtmlTargetElement("markdown")]
public class MarkdownTagHelper : TagHelper
{

    [HtmlAttributeName("normalize-whitespace")]
    public bool NormalizeWhitespace { get; set; } = true;

    [HtmlAttributeName("markdown")]
    public ModelExpression Markdown { get; set; }


    public override async Task ProcessAsync(TagHelperContext context, TagHelperOutput output)
    {
        string content = null;
        if (Markdown != null)
            content = Markdown.Model?.ToString();

        if (content == null)
            content = (await output.GetChildContentAsync(NullHtmlEncoder.Default)).GetContent(NullHtmlEncoder.Default);

        if (string.IsNullOrEmpty(content))
            return;

        content = content.Trim('\n', '\r');

        string markdown = NormalizeWhiteSpaceText(content);

        var html = Markdown.Parse(markdown);

        output.TagName = null;  // Remove the <markdown> element
        output.Content.SetHtmlContent(html);
    }
}
Note that the Markdown property is not specified as a string but as a ModelExpression, which means it expects a Model value that corresponds to the name of a property on the Model. To grab the value, the expression can use the Model property, so Markdown.Model retrieves whatever the Model's value is. If that value has something in it, it will be used because the value takes precedence over content.
If content is specified instead, the content is retrieved with the GetChildContentAsync().GetContent(), which retrieves the content contained between the <markdown> </markdown> tags. These routines retrieve the content and also execute any embedded Razor expressions. The NullHtmlEncoder.Default is passed to ensure that any Razor expressions within the tags are not HTML-encoded. This is important because I don't want my Markdown text passed into the Markdown Parser to be encoded by Razor. There are two reasons: Html encoding might mess up some Markdown Tags in evaluated expressions, and the Markdown parser will do its own HTML encoding as part of the Markdown parsing.
Once I have the raw tag markdown content, I have to normalize the white space, which means stripping out leading spaces applied to a block of text. In Markdown, leading white space is important and four spaces or a tab signify a code block. Unless you left-justify the Markdown, it renders all of it as code. There's a normalize-whitespace attribute that can be set on the TagHelper and it's true by default. You can explicitly set the attribute to false if you explicitly justify left or if you really need the leading white space in place.
After normalization, I now have the normalized Markdown to parse and I can simply call Markdown.Parse(markdown) to retrieve the HTML. All that's left is to set the output on output.Content. Here, I use SetHtmlContent() to set a string result that's the result HTML.
There you have it: HTML output generated from static or model-bound Markdown. You can check out the full source code for the TagHelper including the white space normalization on GitHub.
Serving Markdown Pages as HTML in Any ASP.NET Core Site
When you're building a website, wouldn't it be nice to have an easy way to add in a documentation section or a blog area on the website simply by being able to drop Markdown files into a folder and then have those Markdown files served as content pages with your site's brand identity rendered around it? This idea is nothing new - most CMS systems and content generators do exactly that. But these tend to be dedicated tools that are separate from your Web application. Wouldn't it be nice to have a simple way to just add Markdown page serving capabilities into your existing Web application?
Let's take a look at a ASP.NET Core middleware component that makes it easy to set up folders to serve Markdown files as content from your website.
Most dynamic sites have some content pages that are mostly static and are easier to create using Markdown rather than HTML Tag Soup.
What Do You Need to Serve Markdown Pages?
Here are the requirements for serving static Markdown pages:
- A “wrapper” page that provides the site UI around your rendered Markdown
- A content area into which the rendered HTML gets dropped
- The rendered Markdown text from the file
- Optional YAML parsing for title and headers
- Optional title parsing based on a header or the file name
- Folder-level configuration for the template and options
The idea for all of this is pretty simple: For each configured folder hierarchy, you can specify a Razor template that acts as a Markdown content host page. This page is very simple - in fact, for most sites, I expect this page to have no content other than the embedded markdown and a reference to the site's _layout.cshtml page.
Inside of the Markdown page template, a model is passed in that holds the rendered markdown text, which I can then embed into the template at the desired location. I can create a template any way I like, either as a standalone HTML page or simply referring back to the layout page and embedding the @Model.RenderedMarkdown property into the page.
I also need to create a configuration to hook up the middleware that specifies which folders (or the root) to work with and whether I want to handle extensionless URLs in addition to handling the .md extension.
Then I can simply drop files with a .md extension into my site's wwwroot folder and the configured path(s) just as I would with static html files.
Getting Started
If you want to try out the middleware I describe in this post, you can install the from here:
PM> Install-Package Westwind.AspNetCore.Markdown
Set Up the Markdown Middleware
Once the NuGet package is installed, you can now use the middleware. This is done by hooking up the middleware configuration:
- Use
AddMarkdown()to configure the page processing. - Use
UseMarkdown()to hook up the middleware. - Create a Markdown View Template (the default is:
~/Views/__MarkdownPageTemplate.cshtml). - Create
.mdfiles for your content.
The following configures a /posts/ folder in your application to allow for Markdown document serving:
public void ConfigureServices(IServiceCollection services)
{
    services.AddMarkdown(config =>
    {
        config.AddMarkdownProcessingFolder("/posts/","~/Pages/__MarkdownPageTemplate.cshtml");
    });
    services.AddMvc();
}
For this basic configuration, I provide a path of a base folder for which Markdown documents are handled. You can configure multiple folders and also use the root path (/). You can also specify a Razor template that's used as the container for the markdown content.
The code above is the simplest thing possible, but there are additional options you can use for further configuration. You can configure multiple paths, specify how files are processed, provide a pre-process handler that provides you with a code hook to run before the markdown document is rendered, and you can customize the MarkDig Markdown pipeline configuration.
Next, I need to hook the middleware into the middleware pipeline in the Startup's Configure() method using app.UseMarkdown():
public void Configure(IApplicationBuilder app, IHostingEnvironment env)
{
    app.UseMarkdown();
    app.UseStaticFiles();
    // MVC required for Razor template rendering
    app.UseMvc();
}
Create a Markdown Container Razor Page
The Markdown middleware relies on MVC to render the Markdown content by essentially rewriting the request path and pushing the current request path into a custom controller that the component provides. The controller then renders the Razor template that I specified in the AddMarkdown() configuration shown earlier.
The simplest possible template looks like this:
@modelWestwind.AspNetCore.Markdown.MarkdownModel
@{
    ViewBag.Title = Model.Title;
    Layout = "_Layout";
}
<div style="margin-top: 40px;">
    @Model.RenderedMarkdown
</div>
The model contains two values of interest, the RenderedMarkdown and the Title, which you can embed into the template. Title is inferred from a YAML header's title property, if present, or the first # header tag in the document. If neither of these are present, no title is set. If you want to push other values into your view, the configuration also supports a preprocessing hook that hooks into a Markdown request
folderConfig.PreProcess = (model, controller) =>
{
    // controller.ViewBag.Model = new MyCustomModel();
};
The model also has relative and physical path properties and provides access to the active folder configuration so your pre-processing code can run complex logic based on which file is activated, and it can pass that data into your view via the ViewBag or ViewData properties on the controller.
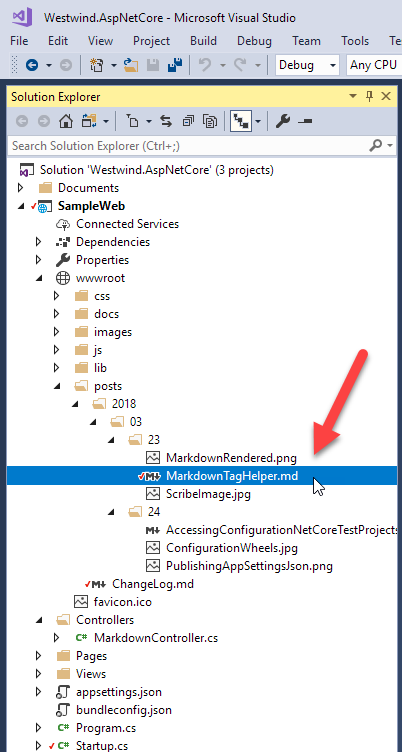
At this point, I can start dropping Markdown files into my /wwwroot/posts/ folder. I'm going to create a folder hierarchy that matches a common Blog post structure that includes a date and post name, as shown in Figure 2, and drop in one of my weblog posts along with some of its related image resources.
That's all that's needed, and I can now access this page with the following URL:
http://localhost:59805/posts/2018/03/23/MarkdownTagHelper.md
Or the extensionless version:
http://localhost:59805/posts/2018/03/23/MarkdownTagHelper
The default configuration works both with an .md extension or no extension. When no extension is specified, the middleware looks at each extensionless request, tries to append .md, and checks whether a file exists and renders it. The result is shown in Figure 3.
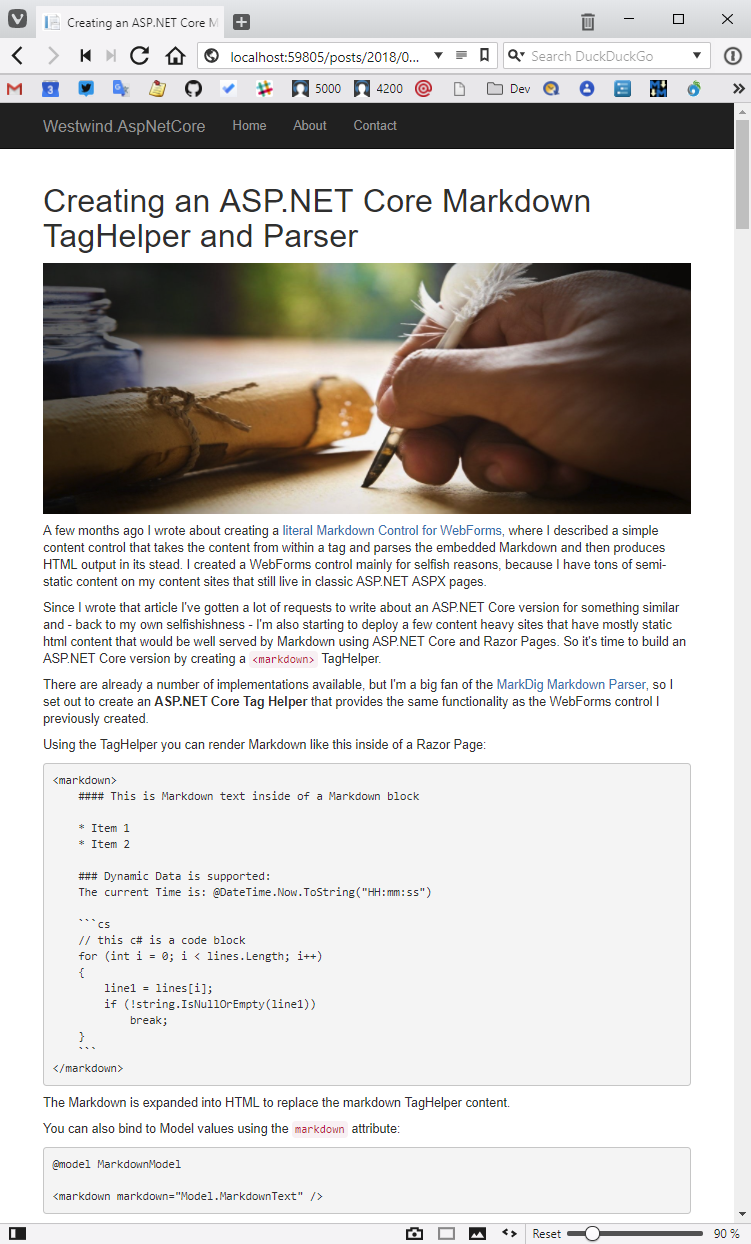
The Markdown content is properly displayed as HTML and, as expected, I get the appropriate site UI from the stock ASP.NET Core Web site template. I haven't made any changes to the stock New Project template, but even so, this markdown text renders nicely into the page maintaining the site's UI context.
More Cowbell
There's one thing that definitely could use improving: The sample code shows up in boring monochrome text rather than syntax highlighted text. To fix this, I can now modify the Razor template and add in some JavaScript to enable syntax coloring and add some Bootstrap styling fix-up to make it look nicer. Listing 2 shows this updated template.
Listing 2: A Razor template with Syntax highlighting for HighlightJs
@model Westwind.AspNetCore.Markdown.MarkdownModel
@{
    ViewBag.Title = Model.Title;
    Layout = "_Layout";
}
@section Headers {
    <style>
        h3 {
           margin-top: 50px;
           padding-bottom: 10px;
           border-bottom: 1px solid #eee;
        }
        /* vs2015 theme specific*/
        pre {
            background: #1E1E1E;
            color: #eee;
            padding: 0.5em !important;
            overflow-x: auto;
            white-space: pre;
            word-break: normal;
            word-wrap: normal;
        }

        pre > code {
            white-space: pre;
        }
    </style>
}
<div style="margin-top: 40px;">
    @Model.RenderedMarkdown
</div>

@section Scripts {
    <script src="~/lib/highlightjs/highlight.pack.js"></script>
    <link href="~/lib/highlightjs/styles/vs2015.css" />
    <script>
        setTimeout(function () {
            var pres = document.querySelectorAll("pre>code");
            for (var i = 0; i < pres.length; i++) {hljs.highlightBlock(pres[i]);}
        });
    </script>
}
Figure 4 shows what the rendered page looks like now.
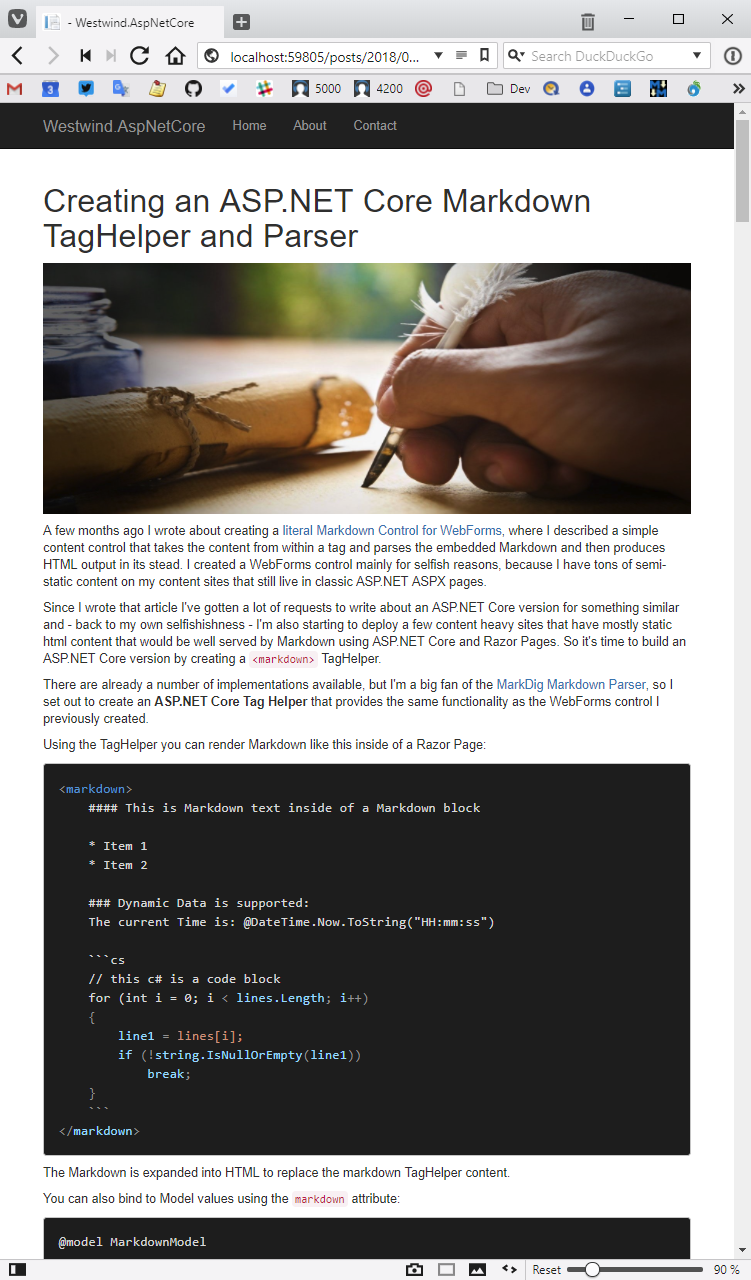
This code uses the highlightJS JavaScript library to format syntax-colored code. This library requires a link to the library, a theme (VS2015, which is a Visual Studio Code Dark-like theme) and a little bit of script that finds pre>code elements in the page and applies syntax coloring. The rendered Markdown also includes a language attribute that the highlightJS understands and uses to pick the appropriate supported language. HighlightJS is customizable and you can create custom packages that include the languages that you care about. I've created a custom package that includes most common .NET, Windows, and Web-related languages that you can find in the library's GitHub repository.
At this point, I can just drop Markdown files into my wwwroot/posts/ folder and they'll just render as self-contained pages. Sweet!
Creating the Markdown File Middleware
So how does all of this work? As you might expect, the process of creating this isn't very difficult, but it does involve quite a few moving pieces, as is standard when you're creating a piece of middleware.
Here's what is required:
- Middleware implementation to handle the request routing
- Middleware extensions that configure and hook up the middleware
- MVC Controller that handles the render request
- The Razor template used to render the rendered HTML
A Quick Review of Middleware
ASP.NET Core Middleware is a class that implements an InvokeAsync(HttpContext context) method. Alternately, Middleware can also be implemented directly in the Startup class or as part of a Middleware Extension using app.Use() or for terminating middleware using app.Run().
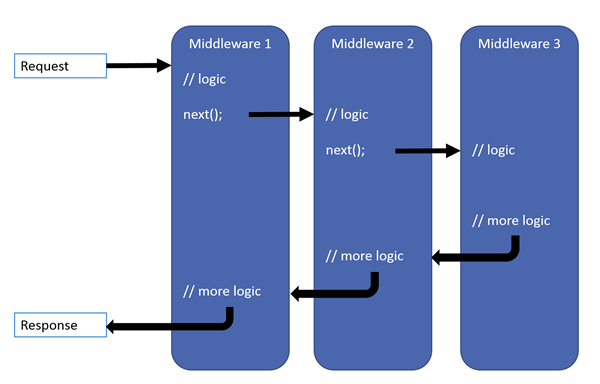
The idea behind middleware is quite simple: You implement a middleware handler that receives a context object and calls a next(context) that passes the context forward to the next middleware defined in the chain, and it calls the next, and so on, until all the middleware components have been called. The chain reverses and each of those calls return their task status back up the chain. Effectively, middleware handlers can intercept inbound and outbound requests all with the same implementation. Figure 5 illustrates the flow of this chained interaction of middleware components. Note that order of the pipeline is significant. So a pre-processing feature like Authentication or CORS needs to happen before a page serving feature like MVC or StaticFile servicing in order to work properly.
Implementing a dedicated middleware component usually involves creating the middleware component as well as a couple of middleware extensions used to configure and hook up the middle using app.Add<Middleware>() and app.Use<middleware>(), which is the pattern that most of ASP.NET Core's built-in middleware components use.
Implementing Markdown Page Handling as Middleware
The primary job of the Markdown page handling middleware is to figure out whether an incoming request is asking for a Markdown document by checking the URL. If the request points at an .md Markdown file, the middleware effectively rewrites the request URL and routes it to a custom, well-known Controller endpoint that's provided as part of this component library. Listing 3 shows what the middleware looks like.
Listing 3: A middleware component to serve Markdown pages
public class MarkdownPageProcessorMiddleware
{
private readonly RequestDelegate _next;
private readonly MarkdownConfiguration _configuration;
private readonly IHostingEnvironment _env;

public MarkdownPageProcessorMiddleware(RequestDelegate next,
                                       MarkdownConfiguration configuration,
                                       IHostingEnvironment env)
{
    _next = next;
    _configuration = configuration;
    _env = env;
}

public Task InvokeAsync(HttpContext context)
{
    var path = context.Request.Path.Value;
    if (path == null)
        return _next(context);

    bool hasExtension = !string.IsNullOrEmpty(Path.GetExtension(path));
    bool hasMdExtension = path.EndsWith(".md");
    bool isRoot = path == "/";
    bool processAsMarkdown = false;

    var basePath = _env.WebRootPath;
    var relativePath = path;
    relativePath = PathHelper
                      .NormalizePath(relativePath)
                      .Substring(1);
    var pageFile = Path.Combine(basePath, relativePath);

    // process any file WITH .md extension explicitly
    foreach (var folder in
               _configuration.MarkdownProcessingFolders)
    {
        if (!path.StartsWith(folder.RelativePath,
            StringComparison.InvariantCultureIgnoreCase))
            continue;

        if (isRoot && folder.RelativePath != "/")
            continue;

        if (context.Request.Path.Value.EndsWith(".md",
            StringComparison.InvariantCultureIgnoreCase))
        {
            processAsMarkdown = true;
        }
        else if (path.StartsWith(folder.RelativePath,
             StringComparison.InvariantCultureIgnoreCase) &&
             (folder.ProcessExtensionlessUrls && !hasExtension ||
              hasMdExtension && folder.ProcessMdFiles))
        {
            if (!hasExtension && Directory.Exists(pageFile))
                continue;

            if (!hasExtension)
                pageFile += ".md";

            if (!File.Exists(pageFile))
                continue;

            processAsMarkdown = true;
        }

        if (processAsMarkdown)
        {
            // push values we can pick up in the controller
            context.Items["MarkdownPath_PageFile"] = pageFile;
            context.Items["MarkdownPath_OriginalPath"] = path;
            context.Items["MarkdownPath_FolderConfiguration"] = folder;

            // rewrite path to our controller
            context.Request.Path = "/markdownprocessor/markdownpage";
            break;
        }
    }
    return _next(context);
} }
The key in this middleware is Context.Path.Value, which holds the current request path. Based on this path, the component checks to see if it points to either the .md file directly, or if the URL is an extensionless URL to which it adds the .md extension and checks for the file.
If the path points at a Markdown file, the middleware sets a flag, and stores the original path and the path to the file into a few Context items. More importantly, it rewrites the current path to point at a well-known MarkdownPageProcessorController that has a fixed route of /markdownprocessor/markdownpage.
Rewriting a request path in middleware in ASP.NET Core is as easy as changing the HttpContext.Path property.
The Generic Markdown Controller
This effectively reroutes the request to my custom controller, which can then render the physical file's content using the configured Razor template.
[Route("markdownprocessor/markdownpage")]
public async Task<IActionResult> MarkdownPage()
This hard-coded Attribute Route is found even though it lives in a separate NuGet-provided library. Note that this route only works in combination with the middleware because it depends on preset Context.Items values that were stored by the middleware earlier in the request. Listing 4 shows the action method that's responsible for serving the Markdown file.
Listing 4: The Controller method that handles serving Markdown content
[Route("markdownprocessor/markdownpage")]
public async Task<IActionResult> MarkdownPage()
{
    var basePath = hostingEnvironment.WebRootPath;
    var relativePath = HttpContext.Items["MarkdownPath_OriginalPath"] as string;
    if (relativePath == null)
        return NotFound();

    var folderConfig =
            HttpContext.Items["MarkdownPath_FolderConfiguration"]
            as MarkdownProcessingFolder;
    var pageFile = HttpContext.Items["MarkdownPath_PageFile"] as string;
    if (!System.IO.File.Exists(pageFile))
        return NotFound();

    // string markdown = await File.ReadAllTextAsync(pageFile);
    string markdown;
    using (var fs = new FileStream(pageFile, FileMode.Open, FileAccess.Read))
    using (StreamReader sr = new StreamReader(fs)) markdown = await sr.ReadToEndAsync();

    if (string.IsNullOrEmpty(markdown))
        return NotFound();

    var model = ParseMarkdownToModel(markdown);
    model.RelativePath = relativePath;
    model.PhysicalPath = pageFile;

    if (folderConfig != null)
    {
        model.FolderConfiguration = folderConfig;
        folderConfig.PreProcess?.Invoke(model, this);
        return View(folderConfig.ViewTemplate, model);
    }

    return View(MarkdownConfiguration.DefaultMarkdownViewTemplate, model);
}
The code starts by first picking up the Context variables that were set in the middleware when the request was forwarded, checking for the file, and, if found, reading it from disk and rendering it to HTML. A model is created and built up with the important title and rendered HTML that are used directly by the view, along with some of the file information and configuration information that can be used either inside the view or in the pre-process hook. When it's all said and done, the model is sent to the view for rendering.
Middleware Extensions
Once you've created a middleware component, it still needs to be hooked up and added to the pipeline. ASP.NET Core provides generic functions for adding typed middleware, but these functions aren't easily discoverable. A better way is to do what the native middleware components do, which is providing extension methods that extend the IServiceCollection and IApplicationBuilder. Listing 5 shows the code for the extensions.
Listing 5: Configuring and hooking up the Middleware to the Pipeline
public static class MarkdownMiddlewareExtensions
{

public static IServiceCollection AddMarkdown(
        this IServiceCollection services,
        Action<MarkdownConfiguration> configAction = null)
{
    var config = new MarkdownConfiguration();

    configAction?.Invoke(config);

    if (config.ConfigureMarkdigPipeline != null)
        MarkdownParserMarkdig.ConfigurePipelineBuilder = config.ConfigureMarkdigPipeline;

    config.MarkdownProcessingFolders = config.MarkdownProcessingFolders
        .OrderBy(f => f.RelativePath)
        .ToList();

    services.AddSingleton(config);

    return services;
}

public static IApplicationBuilder UseMarkdown(this IApplicationBuilder builder)
{
    return builder.UseMiddleware<MarkdownPageProcessorMiddleware>();
} }
The AddMarkdown() method provides the service configuration by creating a default configuration object, and then taking an optional Action<MarkdownConfiguration>() that you provide to configure the middleware. This is a common pattern which delay-invokes the configuration when the first request comes in. The method's final action is to explicitly add the configuration to the Dependency Injection container so that it can be retrieved in the middleware and the controller via Dependency injection.
UseMarkdown() is very simple and simply delegates to builder.UseMiddleware<MarkdownPageProcessor>(). The sole purpose of the wrapper method is to provide a discoverable method in the Startup.Configure() code that's consistent with how ASP.NET Core built in middleware behaves.
Et Voila!
I now have a totally reusable Markdown page-rendering engine that can be easily plugged into any ASP.NET Core application with a few lines of configuration code. From then on, I can just drop Markdown files and related resources into my wwwroot folder and I'm good to go.
In this article, I've shown you a number of different approaches that you can now use for getting Markdown into your applications. Whether you need to render inline Markdown from your application's data using the Markdown.Parse() and @Markdown.ParseHtml() methods, whether you need to create a few small Markdown islands inside of existing pages, or whether you want to create free-standing Markdown files that are served as if they were static pages, you're covered with all of these approaches.
So, go ahead. Markdown all the things!
