


How often have you sat in front of the computer knowing exactly what you want to do, except you didn't know how to tell the computer to do it? This is where natural language processing comes in. Its importance cannot be understated with the advent of machine learning and AI. Not only is natural language becoming a lot more useful and powerful, the number of applications is also increasing. For example, if you're interacting with a bot, the bot itself becomes a lot more useful if it can understand commands written in natural language.
LUIS, or language understanding intelligent service, is a cloud-based service that applies custom machine learning to a user's conversational, natural language text to predict overall meaning, and pull out relevant detailed information. As usual, it's exposed over simple REST APIs. In fact, you can even create, manage, and maintain a LUIS application completely through REST APIs, in effect creating a LUIS app that becomes better with time.
In this article, I'll first demonstrate how you can create a simple LUIS app and use it entirely through the browser, followed by how you can author a LUIS app programmatically.
There's a lot to talk about, so let's get started.
The Source Code
There's far too much code in this article to repeat here. Although I've written out and explained the most important bits here, you can grab the full code at https://github.com/maliksahil/naturallanguage or from the CODE Magazine website (www.CODEMagazine.com) page associated with this article. You also need to log in to the www.luis.ai site and create a LUIS app. It's free; all you need is a Microsoft account. All of the code is in NodeJS, so you can follow along on Mac, Windows, or Linux.
The Concepts
Before I dive into demos and code, let's understand some basic concepts.
The Model
In any AI application, the model is the “thing” you use to predict. This may be a model which, based on historical data, predicts house prices. Or a model that predicts the probability of an email being spam or not.
Similarly, in LUIS, you have a model, which is the “thing” that takes your input text and makes it meaningful, something that a computer can understand. For instance, “Turn lights on,” “make it brighter,” or “let there be light,” could mean the same thing: a command called “lights.on.”
At the heart of every LUIS application, there's a LUIS model. The tighter knit your model is, the better your model will be. In other words, identify the domain first, and make it as precise and clear as possible. For example, if I say the word “deck,” what does that mean to you? If you are a software engineer, it may mean a PowerPoint deck or a presentation. If you're a carpenter, it may mean the porch behind your house. Generally speaking, it's also quite close in pronunciation to a common short form for the name Richard.
In other words, the domain identifies context and context limits the possibilities. There's no confusion about what the word “deck” means.
Now that you have defined the word “deck,” and you're firmly in a carpenter's domain, “paint the deck” has a very clear meaning, plus anyone by the name Richard is not in danger of getting painted.
The process of creating a model can be seen in Figure 1.

Figure 1 shows an oversimplified picture. In reality, you'd train and retrain the model based on experience. For instance, from your program, you can measure the most commonly ordered phrases that you're not handling. You can use them to enhance your model. Similarly, phrases that you once thought were useful could be dropped from the model in subsequent retraining iterations. With experience, you can also tweak existing phrases to extract more meaning from them. For example, when I say “Buy Microsoft,” if this is a stock purchase domain, you know I'm talking about “Buying Microsoft Stock.” If I said, “Buy Microsoft at 55,” you can deduce that I'm asking to place a limited order to purchase Microsoft shares when the price drops to 55.
Intents
An intent is an action the user wants to perform. Natural language is extremely flexible; in fact, different languages and cultures make them less or more flexible. But what is the user's “intention?” It's the goal the user is trying to achieve. Maybe they want to turn the lights on. Maybe they want to schedule a calendar appointment. Maybe they want to book a flight. Whatever the intent may be, the user can express themselves in a multitude of ways, but it always translates to one intent. LUIS understands utterances and converts them to one or more intents that you specify in your LUIS application.
Utterance
An utterance is what the user speaks or types. In cases where the user speaks, you use speech-to-text to convert their words to text. For a LUIS app, an utterance is any text that comes from the user. In any LUIS application, you have one or more utterances. Generally speaking, you limit your LUIS application to a particular problem domain. For instance, one application could be about making travel plans and another application could be about home automation. By limiting the dictionary of possible utterances, you improve prediction. You can also improve prediction by actively learning endpoint utterances, phrase lists for domain word inclusion, and patterns that reduce the number of utterances needed.
In active learning, your LUIS app is coached by you, based on real-world utterances. You can access or correct the endpoint prediction, retrain, and republish. LUIS learns quickly with this iterative process, taking the minimum amount of your time and effort. Also note that all of this is automatable, so theoretically, end users could rate the accuracy of a recognition.
A common word you hear in machine learning is “feature.” A feature is a distinguishing trait or attribute of data that your system observes. Adding features to a language model helps your model, including LUIS models, to recognize both intents and entities. The phrase list feature is simply a group of words or phrases that are specific to your domain. For instance, travel plans may involve names of cities, and buying and selling stock may include stock symbols. Put simply, a phrase list not only enhances the vocabulary of the app, it also makes the app more specific to the domain problem you are trying to solve, thereby improving prediction accuracy.
Patterns allow LUIS to learn quicker by needing fewer example utterances for intents. They're a combination of regular expressions and machine-learned expressions. For example, “Buy Microsoft at 55,” where you specify Microsoft as an entity and 55 as an entity, and “Buy Apple at 56,” where you specify Apple and 56 as entities, help the AI engine to recognize a pattern here as “Buy X at Y.”
Entities
When the user issues a command as an utterance, that utterance is converted into an intent. But hidden inside that utterance is important data that's needed to complete the action. For example, “turn the lights off” represents an action called “off;” what entity is it working on? It's working on lights. You need to extract a single entity out of this utterance.
Let's take another example. The utterance “turn the lights off at 6 p.m.” now has two entities, lights and time (6 p.m.). The user can also say “at 6 p.m., turn the lights off.” Both of these utterances yield the same intent and entities.
LUIS comes with a number of prebuilt domain models with prebuilt entities. Or you can quite easily create a new custom domain model with custom entities.
The important takeaway here is that LUIS helps you convert a simple utterance into intents and entities. And intents and entities are something your program can work with. You don't have to be a machine language expert to take advantage of all this. Remember, if you can call a REST API, you can use LUIS.
If you can call a REST API, you can use LUIS.
LUIS APIs
You can broadly classify LUIS APIs into two main categories. There's one that your applications call to access the domain-specific model you build. This domain specific model can be built using point-and-click on a website called www.luis.ai.
The second set of APIs are the authoring APIs, which allow you to build and maintain a model without going to the website www.luis.ai. In other words, using the second set of APIs, you can automate the process of retraining and improving the LUIS application.
Your First LUIS App
With some background behind you, it's time to start building your first LUIS app. Broadly speaking, you have to do the following steps:
- Create a LUIS app.
- Optionally, add the keys from Azure.
- Create a new model or add a prebuilt model.
- Train the model.
- Publish the model.
- Consume the model in your applications.
Sound simple enough? Let's get started.
Create a LUIS App
In order to create a LUIS application, you simply visit www.luis.ai. You'll be asked to sign into this site using a Microsoft account, so go ahead and sign in. Once you sign in, you should see a user interface that prompts you to either create a new app or import an app. Choose to create a new app.
LUIS asks you for the name of the app, I choose to use Calendar. It also asks you for culture. This is the culture or the language your application targets. Note that once the app is created, you can't change the culture. Currently, for multiple language support, you have to create multiple apps.
Once the application is created, you need to grab some bits of information.
First, go under settings and look for the Application ID, which looks like a GUID. Go ahead and save it somewhere; you'll need it when you write the consuming application shortly.
You'll also need the endpoint address. This is the address your applications call to use this application. To get this address, visit the Publish tab and look for a resource named Starter_Key. Next to it, you'll see a Key String; save that somewhere. You'll also see an endpoint URL, which is a combination of the application ID and the key string you just saved. You can choose to either copy the entire endpoint or construct the endpoint with the information you already have. Let's choose to build the endpoint URL on the fly.
Optionally, Add Necessary Keys from Azure
Under the Publish tab in your application, you'll see an Add Key button. You already have a key, so why do you need another? Simple! You need it for additional throughput, and for throughput you can pay for - you can provision a new key with loads of requests per second and thereby scale your app. Logged in with the same user ID, visit the Azure portal. Ensure that you have an Azure subscription attached to these credentials.
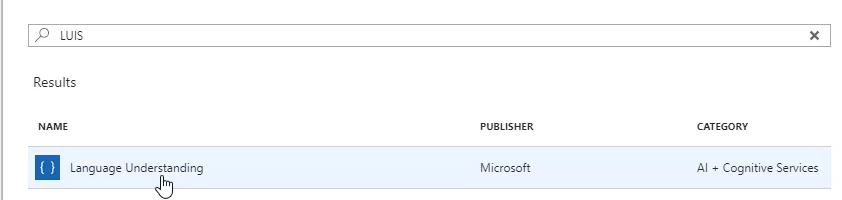
Once in the Azure portal, choose to Create a resource and search for LUIS. You should see a choice here called Language understanding, as shown in Figure 2. Choose to create a LUIS application. You'll be asked to fill in a simple form where you specify a name, location, and pricing tier. It's under that tier where you can specify the throughput you need.
Once you've added a LUIS app to your Azure portal, access it from the All resources area, and visit the Keys section of the LUIS app. Here, you can grab the necessary keys that you add to the LUIS dashboard. Now the consumers of your LUIS applications can call your LUIS application with unique keys that you can track and pay for.
Create a New Model or Add a Prebuilt Model
So far, you've created a new LUIS application and added a key into it, but you haven't put any logic into it. Logic, or domain as LUIS likes to call it, is what you need to do next. When you're on the application page, look at the bottom left corner. You should see a button called Prebuilt Domains. Click on it, and choose to add the Calendar domain, which gives you intents and entities related to calendar entries. You can see on this page that right out of the box, LUIS comes with numerous prebuilt domains you can use. If you're feeling adventurous, feel free to pick a different domain - the concepts are the same.
Once you've added the Calendar domain, your intents should be populated as shown in Figure 3.
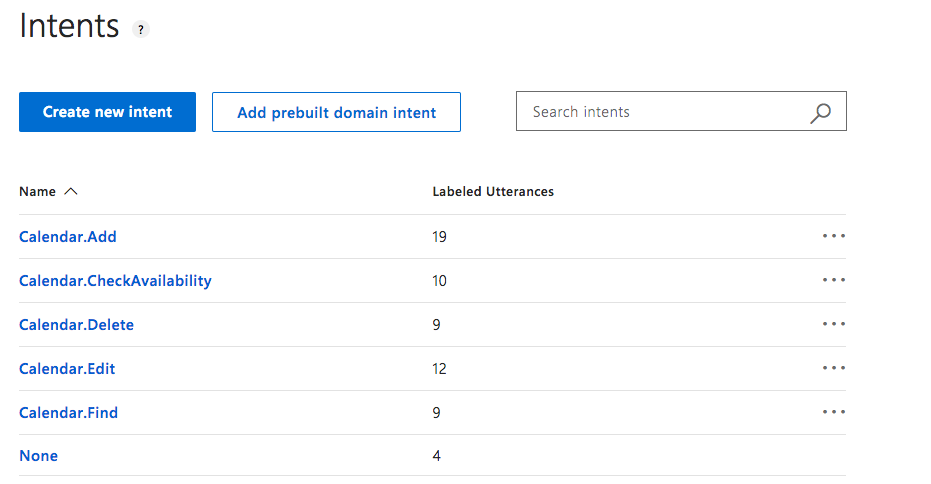
As you can see, each of these intents is associated with one or more utterances. Click on the Calendar.Add intent and it should show you associated utterances and entities for the given intent, as shown in Figure 4.
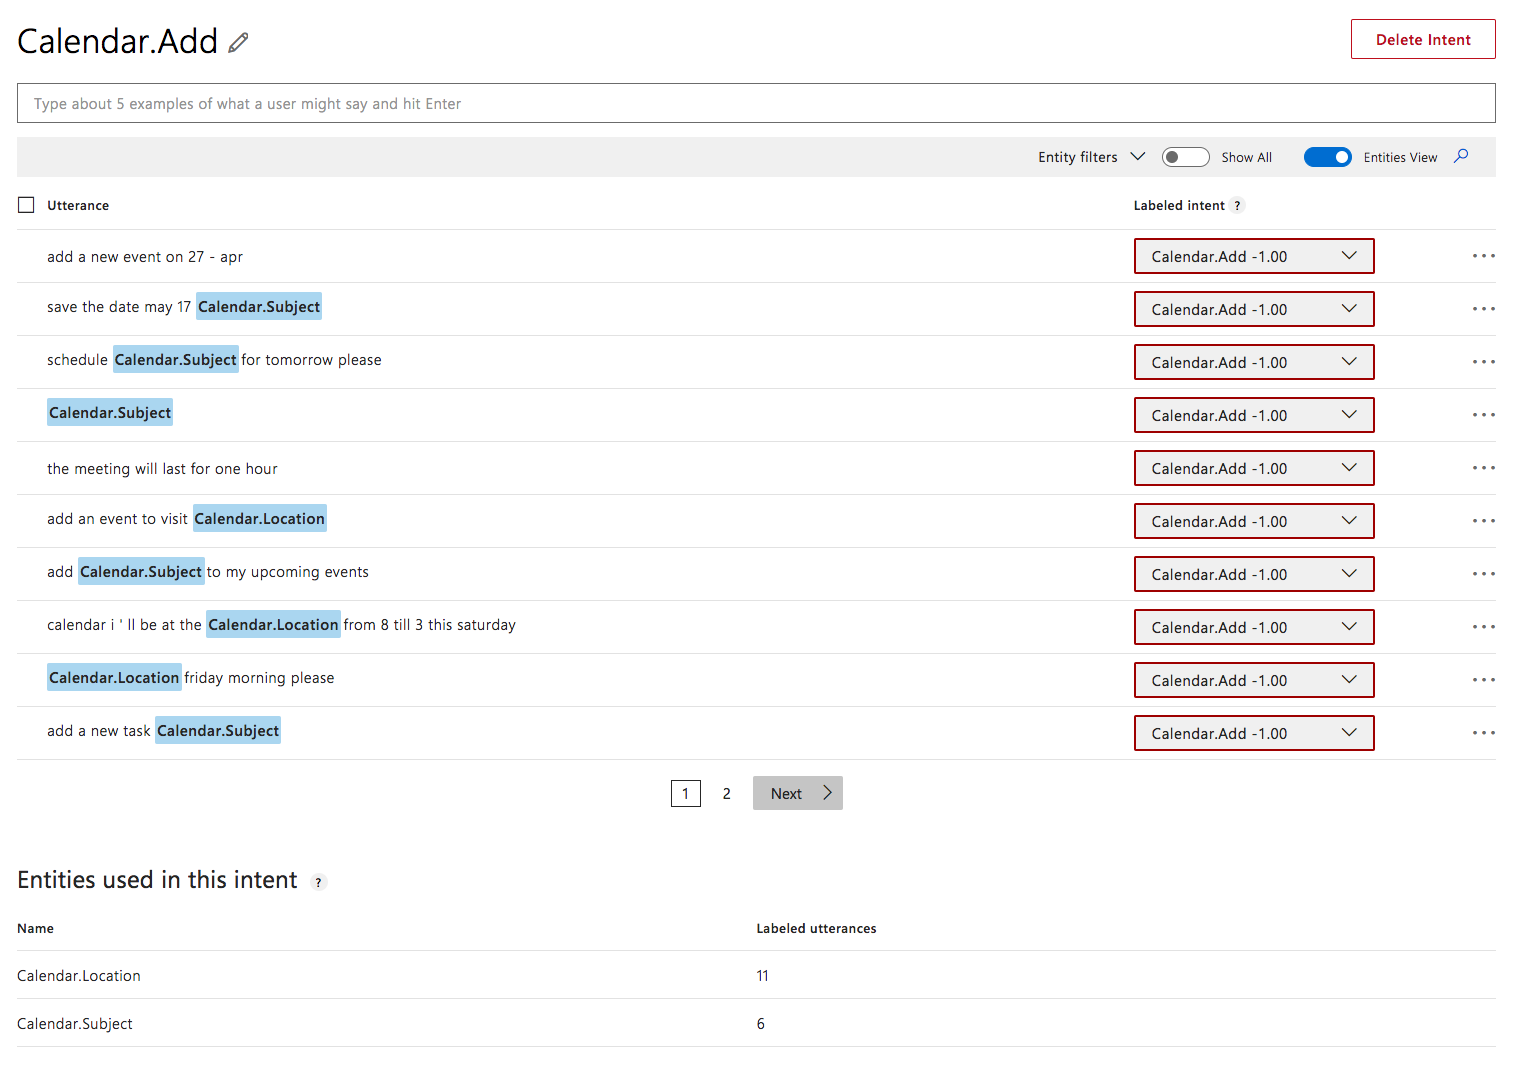
Interestingly, if you hover over the text, you can not only see the current values of the shaded text, you can also assign existing portions of the utterance to entities. This is how you connect utterances with intents and utterances with entities. Using the ellipses on the right, you can also add an existing utterance with an entity as a pattern.
Train the Model
I think you're beginning to get the idea. You had a number of prebuilt domains to pick from. Although that was easy, you can imagine that creating a brand-new domain wouldn't be very difficult either. It may be tedious, but not difficult. Imagine that when you roll out your application, you can easily track which utterances are most common and that you don't handle properly. This way, you can keep enhancing your model. All of this can be automated via an API. You'll see that shortly, but first let's train the model.
You can't use the model unless you train it first.
What's important is that you can't use the model unless you train it first. This is how most AI models work: You start with reference data and you run a bunch of smart algorithms on the data. This step is quite processing-intensive, so it isn't done during the usage of the model; rather, it's used to create a model.
In order to train the model, you'll see a Train button on the top right-hand corner. The button is shown Figure 5.
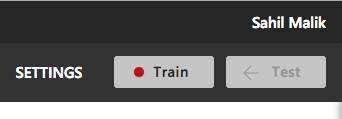
Go ahead and click on that button. Training may take a few moments; it's considered a CPU-intensive and asynchronous process. Once the training is complete, that red dot changes from red to green. The dot is a visual indicator that the model has been trained since changes were last made to it. If you make any changes to the model, you must train it for those changes to take effect.
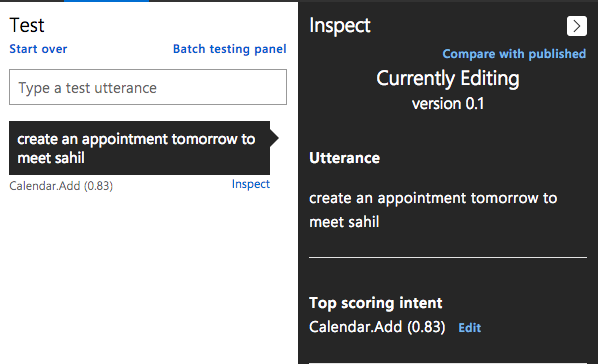
Before you use the model and publish it, you have an opportunity to test it. The Test button should now be enabled. Click on the Test button to reveal a pane with a text box on the right side of your browser. In this textbox, issue a command, any command, as long as it has something to do with calendar events. My test looked like Figure 6. As you can see, the model did clearly predict that this is a calendar.add intent, although I wish it had also picked up meet sahil as the entity calendar.subject.
Luckily, that detail is easy to fix. Just click on a word to mark it as an entity. The two words meet sahil together form an entity. This is a bit tricky, but follow me here:
- Hold the shift key down and click on meet.
- Keep holding the shift key down and click on sahil
- In the drop down, select Calendar.Subject.
- Hit enter.
You should see the newly created entity, as shown in Figure 7.

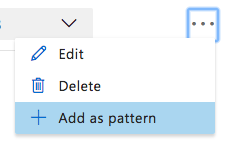
I'm going to educate the model a bit further by marking this as a pattern using the ellipsis menu on the right-hand side as shown in Figure 8.
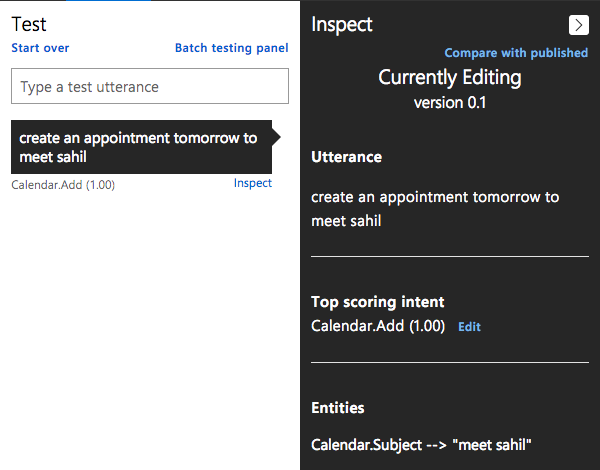
Now you may notice that the dot by the Train button has turned back to red. This is because you have untrained changes in the model. Go ahead and train it again. Once the model is trained, try the same query again. As you can see in Figure 9, not only is the intent recognized accurately, but it also recognizes the entity accurately.
This is where the fun begins! Next, I tried create a plan to meet sahil. This is natural language; note that there is no matching utterance that is exactly like what I typed. Yet, as you can see in Figure 10, the model is accurately able to predict not only the intent but also the entity, and it does so with 92% confidence.

Here are a few other phrases I tried:
- Create plans to water the plant, recognized as calendar.add with 83% confidence, with calendar.subject value as water the plant.
- Please make plans to wash car, recognized as calendar.add and calendar.subject as wash car with 87% confidence.
- Make appointment to get harcut, and yes, the spelling mistake is intentional. It's accurately recognized as calendar.add, but with only 49% confidence, and it missed the entity. How would you go about improving both the confidence and recognizing the entity out of this? Well, you'd use the same steps as above.
Now you can write some additional logic to catch the most commonly used phrases where the confidence score is below 70% and simply improve your model. And you can do this programmatically, so you have effectively created - with just a few simple clicks - an application that can converse in natural language and do so effectively!
This is simply incredible! Now, how do you go about integrating this into your applications?
Publish the Model
The model, as impressive as it may be, is pretty much useless unless you integrate it into your custom applications. Sure, you can tie it to voice assistants like Siri. You can lift the phone and say, “Hey Siri, ask Luis to make plans to wash the car.” iOS allows deep integration of Siri with apps, so this is already possible. You simply use text-to-speech; first convert the issued command to text and then pass it to LUIS. And for good measure, you can also use automatic grammar correction, also available as a cognitive service in Azure, which should greatly improve your results.
Sit back and think about what you just did. You just made Siri useful.
Let's leave the Siri integration for another time. The final leg that talks to LUIS also accepts input as text. So that's what I'll work with.
In order to use your model, you have to publish it. This is as easy as hitting the Publish tab, selecting between the production or staging environments, and hitting Publish. As you can see from this page, you can also choose to enable sentiment analysis, speech priming to improve speech recognition, or the spell checker. For now, you can leave those unchecked.
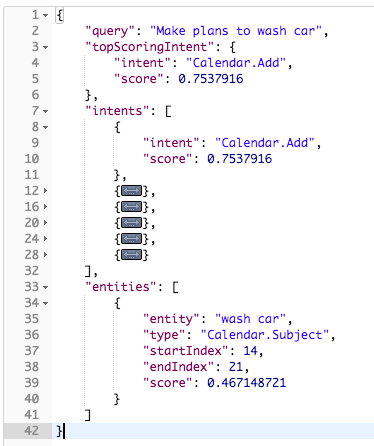
Once the application is published, copy the endpoint address from the bottom of the publish page and issue a REST call. Make a GET call to this URL and place the querystring parameter value as Make plans to wash car. You should see results like those shown in Figure 11.
This is fairly straightforward. Now, with simple REST queries, you can start adding natural language capabilities into any application.
Consume the Model in Your Applications
Making a GET call is quite easy. In the call, you're passing the subscription ID and keys in the querystring, which isn't a good idea from a security point of view. This is easily fixable: You can choose to pass the keys as a header. Let's write up a simple application in NodeJS that can make these calls for you. In this article, I've chosen to show only the relevant portions, but the full code is available in the source code download for this article on the CODE Magazine website (www.CODEMag.com).
The most important part of the code is in Listing 1. As can be seen, I have a simple method called addCalendarAppointment. Calling this method issues a GET request to a URL you're crafting up that's a combination of the application ID and the command you wish to recognize. The difference is that you're passing the secret key as a header variable.
Listing 1: The addCalendarAppointment method
import * as request from "request";
import { config } from './config';

addCalendarAppointment();
function addCalendarAppointment() {
    const requestOptions: request.CoreOptions = {
        headers: {"Ocp-Apim-Subscription-Key": config.luis.subscriptionKey}
    };

    request.get(
        config.luis.endPoint + '/apps/' +
        config.luis.applicationId +
        '?verbose=true&timezoneOffset=0&q='
         + 'Add a calendar appointment',
         requestOptions,
         (err, response, body) => {
              console.log(body);
         }
    );
}
The project you download from GitHub or from the CODE Magazine website is configured to run in VSCode using the F5 key. Download it, run npm install, and place your keys in the config.ts file. Now press F5, and it should produce JSON output similar to Figure 11.
Managing LUIS Models Programmatically
The first question is: Why should you bother to create a LUIS model programmatically? Well, you do it to give your application natural language abilities on the fly and to improve those capabilities automatically with experience. Everything you do from the portal can be done via APIs, and yes, they are just REST APIs that you authenticate with. Specifically, these are named the LUIS authoring APIs.
The full API surface and the code is quite extensive, so for the purposes of this article, I'll illustrate how you can create a LUIS application and I'll keep the code germane to the main points.
The general process of authoring a fully functional LUIS application involves the following steps:
- Create an application.
- Add intents into the application.
- Add entities into the application.
- Add utterances to “stich” the intents and entities together.
All of these are achieved using methods that execute simple REST calls. All of these calls authenticate using the method shown in Listing 2.
Listing 2: Create authentication headers
function getRequestOptions(): request.CoreOptions {
    const requestOptions: request.CoreOptions = {
        headers: {
            'Ocp-Apim-Subscription-Key': config.luis.subscriptionKey,
            'Content-Type': 'application/json'
        }
    };
    return requestOptions;
}
The code to create an app can be seen in Listing 3.
Listing 3: Add a LUIS app
function createApp(appName: string): Promise<string> {
    const promise = new Promise<string>((resolve, reject) => {
        const requestOptions = getRequestOptions();
        requestOptions.body = JSON.stringify({ 'name': appName, 'culture': config.luis.culture });
        request.post(
            config.luis.apiEndPoint, requestOptions, (err, response, body) => {
                body = body.replace(/"/g,'');
                resolve(body);
            }
        )
    });
    return promise;
}
It's a simple call to the authoring endpoint and in the body, you include a payload that looks like this:
{
    'name': appName,
    'culture': config.luis.culture
}
This payload simply includes the name of the application and what language culture you wish to create the application in.
Once the application is created, you get an appId. With the appId, you being to add intents. The code to add intents can be seen in Listing 4.
Listing 4: Add an intent
function addIntent(appId: string, intentName: string): Promise<string> {
    const promise = new Promise<string>((resolve, reject) => {
        const requestOptions = getRequestOptions();
        requestOptions.body = JSON.stringify({'name': intentName});
        const uri = config.luis.apiEndPoint + '/' + appId + '/versions/0.1/intents';
        request.post(uri, requestOptions, (err, response, body) => {resolve(body);}
        );
    });
    return promise;
}
The intent is simply a text field and the creation of an intent is a matter of executing a POST call to a URL that looks like this:
config.luis.apiEndPoint + '/' + appId + '/versions/0.1/intents'
The payload you send to this URL is:
{
    'name': intentName
}
Once all of the intents are added, you add entities. Adding entities is quite similar to adding intents. It's a simple POST request to a URL that looks like this:
config.luis.apiEndPoint + `/${appId}/versions/${config.luis.versionId}/entities`
And you include a body that looks like this:
{
    'name': entityName
}
The full code for adding an entity can be seen in Listing 5.
Listing 5: Add an entity
function addEntity(appId: string, entityName: string): Promise<string> {
   const promise = new Promise<string>((resolve, reject) => {
       const requestOptions = getRequestOptions();
       requestOptions.body = JSON.stringify({
           'name': entityName
       });
       const uri = config.luis.apiEndPoint + `/${appId}/versions/${config.luis.versionId}/entities`;
       request.post(
           uri,
           requestOptions,
           (err, response, body) => {
                resolve(body);
           }
       );
    });
    return promise;
}
Finally, you add utterances (Listing 6). The JSON structure of an utterance looks like Listing 7. What's important here is that the LUIS app needs to stitch together the intents and entities with the utterances you supply. You need to make sure that the intent and entity names that you supply in an utterance are already present in the app. Additionally, you need to ensure that all entities and all intents have been added to the app before you start adding utterances.
Listing 6: Add an utterance
function addUtterance(
    appId: string, utterances: Array<Utterance>): Promise<string> {
        const promise = new Promise<string>((resolve, reject) => {
            const requestOptions = getRequestOptions();
        requestOptions.body = JSON.stringify(utterances);
        const uri = config.luis.apiEndPoint +
            `/${appId}/versions/${config.luis.versionId}/examples`;
        request.post(
            uri,
            requestOptions,
            (err, response, body) => {
                resolve(body);
            }
        );
        });
        return promise;
}
Listing 7: The utterance payload
{
    "entityLabels": [
        {
            "entityName": "Operation",
            "startCharIndex": 0,
            "endCharIndex": 2
        },
        {
            "entityName": "Symbol",
            "startCharIndex": 4,
            "endCharIndex": 7
        }
    ],
    "intentName": "BuyMarket",
    "text": "Buy MSFT"
}
For brevity, I've shown the most meaningful excerpts out of the code available on the CODE Magazine website or GitHub. The code I've supplied only creates an application for you. You can, of course, extend it to train and publish your own application, or for that matter, measure the most commonly used phrases and add them to the model automatically or after manual validation. It's all a matter of calling REST APIs. I keep repeating that, but that is the whole point: This amazing power is in your hands if you can call a REST API.
This amazing power is in your hands if you can call a REST API.
Once you've created the application programmatically, go ahead and train and publish it. In the supplied code, in the Data folder, I've provided the input for a stock purchase application. But you can edit the supplied CSV data file and create any application of a far greater level of complexity.
Conclusion
In this and many of my previous articles, I've been talking about Microsoft cognitive services as the first stepping stone toward AI. Cognitive services is amazing because it puts so much power in your hands. But what if you wish to do something that cognitive services doesn't do; for instance, what if your company doesn't want to send its cognitive data to a Microsoft server for privacy reasons?
This is where you roll up your sleeves and start tapping into the power of things like Azure ML studio. And if things get even more serious, you graduate to using Jupyter notebooks, TensorFlow, and CNTK, etc. There's plenty of overlap among these products as well. In subsequent articles, I'll move on from cognitive services, not because there isn't more to talk about there, but there's so much more powerful and interesting stuff to talk about that's completely within your reach.
Until next time, happy and responsible AI programming!
