


Rich-clients are back. But the new rich-client is the browser. No more plug-ins or ActiveX objects in sight. Instead you'll find new, more powerful JavaScript libraries enabling you to more easily build large-scale applications directly in the browser. You'll still need to be able to work with the disconnected nature of websites, but you no longer need to worry about a page-based model.
One of these libraries is AngularJS from Google. In this article, I hope to get you started by showing you how it works and hopefully why you should be using it.
What is AngularJS
Google builds rich Web applications. In most respects, Google Maps was a revelation of what could be done in the browser without post-backs and the app changed Web developers everywhere. Since Google pioneered the style of Web development that is becoming commonplace, it's not a surprise that they open-sourced a toolkit that can be used to build rich applications: AngularJS.
AngularJS is available at https://angularjs.org/. The library is a set of JavaScript files that allows you to add functionality to a Web page to support a variety of important features for large Web projects including:
- Data Binding
- Modularity
- Dependency Injection
- Intra-Page Routing
- Testable JavaScript Code
- Browser Independence
In this article, I'll be introducing you to the AngularJS concepts as you build an example page using AngularJS and ASP.NET MVC. Let's get started!
Adding AngularJS to ASP.NET MVC Project
To get started, you'll need JavaScript for the project. There are several ways of accomplishing this but my recommendation is to use Nuget to get the package, as shown in Figure 1.
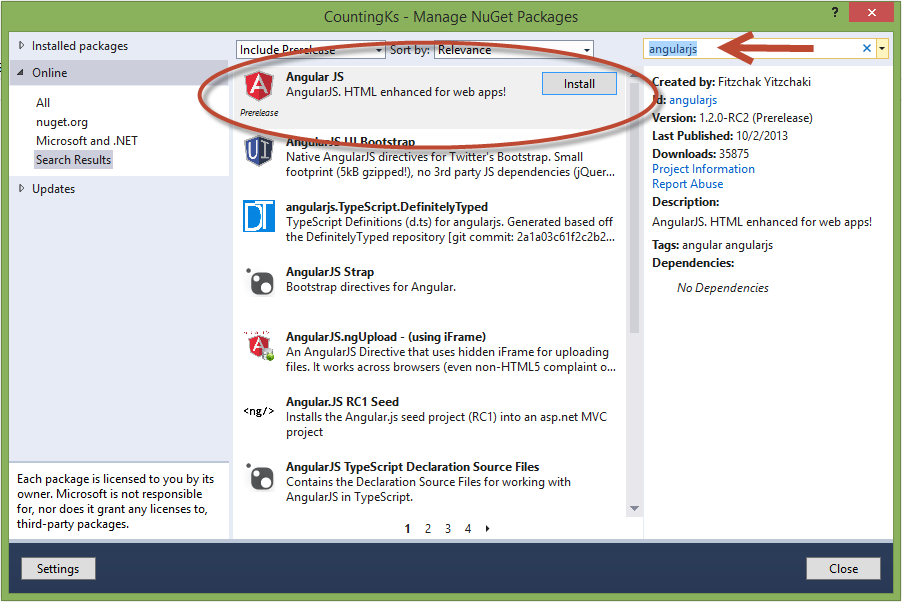
This package adds the set of JavaScript files to the project under the Scripts folder. Now you're ready to start using AngularJS. You'll find that there are a number of .js files with the name “angular” in your scripts folder, but for now we just need one: "angular.min.js".
To get started, you'll need the main AngularJS script added to the page. Since you're working with ASP.NET MVC, you could add this to the Layout file to add it to every page, but to keep the example localized to a single page, let's add it to a view. In my example, this is the index.cshtml view for the Home controller.
All that is required is that you add the AngularJS script to the Scripts section at the top of the page like so:
@* /Views/Home/Index.cshtml *@
@{
    ViewBag.Title = "Home Page";
}
@section Scripts {
    <script src="~/Scripts/angular.min.js"></script>
}
<div>
  <h1>Counting Ks</h1>
  <p>This is an online searchable database for food and nutrition information.</p>
</div>
Once AngularJS is included, it doesn't do anything. When the script is loaded, it searches your HTML markup for indicators about what to do. This is an important concept in AngularJS. To tell AngularJS to start paying attention to some part of the HTML DOM, you need to include an attribute called data-ng-app to a container:
@* /Views/Home/Index.cshtml *@
@{
    ViewBag.Title = "Home Page";
}
@section Scripts {
    <script src="~/Scripts/angular.min.js"></script>
}
<div data-ng-app>
    <h1>Counting Ks</h1>
    <p>This is an online searchable database for food and nutrition information.</p>
</div>
This “pay attention” attribute is called a directive. It describes a scope that AngularJS will start looking for other AngularJS markup also called directives. AngularJS introduces this concept of directives as new attributes that are applied to HTML elements. All AngularJS directives start with either ng- or data-ng-. (See the sidebar on which prefix to use.)
Now that you have the script included and the app directive, you're ready to start using your first controller.
Your First Controller
AngularJS provides a number of services. Let's explore the idea of controllers first. A controller is a unit of code that can be executed when AngularJS detects the controller directive. So in the HTML markup, you'll want to define an element that will be controlled by some code. In this case, just use the data-ng-controller directive and name the controller:
<div data-ng-controller="foodController"></div>
When using a controller, the name defined in the controller directive refers to a named object, usually a function. So in this case, you'll need to create a new JavaScript file for your own custom code to live in and include the script in your view:
@* /Views/Home/Index.cshtml *@
@{
    ViewBag.Title = "Home Page";
}
@section Scripts {
    <script src="~/Scripts/angular.min.js"></script>
    <script src="~/js/home-index.js"></script>
}
<div data-ng-app>
    <h1>Counting Ks</h1>
    <p>This is an online searchable database for food and nutrition information.</p>
    <div data-ng-controller="foodController"></div>
</div>
In the new JavaScript file, you can create a function with the same name as the controller like so:
// home-index.js
function foodController() {
    alert("AngularJS is working!");
}
If you run this page, you'll see that the alert is fired. You don't need to use jQuery.ready() or anything similar. AngularJS notices the app and controller directives and does the right thing. Of course, if you were only supporting a way to instantiate code, this would be overkill. Instead, you can use the controller to control what's happening on the page. Let's make it do something.
Note: The first time your run the demo, there will be a delay of 30-60 seconds as it builds the database of 8000 or so foods.
Data Binding
One of the most common tasks that AngularJS is used for is data binding. To get started, go back to the controller, and add a new parameter called $scope:
// home-index.js
function foodController($scope) {
    alert("AngularJS is working!");
}
The $scope parameter here is a data binding object on which you can expose data to the HTML DOM. But before you see how that works, let's talk about what is happening here.
By specifying the $scope parameter, AngularJS is going to supply that object to the controller. This is how AngularJS handles dependencies. By including a named parameter, AngularJS is looking to see if that named parameter is one of the objects that AngularJS knows how to supply to the controller. You'll see more of this as we continue the example.
By including a named parameter, AngularJS is looking to see if that named parameter is one of the objects that AngularJS knows how to supply to the controller.
Now that you have the $scope object, what should you do with it? It's a property bag, so you can add members to it that you want to data bind to. For example:
// home-index.js
function foodController($scope) {
    $scope.name = "Shawn Wildermuth";
    $scope.favoriteTeam = "Atlanta Braves";
}
Once you've defined data on the $scope, return to the markup and you can use the data binding syntax to push data into the DOM:
<div data-ng-controller="foodController">
    My name is {{ name }} and the best baseball team is {{ favoriteTeam }}.
</div>
The double curly-brace syntax defines a place to name objects on the $scope that should be data-bound to this part of the HTML. This syntax is for a one-way binding. If you go back to the function, you could create properties that are objects instead of simple properties like so:
// home-index.js
function foodController($scope) {
    $scope.name = "Shawn Wildermuth";
    $scope.favorites = {
        team: "Atlanta Braves", iceCreamFlavor: "Vanilla"
    };
}
Notice here that the favorite property on the $scope is now an object with its own properties. That means that in the data binding, you can use property syntax to show the same data:
<div data-ng-controller="foodController">
    My name is {{ name }} and the best baseball
        team is {{ favorites.team }}.
</div>
The syntax in the data binding is simple JavaScript, so you can even use member functions:
<div data-ng-controller="foodController">
    My name is {{ name }} and the best baseball
        team is {{ favorites.team.substr(0,10) }}.
</div>
You can also use a feature of AngularJS called filters. The idea behind filters is to allow you to filter or format the data in the data binding. There are a handful of built-in filters:
- currency
- date
- number
- uppercase
- lowercase
- orderBy
- limitTo
- json
- filter
I don't have room to cover them all, but the way they work is to add them to the data binding after a pipe character. For example, to show the name in uppercase, you can just apply the filter to the name:
<div data-ng-controller="foodController">
    My name is {{ name | uppercase }} and the best baseball
        team is {{ favorites.team.substr(0,10) }}.
</div>
Filters are a great way of doing formatting and filtering of data that is visible. In addition to the curly-brace syntax, you can also use the data-ng-bind directive to bind an entire element:
<div data-ng-controller="foodController">
    My name is {{ name }} and the best baseball
        team is {{ favorites.team.substr(0,10) }}.
    <div data-ng-bind="favorites.iceCreamFlavor"></div>
</div>
Notice that with the bind directive, no curly braces are required and the value of the directive is evaluated instead. But what about binding to collections? Those are easy too.
Data Binding Collections
Let's return to the controller and add a collection as a member of the $scope:
// home-index.js
function foodController($scope) {
    $scope.foods = [
        { description: "Mushrooms" },
        { description: "Eggs" },
        { description: "Steak" },
        { description: "Milk" },
        { description: "Orange Juice" },
    ];
}
You could use the regular syntax to bind to the foods object on the $scope, but it would be difficult to iterate through the collection. That's where the data-ng-repeat directive comes in:
<div data-ng-controller="foodController">
    <ul data-ng-repeat="f in foods">
        <li>{{ f.description }}</li>
    </ul>
</div>
The data-ng-repeat directive has you declare a temporary variable name (f in the example) to hold each iteration of the collection. Then inside the container, it repeats all of the markup with the same data binding syntax that you saw earlier. In this example, notice that the <ul/> tag is where the data-ng-repeat is defined, that the container is not repeated, just the contents. This makes creating lists like those shown here simple. Collections are interesting, but the real case for collections is in working with server-side code. So you have to have a way to make Web requests that return data.
Making HTTP Requests
Although you could use another library for making your Web requests, AngularJS has the support built-in. The reason to use it is that it makes writing unit tests against your code possible, even allowing mocking of your HTTP requests. I don't have room to cover it here, but leveraging the built-in $http support is recommended.
To get started, you can add or remove the foods collection and assign an empty array that you will fill in from an HTTP call. You should also add a new parameter to your controller called $http:
// home-index.js
function foodController($scope, $http) {
    $scope.foods = [];
}
The $http object contains functions for each of the HTTP verbs (e.g., GET, POST, PUT, DELETE, etc.). For my needs here, I'll just use the get function to call an API that exists in the example project:
// home-index.js
function foodController($scope, $http) {
    $scope.foods = [];
    $http.get("/api/nutrition/foods");
}
The call to the API returns an object that has a collection of foods in the database. The call to get uses a concept in JavaScript called a promise. The get function returns a promise object. Call the then function on the promise and supply two functions to retrieve the results when the call to the server returns, like so:
// home-index.js
function foodController($scope, $http) {
    $scope.foods = [];
    $http.get("/api/nutrition/foods").then(
        // success
        function (result) {
            var data = result.data;
        },
        // failure
        function (error) {
            alert("Bad things happen to good people");
        });
}
The first function supplied to the then function is to be called if the request succeeds. The second is called if it fails. In the failure case, I'll just show an alert, although I expect that you'll build real error handling there at a later date.
In the first function, the parameter to the success function is an object that contains information about the request, including a property called data that contains the data returned by the server. If the server returns JSON, the data member contains the evaluated JSON so you simply get an object graph.
Because you're getting the resulting data, you can assign it to the $scope variable and it will work. Because of JavaScript closure, this just works:
// home-index.js
function foodController($scope, $http) {
    $scope.foods = [];
    $http.get("/api/nutrition/foods").then(
        // success
        function (r) {
            var data = r.data;
            $scope.foods = data.results;
        },
        // failure
        function (error) {
            alert("Bad things happen to good people");
        });
}
At this point, you can get data and show the result in the browser. The behavior of the browser is to remove all the elements in the <ul/> because the collection is empty at first. Once the HTTP request is complete, it adds a <li/> per member, based on the data binding. What this example shows is that the state of the data in the $scope is monitored so that as it changes, the UI changes to react to it. You don't have to manually destroy the DOM elements and rebuild them, but instead let the data change and let AngularJS update the UI.
The data returned from the server has structure to it, so you can use this structure to make complex data binding. The JSON returned looks like so:
{
    "totalCount":7539,
    "totalPage":151,
    "prevPageUrl":"",
    "nextPageUrl":"http://localhost:8901/api/nutrition/foods?page=1",
    "results":[
    {
        "url":"http://localhost:8901/api/nutrition/foods/4479",
        "description":"Abalone, Mixed Species, Raw",
        "measures":[
        {
            "url":"http://localhost:8901/api/nutrition/foods/4479/measures/7269",
            "description":"3 Oz",
        },
        ...
        ]
    },
    ...
    ]
}
With this structure, you can show both the foods in the database as well as the types of measures for each food. You can use data binding and nested data-ng-repeats to continue down for complex data binding as shown here:
<div data-ng-controller="foodController">
    <div ng-repeat="f in foods">
        <div class="col-md-4">
            <h4>{{ f.description }}</h4>
            <div ng-repeat="m in f.measures">
                <div>{{ m.description }}</div>
                <dl class="dl-horizontal">
                    <dt>Calories</dt>
                    <dd>{{ m.calories }}</dd>
                </dl>
            </div>
        </div>
    </div>
</div>
You can see here that you can mix styling (with classes) and data binding, as well as the nested data-ng-repeat, to show a collection of subjects on the page. The magic here is that you can be expressive in your HTML/CSS work and not let data binding get in the way, and also express complex data structures via the data binding mechanisms.
Creating Services
One thing I particularly love is how you can compose an application from discrete pieces in AngularJS. In the example, I've put a bunch of information directly into the controller that the controller might not need to know. The call to the service is probably going to be re-used and leaving it sitting in the controller encourages some developers to copy and paste it when they need it. Instead, you should create a service that exposes that functionality. Before you can, I'll need to introduce you to the module functionality in AngularJS.
On any particular part of a page where you use the data-ng-app directive, you can specify the name of a module that is responsible for that part of the UI (very often you'll only have one of these on a particular page, but AngularJS doesn't limit you to that if it is necessary to segment panes of your page into separately modules). If you go to the top of the home-index.js file, you can declare a module that will be responsible for this page:
// home-index.js
angular.module("home-index", []); // no depdendencies
function foodController($scope, $http) {
    ...
}
Calling angular.module allows you to specify a module name to load (in this case “home-index”) and a set of dependencies. Because you're not using any of the other parts of AngularJS (such as routing) you don't need to specify that you need any dependencies, so you can supply an empty array. Because of JavaScript's peculiarities, the module function constructs a new module when you supply two parameters in this way, but if you just specify the name, it attempts to return the module. So the empty array becomes important.
Because of JavaScript's peculiarities, the
modulefunction constructs a new module when you supply two parameters in this way, but if you just specify the name, it attempts to return the module.
Now that you have the module, you need to tell the data-ng-app directive to use this specific module for the page. You can do this by specifying the name of the module in the directive:
<div data-ng-app="home-index">
    <h1>Counting Ks</h1>
    <p>This is an online searchable database for food and nutrition information.</p>
    ...
</div>
The reason for all this ceremony is to allow you to register your own components (or services) in the module. Let's mock up what you want the service to do first. In the controller, remove the $http parameter and add a parameter called foodservice:
function foodController($scope, foodService) {
    $scope.foods = foodService;
    ...
}
Note that the services that start with a dollar sign ($) are AngularJS dependencies. The convention is used so that existing dependencies won't collide with your named dependencies. Your dependencies shouldn't include the $.
For the new service, you can assign the foodService object to the $scope's data property as you want to bind to whatever data is being exposed by the service. This way, the service itself can manage the data to be shown and shared across pages and views.
Next you'll want to replace the call to $http with a call to the foodservice instead. You'll continue to use a promise to handle success and failure but in this case, because you're data binding directly to the service, you can just use the callbacks to notify the user:
// home-index.js
angular.module("home-index", []); // no depdendencies
function foodController($scope, foodService) {
    $scope.foods = foodService;
    $scope.load = function () {
        foodService.getData().then(
            function () { alert("Loaded!"); },
            function () { alert("failed"); }
        );
    }
}
Notice that I've put the call to getting the data inside a function. That's because you can use data binding to bind directly to a function to allow for commands to be issued by the UI layer like so:
<button class="btn" data-ng-click="load()">Load Data</button>
In this case, the data-ng-click is a directive that tells AngularJS to execute the load function on the $scope when a user clicks the button. There are a handful of these different directives and you'll want to learn them all.
Now that you have the service mocked up, how do you actually create it? Let's add a new JavaScript file called foodService.js (don't forget to add the reference to the script on your page after the home-index.js):
@* /Views/Home/Index.cshtml *@
@{
    ViewBag.Title = "Home Page";
}
@section Scripts {
    <script src="~/Scripts/angular.min.js"></script>
    <script src="~/js/home-index.js"></script>
    <script src="~/js/foodService.js"></script>
}
...
Now you're ready to build the service. First, you'll need to get a reference to the module by calling angular.module with just the module name:
// foodService.js
var theModule = angular.module("home-index");
As I mentioned earlier, calling angular.module with only one parameter (the name of the module) returns an existing module. Because of this, you need to make sure that the creation of the module happens before the foodservice.js is parsed (putting your foodService.js reference after the home-index.js reference is usually adequate).
Next you'll want to call the factory function on the module object. The factory function is used to define the new singleton that is used to fulfill dependency requests:
// foodService.js
var theModule = angular.module("home-index");

// Define the service
theModule.factory("foodService", function () {
});
The first parameter of the factory function is the name of the dependency. You'll note that this is the same name as the dependency you specified in the change to the foodController. The second parameter is a function that returns an object that represents the service itself.
First, create a variable called _data that holds the food items from the server. You can then add it to the returned object like so:
// foodService.js
var theModule = angular.module("home-index");

// Define the service
theModule.factory("foodService", function () {
    var _data = [];
    return {
        data: _data
    };
});
Notice that the returned object is passed to each fulfillment of the dependency as requested so that if more than one piece of code requires the foodService object, it is passed the same object - not a copy, but a reference to the same object.
Next, you can add a new function called _getData that represents the function that performs the execution to the server:
// foodService.js
var theModule = angular.module("home-index");

// Define the service
theModule.factory("foodService", function () {
    var _data = [];
    var _getData = function() {
    };
    return {
        data: _data,
        getData: _getData
    };
});
Now you have the interface to the service. But in order to implement the _getData function, you'll need to specify the dependencies in the factory function like so:
theModule.factory("foodService", function ($http) {
    ...
});
Just like any other function in AngularJS, you can use parameters to specify which dependencies are needed. First, add the $http parameter so you can perform the server-side call. You can implement the call to $http.get just like you did in the controller:
// foodService.js
var theModule = angular.module("home-index");

// Define the service
theModule.factory("foodService", function ($http) {
    var _data = [];
    var _getData = function () {
        $http.get("/api/nutrition/foods").then(
            // success
            function (r) {
                angular.copy(r.data.results, _data);
            },
            // fail
            function () {
            }
        );
    };
    return {
        data: _data,
        getData: _getData
    };
});
In this case, you can see that upon success, you're copying the data using the angular.copy method. The purpose of using this instead of just assigning the results to the _data member is because AngularJS needs to know that the collection has changed. It automatically knows about changes to the $scope object in the controller, but because this is further down the chain, angular.copy makes sure that the data binding is updated when you set the data to the collection.
At this point, the code might work, but you aren't notifying the caller (i.e., the controller) when the success or failure happens. To address this, you can implement your own promise. This allows the call to then that you implemented in the controller to work. To implement the promise, you first need to include $q dependency in the factory function and create a promise object by calling $.defer like so:
// Define the service
theModule.factory("foodService", function ($http, $q) {
    var _data = [];
    var _getData = function () {
        var d = $q.defer();
        $http.get("/api/nutrition/foods").then(
            // success
            function (r) {
                angular.copy(r.data.results, _data);
            },
            // fail
            function () {
            }
        );
    };
    return {
        data: _data,
        getData: _getData
    };
});
The object returned by the $q.defer() call allows you to execute the success or failure functions that were specified in the controller. To do this, you'll need to call functions on the deferred object in the success and failure functions:
var d = $q.defer();
$http.get("/api/nutrition/foods").then(
    // success
    function (r) {
        angular.copy(r.data.results, _data);
        d.resolve();
    },
    // fail
    function () {
        d.reject();
    }
);
The resolve function on the deferred object causes the success function in the then function to be executed. The reject causes the failure function to be executed. In this case, you're not sending back any data, but if you need to send back a result, you can simply pass it into the resolve or reject methods. To complete the process, you'll need to return the promise object so that the caller can use the then function (that exists on the promise object itself):
var _getData = function () {
    var d = $q.defer();
    $http.get("/api/nutrition/foods").then(
        // success
        function (r) {
            angular.copy(r.data.results, _data);
            d.resolve();
        },
        // fail
        function () {
            d.reject();
        }
    );
    return d.promise;
};
With the service defined, you should be able to view the Web page and click on the button to get the data loaded.
Summary
Hopefully, this article has whetted your appetite for how AngularJS can power your rich Web application pages. Services and controllers are core concepts in how AngularJS works, but there is so much more to the framework. These features include intra-page routing, views, custom directives, validation, and mocking your services for testability. If you're building a thick client in a Web project, I believe AngularJS will provide you with a great starting point to delivering a great solution for your clients.
