


If you are like many developers, you are using Windows Communication Foundation (WCF) to provide services to Windows Forms, WPF, Silverlight, ASP.NET and possibly Windows 8 Store applications. Now your boss is asking you to develop some mobile applications using HTML 5 and jQuery. You know you can reuse many of your WCF services, but you are having trouble calling them from jQuery without breaking your existing applications. In this article, I will walk you through the steps for taking a sample WCF service from working just for .NET applications to working with jQuery as well. Don't worry, your existing applications will still work with the changes you are going to make.
A Typical WCF Service
To start, let's take a look at a typical WCF service that might be used to interact with a Product table. I am not going to show all of the code, but instead will just focus on the interface class. I am assuming you use one of the many data-access technologies available to retrieve single or multiple products and also to insert, update and delete products. Listing 1 shows a sample interface class used in a WCF Service Application project named ProductServiceHost.
In this WCF service interface, the GetProducts method returns a complete list of Product objects by selecting all rows and columns from the Product table. The GetProduct method returns a single Product object based on the primary key (ProductId) that you pass into this method. The Insert, Update, and Delete methods are used to add, update, and delete data from the Product table.
In Figure 1, you can see the sample solution that comes with this article. The ProductDataLayer class library project contains some reusable classes such as AppSettings and DataConvert. AppSettings retrieves the connection string from your .config file. The DataConvert class helps you work with null values coming from your tables. The Product class contains a single property for each column in the Product table. The ProductManager class performs all of the CRUD logic and uses the Product class as both inputs and outputs from the various methods in this class.
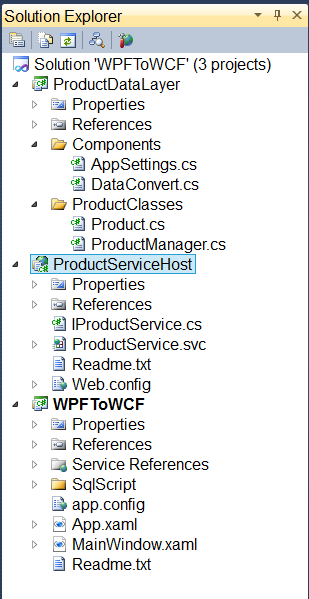
The ProductServiceHost project is a WCF Service Application project that references the ProductDataLayer project.
The ProductServiceHost project is a WCF Service Application project that references the ProductDataLayer project. The ProductService class makes calls to the ProductManager class to perform all of the operations defined in the interface class shown in Listing 1. The last project in the solution is a WPF application used to test the functionality of the WCF services.
Listing 1: A typical WCF Service contract for accessing a database table.
namespace ProductServiceHost
{
    [ServiceContract]
    public interface IProductService
    {
        [OperationContract]
        List<Product> GetProducts();

        [OperationContract]
        Product GetProduct(int productId);

        [OperationContract]
        bool Insert(Product entity);

        [OperationContract]
        bool Update(Product entity);

        [OperationContract]
        bool Delete(Product entity);
    }
}
The Product Class
The WCF service returns a set of Product objects from the GetProducts method, returns a single Product object from the GetProduct method, or accepts a Product object as a parameter when inserting, updating, or deleting. The code snippet below shows the definition of the Product class that will be used for this article.
public partial class Product
{
    public int? ProductId { get; set; }
    public string ProductName { get; set; }
    public DateTime? IntroductionDate { get; set; }
    public decimal? Cost { get; set; }
    public decimal? Price { get; set; }
    public bool? IsDiscontinued { get; set; }
}
Add Attributes for Web Access to Your Interface Class
Modifying your WCF service to return JSON instead of the default XML is very easy.
One method you can use to access your WCF services from a Web page is making Ajax calls. Most developers prefer to use JSON when making Ajax calls with JavaScript and/or jQuery because JSON is easier to process in JavaScript and is smaller to transmit across HTTP than XML. Modifying your WCF service to return JSON instead of the default XML is very easy. First, ensure that you have a reference to the System.ServiceModel.Web.dll if it is not already in your WCF service application. This library is required in order to use the attributes that you add to your interface class to give JSON capabilities. Open your interface file in Visual Studio and add a Using statement at the top of the file, as shown in the following code snippet.
using System.ServiceModel.Web;
Go through each of the methods in your interface that retrieve data and do NOT have parameters passed to them, and add the attribute shown in the following code snippet:
[WebGet(ResponseFormat = WebMessageFormat.Json)]
You call those methods in your WCF service that return data and do not have parameters using a GET call from Ajax. In the interface class, the GetAllProducts method is the only method that returns data and does not have any parameters, so you decorate that method with the WebGet attribute shown above.
WCF takes care of automatically formatting your data as JSON from the generic List that is returned from GetProducts.
The WebGet attribute tells the WCF Service call that it needs to respond to the caller (in this case a Web caller) by serializing the data in a JSON format. There is nothing more needed to ensure that JSON is returned. WCF takes care of automatically formatting your data as JSON from the generic List that is returned from GetProducts. Your complete interface signature for GetProducts now looks like the following:
[OperationContract]
[WebGet(ResponseFormat = WebMessageFormat.Json)]
List<Product> GetProducts();
To call those methods in your WCF service that accept parameters, you need an Ajax POST. For these methods you decorate them with the following attribute:
[WebInvoke(Method = "POST",
    BodyStyle = WebMessageBodyStyle.WrappedRequest,
    ResponseFormat = WebMessageFormat.Json,
    RequestFormat = WebMessageFormat.Json
)]
Calling GetProduct, Insert, Update, or Delete methods in your WCF service from Ajax requires the WebInvoke attribute to be added. Whether you are passing and/or returning a simple data type such as an integer or an object, you still need to decorate your method with this WebInvoke attribute. The WebInvoke attribute has several properties that you can set; I am setting four in this example.
The Method property specifies which protocol this service operation responds to. By setting this property to “POST”, WCF knows to use all of the properties of the WebInvoke attribute only when it receives a POST request. So, for instance, if your WPF application is making the call to the GetProduct method, that is NOT a POST operation and your method runs using the default serialization method (XML). If a jQuery/Ajax call is made using POST, the WebInvoke attribute knows that the Request format will be JSON, the Response format to send back will be JSON, and the body style will be a WrappedRequest.
Add the WebInvoke attribute to all methods in your service interface that accept a parameter. At this point, you are done modifying the code in order to be able to call your service from a Web page. You can re-run your normal Web, WPF, Windows Forms, or Silverlight application to verify that your application still runs. Remember, attributes do not do anything unless some other code is specifically looking for that attribute. So normally, adding attributes does not change how a method runs.
Remember, attributes do not do anything unless some other code is specifically looking for that attribute.
Set Up New Configuration Settings
Now that you have your interface class decorated with the appropriate attributes, you need to configure your Web.Config file to work with Web applications. Again, you want to keep the behavior the same for your existing applications. Depending on when you built your WCF service application, your configuration file may or may not have more than the code snippet shown below:
<system.serviceModel>
    <behaviors>
        <serviceBehaviors>
            <behavior>
                <serviceMetadata httpGetEnabled="true"/>
                <serviceDebug includeExceptionDetailInFaults="false"/>
            </behavior>
        </serviceBehaviors>
    </behaviors>
    <serviceHostingEnvironment multipleSiteBindingsEnabled="true" />
</system.serviceModel>
The above is the minimum configuration you need if you are running your WCF service application from .NET 4.0. You can now make a couple of minor changes to keep your WCF Service running with your existing applications, but also prepare to call your service from an HTTP Ajax call. First, you add a <services> element within the <system.serviceModel> element. Then, place this new element, shown below, just after the </behaviors> ending tag.
<services>
    <service behaviorConfiguration="ProductServiceBehavior"
             name="ProductServiceHost.ProductService">
        <endpoint
            address=""
            binding="basicHttpBinding"
            contract="ProductServiceHost.IProductService" />
    </service>
</services>
Next, locate the <behavior> tag under the <serviceBehaviors> element and add a name attribute to it. This name matches the value ("ProductServiceBehavior") in the behaviorConfiguration attribute in the <service> element that is shown in the above snippet. The snippet that follows is what the change will now look like in the behavior element:
<behaviors>
    <serviceBehaviors>
        <behavior name="ProductServiceBehavior">
        ...
        ...
    </serviceBehaviors>
</behaviors>
You should run your existing application at this point to ensure that everything still works. Adding this <endpoint> for your WCF service explicitly specifies to use basicHttpBinding for all service calls. This is the default WCF behavior for calling services.
Configure for HTTP Ajax Calls
Now it is time to add configuration settings to allow an Ajax call to be made to your services and take advantage of the attributes you added to the interface class earlier. First, add an <endpointBehaviors> element within the <behaviors> element. Add the following element just below the </serviceBehaviors> end tag.
<endpointBehaviors>
    <behavior name="WebBehavior">
        <enableWebScript/>
    </behavior>
</endpointBehaviors>
This end point behavior specifies that Web scripts are allowed to call your WCF Service. The name attribute you added, “WebBehavior”, can be any name you want. Match this name in an end point configuration setting that you add next.
Create a new <endpoint> element below the basicHttpBinding <endpoint> element you added earlier in the <service> element. This new endpoint element is specifically for HTTP binding.
<endpoint address="Web"
          binding="webHttpBinding"
          contract="ProductServiceHost.IProductService"
          behaviorConfiguration="WebBehavior" />
What is very important in the above element is the address attribute of “Web”. Whatever you put into this address attribute is appended to any calls you make from Ajax. There is another example of using this attribute later in this article.
The binding attribute of "webHttpBinding" means that this endpoint is only for Web clients. Notice that the behaviorConfiguration attribute is set to the same name you used in the <endpointBehavior> element.
This next part is optional, but if you will be making service calls from an ASP.NET application and you wish to access Session, Application, or other objects from your ASP.NET application, then add an aspNetCompatibilityEnabled attribute and set it to true in the <serviceHostingEnvironment> element, which should already be in your configuration file. If this element does not exist, add it within the <system.serviceModel> element.
<serviceHostingEnvironment multipleSiteBindingsEnabled="true"
                           aspNetCompatibilityEnabled="true" />
Listing 2 shows the complete listing of what the Web.Config file in your WCF service should now look like. Again, after completing all of these changes, you should run your existing application to ensure that it all still works as it did before.
Listing 2: This is what your complete Web.Config file should look like in order to call your service from .NET applications and from HTTP Ajax calls.
<system.serviceModel>
    <behaviors>
        <serviceBehaviors>
            <behavior name="ProductServiceBehavior">
                <serviceMetadata httpGetEnabled="true"/>
                <serviceDebug includeExceptionDetailInFaults="false"/>
            </behavior>
        </serviceBehaviors>
        <endpointBehaviors>
            <behavior name="WebBehavior">
                <enableWebScript/>
            </behavior>
        </endpointBehaviors>
    </behaviors>
    <services>
        <service behaviorConfiguration="ProductServiceBehavior"
                 name="ProductServiceHost.ProductService">
            <endpoint address=""
                      binding="basicHttpBinding"
                      contract="ProductServiceHost.IProductService" />
            <endpoint address="Web"
                      binding="webHttpBinding"
                      contract="ProductServiceHost.IProductService"
                      behaviorConfiguration="WebBehavior" />
        </service>
    </services>
    <serviceHostingEnvironment multipleSiteBindingsEnabled="true"
                               aspNetCompatibilityEnabled="true" />
</system.serviceModel>
Modify Your Service Class (Optional)
Up to this point, you have modified the interface and the Web.Config file in your WCF service application project. The last item to modify within your WCF service is the service class itself. This is the class that implements the interface you modified with the attributes. Adding this attribute is optional and goes hand-in-hand with the aspNetCompatibility="true" that you set in the Web.Config file. Open up the service class and add the following using statement:
using System.ServiceModel.Activation;
Decorate the service class itself with the AspNetCompatibilityRequirements attribute. Remember: In the Web.Config file, you added the attribute for aspNetCompatibilityEnabled. You now add this attribute to your class so this class is allowed to run within the ASP.NET AppDomain and have access to any Session, Application, or other ASP.NET objects.
[AspNetCompatibilityRequirements(
    RequirementsMode = AspNetCompatibilityRequirementsMode.Allowed)]
public class ProductService : IProductService
{
    ...
    ...
}
Run your application again to ensure that all of your WCF services still work with your application as expected.
Get Data via jQuery
Now that your services are all prepared, you are ready to call your WCF service application from an HTML page. Create a new ASP.NET Empty Web Application in Visual Studio 2010 or 2012. Add a Default.html page to this project. Within the <form> tag of your HTML page, add the following code:
<div style="display: inline;">
    <input id="btnProduct"
           type="button"
           value="Get Products"
           onclick="GetProducts()" />
</div>
<p>
    <select id="ddlProduct">
    </select>
</p>
You need the current jQuery scripts in order to make the Ajax calls to your WCF service. Go to https://jquery.com/ and download the latest jQuery scripts. Add a new folder to your ASP.NET project in Visual Studio called Scripts and add the downloaded .js file to this new folder. Within the <head> tag in your Default.html page, add the following scripts:
<script type="text/javascript"
        src="Scripts/jquery-1.9.1.min.js">
</script>

<script type="text/javascript">
</script>
It's important to note about the above code that you make sure to use a closing </script> tag and don't close the script tag all on one line, as in <script type="text/javascript" ... />. Note the /> closing tag. If you close your <script> tag all on one line, jQuery will not work.
You are now ready to write a function to call the GetProducts method in your Web service and return a list of product objects. Within the second <script> tag in your Default.html page, create a function called GetProducts that looks like Listing 3.
Listing 3: Make an Ajax call to your Web service to retrieve product data.
<script type="text/javascript">
    function GetProducts() {
        $.ajax({
            url: "http://localhost:6207/ProductService.svc/Web/GetProducts",
            type: "GET",
            cache: false,
            data: "{}",
            contentType: "application/json; charset=utf-8",
            dataType: "json",
            processData: true,
            success: function (data) {
                for (i = 0; i < data.d.length; i++) {
                    $('#ddlProduct').append(new Option(
                                               data.d[i].ProductName,
                                               data.d[i].ProductId));
                }
            },
            error: function (response) {
                alert('Failed: ' + response.statusText);
            }
        });
    }
</script>
In the $.ajax call, there are several properties that you need to set. The “url” parameter is set to the http endpoint for your WCF service. The normal syntax for a call to your WCF Service is http://localhost:6207/ProductService.svc/GetProducts where you list the name of the method after the .SVC file name. However, you must add the “Web” attribute after the .SVC file name to match the “address” attribute you added in the Web.Config file of your WCF Service. When running your service from Visual Studio, set a specific port in the properties of the WCF service project instead of letting it generate a new one each time. Use that port number in the “url” parameter.
When running your service from Visual Studio, set a specific port in the properties of the WCF service project instead of letting it generate a new one each time.
The “type” parameter is set to “GET” because no parameters are posted to the GetProducts method. If you decorate your WCF service method with the WebGet attribute, you always set this property to “GET”. The “cache” parameter can be set to false if you want to explicitly call GetProducts each time, and get new data from your service. By default, “cache” is set to true and the data is cached on the client side. The “data” parameter can be set to either null or “{}” to specify that no parameters are being passed to the service call. The “contentType” and “dataType” properties need to be set to JSON to specify that the data sent and returned should be in a JSON format.
You do things with the data that is retrieved within the “success” block. Your results come back in a JSON string into the “data” parameter passed to the success function. Within the data parameter, you'll find a property called “d” where your actual results are located. To access any of your properties returned from your result set, you use the syntax data.d[index].PropertyName. To load a <select>, append a new Option object with the text and value portions filled in, and do the same with the values in the PropertyName and ProductId properties.
Run the WCF service from Visual Studio and once it is running, start your ASP.NET Web application to display the Default.html page. Click on the Get Products button and you should see your data loaded into the drop-down list in your Web page.
Get Data via jQuery using .getJSON()
Instead of using $.ajax(), you can also use a shorthand function called $.getJSON(). This method is a little simpler to use than .ajax(), but does not have all of the options available. Listing 4 is an example of calling your GetProducts service using the $.getJSON() function.
Listing 4: Use of the .getJSON function is a little simpler than the .ajax call but does not allow you fine control over all settings like .ajax. does
function GetProducts() {
    $.getJSON("http://localhost:65446/ProductService.svc/Web/GetProducts",
    function (data) {
        for (i = 0; i < data.d.length; i++) {
            // Format the text to display and check for null.
            if (data.d[i].Price == null)
                var str = data.d[i].ProductName + ' ($0)';
            else
                var str = data.d[i].ProductName +
                    ' ($' + data.d[i].Price + ')';

            $('#ddlProduct').append(new Option(
                str, data.d[i].ProductId));
        }
    });
}
In this version of the GetProducts call, you append the price to the product name prior to adding the data to the select list. However, the price may come back as null, so you should check the Price property for a null value before you append the data to the product name.
Pass an Object to a WCF Service
The Insert method in the WCF service expects a Product object to be passed in, as shown in this code snippet:
[OperationContract]
bool Insert(Product entity);
You are not going to be able to create a .NET Product object in JavaScript or jQuery, so there has to be a mechanism to convert a JSON object into a .NET object. All of this is done behind the scenes for you, as part of the WCF service layer. Let's learn how to create a JSON object in such a way that it will be converted to a .NET Product object when that JSON object is passed to a WCF service.
All of this is done behind the scenes for you, as part of the WCF service layer.
The first way is to use a typical JSON object notation in the format {"key":"value"}. You can see an example of creating a Product object to pass to the Insert method below:
var dataToSend = '{"entity":{"ProductId":"999",
                   "ProductName":"A New Product",
                   "IntroductionDate": "\/Date(1357027200000-0800)/\",
                   "Cost":"10",
                   "Price":"20",
                   "IsDiscontinued":"false"}}';
Notice the wrapper above around the “Product” object notation where the outside object is {"entity":{ ... }}. The name for this outside object needs to be the same name as the parameter you use in the WCF service method. Notice that the date format in the above code is a little strange. The format is "/Date(int)/" where the “int” is the number of milliseconds since midnight January 1, 1970. You will learn how to take a normal date that a user would enter in a format such as mm/dd/yyyy and convert it to this format later in this article.
Another method of creating a JSON object is to use the following syntax:
var product = {
    ProductId: "999",
    ProductName: "A New Product",
    IntroductionDate: new Date("1/1/2013 08:00am").toMSDate(),
    Cost: "10",
    Price: "20",
    IsDiscontinued: "false"
};
What is nice about this syntax is that it is easier to read and create. Notice that on the Date creation, I pass the newly created date to a function called toMSDate(). Let's take a look at how to convert a normal date into a date that can be serialized and passed to a WCF service.
Convert Date to Microsoft Format
One of the methods you can use convert a normal date to the date required by the WCF service is to create a prototype function (see Listing 5). This is similar to creating an extension method in .NET. The function you create takes the date and time passed to the function, converts it to a UTC date and with this new date, converts it to a time in milliseconds using the getTime function. You then wrap the "/Date()/" string around this new time.
Listing 5: You need to create a function to convert a normal date time into a UTC formatted time.
Date.prototype.toMSDate = function () {
    // Convert date to UTC time
    var newDate = new Date(Date.UTC(this.getFullYear(),
                                    this.getMonth(),
                                    this.getDate(),
                                    this.getHours(),
                                    this.getMinutes(),
                                    this.getSeconds(),
                                    this.getMilliseconds()));

    // Create date in WCF format
    var date = '/Date(' + newDate.getTime() + ')/';

    return date;
};
Now that you know how to create an object and deal with date data types, let's write a jQuery function to post this object to the Insert method of your WCF service. Listing 6 shows the complete call to add a new Product object to the Product table by calling your Web service. The data in this sample is hard-coded to keep things simple for the article. However, in the downloaded samples for this article, you will find a complete Web page for adding, editing, and deleting data from fields on an HTML page.
Listing 6: Insert a Product object using a POST call to the WCF Service Insert method.
    function InsertProduct() {
        // Create a Product object
        var product = {
            ProductId: "999",
            ProductName: "A New Product",
            IntroductionDate: new Date("1/1/2013 08:00am").toMSDate(),
            Cost: "10",
            Price: "20",
            IsDiscontinued: "false"
        };

    $.ajax({
        url: "http://localhost:6207/ProductService.svc/Web/Insert",
        type: "POST",
        data: JSON.stringify({ entity: product }),
        contentType: "application/json; charset=utf-8",
        dataType: "json",
        processData: true,
        success: function (response) {
            alert('Success!');
        },
        error: function (response) {
            alert('Failed: ' + response.statusText);
        }
    });
}
To call the method in Listing 6, add a button to the HTML page with the following button definition:
<input id="btnInsert"
       type="button"
       value="Insert Product"
       onclick="InsertProduct()" />
Open the WCF service and set a breakpoint in the Insert method. Run the Web application and click on the Insert Product button and you should see the data being passed into the Insert method once it hits the breakpoint.
Updating and Deleting Data
Updating data uses almost the exact same code that you used for inserting data. Listing 7 shows a function called UpdateProduct that you might include in your HTML page to update a specific record in your Product table. Building the object is exactly the same, and the only difference in the Ajax call is that you use Update on the end of the URL instead of Insert.
Listing 7: Update a Product object using a POST call to the WCF Service Update method.
function UpdateProduct() {
    // Create a Product object to Update
    var product = {
        ProductId: "999",
        ProductName: "A CHANGED Product",
        IntroductionDate: new Date("2/1/2013 08:00am").toMSDate(),
        Cost: "20",
        Price: "30",
        IsDiscontinued: "false"
    };

    $.ajax({
        type: "POST",
        url: "http://localhost:6207/ProductService.svc/Web/Update",
        data: JSON.stringify({ entity: product }),
        contentType: "application/json; charset=utf-8",
        dataType: "json",
        processData: true,
        success: function (response) {
            alert('Success!');
        },
        error: function (response) {
            alert('Failed: ' + response.statusText);
        }
    });
}
When you build the Delete function, you only need to fill in the ProductId in your JSON object, as shown in Listing 8. When you pass this data into the Delete method of your WCF Service, all of the other properties of the Product object will be null.
Listing 8: Delete a Product object using a POST call to the WCF Service Delete method.
function DeleteProduct() {
    // Create a Product object to Delete
    var product = {
        ProductId: "999"
    };

    $.ajax({
        type: "POST",
        url: "http://localhost:6207/ProductService.svc/Web/Delete",
        data: JSON.stringify({ entity: product }),
        contentType: "application/json; charset=utf-8",
        dataType: "json",
        processData: true,
        success: function (response) {
            alert('Success!');
        },
        error: function (response) {
            alert('Failed: ' + response.statusText);
        }
    });
}
Summary
The ability to reuse your existing WCF services with just a few changes is a great time saver since you do not need to write complete new services in order to consume data from jQuery. As our world moves more and more to mobile devices, the need for connecting to existing services will only increase. You don't want to have to rewrite any existing services if you don't have to, so with just a few tweaks of your code and your configuration file, you are good to go. There are a few things you need to worry about on the jQuery client-side of things such as date handling, but for the most part, passing data back and forth works very well.
