


This excerpt is from Reengineering .NET: Injecting Quality, Testability, and Architecture into Existing Systems, by Bradley Irby, Published Oct 24, 2012 by Addison-Wesley Professional. Part of the Microsoft Windows Development Series series. Copyright 2013, ISBN-10: 0-321-82145-9. To Purchase this book go to: http://www.informit.com/store/reengineering-.net-injecting-quality-testability-and-9780321821454">http://www.informit.com/store/reengineering-.net-injecting-quality-testability-and-9780321821454 .
The primary goal of the architectural patterns we discuss is to
break our application into smaller pieces that have fewer references to each other to reduce coupling. This is an advantage because it becomes much easier for a class to evolve if there are fewer hard references to it that must be updated. It also introduces more opportunities for automated testing, or unit testing.
Unit testing is a way of automating much of the quality assurance function of a development department. The goal of unit testing is to isolate classes from the rest of the application so their methods can be tested via code. We write special test methods that exercise the system under test and ensure that it executes proper logic.
Unit tests are a critical part of the reengineering process. If your team does not have a unit-testing framework installed, now is the time to get one.
In this chapter, we touch on the high points of what unit tests are and how to implement them. There are many good books dedicated completely to unit testing; if you are new to the subject, read one (or more). We discuss the topic in as much depth as necessary to provide a continuous narrative.
Though you learn the basics of how to create unit tests here, it is recommended that you take your skills to a higher level.
An Example of Unit Testing
Imagine you are writing a method that needs to calculate the payments to be made on a mortgage at a given interest rate. The caller can specify the initial amount of the loan, the number of years over which it is to be paid, and the interest rate. Your job is to write a method that can calculate the payments the borrower needs to make for any given loan configuration.
After you write this method, how do you test it? You can create a data entry screen that gives the user a way of entering the various values and then manually key in test data to cover the many different values for which you know what payments should be created. This approach is wasteful because it requires you to build a data entry screen that is subsequently thrown away and requires someone to manually test the results of the method before each production release of the product just to ensure that no changes are introduced that can break the calculation.
Now imagine writing code that would test the method for us. We can code something similar to the pseudo code in Listing 3.1.
If we write code to execute the tests shown previously, then we can run that test code anytime and we can ensure that the method is still working.
We can even automate running the tests on each code check-in. This would virtually guarantee that the method is correct for all the scenarios we want to support and that it will never break.
Creating Unit Tests
Before we show a real example of a unit test, we need to look at how to create a unit test project. We will use the unit test project that is built into Visual Studio because it is a robust product that is well integrated into the IDE.
NOTE
We use the Microsoft Unit Testing framework, but there are many good frameworks available. The ideas we review here are applicable to any of these frameworks.
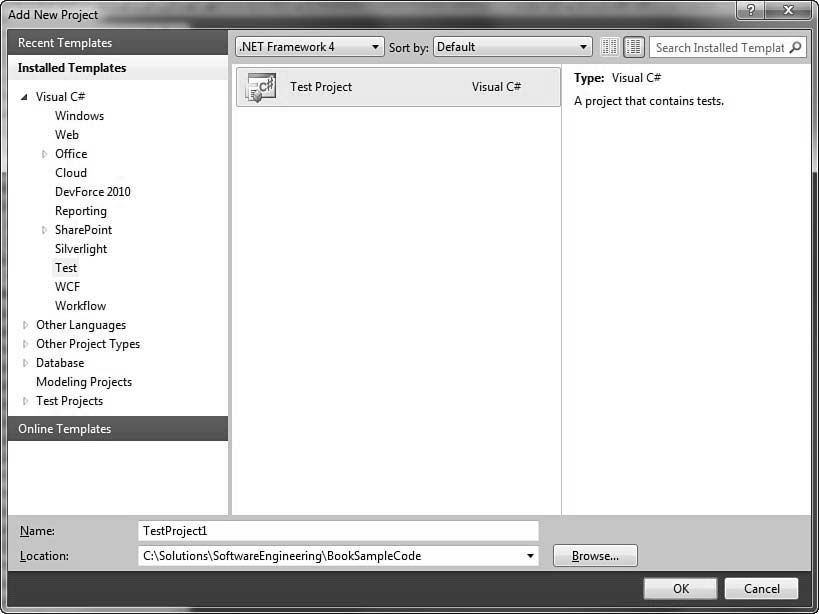
The Microsoft Unit Testing framework has a special project type to hold the unit tests, so the first thing we must do is add a new project. Rightclick the solution in the Solution Explorer and choose Add > New Project. Choose a Test Project type and give it an appropriate name and then press OK. We use a separate test project for every standard project in the solution.
Therefore, as shown in Figure 3.1, we name the test project with the name of the standard project and we append UnitTests to the end.
This creates a new project with a sample test already created and all the necessary references added. The sample test class comes with sample code that is not necessary right now, so to keep things simple, modify your sample test to look like this. This is all that is necessary for your first unit test; it simply ensures that True == True.
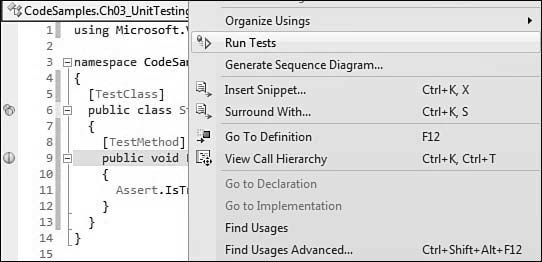
To run this test, right-click the name of the class and choose Run Tests, as demonstrated in Figure 3.2.
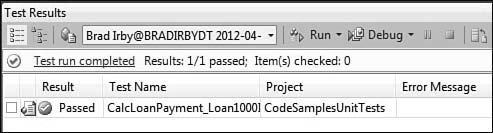
After running the test, the window shown in Figure 3.3 shows that the test passed.


Just so you can see what happens when a test fails, modify your code to make the test fail (see Listing 3.3).
Now that we know how to create unit test files, let’s get back to testing.
Writing a Test
Let’s look at an example of a class to be tested and the unit tests we build for it. The method shown in Listing 3.4 continues the previous example where we calculate the monthly payment for a loan.
We want to create some tests that ensure this method works for all cases that it supports. To begin, we write a test for a scenario that should produce no errors. To check the results, we can use one of the many mortgage rate calculators on the Web or Excel. Using one of these tools, we find that the payment for a $1,000 loan at 10 percent over 30 years should be $8.78 per month. In Listing 3.5, we write the test to pass in these values and Assert that the return value is valid.
Let’s take this test one line at a time. The first thing to notice is the TestClass attribute on the class. This is required to tell the unit-testing framework that this class is a test class. Each unit-testing framework has a different attribute, but they all require something similar to decorate test classes. On the test method, there is also an attribute labeling the method as a test; this is called TestMethod.
The name of the class itself is technically unimportant, so we typically name it the same name as the class that is tested and then append UnitTest to the end. The method name here is also technically unimportant because it will never be called by any code. The standard we use for naming unit test methods is to start with the name of the method or property being tested, add the conditions for the specific case being tested, and finally, add
the results expected. In this case, we test that the CalcLoanPayment method, when called with a loan amount of $1,000, a yearly interest rate of 10 percent, and 360 monthly payments, it returns the proper payment, so we get the following name. The name should be descriptive enough so when you see a red “fail” indicator next to it in your test runs, you will know the
scenario that has failed.
CalcLoanPayment_Loan1000Int10Pmt360_ReturnsProperPayment
The body of the test method is quite simple. We create a new instance of the class we wish to test and then call the method under test with the appropriate parameters. The only code in this method that we have not seen before is the Assert line. The Assert keyword is where we ensure that the method we test works properly. By using the Assert to test the results of our method, we ensure that our CalcLoanPayment method works properly for the given values. If the return value is what we expect, this test passes; otherwise, it fails.
This type of test structure is called Arrange-Act-Assert. The first step of the test is to arrange the classes so that they reflect the situation we want to test. We then act on the class under test to execute the code we want to test. Finally, we assert that the return value (or the actions taken) are appropriate for our test. When we run this test, we can see that our method returns the wrong value, as shown in Figure 3.5. We find our first bug!
Figure 3.5 shows the expected value and the actual returned value in the error message.

Upon examination of the code, we can see that the interest rate we pass in is a number between 0 and 100, whereas our code is expecting a number between 0 and 1. We can either change our test or change our code depending on which we think is in error. Because it is common to refer to yearly interest as 10 percent rather than 0.1, we allow users to pass in a number between 0 and 100 so that a 10 for the yearly interest is valid. That means we must update our business logic to accommodate this, as shown in Listing 3.6.
Running the test again proves that the code now works properly, as shown in Figure 3.6.
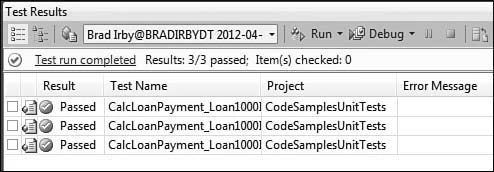
As shown in Listing 3.7, we can now add more methods to test different scenarios and ensure that the return values are valid.
All of these tests should pass, as shown in Figure 3.7.
Detecting Exceptions
When writing your tests, be sure to include tests for invalid values. For instance, what happens if we pass a negative number to our method as an interest rate? This is a condition that should not be allowed, so we should throw an exception. Normally if an exception is thrown in the business logic, we want that treated as a test failure, but in this case, it should cause the test to succeed. To do this, we use the ExpectedException attribute.
To continue reading this article click here: http://ptgmedia.pearsoncmg.com/images/9780321821454/samplepages/0321821459.pdf">http://ptgmedia.pearsoncmg.com/images/9780321821454/samplepages/0321821459.pdf
