


Node.js by itself is a blank canvas. However, the Express.js web framework for Node.js provides programmers with a clear, concise development platform to build high performance Web APIs.
In this article, I’ll illustrate what it takes to build a simple Web API using Node.js and the Express.js web framework with MongoDB as the persistence mechanism. Under the hood I’ll use MongoDB and Mongoose to persist the data.
NOTE: You can find the complete source code for this article at: https://github.com/donnfelker/workout-tracker
The Node.js product is still in its infancy yet it’s already being touted in many tech circles as the quickest way to develop scalable APIs (and applications) that can handle a large load directly out of the box. The main benefit of Node.js is that any existing JavaScript knowledge you have instantly transfers over to Node.js as it is a JavaScript framework. While this is a net gain, the unfortunate consequence of a new framework like Node.js is that you’re left with a blank canvas to start your development from. Building a Web API from the ground floor is not only time consuming but it is also very error prone in the long run. Thankfully, Express, the high performance web framework for Node.js, exists. Express allows you to quickly create applications that have a majority of the common boilerplate code already written for you. In this article, you’ll learn how to use the Express web framework for Node.js by building a simple Web API for a sample application known as the Workout Tracker.
Persistence in any Web API is the cornerstone of development. A common problem in API development is that the inserts or reads are far too slow due to the normalization of the data in a typical relational database. While there are ways to improve these queries (and insertions) with proper tuning of the database, one alternative up and coming approach is to use MongoDB as the backing store for APIs that require high throughput. Modeling the data in a document-oriented fashion (as MongoDB does) allows the developer to tackle the issue from a different angle - allowing the developer to store the data for the model in a complete entity in a MongoDB document. I’m not advocating that one approach is better than another, only that options from one approach might make more sense than another. In this article, I will show you how you can integrate MongoDB with Node.js to create a simple Web API using the Mongoose package.
Standing on the Shoulders of Giants
Node.js has not been around long - a mere three years - not even hitting an official version 1.0 (for this article I’ll use Node v0.8.0). During the last three years, various companies have started to adopt Node.js as part of their core business strategy. One of the alluring aspects of Node.js is the ability to share JavaScript between the client and the server.
While many web developers already know JavaScript and want to learn Node.js, some are turned off at the thought of working with Node.js because there is not a web framework built into the core of Node.js. I was no exception. Upon my first glance at version v0.2.x of Node.js, I thought the feature set was somewhat bare and the landscape of available packages (and documentation and examples) was sparse to say the least. It was frustrating to see that I might have to spend a large amount of time building core components simply to be productive in this new environment. This was also of major concern to a lot of other developers (and sometimes still is). Most developers are concerned with how productive they will be. If you want a solution that makes working in Node.js easier, you’ll want to look at one of the few various web frameworks for Node.js. Some of those include Express, Flatiron and Geddy. In this article I will work with Express because Express is the most popular Node.js web framework at the moment.
Creating Your First Express App
In order to develop an Express application you must install Express first. To install Express, you need to have Node installed (I’m using v0.8.0 - get Node.js at nodejs.org). To install Express from the command prompt, type:
npm install -g express
This command instructs NPM (Node Package Manager) to install Express. After a moment of some values streaming across the screen you will have installed Express! Using the -g switch instructs NPM to install the package globally inside of your current Node.js installation - meaning that you can access Express anywhere, not just in your current project.
To create your first Express app, navigate to the destination where you’d like your application files to reside (e.g., /development or C:\development if you’re on Windows). Next, issue the following command from the command prompt:
express ./workout-tracker
This will execute the express command that will create the Express application inside of a folder called workout-tracker. I will build this application during the course of this article. The Workout Tracker Express application is an API that will allow a user to keep track of the workouts they have performed through API commands.
Once the command above finishes you will need to change directories and install the dependencies that the application needs.
cd ./workout-tracker
npm install -d
The -d switch on the npm install command informs npm to provide an information-level log output during the installation process of the dependencies that npm is installing.
How does NPM know what the dependencies are? If no argument is supplied to the npm install command then npm will look for a file called package.json in the current directory and will read that file for all of the dependencies that need to be installed. Express created the package.json file during the express application generation process. The package.json file is very similar to the Gemfile featured in Rubygems in the Ruby language. The npm install command walks the package.json file and installs each of the dependencies.
Exploring the Express Application Assets
During the Express application generation process, Express generates a file structure similar to what is present in Figure 1.
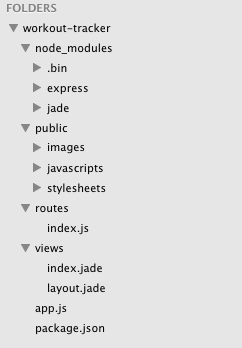
The list below explains the important folders and files:
- node_modules: Contains the downloaded dependencies that were installed through npm install.
- Public: Contains any assets that will be available to the public-facing part of the application such as images, JavaScript files and style sheets.
- Routes: The routes for the application.
- Views: The view templates for the application. You will not be using these in this article as you will be building a JSON APS.
- app.js: The entry point of your application.
- package.json: The file which includes the dependency declarations for your application.
You are not limited to only the folders listed above. You can create alternate folders (as you will do later in this article). However, the folders above are the default folders that Express creates. This style of folder nomenclature and project structure is somewhat of an opinionated approach - very similar to how Rails conventions and project structure are considered very opinionated. Following, not fighting, the conventions will usually help speed up development of Node.js web applications and APIs significantly.
An Express application is comprised of views, routes and assets. Between these various parts of the application you can create compelling applications that maintain a separated architecture. Views contain HTML, routes are responsible for URL routing, and assets such as images are available for download and viewing to the client.
Views are responsible for rendering HTML to the client and maintaining markup for web applications. You will not be using views in this article, as you will be building a Web API that exposes JSON endpoints. However, it is important to note that Express does not use simple bracket tax syntax as Rails ERB or classic .NET WebForms uses. Instead, Express uses the Jade view engine that is very similar to the Haml view development.
Routes in an Express application are responsible for handling the URL mapping to actual code that you write. This could be a route such as /workouts/:id where :id maps to the particular ID which associates with a workout that you’re trying to locate, such as /workouts/134. Express would translate that into a route that is defined in our app.js file:
app.get('/workouts/:id', workouts.show);
which would execute the code in the workouts show method as shown below.
exports.show = function(req, res) {
  // ... code that would get executed ...
}
In this article, you’ll work very closely with routes as this is where the majority of your code will be placed. While this is not a pure MVC approach to developing, you can view an example of how to develop with an MVC approach via the examples folder on the Express GitHub repository located at: https://github.com/visionmedia/express.
The assets of your application include your style sheets, images and JavaScript files. You typically include these files as static files to your application that would most likely be downloaded by the user when viewing an application via a HTML view (again, you will not be using these assets as you will be developing a JSON API with Express).
The file that you should be most concerned with is the app.js file. This is the entry point to your application. You can see the contents of this file in Listing 1.
The app.js file is the file that Node.js will use to bootstrap the Express application. This file contains the proper require statements to create the Express application. After the require statements the Express app is created through the var app = express(); function call.
Immediately after the app variable is initialized, the Express application is configured via the app.configure(…) call. The configure method initializes the Express application, which allows configuration to the current desired runtime environment. You can configure different runtime environments by providing the first parameter to the configure method - such as development or production (or any other environment you may need). I will demonstrate this in Listing 1. In the first instance of the configure method, notice that it does not provide an environment parameter. Any configure method that does not provide the environment parameter will configure the entire Express application. In this method call, the application is configured with the following:
- Default Port: Sets the current environment port or port 3000.
- View Directory: Sets the directory that contains the views.
- View Engine: Sets the view engine that will be used by the Express application.
- Favicon: Provides a fast path to the favicon.
- Logger: The logger to use.
- Body Parser: A parser that parses out the BODY data from HTTP Request.
- Method Overrides: Checks the request.body method for the HTTP method overrides.
- The Router: The router that is used for routing in the Express application.
- Public Directory: Specifies the public directory for static assets such as images, style sheets and JavaScript files.
In the second configure method, the first parameter, development, is provided to configure the current runtime environment for development. In this instance, the errorHandler Connect middleware is activated.
Connect is a middleware framework for Node.js that provides over 18 different bundled middleware components that simplify the usage of Node.js.
The next step in the configuration of the Express application is the set up of the routes. In the current configuration, the only route that is available is the root route, which routes to the default view. This is done via the app.get('/', routes.index);. This route configuration uses the routes located in the routes module in /routes/index.js. You will build five routes in this article.
The last line of the app.js file contains the function call that creates the HTTP Server using the provided port in the first configure method.
Starting the App
Starting your first Node.js application is as simple as executing one command. Navigate to the directory that contains your application and type the following command:
node app
After executing this command, you should see the following on the command line:
Express server listening on port 3000 in development
mode.
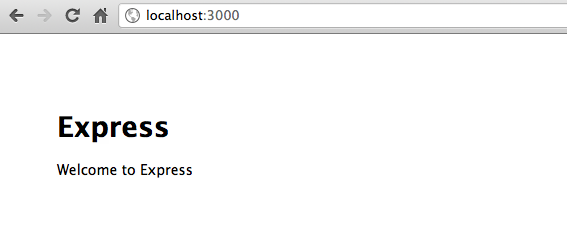
Open your web browser and visit the http://localhost:3000 location. Figure 2 shows what you should see.
Writing Your First Route
Now that you have the app running, open the terminal window that started the Node application and press CTRL+C to close the application. Each time you make changes to the application you will need to stop and start the Node.js server so that each change can be reloaded. Next, you will create your first route and return JSON from the route.
Create a new file with the name workout.js in the /routes folder of your application.
In the workouts.js file, type the following code and save the file.
exports.index = function(req, res) {
  res.json(200, { message: "My first route"});
}
When executed, this route will return an HTTP 200 status code with the application/json content type with JSON data as the result (shown below when you render it via the browser).
In the workouts.js file, a function with the name index is exported using the exports object. For an in-depth understanding of the require function and exports object in Node.js, please see the article located at this address: http://goo.gl/FMxdK.
In order to use the new index route, you will need to require the module in the app.js file. Open the app.js file and add the workouts.js file to the require statements as shown below:
var express = require('express')
  , routes = require('./routes')
  , http = require('http')
  , workouts = require('./routes/workouts');
This will load the workouts.js file into a workouts variable in the app.js module. You can learn more about the Node.js module loading system here: http://nodejs.org/api/modules.html.
Further down in the app.js file you will have to add a new route entry to expose this endpoint. To do so, add the following code after the index route:
app.get('/', routes.index);
app.get('/workouts', workouts.index);
This route definition creates a route which is accessible via the /workouts url location. Using the local workouts variable you can access the index member (which was created via the exports call in the workouts.js file) that exposes the route.
Save the file. Start the Node.js application by issuing the node app command via your terminal client. Open your web browser and visit http://localhost:3000/workouts and you should see something similar to Figure 3. (NOTE: The JSON result in Figure 3 is formatted with the JSONView extension for Chrome. Available here: http://goo.gl/ryn5R. This extension makes it much easier to view JSON results in the browser.)
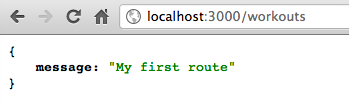
Congratulations you’ve created your first JSON endpoint with Node.js and Express!
Persisting Data with MongoDB
As I’ve said before, for this article you’ll build a simple workout tracking application. The application will track some very simple metadata about a workout such as its name, description and the date the workout was entered.
In this application you will persist data with MongoDB, therefore you will need to have MongoDB installed locally or be using a service such as MongoHQ for a hosted solution (mongohq.com). To install MongoDB, follow the installation instructions here: http://www.mongodb.org/">http://www.mongodb.org/.
In order to communicate with MongoDB you will need to use one of many different drivers or plug-ins. For this article, I’ll use the Mongoose object modeling tool to connect to MongoDB. Mongoose is an object modeling tool (very similar to an ORM) for MongoDB Node.js written in JavaScript. Mongoose object modeling definitions contain validators, defaults, getters, setters, indexes, middleware, methods, statics, plugins and DB Refs. For a complete reference on Mongoose, visit http://www.mongoosejs.com">http://www.mongoosejs.com.
To install Mongoose, you will use NPM with the following command:
npm install mongoose --save
Using the --save switch with NPM will update the package.json file with a dependency on Mongoose. This allows future developers on your team to download the source code for your application and then issue the npm install command that will install all the dependencies for the Express application. At that point, Mongoose would be installed as it is listed as a dependency in the package.json file.
Once the installation of Mongoose is complete, create a folder in the project with the name models. In that folder, create a file with the name workout.js. This is the file in which you will define the workout object model.
Though MongoDB is a schema-less document storage system, Mongoose provides the ability to provide a schema for your object model to simplify the creation, retrieval and updating of documents. In the workout.js file, type the code shown in Listing 2.
The first two lines set the Mongoose variable and Schema variable from the require function. This is needed in order to work with Mongoose.
The first variable declaration, workoutSchema, is created using the Schema function call with a JSON object which defines the object model. This object model is defined as follows:
- Name: The type of the property is String. The required option is included, which if true creates a validation rule that requires this value to be present before saving can occur. This value is also Trimmed before saving by calling the .trim() method. Last, but certainly not least, is the index that is created on the name. This index specifies that the name must be unique in the MongoDB collection.
- Description: Of type String and the value is required.
- date_created: This type of property is Date and it is required prior to saving. The default value of Date.now is provided in the schema definition to provide a default value if nothing is provided. This ensures that there is always a value present in the MongoDB document when saved.
The last variable created is the actual workout model. This model is created with the model method on the Mongoose object. Simply providing the model name and the schema for the model creates the workout model.
Once the workout is created it is exported from the current module using the module.exports object. At this point, you have defined the object model and the only thing left is to connect to MongoDB. Once connected you can query, update, save and remove documents using Mongoose through your Express application.
Integrating Express and Mongoose
Using your Mongoose object model in your Express application is quite simple. Connect to the MongoDB instance and then perform your queries. You are now going to connect to MongoDB and then change your default route to query MongoDB for the workouts that are saved in the collection.
Open the app.js file and add one require statement to the list of require statements.
var express = require('express')
  , routes = require('./routes')
  , http = require('http')
  , workouts = require('./routes/workouts')
  , mongoose = require('mongoose');
Add the following line after the require statements.
mongoose.connect('mongodb://localhost/workout_tracker');
This line connects to the local MongoDB instance you have set up. NOTE: MongoDB must be running (mongod or mongos command) in order to connect to MongoDB from the application you are building. Notice how you have never created a database with the name workout-tracker. This is because as soon as Mongoose attempts to query the database, Mongoose will create the workout-tracker database for you. That’s it! Save the file and close it.
The querying of the workout documents should be done in the workout routes. Open the /routes/workout.js file and replace the contents of the file with the code shown in Listing 3.
The code in Listing 3 queries the MongoDB workout collection using the Mongoose object modeling tool. The Workout.find(…) method accepts two parameters: the query and the callback for when the query completes. The first parameter is empty because no filter is to be applied - this route requests all workouts to be returned.
The callback function has parameters that are returned. An error object, err, and the documents that are returned if no error occurred. The JSON object that is returned is returned as a JSON object with one field - workouts. This contains an array of JSON objects that are returned from MongoDB if documents are found. If no documents are found, an empty array is returned. An HTTP 200 status code is returned when no error is found. When an error is found, an HTTP 500 status code is returned with a message that includes the error object as a JSON object.
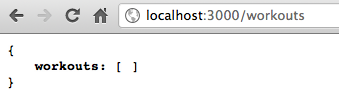
Save the file. Press CTRL+C in the terminal window that is currently running the node application. Type node app once again and hit ENTER. Once the application starts, visit the route http://localhost:3000/workouts and you should see something similar to Figure 4. At this time, there are no documents in the MongoDB collection. You will now add a route to add a document.
In the workout.js file, add the code shown in Listing 4.
The create export in Listing 4 will attempt to find a workout with the same name. If it finds a workout with the same name (case insensitive search) it will return an error. If no duplicate is found and no error occurs than save the new workout, otherwise, return the error that occurred.
The first method call performs a query to find one match based upon the name of the workout, but using a case insensitive search. Providing a regular expression as a query option to the findOne method call performs the case insensitive search. Upon completion of the findOne call, a Boolean check on the document and error is performed. If no document is returned and no error has occurred, a new document will be created. If an error has not occurred but a document is found than an HTTP 403 status code is returned, along with a JSON object that contains a message informing the user of what happened. Finally, if an error has occurred, the error will be returned to the user as a JSON object with an HTTP 500 status code.
Creating the document is as simple as creating a new workout object model, setting the values and then calling the save(…) method on the workout Mongoose object model. This method accepts one parameter - the callback that is performed when the save completes. If no error has occurred, than the save is considered a success and an HTTP 201 status code is returned with a JSON object informing the user that the workout has been created. If an error has occurred, an HTTP 500 status code is returned with a JSON object containing the error. Save the file.
Users of MongoDB may see a glaring cause for the usage of MongoDB’s upsert command. You can use upsert in Mongoose as shown here: http://goo.gl/Jmsfw, however, this was not done in this instance for ease of understanding the integration between Node.js and MongoDB.
In order to be able to access the export that you just created you will need to add the route to the app.js file. In the app.js file, add the following route to the route declarations:
app.post('/workouts', workouts.create);
This route declaration uses the post method and informs Express that when a user POSTs to the /workouts URI, the workouts.create export should be called (the method you just created).
Save the file. In the command terminal type CTRL+C and press ENTER to stop the execution of the current node application. Restart the application type node app then press ENTER. The app is now ready to accept new workouts via the endpoint you just created.
Since working with endpoints that require different HTTP VERBs to be initiated can be quite tricky, I tend to work with a REST client of some sort. Since I use Chrome as my main browser, I have found the Advanced Rest Client to be very useful. This is the Chrome extension that I will use for the remainder of this article. You can get this extension here: http://goo.gl/Fw5I4.
Open the Advanced Rest Client extension and fill out the fields as shown in Figure 5.
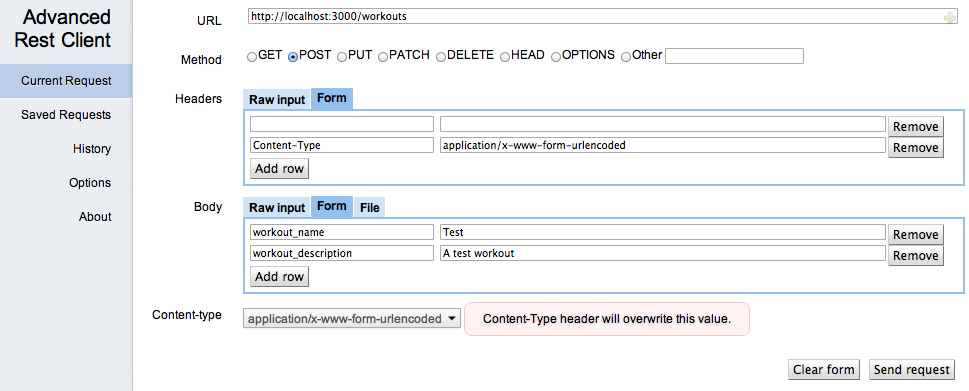
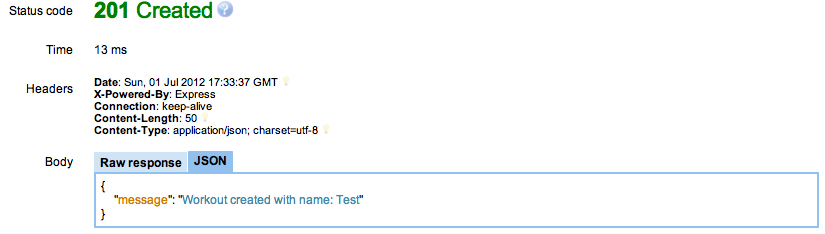
Notice that you are adding body values. These are going to be parsed by the bodyParser in Express and made available to the request object in the route that accepts them. Press the Send Request button. You should now see what is shown in Figure 6 at the bottom of the Advanced Rest Client window.
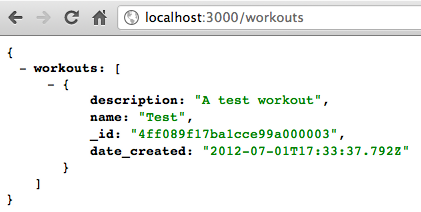
Now, return to the workouts tab on your browser and reload the page (URL: http://localhost:3000/workouts) and you should see the workout you just created returned in the list as shown in Figure 7.
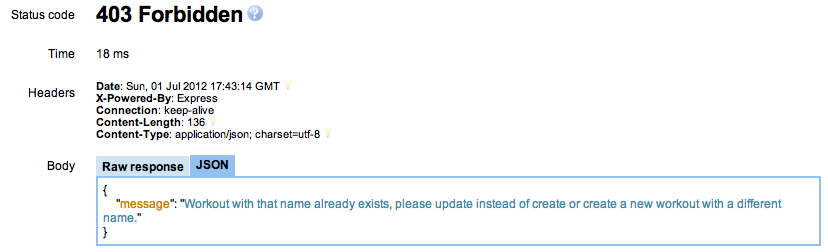
Return to the Advanced Rest Client and press the Send Request button again (do not change any of the values). You should see that an HTTP Status code 403 is returned as shown in Figure 8.
Creating the Show Route
There are a total of five routes that need to be created. Two of those have been created - view all workouts and create a workout. Sometimes in applications it is necessary to view the details of a particular record. To do that you will normally access a URL that has some sort of identifier. That identifier will be an id in a database and it will be used to query the database for the particular record in question.
You will create a route and then create the route to handle that query. First, open the app.js file and add the following route after the existing routes:
app.get('/workouts/:id', workouts.show);
This route allows an HTTP get on the /workouts/:id route. The :id segment of the URI is a placeholder that is parsed using regular expressions under the hood. This allows routes such as /workouts/1234 to be translated in the route function parameters. The id parameter in this case would be 1234.
To create the show route, open the /routes/workout.js file and add the code shown in Listing 5.
The show function takes the ID from the request parameters and uses the Mongoose object model to locate the document in the MongoDB collection. If no error occurs and a document is found, the document is returned as a JSON object with an HTTP 200 status code. If an error occurs, the error is returned as a JSON object with an HTTP 500 status code. If an error does not occur and no matching document is found than an HTTP 404 is returned along with a message informing the user that the document could not be found.
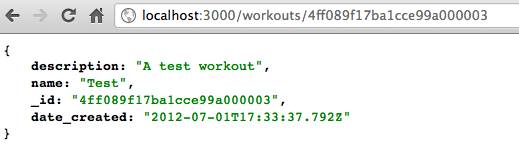
In order to utilize this new route you will need to stop and restart the node application. Once started, visit the /workouts route and then copy the _id value of one of the workouts you’ve created. Now take that value and append it to the URL. For example, you might have an URL like this: http://localhost:3000/workouts/4ff089f17ba1cce99a000003 where 4ff089f17ba1cce99a000003 is the id of the MongoDB document. Now press ENTER - this will execute the show route that you just created. You should see the MongoDB document as shown in Figure 9.
If you issue a request with an invalid id you will receive an HTTP 404 status code and a message stating that the workout could not be found. You can use Advanced Rest Client to verify this.
Creating the Delete Route
Just as you would like to insert a new workout into your application, you also may need to delete a workout from the application as well. To do so you will need to add another route to the application.
Open the app.js file and add the following route to the routes declarations:
app.del('/workouts', workouts.delete);
This route uses the del method, which is short for the DELETE HTTP VERB. Anytime a DELETE request is issued to the /workouts route the workouts.delete method will be invoked. Save the file.
Open the /routes/workout.js file and add the code shown in Listing 6.
This method grabs the id off of the body of the request and then uses it to find a workout through the workout object model. The findById method is a convenience method for finding a MongoDB document by the id of the document. Simply supply the id of the document and the callback (the second parameter of the findById call) will be initiated when the find is done. If an error does not occur and a document is found than you can remove the document by calling the remove() method on the document. This will remove the document from the MongoDB collection. Once that is complete, an HTTP 200 status code is returned to the client along with a message informing them that the delete has occurred. If an error has not occurred, a document is not found, and then an HTTP 404 status code is returned informing the user that the workout was not found. If an error occurs, an HTTP 403 status code is returned with a message informing the user that the workout could not be deleted along with the error code.
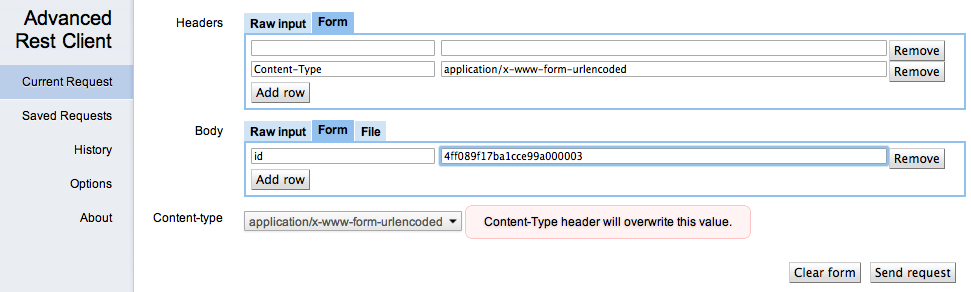
To test this, open Advanced Rest Client and enter the values as shown in Figure 10 (replace the id value with a valid id that you have grabbed from the /workouts route, viewed through a browser).
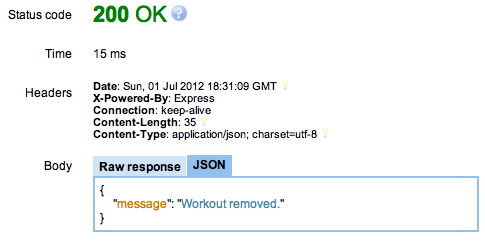
Click Send Request and you should see the same result as Figure 11 (if you used a valid id of a document). Issue the same request again and you’ll notice that you now receive a 403 because the document could not be deleted; this is because you just deleted it in the previous action. Some API developers feel that in this instance the API should return a 404; however, that is up to each API developer and the instance they are working within.
View the /workouts URL via the browser again and you’ll see that the workout you just deleted is not visible in the workout list.
Creating the Update Route
Last but certainly not least is the update route used to update the workout in MongoDB. You may realize that you have misspelled a workout and that you need to rename it. This route will allow you to do that.
First, create the route. To do this, open the app.js file and add the following route:
app.put('/workouts', workouts.update);
This route uses the put() method of the app object which utilizes the HTTP PUT verb. Anytime a PUT HTTP request is issued, the call will invoke the workouts.update method. Save the file.
Open the /routes/workout.js file and add the route to the file as shown in Listing 7.
In the update function, the body contains the workout name and workout description and id of the workout. Using the id, you use the findById method of the Mongoose object model attempting to find the MongoDB document. The callback function of the findById call performs all the necessary logic for the update.
If an error does not occur and a document is found than the document is updated using the values that were present in the HTTP body. Once the document is updated through the document properties, the document is saved using the save function, which also takes a callback as a parameter. Upon a successful save, that second callback is executed and the user is presented with a result that the document is updated with the workout name. If an error occurs during the save of the document, an HTTP 500 status code is returned with the error as a JSON object.
If a document cannot be found by the findById than an HTTP 404 status code is returned with a message informing the user that the workout could not be found, therefore it cannot be updated. If a document is not found and an error is present, an HTTP 500 status code will be returned with the error that occurred.
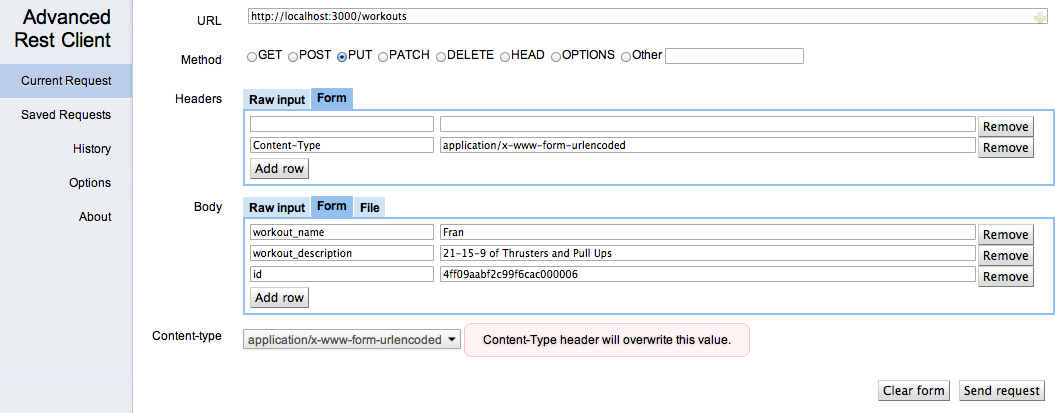
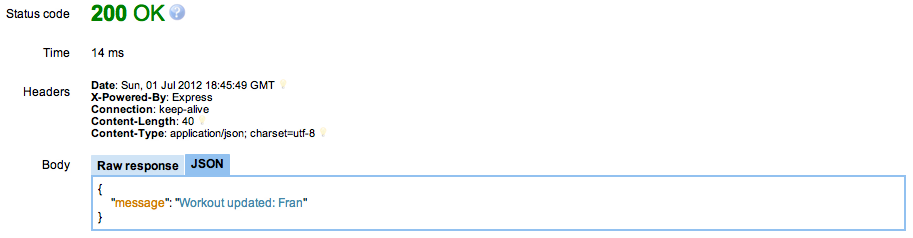
To issue an update, craft a PUT request in Advanced Rest Client as shown in Figure 12. Click the Send Request and you should see the same value as shown in Figure 13. Visit the /workouts route in your browser to view the updated document in the workouts JSON array. If you provide an invalid id in the PUT request a 404 will be returned. You can test this in Advanced Rest Client by changing the id to an invalid id that does not exist.
Thankfully, during the short life of ASP.NET MVC you’ve been introduced to many view engines - WebForms (default in version 1 and 2 of ASP.NET MVC), Spark, NHaml, NVelocity and many others. The big question you’re probably asking is - why do I need another view engine? The simple answer is - iteration.
Conclusion
Creating Web APIs in Node.js can be radically simplified using pre-built packages such as Express and Mongoose. With a minimal amount of upfront development effort and time, a developer can have a decent Web API up and running very quickly. If you don’t use MongoDB you can use other packages found in NPM for Redis, MySql, SQL Server, Oracle and other persistence mechanisms. Additional tools that can help in testing while in development are the should.js and mocha.js packages. You’ll find these available at https://github.com/visionmedia/should.js and http://visionmedia.github.com/mocha/">http://visionmedia.github.com/mocha/.
You can download the full source for the application at the public Git repository here: https://github.com/donnfelker/workout-tracker.
