


This excerpt is from the book, ‘ASP.NET 4 Unleashed, authored by Stephen Walther, Kevin Hoffman, Nate Dudek, Published Oct 14, 2010 by Sams. Part of the Unleashed series. ISBN 0672335522, Copyright 2011. For more info, please visit the publisher site http://www.informit.com/store/product.aspx?isbn= 0672331128
In This Chapter
- ASP.NET and the.NET Framework
- Understanding ASP.NET Controls
- Understanding ASP.NET Pages
- Installing ASP.NET
- Summary
Let’s start by building a simple ASP.NET page.
Note
For information on installing ASP.NET, see the last section of this chapter.
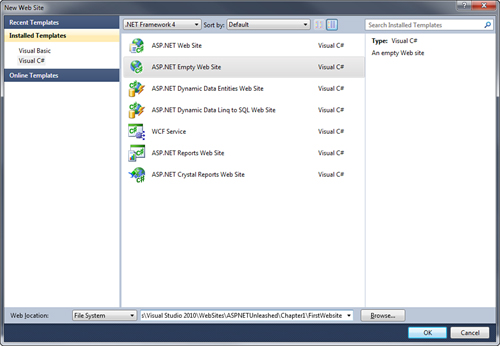
If you use Visual Web Developer or Visual Studio, you first need to create a new website. Start Visual Web Developer and select File, New Web Site. The New Web Site dialog box appears (see Figure 1.1). Enter the folder in which you want your new website to be created (such as “Chapter1”) in the Location field and click the OK button.
Note
When you create a new website, you might receive an error message warning you that you need to enable script debugging in Internet Explorer. You need to enable script debugging to build Ajax applications. We discuss Ajax later in the book.
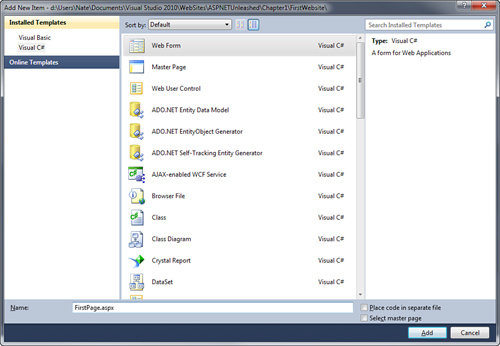
After you create a new website, you can add an ASP.NET page to it. Select Web Site, Add New Item. Select Web Form and enter the value FirstPage.aspx in the Name field. Make sure that both the Place Code in Separate File and Select Master Page check boxes are unchecked, and click the Add button to create the new ASP.NET page (see Figure 1.2).
Make sure that your code for FirstPage.aspx looks like the code contained in Listing 1.1.
Note
The book’s website contains all the code samples found in this book in both C# and VB.NET.
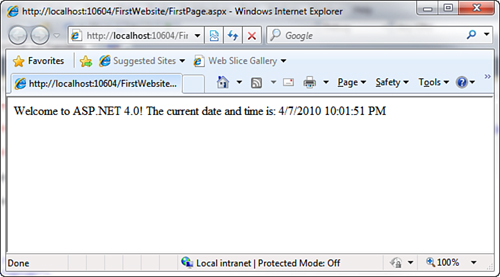
The ASP.NET page in Listing 1.1 displays a brief message and the server’s current date and time. You can view the page in Listing 1.1 in a browser by right-clicking the page and selecting View in Browser (see Figure 1.3).
The page in Listing 1.1 is an extremely simple page. However, it does illustrate the most common elements of an ASP.NET page. The page contains a directive, a code declaration block, and a page render block.
The first line, in Listing 1.1, contains a directive that looks like this:
<%@ Page Language=”C#” %>
A directive always begins with the special characters <%@ and ends with the characters %>. Directives are used primarily to provide the compiler with the information it needs to compile the page.
For example, the directive in Listing 1.1 indicates that the code contained in the page is C# code. The page is compiled by the C# compiler and not another compiler, such as the Visual Basic .NET (VB.NET) compiler.
The next part of the page begins with the opening <script runat=”server”> tag and ends with the closing </script> tag. The <script> tag contains the code declaration block.
The code declaration block contains all the methods used in the page. It contains all the page’s functions and subroutines. The code declaration block in Listing 1.1 includes a single method named Page_Load(), which looks like this:
void Page_Load()
{
    lblServerTime.Text = DateTime.Now.ToString();
}
This method assigns the current date and time to the Text property of a Label control contained in the body of the page named lblServerTime.
The Page_Load() method is an example of an event handler. This method handles the Page Load event. Every time the page loads, the method automatically executes and assigns the current date and time to the Label control.
The final part of the page is called the page render block, which contains everything rendered to the browser. In Listing 1.1, the render block includes everything between the opening and closing <html> tags.
The majority of the page render block consists of everyday HTML. For example, the page contains the standard HTML <head> and <body> tags. In Listing 1.1, two special things are contained in the page render block.
First, notice that the page contains a <form> tag that looks like this:
<form id=”form1” runat=”server”>
This is an example of an ASP.NET control. Because the tag includes a runat=”server” attribute, the tag represents an ASP.NET control that executes on the server.
ASP.NET pages are often called web form pages because they almost always contain a server-side form element.
The page render block also contains a Label control. The Label control is declared with the <asp:Label> tag. In Listing 1.1, the Label control is used to display the current date and time.
Controls are the heart of ASP.NET Framework. Most of the ink contained in this book is devoted to describing the properties and features of ASP.NET controls. Controls are discussed in more detail shortly; however, first you need to understand .NET Framework.
Note
By default, ASP.NET pages are compatible with the XHTML 1.0 Transitional standard. The page in Listing 1.1 includes an XHTML 1.0 Transitional DOCTYPE. For details on how ASP.NET Framework complies with both XHTML and accessibility standards, see the article at the Microsoft MSDN website (msdn.Microsoft.com), “Building ASP.NET 2.0 Web Sites Using Web Standards.”
ASP.NET and the .NET Framework
ASP.NET is part of the Microsoft .NET Framework. To build ASP.NET pages, you need to take advantage of the features of .NET Framework, which consists of two parts: the Framework Class Library and the Common Language Runtime.
Understanding the Framework Class Library
The .NET Framework contains thousands of classes that you can use when building an application. Framework Class Library was designed to make it easier to perform the most common programming tasks. Following are just a few examples of the classes in the framework:
- File class-Enables you to represent a file on your hard drive. You can use the File class to check whether a file exists, create a new file, delete a file, and perform many other file-related tasks.
- Graphics class-Enables you to work with different types of images such as GIF, PNG, BMP, and JPEG. You can use the Graphics class to draw rectangles, arcs, ellipses, and other elements on an image
- Random class-Enables you to generate a random number.
- SmtpClient class-Enables you to send email. You can use the SmtpClient class to send emails that contain attachments and HTML content.
Framework has only four examples of classes. The .NET Framework contains more than 13,000 classes you can use when building applications.
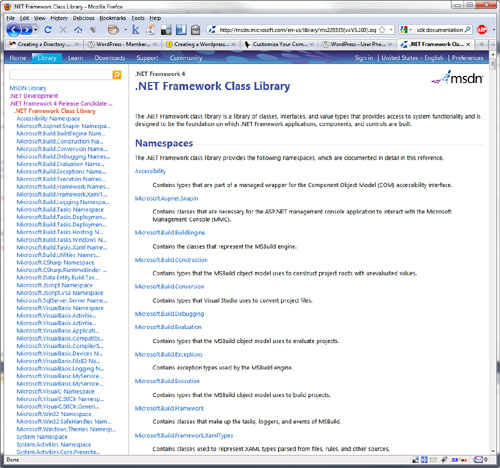
You can view all the classes contained in the framework by opening the Microsoft .NET Framework SDK documentation on Microsoft’s .NET Framework Developer Center website and expanding the Class Library node (see Figure 1.4). The SDK documentation website is located at http://msdn.microsoft.com/en-us/netframework/default.aspx">http://msdn.microsoft.com/en-us/netframework/default.aspx.
Each class in the Framework can include properties, methods, and events. The properties, methods, and events exposed by a class are the members of a class. For example, following is a partial list of the members of the SmtpClient class:
- Properties
- Host-The name or IP address of your email server
- Port-The number of the port to use when sending an email message
- Methods
- Send-Enables you to send an email message synchronously
- SendAsync-Enables you to send an email message asynchronously
- Events
- SendCompleted-Raised when an asynchronous send operation completes
If you know the members of a class, you know everything that you can do with a class. For example, the SmtpClient class includes two properties named Host and Port, which enable you to specify the email server and port to use when sending an email message.
The SmtpClient class also includes two methods you can use to send an email: Send() and SendAsync(). The Send method blocks further program execution until the send operation is completed. The SendAsync() method, on the other hand, sends the email asynchronously. Unlike the Send() method, the SendAsync() method does not wait to check whether the send operation was successful.
Finally, the SmtpClient class includes an event named SendCompleted, which is raised when an asynchronous send operation completes. You can create an event handler for the SendCompleted event that displays a message when the email has been successfully sent.
The page in Listing 1.2 sends an email by using the SmtpClient class and calling its Send() method.
The page in Listing 1.2 calls the SmtpClient Send() method to send the email. The first parameter is the from: address; the second parameter is the to: address; the third parameter is the subject; and the final parameter is the body of the email.
Warning
The page in Listing 1.2 sends the email by using the local SMTP Server. If your SMTP Server is not enabled, you receive the error An Existing Connection Was Forcibly Closed by the Remote Host. You can enable your local SMTP Server by opening Internet Information Services, right-clicking Default SMTP Virtual Server, and selecting Start.
Understanding Namespaces
There are more than 13,000 classes in .NET Framework. This is an overwhelming number. If Microsoft simply jumbled all the classes together, you would never find anything. Fortunately, Microsoft divided the classes in the framework into separate namespaces.
A namespace is simply a category. For example, all the classes related to working with the file system are located in the System.IO namespace. All the classes for working a Microsoft SQL Server database are located in the System.Data.SqlClient namespace.
Before you can use a class in a page, you must indicate the namespace associated with the class. There are multiple ways of doing this.
First, you can fully qualify a class name with its namespace. For example, because the File class is contained in the System.IO namespace, you can use the following statement to check whether a file exists:
System.IO.File.Exists(“SomeFile.txt”)
Specifying a namespace every time you use a class can quickly become tedious. (It involves a lot of typing.) A second option is to import a namespace.
You can add an <$I<%@ Import % directive><%@ Import %> directive to a page to import a particular namespace. In Listing 1.2, we imported the System.Net.Mail namespace because the SmtpClient is part of this namespace. The page in Listing 1.2 includes the following directive near the top of the page:
<%@ Import Namespace=”System.Net.Mail” %>
After you import a particular namespace, you can use all the classes in that namespace without qualifying the class names.
Finally, if you discover that you use a namespace in multiple pages in your application, you can configure all the pages in your application to recognize the namespace.
Note
A web configuration file is a special type of file that you can add to your application to configure your application. Be aware that the file is an XML file and, therefore, all the tags contained in the file are case-sensitive. You can add a web configuration file to your application by selecting Web Site, Add New Item Web Configuration File. Chapter 34, “Configuring Applications,” discusses web configuration files in detail.
If you add the web configuration file in Listing 1.3 to your application, you do not need to import the System.Net.Mail namespace in a page to use the classes from this namespace. For example, if you include the Web.config file in your project, you can remove the <%@ Import %> directive from the page in Listing 1.2.
You don’t have to import every namespace. ASP.NET gives you the most commonly used namespaces for free:
- . System
- System.Collections
- System.Collections.Generic
- System.Collections.Specialized
- System.ComponentModel.DataAnnotations
- System.Configuration
- System.Data.Entity.Linq
- System.Data.Linq
- System.Text
- System.Text.RegularExpressions
- System.Web
- System.Web.Caching
- System.Web.DynamicData
- System.Web.SessionState
- System.Web.Security
- System.Web.Profile
- System.Web.UI
- System.Web.UI.WebControls
- System.Web.UI.WebControls.WebParts
- System.Web.UI.HtmlControls
- System.Xml.Linq
The default namespaces are listed inside the pages element in the root web configuration file located at the following path:
\Windows\Microsoft.NET\Framework\v4.0.30128\Config\Web.Config
To read the entire article go to :
http://www.informit.com/articles/article.aspx?p=1641288">http://www.informit.com/articles/article.aspx?p=1641288
