


Both Internet and intranet applications often require a custom store for user accounts and roles.
ASP.NET 2.0 provides an out-of-the-box provider model as well as a SQL Sever database just for that propose. Unfortunately, the only way to administer the credentials databases is via Visual Studio 2005, and only for local Web applications. This article presents a full-blown custom security management application that administrators can use. The application wraps the ASP.NET 2.0 providers with a Web service and even adds missing features. This article presents the design approaches, challenges, and techniques involved in developing such an application. The article also walks you through some powerful yet useful techniques such as interface-based Web services, reflection-based Web service compatibility, advanced C# 2.0, Web services security, and Web services transactions.
ASP.NET 2.0 Credentials Infrastructure
Internet-based applications often don’t rely on Windows accounts and groups, and instead resort to form-based authentication, combined with some kind of a back-end custom credentials store such as SQL Server. To save developers the trouble of designing and building such solutions over and over, ASP.NET 2.0 ships with a ready-made security credentials infrastructure. The ASP.NET 2.0 credentials store is not just for the sole use of ASP.NET applications: ASP.NET Web services and even Windows Forms applications can use it to manage their user’s credentials. In addition, Windows Communications Foundation (codename Indigo) services can also be easily configured to use the ASP.NET 2.0 security credentials store.
ASP.NET 2.0 ships with a ready-made security credentials infrastructure.
ASP.NET 2.0 uses a provider model for accessing and managing the credentials to avoid coupling the application to any particular store. It is up to the developers to develop the application while taking advantage of the abstract provider model. It is up to administrators to select and manage the specific credentials store. Figure 1 shows the architecture of the ASP.NET 2.0 security providers. Membership providers are responsible for managing users, and role providers are responsible for managing roles. In the credentials store, each user or role is scoped inside an application. This allows different applications to use the same credentials store without conflicting with each other’s user names or roles. Out of the box, ASP.NET offers support for the following credentials stores: SQL Server, Windows, and Active Directory (Figure 1). To install the SQL Server credentials database, run the aspnet_regsql.exe setup program, found under:
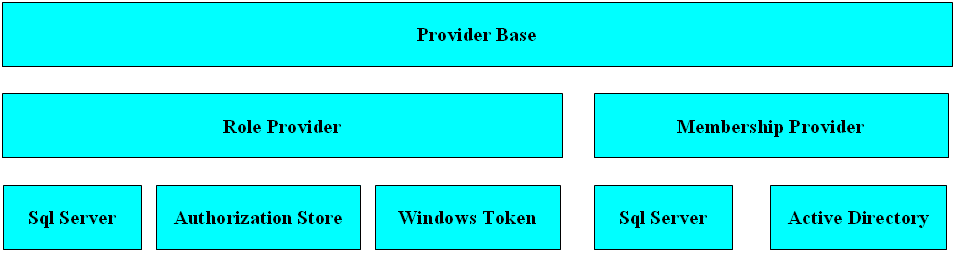
<WINDOWS>\Microsoft.NET\Framework\<version>
The setup program creates a new database called aspnetdb, a set of tables for applications, users and roles, and stored procedures to access the tables. The SQL Server database is well designed, using the latest security best-practices such as password salting and challenges. In addition, ASP.NET 2.0 offers a set of classes that correspond to the providers in Figure 1.
Which provider to use is kept in the application’s configuration file (App.Config or Web.Config). You hardly ever need to interact with the specific providers directly. Instead, there are two static helper classes, Membership and Roles, which read from the configuration file which provider to use. The default provider, that is, when no provider is specified, is SQL Server. The Membership class (Listing 1) allows you to create and delete users, retrieve information about users, and review the password policies. For example, to create a new user in the “MyApp” application you would simply write:
Membership.ApplicationName = "MyApp";
Membership.CreateUser("MyUser","MyPassword",...);
The Roles class allows you to create and delete roles, add or remove users from roles, retrieve users’ role membership information, and verify role membership. For example, to add the role “Manager” to the application “MyApp” you would write:
Roles.ApplicationName = "MyApp";
Roles.CreateRole("Manager");
Administering the Credentials Stores
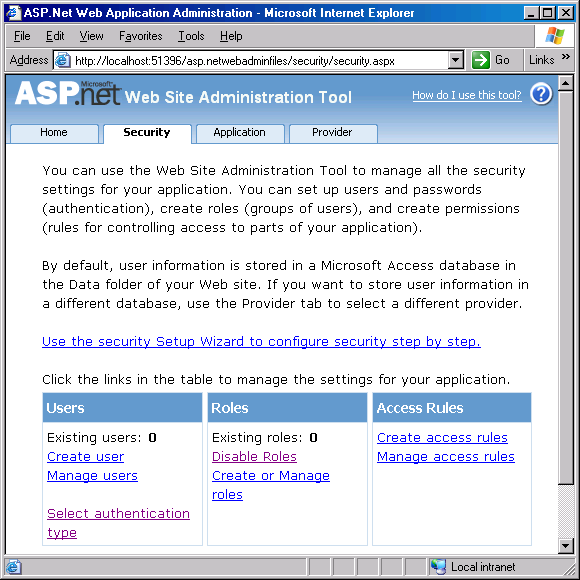
If you choose either Windows or Active Directory to store your application’s users and roles, then you need to administer the user credentials using the dedicated tools for those stores, such as the Computer Management control panel applet or Active Directory tools. The real question is how to administer the credentials stored in SQL Server. To that end, you can use Visual Studio 2005 and a Web browser even if you don’t have IIS installed. In an ASP.NET Web project, select ASP.NET Configuration from the Website menu. This will make Visual Studio host a Web server, open an available port, and navigate to a set of administration pages (Figure 2). The administration pages modify the Web application configuration file and may also manage the credentials store (when Windows authentication is not selected). When using Visual Studio 2005, you first need to select the authentication type. You can choose between Windows or Forms authentication (Internet access). If you choose forms authentication, you can also perform the following operations:
- Enable or disable role-based security
- Create and delete roles
- Create and delete users
- Retrieve a user’s details
- Set a user’s status
- Assign users to roles
- Remove users from roles
Since SQL Server is the only Enterprise-worthy custom credentials store offered by ASP.NET 2.0, you are likely to use the Visual Studio 2005-driven administration pages solely for managing the aspnetdb database, rather than any other store.
Shortcomings of the Built-In Offering
There are a number of significant shortcomings to the Visual Studio 2005-driven administration pages: First, you need Visual Studio 2005. It is unlikely that application or system administrators will have Visual Studio 2005, let alone know how to use it. The administration pages use “/” by default for the application name, and do not offer any way to modify that. There is no remote access: the application and Visual Studio 2005 must be co-located so that Visual Studio 2005 can access the application’s configuration file. The browser-based user interface is somewhat annoying, and you need to frequently click the Back button, and the user interface is rather dull. Many features that administrators are likely to want to use are not available via the administration pages. This is in spite of the fact that the features are supported by the underlying provider classes. Some of the things missing from the Visual Studio 2005-driven administration pages include:
- ability to update most if not all of the details in a user account
- retrieve a user’s password
- change a user’s password
- reset a user’s password
- retrieve information about the number of current on-line users
- ability to remove all users from a role in one operation
- retrieve information about the password management policy (such as length, reset policy, type of passwords, etc)
- ability to test user credentials
- ability to verify user role membership
Moreover, there are additional features that administrators are likely to want, and yet they are not supported, not even by the provider classes. These features include the ability to retrieve a list of all of the applications in the database, the ability to remove all users from an application, the ability to remove all roles from an application, the ability to delete an application (and all its associated users and roles), and the ability to delete all applications.
It is unlikely that application or system administrators will have Visual Studio 2005, let alone know how to use it.
In conclusion, while ASP.NET 2.0 offers a first-class, comprehensive credentials store (sans a few desired features), it only offers a rudimentary administration option, one that is unlikely to be used by actual administrators.
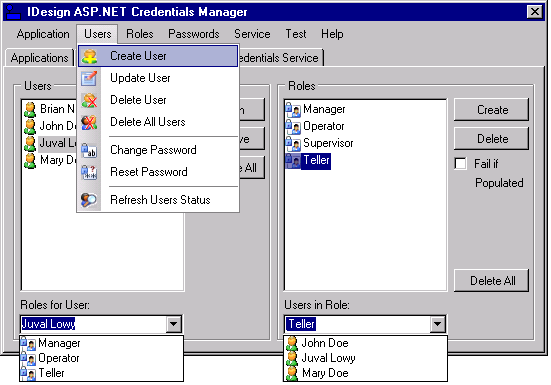
This disparity motivated me to develop the Credentials Manager application-a smart client application that compensates for all the shortcomings just listed. Figure 3 shows a screenshot of Credentials Manager. The rest of this article explains how I designed and built Credentials Manager.
Solution Architecture
The solution architecture is simple-wrap the ASP.NET 2.0 providers with a Web service and expose the credentials management operations for remote clients, and even add the missing functionality. Then, use a Windows Forms application to consume that Web service while providing a rich user interface and a comprehensive credentials management experience. The Web service configuration file will contain the directives pertaining to the credentials store. This does mean, however, that all applications managed by the Web service will share those directives.
Wrap the ASP.NET 2.0 providers with a Web service and expose the credentials management operations for remote clients.
While you can build the Web service bottom-up, that is, start with the static methods of Roles and Membership, wrap them and define the Web service that way, I prefer a contract-driven approach: start by designing what would be the best interfaces to perform the various operation, and only then worry about how to implement them. Doing it this way will ensure that the interfaces exposed by the Web service support all the required administration functionality, and will also decouple the client application from any implementation details (such as wrapping the providers). (Ed. For information about contract-first, see the July/Aug 2005 issue of CoDe Magazine.)
One of the nicer features of ASP.NET 2.0 is its support for Web service interfaces: you can define and have the Web service expose logical interfaces, just like classes do. To do so, you need to decorate your interfaces with the WebServiceBinding attribute and expose the individual interface methods via the WebMethod attribute. Then, you would have a class derive from the interface and implement it, and the compiler will insist you support all methods of the interface.
To manage and interact with the credentials store and the Web service configuration file I defined five interfaces. These are: IApplicationManager, IMembershipManager, IPasswordManager, IRoleManager, and IUserManager.
IApplicationManager
The IApplicationManager interface, shown in Listing 3, allows the administrator to delete a specified application, that is, remove all references to it from the database and delete all its users and its roles. IApplicationManager allows deleting all applications from the store, and it can return a list of all the applications in the store. Note that the interface is defined as an internal interface-public or internal visibility modifiers have no meaning for Web service interfaces. Each method on the interface is decorated with the WebMethod attribute with a short description of the method. In addition, all methods (in all interfaces in this architecture) that access the credentials store are configured to use transactions. This is so that two operations such as deleting an application and creating a user will execute in complete isolation from each other, and to ensure the atomicity of complex operations such as deleting all users. Web services in .NET 2.0 can only start a new transaction, and that is controlled via the TransactionOption property of the WebMethod attribute. In all subsequent code listings, both the description and the transaction support are omitted to save space, but they are in the accompanying source code. Last but not least is the use of the WebServiceBinding attribute on the interface. This designates the interface as a Web service interface that clients and services can bind against, that is, implement or consume it. In order to expose the interface to the outside world as a WSDL contract, you need to use a shim class. The shim class is required because you cannot expose an interface as a Web service, nor can you apply the WebService attribute on it. The shim class will also provide the namespace definition for the interface via the WebService attribute. Listing 4 shows the IApplicationManagerShim abstract class definition. Because IApplicationManagerShim is a class, you can expose it as a Web service. Because it is an abstract class and all the methods are defined as abstract methods, there is no need to implement any of the methods (nor can you). To make it look just like the interface, IApplicationManagerShim sets the Name property of the WebService attribute to IApplicationManager (instead of the default class name). You can now expose the interface using the IApplicationManager.asmx file.
<%@ WebService Language="C#"
CodeBehind="~/App_Code/IApplicationManagerShim.cs"
Class="IApplicationManagerShim"%>
Now, if you browse to the IApplicationManager.asmx page you will see the interface definition. You can use the /serverInterface of WSDL.exe to import the interface definition to the client or to any other service that wants to bind to the interface definition.
IMembershipManager
The IMembershipManager interface (Listing 5) allows you to manage all aspects of user accounts: creating and deleting user accounts, updating user accounts, retrieving user account details, and retrieving all the users in an application.
IRoleManager
The IRoleManager interface (Listing 6) allows you to manage all aspects of logical roles: creating and deleting roles, adding and removing users to and from roles, and retrieving all the roles in an application.
IPasswordManager
The IPasswordManager interface (Listing 7) provides mostly read-only information pertaining to the application password policy. That policy is stored typically in the application’s configuration file. The policy includes whether password reset and retrieval is enabled, password strength, and password answer policy. You can also use IPasswordManager to generate a new password that complies with the password strength policy. In addition, IPasswordManager is used to reset, change or retrieve a specified user’s password.
IUserManager
IUserManager (Listing 8) allows validating user credentials, retrieving role membership, and getting all the roles a user is a member of. It is available for test and analysis purposes.
The AspNetSqlProviderService Web Service
The AspNetSqlProviderService class, shown in Listing 9 implements the five Web interfaces. Doing so is just like implementing any other interface-you derive and implement the methods either implicitly or explicitly (as in Listing 9). You implement most of the methods on the Web interface by simply delegating the implementation to the appropriate methods on the providers. Each time, before using either Roles or Membership, you must prime them by setting the application name to use. For example, to implement IRoleManager.CreateRole(), you would write:
void IRoleManager.CreateRole(string application,
                             string role)
{
   Roles.ApplicationName = application;
   Roles.CreateRole(role);
}
Some of the methods require a little bit of work before or after calling the providers. For example, you can only retrieve the user password if password retrieval is enabled, and AspNetSqlProviderService asserts that.
string IPasswordManager.GetPassword(
               string application,string userName,
                            string passwordAnswer)
{
 Membership.ApplicationName = application;
 Debug.Assert(Membership.EnablePasswordRetrieval);

   MembershipUser membershipUser =
     Membership.GetUser(userName);
   return membershipUser.
     GetPassword(passwordAnswer);
}
However, a few methods have no direct support at all by the providers. There are two possible workarounds: the first is to try and use other methods on the providers to accomplish the desired operation. The second is to execute directly against the aspnetdb database. Both approaches have pros and cons. For example, consider implementing the IMembershipManager.DeleteAllUsers() method. You can call the DeleteUser() method of MembershipProvider on each user in the application, as done in Listing 9. First you would call the IMembershipManager.GetAllUsers() method to get all the users of the application. Note the implicit cast from this reference to IMembershipManager. That is how you use the explicit implementation of interface methods by the class that implements the interface. Next you can define an anonymous method that deletes the user, assign that anonymous method to an Action<string> delegate, and use the static method ForEach<T>() of the Array class to delete each user.
public delegate void Action<T>(T obj);

public abstract class Array : ...
{
   public static void ForEach<T>(T[] array,
                              Action<T> action);
}
The advantage of this first approach is that any internal activities related to deleting a user (such as deleting all role membership as well) are still performed. The disadvantage is that you make many more calls to the database, in which case it is paramount to do that under a single transaction as well.
One of the nicer features of ASP.NET 2.0 is its support for Web service interfaces.
As just mentioned, the second approach is to program against the aspnetdb database directly. This is most useful when the providers do not provide any means at all for accomplishing the task. For example, the providers do not support deleting an application, let alone all applications. While you can write a stored procedure that does that, another goal of mine was to leave aspnetdb untouched. Instead, the implementation of IApplicationManager.DeleteApplication() and IApplicationManager.DeleteAllApplications() use raw SQL commands. I’ve encapsulated these commands in the AspNetDbTablesAdapter helper class (not shown). The advantage of directly accessing the database is that you execute just one command. The disadvantage is that if the database schema were to change, you would need to change your code. Given that operations such as deleting all users or an application are relatively uncommon, and that the number of administrators is often low, I think it is best for the AspNetSqlProviderService to use the ASP.NET 2.0 providers as much as possible.
Configuring the Service
The settings in the Web.Config file used by the AspNetSqlProviderService Web service affects all applications it manages. In particular, settings such as password policies are common to all applications. The service uses the default provider (SQL Server), so there is no need to specify a provider or even a connection string, if the default connection string (maintained in machine.config) is adequate. If you require a different connection string, you need to include a connectionStrings tag (Listing 10). In addition, in order to use the Roles class, you must enable role-based security by including this directive.
<roleManager enabled="true" />
Securing the Service
While the applications whose credentials the AspNetSqlProviderService Web service manages can be Internet or intranet based, the service itself is designed to be accessed by an administrator over the local intranet. You should both authenticate and authorize calls to the service. In addition, you should provide for payload privacy by encrypting the communication. This is required because the service deals with sensitive information such as user names and passwords. The easiest way of ensuring privacy is to use HTTPS. AspNetSqlProviderService verifies in its constructor via the static VerifySecureConnection() helper method that a secure connection was used. VerifySecureConnection() uses the IsSecureConnection property of the current request. To support development or other kinds of none-production deployment of the service, the VerifySecureConnection() method is decorated with the Conditional attribute. Only if the compilation symbol HTTPS is defined will the method have any affect. With regards to authenticating the user of the service, since the Web service is a local Intranet service, there is nothing wrong with using Windows authentication. I chose to use Integrated Windows authentication-this will save the user from explicitly logging in. Another advantage of Integrated authentication is that it hashes the credentials sent in a proprietary way.
Use a Windows Forms application to consume that Web service while providing a rich user interface and a comprehensive credentials management experience.
To configure Integrated Windows authentication, go to the AspNetSqlProviderService Web service properties under IIS, select the Directory Security tab, and click the Edit… button. Uncheck the Anonymous access checkbox and make sure that the Integrated Windows authentication checkbox is checked. The AspNetSqlProviderService class is configured to demand authentication (Listing 9) -it uses the PrincipalPermission attribute, with the Authenticated property set to true.
[PrincipalPermission(SecurityAction.Demand,...,
                     Authenticated=true)]
Once the caller is authenticated by IIS, the service still runs by default under the configured identity in IIS. I wanted the service to run under the identity of the caller. For that to work, the Web.Config file (Listing 10) contains an identity tag with the impersonation attribute set to true.
<identity impersonate="true"/>
Next, you need to use the SQL Server administration tools to allow the caller of the Web service to read and write from the aspnetdb database.
The non-trivial part of securing this Web service is authorization. I wanted to verify that only members of the Windows Administrators group can access the service. To that end, the PrincipalPermission attribute on the AspNetSqlProviderService class demands that only members of the Administrators role be allowed use of the service.
[PrincipalPermission(SecurityAction.Demand,
                     Role = "Administrators",...)]
You can replace “Administrators” with any other groups the actual user of the service should be a member of.
The PrincipalPermission attribute uses the security principal attached to the thread to verify that the caller is indeed a member of the specified role. When relying on NT groups (such as Administrators) this mandates that you use an instance of WindowsPrincipal.
public class WindowsPrincipal : IPrincipal
{
   public WindowsPrincipal(
                      WindowsIdentity ntIdentity);
   public virtual bool IsInRole(string role);
   //Rest of the members
}
The problem is that the AspNetSqlProviderService Web.Config file must enable role-based security in order to use the Roles class.
<roleManager enabled="true" />
This in turn causes ASP.NET 2.0 to attach a different principal to the HttpContext and the thread, the RolePrincipal class.
public sealed class RolePrincipal : IPrincipal
{...}
Trying to use RolePrincipal and demanding membership in the NT Administrators role will fail because it will access aspnetdb to look it up rather than Windows groups. To compensate for that, you have to manually swap the principals and attach an instance of WindowsPrincipal to the thread on every request. The easiest way of accomplishing that is to add a Global.asax file to the Web service project designating the Global class in the Global.cs file as the code behind class.
<%@ Application Language="C#" CodeBehind =
   "Global.cs"
   Inherits = "Global"%>
The class Global provides a handler for the application authorization request (Listing 11). If the caller was authenticated, you need to instantiate a new WindowsPrincipal object and attach it to the current thread. The WindowsPrincipal constructor requires a WindowsIdentity instance. Fortunately, because the service is using Windows Integrated authentication, after successful authentication, the identity associated with the current HTTP context is already of the type WindowsIdentity, so you can just grab that instance.
The Credentials Manager Application
The source code available with this article contains the Credentials Manager application-a rich user interface Windows Forms application that uses the Web service interfaces described in the previous sections to manage the security credentials store for any number of applications.
The application imports the definition of the five Web interfaces, and it uses those interfaces exclusively. The application has a Web service proxy class called AspNetSqlProviderService that targets the service. You need to manually add the derivation from the imported interfaces to the service.
partial class AspNetSqlProviderService :
        SoapHttpClientProtocol,IMembershipManager,
        IUserManager,IPasswordManager,
        IApplicationManager,IRoleManager
{
   public AspNetSqlProviderService()
   {
 Credentials = CredentialCache.DefaultCredentials;
 Url = Settings.Default.AspNetSqlProviderService;
   }
   //Rest of the implementation
}
To support Integrated Windows authentication, the constructor of the proxy class sets the Credentials property using the static property DefaultCredentials of CredentialCache, which simply reads the security token from the current thread. In additon, the constuctor reads the Web service address from the application configuration class utilizing the Designer-generated Settings class.
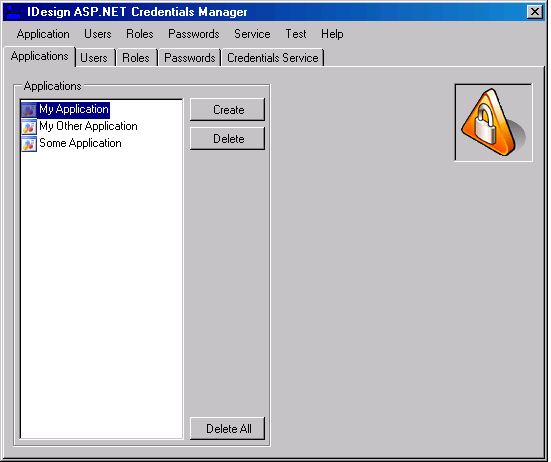
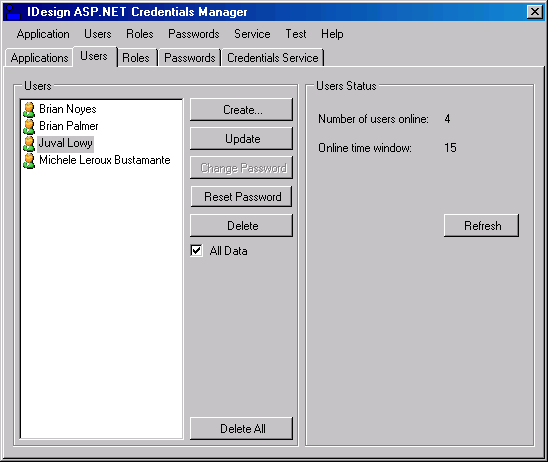
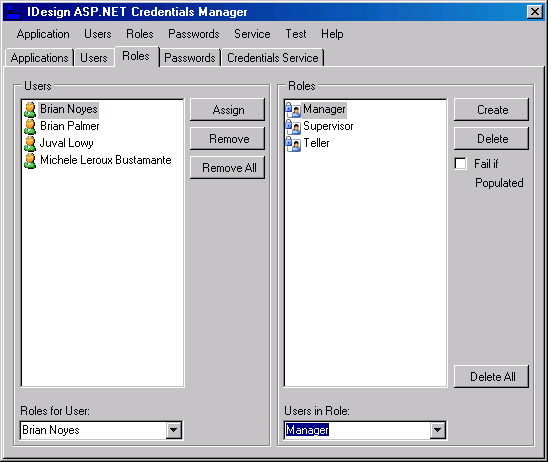
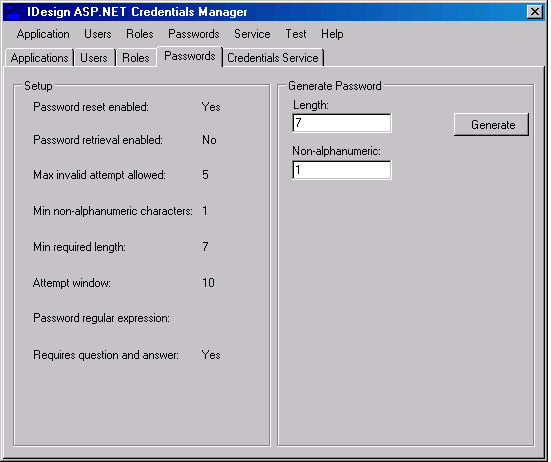
Using the application is intuitive enough, so I will just walk you through the main screens and options. The Applications tab (Figure 4) allows you to select which application to configure. Selecting an application here affects all the other tabs-that is, all users and roles in the other tabs pertain to the selected application in the Applications tab. You can create and delete an application or delete all applications. The Users tab lists all the users in the selected application. You can create or delete a user. If you delete a user but leave the “All Data” checkbox unchecked, it will delete the user but maintain its role membership information. You can update a user account or delete all users. Depending on the password policy returned from the AspNetSqlProviderService Web service, you may or may not be able to change or reset the password, and may or may not need the password answer. The buttons on the Users tab and the dialogs it displays are enabled or disabled accordingly. On the right-hand side of the Users tab are statistics such as the current number of users on-line. The Roles tab allows you to add roles to the application. When deleting a role, if the “Fail if populated” checkbox is checked, it will not let you delete the roles if it has any members. The left-side list view shows all the users in the application. You can add or remove a user from a role, or remove a user from all the roles. At the bottom, the “Users in role” combo box shows all the users in the selected role above (Figure 3), and the “Roles for User” combo box shows all the roles for the selected user above (Figure 3). The Passwords tab shown in Figure 7 lists the configured password policy and allows you to generate a password that complies with the specified password strength policy. The Credentials Service tab lets you select the Web service to use. Upon startup, the Credentials Manager application reads that address from the application configuration file. This tab displays the selected Web service. If the address is invalid, that is, the service does not support all the required functionality, then all controls in the application are empty and disabled. You can provide a different address, and the Web browser control below will display that service. However, you can only select a Web service address (by clicking the Select button) if the service supports the required Web methods (a valid Web service). If the service is invalid, the Select button is disabled.

Unfortunately, there is no-built in support in .NET 2.0 for validating that a service supports a particular binding or Web interface, so I had to do that manually. Listing 12 shows the RefreshSelectButton() and ContainsInterface() helper methods. RefreshSelectButton() first disables the Select button and the matching menu item. It then verifies that the specified address is that of a .NET Web service. Next, it accesses the content of the page displayed in the Web browser control and verifies that it contains methods that support all the interfaces. This is done by calling the ContainsInterface() method, providing it with the content of the page and the interface type to verify. ContainsInterface() verifies the type is that of an interface and obtains an array of MethodInfo objects identifying each method on the interface. It then defines an anonymous method that accepts a single MethodInfo instance and verifies that the content contains that method using the Contains() method of the string class. ContainsInterface() uses the static TrueForAll<T>() method of the array class.
public delegate bool Predicate<T>(T obj);

public abstract class Array : ...
{
   public static bool TrueForAll<T>(
                    T[] array,Predicate<T> match);
}
ContainsInterface() provides TrueForAll() with the array of MethodInfo objects and the predicate in the form of the anonymous method. TrueForAll<T>() will return true only if all the methods were found in the content.
Some finesse details: When the Credentials Manager application stats up, it connects to the Web service and retrieves all the information required to populate the various tabs. Since this might take a bit of time, (especially if the service is not running) the Credentials Manager application first displays a splash screen. I wanted to spice up the various menu items and list boxes with graphics and icons (Listing 3). To that end, Visual Studio 2005 ships with a comprehensive graphics library that you can use in your applications. The library contains all the icons used by Visual Studio 2005 itself, as well as many Office and Windows icons. You can find the library after a normal installation under:
<Program Files>\Microsoft Visual Studio 8\
Common7\VS2005ImageLibrary
