


- At the Build conference in May 2018, Microsoft publicly released the first preview of ML.NET, a free, cross-platform, and open-source machine learning framework designed to bring the power of machine learning (ML) to .NET applications for a variety of scenarios, such as sentiment analysis, price prediction, recommendation, image classification, and more. A year later at Build 2019, Microsoft launched ML.NET 1.0, which added new features and tooling to make training custom ML models even easier for .NET developers.
- ML.NET is more than just a machine learning library that offers a specific set of features; it's evolving into a high-level API and comprehensive framework that not only leverages its own ML features but also simplifies other lower-level ML infrastructure libraries and runtimes, such as TensorFlow and ONNX.
- In this article, we'll go over the basics of ML.NET, dig into the API and framework's features, tooling, and capabilities, and show you how easy it is to get started building and consuming your own custom models in your .NET applications.
Microsoft released ML.NET as a commitment to making machine learning a great and easy experience in .NET.
Machine Learning 101
First, let's go over the basics of machine learning.
Machine learning is getting computers to make predictions without being explicitly programmed. Machine learning is used to solve problems that are difficult (or impossible) to solve with rules-based programming (e.g., if statements and for loops). For instance, if you were asked to create an application that predicts whether an image has a dog in it or not, you might not know where to start. Similarly, if you were asked to write a function that predicts the price of a shirt based on the description of the shirt, you might start by looking at keywords such as “long sleeves” and “business casual,” but you might not know how to build a function to scale that to a few hundred products.
Even if you don't know how to write that function, you have examples of inputs and outputs to the function that you can use to create a model. Machine learning simply means taking in historical data and using algorithms to find patterns and rules in the data (e.g., training a model) that can then be applied to new data to make predictions (e.g., consuming a model).
With machine learning, you can automate a large range of “human” tasks, like classifying images of dogs and other objects or predicting values such as the price of a car or house, which allows you to analyze a large amount of data more quickly and accurately than ever before and to more easily make data-driven decisions.
Overview of ML.NET
ML.NET is first and foremost a framework that you can use to create your own custom ML models. This custom approach contrasts with “pre-built AI,” where you use pre-designed general AI services from the cloud (like many of the offerings from Azure Cognitive Services). This can work great for many scenarios, but it might not always fit your specific business needs due to the nature of the machine learning problem or to the deployment context (cloud vs. on-premises).
With ML.NET, you have the ability to create and train your own ML models, which makes ML.NET very flexible and adaptable to your specific data and business domain scenarios. In addition, because the framework comprises libraries and NuGet packages to use in your .NET applications, you can run ML.NET anywhere.
Made for .NET Developers
ML.NET enables developers to use their existing .NET skills to easily integrate machine learning into almost any .NET application. This means that if C# (or F# or VB) is your programming language of choice, you no longer have to learn a new programming language, like Python or R, in order to develop your own ML models and infuse custom machine learning into your .NET apps. The framework offers tooling and features to help you easily build, train, and deploy high-quality custom machine learning models locally on your computer without requiring prior machine learning experience.
Run It Anywhere for Free
Because ML.NET is a free and open-source framework (comparable in autonomy and context to other frameworks in .NET like Entity Framework, ASP.NET, or even .NET Core), you can use it wherever you want and in any .NET application, as seen in Figure 1. This includes Web apps and services (ASP.NET MVC, Razor Pages, Blazor, Web API), desktop apps (WPF, WinForms), and more.
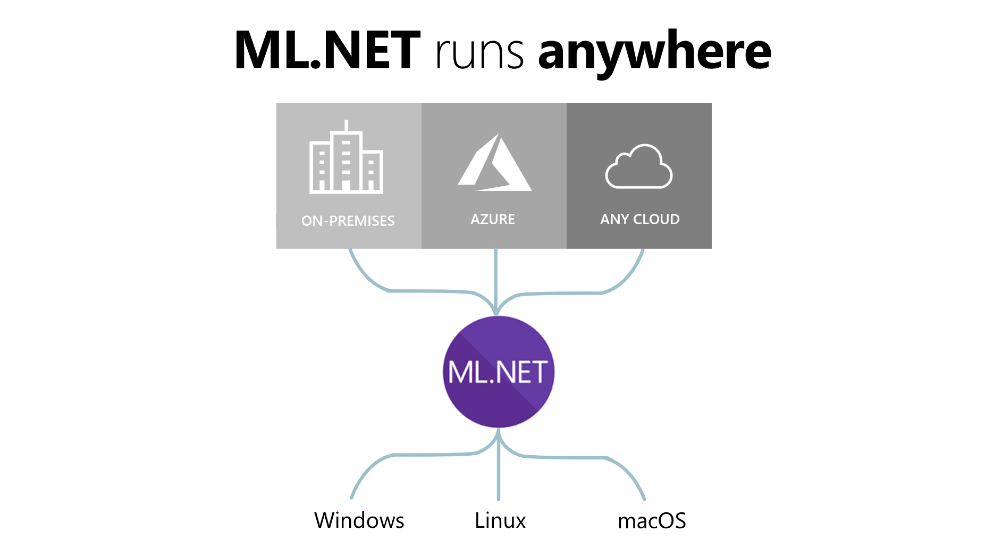
This means that you can build and consume ML.NET models on-premises or on any cloud, such as Microsoft Azure. In addition, because ML.NET is cross-platform, you can run the framework on any OS environment: Windows, Linux, or macOS. You can even run ML.NET on the traditional .NET Framework on Windows in order to infuse AI/ML into your existing .NET applications.
This also applies to offline scenarios; you can train and consume ML.NET models in offline scenarios such as desktop applications (WPF and WinForms) or any other offline .NET app (excluding ARM processors, which are currently not supported).
Interoperability with Python and Data Scientists
ML.NET also offers Python bindings called NimbusML. If your organization has teams of data scientists who are more skilled in Python, they can create ML.NET models in Python with NimbusML, which you can then consume in your production end-user .NET applications very easily while running it as native .NET.
NimbusML is interoperable with scikit-learn estimators and transforms and with other popular libraries in Python, such as NumPy and Pandas, so data scientists and Python developers familiar with those libraries will feel comfortable when using NimbusML to create/train ML.NET models that can run natively in .NET applications. You can learn more about NimbusML at https://aka.ms/code-nimbusml.
Trusted and Proven at Scale
Although Microsoft announced ML.NET only two years ago, it was originally developed by Microsoft Research and has evolved into a significant machine learning framework that powers features in many Microsoft products, such as Microsoft Defender ATP, Bing Suggested Search, PowerPoint Design Ideas, Excel Chart Recommendations, and many Azure services.
Since ML.NET's launch, many companies have used the framework to add a variety of machine learning scenarios to their .NET apps, like Williams Mullen for law document classification, Evolution Software for hazelnut moisture level prediction, and SigParser for spam email detection.
ML.NET Components
ML.NET fundamentally provides a .NET API that you can use for two main types of actions:
- ML model training: Creating/building the model, usually in your “back storage”
- ML model consumption: Using the model to make predictions in end-user applications in production
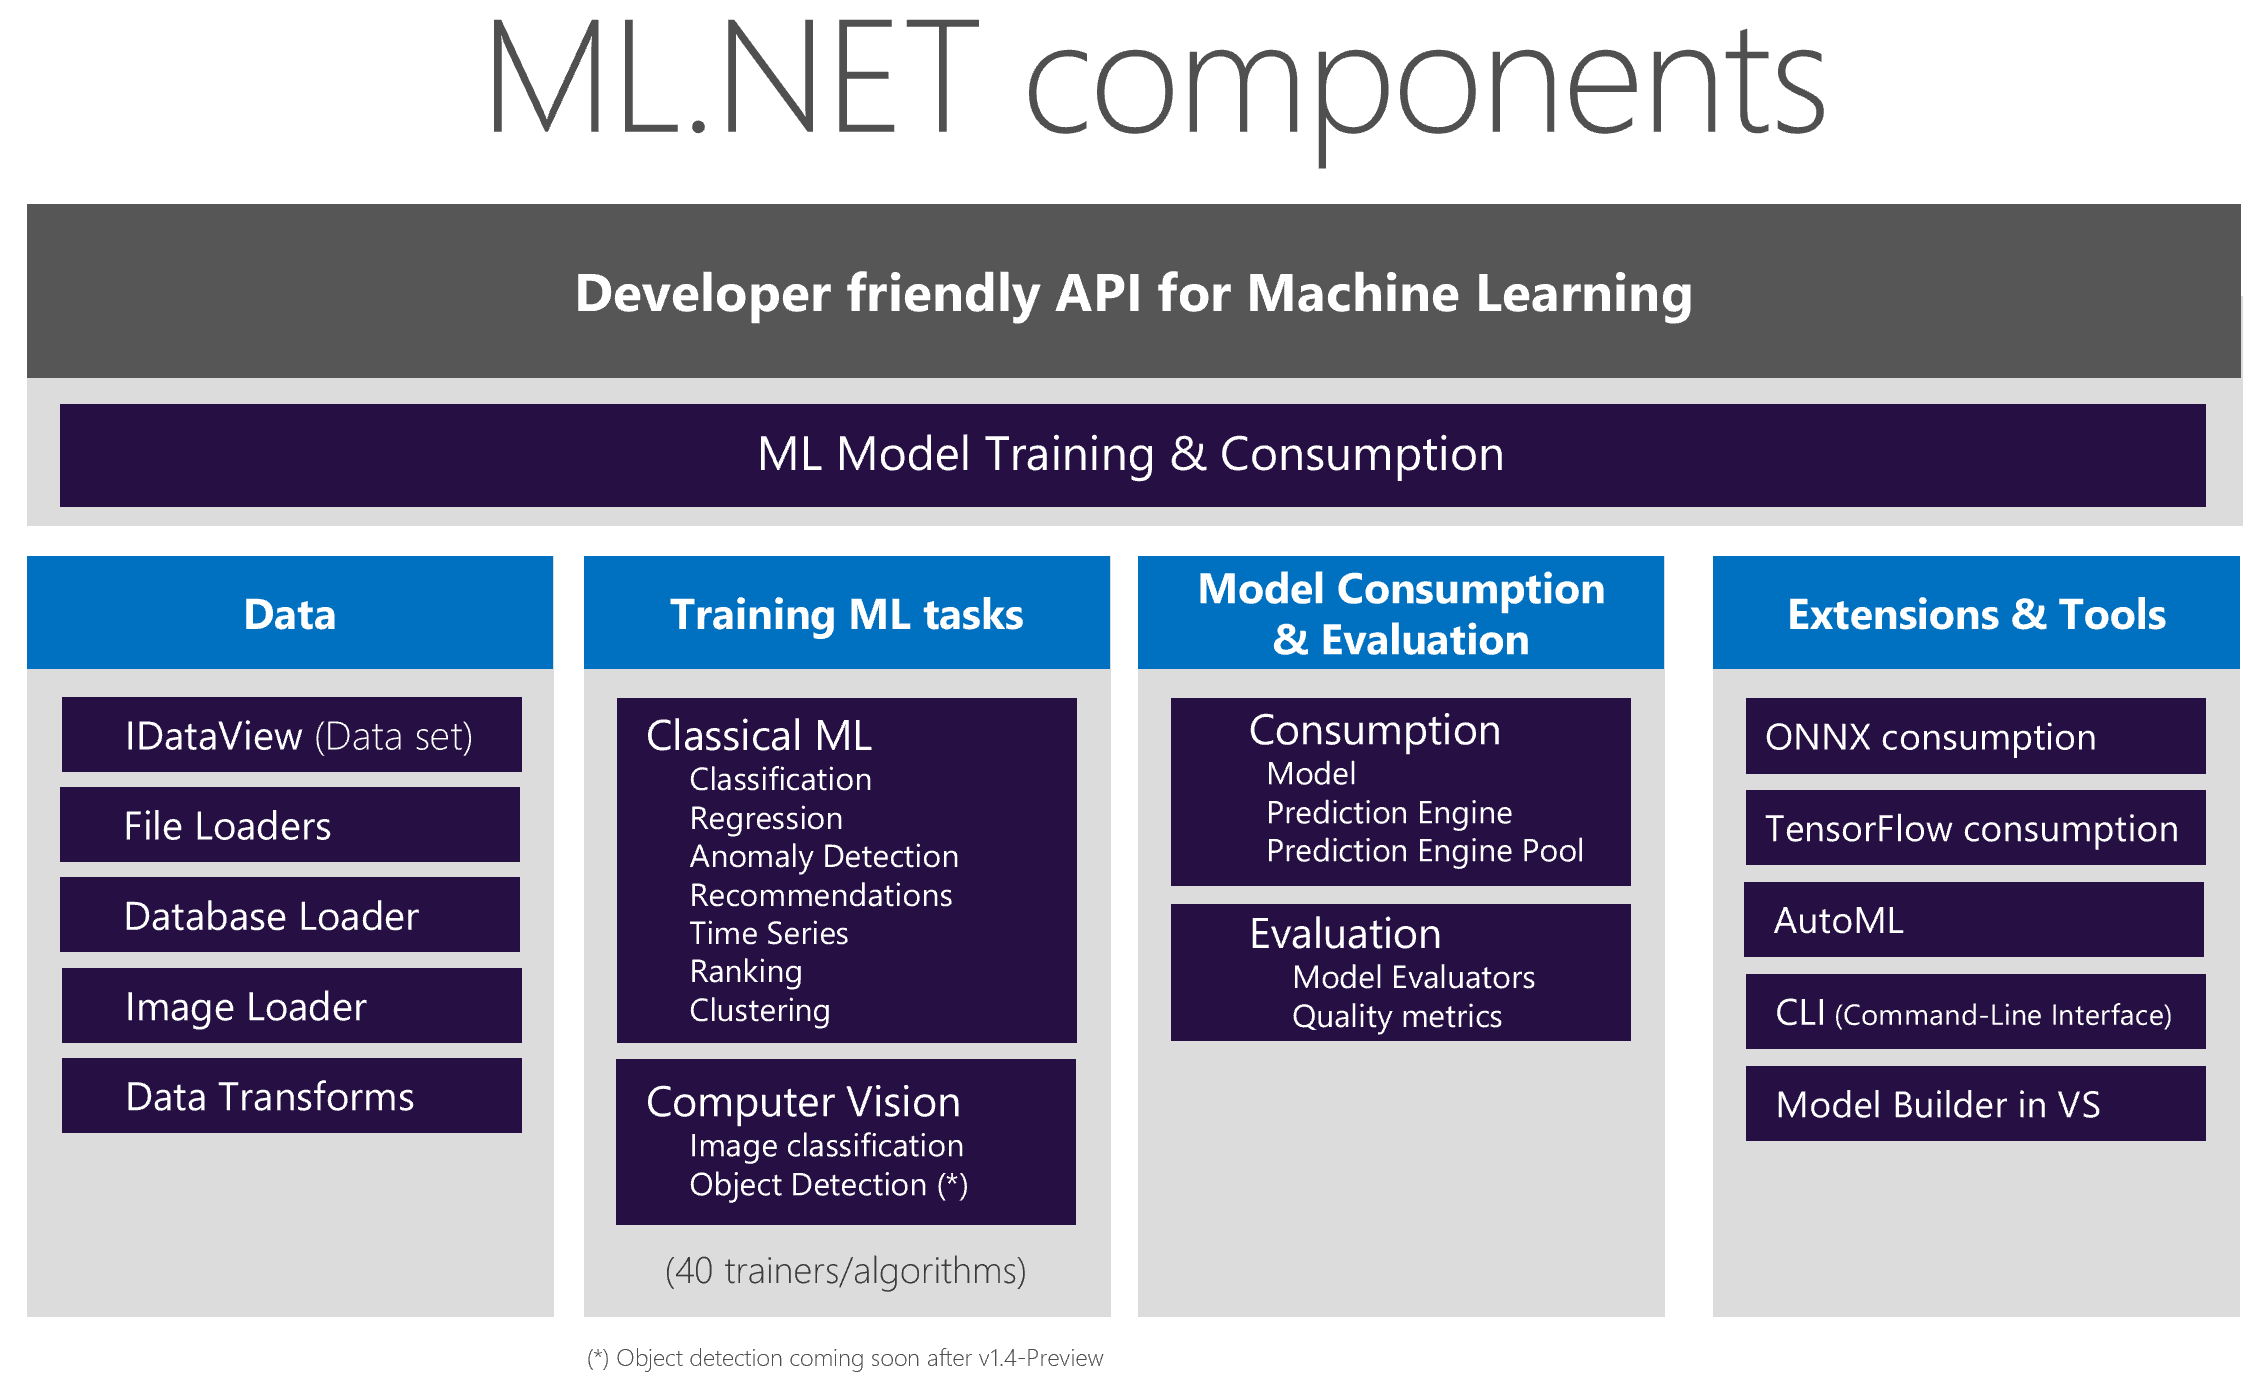
Drilling down deeper, ML.NET has several major components, as seen in Figure 2.
Data components:
IDataView: Data in ML.NET is represented as an IDataView, a flexible, efficient way of describing tabular data (e.g., rows and columns). The IDataView provides a placeholder to load datasets for further processing. It's designed to efficiently handle high-dimensional data and large data sets and is therefore the component that holds the data during data transformations and model training. Although you can load data from a file or enumerable into an IDataView, you can also stream data from the original data source while training without needing to load all the data in-memory, so it can handle huge data sets up to terabytes in size. IDataView objects can contain numbers, text, Booleans, vectors, and more.
Data Loaders: You can load datasets into an IDataView from virtually any data source. You can use File Loaders for typical sources in ML, like text, binary, and image files, or you can use the Database Loader to load and train data directly from any relational database supported by System.Data, such as SQL Server, Oracle, PostgreSQL, MySQL, etc.
Data Transforms: Because machine learning is all about math, all data needs to be converted to numbers or numeric vectors. ML.NET provides a variety of data transforms, such as text featurizers and one hot encoders, to convert your data to an acceptable format for the ML algorithms.
ModelTraining components:
ClassicalMLtasks: ML.NET supports many classical machine learning scenarios and tasks, such as classification, regression, time series, and more. ML.NET provides more than 40 trainers (algorithms targeting a specific task), so you can select and fine-tune the specific algorithm that achieves higher accuracy and better solves your ML problem.
Computer Vision: Starting in ML.NET 1.4-Preview, ML.NET also offers image-based training tasks (image classification/recognition) with your own custom images, which uses TensorFlow under the covers for training. Microsoft is working on adding support for object detection training as well.
ModelConsumption and Evaluation components:
Model consumption: Once you've trained your custom ML model, ML.NET provides several ways to make predictions, such as using the model itself to make predictions in bulk, using the Prediction Engine to make single predictions, or using the Prediction Engine Pool for making predictions in scalable and multi-threaded applications.
Model evaluation: Before using a trained model in production, you want to make sure it achieves the required quality when making predictions. ML.NET provides multiple evaluators related to each ML task so that you can find out the accuracy of your model, plus many more typical machine learning metrics depending on the targeted ML task.
Extensions and Tools:
ONNX model integration: ONNX is a standard and interoperable ML model format. You can run/score any pre-trained ONNX model in ML.NET.
TensorFlow model integration: TensorFlow is one of the most popular deep learning libraries. In addition to the image classification training scenario previously mentioned, you can also run/score any pre-trained TensorFlow model with this API.
Tools: You can use ML.NET's tools (Model Builder in Visual Studio or the cross platform CLI) to make model training even easier. These tools use the ML.NET AutoML API internally to try many different combinations of algorithms and configurations in order to find the best model for your data and scenario.
Supported ML Tasks and Scenarios
As mentioned above, you can use ML.NET to build custom models for many scenarios grouped by various ML tasks. Table 1 maps the ML tasks available in ML.NET to their descriptions and example scenarios.
If you want to try any of these scenarios, check out the ML.NET Sample GitHub repo at https://aka.ms/code-mlnet-samples.
Hello, ML.NET
Now that you've seen an overview of ML.NET and the different components of the framework, let's take a look at ML.NET code.
With ML.NET, it takes only a few steps to build your own custom machine learning model. The code in Listing 1 demonstrates a simple ML.NET application that trains, evaluates, and consumes a regression model for predicting the price of taxi fare for a particular taxi ride.
Listing 1: ML.NET code for training and consuming an ML model
// 1. Initalize ML.NET environment
MLContext mlContext = new MLContext();

// 2. Load training data
IDataView trainData = mlContext.Data.LoadFromTextFile<ModelInput>("taxi-fare-train.csv", separatorChar:',');

// 3. Add data transformations
var dataProcessPipeline = mlContext.Transforms.Categorical.OneHotEncoding(
    outputColumnName:"PaymentTypeEncoded", "PaymentType")
    .Append(mlContext.Transforms.Concatenate(outputColumnName:"Features",
    "PaymentTypeEncoded","PassengerCount","TripTime","TripDistance"));

// 4. Add algorithm
var trainer = mlContext.Regression.Trainers.Sdca(labelColumnName: "FareAmount", featureColumnName: "Features");

var trainingPipeline = dataProcessPipeline.Append(trainer);

// 5. Train model
var model = trainingPipeline.Fit(trainData);

// 6. Evaluate model on test data
IDataView testData = mlContext.Data.LoadFromTextFile<ModelInput>("taxi-fare-test.csv");
IDataView predictions = model.Transform(testData);
var metrics = mlContext.Regression.Evaluate(predictions,"FareAmount");

// 7. Predict on sample data and print results
var input = new ModelInput
{
    PassengerCount = 1,
    TripTime = 1150,
    TripDistance = 4,
    PaymentType = "CRD"
};

var result = mlContext.Model.CreatePredictionEngine<ModelInput,ModelOutput>(model).Predict(input);

Console.WriteLine($"Predicted fare: {result.FareAmount}\nModel Quality (RSquared): {metrics.RSquared}");
No matter which machine learning task you choose, the basic coding steps for model training and consumption remain the same in ML.NET.
You can follow along in the next sections, which break down and explain the steps and demonstrate how to create this app from scratch, or you can check out the full app at https://aka.ms/code-price-prediction.
Create a Console App and Prepare Your Dataset
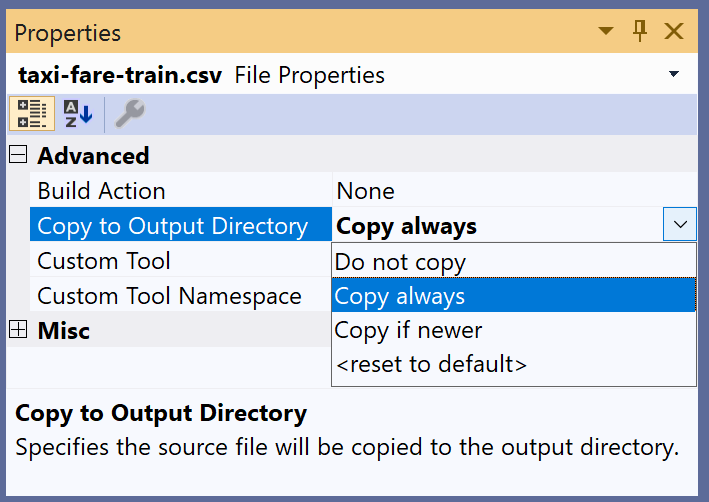
Open Visual Studio and create a new .NET Core Console Application. Download the taxi-fare-train.csv and taxi-fare-test.csv datasets from https://aka.ms/code-taxi-train and https://aka.ms/code-taxi-test respectively (save as .csv files) and add them to your solution, making sure to set the Copy to Output Directory property of the datasets to “Copy Always,” as shown in Figure 3.
Reference the ML.NET NuGet Package
To use ML.NET, you need to add a reference to the Microsoft.ML NuGet package, which you can do by right-clicking on your project, selecting Manage NuGet Packages, and searching for Microsoft.ML in the Browse tab.
Depending on your ML task and type of model, you may need to reference additional ML.NET NuGet packages, but for many common models, including the regression model that you'll build in this section, you can simply use the core algorithms and transforms from the base Microsoft.ML package.
After adding the ML.NET NuGet package, add the following namespaces to the top of your Program.cs file:
using Microsoft.ML;
using Microsoft.ML.Data;
ML.NET Environment
After adding the necessary namespaces, you need to create a new ML.NET environment by initializing MLContext.
MLContext is the starting point for all ML.NET operations; it's a singleton object that contains catalogs, the factories for data loading and saving, transforms (data preparation), trainers (training algorithms), and model operation (model usage) components.
In your Program.cs file, replace the Console.WriteLine(“Hello World”) with the following code to initialize an MLContext:
// 1. Initialize ML.NET environment
MLContext mlContext = new MLContext();
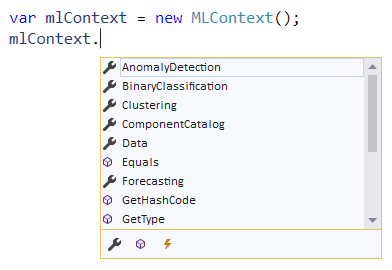
Initializing MLContext creates a new ML.NET environment that can be shared across the model creation workflow objects, as seen in Figure 4.
Loading Data
Next, you'll add the code to load your taxi fare training data (taxi-fare-train.csv) from the CSV file to an IDataView.
Before loading your data, you need to create a class that defines the data schema of your dataset as the model's input. As seen in Figure 5, taxi-fare-train.csv contains seven columns.

For simplification, you'll only use the Passenger Count, Trip Time, Trip Distance, and Payment Type columns as the inputs to the model. You'll use these input columns, also called Features, to make predictions. You'll use the Fare Amount column as the column you'd like to predict, also called the Label.
Create a new class, define the data schema, and choose which columns in the dataset to load by adding the following code outside of your Main() method:
public class ModelInput
{
    [LoadColumn(2)]
    public float PassengerCount;
    [LoadColumn(3)]
    public float TripTime;
    [LoadColumn(4)]
    public float TripDistance;
    [LoadColumn(5)]
    public string PaymentType;
    [LoadColumn(6)]
    public float FareAmount;
}
You can then load data from your dataset file into an IDataView using a TextLoader by adding the following as the next line of code in the Main() method of Program.cs :
// 2. Load training data
IDataView trainData = mlContext.Data.LoadFromTextFile<ModelInput>("taxi-fare-train.csv", separatorChar: ',', hasHeader: true);
As mentioned earlier, you can also directly access a relational database, such as SQL Server, by using a DatabaseLoader; you do this by specifying your connection string and SQL statement in your code, as shown in the following snippet:
string connectionString = @"Data Source=YOUR_SERVER; Initial Catalog= YOUR_DATABASE;Integrated Security=True";
string commandText = "SELECT * from PricePredictionTable";
DatabaseLoader loader = mlContext.Data.CreateDatabaseLoader();
DatabaseSource dbSource = new DatabaseSource(SqlClientFactory.Instance, connectionString, commandText);
IDataView train Data = loader.Load(dbSource);
Once you have your initial dataset configured to be used through an IDataView, you can use the IDataView like normal to perform the typical machine learning steps. You can check out a full sample app that reads data from a SQL Server database at https://aka.ms/code-database-loader.
Data Transformations
As mentioned above, machine learning algorithms generally can't directly use the data you have available for training; you need to use data transformations to pre-process the raw data and convert it into a format that the algorithm can accept.
In this case, PassengerCount, TripTime, TripDistance, and FareAmount are all float values, which is a suitable format for ML algorithms. PaymentType (“CRD,” “CSH,” etc.), on the other hand, is a string value, which isn't an acceptable format. Thus, you must use the OneHotEncoding data transformation to convert the PaymentType column string values to the acceptable format of numeric vectors.
Add OneHotEncoding, with the PaymentType column as input and a new column named PaymentTypeEncoded as output, by adding the following in Program.cs as the next line of code:
// 3. Add data transformations
var dataProcessPipeline = mlContext.Transforms.Categorical.OneHotEncoding(outputColumnName:"PaymentTypeEncoded", "PaymentType")
By default, the algorithms in ML.NET process input from a single column named “Features.” Because your taxi fare training dataset doesn't contain one Feature column with all of the Features included, you need to add one more data transformation to concatenate a new column called Features and combine the PassengerCount, TripTime, TripDistance, and newly encoded PaymentTypeEncoded columns into this new column.
To append this second transformation, add the following code in Program.cs to the line after the first data transformation:
.Append(mlContext.Transforms.Concatenate(outputColumnName: "Features", "PaymentTypeEncoded","PassengerCount", "Trip Time", "TripDistance"));
Algorithms
Now that you've added the data transformations, it's time to select an algorithm. You can use several different algorithms for the regression task, as shown in Figure 6.

In this case, add the LightGbmTrainer, specifying the FareAmount column as your Label, and the Features column as your Features by adding the following as the next line of code in Program.cs:
// 4. Add algorithm
var trainer = mlContext.Regression.Trainers.LightGbm(labelColumnName: "FareAmount", featureColumnName: "Features");
var trainingPipeline = dataProcessPipeline.Append(trainer);
At a high level, the Light GBM (Light Gradient Boosting Machine) regression trainer uses tree-based learning and can quickly and efficiently train large amounts of data to produce an accurate model.
Model Training
The data transformations and algorithms you've specified up to this point don't actually execute until you call the Fit() method (because of ML.NET's lazy loading approach). The Fit() method executes training and returns a trained model.
Add the following code as the next line in Program.cs to fit the model on your training data and return the trained model:
// 5. Train model
var model = trainingPipeline.Fit(trainData);
Model Evaluation
After model training, you can use ML.NET's evaluators to assess the performance of your model on a variety of metrics. As seen in Figure 7, each ML task has its own set of evaluation metrics.
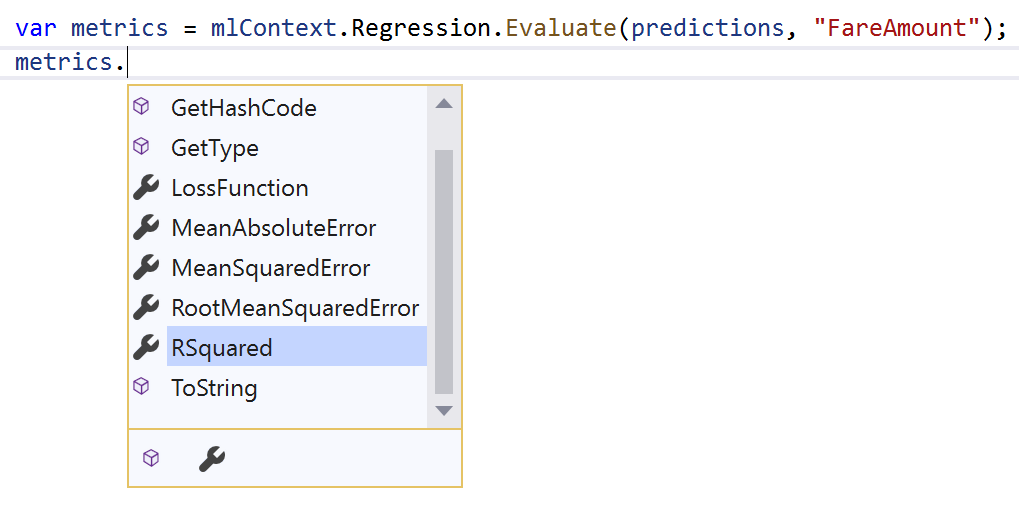
To assess your model, you'll look at a common metric for evaluating regression models called R-Squared, which measures how close the actual test data values are to the values predicted by the model. The closer R-Squared is to 1, the better the quality of the model.
To evaluate your trained model, you must load your test dataset into an IDataView, make predictions on the data using the Transform() method, use the regression task Evaluate() function, and print the R-Squared metric by adding the following as the next lines of code in Program.cs:
// 6. Evaluate model on test data
IDataView testData = mlContext.Data.LoadFromTextFile<ModelInput>("taxi-fare-test.csv", separatorChar: ',', hasHeader: true);
IDataView predictions = model.Transform(testData);
var metrics = mlContext.Regression.Evaluate(predictions, "FareAmount");
Console.WriteLine($"Model Quality" + $"(RSquared):{metrics.RSquared}");
Model Consumption
Now that you've trained and evaluated your model, you can start using it to make predictions.
As seen previously in the Evaluate step, you can make batch predictions with the Transform() method. Alternatively, you can create a Prediction Engine, a convenience API for making predictions on single instances of data. The CreatePredictionEngine() method takes in an input class (ModelInput above) and an output class. The output class defines the data schema for what the model returns when making the prediction, which can vary based on the ML task.
Regression models return a column named Score, which contains the predicted value.
Add the following code outside of your Main() method to define the output class for making predictions and to specify that FareAmount is the default Score column:
public class ModelOutput
{
    [ColumnName("Score")]
    public float FareAmount;
}
Then, you can create input with sample values, create a Prediction Engine based on the trained model and input/output classes, call the Predict() method to make a prediction on the sample input, and print out the predicted result by adding the following as the next lines of code in your Main() method in Program.cs:
// 7. Predict on sample data and print results
var input = new ModelInput
{
    PassengerCount = 2,
    TripDistance = 4,
    TripTime = 1150,
    PaymentType = "CRD"
};
var result = mlContext.Model.CreatePredictionEngine<ModelInput, ModelOutput>(model).Predict(input);
Console.WriteLine($"Predicted fare: " + $"{result.FareAmount}");
Model Consumption in End-User Applications
Although you can train and consume your model in the same application, it's more common to separate model training and consumption into two separate apps.
Normally, you'll train and save your model in a console app and then load and consume your model in the separate end-user application.
To save your trained model to a serialized zip file, use the following code in your training app:
// Save trained model
mlContext.Model.Save(model, trainData.Schema, "MLModel.zip");
In your end-user application, add the trained model to your solution, reference the ML.NET NuGet package, define the output data class, feed in your input data, and then add the following code to load and consume your model and make predictions on the input data:
MLContext mlContext = new MLContext();
string modelPath = AppDomain.CurrentDomain.BaseDirectory + "MLModel.zip";
var mlModel = mlContext.Model.Load(modelPath, out var modelInputSchema);
var predEngine = mlContext.Model.CreatePredictionEngine<ModelInput, ModelOutput>(mlModel);
ModelOutput result = predEngine.Predict(input);
You can learn more about model consumption at https://aka.ms/code-mlnet-consume.
ML.NET Tools and Automated Machine Learning
Although writing the code to train ML.NET models is easy, choosing the correct data transformations and algorithms for your data and ML scenario can be a challenge, especially if you don't have a data science background. However, with the preview release of Automated Machine Learning and tooling for ML.NET, Microsoft has automated the model selection process for you so that you can easily get started with machine learning in .NET without requiring prior machine learning knowledge.
The Automated Machine Learning feature in ML.NET (in short called AutoML) works locally on your own development computer and automatically builds and trains models with a combination of the best performing algorithm and settings. You just have to specify the machine learning task and supply the dataset, and AutoML chooses and outputs the highest quality model by trying out multiple combinations of algorithms and related algorithm options.
AutoML currently supports binary classification (e.g., sentiment analysis), multi-class classification (e.g., issue classification), and regression (e.g., price prediction), with support for more scenarios in the works.
Although you can use AutoML directly via the ML.NET AutoML API, ML.NET also offers tooling on top of AutoML to make machine learning in .NET even more approachable. In the next sections, you'll use the tools to see just how easy it is to create your first ML.NET model.
ML.NET Model Builder
You can use ML.NET Model Builder, a simple UI tool in Visual Studio, to build ML.NET models and generate model training and consumption code. The tool internally uses AutoML to choose the data transformations, algorithms, and algorithm options for your data that will produce the most accurate model.
You provide three things to Model Builder in order to get a trained machine learning model:
- The machine learning scenario
- Your dataset
- How long you would like to train
Let's try out a sentiment analysis scenario. You'll create a console app that predicts whether a comment is toxic or non-toxic.
First you need to download and install the ML.NET Model Builder Visual Studio extension, either in the Visual Studio Marketplace online (https://aka.ms/code-install-modelbuilder) or in the Extensions Manager in Visual Studio. You can use Model Builder with VS 2017 or VS 2019.
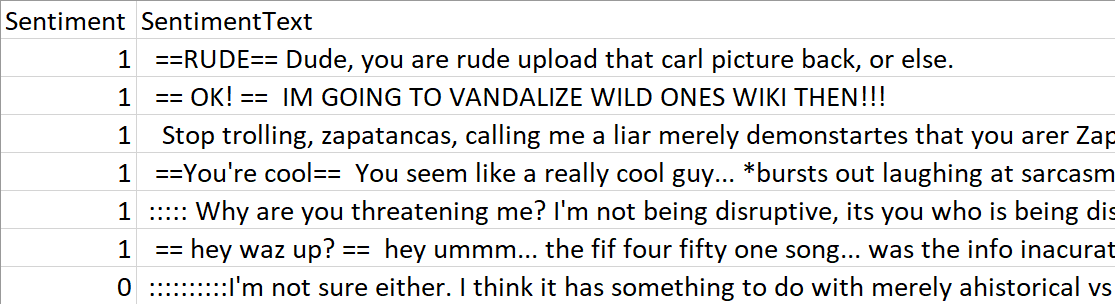
You'll also need to download the Wikipedia detox dataset (wikipedia-detox-250-line-data.tsv) at https://aka.ms/code-sentiment-dataset as a TSV file. Each row represents a different review left by a user on Wikipedia (SentimentText) labelled with a Sentiment of either toxic (1 / True) or non-toxic (0 / False), as shown in Figure 8.
Once you have the extension installed and dataset downloaded, open Visual Studio and create a new .NET Core Console Application.
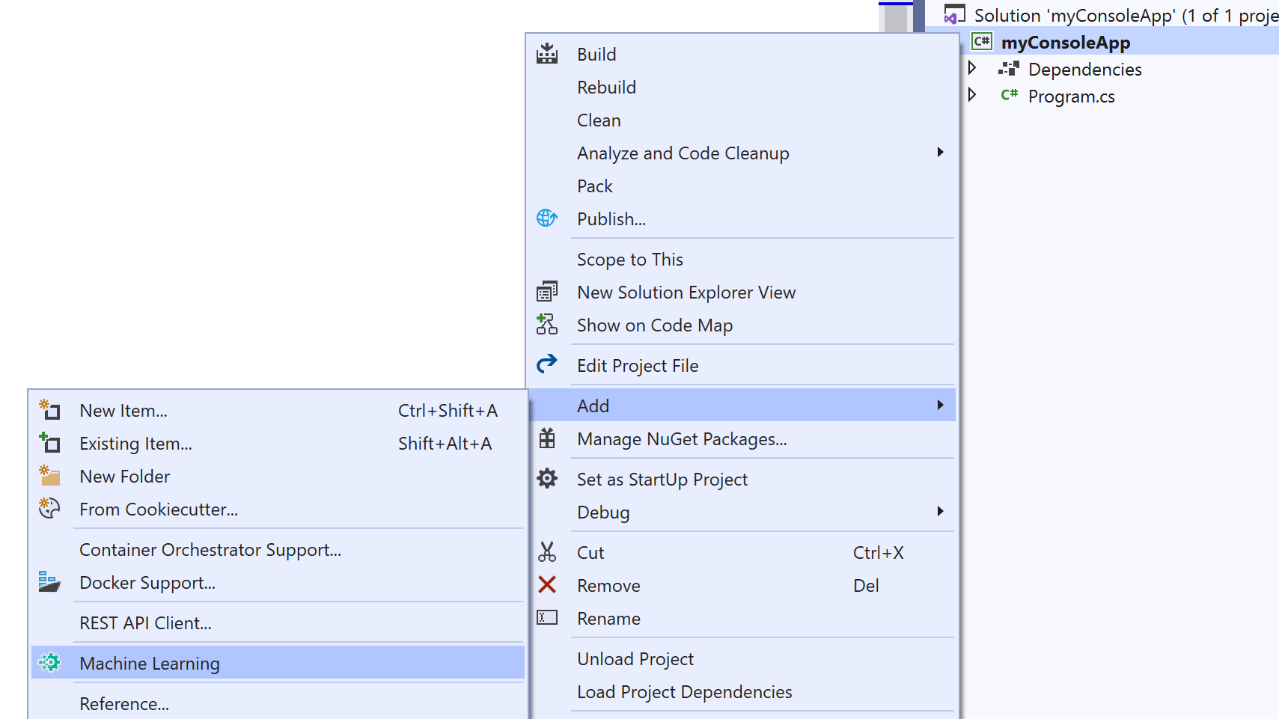
Right-click on your project in the Solution Explorer and select Add > Machine Learning, as seen in Figure 9.
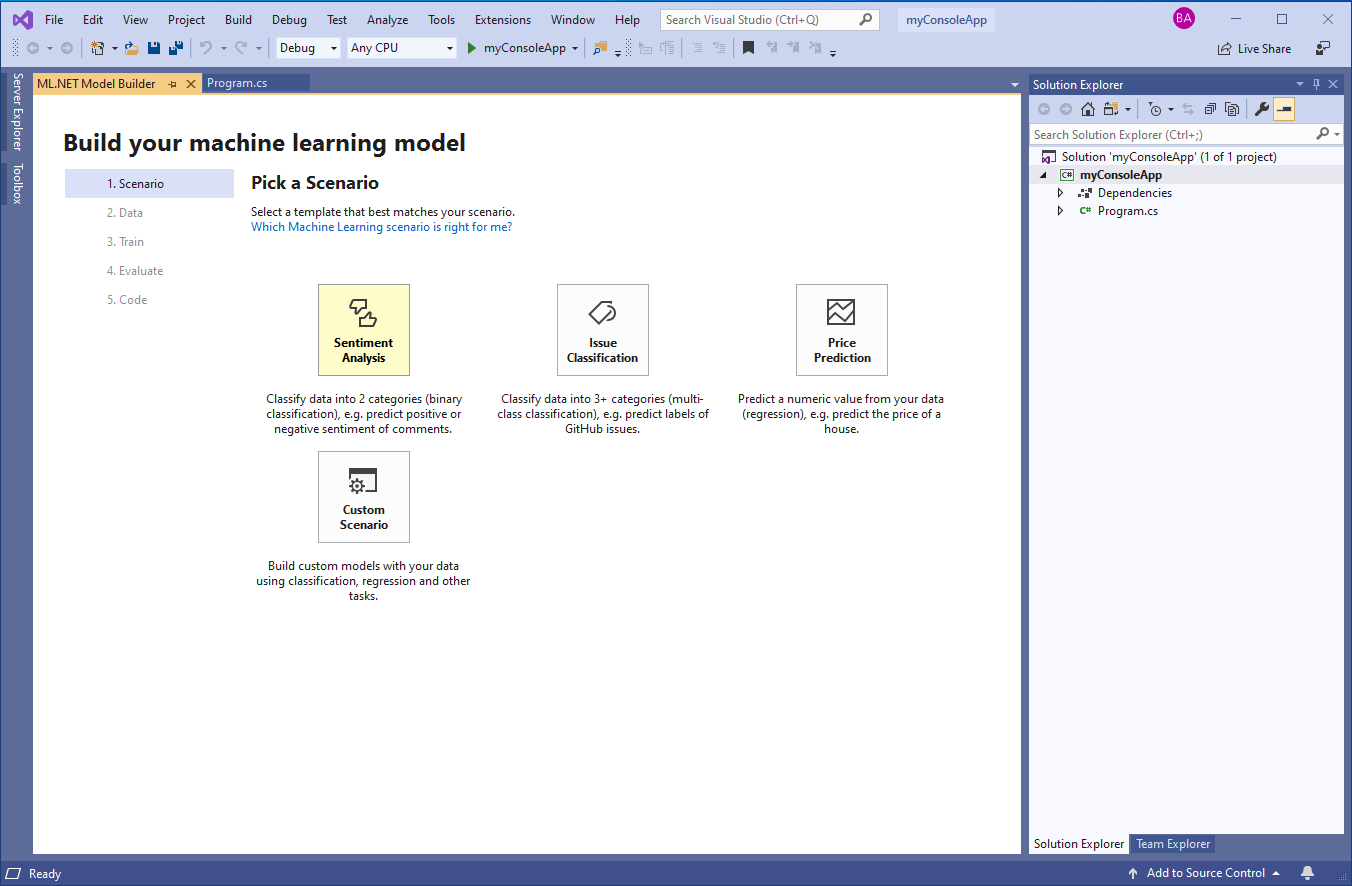
ML.NET Model Builder opens in a new tool window. From here, you can choose from a variety of scenarios, as seen in Figure 10. Microsoft is currently working on adding more ML scenarios to Model Builder, including image classification and recommendation.
Choose the Sentiment Analysis scenario; you use this ML task, called binary classification, when you want to build a model that predicts to which of two categories an item belongs (in this case toxic or non-toxic).
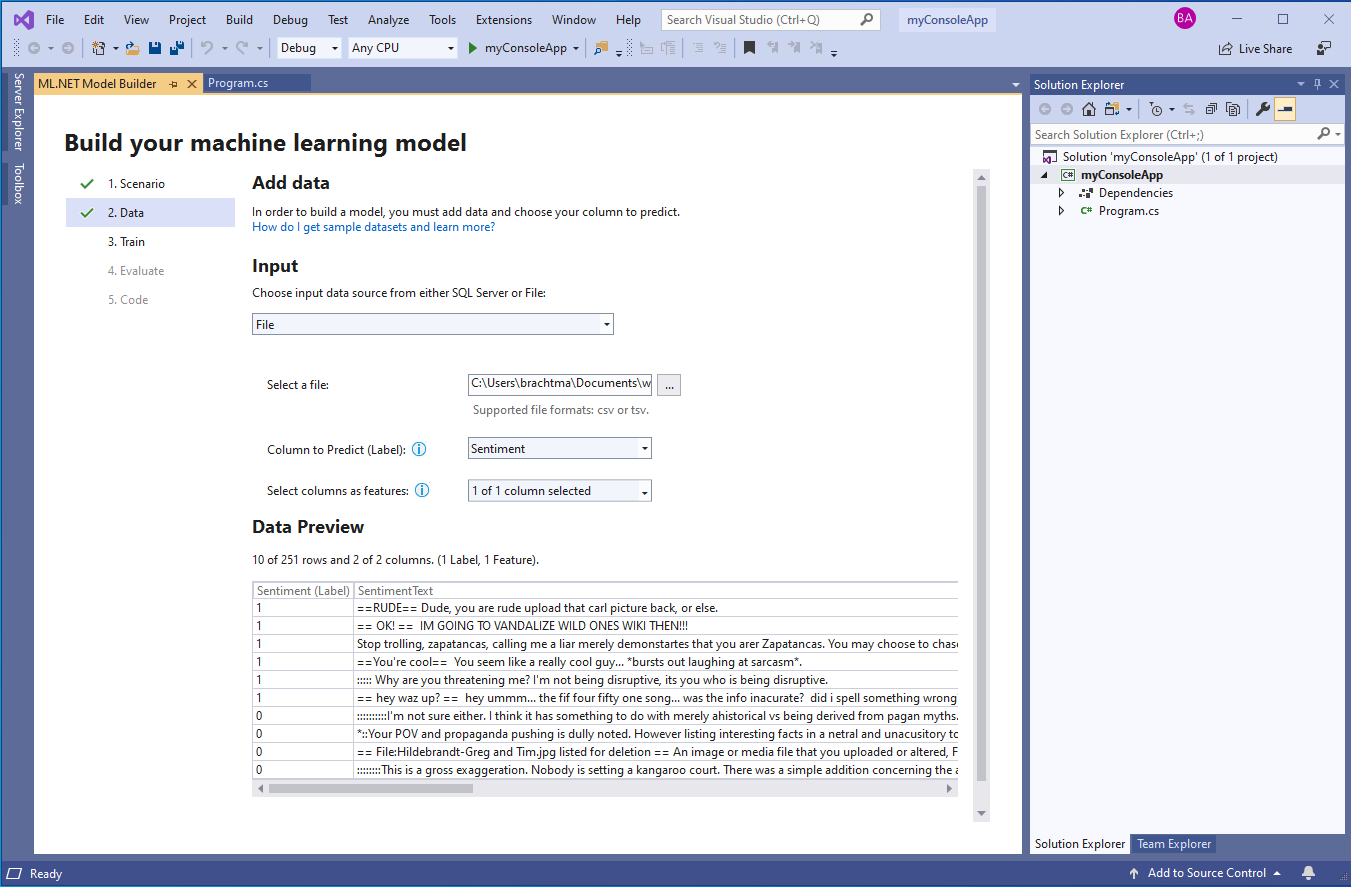
In Model Builder, you can load data from a file (.txt, .csv, or .tsv) or from a database (e.g., SQL Server). In the Data screen, choose File as your input data source and upload the wikipedia-detox-250-line-data.tsv dataset. From the Column to Predict (Label) drop-down, select Sentiment as your Label, and leave SentimentText checked as the Feature, as shown in Figure 11.
Move on to the Train step, where you specify the Time to train (i.e., how long the tool will spend evaluating different models using AutoML). In general, longer training periods allow AutoML to explore more models with multiple algorithms and settings, so larger datasets will need more time to train.
Because the wikipedia-detox-250-line-data.tsv dataset is less than 1MB, change the Time to train to just 20 seconds and select Start training. This starts the AutoML process of iterating through different algorithms and settings to find the best model.
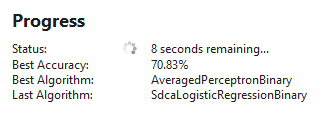
You can watch the training progress, including the time remaining, the best model and model accuracy found so far, and the last model explored in the Model Builder UI, as seen in Figure 12. You can also see more detailed information in the Output pane.
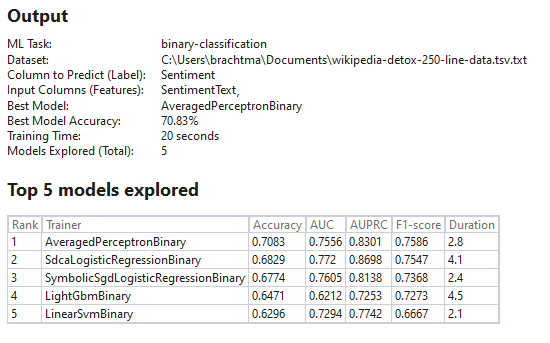
When you move on to the Evaluate step, you'll see output and evaluation metrics like in Figure 13. In this case, AutoML explored five different models in 20 seconds and chose the AveragedPerceptronBinary trainer, a linear classification algorithm that performs well on text classification scenarios, as the best model with an accuracy of 70.83%.
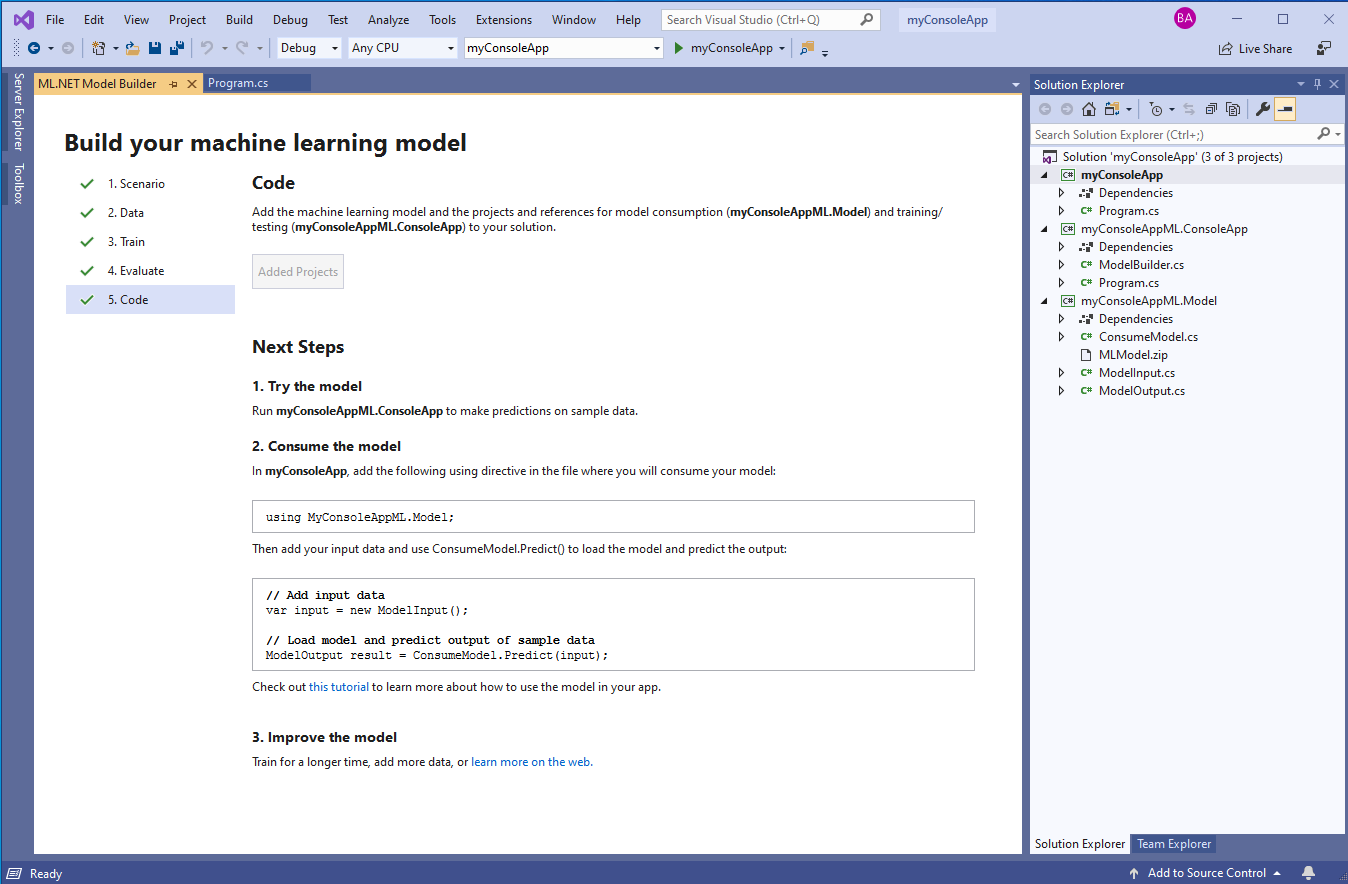
Move on to the Code step and select Add Projects. You'll notice that along with a set of “Next steps,” as seen in Figure 14, Model Builder also generated two new projects in your solution:
- A console app that contains
ModelBuilder.cs(used to build/train the model) andProgram.cs(used to test run the model) - A .NET Standard class library that contains
ModelInput.csandModelOutput.cs(input/output classes for model training and consumption),MLModel.zip(generated serialized ML model), andConsumeModel.cs(model consumption code)
To use your model and start making predictions, follow the set of next steps. First copy the necessary namespaces from the first code snippet box and paste that line of code at the top of Program.cs in the console app that you created:
using MyConsoleAppML.Model;
Model Builder already added a reference to the generated class library in your project, so now you can just copy the second set of code into your Program.cs, modify the input comment, and print the predicted result. You can replace the “Hello World” output in your console app with the following code:
// Add input data
var input = new ModelInput();
input.SentimentText = "That is rude";

// Load model and predict output of sample data
ModelOutput result = ConsumeModel.Predict(input);
Console.WriteLine($"Comment: {input.SentimentText}\nIs Toxic: {result.Prediction}");
When you run the app, you'll see the input comment (“That is rude”) as well as the predicted sentiment (Toxic), as seen in Figure 15.

You can try out different sample comments to see how well the model performs on different inputs. There are also various ways to improve model accuracy even further, such as training for a longer time or adding more data.
Congrats! You've built and consumed your first ML.NET model.
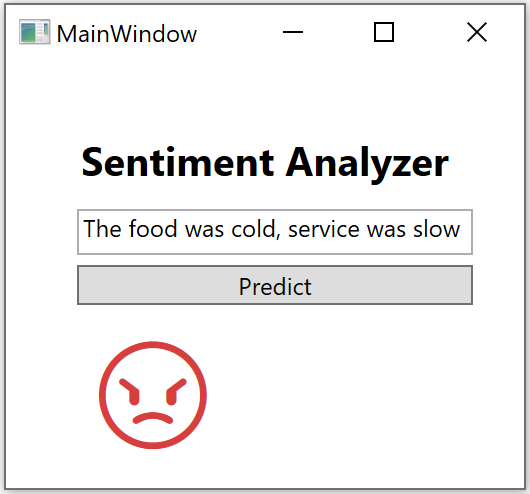
You can try using Model Builder for different scenarios and on different project types. For instance, Figure 16 and Figure 17 show examples of sentiment analysis models built with Model Builder used in a Razor Pages Web app (tutorial/sample at https://aka.ms/code-razor-sentiment) and in a WPF desktop app, respectively.

ML.NET CLI
If you don't use Visual Studio or don't work on Windows, ML.NET also provides cross-platform tooling so that you can still use AutoML to easily create machine learning models. You can install and run the ML.NET CLI (command-line interface), a dotnet Global Tool, on any command-prompt (Windows, macOS, or Linux) to generate high-quality ML.NET models based on training datasets you provide. Like Model Builder, the ML.NET CLI also generates sample C# code to run that model plus the C# code that was used to create and train it so that you can explore the algorithm and settings that AutoML chose.
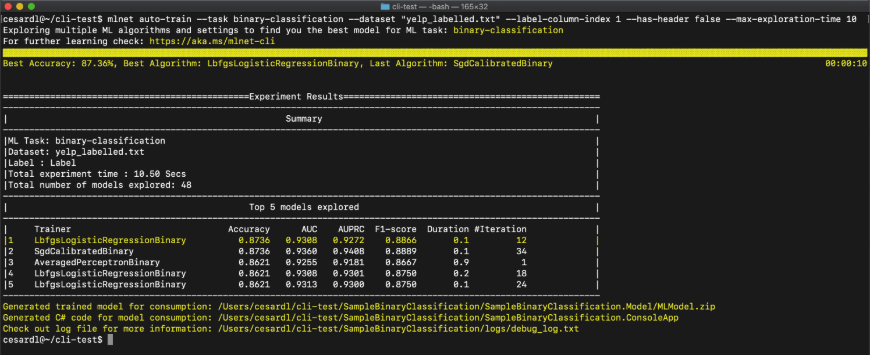
To generate custom ML.NET models with the ML.NET CLI, you simply have to call the mlnet auto-train command and provide your dataset, ML task, and time to train as parameters, and the CLI will output the same summary information as in Model Builder, as seen in Figure 18. You can try out the ML.NET CLI at https://aka.ms/code-mlnet-cli.
Other Important Features in ML.NET
Once you've got the basics down, you can use the following links to learn about some more advanced scenarios and subjects in ML.NET to enhance your machine learning experience:
- Training Image Classification models (DNN/TensorFlow native) with ML.NET: https://aka.ms/code-image-training
- Model Explainability (feature importance): https://aka.ms/code-mlnet-explainability
- Using huge and sparse datasets (thousands or millions of columns): https://aka.ms/code-sparse-datasets
- Deploy ML.NET model into highly scalable and multi-threaded ASP.NET Core apps and services: https://aka.ms/scalable
- Deploy ML.NET model into an Azure Function: https://aka.ms/code-mlnet-azure-functions
ML.NET Roadmap
Although ML.NET provides a very broad spectrum of machine learning tasks and algorithms, there are still many additional exciting areas Microsoft wants to extend and improve, including:
- Training Computer Vision scenarios based on Deep Learning (TensorFlow)
- Finalizing the Image Classification training API, GPU support, and GA release of this feature
- Creating and releasing the Object Detection training API
- Updates on the CLI and Model Builder:
- Add scenarios for recommendation, image classification/recognition, object detection, and other ML tasks
- Integration and support of ML.NET in Azure ML and Azure AutoML for a comprehensive model lifecycle, model versioning and registry, surface model analysis and explainability
- Text analysis based on DNN/TensorFlow (such as using BERT)
- Additional data loaders, such as No-SQL databases
- ARM support or full ONNX export support for inference/scoring in Xamarin mobile apps for iOS and Android and IoT workloads
- Unity support targeting x64/x86
- UWP app support
Microsoft would love to hear your feedback on which of the features in the roadmap for ML.NET are more important for your business scenarios! Feel free to provide feedback, which will influence the priorities, by creating new issues in the ML.NET GitHub Repo at https://aka.ms/code-mlnet-github.
Keep learning about ML.NET at https://aka.ms/code-mlnet.
Table 1: ML.NET machine learning tasks and scenarios
| ML Task | Task description | Example scenarios |
| Binary classification | Classify data into two categories | Sentiment analysis (positive/negative), spam detection (spam/not spam) |
| Multi-class classification | Classify data into three or more categories | Issue classification, iris flowers classification |
| Regression | Predict a numeric value | Price prediction, demand prediction |
| Recommendation | Suggest items to users based on user and item history | Product recommendation, movie recommendation |
| Time series forecast | Predict future observations based on historical data | Sales forecasting |
| Anomaly detection | Detect anomalies in imbalanced datasets | Credit Card Fraud Detection |
| Time series spike detection | Detect spikes or anomaly change points in data over time | Sales spike detection |
| Clustering | Group instances of data into groups that contain similar characteristics | Customer segmentation |
| Ranking | Sort search results depending on the importance of each topic | Search engine result ranking |
| Computer vision: Image Classification | Identify and interpret images | Image classification |
| Computer vision: Object Detection | Detect multiple objects within the same picture/photo. | Object detection |
