


That computer in your pocket is the next frontier in enterprise computing. Devices and services, or cloud-first mobile-first, means that those who conquer that device will rule the future. No one argues that we all need to master that.
Unfortunately, the reality today is that mobile development is a painful mess. There are three major platforms to support: Windows, iOS, and Android. On top of that, there are various interesting nuances, such as HTML5, Cordova, Xamarin, or fully native applications. Even within HTML5 and Cordova or similar, you have a plethora of frameworks to pick from.
Then you need to solve the challenge of connectivity; your mobile device by definition is, well, mobile. It's not on the company's active directory. Yet so many IT administrators are trying to develop iPhones with the same hammer they used to beat Windows laptops. Including Microsoft, vendors who want a piece of the puzzle aren't making the story any better. And to top it all off, the end services, SharePoint and Office 365 for the purposes of my focus here, are also learning how to handle this challenge.
So many IT administrators are trying to solve iPhone development with the same hammer they used to beat Windows laptops.
Clearly, things are a mess.
In this series of articles, I'm going to write an end-to-end mobile infrastructure using a mish-mash of technologies. I am going to argue my architectural choices and decisions. It's not possible to address every single concern in a single article or even a series of articles, but these articles will hopefully lend clarity to the best way forward in your own mobile strategy.
My architectural choices in many instances are driven by pragmatic choices drilled into me through bad experiences. In many cases, you'll see that I don't buy into the official story from Redmond. Everyone is entitled to their own opinions, but the approaches presented in this article series are what I stand behind.
I'll start by describing each of the challenges in depth, along with the choices available to solve them.
Platform Challenges
The mobile landscape is changing quite fast. A while ago, I wrote my opinions about the various platform choices here . Since then, the platforms have moved on a bit. What I wrote there is still 90% accurate., but there are a few things being added to the landscape,
- iOS8-embedded Safari will no longer be throttled. This means that your HTML5 apps will work much better - still not quite as good as native, especially for animations, but perfectly fine for most business applications that are well designed.
- Xamarin has come out with form designers. These form designers are in their infancy at the moment; it's a huge improvement over what we had. Code portability, PCL library support, structuring your projects properly, and mastering MVVM and MVC remain hurdles you must overcome to use Xamarin effectively.
- Both iOS and Windows have improved on device management features and VPN support.
Long story short, the choice among HTML5, Xamarin, PhoneGap, or fully native, remains a confusing yet critical choice to make. The final choice depends on your app, and the needs of your organization. HTML5 gives you the most reach, native gives you the most control. HTML5 lets you skip appstores, native offers a much better experience into the device capabilities. And there's everything in the middle, and the flexibility to pick and choose the best fit. Good luck!
There is no single best answer. Therefore, in this series of articles, I'm going to explain all of the choices - HTML5, Cordova, or PhoneGap, and native. I'll present the pros and cons of each approach.
Connectivity
Your mobile device is on the Internet, and so is Azure AD and Office 365. So connectivity with Office 365 is not a problem. The challenge is that many of us are still on-premises and we wish to have mobile applications that connect with on-premises SharePoint or other on-premises systems. There are two schools of thought on how to solve this challenge: VPN and bridged connectivity.
VPN or Similar Solutions
VPN is not a security technology, it is a network extension technology. By definition, having VPN is less secure than not having VPN. By letting a device on your network via VPN, that device can now touch a number of servers. VPN is also tougher on your device's battery. VPN is also not the best user experience on touch screen devices. However, in the past few years, this technology has become a viable solution for the following reasons:
- Organizations are comfortable with VPN. Existing IT shops have investments in similar solutions; it's something they know and can handle.
- Through various solutions such as Windows Intune, organizations can now register the device, and offer a much smoother VPN experience. In the process of registering the device, they can also push policies, install, update, or even wipe clean apps or company-specific data. The solutions are very well thought-through, so your personal device can play as well.
VPN or similar solutions suffer from some serious drawbacks.
- The solutions, for all practical purposes, require some sort of device registration. This means that I, as a consultant with numerous clients, will be less willing to register my personal device under your company's policies. For instance, your policies could block iCloud, which another client of mine requires. It's very easy to run into such conflicts.
- Such solutions also have device-specific nuances. DirectAccess, for instance, is a wonderful technology but will not work on Apple or Android devices. WinRT, whose future I am not fully sure of, does not understand domain-based restrictions.
VPN is not my preferred choice, but I find myself being strong-armed into this choice only because IT departments feel comfortable with it, or rather, they're afraid of change. In my opinion, it's an inferior choice, but it's quite conceivable that over time, the technology will improve and VPN will become a viable option.
Bridged Connectivity
By bridged connectivity, I mean point-to-point connectivity. The app can talk with a specific server behind firewalls, and it can only do specific actions. The device is not required to be on the company's network, although it can work with the company's device policies if they have a strategy for it. This also requires minimal changes to the company's firewall setup. It can work with reverse proxies. The most important bit, since the device is not on the network, is that what the external app can do on the network is very limited. This choice therefore is extremely secure. Bridged connectivity comes in various forms; as of today, you have Azure Service Bus, Azure AD remote endpoints, or a custom solution.
However, bridged connectivity suffers from a big disadvantage. The throughput of messages can't match direct connectivity. Luckily, mobile devices don't require high throughput, and with judicious use of caching and well-written apps, this is a non-issue. But when you have extremely document- or video-centric applications, this approach falls to its knees. For a regular invoicing, time sheet, or travel expense app, though, this approach works quite well.
As a mobile applications architect, with the end-to-end stack in mind, I prefer to have my solution flexible. My solution will work on Office 365, on-premises SharePoint with VPN, or with bridged connectivity. To keep on topic, I don't intend to show how I solve the connectivity to on-premises challenge, but if you're interested, send me a message at Contact@winsmarts.com.
WS-Trust, WS-Fed, or OAuth?
I miss the times when authentication meant username and password. As much as users hated username and password, I'm not sure the complexity of today's world, even with higher standards, has put us in a better place. I don't have 100% confidence that my mom checks Candy Crush's SSL cert before granting various permissions via OAuth to her Facebook account, for instance.
The reality is that authentication today is far more complicated and we architects need to make the right choices so users find the choice simpler to make.
The choices are dependent on the platform. WS-Trust is better suited for services, so I am not going to consider it here. WS-Federation works very well for browser-based clients who understand HTTP 302 redirects. Unfortunately, native applications are terrible at handling WS-Federation redirects. They can do it by embedding Web views, or catching the FedAuth cookie or similar mechanisms. Those approaches are hardly elegant. Even so, many apps from Microsoft use it. Azure AD pretty much only supports that as an option today; even when you use OAuth, the actual authentication is a bunch of Web views that fit poorly on my native app. This is why Skype on iOS does not have a “remember me” choice. My frustrations seem to have no end here.
OAuth, on the other hand, was designed for access and authorization. It can work perfectly fine for authentication also.
As an architect, the only way I can devise an architecture in this case is to create an abstraction layer. This abstraction layer, uses OAuth as the primary technology, since that is the most flexible and easiest to implement. And, as the behind-the-scenes technology at Microsoft matures, I'll have the ability to change this abstraction layer in the cloud without having to update every single mobile app installed in my user base. Remember, I have zero control over when the apps are updated, so I must support all versions. But I can change logic on the server without going through app stores.
Technology Provided by Microsoft
In a mobile world, you need to be technology agnostic, but since the back-end here is SharePoint and Office 365, I must also consider what Microsoft is doing. Microsoft, in my opinion, at the time of writing this article, is still figuring it out.
Microsoft has Android, iOS, and native .NET client SDKs for Azure AD. They also have the common consent framework and Office 365 developer tools for Visual Studio. They also have Apps for Office365 and SharePoint. Those are very welcome improvements. Still, there are a few big holes at the moment:
- All of these Microsoft solutions require Azure and Office 365. A lot of my customers use technologies that have nothing to do with Microsoft, or are fully on premises, or, for legal reasons, cannot use Azure or similar cloud services. My life would be a lot simpler if none of these were true, but I live in the real world and must solve this real challenge.
- The sign-on experience provided is poor. It comes down to Web views; customizing Web views is possible but not the easiest across devices. I could put a native shim to mimic the browser, but I don't want to write all that complex code. The SDK should do that for me. There is no such SDK at this time.
- As of writing this article, there's no
TokenHelper.csfor iOS or Xamarin, and there's no SDK for iOS, Xamarin, or Cordova. When - or if - this SDK comes out, we don't know how capable it will be.
Again, I can solve all these challenges by authoring an abstraction layer. An abstraction layer that is built on standards, and is built using .NET, because frankly C#, .NET, and Visual Studio are simply awesome!
And now, without further ado, I introduce you to my architecture.
Overall Architecture
Figure 1 illustrates my overall architecture.
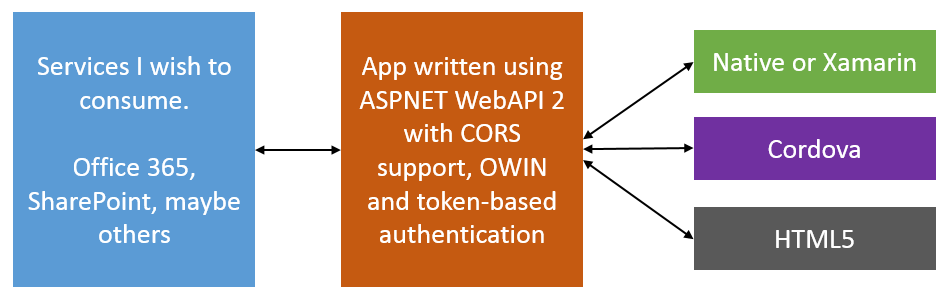
I intend to abstract out all back-end services through an ASP.NET application that I am going to author. This ASP.NET application can act as an app inside Office 365 or SharePoint. It can forward the user's identity to Office 365 as need be, or work using App-only permissions. For purposes of demonstration, I will stick with App only permissions.
I have chosen to use OAuth as my preferred app authentication and authorization mechanism. In order to receive an OAuth token, the app will be expected to sign in also. The authentication will be username and password-based, but it will be built on a provider model, so you can easily replace it with a client-side certificate if you prefer.
The reason I didn't go with WS-Federation is because I didn't see any advantage in going down that route, but I did see complexity. The App is going to reside in the cloud, fully under my control. I can easily add WS-Fed at a later date if I need to. But honestly, I don't see why I would need to.
Notice that in my architecture, there is no mention of Azure AD or Azure SDK. Neither is there a mention of Office 365 developer tools. There are many good reasons behind the choice of such an architecture.
- The above architecture decouples Microsoft tools that work well on Microsoft platforms but offer no equivalent on iOS or other platforms.
- The above architecture, outside of my ASNET app, has no dependency on Azure ACS or Azure AD. Don't get me wrong; I love Azure and Azure AD. I'm a big fan of Azure AD SDK for mobile platforms (except the sign-on inflexibility). But sometimes the clients who pay my bills can't use Azure for many reasons.
- The above architecture leverages CORS and OAuth, now behind the scenes once the common consent framework matures and comes out of its beta form (if we can call it beta). I can easily extend the app to use it. Additionally, I can make these changes, while remaining backward compatible with existing installed mobile apps.
- In pure HTML5 apps, I must consider a huge platform limitation, which is that I can't trust the device. I can't store anything on the device that I don't mind being compromised. There is no encryption in JavaScript. This means that I can't use a “remember me” checkbox, or save refresh tokens on the client. I can, however, store this information on the server-side in my ASP.NET app. Problem solved! Additionally, the ASPNET API offers a cheap platform-independent synch service between multiple mobile platforms.
- This architecture allows me to create a login experience that is 100% under my control. This is important since the logon page is the face of my app. Very frequently, these mobile apps are an amalgamation of multiple backend platforms, not just Office 365. Even though here I am using Azure or Office 365 behind the scenes, I don't want my login experience to be driven by that.
- Scalability, since the token is self-contained, I can theoretically load-balance my front end as much as I wish. Of course, the back end needs to scale as well.
- It's mobile friendly, no matter what platform you pick. Native apps do not like Web redirects and cookies. Browsers do. Our architecture doesn't care and can support both.
Let's See Some Code
I did a complex calculation of the minimum background I need to provide before I can dive into implementation. The background is important, and I wish I had the opportunity to provide even more background than I already have so far in this article. But I know you are raring to see some action, some code, something functioning.
In this series of articles, I'll break apart the problem into smaller pieces. In this first article, I author the abstraction layer using ASP.NET Web API. In subsequent articles, I'll author mobile apps on various platforms targeting this ASP.NET abstraction layer.
The first step is to author a simple ASP.NET Web API 2 application that also acts as a SharePoint app. To keep things simple, my app reads the title of the site and exposes it over a WebAPI method. The app authenticates into Office 365 using App-only authentication. I could easily extend this to use user + app authentication, but that would require me to populate user profiles, and give Office 365 or on-premises enough information to resolve my ASP.NET user to a SharePoint user. All that is possible, but out of scope of this article.
Start Visual Studio 2013, and choose Create a new Project. Ensure that you are creating an ASP.NET Web application targeting .NET 4.5, and call it MobileBackEnd. Ensure that you create an Empty Web App, with no authentication. Choose to add support for Web API. This can be seen in Figure 2.

Next, you need to install some nuget packages to setup the WinServer and configure ASP.NET Web API to be hosted within an Owin server. In the Package Manager Console of Visual Studio 2013, run the following commands:
Install-Package
Microsoft.AspNet.WebApi.Owin –Version 5.1.2

Install-Package
Microsoft.Owin.Host.SystemWeb –Version 2.1.0
Next, you need to add an Owin startup class. In your project, add a class called Startup.cs, and add the code shown in in Listing 1.
Listing 1: Startup.cs
using Microsoft.Owin;
using Owin;
using System;
using System.Collections.Generic;
using System.Linq;
using System.Web;
using System.Web.Http;

[assembly: OwinStartup(typeof(AngularJSAuthentication.API.Startup))]
namespace AngularJSAuthentication.API
{
    public class Startup
    {
        public void Configuration(IAppBuilder app)
        {
            HttpConfiguration config = new HttpConfiguration();
            WebApiConfig.Register(config);
            app.UseWebApi(config);
        }
    }
}
As you can see, the assembly attribute provides the hint to the framework about which class should fire up on startup. The class fires up and the Configuration method is called. An IAppBuilder variable is passed in, where you can compose the application for the Owin server. Additionally, you'll also use this to configure your Web API routes. This also means that you don't need the global.asax, so go ahead and delete it.
Next, in the App_Start\WebApiConfig.cs class, add the code shown in Listing 2.
Listing 2: WebApiConfig.cs
using System;
using System.Collections.Generic;
using System.Linq;
using System.Net.Http.Formatting;
using System.Web.Http;
using Newtonsoft.Json.Serialization;

namespace MobileBackEnd
{
    public static class WebApiConfig
    {
        public static void Register(HttpConfiguration config)
        {
            config.MapHttpAttributeRoutes();

            config.Routes.MapHttpRoute(
                name: "DefaultApi",
                routeTemplate: "api/{controller}/{id}",
                defaults: new { id = RouteParameter.Optional }
            );

            var jsonFormatter =
                config.Formatters.OfType<JsonMediaTypeFormatter>().First();
            jsonFormatter.SerializerSettings.ContractResolver =
                    new CamelCasePropertyNamesContractResolver();
        }
    }
}
Setting Up Authentication
The Web application needs to authenticate the user. This means that you need to support some kind of authentication. The easiest one to set up is to use the ASP.NET Identity system. In order to do so, add the following two nuget packages.
Install-Package
Microsoft.AspNet.Identity.Owin -Version 2.0.1

Install-Package
Microsoft.AspNet.Identity.EntityFramework -Version 2.0.1
As you can see, the first package adds support for ASP.NET identity Owin, and the second adds support for ASP.NET identity with Entity Framework. To keep things simple, I'm going to use a code-first approach with a POCO object to represent my users.
Create a new class called AuthContext.cs with the code in Listing 3 in it.
Listing 3: AuthContext.cs
using System;
using System.Collections.Generic;
using System.Linq;
using System.Web;
using Microsoft.AspNet.Identity.EntityFramework;

namespace MobileBackEnd
{
    public class AuthContext : IdentityDbContext<IdentityUser>
    {
        public AuthContext() : base("AuthContext") { }
    }
}
In order to support this class, you'll need a Model to represent the user object. Therefore, under Models, add a class called UserModel.cs with the code shown in Listing 4.
Listing 4: UserModel.cs
using System;
using System.Collections.Generic;
using System.ComponentModel.DataAnnotations;
using System.Linq;
using System.Web;

namespace MobileBackEnd.Models
{
    public class UserModel
    {
        [Required]
        [Display(Name = "User name")]
        public string UserName { get; set; }

        [Required]
        [StringLength(100, ErrorMessage =
            "The {0} must be at least {2} characters long.", MinimumLength = 6)]
        [DataType(DataType.Password)]
        [Display(Name = "Password")]
        public string Password { get; set; }
    }
}
And also, you need to point your application to a SQL Server you can use, where a database will be created when the first user hits the system. Create a new ConnectionString entry called AuthContext with a username and password that has sysadmin rights to the SQL instance for simplicity's sake. Mine looks like this:
<connectionStrings>
    <add name="AuthContext" connectionString="Data Source=SP;
                    Initial Catalog=Users;User Id=sa;Password=p@ssword1"
         providerName="System.Data.SqlClient"/>
</connectionStrings>
Next, you need a repository class called AuthRepository. This class depends on the UserManager object to provide enough information about working with users. The code for this class is shown in Listing 5.
Listing 5: AuthRepository.cs
using System;
using System.Collections.Generic;
using System.Linq;
using System.Threading.Tasks;
using System.Web;
using Microsoft.AspNet.Identity;
using Microsoft.AspNet.Identity.EntityFramework;
using MobileBackEnd.Models;

namespace MobileBackEnd
{
    public class AuthRepository : IDisposable
    {
        private AuthContext ctx;
        private UserManager<IdentityUser> userMgr;
        public AuthRepository()
        {
            ctx = new AuthContext();
            userMgr = new UserManager<IdentityUser>(
                new UserStore<IdentityUser>(ctx));
        }

        public async Task<IdentityResult>
        RegisterUser(UserModel userModel)
        {
            IdentityUser user = new IdentityUser
            {
                UserName = userModel.UserName
            };
            var result = await userMgr.CreateAsync(
                user, userModel.Password);
            return result;
        }

        public async Task<IdentityUser>
        FindUser(string userName, string password)
        {
            IdentityUser user = await
            userMgr.FindAsync(userName, password);
            return user;
        }

        public void Dispose()
        {
            ctx.Dispose();
            userMgr.Dispose();
        }
    }
}
How exactly does the application know about this AuthRepository class? The answer is that you'll implement a controller to handle accounts. This is a simple WebAPI controller, which you will later extend to understand CORS also. For now, under controllers, right-click and add an empty Web API 2 Controller called AccountController and add the code as shown in Listing 6.
Listing 6: AccountController.cs
using System;
using System.Collections.Generic;
using System.Linq;
using System.Net;
using System.Net.Http;
using System.Threading.Tasks;
using System.Web.Http;
using Microsoft.AspNet.Identity;
using MobileBackEnd.Models;

namespace MobileBackEnd.Controllers
{
    [RoutePrefix("api/Account")]
    public class AccountController : ApiController
    {
        private AuthRepository repo = null;
        public AccountController()
        {
            repo = new AuthRepository();
        }

        [AllowAnonymous]
        [Route("Register")]
        public async Task<IHttpActionResult>
        Register(UserModel userModel)
        {
            if (!ModelState.IsValid) return BadRequest(ModelState);

            IdentityResult result = await repo.RegisterUser(userModel);
            IHttpActionResult errorResult = GetErrorResult(result);

            if (errorResult != null) return errorResult;
            return Ok();
        }

        protected override void Dispose(bool disposing)
        {
            if (disposing) repo.Dispose();
            base.Dispose(disposing);
        }

        private IHttpActionResult
        GetErrorResult(IdentityResult result)
        {
            if (result == null) return InternalServerError();
            if (!result.Succeeded)
            {
                if (result.Errors != null)
                {
                    foreach (string error in result.Errors)
                    {
                        ModelState.AddModelError("", error);
                    }
                }

                if (ModelState.IsValid) return BadRequest();
                return BadRequest(ModelState);
            }
            return null;
        }
    }
}
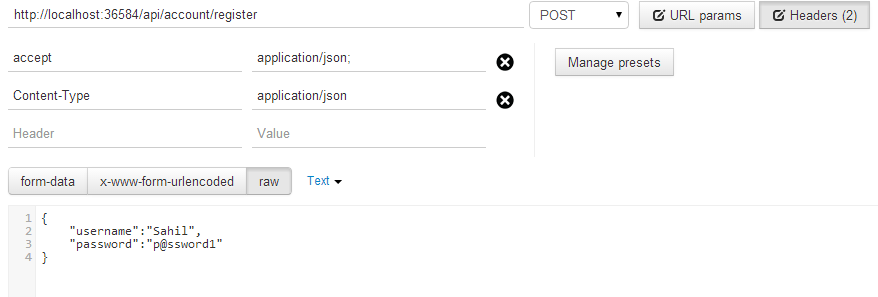
If you observe the code shown in Listing 6, you've created a single method at /api/account/register that accepts a POST request. This method will accept the UserModel as a JSON Object, and allow you to register the user. At this time, go ahead and start your application and issue a POST request to /api/account/register with the following POST payload:
{"username":"Sahil", "password":"p@ssword1"}
If all steps followed and properly done so far, you should see a database called Users in your SQL Server with the user's entry created. You can see my POSTMAN (chrome app) REST call in Figure 3.
Curiously enough, there is no Login action. That doesn't belong here. When I add support for OAuth, I'll use a provider-based architecture to add support for login.
Business Logic Controller
Next, I'm going to add a simple controller. I'm going to keep things really simple here, but you can choose to make this more complex if you wish. I'm going to write out the title of the SPWeb. In fact, for now, I'll just return a hard-coded value. I'll return to this portion when I'm ready to turn this into a SharePoint App. The logic for my controller is as shown in Listing 7.
Listing 7: SPWebController.cs
using System;
using System.Collections.Generic;
using System.Linq;
using System.Net;
using System.Net.Http;
using System.Web.Http;

namespace MobileBackEnd.Controllers
{
    [RoutePrefix("api/SPWeb")]
    public class SPWebController : ApiController
    {
        [Authorize]
        [Route("title")]
        public IHttpActionResult Get()
        {
            return Ok("Dummy title for now");
        }
    }
}
If you try visiting /api/SPWeb/title now, you'll get an HTTP 401 because you have that Authorize attribute at the top. You must make an authenticated request to be able to call this action.
Adding Support for OAuth
To add support for OAuth, add the following nuget package.
Install-Package
Microsoft.Owin.Security.Oauth –Version 2.1.0
This nuget package adds support for OAuth. Go look at Listing 6 again; notice that I didn't have an action for Login. To perform Login, I need to implement an authorization provider, as shown in Listing 8.
Listing 8: UsernamePasswordAuthorizationProvider.cs
using System;
using System.Collections.Generic;
using System.Linq;
using System.Security.Claims;
using System.Threading.Tasks;
using System.Web;
using Microsoft.AspNet.Identity.EntityFramework;
using Microsoft.Owin.Security.OAuth;

namespace MobileBackEnd
{
    public class
    UsernamePasswordAuthorizationProvider : OAuthAuthorizationServerProvider
    {
        public override async Task
        ValidateClientAuthentication(
            OAuthValidateClientAuthenticationContext context)
        {
            context.Validated();
        }

        public override async
        Task GrantResourceOwnerCredentials(
            OAuthGrantResourceOwnerCredentialsContext context)
        {

            context.OwinContext.Response.Headers.Add(
                "Access-Control-Allow-Origin", new[] { "*" });

            using (AuthRepository repo = new AuthRepository())
            {
                IdentityUser user = await repo.FindUser(context.UserName,
                    context.Password);
                if (user == null)
                {
                    context.SetError("invalid_grant",
                    "Incorrect username password.");
                    return;
                }
            }

            var identity = new ClaimsIdentity(context.Options.AuthenticationType);
            identity.AddClaim(new Claim(ClaimTypes.Name, context.UserName));
            context.Validated(identity);
        }
    }
}
Pay close attention to the code shown in Listing 8. You're using the same AuthRepository you created earlier, and registered a user using a POST request to find a user now. What's most interesting here is that in the created identity, you are adding claims. You can add whatever claims you wish, but since you intend to use App-only authentication, a name claim is enough. As it is, you won't be passing the user's identity to Office 365. However, if you needed App + user identity, you will need a UPN claim (preferable) or email claim. I leave that up to you to try as an exercise.
To hook-in this UsernamePasswordAuthorizationProvider class, open startup.cs, and in the Configuration method, before HttpConfiguration, add the code in Listing 9.
Listing 9: Adding UsernamePasswordAuthorizationProvider
OAuthAuthorizationServerOptions OAuthServerOptions =
  new OAuthAuthorizationServerOptions()
{
    AllowInsecureHttp = true,
    TokenEndpointPath = new PathString("/token"),
    AccessTokenExpireTimeSpan = TimeSpan.FromDays(1),
    Provider = new UsernamePasswordAuthorizationProvider()
};

app.UseOAuthAuthorizationServer(OAuthServerOptions);
app.UseOAuthBearerAuthentication(new OAuthBearerAuthenticationOptions());
Adding Support for CORS
SharePoint does not understand CORS because the SharePoint app model relies on app identities that must hit SharePoint in a certain way to prove their identities. As it happens, CORS is a very valuable and well-accepted mechanism, especially when it comes to native applications. You need CORS to simplify your mobile life.
Luckily, you had an excellent architect who decided to have an abstraction layer in the middle, so adding support for CORS is easy. Simply add the following nuget package:
Install-Package
Microsoft.Owin.Cors -Version 2.1.0
And, add the following line of code to allow CORS in the app in the Configuration method of startup.cs:
app.UseCors(Microsoft.Owin.Cors.CorsOptions.AllowAll);
Testing the Setup
You will soon expose SharePoint functionality through the business controller you wrote a moment ago. But before you do that, ensure that the setup is working nicely. There were a lot of steps, so let's ensure that you can authenticate, that you can get an OAuth token, and that you can use that OAuth token to call your WebAPI controller, where the business logic will go.
I'm going to use POSTMAN, which is a fantastic Chrome browser app, to craft up my REST APIs. You can use any tool you wish.
You already have a user registered, so go ahead and authenticate, as shown in Figure 4.
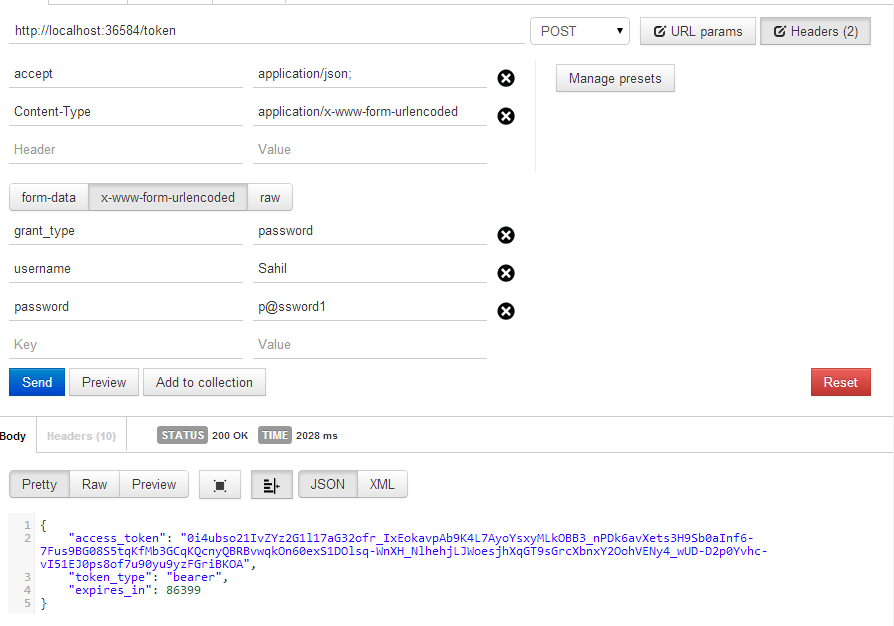
As you can see, you're able to get an OAuth access token, and so far, there is zero dependency on Azure ACS. It's worth noting that you haven't added support for RefreshTokens. To be honest, RefreshTokens are very valuable in real world scenarios. This is because:
- Refresh tokens allow you to update access tokens without going through a full logon process again.
- Refresh tokens allow you to reduce the validity duration of an access token, which, in turn, means you can invalidate a user that has previously authenticated.
- You're not authenticating very frequently, so there is little need to store a username and password.
It's typical that an access token is valid for 30 minutes or an hour, and a refresh token is valid for months. The exact durations are your choice. In the architecture so far, you haven't implemented support for refresh tokens. You only have access tokens. In a real-world scenario, you'd add support for refresh tokens, but for the scope of this article, I'm keeping things simple and simply increasing the duration of the access token to 24 hours, which can be seen in Figure 4. Adding refresh tokens is a whole other article, which I leave for another day.
With a valid access token, make a call to the SPWebController, as shown in Figure 5.
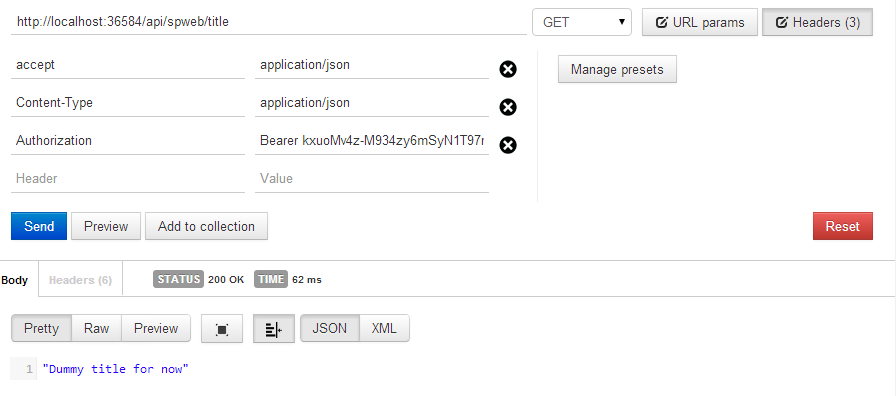
As you can see, the Web app is working just fine. You've added CORS support earlier, so this will also work in a cross-domain fashion, which you will need shortly when you author the Mobile apps. There will be more on that in the next article.
Turning the ASPNET Site into a SharePoint App
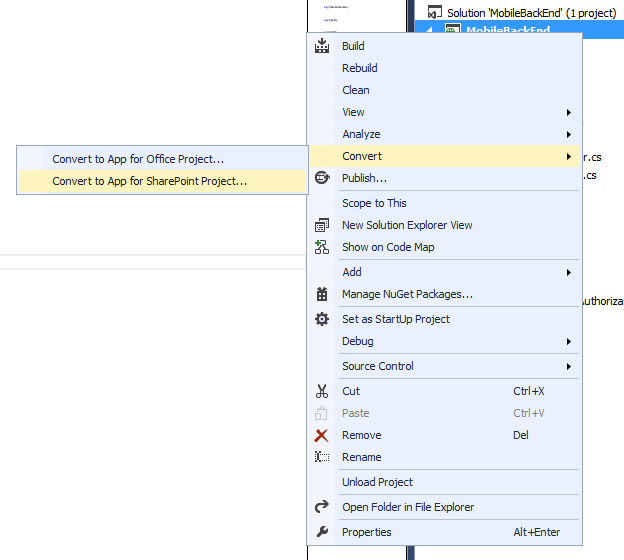
The next thing you need to do is turn the ASPNET site into an Office app, and instead of returning the dummy title, return the actual title of the SPWeb. This is rather simple to do. Right-click on your project, and choose Convert > Convert to App for SharePoint Project as shown in Figure 6.
As soon as you do this, you'll be asked to provide your SharePoint site address. You can provide either an Office 365 site here or on-premises. But remember, the MobileBackend needs to HTTP to this SharePoint site or you need to offer an alternate connectivity route.
Once the project is turned into an App, double-click and open AppManifest.xml. Under the Permissions tab, allow the App to make app-only calls to SharePoint. Also, open the SPWeb controller, and add the code shown in Listing 10.
Listing 10: SPWebController.cs - with SharePoint code
using System;
using System.Collections.Generic;
using System.Linq;
using System.Net;
using System.Net.Http;
using System.Web.Http;

namespace MobileBackEnd.Controllers
{
    [RoutePrefix("api/SPWeb")]
    public class SPWebController : ApiController
    {
        [Authorize]
        [Route("title")]
        public IHttpActionResult Get()
        {
            // return Ok("Dummy title for now");

            Uri siteUri = new Uri("https://winsmartsdev.sharepoint.com");
            string realm = TokenHelper.GetRealmFromTargetUrl(siteUri);
            string accessToken = TokenHelper.GetAppOnlyAccessToken(
                TokenHelper.SharePointPrincipal, siteUri.Authority,
                realm).AccessToken;
            using (var clientContext =
                TokenHelper.GetClientContextWithAccessToken(
                "https://winsmartsdev.sharepoint.com", accessToken))
            {
                if (clientContext != null)
                {
                    clientContext.Load(clientContext.Web);
                    clientContext.ExecuteQuery();
                    return Ok(clientContext.Web.Title);
                }
                else return Ok("Title not found");
            }
        }
    }
}
As you can see, you're getting an access token and using the access token in an app-only client context. Using this client context, you're making CSOM calls to find out the Web title. Now you can turn this into a more compelling app easily. This simple code demonstrates the basic concept.
To keep things clean, I'd have used AppRegNew.aspx etc. to create an application. To save some time, go ahead and hit F5 in Visual Studio, which will deploy the app and ask you to trust it. Of course, when the app launches, it will error out because it's a WebAPI app that isn't intended to be used through the browser.
But once the app is installed and running, go ahead and fire up POSTMAN. Authenticate to your App and get an OAuth token. And just like before, call the SPWebController as shown in Figure 7.
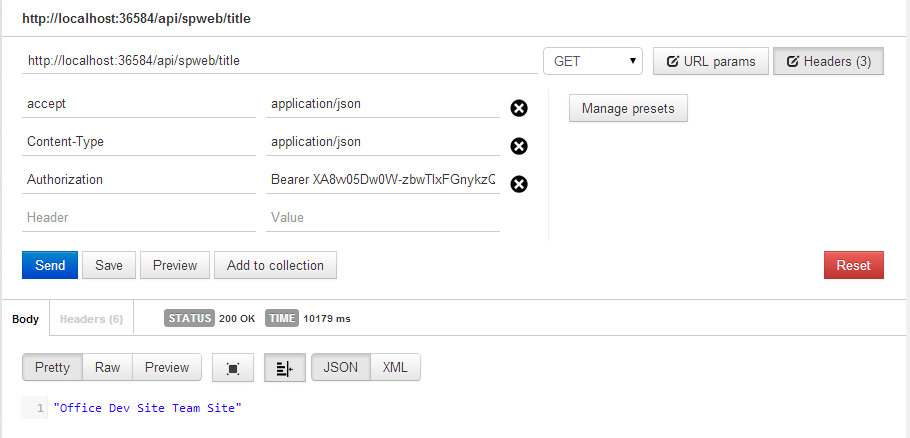
As you can see, I'm able to get the title of my Office 365 site.
Congratulations, you have just finished your MobileBackEnd.
Summary
In this article, I started with an explanation of the painful mess that mobile app development is today. I explained the tough choices you need to make, and with that background, I proposed an architecture. You created a MobileBackEnd, which was an ASP.NET WebAPI 2 website that supports OAuth token-based authentication and CORS. This MobileBackEnd is also a SharePoint app. It uses app-only permissions to make a call into SharePoint Office 365, and gets the title of the SPWeb it's installed on.
With this in place, the next step is to author a mobile app that is able to use this MobileBackEnd, and expose this functionality nicely inside itself. More on that in the next article. Until then, happy coding.
