


If we have been friends for a while, you must know my opinions about workflows in SharePoint 2010 and SharePoint 2007. I didn't think they were very good, especially from a performance and scalability point of view. Frankly I think Microsoft should have called them “workslows.” Though, I don't think it was the implementation in SharePoint that was the issue, it was fundamental issues with Workflow Foundation, compounded by the nature of SharePoint that acerbated the issues. Well, I am happy to say that Workflows in SharePoint 2013 are something I feel quite comfortable recommending to anyone, and I hope to make that case in this article.
A Brief History of Workflow
Imagine you are running a business, and you need to invest in your business - let's say buy a laptop or maybe some furniture. That asset you plan on purchasing is a predictable known quantity - you know exactly what you are paying for, and in most cases, the asset comes with a warranty to protect you against defects. Yet if you are like me, you make such asset purchases carefully, after reading many reviews and doing lots of research.
Now imagine that you are a big company that wishes to invest in custom software, something that cannot be bought off the shelf, and has to be custom developed. Therefore, you need to invest in a few developers. While a laptop may cost you $3000 at the most, a developer will cost you that much for one week - and that doesn't even count the facilities they will use. The servers the software developed will run on will cost much more, and then there are licensing fees, insurances, supporting staff, etc.
The first week you'll just get used to all the acronyms. It isn't until months later that you really know how good or how bad the developer really was. And there is really no warranty to save you from it either.
As a business owner, the perceived risk and expense in custom developing software is absolutely immense. Perhaps so vast that the word immense does not fully capture the risk involved in starting a custom software development project. It is not a surprise therefore that most companies prefer to go with off the shelf software, even if it means hammering a nail with a plier - at least you know you have a plier.
That said, custom software development is a necessary evil. There are many situations where the off the shelf plier won't work, and you really need a hammer. There is a middle ground, however, and that is empowering the business user to describe some basic logic themselves, and be able to do so visually and easily without the requirement to know any underlying complex languages or platform details.
This is the value of workflow, putting the power in the hands of business users, so they can craft up simple logic, leaving developers free to focus on more complex systems from a logic perspective.
A Brief History of Workflow in SharePoint
The ability to allow non-technical business users to describe and run logic, visually, is quite compelling. In addition, the need to model long running business processes is also quite desirable. To satisfy these needs, Microsoft formulated Workflow Foundation in the release of .NET 3.0. The first time I played with Workflow Foundation in .NET 3.0, I felt it was a good academic project, but something that would have very little applicability in the real world. You can find a very old discussion thread where I saw some glaring issues with Workflow Foundation 3.0.
I know many will disagree with me on this, because a lot of people have made lots of money solving challenges with workflows, but I will stick with my opinion. I am not a fan of WF 3.0.
Then Microsoft rolled out WF 3.5 and 3.5 SP1 where WF's smarter brother, WCF, tried to solve some challenges with WF. But the issues in WF ran quite deep.
You really don't know if a technology is good or bad until you try it. SharePoint 2007 was one of the first platforms that implemented WF. Built upon WF, SharePoint 2007 workflows allowed developers and users to model long running complex tasks. Companies could author these workflows in Visual Studio or SharePoint Designer. Visual Studio workflows were difficult and complex to write, and SharePoint Designer 2007 workflows, due to the lack of their portability between environments, were somewhere between marginally useful to completely useless. The workflow design surface in SharePoint Designer 2007 was also quite challenged. In fact, it was nearly impossible to model even the out-of-the-box approval workflow in SharePoint Designer 2007. Not to mention, workflows themselves suffered heavily from performance issues.
When Microsoft rolled out SharePoint 2010, the workflow templates in Visual Studio 2010 were a lot better, but they were still complex to write and maintain. SharePoint Designer 2010, however, made massive improvements in its workflow investments. Workflows written in SharePoint Designer 2010 are portable between environments; they can be attached to Visio visualizations, the workflow design surface is vastly improved, and many other such improvements.
But in spite of all these improvements, the main issue still remained - workflows still did not perform or scale well enough. Even the out-of-the-box approval workflow banged up your SQL Server like a Japanese car on Indian roads.
Even the out-of-the-box approval workflow banged up your SQL Server like a Japanese car on Indian roads.
All these problems aside, I could never argue with the compelling value that workflows bring, that non-technical business users could express some basic logic in the platform, and visually see it running in production in a matter of minutes.
Performance and other considerations had so far held back the true potential of workflows. Well, all that is changing in SharePoint 2013.
Workflows in SharePoint 2013
I am incredibly thrilled to see that in Workflow 4.0, Microsoft made numerous underlying improvements to WF platform and then continued to make them in WF 4.5. SharePoint 2013 benefits vastly from these changes. In fact, when you add all the incremental improvements that SharePoint Designer has made over the years, pair them with the badly needed and finally available improvements in the underlying platform, I am super excited about the potential of workflows in SharePoint 2013.
With SharePoint 2013, Microsoft introduced a new kind of workflow, something that they call SharePoint 2013 style workflow. A SharePoint 2013 style workflow runs out of process from SharePoint. It is therefore not tied to the constraints that SharePoint might bring. The workflow itself runs in a product called Workflow Manager, and the SharePoint web front end has a product called the Workflow Client built on it. The communication between the two happens using REST API and is secured using OAuth. As a result, we finally have a platform where workflows perform and scale.
Not to mention, there are vast improvements in the SharePoint Designer and Visual Studio 2012 workflow development stories.
It is worth noting, however, the older style workflows, or SharePoint 2010 style workflows, are completely different, and they are not going to upgrade from 2010 style workflows to SharePoint 2013 style workflows automatically. In other words, unless you manually rewrite your older workflows to SharePoint 2013 style workflows, they will continue to suck, even in SharePoint 2013. The best you can do is to use something called as the Workflow Interop Bridge which put simply allows you to invoke a SP2010 style workflow from an SP2013 style workflow.
Now let's delve deeper into workflows for SharePoint 2013.
Setting up SharePoint 2013 Workflows
In this section, I will talk about how to setup workflows on a SharePoint 2013 environment. The steps below demonstrate an HTTP setup. In production, you should go with an HTTPS setup. The steps involved in configuring HTTPS are quite similar.
This whole thing is built on Workflow Manager, which is not a SharePoint-specific technology, but it is certainly something that SharePoint is one of the first beneficiaries of. Therefore, we start by installing the Workflow Manager.
First, you need to install the Workflow server. I demonstrate this technique using the Web Platform Installer.
Using Web Platform Installer
- Download and install Workflow Manager Installer from the URL
http://go.microsoft.com/fwlink/?LinkID=252092. - Since it is a Web Platform Installer, it requires Internet connectivity.
- Web platform installer will automatically download and install all other required prerequisites and core components. You do not need to download and install them yourself.
- Prerequisites include:
- .NET Framework 4.5
- Service Bus 1.0
http//:go.microsoft.com/fwlink/?LinkID=247555&CLCID=0x409 - Workflow Client 1.0
http://go.microsoft.com/fwlink/?LinkID=251617&CLCID=0x409 - Microsoft Windows Fabric
http://go.microsoft.com/fwlink/?LinkID=247564&CLCID=0x409
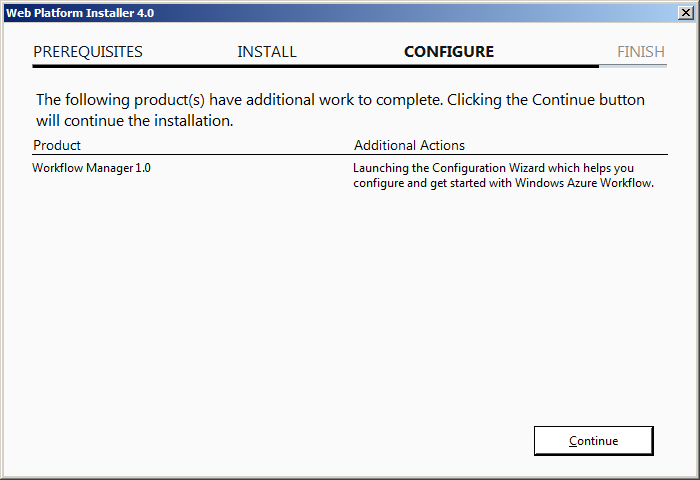
Once installation is complete, the configuration wizard would start automatically. As shown in Figure 1.
If you wish to install later, you can choose to open the configuration wizard from the Start > All Programs > Workflow Manager 1.0 > and click on Workflow Manager Configuration.
Offline Installation
If Internet connection is not available, you can download all the required individual setup files using WebPICmd.exe and install them manually.
- From the machine where you have Internet connectivity, download and WebPICmd zip from the URL
http://go.microsoft.com/fwlink/?LinkId=233753. - Extract the zip file to your local file system.
- Using Run as administrator, launch Windows PowerShell.
- Access the location where WebPICmd is previously unzipped.
- Identify a location where you would like to download the required installation files.
- From the PowerShell window, run the following command. Make sure to replace {Download Location} with the location where you would like to download identified in step #5.
./WebpiCmd.exe /offline /Products:Workflow/Path:{Download Location}
For example, if you choose the download location as C:\Winsmarts\Waw then the command would look like this:
./WebpiCmd.exe /offline /Products:Workflow/Path:c:\Winsmarts\Waw
- Allow WebPiCmd to download all the necessary software.
- After the download is completed, copy the entire folder to VM where SharePoint 2013 is installed.
- On the SharePoint 2013 VM, run each of the setup files in the folders.
Once all the setup files are installed, you can begin configuring the Workflow Manager.
Configuring the Workflow Manager
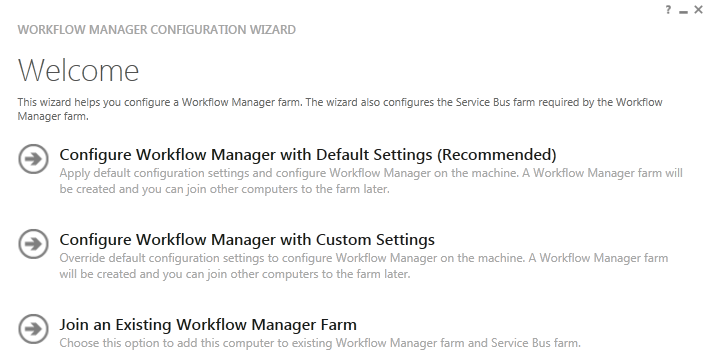
After installing the required software, the configuration wizard starts automatically. If you choose to configure the farm at a later time, you can launch the configuration wizard from Start > All Programs > Workflow Manager 1.0 > and click on Workflow Manager Configuration. Figure 2 shows the configuration wizard screen.
Steps to Configure Workflow
- Choose to configure Workflow Manager with default settings (recommended).
- The configuration wizard will ask you for a SQL Server for farm databases. In this case, this is our local development box. I will reuse the sp_admin account for now, but in production, you probably want to separate this out on a separate server and separate user id. My settings were as follows:
- SQL Server instance: sp.ws.int
- USER ID: sp_admin@WS
- Password: <my super secret password that I won't tell you>.
- I checked Allow Workflow Management over HTTP on this computer. I would leave this unchecked in production.
- I checked Enable firewall rules on this computer.
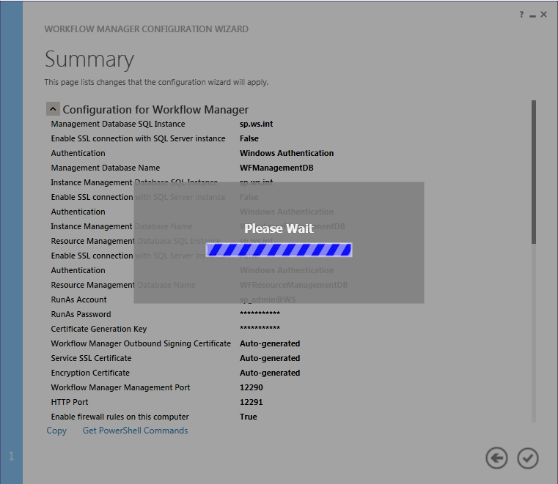
- I entered a certificate generation key, something I would remember later. I made it the same as my password in #c, which is p@ssword1. You will be presented with a confirmation screen as shown in Figure 3.
- Additionally, you are also provided PowerShell commands, which you can see in Listing 1.
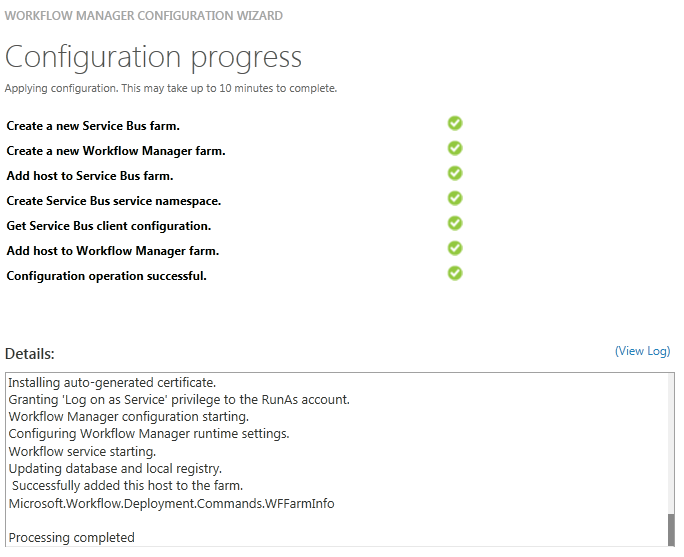
- Click the tick mark button to start configuring Workflow Server. Workflow will begin setting itself up. After going through a few progress bars, you should see success confirmation as shown in Figure 4. Go ahead and exit the WebPI and WF Manager configuration tool.
Listing 1: PowerShell script to configure workflow server
# To be run in Workflow Manager PowerShell console that
has both Workflow Manager and Service Bus installed.

# Create new SB Farm
$SBCertificateAutoGenerationKey = ConvertTo-
SecureString -AsPlainText  -Force  -String '*****
Replace with Service Bus Certificate Auto-generation
key ******' -Verbose;


New-SBFarm -SBFarmDBConnectionString 'Data
Source=sp.ws.int;Initial
Catalog=SbManagementDB;Integrated
Security=True;Encrypt=False' -InternalPortRangeStart
9000 -TcpPort 9354 -MessageBrokerPort 9356 -
RunAsAccount 'sp_admin@WS' -AdminGroup
'BUILTIN\Administrators' -GatewayDBConnectionString
'Data Source=sp.ws.int;Initial
Catalog=SbGatewayDatabase;Integrated
Security=True;Encrypt=False' -
CertificateAutoGenerationKey
$SBCertificateAutoGenerationKey -
MessageContainerDBConnectionString 'Data
Source=sp.ws.int;Initial
Catalog=SBMessageContainer01;Integrated
Security=True;Encrypt=False' -Verbose;

# To be run in Workflow Manager PowerShell console that
has both Workflow Manager and Service Bus installed.

# Create new WF Farm
$WFCertAutoGenerationKey = ConvertTo-SecureString -
AsPlainText  -Force  -String '***** Replace with
Workflow Manager Certificate Auto-generation key
******' -Verbose;


New-WFFarm -WFFarmDBConnectionString 'Data
Source=sp.ws.int;Initial
Catalog=WFManagementDB;Integrated
Security=True;Encrypt=False' -RunAsAccount
'sp_admin@WS' -AdminGroup 'BUILTIN\Administrators' -
HttpsPort 12290 -HttpPort 12291 -
InstanceDBConnectionString 'Data
Source=sp.ws.int;Initial
Catalog=WFInstanceManagementDB;Integrated
Security=True;Encrypt=False' -
ResourceDBConnectionString 'Data
Source=sp.ws.int;Initial
Catalog=WFResourceManagementDB;Integrated
Security=True;Encrypt=False' -
CertificateAutoGenerationKey $WFCertAutoGenerationKey -
Verbose;

# Add SB Host
$SBRunAsPassword = ConvertTo-SecureString -AsPlainText
-Force  -String '***** Replace with RunAs Password for
Service Bus ******' -Verbose;


Add-SBHost -SBFarmDBConnectionString 'Data
Source=sp.ws.int;Initial
Catalog=SbManagementDB;Integrated
Security=True;Encrypt=False' -RunAsPassword
$SBRunAsPassword -EnableFirewallRules $true -
CertificateAutoGenerationKey
$SBCertificateAutoGenerationKey -Verbose;

Try
{
   # Create new SB Namespace
   New-SBNamespace -Name 'WorkflowDefaultNamespace' -
AddressingScheme 'Path' -ManageUsers
'sp_admin@WS</a>','Administrator@WS' -Verbose;

   Start-Sleep -s 90
}
Catch [system.InvalidOperationException]
{
}

# Get SB Client Configuration
$SBClientConfiguration = Get-SBClientConfiguration -
Namespaces 'WorkflowDefaultNamespace' -Verbose;

# Add WF Host
$WFRunAsPassword = ConvertTo-SecureString -AsPlainText
-Force  -String '***** Replace with RunAs Password for
Workflow Manager ******' -Verbose;


Add-WFHost -WFFarmDBConnectionString 'Data
Source=sp.ws.int;Initial
Catalog=WFManagementDB;Integrated
Security=True;Encrypt=False' -RunAsPassword
$WFRunAsPassword -EnableFirewallRules $true -
SBClientConfiguration $SBClientConfiguration -
EnableHttpPort  -CertificateAutoGenerationKey
$WFCertAutoGenerationKey -Verbose;
Note that in step #2 above, if the “Test Connection” button fails, you most probably forgot to enable remote connectivity or TCP/IP and Named Pipes protocols for SQL Server. I highly recommend that you enable those protocols for numerous reasons.
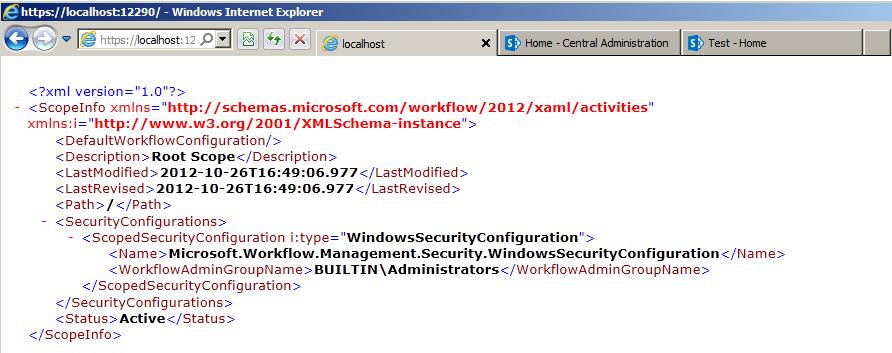
The above configuration creates a new web application called Workflow Management Site under IIS, and you can browse the URL at https://localhost:12290/ to view the workflow and security configuration as shown in Figure 5.
In a production environment, you will have to create a valid certificate, configure IIS, export the certificate, and then import and install the certificate on the SharePoint server. These steps are well described in this article http://technet.microsoft.com/en-us/library/jj163276(v=office.15).aspx#appendix.
The next steps are configuring SharePoint to use the above Workflow Manager Server.
Pairing SharePoint 2013 with a Workflow Manager Server
You can access Workflow Manager Server using the web application URLs on which it is installed in the previous steps. This web application runs on port 12291 for http and 12290 for https. You'll use the https URL in production environments. For development environments you can use the http port URL. Use the fully qualified domain name or FQDN site URL of the workflow farm along with the port number while you are configuring SharePoint. For example, considering the FQDN for the web application is http://sp.ws.int, use the URL http://sp.ws.int:12291/. You also will need a site collection where you will register the workflow service. I recommend creating a new site collection first and then begin configuration. If you install the workflow farm on a different VM, then you will need to install the Workflow Client on the SharePoint VM. This is required to register the workflow service successfully.
Considering that your new site collection where the workflow service would be registered is http://sp/sites/wfs/, prepare the following PowerShell script and run it in the SharePoint 2013 Management Shell window.
Register-SPWorkflowService -SPSite
"http://sp/Sites/wfs" -WorkflowHostUri
"http://sp:12291" -AllowOAuthHttp
This completes the setup of your farm for workflows.
Writing a Simple SharePoint Designer Workflow
After the above PowerShell script runs, you need to test if workflows are running properly or not. You can create a simple SharePoint 2013 style workflow and verify if the workflows are initiated and completed as expected. To perform this test, I'll walk you through using SharePoint 2013 designer workflows.
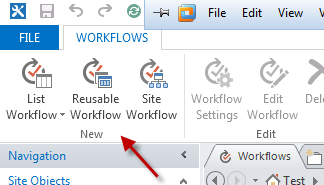
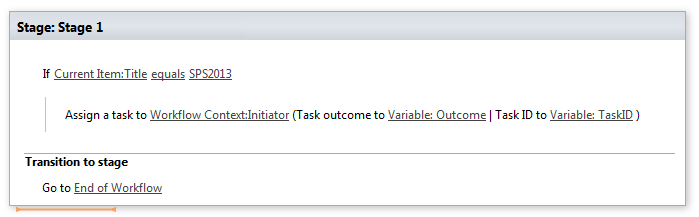
In this workflow, you'll create a task in the workflow tasks list if the title of the newly created list item is “SPS2013”. To craft up such a workflow, open SharePoint Designer 2013, and open the http://sp site. Once SharePoint Designer has opened the site, click the Workflows tab on the left hand side, and then click on Reusable Workflow button in the ribbon as shown in Figure 6.
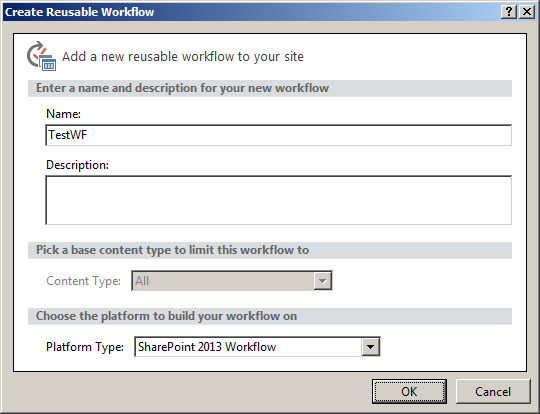
Name your workflow TestWF; note that you can only target the “All” content type setting here, even though you're choosing to create a reusable workflow. Ensure that you are creating a SharePoint 2013 workflow as shown in Figure 7.
Next, go ahead and craft up a workflow as shown in Figure 8.
Finally, click the Save and Publish buttons in the ribbon.
Now go to your SharePoint site and click Site Contents. Choose to “Add an app” and add a custom list. Once the list is created, choose to add a workflow to it, and add the TestWF to this list. Select the checkbox, “Creating a new item will start the workflow.”
In this custom list, add a new item, ensure that its title is “SPS2013.”
Once the item is created, verify that the workflow task gets created as shown in Figure 9.
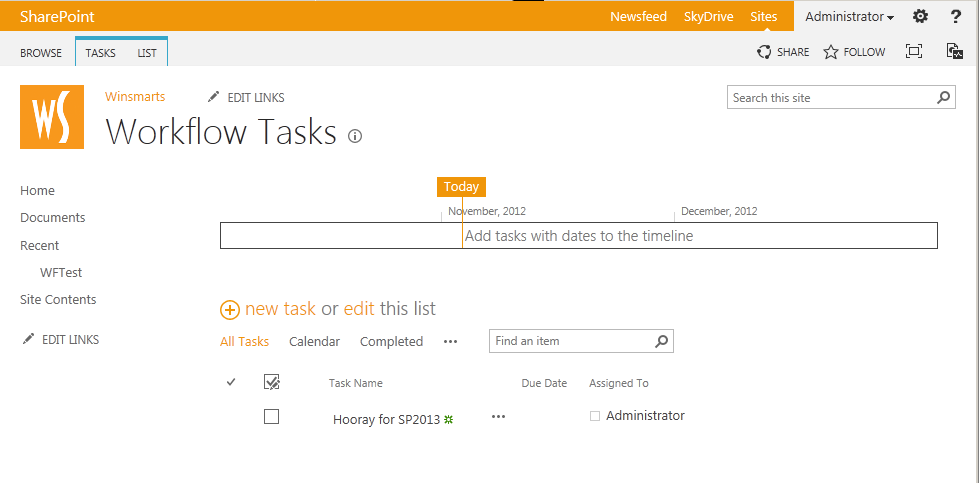
Congratulations. You just wrote your first SharePoint 2013 style workflow.
Summary
I don't know if you could tell, but I am quite excited about the improvements in workflow in SharePoint 2013. This is a big topic - one article is not going to cover all the details of what I'm excited about. There are numerous improvements in SharePoint Designer authoring experience, the integration of Visio visualizations, improvements in Visual Studio workflow authoring experience, and many other improvements in the underlying platform that has nothing to do with SharePoint, but SharePoint will benefit from.
I will talk about these and more in my next article. Until then, happy SharePointing.
