


As software development becomes complicated, writing unit tests provides a protection against constant changes and modifications. Traditionally, unit tests were written by testing each piece of the application layer in isolation. With the advent of behavior-driven development, now our unit tests can be composed into user defined stories. Each story represents a single feature of the application which can be tested from end to end. This method makes sure that the unit test only passes when the story is completely done. In this article I’ll show you how to use SpecFlow and WatiN to write BDD-style tests to implement user stories.
SpecFlow
SpecFlow is inspired by Cucumber framework in the Ruby on Rails world. Cucumber uses plain English in the Gherkin format to express user stories. Once the user stories and their expectations are written, the Cucumber gem is used to execute those stores. SpecFlow brings the same concept to the .NET world and allows the developer to express the feature in plain English language.
You can download the SpecFlow framework from the official website, specflow.org. The installation files also install the Visual Studio template for SpecFlow which you can use when writing user stories.
Scenario and Setup
In this article I’ll show you how to implement the user registration feature, which is a common feature implemented on most of the websites.
The solution comprises of two different projects. One project is an ASP.NET MVC project and the other one is a Microsoft Unit Test project. Before we start writing our features we need to add the SpecFlow framework to your test project. You can accomplish this in different ways but the easiest method is to use NuGet to download and reference the SpecFlow libraries. From within the Visual Studio launch the Package Manager Console and issue the “Install-Package SpecFlow” command as shown below in Figure 1:

Make sure that the Default project in Package Manager Console is setup as the MS Test project and not the web application project. Issuing the above command will add a SpecFlow reference to the test project. Repeat the same procedure for installing the WatiN framework which will be used to automate the user interface. After installing the SpecFlow and WatiN, we are ready to write some BDD-style unit tests.
Writing User Registration Feature
Each feature is written in a SpecFlow feature file which can be added to the project. SpecFlow uses a special format when defining the features. The format is known as Gherkin format and it consists of special English keywords like “Given”, “When”, “And”, “Then”, etc. These keywords, along with the English language, allow the feature files to be easily read by developers as well as the non-technical staff and bridge the communication gap between them.
Add a new SpecFlow feature file to the project and name it “RegisterUser.feature”. You can see the contents of RegisterUser.feature below:
     Feature: Register a new User
In order to use the features provided by CodeBlog
a user should be able to register to the website
Scenario: Create a new user registration
      When the user visits the registration page
      And enter the following information
      | Field    | Value   |
      | username | johndoe |
      | password | star    |
      And click the "Register" button
      Then the user should be redirected to the
confirmation page
The feature file starts with the “Feature” keyword, which defines the main purpose of the feature. The next few lines represent the description of the feature, which further illustrates the business need of the feature.
The “Scenario” keyword describes a particular scenario within the current feature. A single feature can consist of multiple scenarios. A scenario is described in plain English with some reserved keywords like “When”, “And” and “Then”. The Field Value pair, which is displayed in the form of a table, is used to inject input parameters into the stories. You can send in plain values instead of defining the table but in our experience, using a table is much easier to implement as well as to modify.
After defining the feature in the feature file, run the unit test. You will see that the test result is inconclusive since we have not defined the steps for our feature. Figure 2 shows a failed test message.
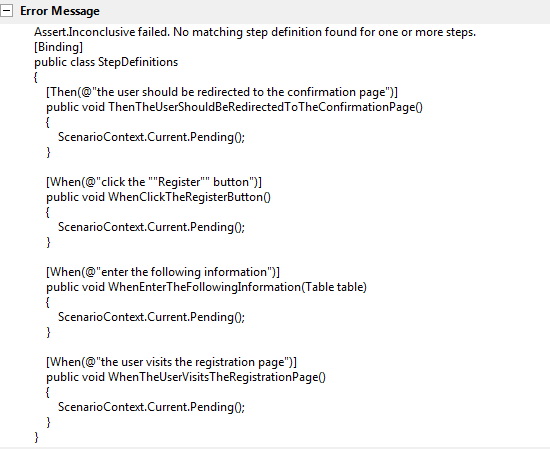
The error message indicates that in order to run the test we must have the step definitions defined. The easiest way is to copy the step definitions from the error message and paste it in the step definitions file as shown below:
[When(@"the user visits the registration page")]
         public void
WhenTheUserVisitsTheRegistrationPage()
        {

        }


[When(@"enter the following information")]
        public void
WhenEnterTheFollowingInformation(Table table)
        {

        }


[When(@"click the ""Register"" button")]
        public void WhenClickTheRegisterButton()
        {
        }


        [Then(@"the user should be redirected to
the confirmation page")]
        public void
ThenTheUserShouldBeRedirectedToTheConfirmationPage()
        {

        }
NOTE: You can add a Step Definition file by using the Add New Item option. The step definition template is automatically installed with the SpecFlow.
In order to pass the feature we need to implement the above methods. During the implementation of the above methods we will be constantly jumping between the different layers of the application and implementing unit tests. The reason for this fast switching between different layers is that our primary purpose is to implement the feature and during the implementation we will also be implementing the unit test for the dependencies which will help us to pass the feature.
In this article we will be using the MS Test framework to run our unit tests. Our first task is to let the user browse to the registration page. Take a look at the following implementation:
private IE _ie = new IE();
[When(@"the user visits the registration page")]
public void
WhenTheUserVisitsTheRegistrationPage()
        {

_ie.GoTo("http://localhost:1064/Register/");
        }
We have utilized the WatiN framework to automate the user interface. When you run the above test it will fail because Register controller as well as the Index action do not exist. The next step is to implement the Register controller and the actions associated with the failing test. We will use the same test-driven approach to implement the Register controller. The following unit test makes sure that the Register view is returned:
[TestClass]
public class when_requesting_index_view
{
    [TestMethod]
    public void should_return_successfully()
    {
        var controller = new RegisterController();
        var result = (ViewResult) controller.Index();
        Assert.AreEqual("Index",result.ViewName);
    }
}
After the controller test passes we can return back to the Registration feature and run it again. This time it will launch the default page of the Register controller in IE but it still fails. Next, we will implement the step where the user enters the registration information on the page. The step is defined as follows:
 [When(@"enter the following information")]
        public void
WhenEnterTheFollowingInformation(Table table)
        {
            foreach (var tableRow in table.Rows)
            {
                var field =
_ie.TextField(Find.ByName(tableRow["Field"]));

                if (!field.Exists)
                {
                    Assert.Fail("Field does not
exists!");
                }

                field.TypeText(tableRow["Value"]);
            }
        }
  [When(@"click the ""Register"" button")]
        public void WhenClickTheRegisterButton()
        {
            _ie.Button("registerButton").Click();
        }
NOTE: We have utilized the table feature of the SpecFlow framework. This allowed us to quickly and cleanly inject the control name along with their values.
The above test will fail because there are no input controls on the page with the expected names. So, we will implement the controls inside the Index.cshtml page as shown in the implementation below:
@using(Html.BeginForm(new { Action = "New" }))
{

<text>User Name: </text>
@Html.TextBox("username")
<br />
<text>Password:</text> @Html.TextBox("password")

<input type="submit" id="registerButton"
name="registerButton" value="Register" />

}
Run the test again and you will notice that the input controls are populated with the test data specified in the feature file and the register button gets invoked.
Unfortunately, the test fails since there is no “New” action specified in the RegisterController. Just like before, implement the controller test and make sure the correct view is returned from the RegisterController.
Now, we can test whether the controller returned the correct view once the user was registered successfully or not. Our focus is the controller’s behavior and for that reason we will mock out the repository layer and return the expected result. The implementation below shows the controller test.
[TestClass]
    public class when_registration_is_successfull
    {
        [TestMethod]
        public void
should_return_the_confirmation_view()
        {
            var repositoryStub =
MockRepository.GenerateStub<IUserRepository>();
            repositoryStub.Stub(x => x.Save(new
User())).Return(true).IgnoreArguments();
            var controller = new
RegisterController(repositoryStub);
            var result = (ViewResult)
controller.New("johndoe", "star");
            Assert.AreEqual("Confirm",result.ViewName);
        }
    }
The above test directed the implementation of the controller’s “New” action which is shown below:
   public ActionResult New(string username, string
password)
        {
            var isSaved = _repository.Save(new
User() {UserName = username, Password =
password});
            if (isSaved) return View("Confirm");
            return View("Index");
        }
Return back to the SpecFlow test and run the test again. You will notice that the test fails in the “New” action since the repository has not been initialized. You can easily solve this by calling the overloaded constructor from the default constructor as shown below:
public RegisterController() : this(new
UserRepository())
        {

        }

        public RegisterController(IUserRepository
repository)
        {
            _repository = repository;
        }
This is the simplest method to pass the test. If you constantly have multiple dependencies then you should be using a dependency injection framework to inject the dependencies such as StructureMap, Ninject, Unity, etc.
After making the changes, run the SpecFlow test again and you will notice that the feature now passes the test. This proves that the feature has been completed and is functional end to end. The same steps above can be used to implement the next feature in the list.
Conclusion
Unit testing provides the essence for creating professional and maintainable applications. Traditionally, the unit testing paradigm did not focused on the user stories. Behavior-driven development demonstrates the importance of user stories in a domain-centric application.
