


For any Line of Business (LOB) application that targets business users, validating data is one of the most important things that the application is expected to do. Since LightSwitch is a tool that is geared towards generating LOB applications quickly, data validation plays an important role in LightSwitch. This article talks about various aspects of data validation in LightSwitch and provides insight into certain details of the underlying framework and design. This article assumes that the reader is familiar with the .NET Framework and has some basic experience using LightSwitch.
Validation - Basics
To start with, let’s look at the goals of the LightSwitch validation framework. They are:
- Provide developers a simple conceptual model of validation.
- Enable developers to write validation rules using a simple event-driven programming model.
- Handle running validation rules at appropriate times when the relevant data changes.
- Show validation results in the UI.
- Enable third-party control developers to easily display validation results associated with relevant data.
In the following sections, we will examine various aspects of the LightSwitch validation system and how it helps achieve these goals.
Validation Rules
In LightSwitch, a validation rule can be thought of as a piece of code that verifies the validity of given data. In LightSwitch, data is typically associated with a data construct, which can be an entity property, entity or screen property. LightSwitch supports validation rules for all the above-mentioned data constructs. Validation rules validate the data they apply to. For example, Entity property validation rules validate entity properties. Similarly, Screen property validation rules validate screen properties. Entity rules (also called DataService rules) validate entire entities before they are saved to storage. LightSwitch applications can be developed as a 3-tier or 2-tier application and different types of validation rules run at different tiers. (Note: LightSwitch doesn’t have support for writing validation inside the database directly.) Table 1 describes validation rules for different data constructs. It also provides information on which tier they run and in which data modification stage they run.
LightSwitch supports two types of validation rules. One is predefined validation (declarative) rules which do not require any kind of code to be written. The other is imperative rules or custom validation rules, where the developer writes code (VB/C#) to implement the validation rule.
Predefined Validation Rules
Predefined validation rules (http://msdn.microsoft.com/en-us/library/ff852065.aspx) generally perform simple and common validation tasks. Each predefined validation rule applies to a specific set of data types. For example, the Length validator applies to the string type. Predefined rules are configured through the LightSwitch designer and are typically accessible from the designer properties window. LightSwitch comes with a small set of predefined validation rules, some of which include:
- Length validation rule (for string types)
- Range validation rule (for integer, date and decimal types)
- Precision and scale validation (for decimal types)
- Standard entity validator (always runs, validates some of the entity relationship constraints and required values)
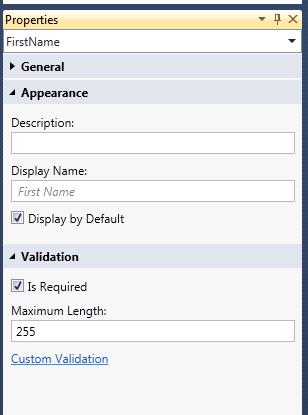
Predefined validation rules are shown in the Validation section of the properties window in the designer. Developers can typically turn on/off the validation rule and configure the specific parameters for a rule using the properties window. For example, Figure 1 shows the properties window, which shows validation rules available for a string property. (F4 will bring the properties window to front if it is not visible.)
Custom Validation Rules
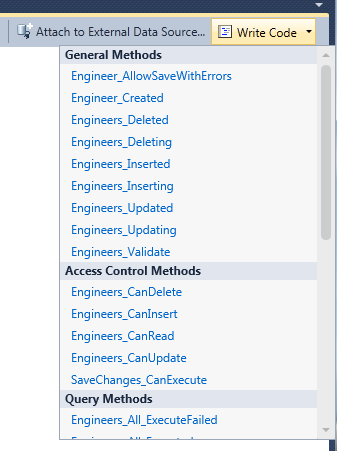
Custom validation rules require C#/VB code to be written by developers to implement them. LightSwitch provides an event-driven programming model for writing validation rules. This makes it easy for developers to access the code since the code stub (or method skeleton) is auto-generated by LightSwitch. The code stubs are accessible from designers through various UI access points. These rules can be as simple as pattern matching or as complex as computations involving web services to validate data. LightSwitch doesn’t have any specific restrictions for the custom validation code. Custom validation rules can be accessed from the WriteCode drop down-button in designers (Figure 2). They can also be reached from the properties window (Figure 1).
Writing Custom Validation Rules
You can write custom validation rules for almost all LightSwitch data constructs that have validation support. This includes entity properties, entities and screen properties. You can write validation rules for an entity property by using the WriteCode drop down and then selecting the <PropertyName>_Validate method from the list. (Refer to Figure 2.) Clicking the link will open the editor with the right stubs in place where the validation logic can be written. Similarly, a developer can write validation rules for screen properties and entities. All the code events that are relevant to the data construct will be available in WriteCode drop down in the designer.
Validation Results
When validation rules run, they generate one or more validation results which contain information about the type of result, where it applies, as well as a few other details. The LightSwitch UI displays different visual cues based on the type of validation result. LightSwitch supports three types of validation results:
-
Validation Error - Displayed in the UI in red -
Validation Warning - Displayed in the UI in black -
Validation Information - Displayed in the UI in black
A validation error is the most severe type of validation result. LightSwitch will not save data if the data contains any validation errors. Validation warnings and information results are primarily used to present a warning/information UI when entering data. They also serve to provide data-specific information to users. LightSwitch ignores validation warning/information results when saving data.
The following code sample demonstrates adding a simple validation rule to the FirstName property of an entity. This validation rule validates that the FirstName property contains only alphabetic characters. A validation rule reports the results back to LightSwitch by calling appropriate AddXXX() methods on results object.
partial void FirstName_Validate(
    EntityValidationResultsBuilder results)
{
    if (this.FirstName != null &&
        !System.Text.RegularExpressions.Regex
        .IsMatch(this.FirstName, @"^[a-zA-Z]+$"))
    {
        results.AddPropertyError(
         "Invalid characters in FirstName.");
    }
}
In the above code snippet, EntityValidationResultsBuilder is a simple collection builder object that has few methods to add new validation results. It also provides overrides to add information/warning messages. All the results that are added will be attached to the FirstName property.
Things to Remember When Writing Validation Rules
Developers should follow certain guidelines when writing validation rules. First and foremost, a validation rule should not attempt to modify data. This might cause unwanted side effects. Validation code should not attempt to show any kind of UI (like a message box) or interact with UI controls. This might result in unexpected drawing issues. Validation rules that run in the client application should run faster to enable faster UI response. For validation rules that do complex computations (like querying large database or talking to web services), they should be written as Entity validation rules, so they will only run on the server. Since server validation rules run only upon save, they do not interfere with UI responsiveness.
Accessing Validation Results in Code
LightSwitch exposes validation results for all the supported constructs through a property named ValidationResults. This property is accessible from the details API for entities and screens. For those of you that are not familiar with the “Details” API in LightSwitch, it is essentially a set of functions and properties describing various details about a construct. For example, the Details of an entity property contains its display name, description, is read-only and other information about the property (Figure 3). We will discuss ValidationResults in more details later.
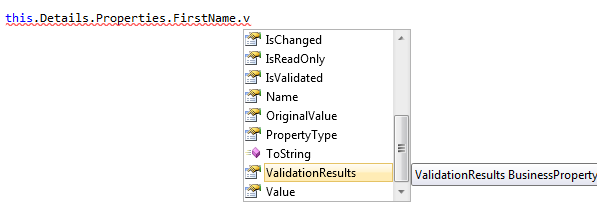
The following code snippet shows how to access validation results for an entity property called FirstName as well as the entity itself. The same rule applies to accessing ValidationResults for screen properties and screens.
// Entity property FirstName's validation results
this.Details.Properties
    .FirstName.ValidationResults

// Entity's validation resuls
this.Details.ValidationResults
Save and Validation Results
LightSwitch applications do not distinguish between predefined and custom validation rules. They are treated the same way in the running application. The only difference between the predefined validation and custom validation is the way they are configured as I have shown. Next I will discuss the role of validation rules when saving modified data in a screen.
When an attempt is made to save a dirty screen (either by clicking the save button on screen or by calling Save() in code), all validation rules for modified and added entities are run on the client. If any of the rules fail (produce validation errors), the save operation is cancelled and the user is notified of the errors. Warnings and information messages are ignored. Validation errors that cause the save to fail are shown in the validation viewer. The user can correct the errors and try to save again.
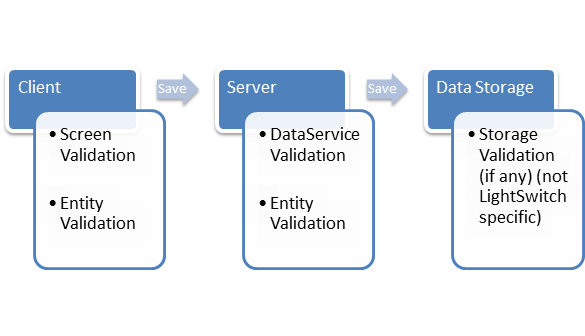
Upon save, if there are no validation errors found on the client, LightSwitch submits the changes to the server. Once data reaches the server as a result of a save operation, the server will run all the validation rules defined on the Entity and the DataService. If there are any validation errors, the server will reject the save operation and return the validation errors to the client. The user will have to fix the errors by updating the data and save again. If there are no validation errors found after running the rules, the server will submit the changes to the data store. Figure 4 explains the flow of running validation rules.
Running Validation Rules
The LightSwitch validation engine is responsible for running the validation rules and attaching the results to the ValidationResults property of various constructs. The validation engine also caches the validation results to avoid re-running rules every time validation results are needed for a specific construct. This also introduces the problem of cached results becoming invalid as a result of data changes. LightSwitch handles this by maintaining dependencies. In the following section, we will learn more about dependency tracking.
Dependency Calculation
LightSwitch calculates dependencies for a validation rule by tracking and storing all the properties that are accessed by a validation rule while it runs. If a rule accesses property X of object Y, then X(Y) is registered as a dependency to that particular validation rule. When the property X(Y) changes, the validation engine automatically schedules the re-running of the validation rule. X can be an entity property or any other details property like DisplayName of an entity property or the SelectedItem property of query collection on the Screen. This ensures that a validation rule will be re-run when one or more relevant pieces of data changes. This frees developers from having to wire up various events to re-run the validation rule when data changes.
The following is an example of some simple code that validates a city name with the ZIP Code by calling into a web service. In the following example, CityName and ZipCode properties are registered as dependencies to the CityName validation rule. Changes in either CityName or ZipCode properties will trigger re-evaluation of the following validation rule code.
partial void CityName_Validate(
    EntityValidationResultsBuilder results)
{
    if (    MyWebServiceWrapper.GetZipCode(
this.CityName)
     != this.ZipCode)
    {
        results.AddPropertyError(
            "Invalid CityName. Doesn't match
Zipcode");
    }
}
The validation engine can track almost all of the properties exposed by the LightSwitch API. This includes but is not limited to all entity properties, screen properties, details properties like IsReadOnly, SelectedItem, and ValidationResults.
Presenting Validation Results in UI
As you have seen, LightSwitch exposes the validation results for various constructs through the ValidationResults property. However, Silverlight doesn’t have built-in support for utilizing the ValidationResults property directly. Silverlight has its own mechanism for supporting data validation in the UI through the INotifyDataErrorInfo interface. So, all LightSwitch Details objects that expose the ValidationResults property also implement the INotifyDataErrorInfo interface. This enables Silverlight controls to bind directly to the Details object and display the appropriate UI for validation results. This eliminates the need to write custom code for displaying validation results UI on various controls.
A typical screen in LightSwitch contains various visuals that bind to the data. Typically screen visuals like a TextBox bind to the Details properties. This is all done automatically for you by LightSwitch. However, here is an example of how a third-party control displaying a string might look in the Xaml file. Since the Details object implements INotifyDataErrorInfo interface, TextBox will automatically show validation errors as shown in Figure 6 and Figure 7.
<TextBox Text="{Binding Details.Value,
    ValidatesOnExceptions=True,
    NotifyOnValidationError=True}"
    IsReadOnly="{Binding Details.IsReadOnly}"
    ToolTip="{Binding Details.Description}"/>
Difference between INotifyDataErrorInfo and ValidationResults
Even though the INotifyDataErrorInfo implementation looks like it is just a proxy to access the ValidationResults property from the UI, it does do a few interesting things. The most interesting is filtering the validation results. The INotifyDataErrorInfo implementation filters out validation results from unmodified entities. For example, accessing INotifyDataErrorInfo.GetErrors() on unmodified entities always returns empty results. However, accessing the ValidationResults property for the same entity will return validation results if there are any regardless of entity state.
Filtering ensures that when the UI loads hundreds of entities, the validation results for the unmodified entities are not computed, reducing overhead. However, when your code accesses the ValidationResults property, all the validation rules will be run.
Validation Summary Viewer
Every screen in a LightSwitch application has a validation summary viewer embedded within it. The validation summary viewer is a control that displays validation errors that are present in the screen. This viewer merely uses the INotifyDataErrorInfo interface on the screen details object to get the list of validation errors, and displays them to the user as a list. Every screen in LightSwitch (with the possible exception of third-party shells) automatically gets the validation summary viewer.
Figure 6 shows a screenshot of the validation summary viewer with few validation results.
Validation UI and Third-Party Controls
LightSwitch enables third-party developers to write custom controls and distribute them as LightSwitch extensions. Since LightSwitch uses the standard Silverlight validation framework for wiring up the validation results to controls, control authors can easily enable validation UI for their controls with minimal or no work. In certain cases, a custom control template needs to be written to enable controls to display LightSwitch validation results. Also, a few special converters may be needed to display different validation result types.
LightSwitch also supports adding and removing control-specific validation results back into the LightSwitch ViewModels, which enable controls to integrate control-specific validation results with the LightSwitch core validation results. This enables the same validation UI to display all the validation results in one single place.
Walkthrough: BugTracker
Now that we have discussed the various aspects of LightSwitch validation, it is time to put some of them into practice. In this walkthrough, we will build a small bug tracking application for a small software firm. The application performs the following basic functions.
- Add a new bug
- Assign existing bug to someone
- Resolve or close a bug
- Basic validation on above three functions (will be discussed in detail later)
Step 1: Adding Entities
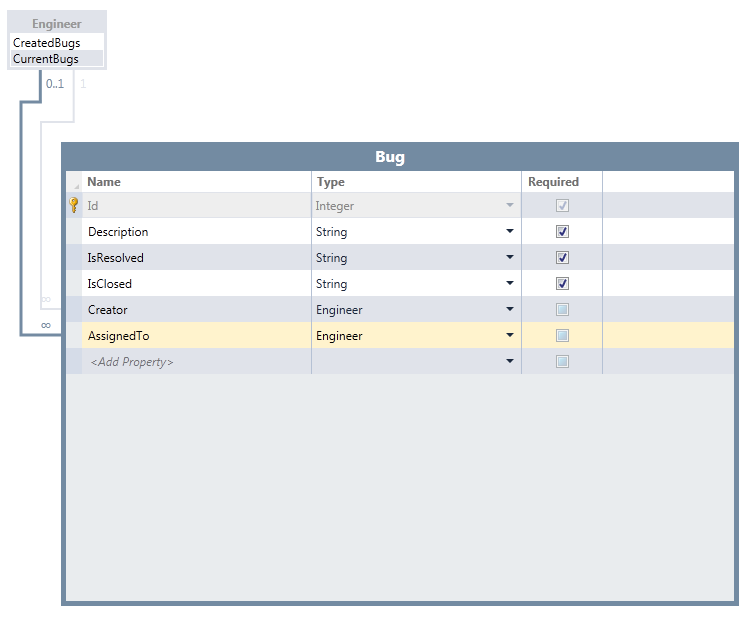
To start, let’s create a new entity (table) named Engineer. Add the necessary properties to the entity. You can find the schema for the entity in Table 2. (Ignore the last two relationship properties for now.) Create another entity named Bug and add the necessary properties. Table 3 show the schema for this entity. (Ignore the last two relationship properties for now.)
Open Bug entity in the designer (if it is not already open), and add a Many:ZeroOrOne relationship (by clicking the add relationship button on top of the designer) to the Engineer entity. Select Engineer as target entity. Name the relationship property as AssignedTo. Create another Many:1 relationship for the Engineer entity, and name the property Creator.
Open the Engineer entity, and rename the first relationship property to CurrentBugs. Rename the second relationship property to CreatedBugs. Now the data part of the application has been created. Figure 5 shows the screenshot of the Engineer entity opened in the designer.
Step 2: Adding Screens
Now let’s add a simple screen for adding engineers. Right-click on screens node in the Application Explorer and click the Add Screen link. Select List and Details Screen, and then select Engineer as the data to include. Click Ok, and we now have a simple screen for Engineers.
Now, let’s add a screen for the Bug entity. Click Add Screen. Select List and Details Screen, and then select Engineer as the data to include. Click Ok, and we now have a simple screen for Bug.
Step 3: Writing Validation Rules
BugTracker has the following requirements. Typically, the requirements have to be mapped to validation rules, but we will skip that step and consider the following to be validation rules for this simple example.
Let’s start writing these rules one by one.
Rule 1 - No Empty Description
We don’t have to do anything for this rule. Since we created Description as a Required property, LightSwitch will enforce the rule automatically.
Rule 2 - AssignedTo and Creator Can’t Be the Same
Since this is a very simple rule, it is a suitable candidate to write on the property AssignedTo since Creator doesn’t change after the bug is created. To do that, open the Bug entity in the designer and select the AssignedTo property. Click the WriteCode dropdown and select the AssignedTo_Validate link. This will switch to code editor with the stub to write code. Write the following code in the code stub.
partial void AssignedTo_Validate(
    EntityValidationResultsBuilder results)
{
    if (this.AssignedTo == this.Creator)
    {
        results.AddPropertyError(
     "AssignedTo and Creator can't be the same");
    }
}
    }
}
Rule 3 - Bug Can’t Be Closed Until It Is Resolved
Rule 3 is also a straightforward rule. We will write this rule for the IsClosed property on the Bug entity. Open the Bug entity in designer, select the IsClosed property. Click the WriteCode dropdown and select IsClosed_Validate link. In the stub, write the following code.
partial void IsClosed_Validate(
    EntityValidationResultsBuilder results)
{
    if (!this.IsResolved && this.IsClosed)
    {
        results.AddPropertyError(
    "Bug can't be closed before it is resolved");
    }
}
Rule 4 - 30% Rule
Rule 4 is a good example of a rule that should be run only on server side, since it involves going through each engineer entity instance and querying each engineer’s bugs in order to count them. The time it takes to run can vary depending upon the number of bugs in the database. To avoid any potential UI responsiveness issues, and hogging network bandwidth, we will write this rule on the entity so it becomes a server-only rule. Open the Bug entity and click the WriteCode dropdown and select the Bugs_Validate method from the drop down. This will take you to the ApplicationDataService class and the Bugs_Validate() method stub. In the method stub, write the code in Listing 1.
Verifying the Validation Rules
Now that all the validation rules have been written, it is time to verify the rules. Press F5 to start the application. Open the Engineers List Details screen. Add a few engineers and save the screen.
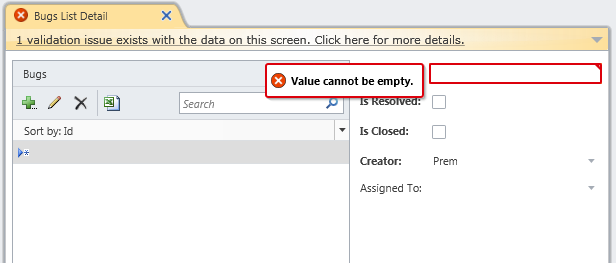
Verifying Rule 1 - Open the Bug List Details screen. Click the Add new button on the list, leave all the fields empty, and click OK. Figure 7 shows the popup and the validation viewer with one error. Note that the validation popup with error message shows up only when the control is focused.
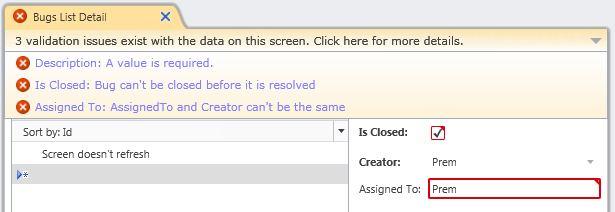
Verifying Rule 2 - Add a new bug with Creator and AssignedTo being the same engineer. You will see a validation error showing up on AssignedTo field right away as shown in Figure 8.

Verifying Rule 3 - Add a new bug and set IsClosed to true without setting IsResolved. Now the validation error will show up on the IsClosed field (Figure 8).
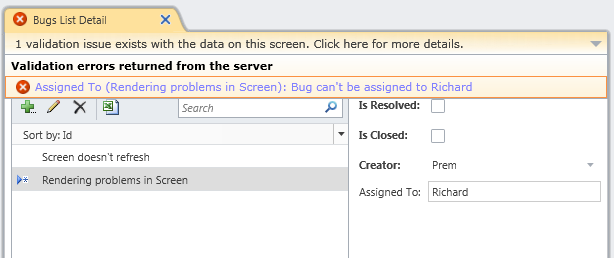
Verifying Rule 4 - Clear all bugs, and add one bug each for every engineer except one engineer. Save the screen. Now, add a bug to any one of the engineers who already has a bug assigned. Click Save. The save will fail with a message that validation errors exist on the screen. Note that the validation viewer is showing errors under the server errors section as shown in Figure 9.
Wrapping Up
LightSwitch provides a streamlined way of writing validation rules and frees developers from having to worry about all the plumbing in their applications. This enables developers to focus on core business logic, making LightSwitch one of the most efficient tools available in this space. In this article you learned about various aspects of the LightSwitch validation framework, however, there are more features that are available that couldn’t be covered in just one article. I encourage you to learn more about LightSwitch by visiting the LightSwitch Developer Center at http://msdn.com/lightswitch. Have a wonderful time writing business apps!
Listing 1: Rule 4 implementation
partial void Bugs_Validate(Bug entity,
    EntitySetValidationResultsBuilder results)
{
    // If the AssignedTo property is not changed,
    //  we don't have to run validation.
    if (entity.AssignedTo == null ||
        !entity.Details.Properties.AssignedTo.IsChanged)
    {
        return;
    }

    IEnumerable<Engineer> engineers =
        this.Engineers.GetQuery().Execute();

    int totalEngineersCount = engineers.Count();
    int thirtyPercentCount = (int)Math.Ceiling(
        (double)((30 * totalEngineersCount) /
        (double)100));

    // Find the bottom 30% in bug count
    IEnumerable<Engineer> low30List = engineers
        .OrderBy(e => e.CurrentBugs.Count())
        .Take(thirtyPercentCount);

    int highestCountInLow30 = low30List.Last()
                           .CurrentBugs.Count();

    Engineer bugOwner = entity.AssignedTo;
    if (low30List.Contains(bugOwner) ||
        bugOwner.CurrentBugs.Count() ==
highestCountInLow30 + 1)
    {
      // Case 1: bug is assigned to someone in bottom 30
      //  or engineer has same number of bugs as the
      //  ones in low30 group.
    }
    else
    {
      // Case 2: AssignedTo engineer is not in
      // bottom 30%
        string error = String.Format("Bug can't be
                       assigned to {0}",
            bugOwner.FirstName);
        results.AddPropertyError(error,
            entity.Details.Properties.AssignedTo);
    }
}
Table 1: The various scenarios under which validation rules run.
| Validation Rule Type | Where It Runs | Upon Changing Data (On Client) | Upon Save (On Client) | Upon Save (On Server) |
|---|---|---|---|---|
| Entity Property Validation Rules | Client & Server | Yes | Yes | Yes |
| Screen Property Validation Rules | Client | Yes | Yes | N/A |
| Entity Validation Rules | Server | N/A | N/A | Yes |
Table 2: Schema details for developer entity.
| Property Name | Type | Is Required? |
|---|---|---|
| FirstName | String | Yes |
| LastName | String | Yes |
| AssignedBugs | Collection of Bugs (Relationship) | N/A |
| CreatedBugs | Collection of Bugs (Relationship) | N/A |
Table 3: Schema details for bug entity.
| Property Name | Type | Is Required? |
|---|---|---|
| Description | String | Yes |
| IsResolved | Boolean | Yes |
| IsClosed | Boolean | Yes |
| AssignedTo | Developer (Relationship) | N/A |
| Creator | Developer (Relationship) | N/A |
