


What is Git? Git is a content-addressable file system wrapped in a version control system.
That may sound complicated, but code snippets sometimes speak louder than words:
$ mkdir proj
$ cd proj
$ git init
Initialized empty Git repository in
proj/.git/
That folder, proj, is now a Git repository. It is that simple.
A Scenario
Lucas is working on ticket 1034 when Bishop, a systems analyst, comes by and lets him know about a pretty nasty bug in production. Lucas goes to the production system website and is able to recreate the bug. Management has decided fixing this bug is an absolute priority. Since Lucas has the most current knowledge about it, management assigns Lucas to develop a solution.
Lucas was working on a topic branch for ticket 1034 and had unfinished work. He stashes those changes, fetches the latest changes from the production branch, and then creates another topic branch from the production branch so he can apply the needed hot-fix. This is where Lucas would open his .NET solution and write failing tests, make them pass, and commit, fixing the production bug. He fetches from the remote production branch again to get any changes anyone else might have pushed up in the meantime, commits his changes locally, and then finally pushes his changes up to the remote production branch in preparation for a production hot-fix deployment. He moves the task to “committed” and goes back to working on ticket 1034.
I just described a possible scenario for a developer using Git, which is getting a lot of buzz in the .NET development arena. With the use of GitHub.com and social coding lately, Git’s popularity has increased.
Git
What is Git? Git is a content-addressable file system wrapped in a version control system. Huh? The simple answer is that it’s a distributed version control system. If you aren’t familiar with version control, it is the management of changes to files or sets of files, as related to software development. Git is the version control system for the Linux kernel and other popular projects (see the Works Cited sidebar). If you look on the Internet you can find many good resources already available on how to install Git so I won’t explain that here. So what is “distributed” source control? In layman’s terms it means you can still put your local code under version control without being connected to a remote server. This will become clearer by reading the remainder of this article.
Workflows
Learning the syntax is just memorization and muscle memory. The hardest part about Git, and most source control choices for that matter, is the workflow. Git users work with three popular remote workflows: Central Repository (Subversion style), Integration Manager, and Director/Lieutenants. In this article, I’ll focus on the first option as it is the most common workflow.
Central Repository (Subversion Style)
In this workflow, there is one “blessed” repository, usually remote on a centralized server. A developer will clone this central repository locally, work, pull any new changes, and then finally push their changes back to the central repository. This is how a developer works with other source control systems like Subversion. And as in Subversion, if two developers are working on tickets, the first one to push their changes back to the central repository will not have any issues. However, the second developer will be forced to pull down the first developer’s changes, handle any conflicts, and then push their changes up.
Using Git Locally on the Command Line
For the following sections I’ll use msysgit/Git Bash on a Windows 7 virtual machine. The dollar sign ($) is my command-line prompt, not something you will include in the commands issued. You can also perform the tasks through the Git Gui interface that’s available.
The first thing you should always do when working with Git is set up your name and email settings.
Git Init
As mentioned above, to create a Git repository, use the git init command:
$ mkdir proj
$ cd proj
$ git init
Initialized empty Git repository in
proj/.git/
The git init command creates a .git folder. In Subversion there is a .svn folder in every directory. Not so with Git, which has only the one .git folder.
Git Config
The first thing you should always do when working with Git is set up your name and email settings so that your information is attached to your commits:
$ git config --global user.name
"John Doe"
$ git config --global user.email
<a href="mailto://jdoe@site.com">jdoe@site.com</a>
The –global argument is to tell Git that you want this user name and email assigned to any future repositories when logged in as this user to this machine. This will update the /.gitconfig file. For the non-*nix readers, the tilde sign () means your “home” directory or the C:\Users<username> folder. If you used –system instead, you would have this setting as the default for all users. If they use the above git config command, it would supersede that system-wide setting. Omitting the –global or –system option would set this for a particular repository only. This way you could use a different email address and/or name on another repository.
Git Status
Running the git status command shows that you are on the local master branch and that there is nothing to commit:
$ git status
# On branch master
#
# Initial commit
#
nothing to commit (create/copy files
and use "git add" to track)
The following snippet will create two files, test1.txt and test2.txt, by writing (echoing) some text into them. Then you’ll run git status again:
$ echo "test1" > test1.txt
$ echo "test2" > test2.txt
$ git status
# On branch master
#
# Initial commit
#
# Untracked files:
#   (use "git add <file>..." to
include in what will be committed)
#
#       test1.txt
#       test2.txt
nothing added to commit but untracked
files present (use "git add" to track)
Git Local Repository, Index, and Working Directory
Git says you have untracked files. Okay. What is trying to track them? The local Git repository. Local repository? Yes. That is why Git is considered a distributed version control system. You don’t have to be connected to a remote repository. You can do everything locally. This status output also tells you that if you want to add these files to be “tracked” by the local repository, you need to use the git add command to include these files in what will be committed. What does the git add command add the files to? The index.
Put your local code under version control without being connected to a remote server.
The index is a staging area, another common name for the index. Git allows a user to “build up a set of changes” that will be pushed to the local repository when the user runs the git commit command (I’ll explain this in a little bit). This concept, second to workflow, is very important to understand. As Figure 1 shows there are three layers locally when using Git: the repository, the index (or staging area), and the working directory.
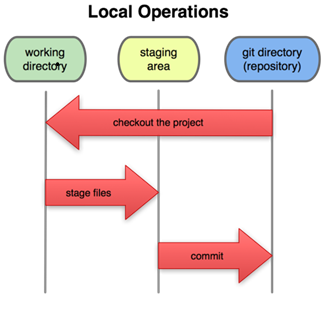
So, you’re happy with the two text files and have made all the necessary changes in the working directory. Working directory? Another term? Like I said, this is the second-most important thing to know. You now have all three terms. The working directory is where you are actively making changes. So by creating the two text files, you have altered the working directory. The local Git repository notices that there are two new files that are “untracked.” You’ll add them to the index and commit them to the local Git repository. (Note: I have friends who have written Git pre-commit hooks to automatically add all untracked files to the index before their git commit command begins. This is possible but beyond the scope of this article.)
Git Add
Let’s add two text files to the index:
$ git add test1.txt test2.txt
$ git status
# On branch master
#
# Initial commit
#
# Changes to be committed:
#   (use "git rm --cached <file>..." to unstage)
#
#       new file:   test1.txt
#       new file:   test2.txt
#
The git add command is very powerful in the interactive mode as you can specify that you want to only add specific parts of the changes. Say you want only part of test1.txt and all of test2.txt to be staged for a commit; you could do it with the -p option after the git add command above. For initial file additions, you can’t. But you can correct that. I’ll show you how to get into more on that later with interactive rebase-a very powerful tool that allows you to reorder, split, and squash together already committed changes.
Git Commit
The two text files are now in the index (staging area), ready to be committed to the local Git repository. This snippet shows how to commit them:
$ git commit -m "committing files to
show how to use git commit command"
[master (root-commit)]: created
259e554: "committing files to show how
to use git commit command"
 2 files changed, 2 insertions(+), 0
deletions(-)
 create mode 100644 test1.txt
 create mode 100644 test2.txt
The two text files are now committed to the local repository. If you run the git show command, you can see the contents of the latest commit.
Git Show
Let’s try the git show command:
$ git show
commit 259e5542776595316
fe26bb71de91482a87d1cc4
Author: John Doe <<a href="mailto://jdoe@site.com">jdoe@site.com</a>>
Date: Mon Oct 4 20:39:30 2009 -0600
committing files to show how to
use git commit command
diff --git a/test1.txt b/test1.txt
new file mode 100644
index 0000000..a5bce3f
--- /dev/null
+++ b/test1.txt
@@ -0,0 +1 @@
+test1
diff --git a/test2.txt b/test2.txt
new file mode 100644
index 0000000..180cf83
--- /dev/null
+++ b/test2.txt
@@ -0,0 +1 @@
+test2
Notice a few things here. First, the long 40-digit character, which is the SHA-1 assigned to this commit. It makes this commit unique. You usually only need seven digits (i.e., 259e554) to be able to uniquely call this specific commit-two or three is enough when just starting on a project. Second, the author is set to the name and email that I declared earlier. Third, you can see two diffs at the bottom: one diff for text1.txt and one diff for text2.txt. You notice they have a line starting with three minus signs and the text “/dev/null.” This means that the file did not exist before this commit. The lines starting with the plus signs show that the files were added.
Git Log
Another command that I use frequently is the git log command, which shows the history of commits:
$ git log
commit 259e5542776595316
fe26bb71de91482a87d1cc4
Author: Jason Meridth
<<a href="mailto://jmeridth@gmail.com">jmeridth@gmail.com</a>>
Date: Mon Oct 4 20:39:30 2009 -0600
committing files to show how
to use git commit command
Adding a “–help” option will take you to the documentation page for that particular command.
This command is similar to git show but just shows the commit message. The headers are identical between git show and git log. They include the commit SHA-1, author, and date/time stamp. You can format the output of these commands as you like with optional parameters. Adding a “–help” option will take you to the documentation page for that particular command.
Git Commit -a
Go ahead and add some more lines to the two text files and re-commit them to the local repository:
$ echo "ONE" >> test1.txt
$ echo "TWO" >> test2.txt
$ git status
# On branch master
# Changed but not updated:
#   (use "git add <file>..." to update
what will be committed)
#   (use "git checkout -- <file>..."
to discard changes in working
directory)
#
#       modified:   test1.txt
#       modified:   test2.txt
#
no changes added to commit (use "git
add" and/or "git commit -a")
The git status command indicates that the files have been modified. It also states that you have to re-add the files to the index, stating that you want those changes committed. If you tried to run git commit right now, it wouldn’t commit any changes-nothing was added to the index. The last line of the status results states just that. So you have two ways to add these files to the local repository. This snippet shows the first way:
$ git add test1.txt test2.txt
$ git commit -m
"added changes to files"
[master]: created 8a8de70:
"added changes to files"
 2 files changed, 2 insertions(+), 0
 deletions(-)
And the second is:
$ git commit -am
"added changes to files"
[master]: created 8a8de70:
"added changes to files"
 2 files changed, 2 insertions(+), 0
deletions(-)
I personally use the second notation more than the first, but both work. The -a says “automatically add any files that are already tracked by the repository to the index, and then commit them.” Notice I said, “tracked.” If you run this after you’ve created a completely new file that has never been added, it will not be committed. Should you omit the “m” parameter-meaning you will not specify the commit message-you will then be taken to an editor where you can edit your commit message, save, and then quit to complete the step. You can configure Git to launch whichever editor you like to edit your commit message.
Now I’ll discuss the differences between the three different levels of the local folder (repository, index, and working directory).
Git Diff
First I’ll add a line again to each file so the working directory has changes:
$ echo "one" >> test1.txt
$ echo "two" >> test2.txt
Then I’ll run the git diff command:
$ git diff
diff --git a/test1.txt b/test1.txt
index 0b35278..ab4b388 100644
--- a/test1.txt
+++ b/test1.txt
@@ -1,2 +1,3 @@
 test1
 ONE
+one
diff --git a/test2.txt b/test2.txt
index 6db6955..a72c2b2 100644
--- a/test2.txt
+++ b/test2.txt
@@ -1,2 +1,3 @@
 test2
 TWO
+two
This command without any arguments shows any changes in the working directory that are not yet in the index (or staged). The arguments you can pass to see other differences are:
$ git diff --cached
…
The –cached argument shows the difference between the index and the local repository. That means anything that is staged but not yet committed. Currently this argument wouldn’t show any results because there is nothing staged:
$ git diff HEAD
…
The HEAD reference shows the changes in the working directory since your last commit. In other words, what’s in your working directory that is not committed to your local repository. This argument shows the same results as the original git diff command.
New Remote Repository (Local Interaction)
The next topics include how to interact with a brand new remote repository, which is separate from your chosen workflow. So let’s say you are on the remote server and you allow connection over a smart protocol for you user account (SSH protocol for write and git protocol for read). I personally use Gitosis5 for this. You can just use a file path (//server/sharename/etc) if you don’t need a secure connection to commit your changes. A remote repository can be on the same machine if you wish. When you create your repository on the remote server you will use git init command with the –bare argument.
Git Init –bare
Let’s try the git init –bare command:
$ git init --bare
Initialized empty Git repository in
/var/git/proj.git
The git init command with the –bare argument creates a Git repository without a working directory. This repository is never intended to have any local work done on it. Git cannot assume that someone is not already working in a repository that has a working directory. Pushing to such a repository requires coordination with the person using that working directory. This is why a bare repository option is available. This repository does not need to maintain a working copy and hence changes can be pushed into it by whoever and whenever. Pushing and Pulling will be addressed in the next sections. This is not mandatory but a very good suggestion.
Locally you will now add this remote to your local repository. A remote? Git remotes are just local copies of remote repositories. You’ll now add the remote repository.
Git Remote
Let’s try the git remote command:
$ git remote add origin
ssh://myserver.com/var/git/proj.git
$ git remote
origin
$ git remote -v
origin
ssh://myserver.com/var/git/proj.git
~/code/proj(master) > git remote
origin
The git remote add… command adds configuration changes and notifies the local repository that you want to address that remote repository by the name of “origin.” The name is whatever you want it to be. It is just an alias. The git remote command without any other parameters just lists all remote names. The -v parameter lists all parameter names and the remote URL.
Now you can push the local changes to the new remote repository.
Git Push
Let’s try the git push command:
$ git push origin master
Counting objects: 8, done.
Compressing objects: 100% (4/4), done.
Writing objects: 100% (8/8), 558
bytes, done.
Total 8 (delta 0), reused 0 (delta 0)
To ssh://myserver.com/var/git/proj.git
 * [new branch]      master -> master
The local master branch has now been pushed up to the remote master branch, which was newly created because it did not exist prior to this push. “Origin” specifies which remote repository you want to push to and “master” specifies which branch you want to push to that repository. The git push command alone can be made, by default, to push the current branch to a predetermined remote repository if you wish. This is called tracking and you can read more about it in the git push and git pull documentation.
Note: If you are seeing errors about connectivity or privileges, it is most likely either a problem with the remote URL or your SSH keys. You may also want to check to make sure your remote user account has rights to write to the repository.
Let’s now look at the local and remote branches.
Git Branch
Let’s try the git branch command:
$ git branch
* master
$ git branch -r
   origin/master
$ git branch -a
* master
   origin/master
The git branch command by itself will only show local branches. The branch with the asterisk is the current branch. If you add the -r parameter, a list showing only remote branches is shown, and the -a parameter shows local and remote branches together. Please notice that the remote branches are prefixed with their remote’s name (i.e., origin/master). Origin/master means that it’s the master branch on the origin remote repository.
If you run git diff against the local master and remote master branches you should see no differences.
Git Diff (Double Dot Notation)
The explanation of the double dot notation is beyond the scope of this article. I’m mentioning it here briefly to show that it is possible to compare Git branches:
$ git diff master..origin/master
Existing Remote Repository
Okay, now let’s say your friend has some code he wants you to check out. He doesn’t necessarily want you to commit any changes back to his repository. This is where, once he’s set up your access correctly, you clone the repository to your local computer.
Git Clone
Let’s try the git clone command:
$ git clone
ssh://<a href="mailto://jdoe@friendsserver.com">jdoe@friendsserver.com</a>/var/git/
hisproj.git
Initialized empty Git repository in
/Users/jdoe/hisproj/.git/
remote: Counting objects: 3018, done.
remote: Compressing objects: 100%
(2197/2197), done.
remote: Total 3018 (delta 609), reused
2710 (delta 452)
Receiving objects: 100% (3018/3018),
3.94 MiB | 1219 KiB/s, done.
Resolving deltas: 100% (609/609),
done.
And voila, you now have all of his code. All? Yes. Imagine that his remote server blew up. He could call you, you could zip up the folder and send it to him in email, and then he would have all of his code, history, etc. Every clone of a remote repository is the full repository. Don’t worry though, it’s very efficient.
All the commands you learned earlier apply still. However, two things have already been wired-up for you. The local master branch already exists and is the current branch:
$ git branch
* master
And the remote repository has been added with a name of “origin”:
$ git remote -v
origin
ssh://<a href="mailto://jdoe@friendsserver">jdoe@friendsserver</a>/var/git/
hisproj.git
It’s nice when things just get wired-up. If you did have write access back to the repository, you could make changes, stage them, commit them locally, and then push them up to the remote repository.
My Current Workflow
In this section I’m going to explain my personal workflow. Let’s imagine I have the current code base and I’m currently on the local master branch with no changes in the working directory or the index/staging area.
Once I grab a task, I immediately create a topic branch with a name related to the task. What is a topic branch? A topic branch is a lightweight local branch where a developer will take care of a bug fix or feature. They can also be called feature branches.
This task, for consistency’s sake, will be create_third_test_file. I create the topic branch.
Git Checkout
Let’s try the git checkout command:
$ git checkout -b
create_third_test_file
Switched to a new branch
"create_third_test_file"
The git checkout -b command is two commands in one. The two commands are git branch and git checkout. To create a branch in Git, you simply use the git branch command.
Git Branch
Now let’s try the git branch command:
$ git branch create_third_test_file
To switch to a branch you use the git checkout command:
$ git checkout create_third_test_file
Switched to a branch
"create_third_test_file"
By using the git checkout command with the -b parameter and the new branch name, you are doing both commands.
Now that you’ve created the topic branch and prepared your working directory for it, create the third test file, stage it, and commit it to the local repository:
$ echo "test3" > test3.txt
$ git add test3.txt
$ git commit -m "add third test file
for demo"
[create_third_test_file]: created
9816f0c: "add third test file for
demo"
 1 files changed, 1 insertions(+), 0
deletions(-)
 create mode 100644 test3.txt
Normally I would be committing after every test pass that I make. Because I’m in a topic branch, I can commit many, many times. Why? It is all done locally and I will be taking my next step of merging these changes into my local master branch. Okay, how does that make many, many commits any better? I will also be squashing all my changes into one commit on the master branch. Really? Yep. Others prefer to keep the commits and not lose information about how they added a feature. More on that later.
To demonstrate the squash feature of git merge I will be adding a README file to this branch, acting like a manifest of the files present:
$  cat README
test1.txt
test2.txt
test3.txt
And committing it also:
$ git add README
$ git commit -m "add readme file
manifest"
[create_third_test_file]: created
a8254ed: "add readme file manifest"
 1 files changed, 3 insertions(+), 0
deletions(-)
 create mode 100644 README
I would check out the master branch and pull down any changes from the remote branch.
Git Pull
Let’s try the git pull command:
$ git checkout master
Switched to branch "master"
$ git pull origin master
From <a href="mailto://jdoe@friendsserver">jdoe@friendsserver</a>/var/git/proj
* branch master ->
FETCH_HEAD
Already up-to-date.
If there were any changes, they would have been fetched from the origin/master branch and merged into the local master branch automatically. Can I make these steps individually? Yes. The git pull command is simply a nice wrapper over the git fetch and git merge commands. Notice the git pull syntax. The two following parameters are the remote name and the branch on that specific remote. I’m accustomed to making this explicit call (I actually have an alias in my bashrc file called gpom that is easier to type). Again, there is a way to ensure that the local master branch is tracking the remote origin master branch, but that topic is beyond the scope of this article.
Now that the master branch has all the latest changes, I can merge in my changes from my topic branch.
Git Merge
The git merge command means that all of the commits from the create_third_test_file branch were squashed into one group, merged over to the master branch, staged, and are ready to be committed:
$  git merge --squash
create_third_test_file
Squash commit -- not updating HEAD
Automatic merge went well; stopped
before committing as requested
The git status command shows the files waiting to be committed:
$   git status
# On branch master
# Changes to be committed:
#   (use "git reset HEAD <file>...
" to unstage)
#
#       new file:   README
#       new file:   test3.txt
#
Now I commit the files:
$   git commit -m "add third file and
manifest"
[master]: created 6feb391: "add third
file and manifest"
 2 files changed, 4 insertions(+), 0
deletions(-)
 create mode 100644 README
 create mode 100644 test3.txt
Running git status again shows that everything committed and nothing is left:
$    git status
# On branch master
nothing to commit (working directory
clean)
The log shows the commit:
$ git log -n 1
commit
6feb3912e33734f3db139bcf6374
cde86c5251d7
Author: Jason Meridth
<<a href="mailto://jmeridth@gmail.com">jmeridth@gmail.com</a>>
Date: Tue Oct 5 00:21:35 2009 -0600
add third file and manifest
The -n 1 parameters to git log tell it to only show the latest commit. I would now delete the topic branch:
$   git branch -D
create_third_test_file
Deleted branch create_third_test_file
(a8254ed).
You can also use the –graph option to see where the history of changes took place. For a non-ascii-art version, you can use the “gitk –all” to see a graphical view of the history. The “all” option specifies that all branches should be shown.
I just make my pre-commit hook run all of my tests (unit, functional, and integration) and not allow a commit to occur if any tests fail.
Git Hooks
Another item that I have in my local setup is a pre-commit git hook. In the .git folder that was created there is a folder called hooks (.git/hooks). There are 10 hooks as of Git 1.6.3. There are sample hooks by default showing possible code, and, on some of them, you just have to remove the .sample suffix, make it executable, and it will work great. For my purposes I’m usually in a Ruby on Rails project, so I just make my pre-commit hook run all of my tests (unit, functional, and integration) and not allow a commit to occur if any tests fail.
Visual Tools
I know that the command line is not for everyone. Especially people coming from TortoiseSvn or VisualSvn. Those tools work very well. By default a user will receive two visual tools when they install Git. They are GitK and Git Gui. Git Extensions is another tool that is becoming very popular as is TortoiseGIT. It integrates with Windows Explorer and there is a Visual Studio plug-in.
GitK
GitK displays changes in a repository or a selected set of commits. You can see an example of this in Figure 2.
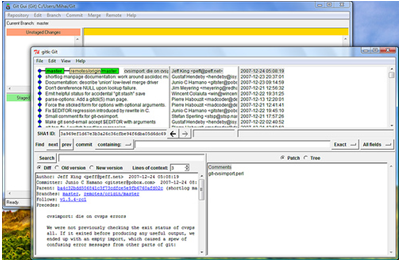
Git GUI
Unlike GitK, Git Gui focuses on commit generation and single file annotation and does not show project history. Git Gui is an established visual tool and is the one I choose to show visual learners. You can see an example of this in Figure 3.
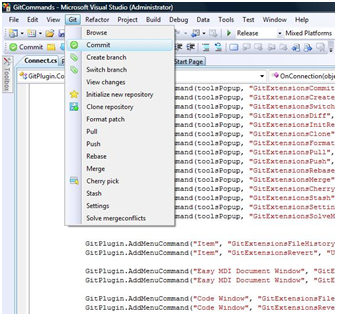
Git Extensions
Git Extensions is a shell extension, a Visual Studio 2008 plugin, and a standalone Git repository tool. You can see an example of this in Figure 4.
Continuous Integration
One of the questions I always hear is “will my current Continuous Integration tool work with Git?” Due to Git’s recent popularity there are plenty of options available.
The most common two tools that I’ve heard of are JetBrain’s TeamCity and Hudson. There are more tools, such as IntegrityApp, CruiseControl.NET, CruiseControl.rb, Cerberus, and CI Joe.
At work I use IntegrityApp and for personal projects I use both CruiseControl.rb and TeamCity.
All of these Continuous Integration tools support both polling-based builds (pulling) and pushing builds. The polling builds will query the source control central repository and see if any changes are available. If so, it will start a build. Pushed builds are typically the result of a hook in the version control system notifying the Continuous Integration tool that changes have occurred. I personally use the Git post-receive hook to initiate push builds. Like I said earlier, you write the script and make the file executable. Git will ensure that the script is run and your builds can now be automated.
GitHub
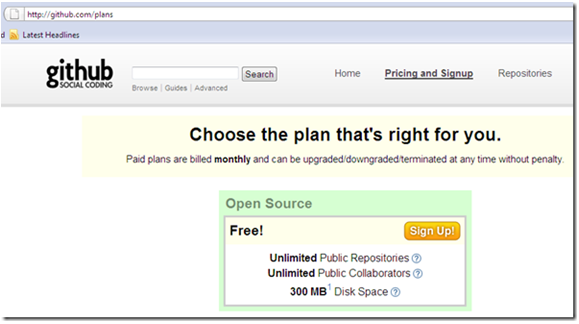
For a free public place to host a git repository, GitHub is the most popular. Go ahead and browse to http://www.github.com/ and click on the Pricing and Sign Up link. Please use your own information in place of the examples given here (Figure 5).

Pick the free option (Figure 6).
For a free public place to host a git repository, GitHub is the most popular.
You will now need to generate a public and private key so you have a secure connection to the repository. Go ahead and issue the ssh-keygen command as shown in Figure 7 (just press enter when prompted for the file name, password, and password confirmation):
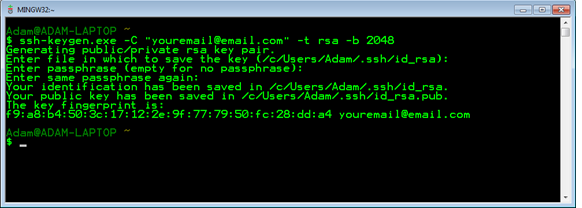
This will generate a public and private key in the directory specified in the prompt for the file name. Now open the id_rsa.pub file in Notepad or whichever text editor you use. Copy the contents to the Clipboard.
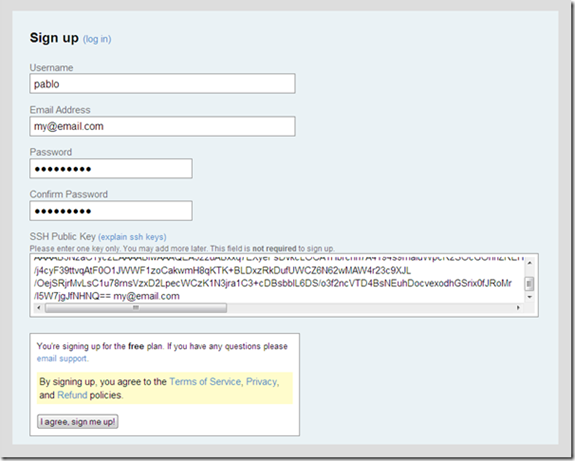
Now go back to the GitHub signup page and paste in your public key (Figure 8).
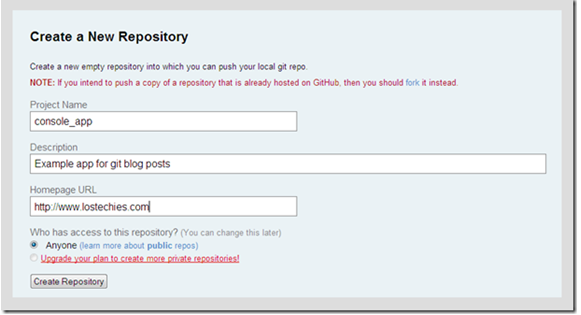
Follow the rest of the instructions to finish setting up your account. Click the “create a new one” link next to “Your Repositories” (Figure 9).

Fill in the rest of the information for your repository (Figure 10).
Click “Create Repository” to finish. The repository information will now be shown (Figure 11).

The part that you want is the URL for the repository (Figure 12).

You can now go ahead and push your repository to GitHub. From the command line enter:
git remote add origin
<a href="mailto://git@github.com">git@github.com</a>:armer/console_app.git
git push origin master
That’s it! Now you can push and pull changes to and from GitHub.
Git Tag
Tagging in Git is slightly different than other VCSs. It is purely a marker and is different than a branch in that respect. When you try to check out a tag and amend it, the commits that you are putting in are not tracked by any branch. If you run the git checkout master command now, you will lose all commits done on top of this tag. You can add another tag to mark these sets of changes or create a branch to track them.
In reality, those commits are not yet lost if you switch without tracking or tagging. This brings us to the next segment.
Git Reflog
There is a place where Git tracks what you’ve done in the last 90 days-90 days is the default. Specifically, GIT tracks where the HEAD reference has been. The HEAD reference is what tracks your current place in the repository.
So let’s throw away some commits “by accident on purpose.” Go ahead and make a couple of commits, and then throw them away by resetting HEAD reference to two commits ago with “git reset –hard head^^”. “hard” indicates that you would like to change your working directory-otherwise it would keep it the way it is now and you would have potential changes to commit. The two ^ characters mean “go back two”; one of them indicates to go back one-or you can use {n} where n is the number of commits to go back.
Rebase is dangerous if you do it on commits that others have worked off of. Do not use it on shared commits unless you and the others working with you know exactly what you are doing.
Taking a look at your working folder, you will see that you “lost” your last two changes that you committed. Git log will show you that you are missing the last commit.
Now run git reflog. You will see your missing commits there with the commit messages you used! Now you would like to recover this work. It would be easy to do this in this case as it’s a trivial example. In a non-trivial example, you would probably want to track that lost commit and its parents (prior commits if any) with a branch or a tag of the top of those changes. Issue the command “git checkout -b recovering <SHA1>” making sure to replace <SHA1> with the corresponding commit’s SHA-1 you found in the reflog. Looking at the repository with “gitk -all” you see that you have your commits back.
You can now merge that to your other branch or pick out specific commits with git cherry-pick. Upon a closer look, let’s say you decide you just want one of the changes. You’ll use cherry-pick to do that since, for this example, you actually don’t want the second-to-last one.
Git Cherry-Pick
Let’s go back to the main branch with “git checkout master” (replace master with the branch name you were using if you were not using the master branch). Now you will take the changes that you want by issuing the “git cherry-pick <SHA1>” (use the actual hash instead of <SHA1>).
Should those changes be in the same file, you may need to resolve conflicts as Git won’t assume that your changes make sense any more. If the changes were in different files, you should be OK and you won’t have to resolve any conflicts.
Git Rebase
Caution: The git rebase command is dangerous if you do it on commits that others have worked off of. Do not use it on shared commits unless you and the others working with you know exactly what you are doing.
Rebasing is something that people seem to have a tougher time getting their heads around. Let’s look at a scenario where you would want to do that. A typical scenario is when you are working on a team and there are changes committed to the master branch by others.
You make changes in your own branch that you created and commit. The main branch now has other commits in it. You would like to change your branch so that it is based off of the latest commit in the main branch.
Issuing the git rebase master command will apply changes in your branch on top of the main branch. It’s as if you just now branched and committed the work in your branch from then on. A merge now will result in a fast-forward merge, meaning just the pointer to the current commit gets moved-there is no file manipulation at all.
Git will make sure that if there were some changes that were already pulled into the main branch from your branch, the rebase will skip those.
The other benefit of rebasing work is that the commit history is kept linear and easier to read and manage. Merging leaves concurrent streams that intertwine unless it’s a fast-forward merge.
Git Bisect
Git bisect is an interesting tool that allows a defect or anything else interesting to be pinpointed in the history. An example would be where you discover a bug. You know this bug did not exist before. You check out a version from one year ago and the bug is not there. To make matters worse, it seems to be a side-effect of some combination of features.
You now branch at this point and introduce a test showing that the feature works as expected. Add a tag that marks where the test is introduced. Now you can rebase the mainline commits on top of the addition of this test in this branch. This will be the equivalent of having written this test one year ago.
Given that there are hundreds or thousands of commits in this amount of time, it would be hard to manually jump around to isolate the commit where the problem was introduced.
Git bisect will check out the middle commit and ask you if it is working. Based on your answer, it will then either pick the middle of the commits above or below the current commit. The bisect process continues until you have isolated the commit that caused the bug.
This is still some manual work to do and it will still require a lot of time; however, it’s much more efficient than doing it by hand since Git uses SHA-1 strings to identify commits. To make things easier, git bisect offers a run parameter where you can automate a command or script to answer with the exit code whether the commit is good or bad. This can reduce weeks of work down to minutes.
Here is an example:
git bisect start HEAD ver1.2
git bisect run sh -c
"make_and_test.sh
Tests.Login.LocaleIsFrench"
In the first line, you specify that you would like to test the range of commits starting at ver1.2 and ending at the current version.
The script here will return 0 for a positive build and test, non-zero for a bad test and, for example, 125 if the project could not be built. The 125 return code is equivalent to issuing the “skip” git bisect command manually.
After you find the problematic commit, you have a few options. You can go back to the commit where you were before:
git bisect reset
You can add a specific commit in the above line to be returned there instead. If you specify HEAD, you will remain where you are. If you specify bisect/bad, you will get the first bad commit. This last case is often what you want.
If you need to see what was done so far while in a bisect session, what commit range is still left to be inspected, or undo a mistake, you can use the visualize, view, log, reset, and replay subcommands.
Git Stash
If switching branches is not enough, there is another way to put away your work while you go tend to something more urgent. Let’s say you are working on the development branch and you are in the middle of some work. An email comes through about an urgent bug that needs to be fixed. You simply use the git stash command, fix your issue, commit it, and then “git stash apply” to return to where you were. Here is an example (I’m assuming that test3.txt and test4.txt exist in the repository):
$ echo "last line in this file" >>
test3.txt
$ git stash
Saved working directory and index
state WIP on experiment3: b055ab2
committed test6.txt
HEAD is now at b055ab2 committed
test6.txt
(To restore them type "git stash
apply")
$ echo "fixing some bug" >> test4.txt
$ git commit -am "fixed emergency"
[experiment3 0c70a65] fixed emergency
 1 files changed, 1 insertions(+), 0
deletions(-)
$ git stash apply
# On branch experiment3
# Changed but not updated:
#   (use "git add <file>..." to
update what will be committed)
#   (use "git checkout -- <file>..."
to discard changes in working
directory)
#
#       modified:   test3.txt
#
no changes added to commit (use "git
add" and/or "git commit -a")
$ git diff
diff --git a/test3.txt b/test3.txt
index fe0aa77..5447dfb 100644
--- a/test3.txt
+++ b/test3.txt
@@ -1 +1,2 @@
 another test
+last line in this file
You now have the fix in your history and you can continue working from where you left off. In a usual workflow, you would have probably pushed the changes or built the project before restoring the stash. The git diff command shows you the modifications you stashed.
The stash is a stack. This means that while you were working on the emergency, a more important issue could have interrupted you, requiring you to stash your emergency work and switch gears to the new one. After that, you could resume working on the first issue and continue as before. This can be done indefinitely.
The subcommands that are available for stash allow you to manage the stack. You can delete and apply the stashes in any order you see fit. You can also name them so that you know what you were thinking when working on something. These can then be referenced by name. Otherwise you can reference them by their place in the stack.
If you have work in progress stashed for a significantly long time, the branch may have had significant changes in it. Applying your stashed work may result in conflicts. The branch subcommand will restore your stash to a new branch that you specify. This branch will be based off of the commit at which you originated the stash. Now you have some freedom to explore different merging strategies, etc.
One final note. If you just added a new file to your working directory and then call the git stash command, the new file will not be part of the stash as it is an untracked file. It will stick around after you stash. If you intend to build your solution for a fix and this new file will cause issues, make sure to add everything before stashing. This will give you a clean working directory after stashing your work-especially if you plan on checking out another branch or old tag where the directory structure might be quite different.
Git for Branch-per-Feature Development Workflow
You may be working in a development shop where you have a feature or set of features that take a long time to develop. It would be difficult and not optimal to release this work as part of the main branch. Git allows you to track branches easily and to easily merge them and rebase them.
When merging a feature that’s ready for release, it is important to specify the –no-ff option.
A good workflow leaves the master branch with good-to-go tagged commits that you can check out and use for deployment. There is usually a development branch that is used for your day-to-day coding. This is usually what is used by your continuous integration server. You will also have topic branches. These branches are named after the feature that you are working on and it’s up to you and the team to determine who needs to share them. The last type of branch is the hot-fix branch. This is usually branched from a tag since that is what is in production. Topic branches and feature branches are usually deleted once the work is finished. The master branch and development branch exist at all times.
When merging a feature that’s ready for release, it is important to specify the –no-ff option which stands for “no fast forwards”. The problem is that if you do not specify this option and should a merge result in a fast forward (the pointer is simply moved), you lose the spot where the feature branch started. Here is a simple example to illustrate the point:
$ git checkout master
$ echo "some code" >> feature1.cs
$ git add . -A && git commit -m
"working on feature 1"
$ echo "some more code" >> feature1.cs
$ git commit -am "still working on
feature 1"
$ echo "some code to finish feature 1"
>> feature1.cs
$ git commit -am "finished working on
feature 1"
$ git checkout -b feature2
$ echo "some code" >> feature2.cs
$ git add . -A && git commit -m
"working on feature 2"
$ echo "some more code" >> feature2.cs
$ git commit -am "working on feature
2"
$ echo "some more code to finish
feature 2" >> feature2.cs
$ git commit -am "finished feature 2"
The history looks like this (Figure 13):
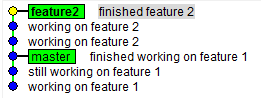
$ gitk --all
If you now merge feature2 into trunk:
$ git checkout master
$ git merge feature2
Your history looks like this (Figure 14):
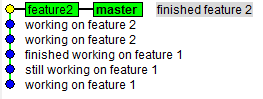
$ gitk --all
You have lost the place where you branched from. In this case I can figure it out by the comments, but for non-trivial examples this is not enough. Let’s look at the ref log and use that information to revert your last action:
$ git reflog
6d67c17 HEAD@{0}: merge feature2: Fast
forward
175f802 HEAD@{1}: checkout: moving
from feature2 to master
6d67c17 HEAD@{2}: commit: finished
feature 2
1a66d29 HEAD@{3}: commit: working on
feature 2
e3da369 HEAD@{4}: commit: working on
feature 2
175f802 HEAD@{5}: checkout: moving
from master to feature2
175f802 HEAD@{6}: commit: finished
working on feature 1
25c54d5 HEAD@{7}: commit: still
working on feature 1
You see that you want to undo the merge which was the last action. This is where HEAD was pointing to previously:
$ git reset --hard HEAD@{1}
This should move the master branch back to where it was (Figure 15):
$ gitk --all
Now let’s merge feature2 without a fast forward:
$ git merge --no-ff feature2
When you look at the history, you can see that feature2 is clearly visible (Figure 16):
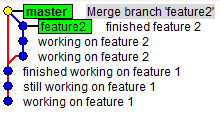
$ gitk --all
If you inspect the commit that the master branch is pointing to, you will see that all it has is a comment. There are no file changes. This is essential to keeping your master branch clean. It should only have commits that are tagged with specific revision numbers and ones that would usually have been deployed.
Git Submodules
One of the needs of organizing a repository or set of repositories is a way for them to reference one another. Ideally, a repository should only be storing the work that is relevant to the project it represents. The reliance on other projects or libraries is inevitable. To store these other projects or libraries in your project’s repository would quickly bloat your repository.
Subversion has this built in with externals. Git does the same with submodules. To show how this works, set up a scenario where two developers are using a 3rd repository as the central “blessed” repository and a 4th repository that will exemplify a library that is shared within the enterprise. Here is how to set up the situation:
$ mkdir lib
$ cd !$ && git init && cd ..
Initialized empty Git repository in
c:/dev/submodules/lib/.git/
$ mkdir blessed
$ cd lib && git init --bare && cd ..
Initialized empty Git repository in
c:/dev/submodules/blessed/
$ git clone blessed dev1
Initialized empty Git repository in
c:/dev/submodules/dev1/.git/
warning: You appear to have cloned an
empty repository.
$ git clone blessed dev2
Initialized empty Git repository in
c:/dev/submodules/dev2/.git/
warning: You appear to have cloned an
empty repository.
You now have four repositories. The developer repositories were created by just cloning the blessed repository. Now add some work to all the repositories by having the first developer do some work and add some functionality to the library:
$ cd ../dev1
$ echo "this is a readme file" >>
readme.txt
$ git add . $$ git commit -m "Initial
commit"
$ git push origin master
$ cd ../dev2
$ git pull
$ cd ../lib
$ echo 'function string greeting() {
return "hello"; }' >> lib.c
$ git add . && git commit -m "Added
greeting function"
This developer now wants to make use of this function in the project so he adds the lib repository to his repository as a submodule:
$ cd ../dev1
$ git submodule add ../lib lib
$ echo "#include lib.c" >> project.c
$ echo "call greeting();" >> project.c
$ git add . $$ git commit -m "User
gets greeting"
$ git push
The other user should now see the changes by getting the latest from the blessed repository:
$ cd ../dev2
$ git pull
The submodule information has been pulled down as you can see here:
$ git submodule status
-74ce62fb34ca254462936556
fd5bbad1b2b78e71 lib
The submodule directory will be empty. This is outside the scope of the git pull command, which only acts on this repository. The submodule is its own repository:
$ git submodule init
This will configure your repository to register the URL of this submodule. Taking a look at the configuration, you will notice that it’s now there:
$ git config -l | grep lib
submodule.lib.url=c:/dev/submodules/
lib
Now you have two pieces of information. The commit that your project needs out of the submodule and the location of the submodule. Let’s go ahead and clone the repository and check out the proper commit:
$ git submodule update
Initialized empty Git repository in
c:/dev/submodules/dev2/lib/.git/
Submodule path 'lib': checked out
'74ce62fb34ca254462936556fd5bbad
1b2b78e71'
The reason that these steps are separate will be shown in a moment when you have the other developer unable to use a newer version of the library. Let’s double-check that you have everything:
$ ls -R
.:
lib  project.c  readme.txt
./lib:
lib.c
$ cat lib/lib.c
function string greeting() { return
"hello"; }
$ cat project.c
#include lib.c
call greeting();
Looks like it’s all there. Let’s say the developer is working on a future release and needs the greeting to be more advanced. You will have some warnings generated as the lib repository is not a bare repository. This means that there is a working directory there. Pushing changes in this case may be unexpected if someone is working there. So let’s fix this problem by making the lib repository into a bare repository:
$ cd ..
$ git clone --bare ./lib lib2
$ rm -rf lib && mv lib2 lib
This is the preferred way to work as you are free to work in your own submodules, making sure your commits are not breaking things, and then pushing the changes up once you are happy with them. Let’s now make a feature branch by the first developer where he will expect newer functionality in the lib repository:
$ cd dev1
$ git checkout -b polite_feature
$ echo "… some polite functionality"
>> project.c
$ cd lib
Now you need to modify the function in your library. The problem here is that you don’t actually have a branch. You simply have a commit at HEAD. This means that you will not be able to commit and push changes as you want. Take a look at the branches:
$ git branch
* (no branch)
  master
If you want others to be able to make use of new things you add to the lib repository, you need to make sure you are updating the master branch:
$ git checkout master
You can double-check that you are on the same commit with a “git log”. You will see that the last commit on the master branch is the commit that HEAD was pointing to anyway. Now you have HEAD moving the master branch, which is what you want. Let’s improve the greeting function:
$ echo 'function string greeting() {
return "hello, " + USER_NAME; }' >
lib.c
Now you can commit that to the submodule and push the change to the main lib repository so others can use the new function:
$ git commit -am "Improved the
greeting function"
$ git push
Because you did this in the submodule, the main module will now note that it is pointing to a different commit for this submodule:
$ cd ..
$ git diff
diff --git a/lib b/lib
index 74ce62f..bba01bf 160000
--- a/lib
+++ b/lib
@@ -1 +1 @@
-Subproject commit
74ce62fb34ca254462936556
fd5bbad1b2b78e71
+Subproject commit
bba01bf52eb84cefcd572247
bad7bbe8b6af1a00
diff --git a/project.c b/project.c
index 72f1b50..ce7b318 100644
--- a/project.c
+++ b/project.c
@@ -1,2 +1,3 @@
 #include lib.c
 call greeting();
+... some polite functionality
You need to commit this so you are pointing to the commit in the submodule with the changes that you want and push it to the blessed repository:
$ git commit -am "Politely using
user's name when greeting"
$ git push origin polite_feature
Now you are using the latest in your library. What about the other developer?
$ cd ../dev2
Take a look and see that things are still as they were. From here you can take a look at your remote repository and see that the new feature is there:
$ git ls-remote origin
7d08eab3249b8fb21e03a8624b7f5110
dbf68cb1        HEAD
7d08eab3249b8fb21e03a8624b7f5110
dbf68cb1        refs/heads/master
1846424c7d411b559542b4feb8586480b053e4
00        refs/heads/polite_feature
You see that there is a new branch that you don’t have. Let’s pull it down and track it from now on so that you can push and pull changes from it automatically:
$ git fetch
From c:/dev/submodules/blessed
 * [new branch]      polite_feature ->
origin/polite_feature
$ git checkout -b polite_feature
origin/polite_feature
M       lib
Branch polite_feature set up to track
remote branch polite_feature from
origin.
This is not enough to work with this feature. It uses a more recent version of the library. To see this you can look at the differences and notice that your module is pointing to a different commit:
$ git diff
diff --git a/lib b/lib
index bba01bf..74ce62f 160000
--- a/lib
+++ b/lib
@@ -1 +1 @@
-Subproject commit bba01bf52eb84
cefcd572247bad7bbe8b6af1a00
+Subproject commit 74ce62fb34ca
254462936556fd5bbad1b2b78e71
This means that checking out a branch does not alter the submodules. It looks like your submodule points back to the old commit. You need to update the submodule:
$ git submodule update
Submodule path 'lib': checked out
'bba01bf52eb84cefcd572247bad7bbe
8b6af1a00'
$ git status
# On branch polite_feature
nothing to commit (working directory
clean)
And you are in sync again. You can confirm this by checking out the master branch:
$ git checkout master
$ git diff
You can see that the submodule points to what was in the previous branch. Again you fix this by using the following snippet:
$ git submodule update
This is intentional. If the git pull command automatically updated the lib submodule and if you had any work done in the submodule, you would lose that work when updating the master branch by pulling in a change that pointed to a different version of the lib submodule.
Git Under the Hood
Git’s power comes from its simplicity. It only stores four types of objects: blobs, trees, commits, and tags. All of these are stored in the .git/objects directory. Let’s make a new repository and commit a file:
$ cd ..
$ mkdir objectsexample
$ cd !$
$ echo "example" >> example.txt
$ git add . && git commit -m "example
commit"
Git’s power comes from its simplicity. It only stores four types of objects: blobs, trees, commits, and tags.
You can take a look at how many objects this action has made by simply listing the objects in the object directory:
$ ls .git/objects/*/*
.git/objects/1f/cf6dd36498bc0
dba87f06591876376ac8f6b38
.git/objects/33/a9488b167e4391
ad6297a1e43e56f7ec8a294e
.git/objects/c1/836d524bd24c2
abaaea777cdb830bdc799c51a
Notice the structure. You have a total number of 256 possible subdirectories. These are the first two characters of the hexadecimal hash value of the object’s SHA-1. The remainder of the SHA-1 is the name of the file that stores the object.
Note: On non-trivial projects, Git will pack objects to conserve space; hence, you will not see the objects in this same structure.
Let’s look at each object (you can use the minimum first four characters of the SHA-1 to reference the objects since there are so few):
$ git cat-file -p 1fcf
tree c1836d524bd24c2
abaaea777cdb830bdc799c51a
author Adam Dymitruk
<<a href="mailto://adam@dymitruk.com">adam@dymitruk.com</a>> 1265064479 -0800
committer Adam Dymitruk
<<a href="mailto://adam@dymitruk.com">adam@dymitruk.com</a>>
1265064479 -0800
example commit
$ git cat-file -p 33a9
example
$ git cat-file -p c183
100644 blob 33a9488b167e4391
ad6297a1e43e56f7ec8a294e
example.txt
If you entered the example exactly as shown here, you would only share two of the object names. The commit would have a different SHA-1 for many reasons: Your name is different, your email is different, the time that you committed is different, and your time zone may be different. You could simulate the same SHA-1 by applying a patch with the same information in it.
The first object is the commit. It stores author/committer information along with a pointer to the tree object that went into the commit and the comment. The second is the contents of the file that you committed. The third is the tree of what you committed. In this case it is only the one file.
A quick note: the git show command will work with this as well. The only issue is that git show will wrap a commit and tree with extra information. To demonstrate this I chose something that will closely match the raw contents of the files.
Let’s add another commit and see how the object’s directory changes:
$ echo "another line" >> example.txt
$ mkdir subdir
$ cd !$
$ echo "contents of extra file" >>
fileinsubdir.txt
$ echo "contents of second extra file"
>> anothefileinsubdir.txt
$ cd ..
$ git add . && git commit -m "your
second commit"
Let’s take a look at the contents of the object directory:
$ ls .git/objects/*/*
.git/objects/00/aebc9524964c47
ff1198b75b81a8a957fcd43c
.git/objects/1f/cf6dd36498bc0
dba87f06591876376ac8f6b38
.git/objects/20/ac68c63c0f55dccef2
fdd70a449e569825b16a
.git/objects/23/431fe48644f20
ca3946a75c987a13f56d03682
.git/objects/33/a9488b167e4391
ad6297a1e43e56f7ec8a294e
.git/objects/3a/510547b9227dad3
df9b8f757793cda84ae2cb4
.git/objects/73/84e8c5e505963a4
e434c054f0cb9503cead819
.git/objects/ad/b448e398751c058
db2ec038f7b1ca0c8326b2e
.git/objects/c1/836d524bd24
c2abaaea777cdb830bdc799c51a
The reason that there are more objects than expected is due to how tree objects work. Let’s examine the latest commit:
$ git cat-file -p 20ac
tree 3a510547b9227dad3df9
b8f757793cda84ae2cb4
parent 1fcf6dd36498bc0
dba87f06591876376ac8f6b38
author Adam Dymitruk
<<a href="mailto://adam@dymitruk.com">adam@dymitruk.com</a>> 1265067825 -0800
committer Adam Dymitruk
<<a href="mailto://adam@dymitruk.com">adam@dymitruk.com</a>> 1265067894 -0800
your second commit
Let’s look at the tree of this commit:
$ git cat-file -p 3a51
100644 blob 7384e8c5e505963
a4e434c054f0cb9503cead819
example.txt
040000 tree 00aebc9524964
c47ff1198b75b81a8a957fcd43c    subdir
Notice that it contains another tree object. It is your new subdirectory. Listing this tree will show you the rest of the files you committed:
$ git cat-file -p 00ae
100644 blob 23431fe48644f20
ca3946a75c987a13f56d03682
anotherfileinsubdir.txt
100644 blob adb448e398751
c058db2ec038f7b1ca0c8326b2e
fileinsubdir.txt
So you have 6 extra objects on top of
your first 3: 3 blobs (1 changed file,
2 new files), 2 tree objects, 1 commit
object.
Conclusion
Underneath such a powerful DSCM tool is a really simple structure. More and more tools are written on top of this simple system. There are more aspects of Git to dig into. This just scratched the surface and will help you get going with it. Some of the things that you have done by following the article are not possible in other source control systems. Git is built to help you manage change in your code. It not only removes friction on non-trivial projects, it also speeds up the development process by being a key piece in such approaches as branch-per-feature and others.
I’d like to give a big thanks to Jason Meridth for his work on the GitHub portion of this article. Adam or Jason can be contacted via Twitter at twitter.com/adymitruk and twitter.com/armmer.
