


Who said client deployment has to be difficult?
Many developers would love to leverage the rich UI, high performance, and offline capability offered by smart client applications; however, they’ve been turned off by the high TCO caused by client deployment headaches. The advent of ClickOnce client deployment technology in the .NET Framework 2.0 heralds a new era where client deployment takes on the ease and reliability of Web deployment.
This article serves as an overview of ClickOnce deployment to get readers acquainted with this new technology. I will take a peek under the hood to see what makes ClickOnce run, then bubble back up to talk about how to deploy applications and updates via ClickOnce, using tools such as Visual Studio 2005 and Mage.
Why ClickOnce?
Client deployment can be hard and expensive. First, you need to install the application to every client machine not only at the point of initial deployment, but also for every subsequent update to the application. Ensuring that your users are all in sync with the latest version of the application is also an expensive proposition. Then there’s the risk that a client setup may break existing applications on the target machine.
In order to deploy using ClickOnce, the .NET Framework 2.0 needs to be installed on the client machine. There are no such requirements for the host server.
ClickOnce works to remove these barriers to client deployment by delivering on the following principles:
-
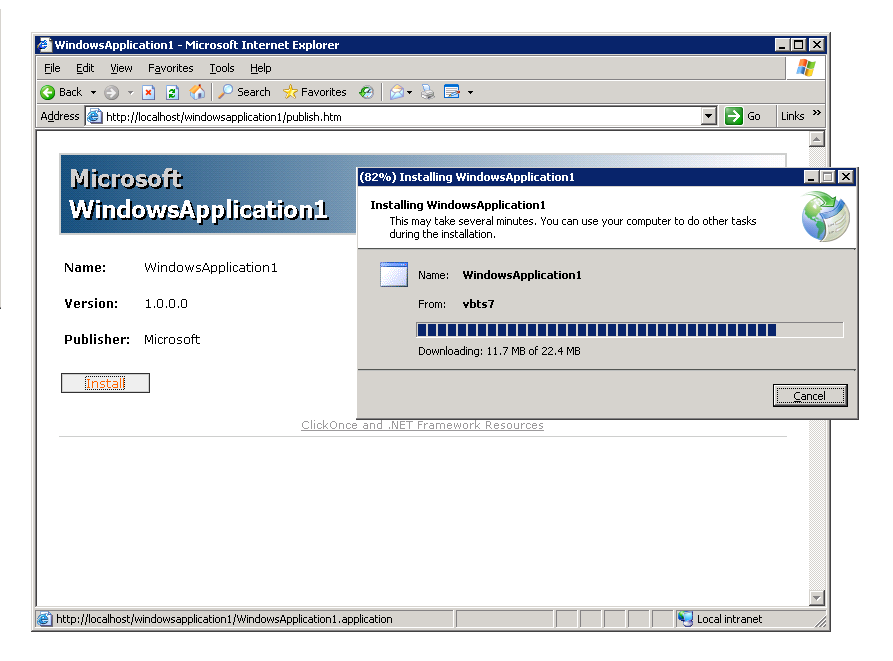
Touchless install: ClickOnce deployment has the mien of a Web installation. The application files are posted to a central location, and the end-user is presented with a URL pointing to this location. Upon execution of the link, the application files are downloaded on to the user’s machine and the application runs immediately. During the interim between clicking the link and activation of the application, the user is shown progress UI, as in Figure 1.
-
Auto-updates: ClickOnce-deployed applications update themselves. Once you have published a new version of the application to the update server, ClickOnce will detect the change and each client machine will be updated without additional effort on your part. -
Robust security model: ClickOnce introduces the concept of application-level security. That is, applications run within a default security sandbox. Stepping outside the sandbox boundaries requires explicit trust elevation by the user or an administrator. -
Reliable and scalable: Installation of a ClickOnce application is low-impact and isolated, so other applications on the target machine are not affected and system resources are not corrupted.
Early adoption of ClickOnce has shown that the technology can scale up to thousands of users without a decrease in service quality.
Mechanics of ClickOnce
Let’s “geek out” for a bit and dive into how ClickOnce works behind the scenes. ClickOnce deployment does not involve an installation package. In fact, the whole shebang is driven by two manifests: the deployment manifest and the application manifest. As one would expect, the application manifest describes the application; that is, the files that make up the application and the application’s security information. The deployment manifest contains information such as the version of the application being described and the semantics for checking for updates. As I’ll show in a bit, with the help of Visual Studio 2005, you won’t have to know much more about these two files.
All the smarts to handle the application metadata stored in these manifests is baked into the .NET Framework 2.0. As part of the Framework’s setup on the user’s machine, a mime handler for the deployment manifest is installed. The deployment manifest is thus the activation point for the application. When the deployment manifest is activated (eg: via URL in the browser), the mime handler for this file type invokes the ClickOnce runtime in the .NET Framework 2.0, which then kicks off the installation of the application or checks for updates if the application is already installed. I think the best way to think of ClickOnce is that it’s a manifest-driven deployment and update service for client applications, baked into the .NET Framework 2.0.
There are a few more details about how ClickOnce installs itself that are important to note. First, ClickOnce installation is non-impactful. ClickOnce does not touch the Global Assembly Cache or Windows registry, for example. These restrictions are in place to ensure a reliable and non-breaking client installation on the target machine.
During a ClickOnce installation, the application files are being downloaded into a per-user application store. In this location, applications are isolated from one another, and furthermore, each user’s application installs are isolated from other users on the same machine. This store is independent of the user’s Internet browser cache; in fact, it is managed by the ClickOnce runtime.
Besides downloading files to a specific location, what more is done at install time? Depending on how the application is configured to be installed, ClickOnce allows for some integration with the Windows Shell.
There are two different ways that a ClickOnce application can be installed: online or offline. An online application has the feel of a true Web application in that the only way to activate the application is via the URL with the user connected to the network.
By contrast, the application installed as offline has some integration with the Windows Shell that allows it to be activated when the user is offline. At install time, a shortcut is inserted into the Start menu and an entry is added in the Add and Remove Programs list. This allows the user to uninstall the application and self-administer updates.
How to: ClickOnce Deploy
So you’ve finished developing your feature-rich, light-speed smart client application, and now you want to deploy it to using ClickOnce. What do you have to do?
Publishing
You first need to configure and generate the ClickOnce manifests. You’ll be happy to know that all versions of Visual Studio 2005, including the Express editions, have full support for ClickOnce. Visual Studio will not only build the application and create the manifests for the deployment in a process referred to as publishing, but also copy your application files and manifests to the location of your choice.
ClickOnce supports client application install from Web server, UNC share, and CD.
ClickOnce is integrated into the new project designer in Visual Studio. You can access this designer by right-clicking your project in the Solution Explorer and selecting Properties. You will notice that there is a Publish tab in the designer, as in Figure 2.
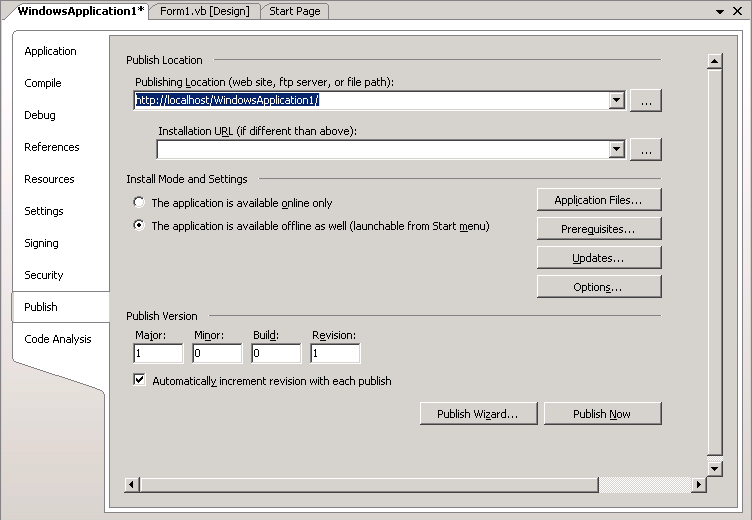
On this page, right off the bat, you’ll want to indicate whether the application is installed in online or offline mode. The decision you need to make is whether you want your application to operate as a Web application, or whether you want the user to be able to activate the application when he is offline.
Next, you want to indicate what files are actually in your application. You’ll notice on the Publish tab, there is an Application Files button, which (when clicked) brings up a list of application files that will make up your deployment. These are the files that will be listed in your application manifest and that the ClickOnce runtime will download on the client’s machine. By default, your application’s executable is shown in the list, along with any other assemblies and files in your project. Assemblies upon which your application has a dependency will also appear.
To add to this list of files, you need to add the file to your project through the File menu or Solution Explorer context menu. After adding a file in this way, go to the Application Files dialog box, find the file that was added, and ensure that the publish status column is set to Include.
By setting a dependent assembly’s publish status to Prerequisite in the Application Files dialog box, you can get the ClickOnce runtime to not bundle this file with your application, but instead have it look for the assembly in the Global Assembly Cache or Windows Side-by-Side folder on the target machine when the application is installed. If ClickOnce cannot find the file in either of these locations, then it will stop the installation and display a dialog box indicating that the file could not be found. Files marked as a Prerequisite will not be updated with the application. By default, the .NET Framework 2.0 is listed as a prerequisite for your application in the application manifest, although it is not listed as an entry in this dialog box.
Now you’re ready to set the Publish Location-the place where the application files and manifests will be published to. Visual Studio 2005 supports publishing to Web server, UNC share, FTP server, and local path.
You’re almost there-you just need to indicate the install location. This is the location where your application deployment will be hosted, and where users will install the application from. If the install location is the same as the publish location, filling out this field is optional.
Now you’re all set to publish. You can click the Publish Now button on the Publish tab in the project designer. Alternately, there’s a publish wizard that walks you through the steps of setting these properties. This wizard is accessible on the Publish tab, or by right-clicking the project in the Solution Explorer and selecting the Publish option in the context menu.
While it may seem like I’m plugging Visual Studio, it turns out that it is not the only way to create a ClickOnce deployment. There is a tool in the .NET Framework 2.0 SDK called Mage, which offers a stripped down way to access the manifest properties as you would in Visual Studio. The tool offers a UI-based experience, which is handy for administrators tweaking manifest properties. It also runs as a command line utility, which is convenient for build lab scenarios.
Another tool in the SDK that supports ClickOnce manifest generation is MSBuild. You can employ the MSBuild tasks used by Visual Studio as part of its publishing operation to support your automated build lab scenarios.
Issuing Updates
After the initial release of the application, you may be on the hook for servicing, or there may be additional features that users are clambering for. While it’s great to have this job security, you want to get these updates out to the users in a quick and cost-effective way.
Fortunately, ClickOnce offers a simple deployment and install experience for updates. Similar to the initial deployment, you post your updates to a central update location, which likely will be the same place to which you initially deployed the application. The ClickOnce runtime on the client machines will automatically apply the updates as they’re made available.
Let’s dive into the details of ClickOnce updating on the client side. If the application is an online application, then the user always gets the latest bits because he activates the application directly from the server or UNC-just like a Web application!
If the application is installed in Offline mode, then the ClickOnce runtime on the client machine will automatically poll the server for updates. When it detects that an update is available, ClickOnce downloads the change. ClickOnce supports two native update semantics for offline applications. The first option is for the runtime to check for updates prior to the application starting. This setting allows you to be sure that the latest version of the application is always run. The other option is to check for updates after the application starts. This means the next time the application runs, it will be the updated version. This option allows you to avoid slowing down the activation of the application.
With all this talk of downloading, there can be a legitimate concern that this will place an undue tax on bandwidth. Fortunately for both the online and offline application, only the application files that have changed in the update, based on a hash, are downloaded into the user’s app store.
In Visual Studio 2005, configuring your application update semantics and issuing updates are easy. To set the update behavior for you application, use the Updates dialog box (see Figure 3) on the Publish tab. There you can set whether the application will check for updates automatically, and whether it should do so before or after starting. If the application checks for updates after activation, you can set the period between updates (eg: every 3 days). You should note that neither of these settings constitute a true background update.
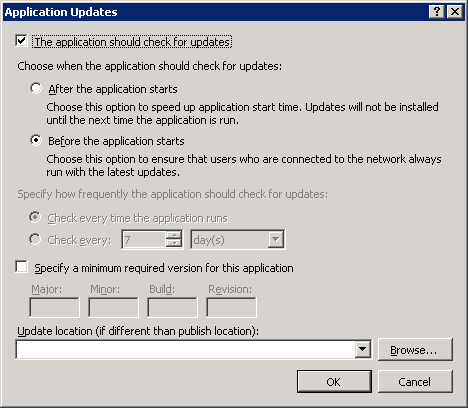
You can also use the Updates dialog box in Figure 3 to set the update URL field. This information is baked into the deployment manifest because the ClickOnce runtime uses it to know where to check for updates. If your users are installing from UNC or URL, this will likely be the same as your installation location. If that’s the case, there’s no need to set this property as your install location is taken by default.
Sometimes the installation and update location fields will differ. For example, some users want to install from CD, then update from a server. This scenario is possible by setting your installation location to your CD. Then set the update URL in the Update dialog box to be your update server.
To issue an update is remarkably simple in Visual Studio 2005. After you have made the changes that constitute the update to your application, you simply re-publish your application to the update location. The ClickOnce runtime on the client machines will detect the change and update the application accordingly.
Version Roll-Back
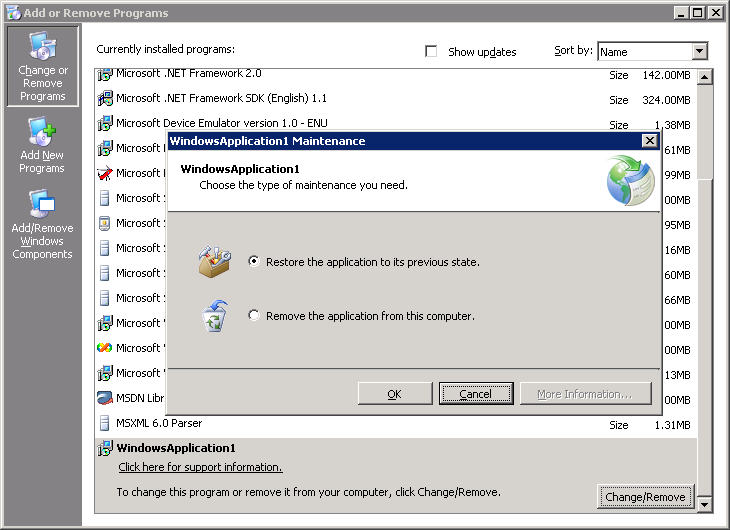
Remember how I mentioned that for ClickOnce applications installed as offline, an entry is added to the Add and Remove Programs? In addition to letting the user uninstall the application, it also allows the user to roll back to previous versions of the application. ClickOnce retains one version back of the application for the user to revert to in this way, as shown in Figure 4.
The other way to roll back is on the server. Let’s say that you issue an update but discover to your horror there’s an embarrassing bug in the new version. You want all users to revert to the previous stable version of the product until you fix the issue. To do this, you use Mage to update the deployment manifest on the server to point to the desired version of the application manifest. When the ClickOnce runtime on the client machine next checks for updates on the server, the application will be reverted to this previous version.
Optional and Required Updates
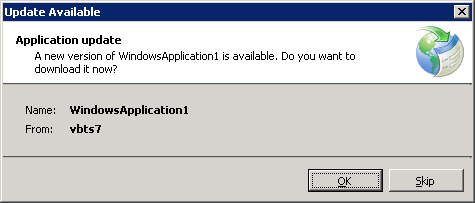
For offline applications, there are two types of updates: optional and required. When ClickOnce detects an optional update on the server, the user is presented with a dialog box, as in Figure 5. The user can either accept or skip the update.
If an update is set to be required, then it means the user is not given the option of deferring the update. In addition to no dialog being shown, the Add and Remove Programs entry for the application prevents the user from rolling back to the previous version of the application.
The entry point of your application must be a managed executable compiled against the .NET Framework 2.0.
To make an update required in Visual Studio 2005, you need to set the Minimum Required Version field in the Updates dialog box to match the version of the application you’re currently publishing. You can find this version value on the main Publish tab. At install-time of the update, the ClickOnce runtime will compare the minimum required version to what the user currently has. If the client has a lower numbered version, then ClickOnce will force the user to update.
Localization
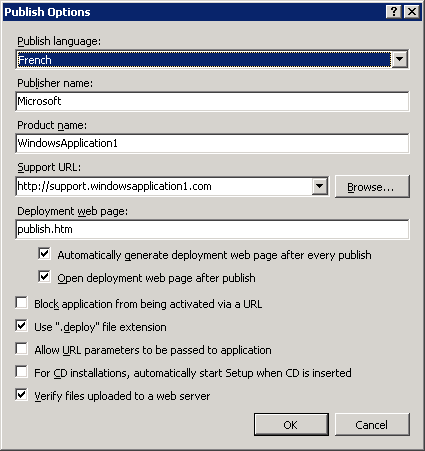
Let’s suppose you’ve localized your application in French, and you now want to publish the satellite assemblies and resources in Visual Studio 2005. To do this, you need to select Options on the Publish tab, as in Figure 6, and in the dropdown for Publish Language, select French
If you open the Application Files dialog box, you’ll notice that the French satellite assemblies are now included by default. When you publish, these localized resources will be carried along with your application.
At install time on a target machine, ClickOnce will show UI in French, provided the matching French language pack of the .NET Framework 2.0 is installed on the user’s machine. In any case, the French satellite assemblies will come down when the application is installed, and bingo-you have a localized application running on the end-user’s machine.
ClickOnce Security Model
ClickOnce and the Common Language Runtime (CLR) introduce a security model that operates over the entire application, as defined by the application manifest. Gone are the days of granting permissions to individual assemblies.
You can ClickOnce-deploy unmanaged components provided they are deployed privately. Even COM components can be deployed via ClickOnce using an OS mechanism referred to as Registration-Free COM, available on Windows XP and above.
By default, a ClickOnce-deployed application runs within a sandbox in that the application is granted a limited set of permissions that depend primarily on the security zone from which it is deployed. The security zones are Internet, Local Intranet, and Local Computer, where each zone allows a greater set of permissions by default. Internet is the most restrictive, and Local Computer imposes virtually no limit. If the application attempts to do something for which it does not have permission, the CLR will prevent the action and throw a security exception.
The set of permissions for the Internet and Local Intranet are quite restrictive. For example, your application will not be allowed to access the target machine’s file system or touch the registry.
So how do you get permission to do these actions, while avoiding the pesky security exceptions? There are two aspects to this problem. First, as the developer, you need to figure out what set of permissions your application requires. Second, in the case that the application is demanding a set of permissions that exceeds the defaults for the security zone from which it is being deployed, the application must be granted elevated trust by either the user or an administrative entity responsible for this decision.
Visual Studio offers a number of tools to help you hone in on the set of permissions required by your application. Here is a quick summary of your war chest:
-
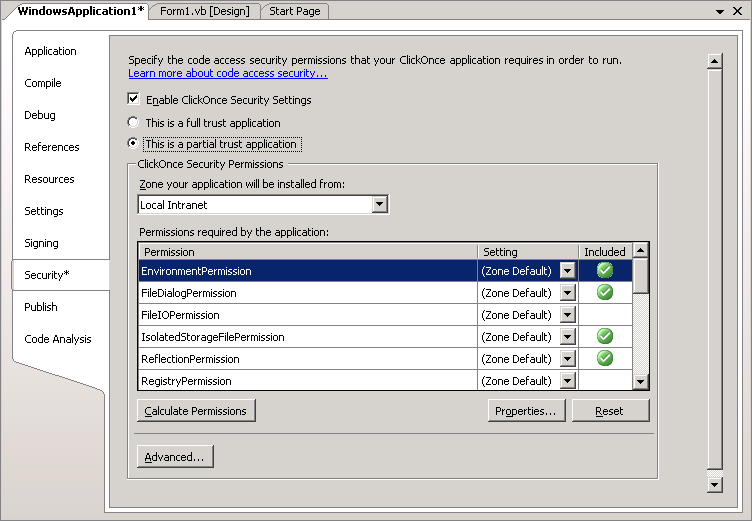
Debug-in-Zone (DIZ ): In the Project designer you’ll find the Security page (see Figure 7), which acts as your cockpit for the ClickOnce security model. On this page you can set whether your application will run in Full-Trust (all permissions requested) or in Partial-Trust (some subset of permissions requested). When you choose to run your application in Partial-Trust, you pick the security zone from which your application will be deployed and the desired set of permissions from a checklist of available permissions, with the defaults for the zone indicated.
Now the kicker is that when you click F5 after setting up your application permissions on the Security page, the application will run as if it was deployed with the security settings you’ve indicated. This allows you to explore the various codepaths of your application to ensure that no security exception will be thrown when the application is deployed.
-
ExceptionHelper: When your application experiences a security exception as a result of running in DIZ mode, the ExceptionHelper will trap the exception and indicate which permission needs to be added so that the CLR will no longer prevent the offending action. -
IntelliSense-In-Zone: At design time when DIZ is enabled in Visual Studio, IntelliSense will only show methods and properties in the dropdown that will run without throwing security exceptions, given the permission set currently requested by your application. Disallowed members will appear grayed out in the dropdown. -
Calculate Permissions: Accessible from the Security page, Calculate Permissions causes Visual Studio to statically analyze your application’s code and recommend a set of permissions that virtually guarantees that you will not get security exceptions at runtime. For this reason, it tends to be overly-conservative; however, it can serve as a starting point for determining the permission set required by your application. You can then use the other tools mentioned above to whittle down to the minimal permission set.
So now you know the security requirements of your application, but in the case that you’re exceeding defaults for the zone of deployment, your application will need to be granted elevated trust at install time.
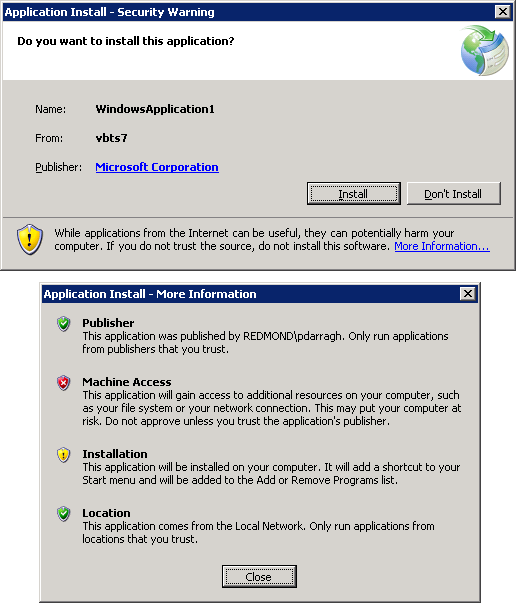
There are two ways this can happen for ClickOnce applications. In the case that there is no administrator in the picture, the decision to elevate trust can be made by the end-user installing the application. At the point when the user executes the installation link, the ClickOnce runtime detects that the application is demanding a non-default permission set. Similar to the Internet Explorer Run/Save dialogs, ClickOnce will prompt the user (see Figure 8), indicating that the application could harm the user’s machine. The user has the choice of either granting elevation and proceeding with the install or canceling. In order to minimize annoyance to the user, the trust decision is cached, so he will not be prompted again when he next runs the application. The only exception is if an update being applied demands permissions beyond what was originally requested by the current version of the application; in this case, the ClickOnce runtime will prompt again when the application updates.
The other option is for an administrator to push out policy via IT infrastructure, such as Active Directory. I’ll talk about how to do this in a moment, but first I need to talk about signing.
Signing
In order to make a decision about whether or not to trust an application, it is necessary to absolutely identify its origin; that is, who deployed it. To this end, ClickOnce requires that both the deployment and application manifests be signed with an Authenticode certificate that identifies its publisher. An important aside: ClickOnce does not require that the application’s assemblies or other files be signed.
The identity baked into the certificate is used in several ways by the ClickOnce runtime. The publisher’s name, for example, will appear in the ClickOnce trust elevation dialog boxes described above. In the case that the end-user is responsible for making the trust decision, this allows him to make the determination, “Hey, I can be sure this application came from Microsoft, so I know I can trust it.”
ClickOnce taps into support in Microsoft Windows for the publisher whitelist and blacklist. This allows an administrator to control trust decisions for ClickOnce applications through policy. Applications whose manifests have been signed with a certificate in the Trusted Publisher list will be implicitly trusted. That is, the application will be granted the permissions it requests and the user will not be prompted at install time. Similarly, applications whose manifests are signed with a certificate in the Untrusted Publisher list will be blocked from installing. Administrators can place certificates in these stores using existing mechanisms, such as Active Directory.
The signature also allows the ClickOnce runtime to only accept updates to an application from its original publisher. This prevents an attacker from propagating malicious updates to all client machines by hacking the update server and posting his own binaries.
As with publishing and security, there is a property page in the Project Designer in Visual Studio 2005 devoted to signing. There you can set the certificate with which to sign the manifests at publish time. In the case that you do not have a bona fide certificate, the page allows you to create a temporary certificate, which will allow you to create manifests that are accepted by ClickOnce. However, to have the publisher identity show up on the Trust elevation dialogs and to take advantage of the white and black list, the certificate used to sign the manifests must be valid; that is, it must chain to a certificate in the Trusted Root certificate store and it must not be revoked or have expired.
Mage also supports signing ClickOnce manifests, as may later releases of Signtool, which is an all-purpose signing utility available in the Windows Platform SDK. This is particularly relevant to IT administrators who may need to re-sign the manifest after modifying the deployment properties therein.
Bootstrapper
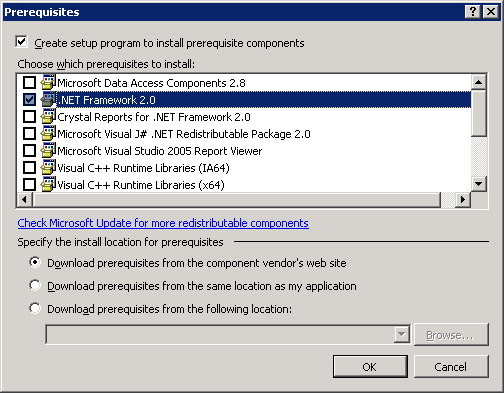
I’ve mentioned that ClickOnce has a dependency on the .NET Framework 2.0, which usually prompts the question: as an application publisher, how do I ensure that the Framework is installed on the end-user’s machine? If you’re deploying to a managed desktop environment, then it will likely fall to the IT department to push out the runtime. But if you’re in a position where you can’t be sure whether or not the .NET Framework 2.0 is installed on the target machine, then you want the Bootstrapper. The Bootstrapper is a feature available in Visual Studio 2005 and the .NET Framework 2.0 SDK. It provides developers a way to fold the installers for their application and application prerequisites into a single integrated setup experience for the end-user. Configured from the Prerequisites dialog box on the Publish page (see Figure 9), the Bootstrapper is built automatically by Visual Studio when you publish.
When executed by the end-user, the Bootstrapper will detect whether or not the .NET Framework 2.0 is present on the user’s machine. If it’s not installed, the Bootstrapper will display a EULA and download and install the redistributable, while displaying progress UI. The Bootstrapper will also install the correct version of Windows Installer if it’s missing because the .NET Framework 2.0 has a dependency on this Windows component. Once the Framework has successfully installed, the Bootstrapper will kick off the installation of your ClickOnce application. To your end users, however, it appears as if they’ve run a single setup.
The Bootstrapper is completely pluggable, so it can be configured to install pretty much any redistributable. Besides the .NET Framework 2.0, Visual Studio 2005 includes in the box the ability to bootstrap SQL Server Express 1.0, MDAC 2.81, and several others. Using the Bootstrapper, you can string these redistributables together into a single setup experience for your end-user. You can even plug in additional custom prerequisite installers yourself. The process required to do so is beyond the scope of this article; however, information is available on MSDN on how to do this.
System.Deployment APIs
There are instances of advanced deployment scenarios that go above and beyond what is natively supported by the ClickOnce runtime. Fortunately, there are APIs in the System.Deployment namespace in the .NET Framework 2.0 that should get you where you want to go. These APIs provide you mechanisms to manually control when your application checks and applies updates. The APIs also allow you to download optional application files dynamically after the initial installation.
Installing an application in a piecemeal way as portions of the application are required by the user is a great optimization to minimize the size of the application that comes down the wire at the initial installation point. The optional module may be an obscure component that is rarely required, or it may be fat content files that are not necessary to the user until they’re specifically requested, such as Help documents.
By writing a little bit of code, you can support this scenario in your ClickOnce application. The code shown in Listing 1 is bringing down the file download group named Helpfiles after the user clicks on the Help button on a form. Note that I am downloading asynchronously so I can avoid freezing the UI of the application.
To specify a download group for a set of files, you must go the Application Files dialog box, shown in Figure 10, on the Publish tab. Under the Download Group heading, you can create a new group name in the dropdown for a particular file. Set this download group for any other file you want to download at the same time. When you publish your application, these files will be marked as optional and will not be downloaded onto the client machine until you expressly do so in code, as shown in Listing 1.

In the code snippet below, I have added the code to hook up a progress bar on my form to give the user feedback that some action is being taken on his behalf.
Private Sub ProgressChanged(ByVal sender As _
    Object, ByVal e As _
    DeploymentProgressChangedEventArgs) Handles _
    appDeployment.DownloadFileGroupProgressChanged

    Me.DownloadProgressBar.Value = _
        e.ProgressPercentage

End Sub
Conclusion
Armed with the .NET Framework 2.0 and Visual Studio 2005 (which shipped on November 7, 2005), you’ll be set to write the client application you’ve always wanted to and let ClickOnce take care of the deployment and servicing of your killer app.
Listing 1: This code asynchronously downloads the file group named Helpfiles after the user clicks on the Help button on a form
'Class Variables

'Entry point into the ClickOnce deployment APIs
Dim WithEvents appDeployment As ApplicationDeployment

'Fired when user clicks button to view help
Private Sub HelpButton_Click(ByVal sender As System.Object, _
    ByVal e As System.EventArgs) Handles HelpButton1.Click

    'Check that the application has been deployed via ClickOnce.
    'If these APIs are used outside of ClickOnce, an exception
    'will be thrown
    If (ApplicationDeployment.IsNetworkDeployed) Then

        appDeployment = ApplicationDeployment.CurrentDeployment

        appDeployment.DownloadFileGroupAsync("Helpfiles")

    End If
End Sub

'Fired when a FileDownloadGroup finishes downloading asynchronously
Private Sub DownloadCompleted(ByVal sender As Object, ByVal e As _
    DownloadFileGroupCompletedEventArgs) Handles _
    appDeployment.DownloadFileGroupCompleted

    'All downloads fire the same event when done, so need to make
    'sure you are acting on the correct FileDownloadGroup
    If (e.Group.Equals("Helpfiles")) Then

        'Files are downloaded to the ClickOnce store. If the
        'application is deployed in Full-Trust, the current working
        'directory will the application's folder in the store.
        Me.HelpDisplayTextBox.Text = _
            My.Computer.FileSystem.ReadAllText _
                ("HelpFiles\TextFile1.txt")

    End If
End Sub
