


Imagine that you are in IT operations and tasked with creating a new business website to provide your company's product information. Or perhaps the site offers participation in courses, a bulletin board, an application submission portal, and similar services to your verified partners. Now imagine that you also need to interact with the partners on the platform, from registration to bookings. Sure, there are several technologies and services that can help develop internal or external websites. But Microsoft Power Pages is a straightforward, fast, easily extendable, and remarkably interesting solution for public websites, Business-to-Consumer (B2C), and Business-to-Business (B2B) scenarios with a wide range of flexibility, from simple forms to fully customized partner portals. With the integration of Microsoft Copilot, the process becomes even more streamlined. Putting Copilot's capabilities right at your fingertips takes the process of designing and iterating in Power Pages to a new level of efficiency. Copilot acts as a companion, complementing your development journey by suggesting design templates and improvements, code snippets, offering best practices, and helping you with tasks to finalize your Power Pages projects. This not only speeds up the creation of your web portals, but also promotes a deeper understanding of best practices and patterns.
In this article we will investigate Power Pages, areas of the application, management, and implementation of an example application website portal to register for courses. Whether you are a power user or a professional developer, you can use Power Pages to quickly achieve your desired results.
Introduction to Power Pages
If you have not yet investigated the Power Pages (see sidebar) service and its use cases, let's start by asking: what is it and for what can you use this service?
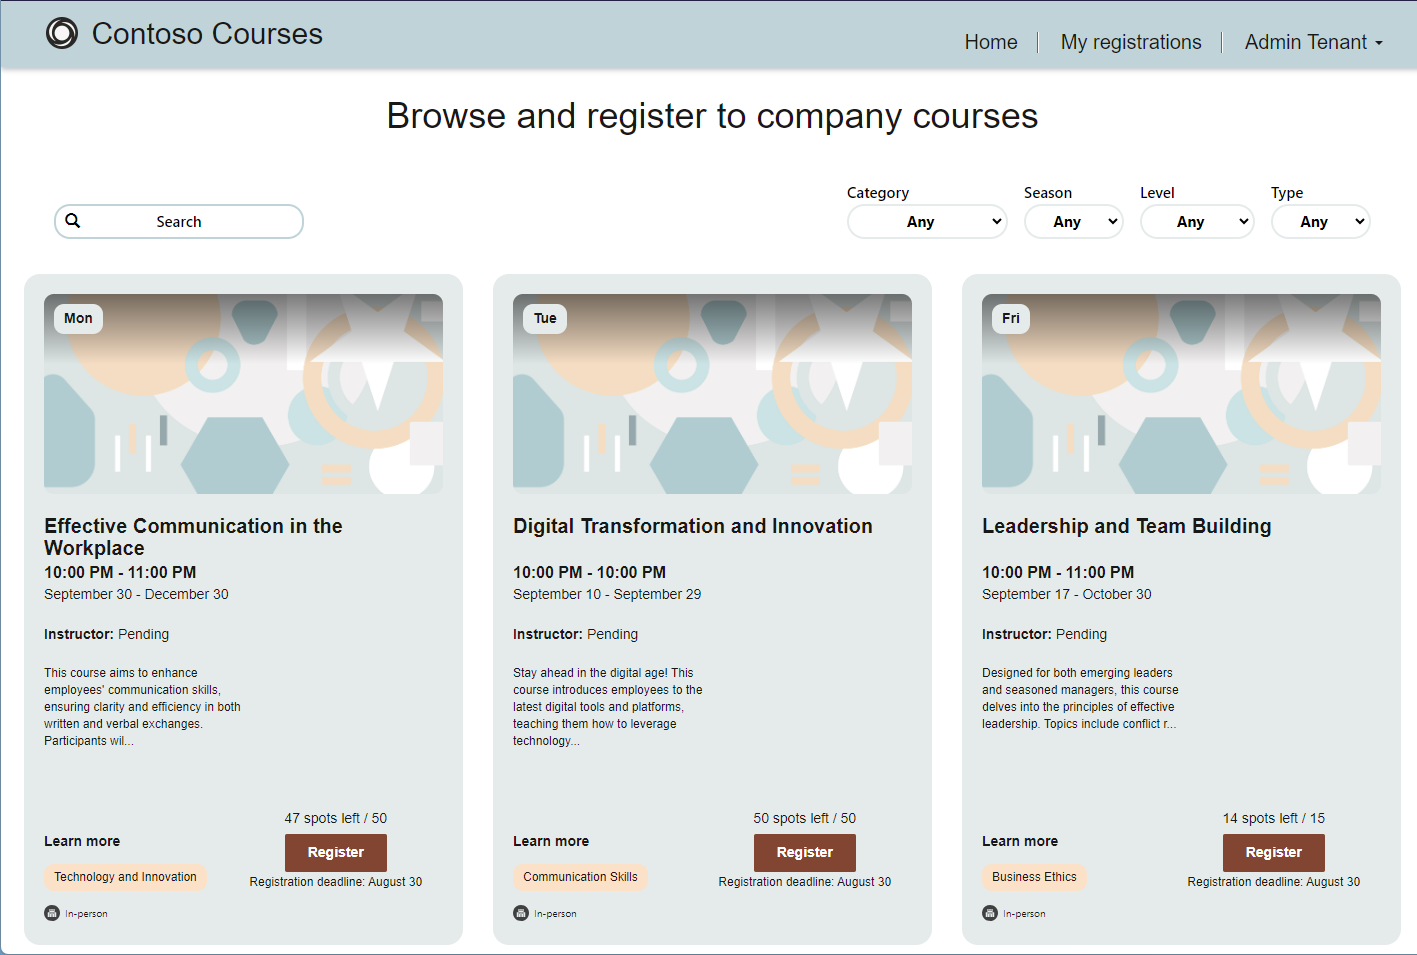
From a functional point of view, Power Pages enables organizations to create public-facing websites or portals that can be used for data access, forms, and internal tasks (and for external audiences such as customers, vendors, partners, and employees). You can develop such portals for a variety of purposes, such as providing self-service support, allowing customers to track orders or submit requests, or providing a platform for employee collaboration and communication. Figure 1 shows an example of a website built with Power Pages that facilitates event registration.
While the primary focus of the Power Platform is internal users, Power Pages excels at outreach to external users (particularly for purposes like registration websites, partner portals, and other customer-facing websites).
Technically, Power Pages are built on top of the Dataverse service and the Power Platform. Microsoft Dataverse is a database system that provides a secure and efficient storage system for data used by business applications. This robust framework allows us to store the data required for our enterprise website and benefit from the built-in features such as data integrity, data usage optimization, and integrated, easy access. The Power Platform includes a suite of software applications spanning business intelligence, app development, and app connectivity.
In Power Pages, you can add web pages, web forms, web components, and web templates to create a customized portal. While you can develop applications and business processes with the services of the Power Platform using low-code expressions, you can also increase your productivity as developers by integrating custom code and familiar developer tools like Visual Studio Code, GitHub, and DevOps.
Portal authentication plays a significant role here: you can build a web portal that is available anonymously or one that requires a login. Power Pages support a variety of authentication methods, including Microsoft authentication, external authentication providers such as Google, Facebook, LinkedIn, and X (formerly Twitter), and custom authentication providers to ensure that only authorized users can access the portal and perform specific actions.
Power Pages can be used by everyone, from power users to professional developers and Power Pages integrate fully into the Power Platform. Note that a corresponding license is required. With these conditions, you can use Power Pages with other Microsoft products, such as Dynamics 365, Power BI, and Power Automate, to create end-to-end solutions that streamline business processes and improve user experiences with custom web-applications. This service allows you to foster a culture of collaboration within your organization and among your partners and customers with little effort, while also being able to extend it with custom code.
Use Cases
You can create Power Pages and customize it to fit the specific needs of an organization to communicate with users, whether they are internal or external. Here are some typical use cases for Power Pages.
Within the organization, with internal users:
- Forms: Collect feedback from your coworkers in a structured way.
- Company news: An employee portal that provides access to company news, HR information, and collaboration tools.
- Company self-service portal: Give your users forms and processes to do tasks themselves. This can be simple tasks like provision a new Team site with an approval process behind, invite a guest user, upload an invoice, order a new computer, or similar.
- Employee self-service portal: An internal portal for employees to view their pay stubs, update their personal information, request time off, and access company resources.
- Knowledge base portal: An internal portal for employees to access company policies, procedures, and training materials.
- Sales portal: An internal portal for sales teams to manage leads, opportunities, and customer accounts.
- Bulletin board: Employees who want to exchange information and, for example, want to buy and sell goods privately in the portal.
With partners, and external users:
- Support site / customer service portal: A customer service portal that allows customers to submit support tickets, track their progress, and access helpful resources.
- Vendor portal: A portal that allows suppliers to manage their accounts, submit invoices, and track payments.
- Community portal: A portal for customers to interact with other customers, share ideas, and provide feedback.
- Partner portal: A portal for partners to manage their accounts and to access resources. This portal could allow specific partners to manage and view your products, price lists, and other relevant information to collaborate with your organization.
- Forums: A forum for a group of users to exchange information about specific topics such as technology, hobbies, etc.
- Ideation portal: An online platform dedicated to user-generated ideas, feedback, content, reviews and other information to encourage your coworkers to turn their issues and experiences into digital solutions and to view and submit them.
With anonymous users:
- Public-facing website: A website that provides general information about the company, its products and services, and contact information.
- Event site and registration portal: A portal showing event information that allows users to register for events, view event details, and access event resources.
- Job application portal: A portal for users to submit job applications, view job postings, and track the status of their applications.
- Whistleblower portal / GDPR incident portal: A secure platform for employees, customers, or other stakeholders to anonymously report any unethical or illegal activity within an organization. On the other hand, only authorized users who work on the cases must have secure access to the portal and the incidents.
Here you see just a few examples of the many use cases for Power Pages. The flexibility and customization options of Power Pages make it a versatile tool for organizations to build web applications and websites that can connect to data and processes in the Power Platform and to other Microsoft products. For example, you can use Power Automate workflows for managing incidents reported through the portal. For reporting and analytics, you can benefit from using Power BI to generate reports and analytics on the incidents reported through the portal to provide real-time reporting and insights. These are just a few ideas of how to use these services for projects in your organization.
Advantages
There are several advantages of using Power Pages compared to other tools or custom development, including low-code development, integration with Microsoft products, pre-built templates and components, rapid development and deployment, scalability, and security. Here is a list of some of the main benefits:
- Pre-built templates and components: Power Pages provides pre-built templates and components that can be easily customized to meet specific business needs. This saves time and effort in development and ensures that solutions are built on best practices.
- Rapid development and deployment: With Power Pages, users can quickly develop and deploy web solutions to meet changing business needs. The Power Pages Product group says, “Web developers should be 10x more productive and should have a very small learning curve while building sites using Power Pages.” This enables organizations to be more agile and responsive to standardized processes and both internal and market demands.
- Scalability and security: Power Platform provides scalability and security features that enable solutions to grow and evolve over time. This ensures that solutions are secure and can accommodate future growth and expansion.
- Low-code development: Power Platform provides a low-code development environment that enables users to build web applications and workflows without the need for extensive coding knowledge or experience. This makes it easier for business users to create custom solutions that meet their specific needs.
- Professional development: Developers can leverage their existing skills and knowledge of developing websites to build Power Pages portals. With the Power Platform runtime, professional developers can use features such as Web APIs, PCF controls, and UI components and there is support for Visual Studio Code, Visual Studio and all CI/CD and ALM functionality. Power Pages also provide support for virtual tables with virtual connectors to access external data sources like SQL Server, Cosmos DB and SharePoint, with support for OOB components like forms and lists including permissions. Developers also can call Cloud flows or Azure functions from a Power Pages website to add custom business logic. Such Web API calls are implemented in a secure manner from the server side as a synchronous task that delivers a return value to the website so that it can react to the result and visualize new data in the portal site.
- Integration with Microsoft products: Power Platform integrates seamlessly with other Microsoft products such as Dynamics 365, Microsoft 365, and Azure. This enables users to leverage existing data and processes in these products to build custom solutions.
- Integration with third-party vendors: Typical customer requests often go in the direction of e-signature and payment. Power Pages will support DocuSign e-signature and Stripe payment. Other systems might follow in the future.
- Bot- and AI-driven experiences: Last, but not least, we need to mention that you can embed a Power Virtual Agent bot with ChatGPT answer experiences into our Power Pages website. The result can be scoped to the anonymous content of the website itself, for example, for product information and FAQs pages. So, users can ask questions in natural language and get results without the need for any development. As of August 2023, this feature is only available as preview in North America.
Above all, the rapid development and deployment as well as the integration are great advantages of Power Pages for creating individual website solutions. Furthermore, every user, from the power user to the professional developer, can use Power Pages in a secure environment.
Architecture and Security
The Power Pages Platform is built on Microsoft Azure and leverages the same security stack as Azure, which integrates with Microsoft 365 compliance tools. Power Pages are fully embedded in the Power Platform, where security is a core aspect of the Microsoft 365 services. Microsoft has implemented a variety of security features to ensure that the portal and the data it contains are secure and protected from unauthorized access or malicious attacks. You can find detailed information about the Power Platform architecture in the white paper at https://aka.ms/PowerPagesArchitecture.
Supported authentication methods include Microsoft Authenticator, external providers like Google, Facebook, LinkedIn, and others as well as custom authentication providers, requiring user authentication to access the portal. To further control access, fine-grained security controls are available, enabling the definition of roles and permissions to restrict user access to specific resources and features. Data encryption is used at rest and in transit, ensuring data remains safeguarded from unauthorized access or disclosure. For proactive security monitoring, Power Pages provides real-time monitoring and logging of security events, empowering our IT to promptly detect and respond to potential security threats. This comprehensive set of security measures makes Power Pages a reliable and secure platform for building and managing web portals with confidence. Microsoft also provides a Power Pages security white paper at https://aka.ms/PowerPagesSecurity.
Speaking of security, sometimes customers ask if it's possible to use Power Pages on-premises. The answer is that Power Pages can be used with on-premises data gateways to access data that remains on-premises. Such a scenario requires the gateway service to run on a local server, and the use of stored credentials to interact with the connectors. The gateway service creates an outbound connection to Azure Service Bus so there are no inbound ports required to be open. You can find details about the on-premises gateway at https://learn.microsoft.com/en-us/power-platform/admin/wp-onpremises-gateway.
Developers can choose to make a Power Pages site available only to authenticated users or to also make it available to anonymous users. Mixed operation is also possible, e.g., with a publicly accessible area and a separate user area on the same website. Users are licensed based on authentication and licensing plan. Microsoft offers two models here: a subscription-based license plan and a pay-as-you-go plan. You can find the Power Pages pricing website at https://powerpages.microsoft.com/en-us/pricing/. All plans incorporate essential features such as Dataverse storage, access to authentication providers, pre-built templates, pre-built Dynamics 365 application templates, built-in content delivery network support, and role-based access control for users. These functionalities are available across all subscription levels, ensuring that you can leverage these valuable tools regardless of the plan you choose.
Administration and Governance
The administration of the Power Pages portals works in the same way as the rest of the Power Platform. The Power Platform environment provides isolated workspaces where you can develop, deploy, and manage our business applications and solutions. Data Loss Prevention (DLP) policies also apply here. You can find more information about how to administer the Power Platform at https://learn.microsoft.com/en-us/power-platform/admin/admin-documentation.
Before you can start to be creative, you must think about the environment you want to use:
- Default environment: You can't create Power Pages websites in the default environment since the default environment is accessible to everyone in your organization. Therefore, Microsoft does not allow creating external-facing sites in this environment. You need to have another environment for Power Pages.
- Developer environment: For a team of developers, we recommend the Power Pages Developer environment. Unlike trial environments, developer environments never expire, and they require a Power Apps Developer Plan. This environment type offers limited control, and Security groups can't be assigned to developer environments. Also, provisioning developer environments can be restricted to admins. Once you are done with developing and updates, export the site and import it into another environment to publish it.
- Types of environments: You can find an overview of environment types at https://learn.microsoft.com/en-us/power-platform/admin/environments-overview#types-of-environments.
The same system and rules apply to Power Pages as to Power Apps and Flows. It is important to train users on where and how to create and edit their resources. Always consider the environment in which you create a new Power Platform resource before creating it. User training is an important part of any adoption and change management (ACM) project to educate them on how to use the Power Platform.
For governance regarding who owns which website and how it is used, you can use the Power Platform CoE Starter Kit. In the business context, a Center of Excellence (CoE) refers to a team or department within an organization that is responsible for developing and promoting best practices, knowledge, and expertise in a particular area. This is the intention of the CoE Starter Kit, to provide useful data about properties, such as owner, type, creation date, etc., and the usage of the resources in the Power Platform. The CoE Starter Kit runs fully as a solution in the Power Platform and aims to provide guidance, support, administrative control, and standardization across the organization. You can get it at https://aka.ms/coestarterkit and use it for the whole Power Platform except Power BI services. With the use of managed environments, Microsoft is also gradually expanding the Power Platform with additional governance functionalities.
We want to highlight one option for developers: if you don't already have a Power Platform subscription, the easiest way to get access to a Power Platform environment is to sign up for the free “Power Apps Developer Plan.” With this plan you can explore the Power Platform and develop Power Apps, Flows, and Power Pages. Sign in with your work or school account at: https://powerapps.microsoft.com/en-us/developerplan. This environment is a personal space where developers can build, test, and experiment with their applications and solutions.
Creating Power Pages Portals
Interactively, you can open sites created using Power Apps by using the legacy Power Apps portals Studio (https://make.powerapps.com), or with the new design studio (https://make.powerpages.microsoft.com). Note that the Power Apps portals Studio currently offers some features that aren't part of the Power Pages design studio: these include web template code editing, Power Virtual Agent chat bot configuration, breadcrumbs, custom menus, and content snippet editing. However, sites created using Power Pages by default open in Power Pages design studio and Microsoft recommends using the new design studio with the “new site-building experience.” For detailed information about the two studios, see https://learn.microsoft.com/en-us/power-pages/configure/editing-sites.
Start Simple With Design Studio
Now let's start and create a new Power Pages website.
Power Pages consist of a set of web pages and web components that are designed using a drag-and-drop interface in the design studio. The AI-powered Copilot allows you to generate or modify controls and content on the website. The design studio consists of four areas in the left menu, referred to as workspaces. Each are tailored to address the following user tasks:
- Pages workspace empowers you to design and build web pages.
- Styling workspace lets you apply global site styles.
- Data workspace supports you to easily model, visualize, and manage business data for the site with tables, forms, and lists.
- Set up workspace enables site administrators to configure site settings such as identity providers, security, and permissions.
You can start to develop your website experience in the Power Pages design studio. To access the design studio, you must be assigned the system administrator role within the same Dataverse environment as your site. You can find a starter guide for the design studio at https://learn.microsoft.com/en-us/power-pages/getting-started/use-design-studio. Figure 4 shows the Power Pages design studio generated with a template site.

The site visibility setting in Power Pages allows you to manage access to a website. By default, the site is private to restrict access to specific people in the organization. If you choose to make the site public, anyone with the link can access it. Therefore, we recommend leaving the default setting to private to limit access while your site is in development.
From the Power Pages design studio, you can always check the result using the desktop or mobile experience as shown in Figure 5.

Working with Copilot and an Integrated Bot
With Power Pages Copilot, you can create a new web page for your site by describing the type of web page. Copilot generates the HTML for the page with relevant text and images from the description. The page is added to the main navigation of the site and can be refined and edited using Copilot and the editor. The availability of Copilot features depends on your site settings or global region. See more at https://learn.microsoft.com/en-us/power-pages/getting-started/create-page-copilot.
You also have the capability to integrate a Power Virtual Agent bot with a ChatGPT answer experience into our Power Pages website. This integration allows users to interact with the bot in natural language, providing instant answers to their queries without requiring any additional development efforts. The bot's functionality will be tailored to cover anonymous website content, such as product information and FAQ pages. However, it is essential to keep in mind that this feature is currently available in preview mode and limited to users in North America. This offers an interesting opportunity for communication within the Power Pages website.
Using the Power Platform CLI
You can also create a new website and manage a website using the Power Platform command-line interface (CLI) and integrate the management of Power Pages websites in CI/CD pipelines. The Power Apps module is a simple command-line interface that empowers developers and ISVs to perform various operations in Power Platform.
- You can download the CLI from https://aka.ms/PowerAppsCLI, or install it with the DotNet tool (https://learn.microsoft.com/en-us/dotnet/core/tools/global-tools) (.NET 6.0 recommended) and the following command:
dotnet tool install --global Microsoft.PowerApps.CLI.Tool
- You can find more about the CLI at https://learn.microsoft.com/en-us/power-platform/developer/cli/introduction.
- See the tutorial at https://learn.microsoft.com/en-us/power-pages/configure/power-platform-cli-tutorial on how to use the CLI with Power Pages.
- Please also see David Yack's article, Power Platform ❤ Code Developers in this issue.
Coding Experience
Power Pages customization is a key element for any professional developer who wants to create unique and effective user experiences. Whether it is a simple layout adjustment or a complete design revolution, code-based customization offers a range of possibilities that can significantly improve the interface and functionality of a page. Here are the key components from a coding perspective:
- Liquid template language: Speaking of customizing layouts, the Liquid templating language allows you to add dynamism to static pages. Liquid is simple and flexible, allowing you to manipulate data in real time and create rich templates. It is especially powerful when it comes to inserting, performing calculations, or manipulating data before the page is rendered to the user. You can find a learning path for working with Liquid at https://learn.microsoft.com/en-us/training/modules/power-pages-liquid/.
- Visual Studio Code for the Web: The ability to directly edit the template in Liquid is provided through Visual Studio Code for the Web, which is a preview feature that allows you to have an instance of Visual Studio Code directly in the browser (and thus allows you to edit not only Liquid templates but also CSS, JavaScript, web templates, etc.).
- Web templates: Defining web templates at the configuration level is another key aspect of customization. They provide a way to define templates for website pages and allow you to control the appearance and structure of these pages. They are fully customizable and can be used to create any type of design or layout.
- PCF: The Power Apps Component Framework (PCF) allows the creation of code-based components. These components can be reused across applications and/or sites and allow the ability to integrate complex functionality or create rich user interfaces.
- Web API: Access to the Portal Web API further expands the possibilities for customization. APIs provide a means to interact with portal data, allowing developers to create custom functionality and integrate external applications or services.
- ALM: An important aspect to consider from a portal development perspective is the application life cycle management (ALM), which in Power Pages can be handled in different ways. We'll cover this in more detail later in this article.
- Solutions: Use solutions (currently in preview at the time of writing) to migrate customizations between different environments to maintain an efficient and secure workflow. This can include migrating customizations from a development environment to a test environment or from a test environment to a production environment directly or using pipelines.
Let's now go into the details of these capabilities.
Visual Studio Code for the Web
Visual Studio Code for the Web is a preview feature that allows you to customize web pages using the Visual Studio Code editor directly in the browser (Figure 6). This feature provides the ability to edit static content, HTML, CSS, Liquid, and JavaScript for the following website metadata:
- Advanced modules (multi-step modules): JavaScript.
- Basic modules: JavaScript.
- Content fragments: all content supported for content fragments.
- Lists: JavaScript.
- You can use Liquid code anywhere in the portals where you can enter HTML or text content.
- Web files: view and download media files. Edit text files (code).
- Web pages: all content supported (by language), JavaScript and CSS.
- Web templates: all content supported.
However, there are some limitations to keep in mind. You are not able to create new metadata records, only to add and edit content, code, and view/download file attachments. Also, file creation, deletion and renaming operations are not supported as of today.
If you are collaborating with other developers, you can manage the source code by using a source control system like Azure DevOps or GitHub.
There are several places to access code editing such as directly from the page or from the templates used in the page such as the header or even from the selection of CSS files used in the site.
In all these cases the steps are as follows:
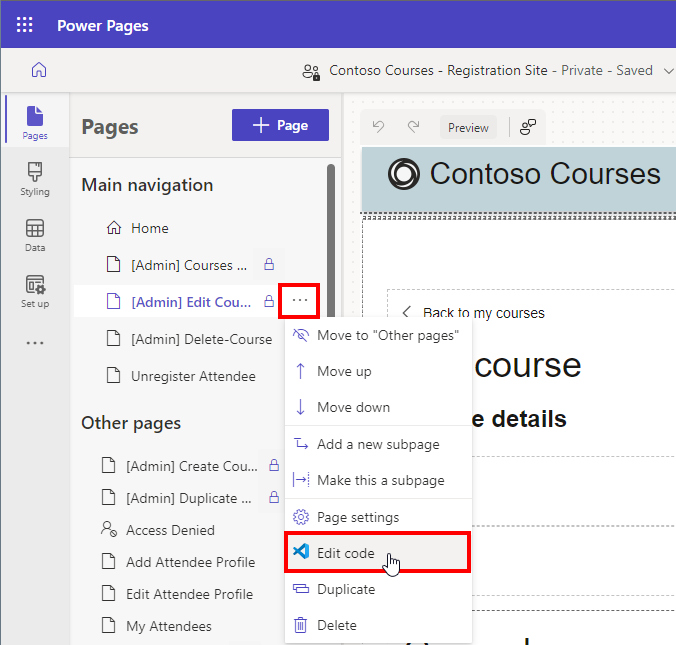
- Open your site in Power Pages design studio.
- Select Edit code.
- Select Open Visual Studio Code from the confirmation dialog box.
- Log into Visual Studio Code using your environment credentials.
- Wait for the Power Platform Tools web extension to initialize and for the web page code to load in the left pane.
Users can edit, debug, and preview page changes using Visual Studio Code for the Web without the need for external tools (Figure 7). Using the Power Platform extensions, Visual Studio Code for Desktop can also be used, which offers other advanced features for editing all site metadata and integration with GitHub and continuous integration/continuous development (CI/CD) processes.
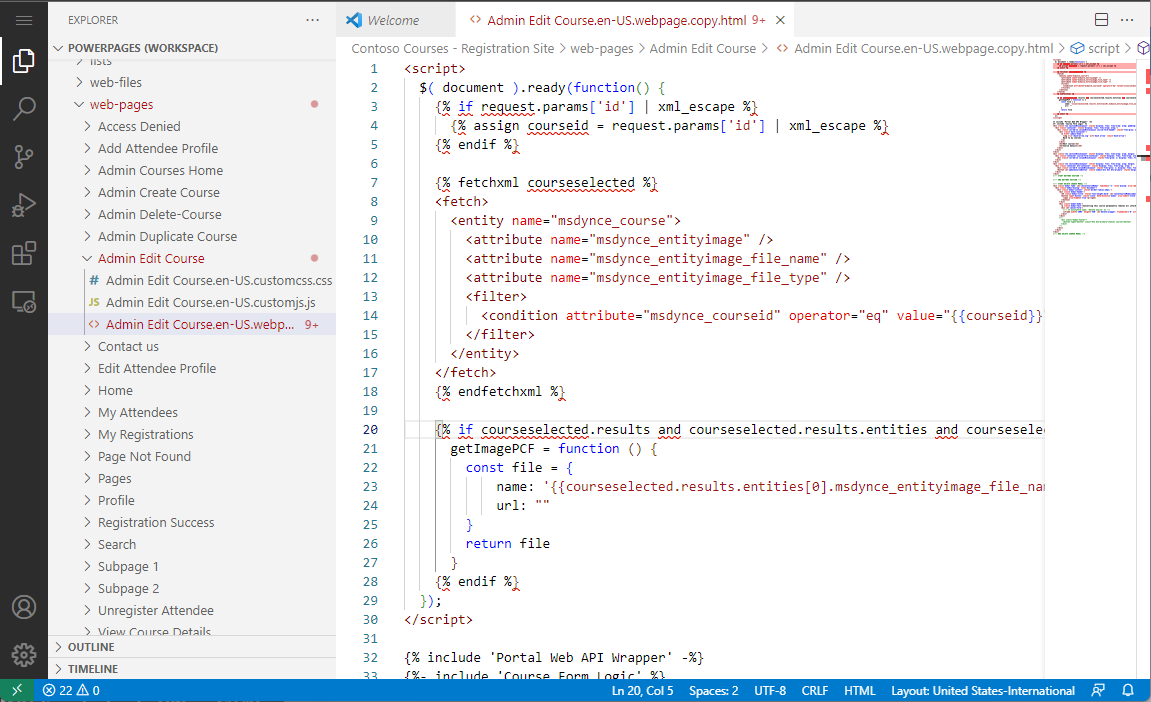
In the Visual Studio Code for the Web editor, you can work with the typical website structure and the files in a workspace. In the Admin Edit Course page , you see how the list of courses is processed with a mixture of JavaScript and HTML elements. These expressions are used to render the full page when accessed.
Using Liquid to Create Dynamic Controls
When you want to modify the templates of the site, you need to learn how to use Liquid. Liquid is a versatile and easy-to-use template language designed to simplify the process of rendering dynamic content. Originally developed by Shopify, Liquid offers a clean, straightforward syntax that allows developers and designers to create flexible, reusable templates. As a powerful template engine, Liquid allows for dynamic data insertion, conditional logic, and iterative loops – enabling the creation of custom, dynamic user interfaces.
Liquid uses a combination of tags, objects, and filters to load dynamic content. At its core, Liquid uses a specific syntax to define templates. The two primary types of delimiters used are “{{ }}” for output and “{% %}” for logic.
With the double curly braces, developers can write an output statement that will be rendered in the final web page. This allows variables, values, or data to be dynamically inserted into the template.
Hello {{ user.firstname }} from {{ 'Power Pages' }}
Liquid supports the use of “filters,” which are functions that allow developers to format data, perform calculations or manipulate numbers, dates, and arrays before they are used, increasing the flexibility and versatility of the language.
Hello {{ user.firstname | upcase }} from
  {{ 'Power Pages' }}.
The date is {{ 'now' | date: 'MMMM d yyyy' }}
Here are some commonly used filters (the list is not complete):
- date: Reformat a date.
- capitalize: Capitalize words in the input sentence.
- downcase: Convert an input string to lowercase.
- upcase: Convert an input string to uppercase.
- first: Get the first element of the passed in array.
- last: Get the last element of the passed in array.
In addition to filters, Liquid also incorporates tags to extend the functionality of the language.
For example, there are tags that control the logic of the model, i.e., flow control tags (e.g., “if” statements) to execute specific code based on certain conditions or tags that allow the creation of loops (e.g., “for” loops) to iterate data structures and efficiently perform repetitive tasks.
- if tag allows a block of code to execute if the condition is met:
{% if user.fullname == 'Dave Bowman' %}
   Hello, Dave.
{% endif %}
- unless tag allows the execution of a block of code if the condition is not met:
{% unless page.title == 'Home' %}
   This is not the Home page.
{% endunless %}
- elsif/else tag allows additional conditions to be added to an if block:
{% if user.fullname == 'Dave Bowman' %}
   Hello, Dave.
{% elsif user.fullname == 'John Smith' %}
   Hello, Mr. Smith.
{% else %}
   Hello, stranger.
{% endif %}
- case/when tag allows you to implement a switch statement to compare and execute a different block of conditions:
{% case user.fullname %}
   {% when 'Dave Bowman' %}
      Hello, Dave.
   {% when 'John Smith' %}
     Hello, Mr. Smith.
   {% else %}
     Hello, stranger.
{% endcase %}
- for tag allows you to iterate over items in an array or dictionary and execute a block of code repeatedly:
{% for child_page in page.children %}
   <a href={{ child_page.url }}>
     {{ child_page.title }}</a>
{% endfor %}
Of course, to control the flow of logic using tags, Liquid supports different types of operators such as mathematical, comparison and logical operators, like the following ones:
+, -, *, /, ==, !=, >, <, >=, <=, and, or, not
Since Liquid is a full-fledged programming language, it supports various data types such as:
- String: A sequence of characters. Strings are surrounded by quotes.
- Number: Any number without quotes.
- Boolean: True or false.
- Nil: Represents an empty or non-existent state. It's not true or false.
- Array: A collection of items. Arrays are surrounded by square brackets and items are separated by commas.
- Hash: A collection of key-value pairs. Hashes are surrounded by curly braces, and key-value pairs are separated by commas.
In addition to tags to manage control flow, there are tags for variables, tags for templates, and tags to access Dataverse.
Tags for variables are used to create new variables.
- assign tag is used to create a new variable:
{% assign is_valid = true %}
- capture tag is used to create a new variable from a block:
{% capture hello %}Hello, {{ user.fullname }}.
  {% endcapture %}
Tags for templates are used to load content from your site into your template. They include tags like:
- include tag includes the contents of one template in another using the name, allowing you to reuse templates fragments in multiple places:
{% include 'My Template' %}
- extends and block tags provides the possibility to extend a shared layout, overriding specific areas.
- comment/endcomment tag is used to stop a specific block from rendering:
Hello{% comment %}, {{ user.fullname }}
  {% endcomment %}. My name is Charles.
Tags for Dataverse are used to interact with Dataverse. They include tags like:
- chart tag adds a Power Apps model-driven app chart to a web page:
{% chart id:"EE3C733D-5693-DE11-97D4-00155DA3B01E"
  viewid:"00000000-0000-0000-00AA-000010001006" %}
- entityview tag loads a given Dataverse view, by name or ID
{% entityview logical_name:'contact', name:"Active Contacts" %}
    Loaded entity view with {{ entityview.total_records }} total records.
{% endentityview %}
- entityform tag renders a form by name or ID
{% entityform name: 'My Basic Form' %}
Working With Web Templates
Power Pages web templates are an integral part of Power Pages and provide a framework for creating dynamic, customizable content. These templates use Liquid expressions to enable dynamic rendering of content within the static web pages.
Web templates in Power Pages can be included in other content or combined with other templates using template tags. In these tags they are referenced by the Name attribute. They can be used to create entire custom page layouts or to design custom headers and footers for a Power Pages website.
So, let's look at the steps to create a web template for a page template.
- Start by selecting Portal Management in the design studio. This application enables complete control over all Power Pages sites.
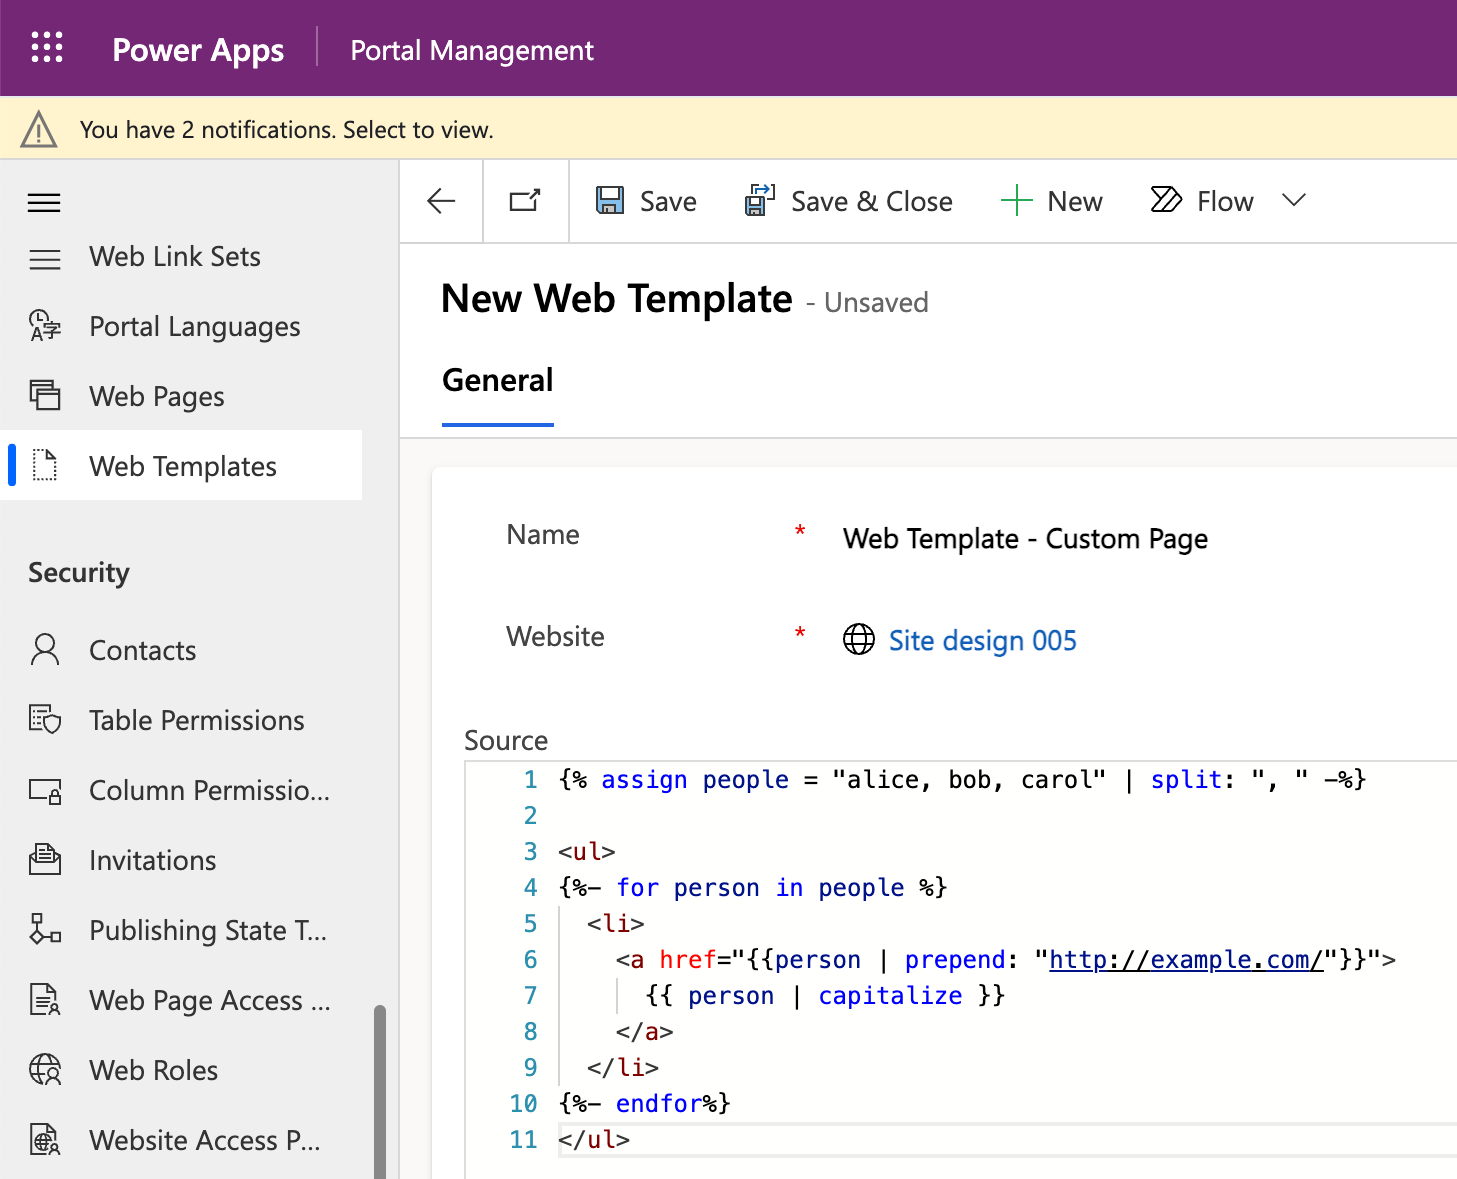
- Create a web template record by scrolling to the Content section of the Portal Management app and selecting *Web Templates (Figure 8). Provide the necessary details in the fields presented.
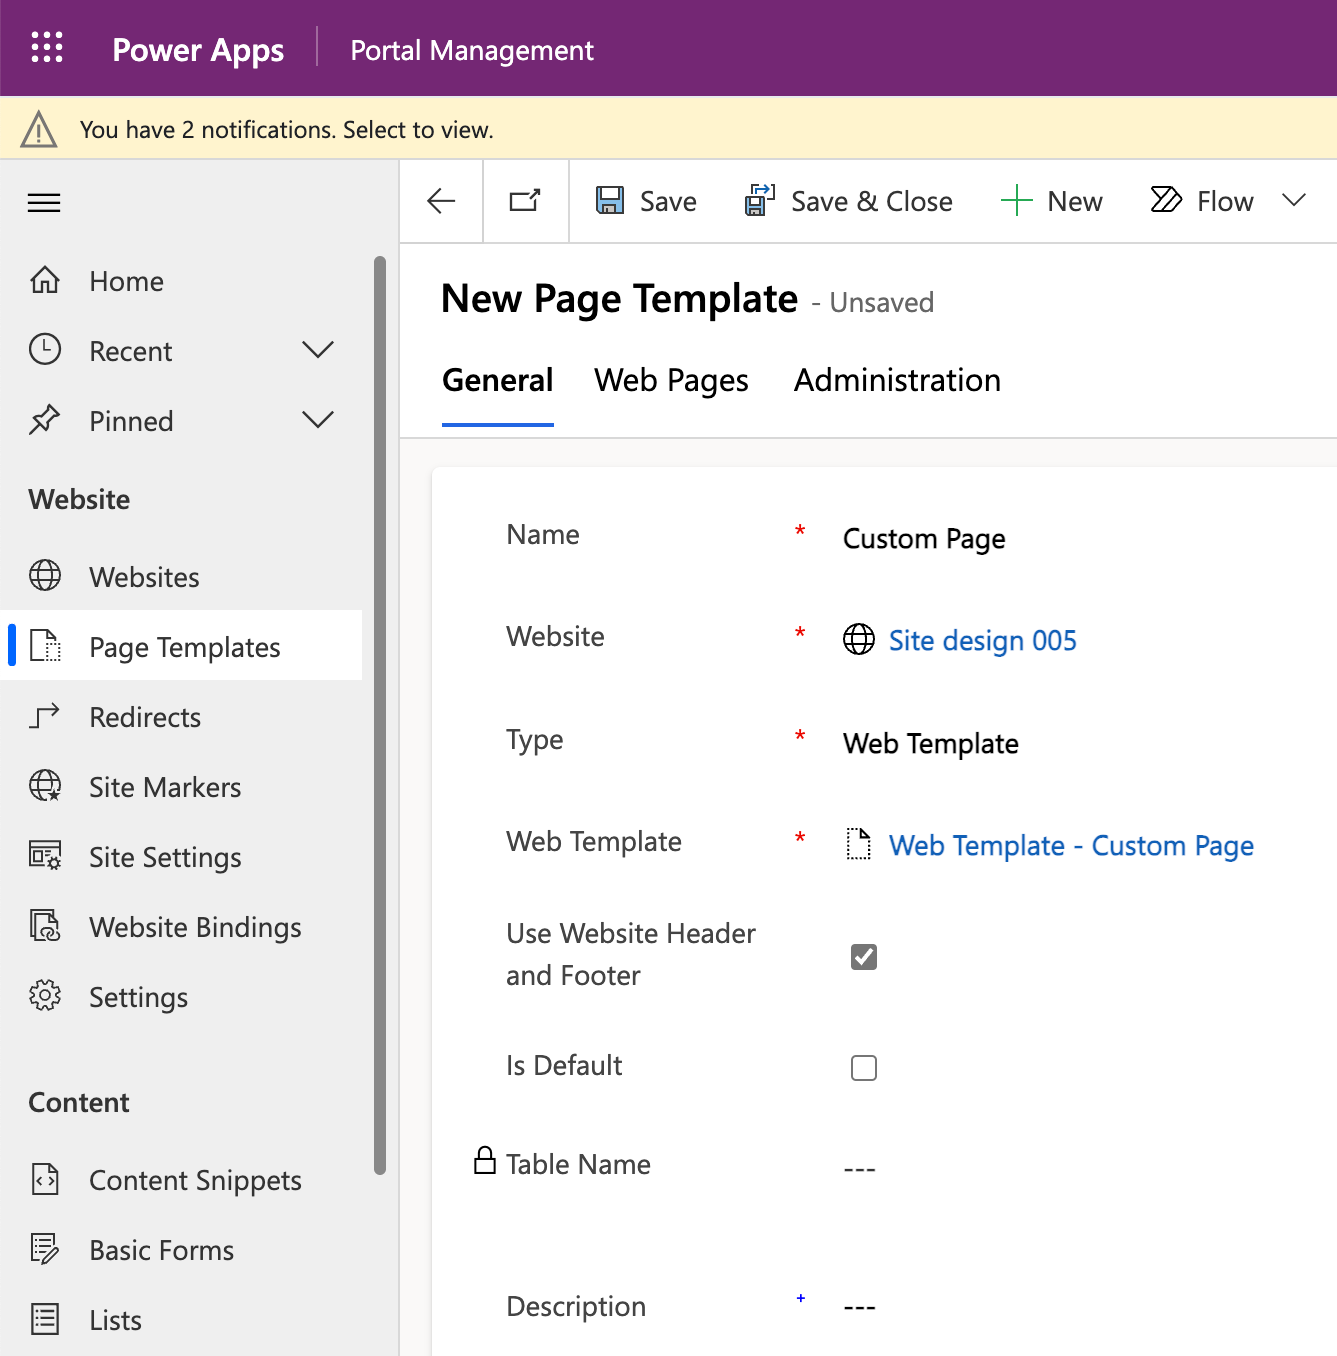
- After creating a web template record, you can now create an associated page template. Scroll to the Website section in the Portal Management app and choose Page Templates (Figure 9). Again, fill in the necessary fields, selecting the web template you created earlier as the template for your code.
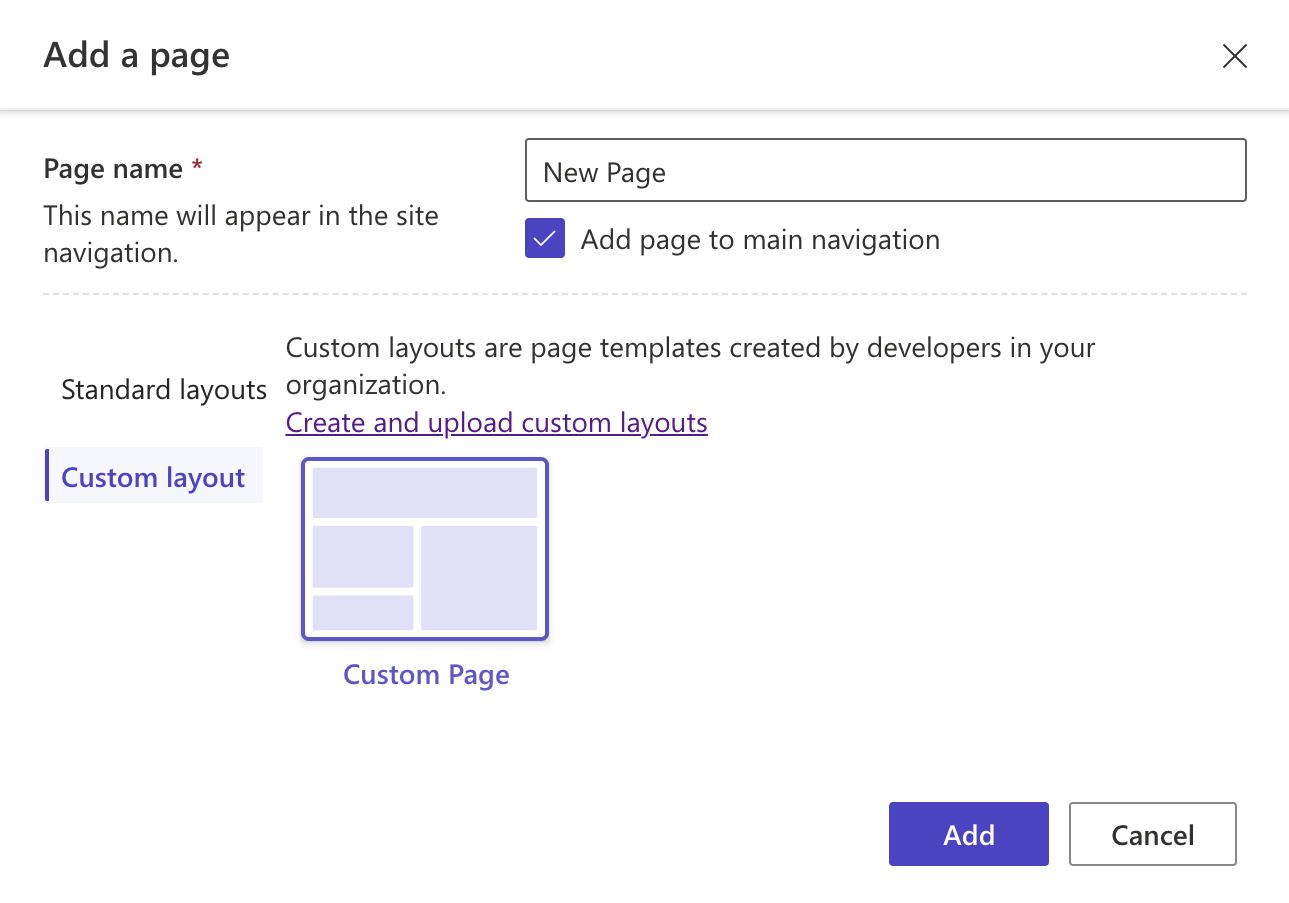
- Once both templates are created, you can apply them when creating a new page in the Pages workspace of the design studio. Choose the custom layout you created during the “Add a Page” process (Figure 10) and preview the new custom page on your site.
Create and Use Code Components With Power Apps Component Framework
Code-based components, also known as Power Apps Component Framework (PCF), are custom components that developers can create to enhance the user experience within Power Apps applications and Power Pages. These components can be used to visualize data, display graphics, create custom user interfaces, and more. Code-based components can be used in model-driven and canvas applications as well.
Microsoft created a series of tutorials that teach you how to create a PCF component. These tutorials guide the user through the steps to create and use these types of components.
One of these tutorials shows how to create a component to customize a Dataverse linked field within Power Pages. The tutorial uses the Feedback table and the Contact Us web page, which are available in Starter layout templates.
You can find this tutorial at https://learn.microsoft.com/en-us/power-pages/configure/component-framework-tutorial.
Code-based components can also be added to Liquid templates using the Liquid template tag for code-based components. The code of the component to be loaded is passed using the name attribute. The code can be the component ID (which is the ID of the code-based component) or the name of the code-based component imported into Dataverse.
{% codecomponent name: <ID or name> <property1:value>
    <property2:value> %}
This opens many scenarios. For example, you can create a map-type control and place it where you want it within your template.
{% codecomponent name:abc_SampleNamespace.MapControl
    controlValue:'Space Needle'
    controlApiKey:<API Key Value>%}
Or you can create components to interact with the Dataverse API and display this data in a completely custom way, like the example implemented by Microsoft at https://learn.microsoft.com/en-us/power-pages/configure/implement-webapi-component.
In the portal Web API component example, remember that your portal version must be 9.3.10.x or higher and your startup portal package must be 9.2.2103.x or higher. Also, you must enable the site setting to enable the portal Web API for your portal.
Managing ALM in Power Pages
The application life cycle management (ALM) within Power Pages holds significant importance for developers. Leveraging either Azure Pipelines or GitHub Actions in conjunction with the Power Platform CLI facilitates the inclusion of metadata in source code control and its seamless dissemination across diverse development environments.
As previously mentioned, Power Pages readily embraces the Power Platform CLI, thereby enabling the realization of continuous integration and continuous deployment (CI/CD) strategies for website configuration. Through such deployment methodologies, website configuration becomes amenable to source code control, enabling its migration across environments with the aid of the Power Platform CLI.
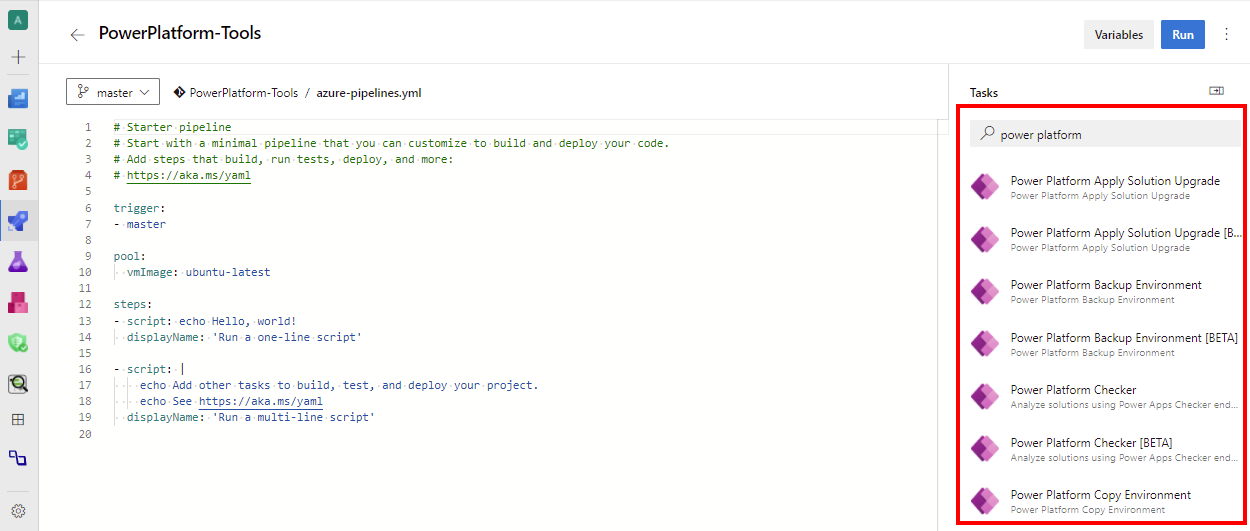
You can decide whether to use Azure DevOps or GitHub. In the case of Azure DevOps, you can create an Azure DevOps pipeline (Figure 11) by first going to use the “Power Platform Download PAPortal” task to download the code and metadata into DevOps and then the “Power Platform Upload PAPortal” task in case you want to upgrade the code and metadata from DevOps to Power Pages.
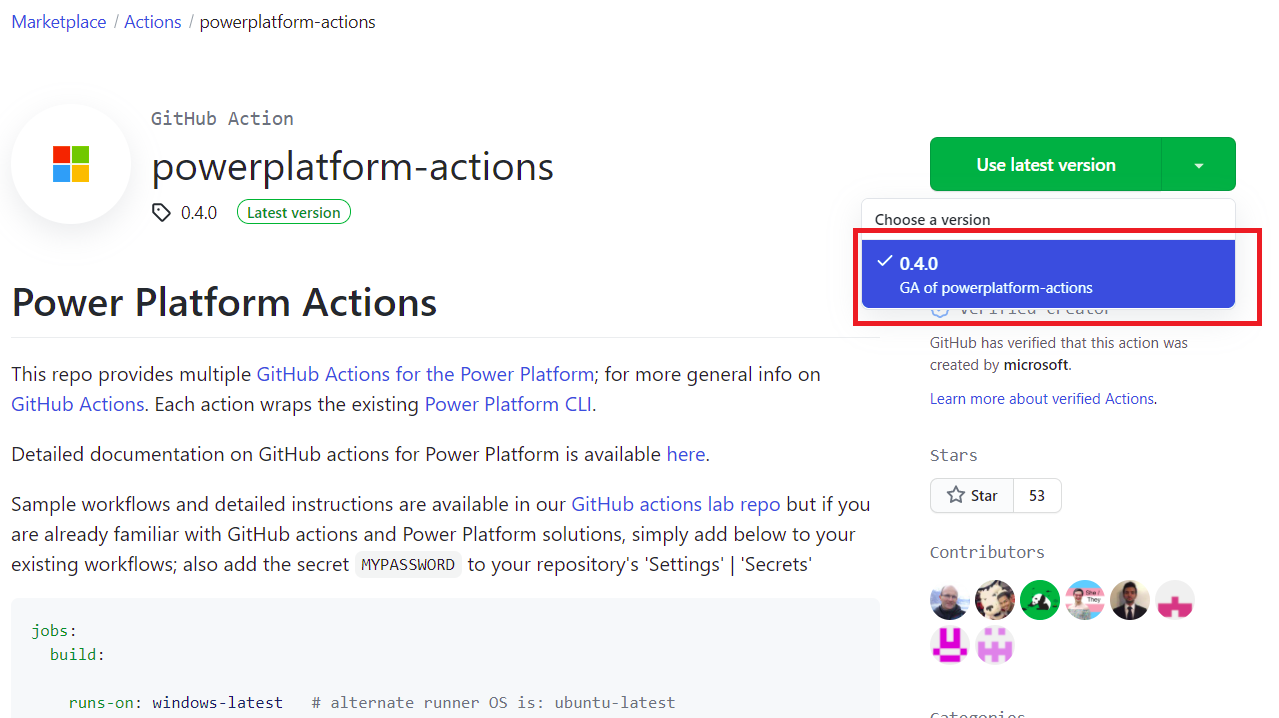
In case you want to use GitHub instead, you can use specific actions found in “powerplatform-actions” (Figure 12) such as “upload-paportal” to interact between GitHub and Power Pages.
Using Solutions in Power Pages
Solutions in Power Pages, which are currently in preview, allow developers to contain and transport all website configurations across standard Power Platform solutions. You can combine all website and Dataverse components into a single solution, then download and install the solution in different environments.
Or, with the Power Platform CLI, you can leverage advanced application life cycle management (ALM) capabilities to deploy websites to target environments using managed solutions, allowing the life cycle of a Power Pages Portal to be managed in a very practical way.
To do this, you must have two Power Platform environments in which the new enhanced data model is enabled. The new enhanced model for Power Pages, currently in preview, offers faster setup, improved design experiences, streamlined application management, and an efficient update process, using a mix of various table types. One of the environments must be designated as the source and the other as the destination.
To create a solution containing a Power Pages site, you need to perform a few steps:
- Open the main page of Power Pages.
- On the left side panel, select the Solutions, see Figure 13.
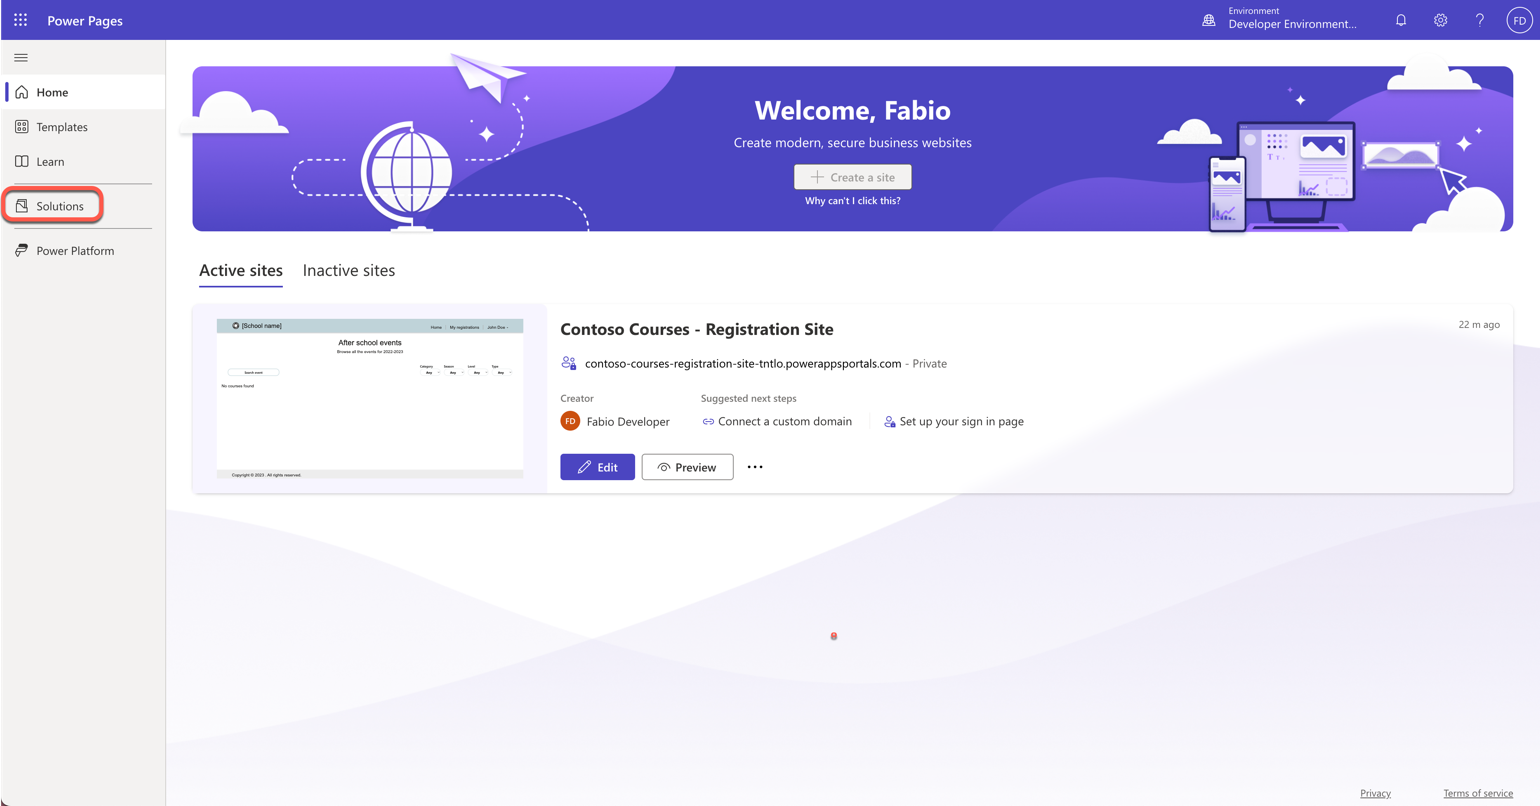
- In the toolbar at the top of the page, select “New Solution”. Fill in the details of the solution and then select Create.
- Navigate to the new solution.
- In the Add existing menu, select Site, as in Figure 14.
- In the Add Existing Sites panel, select one or more sites, and then select Add.

When you create new components and add them to your website, they are not automatically added to the solution that contains a site. You will have to manually add them to the solution. At this point, all that remains is to export from the source environment and import the solution into a new environment. Once the import is successful, you need to activate the site in the target environment.
Now, using solutions, you can use another interesting mechanism – pipelines, which are also in preview – and allow automating the process of deploying websites from development environments to target environments such as testing and production.
To use solutions to deploy websites, again, you must have at least two Power Platform environments that have the advanced data model enabled. One is designated as the source and the other as the target. You can have multiple target environments depending on your configuration. For example, you might have test, staging, and production environments.
Each environment requires a site that has been created using the new enhanced data model. In addition, you need to configure a pipeline from your development environment to the corresponding target environments, as in Figure 15.
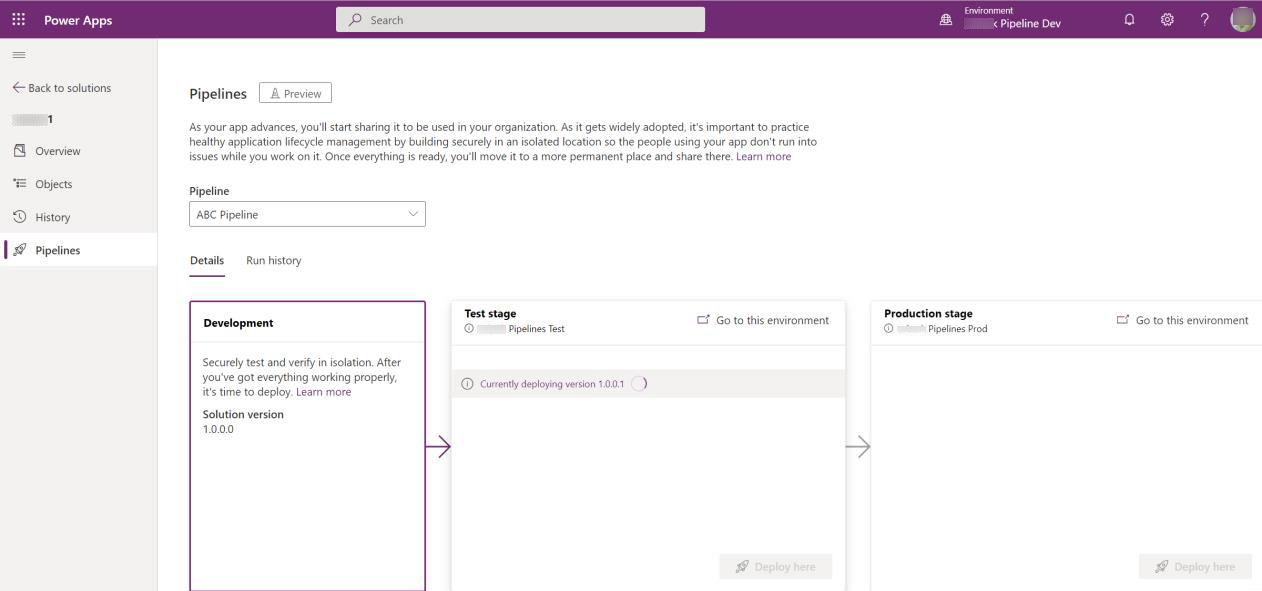
In the development environment, you can create and configure the website and add the website to a solution. In the solution, you can select the pipeline icon in the side toolbar and then select a pipeline from the drop-down menu and choose whether you want to deploy immediately or schedule the deployment for a later time.
After you click Deploy here, you will be taken to a summary screen where you can edit the version number and deployment notes, and then do the actual deployment. This built-in mechanism allows you to transport solutions between environments and to reuse a package for development, testing, and production.
Summary
The Power Pages platform allows developers to quickly and easily create customized web portals. It provides a low-code development environment that enables power users to make feature-rich websites without extensive coding knowledge. With a range of pre-built templates and components, developers can rapidly prototype, iterate, and deploy web portals, saving time and effort in the development process. With robust security features, fine-grained access control, and data encryption, you can trust Power Platform to ensure sensitive information is protected and only accessible to authorized users. Professional developers can leverage their familiar tools and processes to create sophisticated, data-driven applications, delivering value to organizations more efficiently than traditional development approaches.
As developers, we find rapid prototyping and iteration to be among the primary advantages offered by Power Pages. We can focus on building functionality and delivering tailored user experiences, while the platform handles underlying infrastructure, security, and complexities. By using Power Pages, we can benefit from seamless integration with other services and tools.
Of course, you must look at the individual functions in detail when using the Power Pages. We hope this article has helped you to better understand the concept and use cases of Power Pages. The examples show how you can use the platform to create website solutions for your organization's business processes and needs. You can find the Contoso sample with the course portal on GitHub at https://github.com/tonipohl/PowerPagesCodeMagazine.
With Power Pages, you create compelling user experiences, all while maintaining security and compliance standards!
