


Microsoft Power Automate is one of the core products of Power Platform, our low-code suite of cloud tools and services. Power Automate supports organizations and users to implement workflows, increasing productivity, reducing manual workloads, and the margin of human error - thereby optimizing business efficiency.
Whether you have a lot of experience in software development or you are just getting started, you'll find that Power Automate has the building blocks you need. Do you want to manage complex processes for your organization? You can build them by dragging connectors and configuring them to perform actions such as sending an email, starting an approval process, interpreting sentiment and much more, without writing code. Prior to Power Automate, this would have been hard to even imagine.
People without a solid development background can retrain in the workplace and find a rewarding new job. While developers could use their development skills to support “citizen developers” (people without a coding background who create low-code solutions), for example, by implementing custom connectors to integrate custom applications with Power Platform. Or professional developers can use Power Automate to do many of the repetitive tasks so they can customize the applications while citizen developers do the bulk of turning business ideas into processes.
What Is Power Automate, and How Does It Fit into Power Platform?
Power Automate is a cloud-based service that allows people at organizations to create workflows. Essentially, Power Automate harnesses over a thousand connectors to facilitate the integration of various services into your Power Platform solution.
A connector is a wrapper around an API that allows services to talk to Microsoft Power Automate (and Microsoft Power Apps, and Azure Logic Apps). Power Automate offers users the ability to connect their accounts and utilize pre-made actions and triggers to create their own applications and sequences of tasks.
You can find more details about connectors here: https://learn.microsoft.com/en-us/connectors/connectors
A Power Automate flow lays out what happens when triggers start, connecting them to actions. A Flow can be triggered when an inbox receives an email, or when a row is created in a SharePoint list, or in any supported database. I'll describe flows in the next section.
You can use Power Automate to integrate many services and applications, including many not made by Microsoft, or you can use Power Automate to use services of Microsoft 365 products like Planner, Forms, Lists, SharePoint etc., but with every service by their connectors.
Explanation of Examples
I will walk through two examples to demonstrate some use cases for Power Automate. By the end, you'll have the confidence to know how to build flows in Power Automate.
Example one explains how to process an invoice received via email using AI Builder and store information in a Dataverse table. You should read it if:
- You've never created a Power Automate flow.
- You're interested in AI Builder.
- You want to see how to create and store data in a Dataverse table.
Example two demonstrates how to leverage Power Automate Desktop to make a flow perform actions, normally carried out by a user. You should read it if:
- You want to understand more about Power Automate Desktop.
- You do repetitive tasks every day and want to automate them.
Let's start!
Key Concept: Trigger, Cloud Flow, and Connectors
Let me explain some key concepts, common to all flows, which will allow you to better understand this article and Power Automate.
Every flow must have a trigger and at least one action. What are they? How do they interact? In short, the trigger starts the workflow, connectors allow the flow to interact with external applications, and actions specify what to do during the automation process.
- Cloud flow: A cloud-based workflow that I will demonstrate how to implement. Cloud flows reside directly on the cloud and are automatically activated depending on the trigger.
- Trigger: This is the event or triggering action that starts the flow (Figure 1).
- Actions: These are what you want to happen when the flow starts. You can add more actions to design your flow. Every action can have parameters.
- Connector: These allow a flow to communicate with a service, via API, and leverage a set of prebuilt actions and triggers.
- Solution: A sort of “package” where you can bundle all components that make up your solution. Customizers and developers use solutions to create, bundle, and manage software components that enhance Microsoft Dataverse.

Power Automate lets you create three types of cloud flow:
- Automated cloud flow: A flow that runs automatically where an event is triggered. This happens when, for example, you receive an email, someone posts a tweet, someone creates a file, updates a document, etc.
- Instant cloud flow: A flow can start when someone clicks on a button. This is usually used to do repetitive tasks instead of the user, who basically starts the flow with a click. For example, this happens when someone requests an approval, sends a notification, etc.
- Recurring flow: A flow that starts at a particular time such as every day, every week, etc. This flow execution start is independent of human actions. These flows could, for example, import some data every day or run and distribute a report at a scheduled interval.
Example One: Create a Cloud Flow to Process an Invoice With AI Builder From an Email Attachment and Store It in Dataverse
Let's start with example one! I will walk you through creating a flow to process an invoice from an email attachment, retrieve information from a PDF or image by means of AI Builder, store the information in Dataverse, and use a Power Apps application to see them.
AI Builder is a feature of Power Platform that provides artificial intelligence models designed to optimize business processes. AI Builder allows you to leverage artificial intelligence for your processes without specific expertise in this field. It is possible to create custom models based on your own needs or choose a prebuilt model ready to use for many common business scenarios, which is what we'll do here.
These examples assume that a solution is already created and that you know what it is. To read more information about solutions, see this link: https://learn.microsoft.com/en-us/power-apps/maker/data-platform/solutions-overview.
Create Dataverse Table “Invoices”
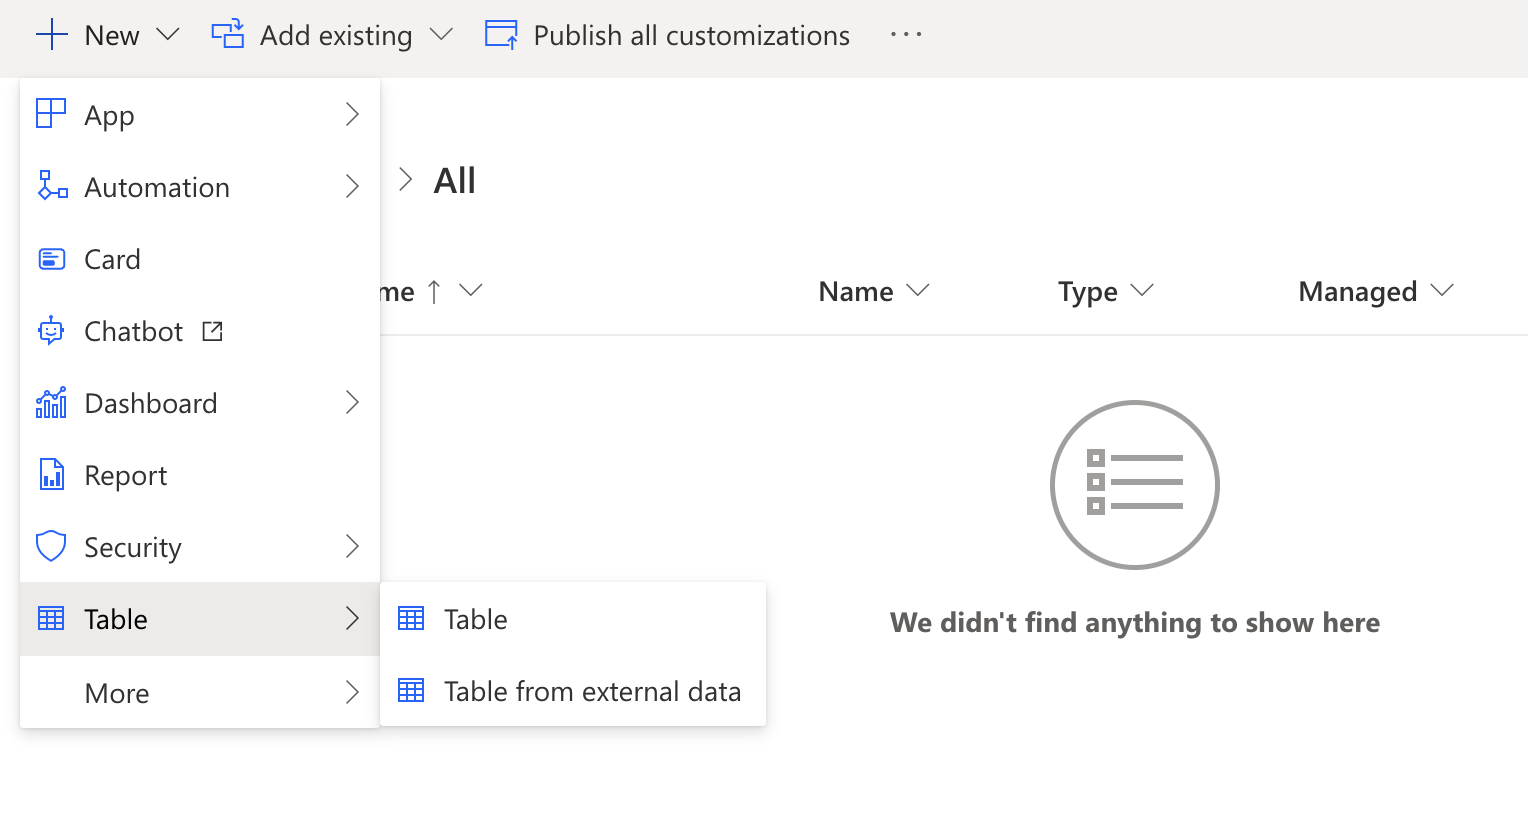
First, you'll create a Dataverse table to store your invoice data. At the top of the form (Figure 2) click + New and from the Table menu option choose Table.
Enter the display name for the table. For this example, I'll call it Invoice.
Now I need to create columns to store the invoice data (no spaces are allowed in the column names):
- Customer
- Date
- PaymentTerms
- DueDate
- Subtotal
- Total
- TotalTaxes
On the Invoice table, you can see other column names (Figure 3) created by default.
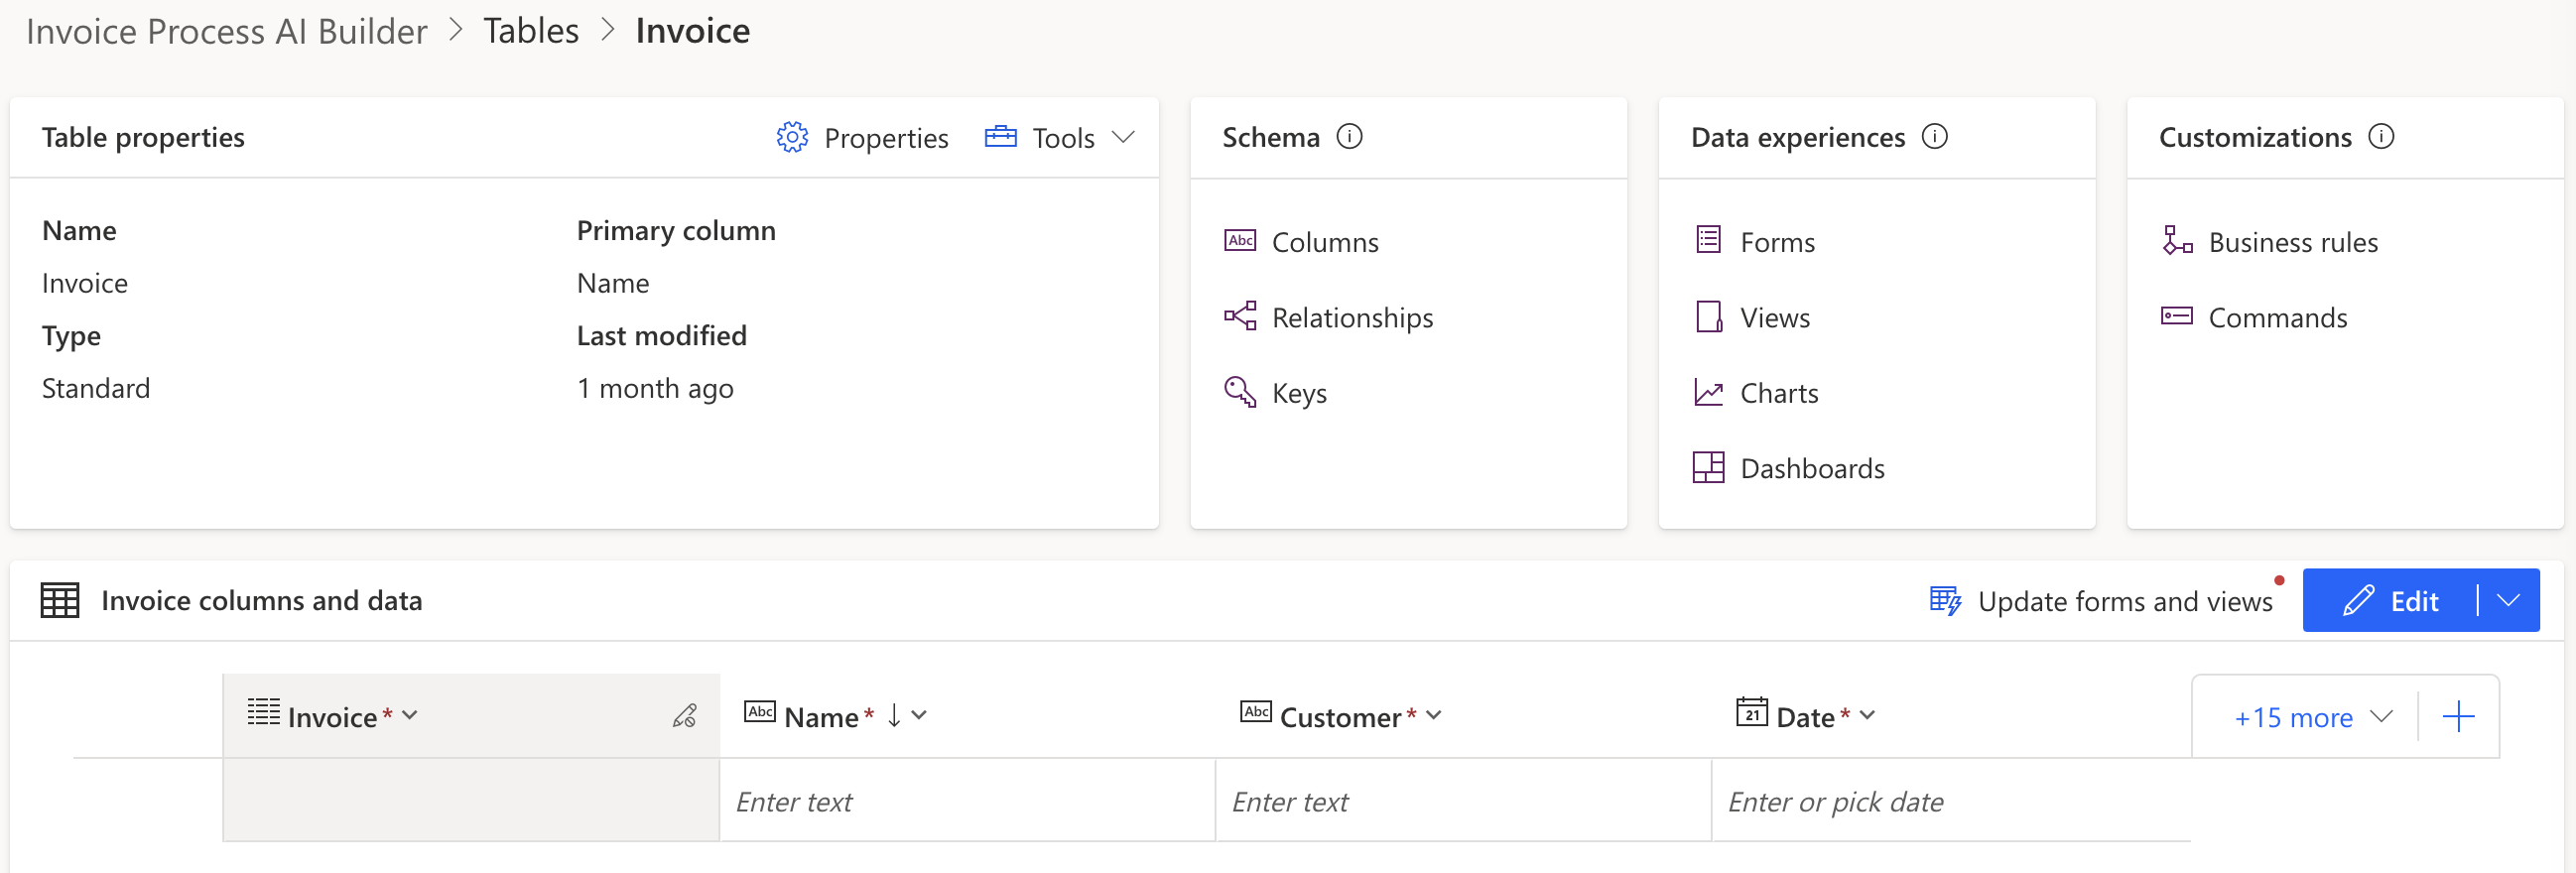
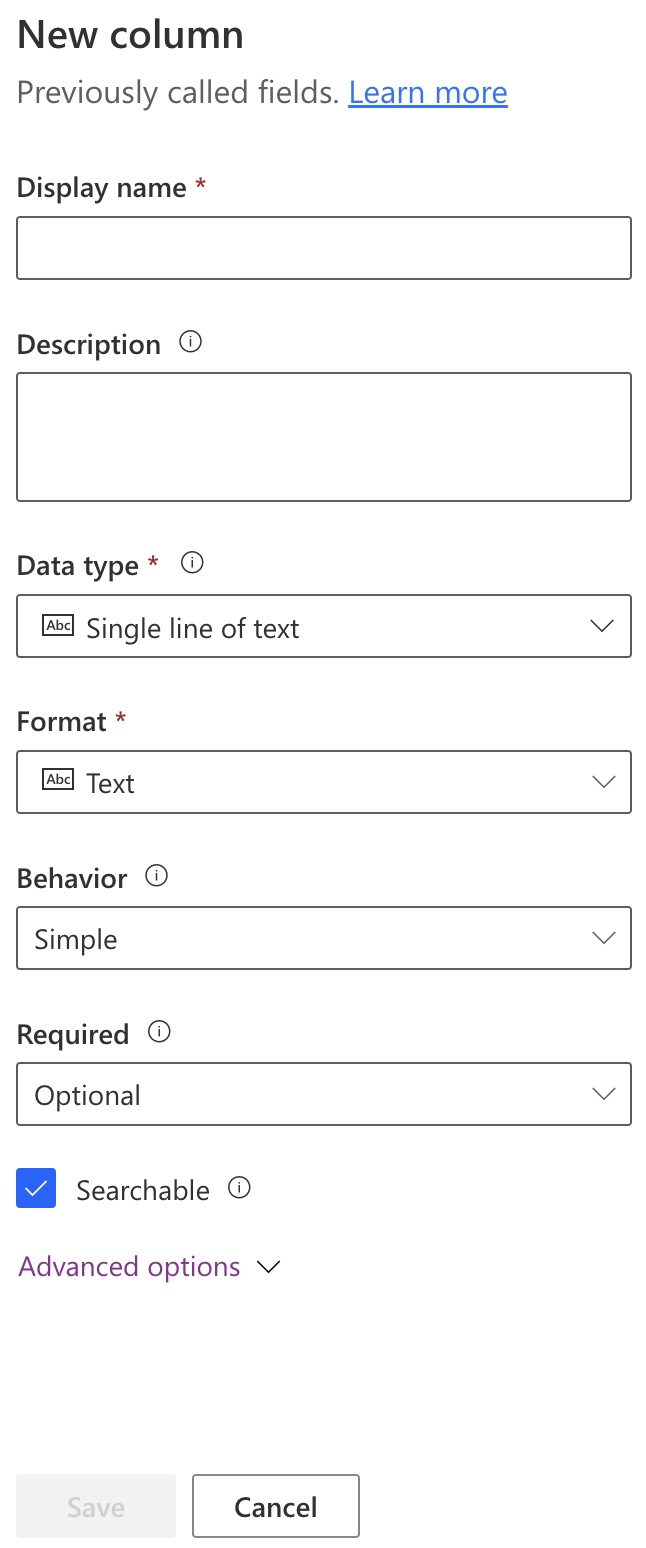
To create a new column, click “+” on the bottom right below the Edit button (Figure 3), write the Display name, set the correct data type (Figure 4), and (at the bottom of the form) click Save. Repeat this for the other columns in the bullet list above.
When you've created all columns, go back to the solution page and then go to the next step to create a flow. Click All at top left to come back to default view of our solutions with all elements.
Create a Flow
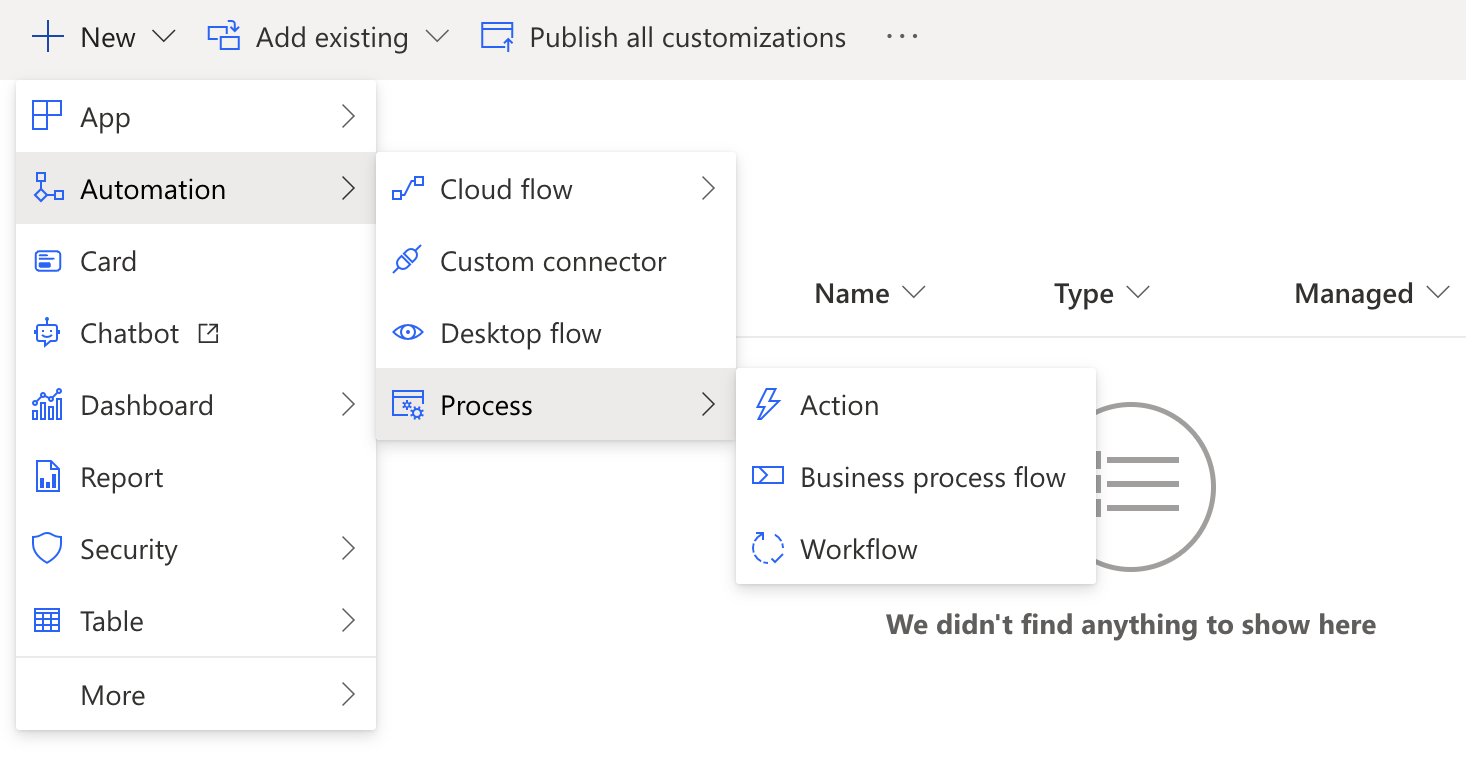
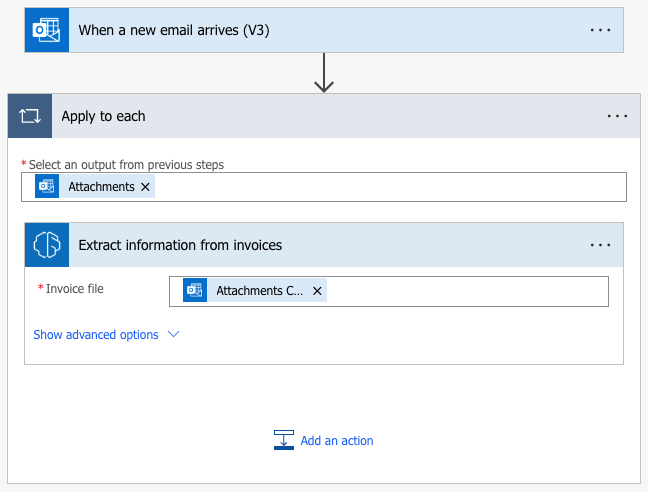
Now you want to create a flow. At the top pick New and then, from the menus (Figure 5), choose Automation > Cloud flow > Automated. Now type a name for the flow and choose a trigger. I named my flow Invoice Process Flow, and I selected the trigger, "When a new email arrives (V3)".
Now, I'll configure the properties of the trigger (Figure 6). In order to test the flow, I can use default parameters except for the one named Include Attachments. I'll set that to Yes. In a real-world scenario I would also set the From parameter to specify, for example, that it starts the flow only if the sender's email address is from a known customer.

With the trigger parameters modified, I'll click Next to add some action to do when a new email with an attachment arrives. In this way, I am drawing the flow (Figure 7). When I click New, I can search and choose from hundreds and hundreds of connectors. Keep in mind that if you see a diamond near the connector, it is a premium connector that needs a paid license.
I'll search for the action named Extract information from invoices (it is an action of the AI Builder connector) and add it to the flow (Figure 7). It's a premium connector, so if you don't have a license, you can start a trial to test it. This connector analyzes a PDF or image and gets information with the correct datatype.
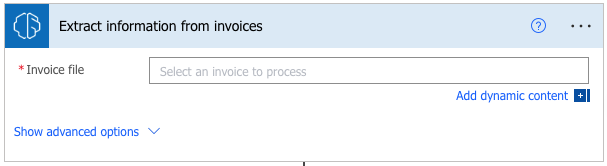
This action uses a prebuilt AI model for invoice processing. It can automatically extract important information from invoices. This model specifically focuses on identifying and understanding commonly found details such as invoice ID, invoice date, and the total amount payable.
Read official documentation (https://learn.microsoft.com/en-gb/ai-builder/prebuilt-invoice-processing) before you use it. There are a few things to consider:
- File format and size: The image format must be JPEG, PNG, or PDF and size must be less than 20 MB.
- PDF size: PDF dimensions must be at most 17 x 17 inches and the connector can only process the first 2,000 pages.
- Supported languages: Dutch (Netherlands), English (Australia), English (Canada), English (India), English (United Kingdom), English (United States), French (France), German (Germany), Italian (Italy), Portuguese (Portugal), Spanish (Spain)
In a real-world scenario, you should check the file format and size before passing the attachment content to the connector.
Since the connector uses a prebuilt template, it has a lot of ready-made fields to use when the connector detects an invoice, like amount, billing address, customer name, due date, etc.
Now you must specify the Invoice file parameter of the action, selecting the email attachment. Since the email could have more than one attachment (an array of attachments), Power Automate will create a loop to cycle through all attachments (Figure 8).
What's the next step? We want to get information (remember those columns created earlier) from the Extract information from invoices action and create a new Dataverse row:
- Click Add an action and then choose Add new row.
- Select the Microsoft Dataverse connector to add a new row.
- Select the Invoice table (created earlier) and on the
Table nameparameter click Show advanced options so the connector shows every field of the Invoice table.
Now, we'll map every field from the AI Builder connector action to the Add a new row action of the Dataverse connector (Figure 9).
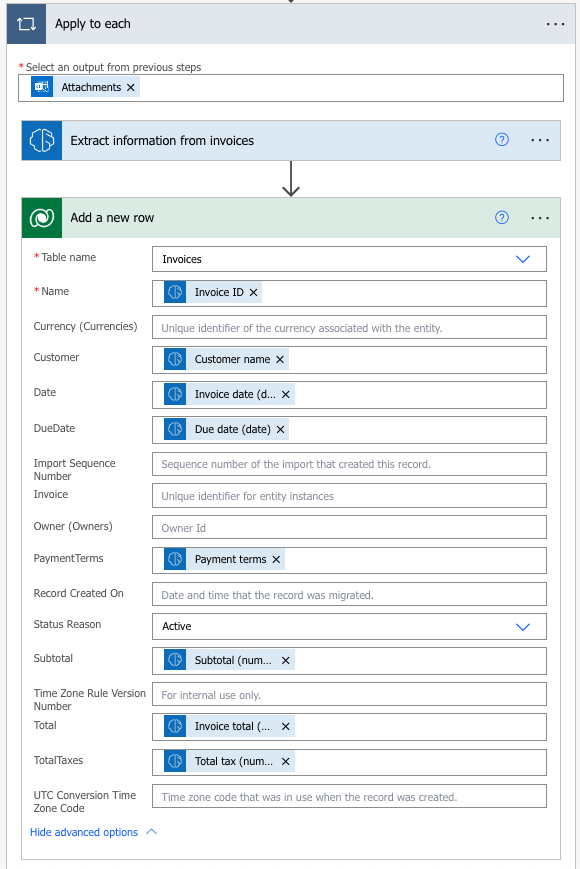
For the Invoice parameter, the table needs a valid GUID so I used the guid() function to generate a random value.
Test the Flow
Click the Test button at the top of the Power Automate designer to test the flow.
You can choose between:
- Manually keep the flow waiting for a start trigger
- Automatically if you want to use previous execution and start again
By testing your Power Automate flow, you can view the execution step by step to identify and fix any potential issues before deploying it in a production environment.
In this case, start with manual testing. Get an invoice example (Figure 10) and send it as an email attachment.
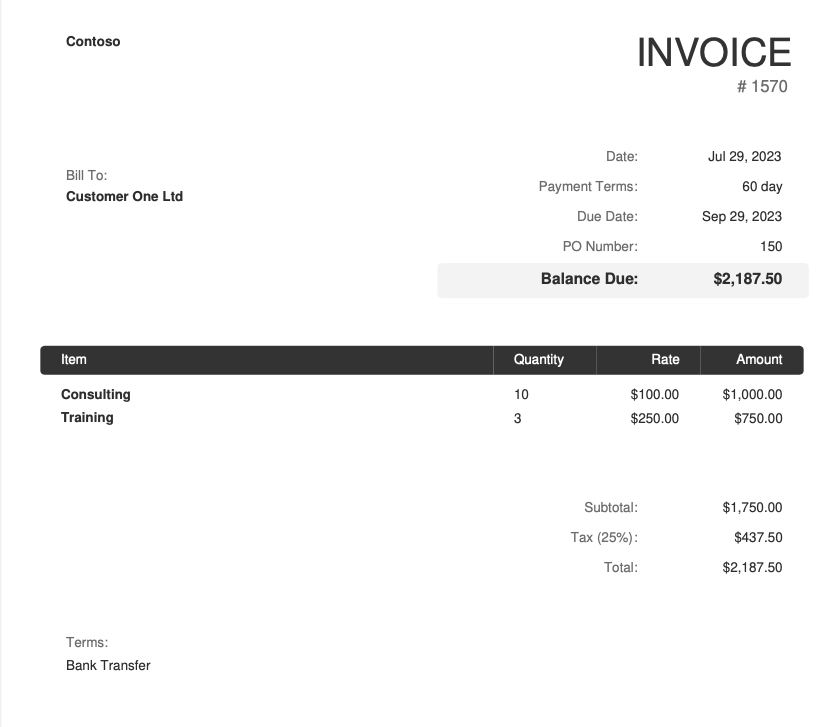
Figure 11 shows the email received.
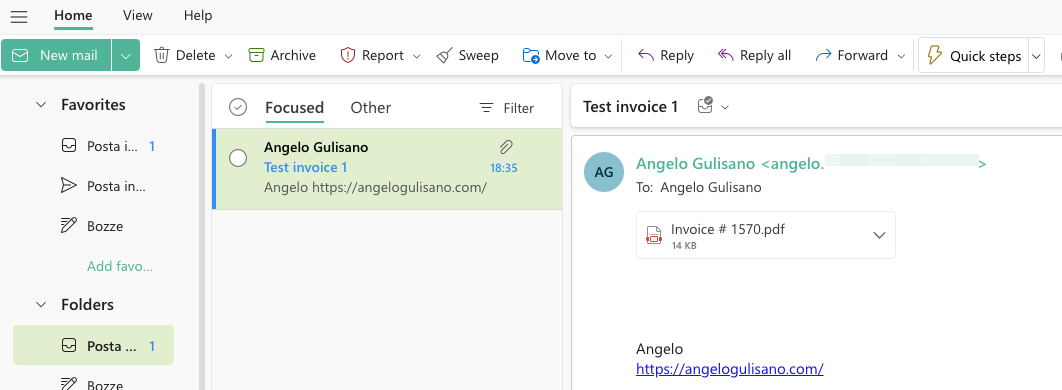
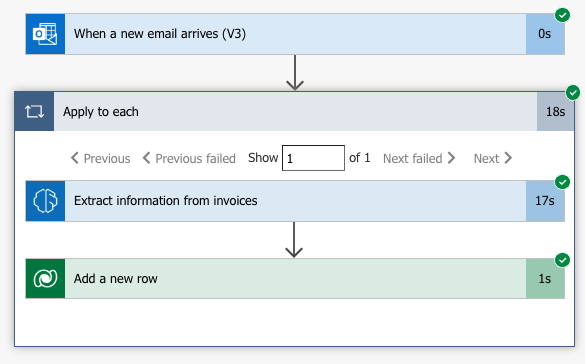
Figure 12 shows that the flow has processed the invoice.
As you can see in Figure 13, AI Builder action was able to get a lot of data with high-confidence level and without any problem.
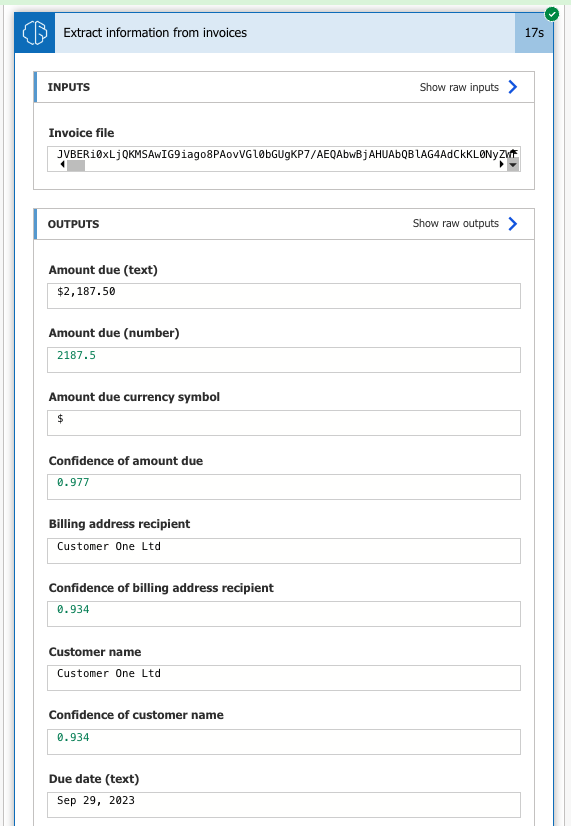
See sidebar, Confidence Level.
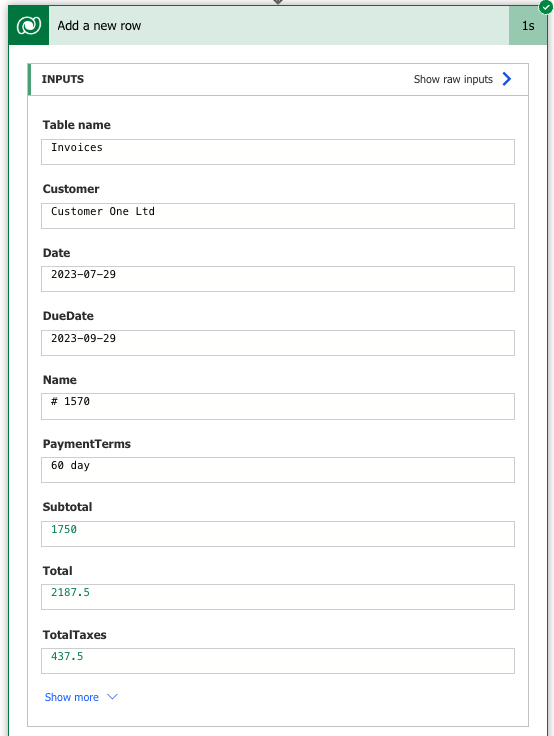
Figure 14 shows the record was created.
With the details of the invoice now in a row of the Invoice table, we can send a Teams notification. After the test is completed, click Edit (Figure 15) at the top right of the flow.

To send a Teams notifications, simply add a new action, and search “Post message in chat or channel.” The action needs you to choose a parameter from a list in the Post in field. You can choose:
- Channel if you want to post in Teams channel.
- Chat with flow bot if you want to post in a chat with a specific user.
- Group chat if you want to send the message in group chat.
- Choose Channel.
- You also need to specify where to post a message. The action requires you to fill in three additional parameters:
- Team: Choose a team. I picked DEV.
- Channel: Choose your team's channel. I picked General.
- Message: Write the message to post. I used values from the “Extract information from Invoice” action (Figure 13) to dynamically compose the message.
The Teams action you added should appear like Figure 16.

Figure 17 shows the result you would see in Teams.
Thoughts About This First Example
You have seen how to create a flow to retrieve the attachments of a received email and, by using AI Builder, extract information from a document using a connector with prebuilt AI models. This receives and stores the invoice data in a Dataverse table and informs users through a Teams notification.
In this example of invoices, which tend to have specific formats, it is possible to take advantage of AI Builder and create a custom model. Basically, you will have to train your model to be able to use it later. To get started, you need at least five documents.
Follow https://learn.microsoft.com/en-us/ai-builder/create-form-processing-model for more information.
Power Automate for Desktop
In addition to cloud flows, you can create desktop flows with Power Automate for Desktop, which is an automation solution of the family RPA (robotic process automation). A desktop flow can be used to perform manual tasks, reduce errors, improve operational efficiency, thus freeing employees to perform higher-value tasks.
People can create and execute desktop flows using the preinstalled Power Automate application included with Windows 11.
Some key concept to know:
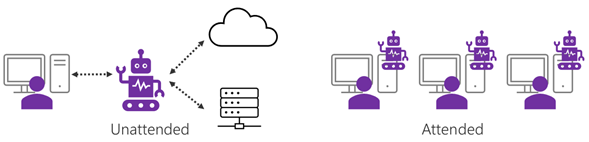
- Attended flow: Run while a user is logged in.
- Unattended flow: Run when a user is signed out.
However, both modes (Figure 18) require the computer to be connected.
An attended flow can be run manually using a desktop shortcut or URL. You can take advantage by using a URL to start an attended flow from a different source, for example, Windows Task Scheduler or a command prompt. For an attended flow, the user must be signed in.
A desktop flow can be started by a cloud flow, using “Manually Trigger a Flow” as a trigger. For example, you can use a tap of a button on your mobile device. I ran a desktop flow from a VM and authenticated to my Microsoft 365 account which is different from the Windows user account I was connected to on my Windows desktop. Keep in mind that to run it in attended mode, you need an active Windows user session which has the same username of your desktop flow connection, and the session must be unlocked. When an attended desktop flow starts the desktop stream starts; don't interact with your PC until it's finished.
- A desktop flow run in Windows 10 or 11, can't be run unattended if there are active user sessions.
- On Windows server, if a session is open by same user configured in as the desktop flow connection, you'll get an error.
How does an unattended desktop flow work? Power Automate facilitates an RDP connection and creates and manages a Windows user session on the target PC. While a flow runs, the screen is in locked state. For more information, see https://learn.microsoft.com/en-us/power-automate/desktop-flows/run-unattended-desktop-flows.
Unattended desktop flows can't run with elevated privileges.
To create a desktop flow, you can drag and drop connectors to draw your flow, or you can record the actions you do, and Power Automate will create the flow for you, generating every single action. When you finish your recording, you can manually edit the Power Automate flow.
Example Two: Stop Manual and Repetitive Tasks! Manage Customer Order Requests From Your Old Software to Power Platform
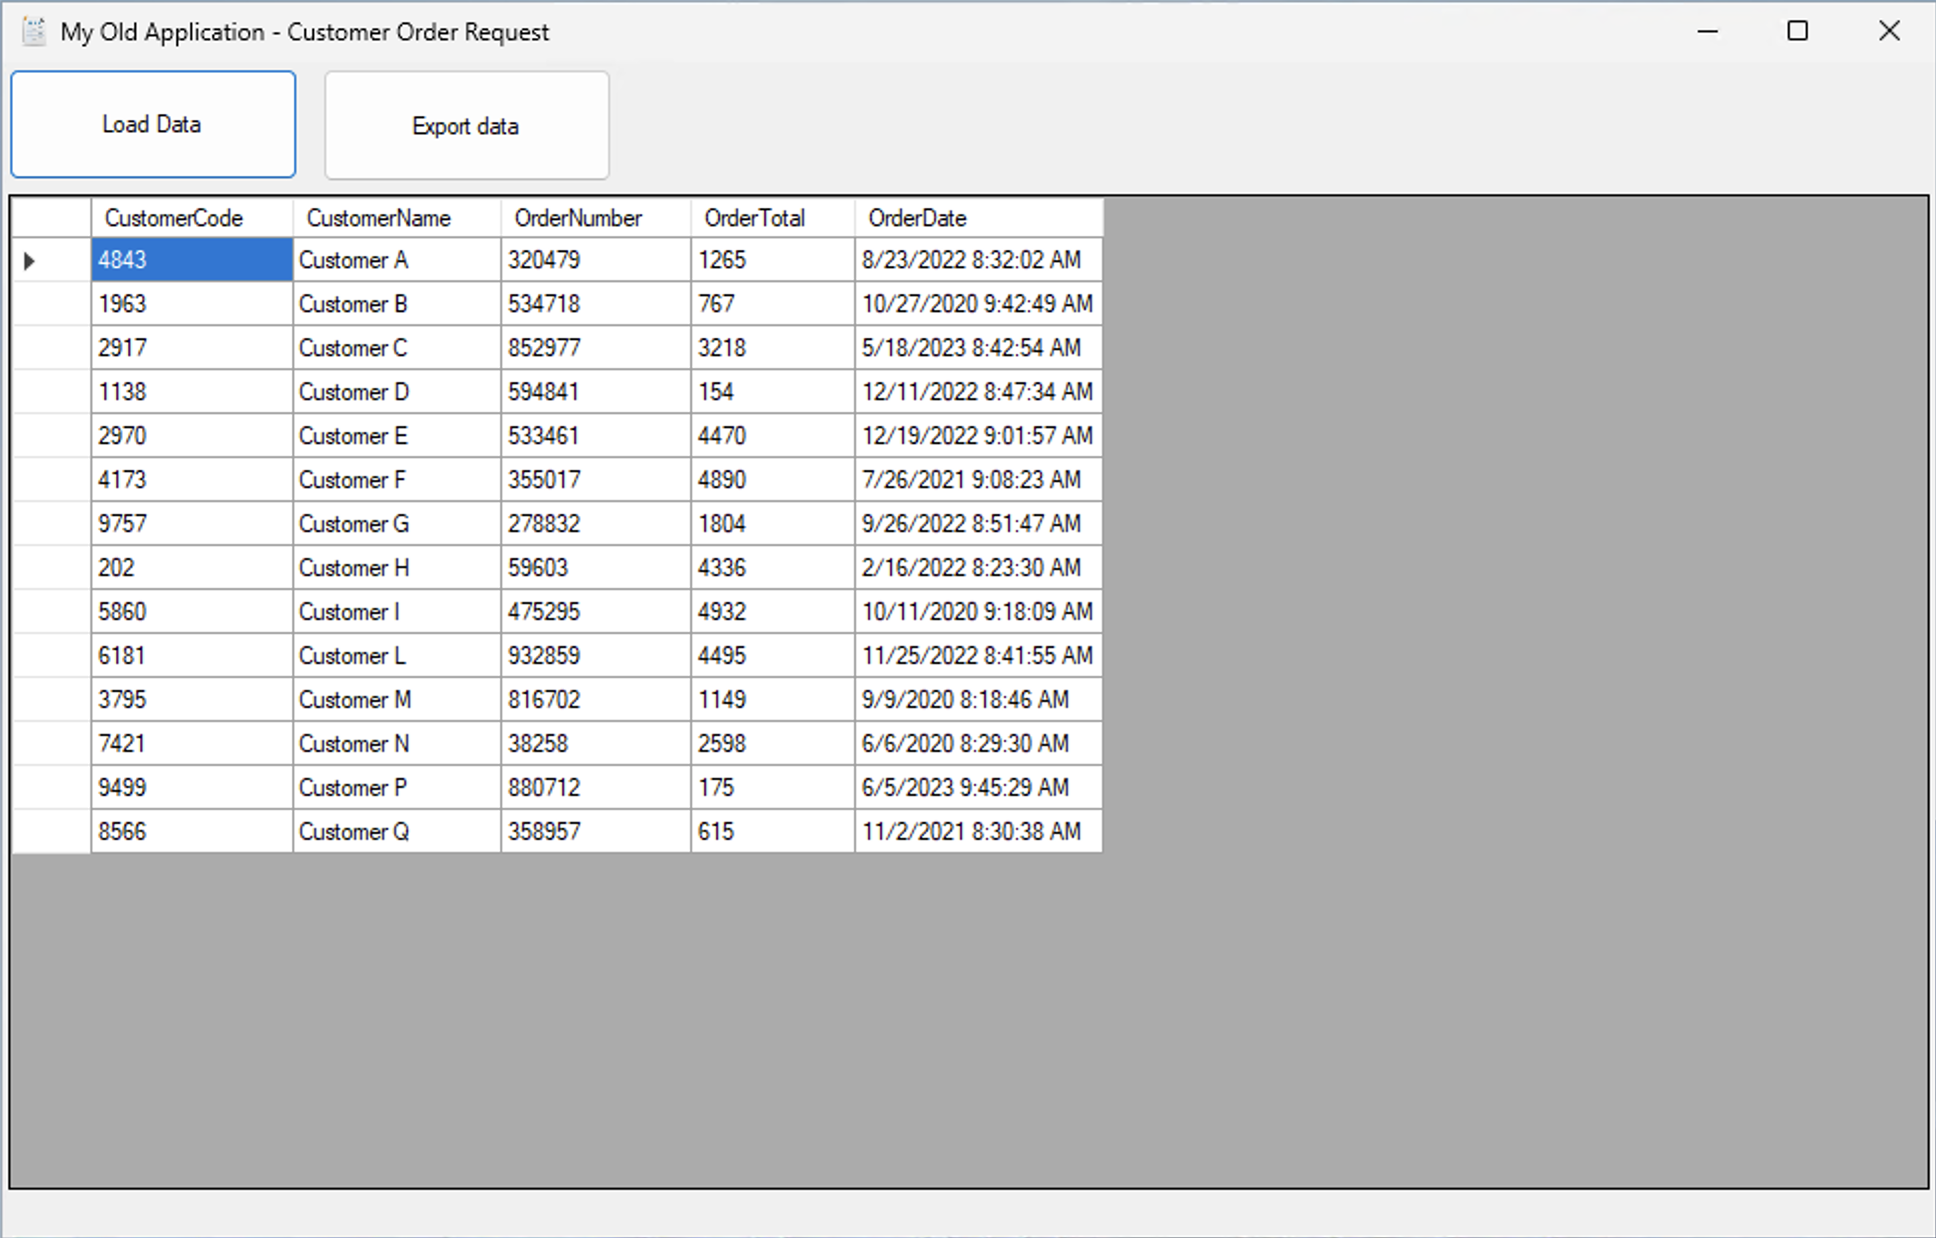
In example two, I'll show you how to leverage the capabilities of Power Automate desktop to open a Windows Forms application, extract data, and import the data into Dataverse to make it accessible to a Power Apps application. I created this sample application specifically for this article, but it represents the typical case of an old desktop application. The desktop flow performs the operation that the operator manually performs.
By “old application,” I mean older software that doesn't expose information or functionality via REST APIs, for which you can't create a custom connector for Power Automate. In my case, I created an example Windows forms application in .NET, but it can also be a web or Windows application, made with other technologies.
Create a Desktop Flow
This example starts by creating a new desktop flow. Open Power Automate desktop and click New Flow. Give the flow a name and click Create. This should open Power Automate desktop flow designer: the tool that allows users to create and troubleshoot Power Automate desktop flows. It provides access to all the necessary features for designing and debugging flows including managing images, UI elements, and variables for desktop flows. The flow designer consists of various components such as the Actions pane, Variables pane, and the workspace (center pane), which provides information about the flow's status and data.
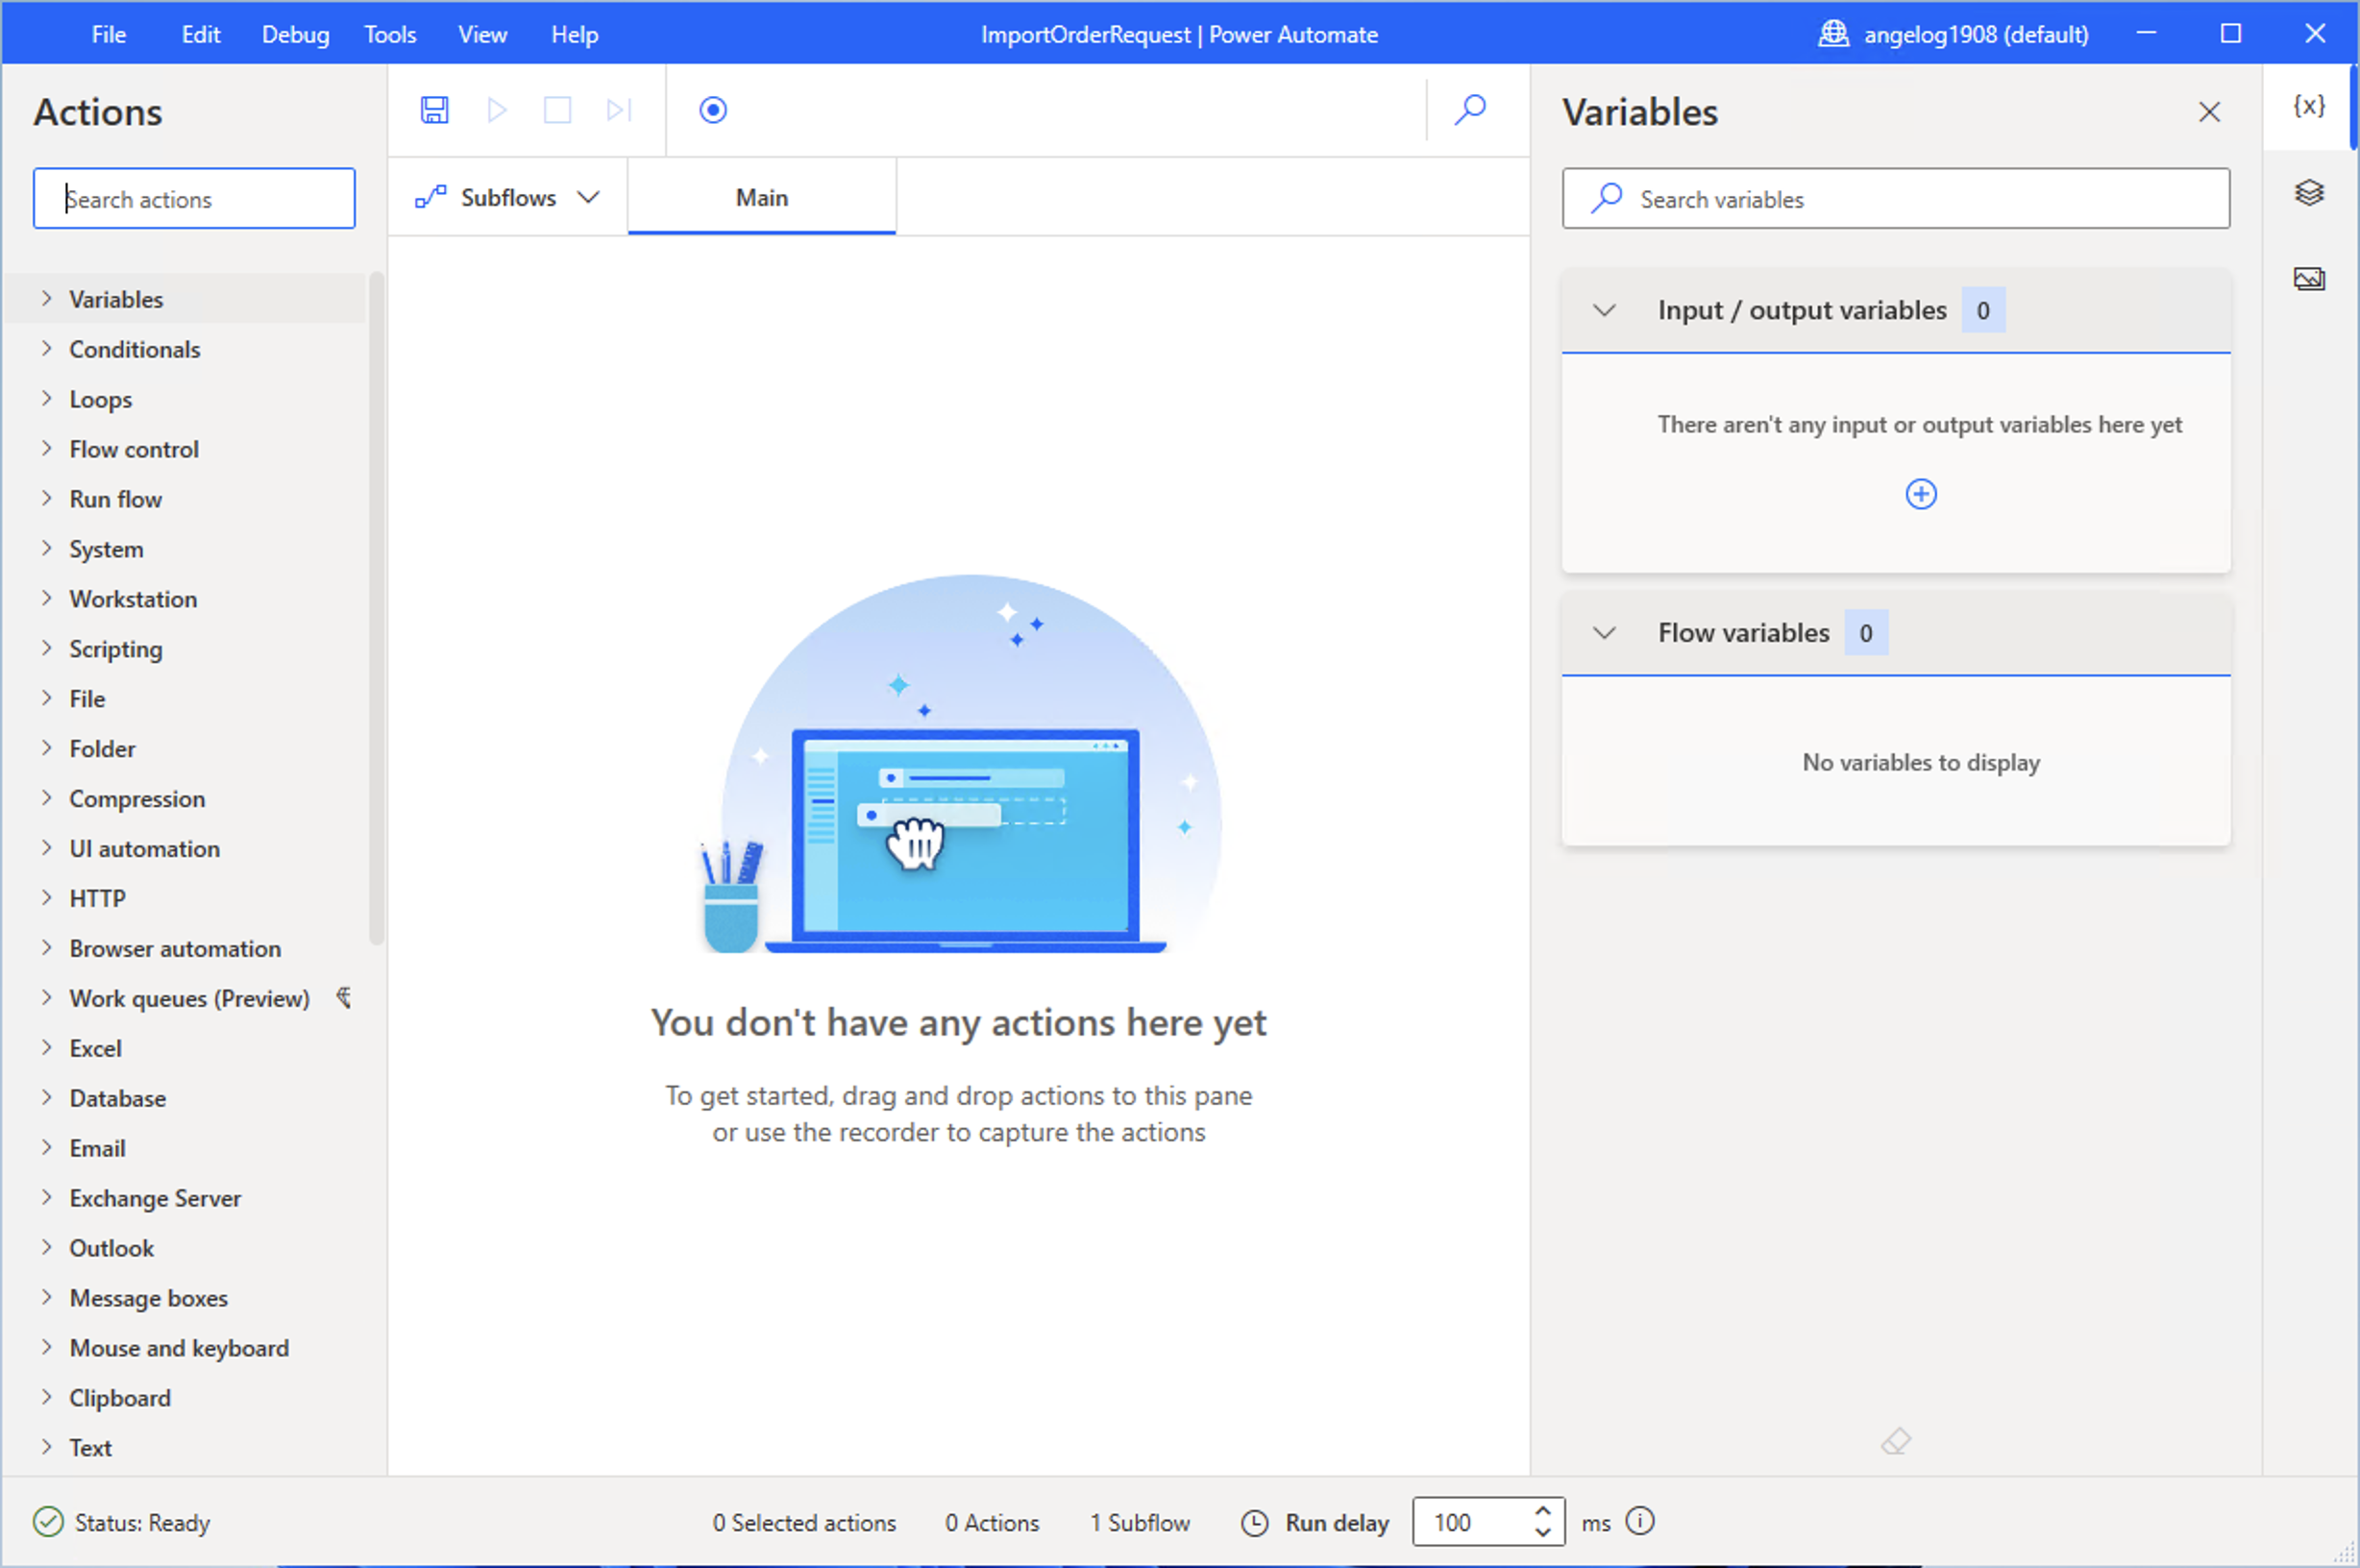
Now, you can choose how to create your flow. You can search for, select, and drag actions from the Actions pane on the left (Figure 19) to the workspace of the flow in the center pane. (The approach is very similar to creating a cloud flow.) Or you can record your actions, which will be automatically converted into the sequence of actions of the flow by clicking the record button (Figure 20).

After you click the record button, Power Automate opens the Recorder window (Figure 21) and you can start recording.
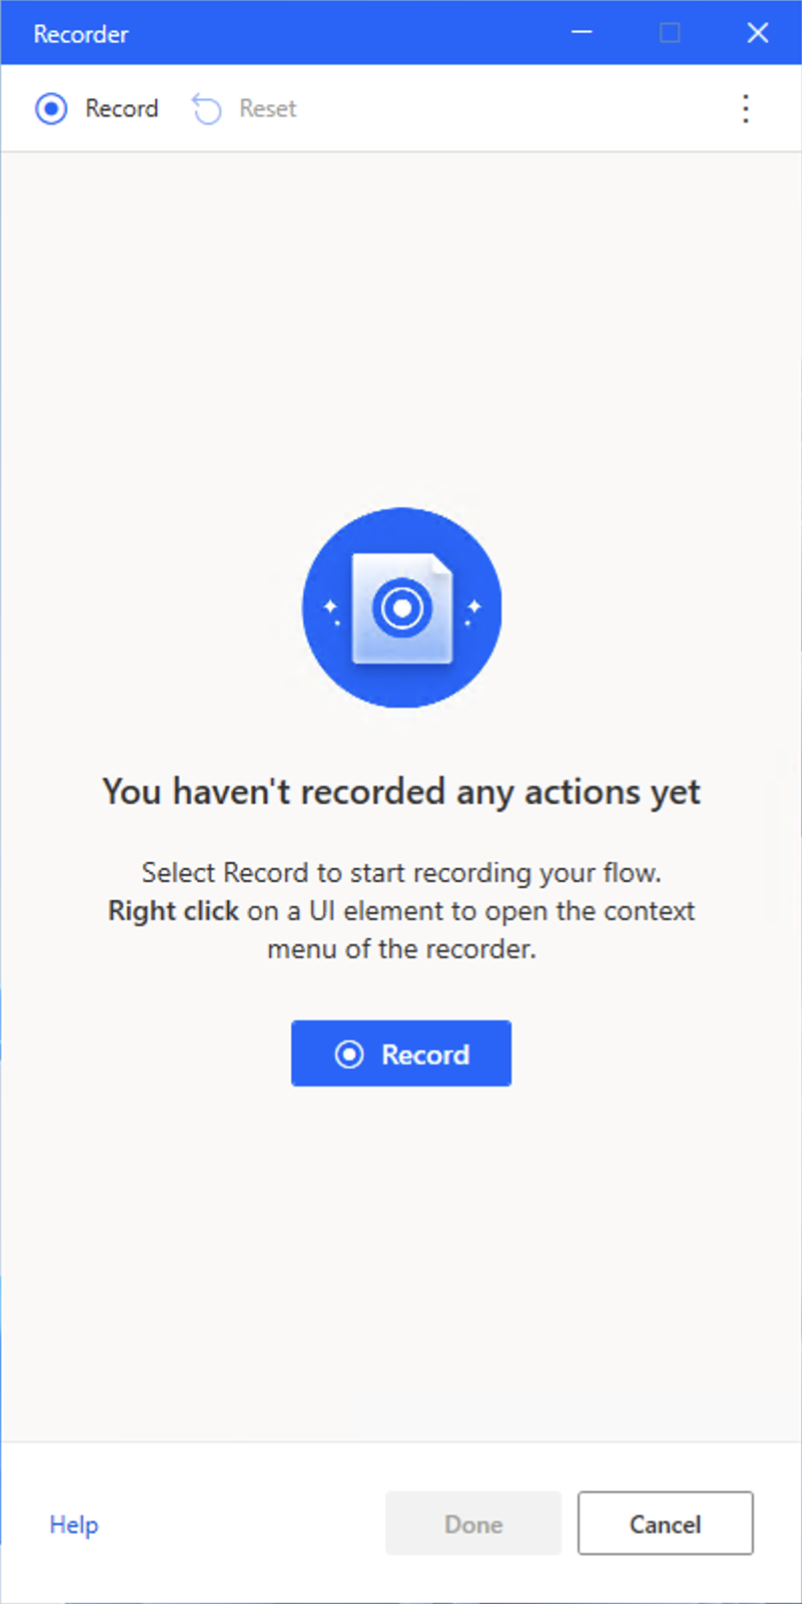
Click Record and do your activities as you normally do. When you finish those activities, come back to the Recorder window (Figure 21) and press Done to stop the recording.
Now, Power Automate has added your recorded activities to your flow (Figure 22).

Of course, the flow created by recording can be modified by adding actions from the left panel.
At the top of the workspace, save the flow and then click the Run icon to execute your flow to test that it works correctly.
If you read the generated actions, the flow will execute in order:
- Click UI element in Window. This action sets focus to the desktop icon for "My old application.""
- Click UI element in Window. This action is my double-click on the desktop icon to run "My old application.""
- Move window. This action moves the application window named Customer Order Request to a location on the screen.
- Press button in window. This action clicks the Load Data button.
- Press button in window. This action clicks the Export data button.
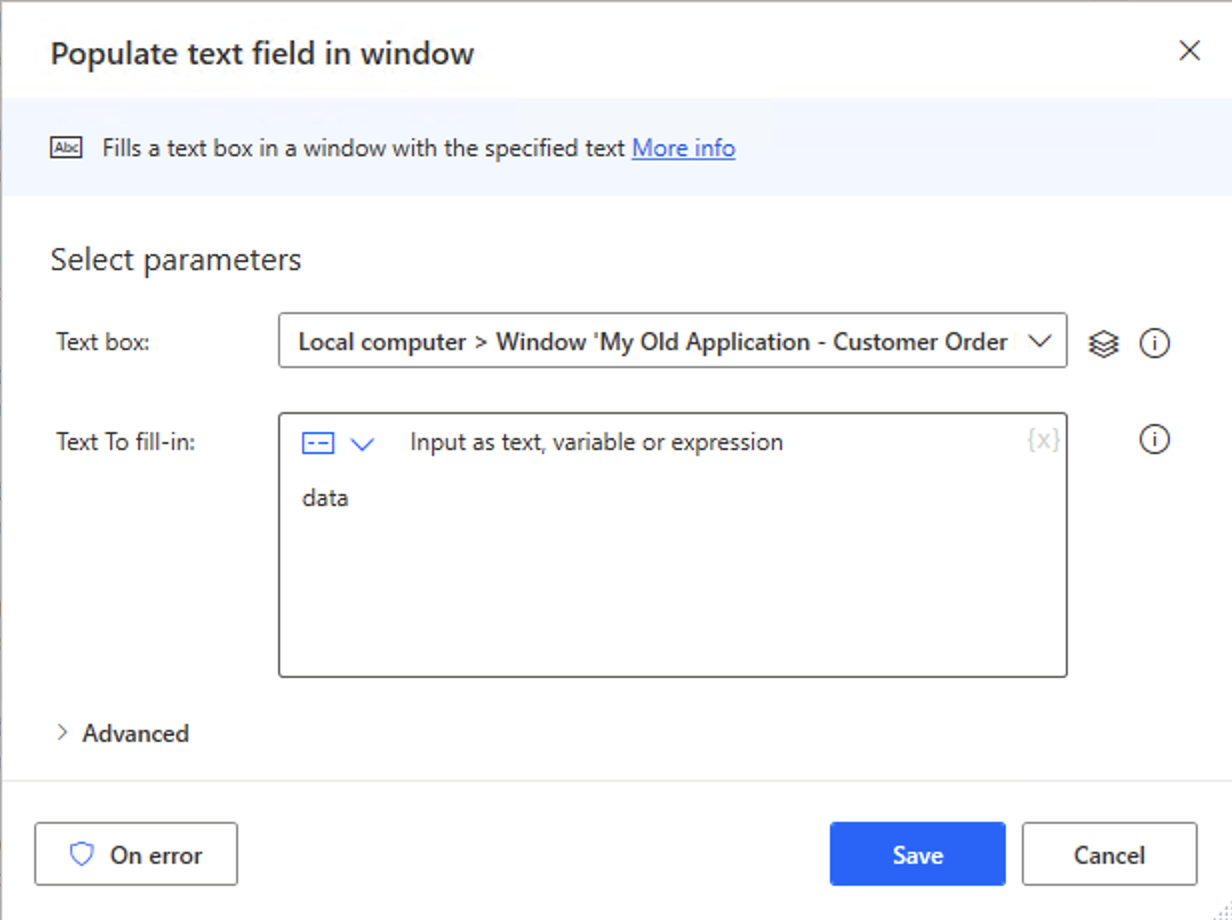
- Populate text field in window. This action writes a file named data in a file dialog window (Figure 23).
- Press button in window. This action clicks on the Save button of the file dialog window.
- Close window. This action clicks the X of the application window to close “My old application.”
In my case, the Power Automate desktop recorder has done everything correctly. It opened my Windows Forms application (Figure 24), clicked Load Data, then it clicked Export Data and saved my Excel file in my OneDrive folder.
Now, I will create a cloud flow to get the Excel file and import the data file into a Dataverse table (used by Power Apps).
Import Data to a Dataverse Table
Open make.powerautomate.com, create a dedicated solution, and add a new flow with a manual trigger. Then, add an action called List rows present in a table to enable you to retrieve data from an Excel table.
Set these parameters (Figure 25):
- Location: Where the file is stored. In my case, OneDrive for Business.
- Document Library: OneDrive
- File: The path of the data file. In my case, in
/My old Application/data.xlsx - Table: Table name contained in the Excel file. In my case, Table1.
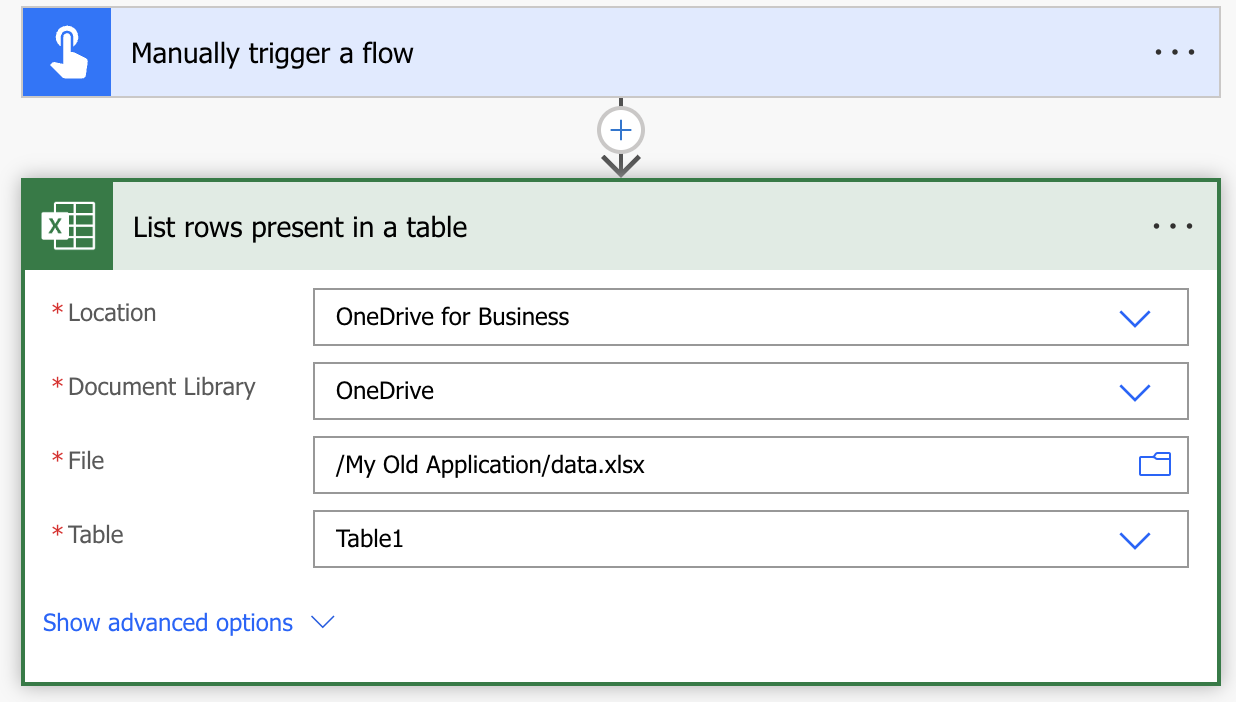
Why set a table parameter? The List rows present in a table action Excel connector can retrieve information from an Excel file only if the table has been defined. You can learn more information here: https://learn.microsoft.com/en-us/connectors/excelonlinebusiness/.
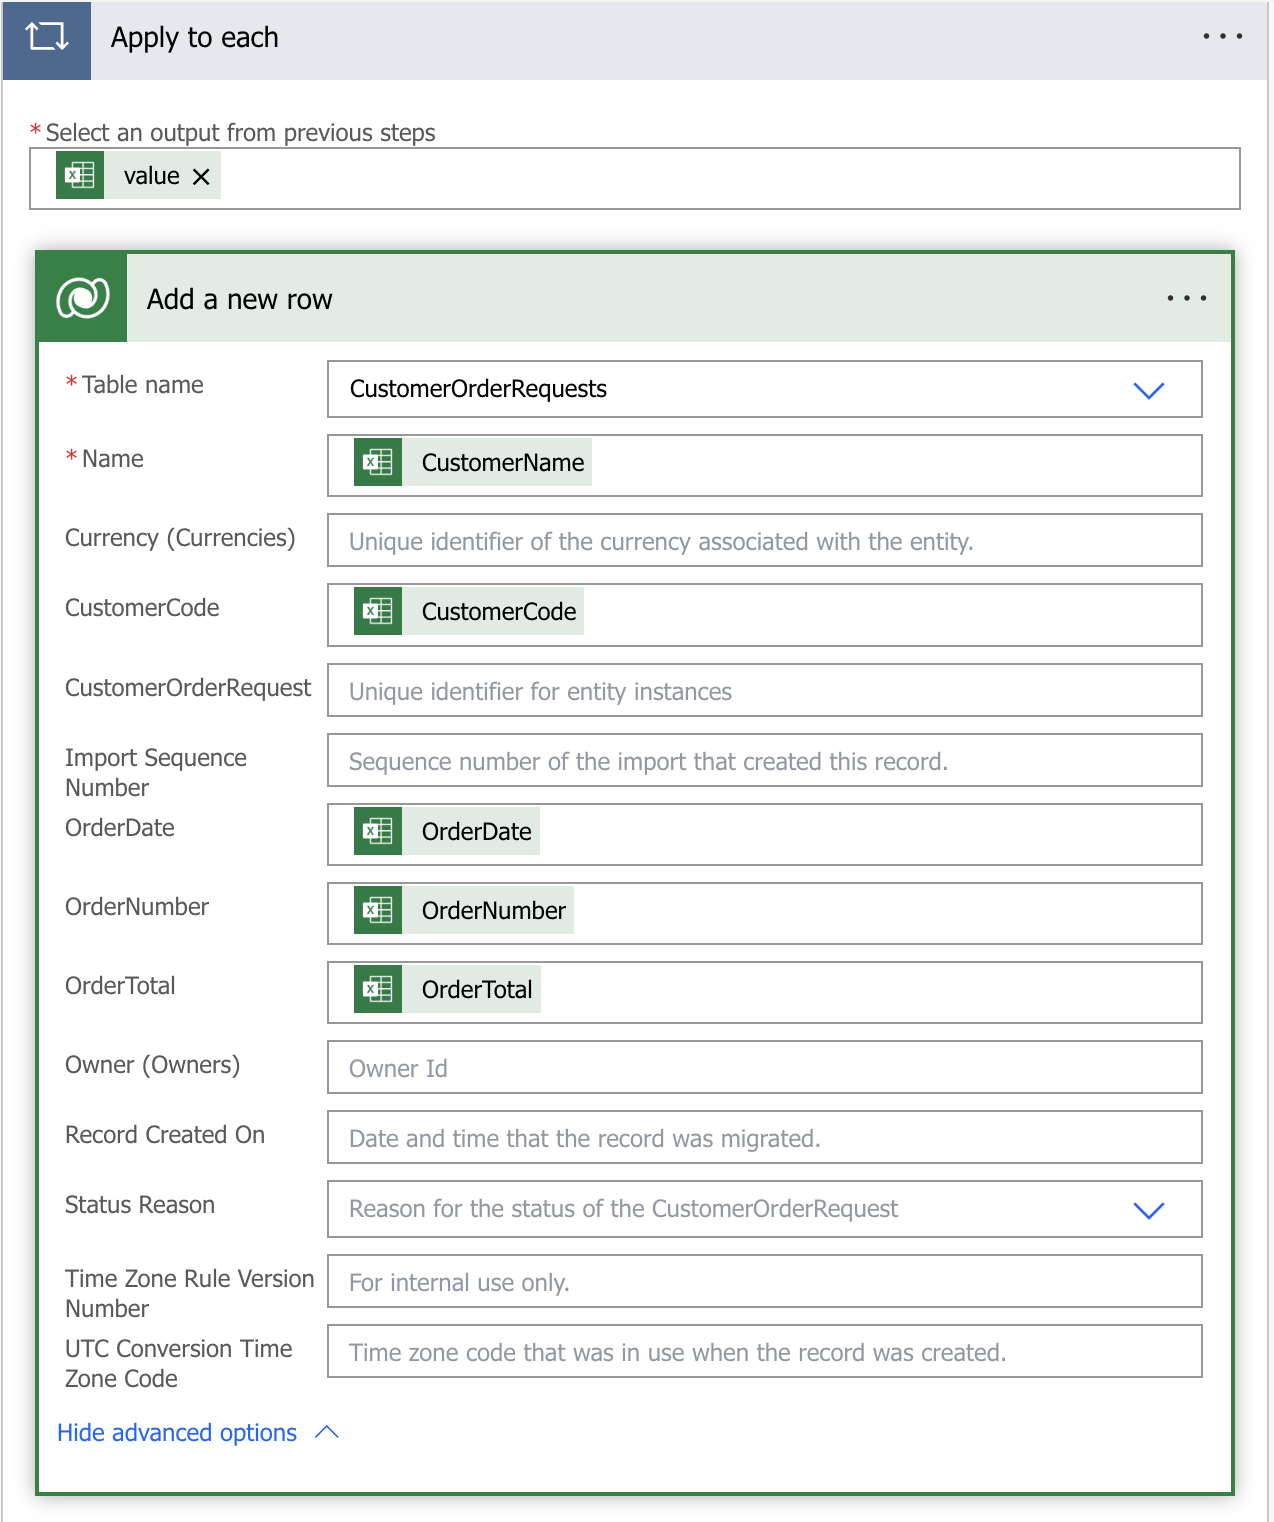
For each row in Table1, I must create a record in my Dataverse table (which I created before). Like I did in the first example, Power Automate will add a loop (Figure 26), getting values from Table1 and adding them to the table named CustomerOrderRequests in Dataverse.
Now you can give it a try. In a real-world scenario, you should modify the trigger to initiate the import process upon file creation and then remove it (or relocate it) after insertion. Finally, you can schedule the Desktop flow to run based on your specific business requirements.
When records are stored in your table, you can create an app with Power Apps to consume and edit data or use Power BI to create reports.
Thoughts About This Desktop Flow Example
You have seen how Power Automate can record screen actions to create a desktop flow. This approach is useful as a starting point with Power Automate Desktop if you have never created a flow before or to quickly create a desktop flow and manually revise it later. I have also shown you how to import data into Dataverse from an Excel file, which allows you to store data to make it available to other applications.
As you can see, Power Automate allows us to create flows to manage and drive business processes. With connectors, you can integrate thousands of services and applications. Additionally, with developer support, you can integrate an application via REST API. Power Automate for Desktop provides the possibility to implement flows that can perform repetitive tasks on our behalf.
I Know What I Have to Do, But I Don't Know How to Do It: Use Copilot!
Microsoft recently released Copilot, a technology that leverages artificial intelligence to understand natural language. Users simply describe what they need in Power Automate scope and flow, and Copilot can create it.
Copilot can do the following actions:
- Understand your intent and create a flow based on your intent.
- Set up connections needed by a flow.
- Apply necessary parameters in the flow.
- Make changes to your flow, such as update actions and replace actions.
- Answer questions regarding your flow, for example, “What does my flow do?” “How do I access licenses?” etc.
Let's see an example. Go to https://make.powerautomate.com/. In the top center of the screen click Create and then from the options click Describe it to design it (preview) the fourth option in Figure 27.

On the page that appears, you should complete three steps. First, describe what you need. For this example, I wrote, “Send me data contained in Dataverse table.”
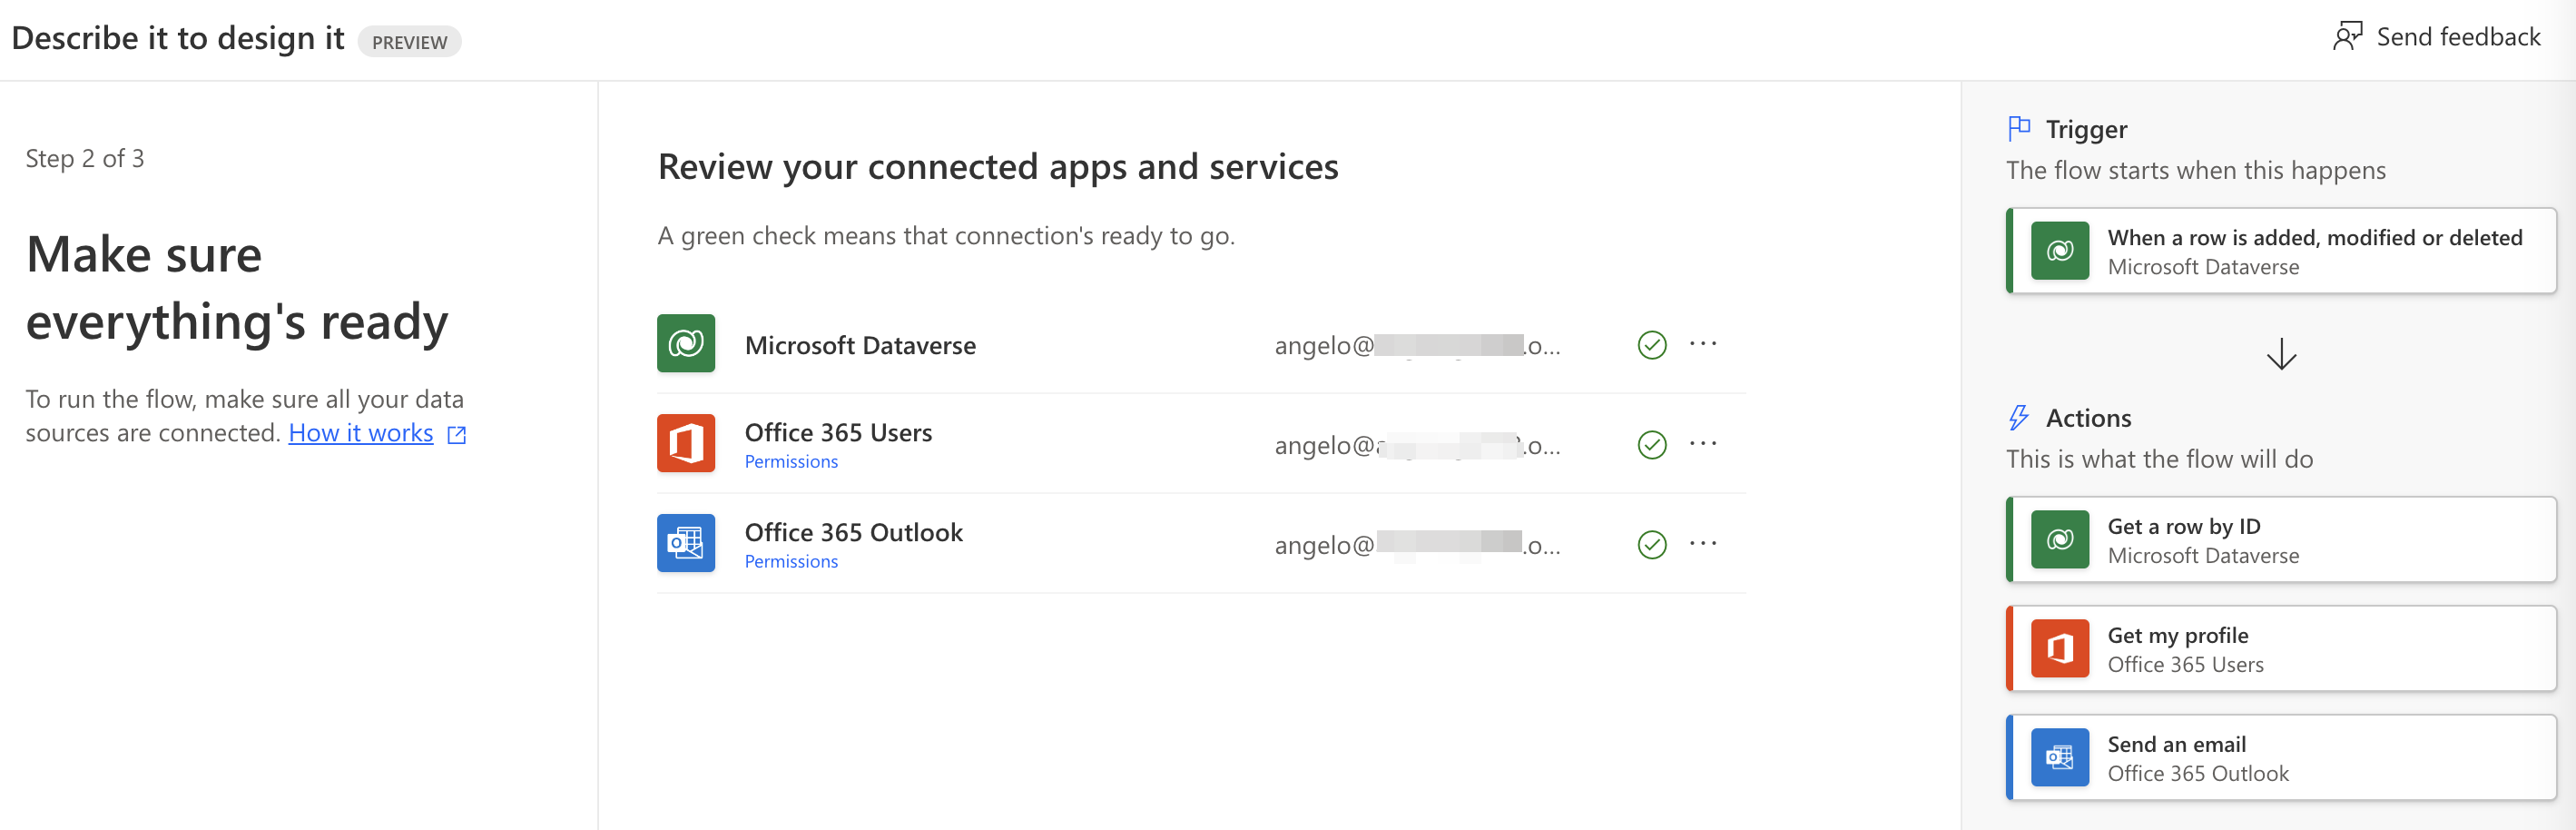
Copilot suggested the flow for me with a trigger and a few actions, as shown in Figure 28.

Copilot suggests:
- A trigger for Dataverse when a new row is added, modified or deleted
- An action to retrieve row by ID from Dataverse
- An action to retrieve information from my profile (for the email it will send)
- An action to send an email (with the row detail it retrieved)
Click Next to configure the connectors, if needed. Figure 29 shows green checkmarks, so they are already connected.
Click Next. Copilot asks us to configure our actions (Figure 30).
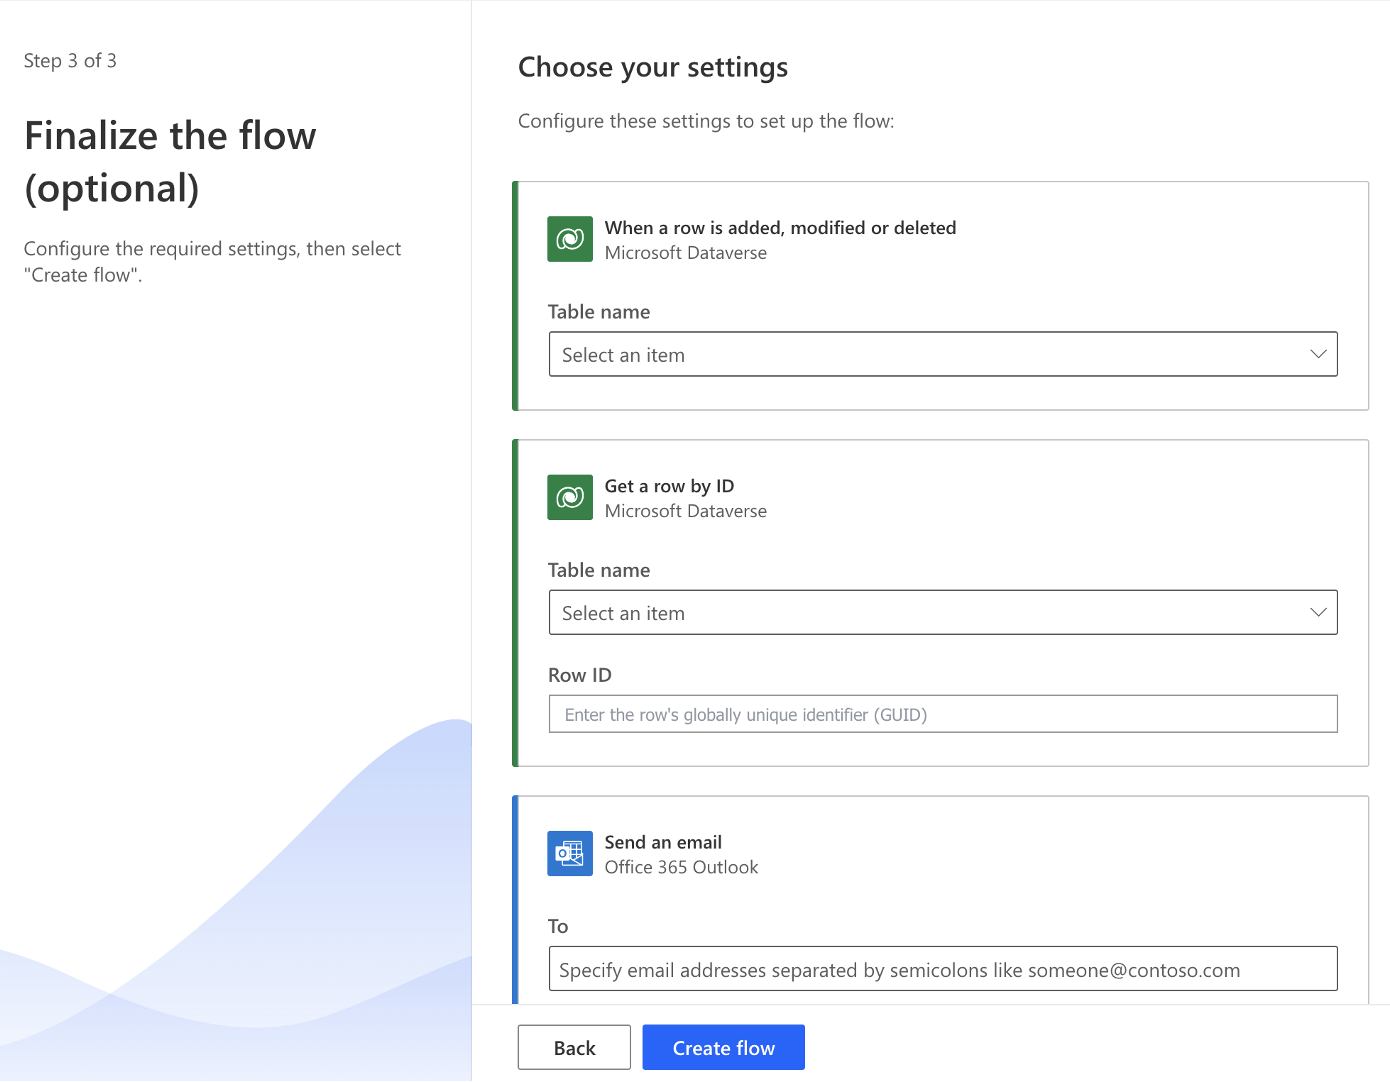
Click Create flow.
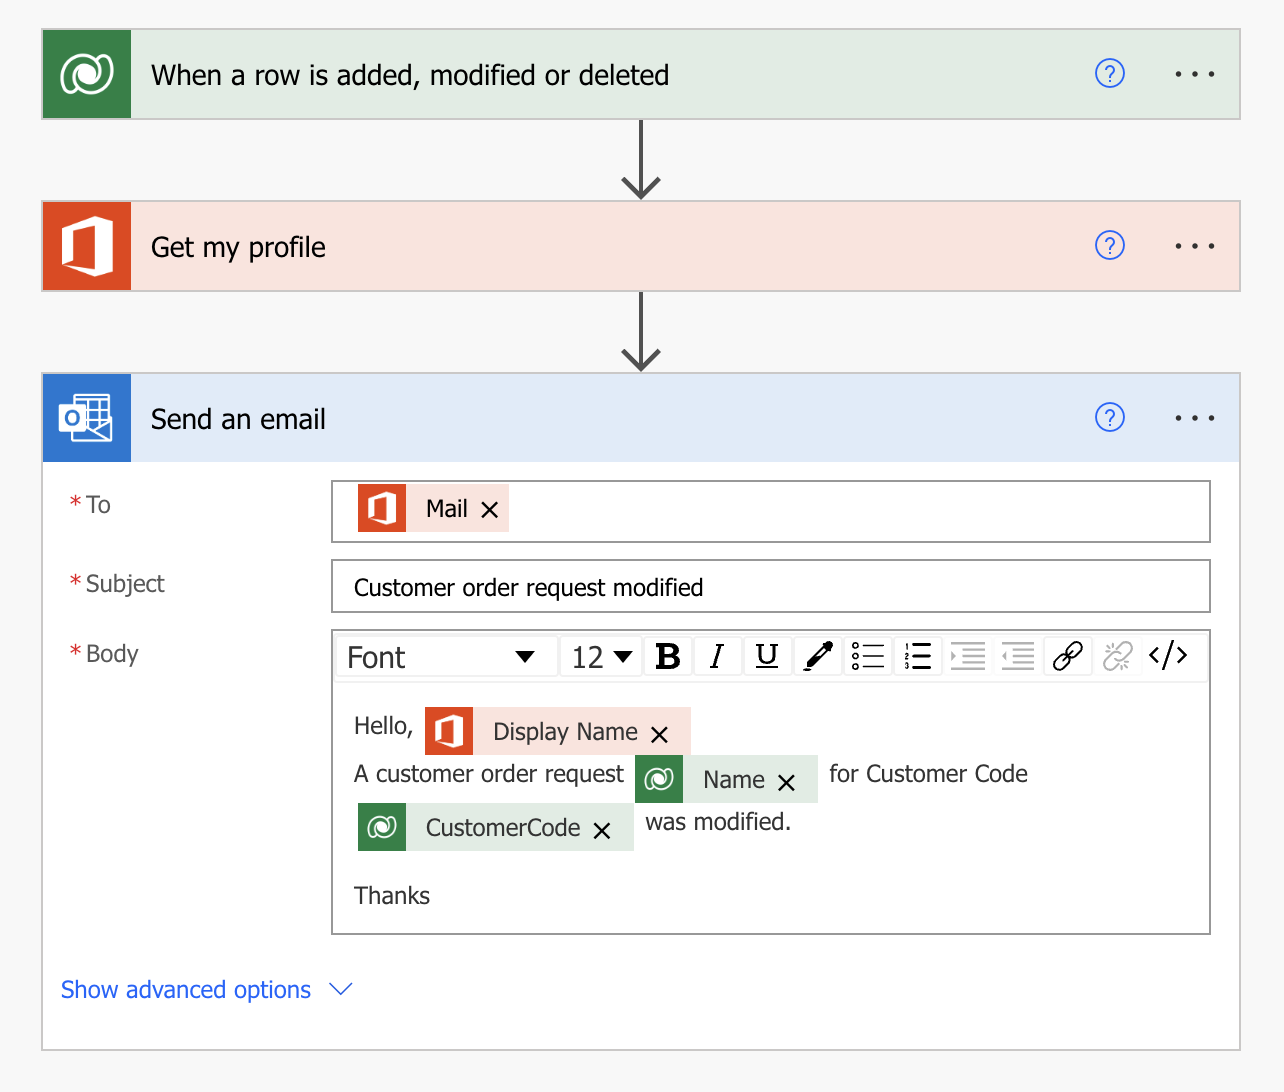
Then I modified the flow:
- I removed the Get a row by ID action.
- I selected Modified as the trigger.
- I configured the Send an email action.
Figure 31 shows the flow after my modifications.
I ran the flow, and I received a mail from it (Figure 32).
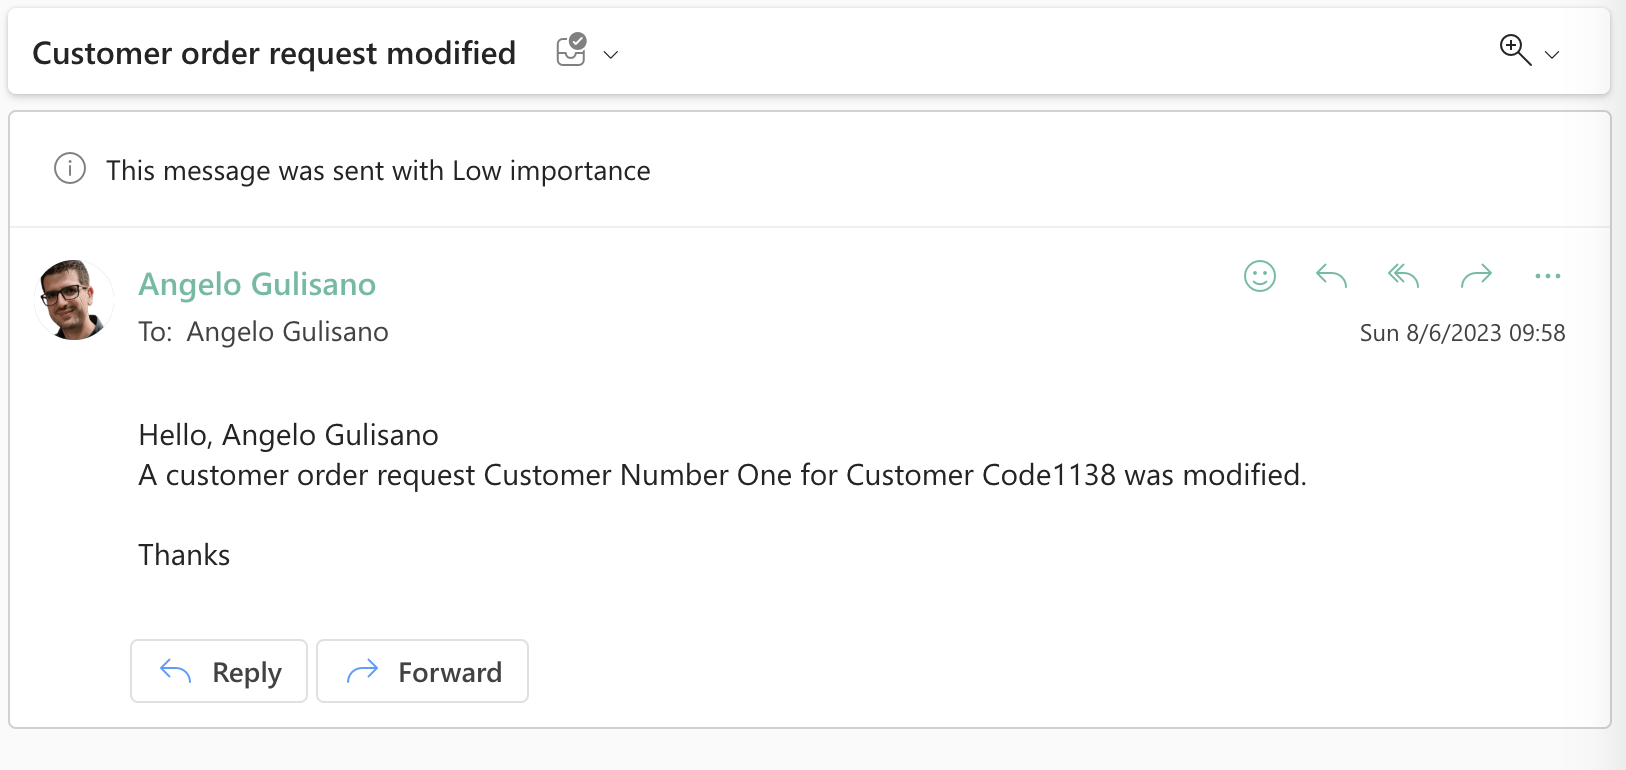
Thanks to Copilot, I was able to describe the flow in the natural language I wanted, and Copilot generated a Power Automate flow in minutes. Copilot is an incredible feature that will enable experienced users to accelerate their work and allow users with less experience to create flows and promptly use the potential of Power Automate.
Typical Uses for Power Automate
There are many scenarios you can make with Power Automate and Power Automate for Desktop. If you are a developer, you can create a custom connector to allow your flow to communicate with your software by using a REST API.
Here are some Power Automate examples with which I have real-world experience:
Integration with old software: A customer had old proprietary software, developed many years ago. The software didn't expose a REST API, but the software could export a CSV file. The customer needed to have an application to manage a new business process based on data stored in his old software.
Increase personal productivity:
- A customer needed help to manage the activity of his employees. They started using Planner to manage tasks. With Power Automate, the employees receive a summary of tasks to work on each day. The manager received a weekly recap of the completed tasks.
- A manager needed help to manage permissions and time off requests. With Power Apps, I built an application to allow staff to create a permission request. This information is now stored in a SharePoint list. When a time-off request is created, a Power Automate flow can email the manager of the employee who created the request to start an approval process. Managers receive requests both on Teams and email. They can approve or reject a request and add comments. Employees receive an email with the manager's response. Every Saturday, another flow exports every approved request and saves them to Excel files that are acted upon by a proprietary HR application.
Integrations by custom connectors: A customer needed a purchase order request approval system. All requests were created and managed by different software that stored its data on a SQL Server database. The idea was to start a process to approve the request when it was created. My team created a Power Automate flow with an HTTP trigger to allow the customer to call it from his application, which can accept an RDA Number as an input parameter.
Now, when the flow is triggered, it uses a custom connector to call a REST API to get all information about the RDA. The flow creates an approval request for the manager of the user who created the request. If the first-level request is approved, it can create another request for a second-level manager. Responses in the approval process are stored by calling another method of the custom connector to update RDA status.
Conclusion
Power Automate allows users to create automated processes, known as flows, that connect applications and services, both within and outside the Microsoft ecosystem. These flows are triggered by specific events or conditions (triggers), ensuring that repetitive tasks and manual data entry become a thing of the past. With a user-friendly interface and a wide range of prebuilt templates, Power Automate caters to users of all technical levels, making automation accessible to everyone.
