


If you're an ASP.NET Web Forms developer and you're unsure of how to take your skills to the future of the .NET platform (e.g., .NET Core or .NET 6), there's hope. Although Microsoft won't port Web Forms, you can apply your existing skillset to a similar framework, called Razor Pages. You'll still need to think about this new platform differently, but if you take the time, I think you'll find a similarly powerful and easy to use tool to create web applications.
Where You're Coming From
Back in the early 2000s, I was a C++ developer and was one of these “you'll have to take my pointers out of my cold dead hand” guys. But once I was introduced to how garbage collection worked in .NET, I was a convert. In those early days, I was writing ASP.NET (after my time writing components for ASP projects).
The reality was that I didn't understand how the web actually worked, but I was tasked with creating websites and web apps using ASP.NET. Microsoft came to my rescue by introducing Web Forms. Nowadays, Web Forms gets quite a lot of hate from many directions about how un-web-like it was. But it helped people like me dip my toe in the web world without the fear that comes from something new. Microsoft successfully turned desktop developers into web developers. But it wasn't without inherent risks.
Web Forms introduced drag-n-drop designing to web development. Under the covers, it was trying to hide the details of the web and feel like the server-side code was something akin to a stateful development solution. Add in ViewState and Session State, and lots of developers were able to accomplish a lot of value for their companies and employers.
But it's now 2023. We've been through a world of change since those early days. For many Web Forms developers, it can be overwhelming to be asked to learn JavaScript on the client, separate concerns into Controllers and Views, and write code that is truly stateless. But that's where we are now. There isn't a perfect upgrade path to ASP.NET Core for Web Forms developers. But there are some ways to apply our existing knowledge without throwing out the baby with the bathwater. In comes Razor Pages.
Although you won't get a WYSIWYG designer with Razor Pages, you can use your page-centric development skills from Web Forms to succeed in ASP.NET Core.
Introducing Razor Pages
As an answer to Web Pages, Microsoft introduced ASP.NET MVC as a Model-View-Controller framework that separated (and simplified testability) views and logic. This has been the prevailing framework for many projects, although it never did replace Web Forms. After .NET Core was introduced, Razor Pages was introduced to have a model closer to a page-by-page solution instead of complete separation. Now with Blazor, another solution has been added to the quiver of tools. For this article, I'm going to focus on Razor Pages themselves as I think it's the most straightforward migration path for Web Forms developers.
Naming is the Hardest Job in Software Engineering
Before we get started, I want to define some terms. Razor is a language for adding logic to HTML markup (and was invented for ASP.NET MVC). Because this language is so useful, it's used by a number of technologies in the Microsoft stack and that has led to everything being called Razor-something. In most cases, Razor files end in “.cshtml” or ".vbhtml". So, let's try to disambiguate:
- Razor View: The files associated with a View in ASP.NET MVC
- Razor Page: The files associated with a Page in Razor Pages
- Razor Component: A component used by the Blazor framework for Web Assembly-based web applications
Enough with definitions, let's see how Razor Pages work.
Let's try to map Web Forms nomenclature to Razor Pages, as seen in Table 1.
Brief Overview
Razor Pages is based on two fairly simple concepts:
- Convention-based URLs
- Razor Pages to produce content
What I mean by this is that if you create a new project using Razor Pages, a new piece of middleware is added to handle requests:
var app = builder.Build();

// Configure the HTTP request pipeline.
if (!app.Environment.IsDevelopment())
{
    app.UseExceptionHandler("/Error");
}

app.UseStaticFiles();
app.UseRouting();
app.UseAuthorization();

app.MapRazorPages();

app.Run();
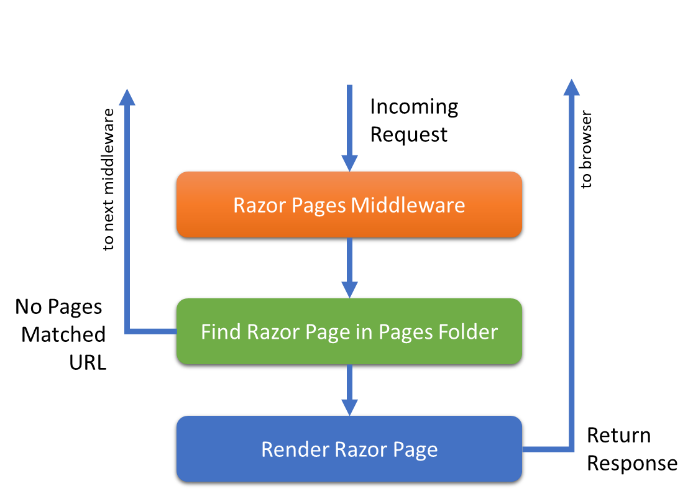
MapRazorPages simply listens to requests and sees if there is a match to Razor Page files. If found, the middleware returns a rendered page, as seen in Figure 1.
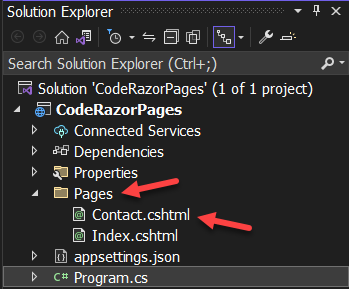
How does it know if there's a Razor Page for the request? It uses a convention to find the files. Although the specific implementation might be a bit different, you can simply think of the Pages folder as the root of the web server. This means Razor Pages will follow the folder/file structure to respond to requests. For example, if the request URL is /contact, the middleware will look in the Pages folder to find a file named contact.cshtml. If it finds it, it then renders that page and returns it to the client, as seen in Figure 2.
The exception to this is the Index.cshtml file. This file is used when the URL points directly to a folder instead of an individual file name. It's the default page name and fallback. This means that if the URL looks like https://localhost/, it will search for the index.cshtml.
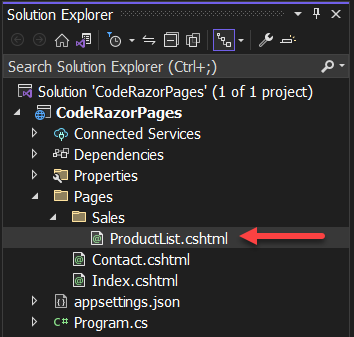
Folders work in the same way. Any folders inside of the Pages folder map to URL fragments. For example, if you have an URL like /Sales/ProductList, the file matches, as seen in Figure 3.
Okay, now that you can see how Razor Pages are mapped, let's dig into what makes a Razor Page.
Anatomy of a Razor Page
Although you'll often use scaffolding to create Razor Pages, let's look at what makes a Razor Page a Razor Page. A Razor Page is just a file that contains a @page declaration:
@page
<!DOCTYPE html>
<html lang="en">
<head>
    <meta charset="UTF-8">
    <meta http-equiv="X-UA-Compatible" content="IE=edge">
    <meta name="viewport" content="width=device-width, initial-scale=1.0">
    <title>Document</title>
</head>
<body>
    <h1>Hello from Razor</h1>
</body>
</html>
This tells the middleware that this is a servable file. Your Pages folder might include other files like layout files or partial files that you don't want to be rendered as individual pages. This helps the middleware differentiate whether it's actually a Razor Page or not. The “@” sign isn't an accident. The Razor syntax uses the “@” symbol to indicate the start of a server-side code operation. For example, you can create an arbitrary code block like so:
@page
@{
    var title = "This is made with Razor Pages";
}
<!DOCTYPE html>
The curly braces (e.g. {}) are just to allow for multi-line code. This code is just plain C# (or VB.NET if you're using .vbhtml files). With that set, you can use it with the “@” symbol to start:
@page
@{
    var title = "CODE Magazine - Razor Pages";
}
<!DOCTYPE html>
<html lang="en">
<head>
    <meta charset="UTF-8">
    <meta http-equiv="X-UA-Compatible" content="IE=edge">
    <meta name="viewport" content="width=device-width, initial-scale=1.0">
    <link href="~/css/site.css" rel="stylesheet" />
    <title>@title</title>
</head>
<body>
    <div>
        <h1>@title</h1>
    </div>
</body>
</html>
With a variable created here, you can just insert the title in both places you need it. Razor also allows you to call methods or properties because everything after the @ sign is interpreted as the language of the file:
<p>Today is @DateTime.Now.ToShortDateString()</p>
In fact, you can use control-flow statements too:
<!DOCTYPE html>
<html lang="en">
<head>
    <meta charset="UTF-8">
    <meta http-equiv="X-UA-Compatible" content="IE=edge">
    <meta name="viewport" content="width=device-width, initial-scale=1.0">
    <link href="~/css/site.css" rel="stylesheet" />
    <title>@title</title>
</head>
<body>
    <div>
        @if (string.IsNullOrEmpty(@title) == false)
        {
            <h1>@title</h1>
        }
    </div>
</body>
</html>
You're using an If statement to determine whether to show the title. This works with all control-flow statements like for, foreach, switch, etc.
If you're coming from Web Forms, this sort of server-side syntax should be comfortable to you, although the syntax is different. But using in-line code in this way could mix logic and design, which concerns me. That's where page models come in.
The Page Model Class
When you create a new Razor Page using Visual Studio, it will automatically add a .cshtml.cs file of the same name. This is called the PageModel class. For example, the index page would look like this:
// Index.cshtml.cs

using Microsoft.AspNetCore.Mvc.RazorPages;

namespace CodeRazorPages.Pages;

public class IndexModel : PageModel
{
    public void OnGet()
    {
    }
}
This is a class that derives from the PageModel class. This class is wired up to the cshtml file using the @model declaration on the Index Page:
@page
@model IndexModel
By doing this, you have access to the PageModel instance. If you were to add a property on PageModel class, you could access it here. For example:
// Index.cshtml.cs

using Microsoft.AspNetCore.Mvc.RazorPages;

namespace CodeRazorPages.Pages;

public class IndexModel : PageModel
{
    public string Title { get; set; } = "Welcome";
    public void OnGet()
    {
    }
}
You can then use this on the cshtml file, like so:
@page
@model IndexModel
...
<h1>@Model.Title</h1>
<p>Today is @DateTime.Now.ToShortDateString()</p>
...
The model declaration exposes a property called Model that's an instance of the IndexModel class. You can see that you can use Razor syntax to inject the Title into the page that you defined in the PageModel class.
The PageModel class can do more complex interactions too. You'll notice that the PageModel class contains a method called OnGet. This method is executed before the page is rendered when this page is retrieved via the GET verb in HTTP. So, you could do something like this in your example:
public class IndexModel : PageModel
{
    public string Title { get; set; } = "Welcome";
    public List<double> InvoiceTotals { get; set; } = new List<double>();
    public void OnGet()
    {
        for (var x = 0; x < 10; ++x)
        {
            InvoiceTotals.Add(Random.Shared.NextDouble() * 100);
        }
    }
}
You can see here that you can create content (in this case, random invoice totals) and then use them:
<h1>Model.Title</h1>
<p>Today is @DateTime.Now.ToShortDateString()</p>
<h3>Invoices</h3>
@foreach (var invoice in Model.InvoiceTotals)
{
    <div>$ @invoice.ToString("0.00")</div>
}
Although this is a convoluted example, you could imagine reading from a database to show information in this same way. You want to do this in the `OnGet method instead of the constructor because you don't want to generate the data if you were to POST to this page, which you'll see next.
Model Binding
When creating forms (or other interactions) with Razor Pages, you can use model binding to help you take the data from the form and inject it into the page model class. Let me explain. Let's start with a simple class that holds data for a user:
public class UserSettings
{
    public string? UserId { get; set; }
    public string? FullName { get; set; }
}
In the page model class, let's add the property for the UserSettings:
  public UserSettings Settings { get; set; } = new UserSettings();
  public void OnGet()
  {
      Settings.UserId = "shawn@aol.com";
      Settings.FullName = "Shawn Wildermuth";
  }
Then you create a form on that page. Notice that the Settings is accessible from the Model:
<h1>Settings</h1>
<form method="POST">
    <label>Email</label>
    <input type="email" name="UserId" value="@Model.Settings.UserId" />
    <label>Full Name</label>
    <input type="text" name="FullName" value="@Model.Settings.FullName" />
    <button type="submit">Send...</button>
</form>
Note that the name is the same as the property value. You're setting the value from the model so you can have the current values shown. But if you want the form to be able to send the changes, you'll need an OnPost method:
public void OnPost()
{
    var UserId = Settings.UserId;
    if (UserId is null)
    {
        throw new InvalidDataException("UserId can't be null");
    }
}
When you submit the form, the exception is being thrown. Why doesn't this work? Model binding isn't being used. There are a couple of ways to make this happen. First, you could accept a UserSettings object in the OnPost method:
public void OnPost(UserSettings settings)
{
    var UserId = settings.UserId;
    if (UserId is null)
    {
        throw new InvalidDataException("UserId can't be null");
    }
}
This works because the data on the form matches the properties in UserSettings. But you don't always want to pass in the settings, sometimes you want to bind it directly to the page model class. In that case, you can add a [BindProperty] attribute:
[BindProperty]
public UserSettings Settings { get; set; } = new UserSettings();

public void OnPost()
{
    var UserId = Settings.UserId;
    if (UserId is null)
    {
        throw new InvalidDataException("UserId can't be null");
    }
}
In this case, the OnPost (or OnPut, OnDelete) takes the values and binds them to the instance on the class. In this way, it can be easier to work with large sets of data on your Razor Page. But building the form should be easier. Let's see how.
TagHelpers
When building a form, you might want to more easily set the values and bindable properties (and matching names). To do this, Microsoft supports something called TagHelpers. Tag helpers allow you to more easily bind to the Page model. For example, you could use the asp-for attribute to tell the form which properties you want to bind:
<form method="POST">
    <label asp-for="Settings.UserId">Email</label>
    <input asp-for="Settings.UserId" />

    <label asp-for="Settings.FullName">
      Full Name
    </label>
    <input asp-for="Settings.FullName" />

    <button type="submit">Send...</button>
</form>
Although TagHelpers are usually wired up for you in a new project, I think it's important for you know where they come from. There's a special file called _ViewImports.cshtml. It can contain any namespaces you want to be implicit in your Razor Pages (i.e., YourProject.Pages) and it's where TagHelpers are included:
@* _ViewImports.cshtml *@
@namespace CodeRazorPages.Pages
@addTagHelper *, Microsoft.AspNetCore.Mvc.TagHelpers
If you're not getting access to the tag helpers, this file is missing or incorrect. Now that you can see how individual pages work, let's look at how to better compose pages from individual components.
Composing Razor Pages
Like Web Forms, Razor Pages has the ideas around breaking out individual parts of a page like UserControls and MasterPages. Let's see how that looks in Razor Pages.
Using Layouts
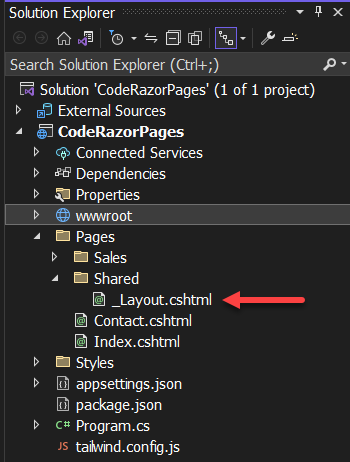
Having the entire HTML page defined in every Razor Page would be a waste of time. Just like Web Forms, you can have master pages, which are called Layouts in Razor Pages. Layouts are kept in a folder called Shared (this folder is part of the search path of several kinds of files (e.g., partials, layouts, etc.). This way, they're available to every page that needs them. By convention, a Layout is called _Layout, as you can see in Figure 4.
The Layout will usually have the HTML boilerplate that you want on every page. You can call RenderBody() to tell the Layout where you want the page's content to appear:
<!DOCTYPE html>
<html lang="en">
<head>
    <meta charset="UTF-8">
    <meta http-equiv="X-UA-Compatible" content="IE=edge">
    <meta name="viewport" content="width=device-width, initial-scale=1.0">
    <link href="~/css/site.css" rel="stylesheet" />
    <title>Razor Page</title>
</head>
<body>
   <div>
        @RenderBody()
    </div>
</body>
</html>
Although this example is really simple, you can imagine that you have navigation and footers defined here too. To use the layout, your page can just set the Layout property:
@page
@{
    Layout = "_layout";
}
<h1>Razor Page</h1>
<p>Today is @DateTime.Now.ToShortDateString()</p>
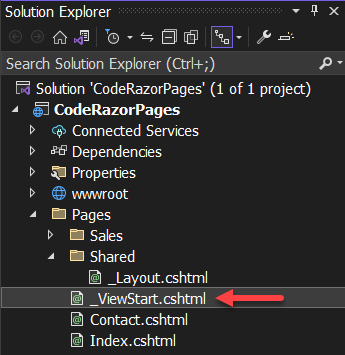
Having to add this to every page is annoying, so you can create a special file called _ViewStart.cshtml. This file is used to specify common things for each Razor Page. In this case, you can simply move the setting of the layout to that file and it will apply to all Razor Pages. This file must reside in the Pages folder (it applies to a folder and all subfolders), as seen in Figure 5:
Now that you have a Layout, you might find it useful to share information with the Layout. The most common scenario here is to set the title tag in the header. You can use a property bag called ViewData. If you set this on the Razor Page, you'll be able to access it in the Layout. For example, in your Razor Page:
@page
@{
    ViewData["title"] = "Razor Pages Example";
}
<h1>@ViewData["title"]</h1>
<p>Today is @DateTime.Now.ToShortDateString()</p>
Notice that even though you're setting it, you can use it on your page as well. In the Layout, you can just refer to the ViewData object:
<head>
    <meta charset="UTF-8">
    <meta http-equiv="X-UA-Compatible" content="IE=edge">
    <meta name="viewport" content="width=device-width, initial-scale=1.0">
    <link href="~/css/site.css" rel="stylesheet" />
    <title>
        CODE Magazine - @ViewData["title"]
    </title>
</head>
Notice how you can use the ViewData to insert into content, not just be the entire content. In this example, every page's title starts with some boilerplate, but then each page can specify their own title.
In addition, Layouts support the concept of Sections. An area of the page that the Razor Page itself can insert into the Layout. For example:
<head>
    <meta charset="UTF-8">
    <meta http-equiv="X-UA-Compatible" content="IE=edge">
    <meta name="viewport" content="width=device-width,
         initial-scale=1.0">
    <link href="~/css/site.css" rel="stylesheet" />
    <title>
        CODE Magazine - @ViewData["title"]
    </title>
    @RenderSection("head", false)
</head>
You can call @RenderSection to specify a section with any name you want. The second (optional) parameter defines whether the section is required. Two common use cases for this are to allow an individual page to inject page specific styling or scripts. But you could use it for any section of a page. To use the section, you use the section keyword in your .cshtml file:
@page
@{
    ViewData["title"] = "Contact Page";
}
@section head {
    <link src="./someextracss" rel="stylesheet" />
}
<h1>Contact Us</h1>
You can see the @section near the top of the file. The name of the section is supplied to specify which section you want to insert into. Everything inside the curly braces is injected into the Layout.
Partials
Sometimes you want to be able to re-use a common piece of markup. Razor Pages supports this via Partials. Partials allow you to inject a shared file with Razor syntax into an existing page. You could take the form you created on the UserSettings page earlier and move it into a partial page. To do this, create a cshtml file prefixed by an underscore.
This isn't required but it makes it easier to see what are actual pages and partial pages. For example, if you were to create a _SettingsForm.cshtml file like this:
<form method="POST">
    <label asp-for="Settings.UserId">Email</label>
    <input asp-for="Settings.UserId" />

    <label asp-for="Settings.FullName">
        Full Name
    </label>
    <input asp-for="Settings.FullName" />

    <button type="submit">Send...</button>
</form>
Note that this new file doesn't have an @page declaration; no declaration is necessary. To use this partial page, you just use a partial element:
@page
@{
    ViewData["title"] = "Contact Page";
}
<h1>Contact Us</h1>
<div>
    <partial name="_ContactForm" />
</div>
Notice here that the name of the view is the name without an extension. This isn't a path to the partial, but instead a name that can be looked up. When finding a partial, the system searches in several places (in order):
- The same directory as the Razor Page that contains the partial element
- Any parent directory above the page's directory
/Shareddirectory/Pages/Shareddirectory/Views/Shareddirectory
If the partial can't be found here, it returns an error. If this happens, either the name is incorrect or it's somewhere that Razor Pages can't find it.
You can think of partial pages as being very similar to a regular Razor Page. This means that it has data that can be handed to it and can use Razor syntax to change it. In this example, in order to fill-in the form, you need to pass it the UserSettings. You do this with the model attribute:
@page
@model UserSettingsModel
<h1>Settings</h1>
<partial name="_SettingsForm" model="Model.Settings" />
Once you do this, you need to set the model in the partial page:
@model UserSettings
<form method="POST">
    <label asp-for="UserId">Email</label>
    <input asp-for="UserId" />

    <label asp-for="FullName">Full Name</label>
    <input asp-for="FullName" />

    <button type="submit">Send...</button>
</form>
Note that this is only necessary because you're using model binding here. If this was just a snippet of HTML, you wouldn't need this at all. By using these different mechanisms, you can build server-side web projects. Let's wrap this up.
Where Are We?
Razor Pages is a page-centric web development programming model similar to how the WebForms framework works. Although you can apply much of your experience with Web Forms directly to Razor Pages, there are major differences. If you're used to working with a design surface and setting properties in a user-interface, you still have to get comfortable with how HTML actually works. Because there's no notion of session state, you'll need to change how you think about these. But if you're ready to move your C# skills to .NET Core, Razor Pages are a great place to start.
Table 1: Translating WebForms terms to Razor Pages
| WebForms Term | Razor Page Term |
|---|---|
| Web Form (.aspx) | Razor Page (.cshtml/vbhtml) |
| Web Control (.ascx) | Partial Page (also .cshtml/vbhtml) |
| MasterPage | Layout |
| AJAX | Just JavaScript |
| global.asax | Program.cs or Startup.cs |
