


You know the pattern Model-View-ViewModel, also known as MVVM? It's the most common approach to implement user interfaces in C# and .NET nowadays. We've been using it for multiple years without any issues, and we like it for its simplicity. So, what's your usual approach to implementing user interfaces for one part of an application that's required to run on multiple platforms? Of course, if you stay on mobile platforms, Xamarin forms helps a lot. But what happens when you need to target Windows desktop and mobile devices at the same time? Or, even more interestingly, suppose you need to build multiple user interfaces for one and the same business logic but with different levels of details? How do you start? What should you do?
Many times, developers apply the most common pattern in the entire software industry: copy-and-paste. I fully understand the convenience of simply copying the parts you require to multiple projects. In my early days, I did the same. It's simple, and it solves the problem. Or does it? Well, applying this copy and paste anti-pattern comes with tons of disadvantages, some obvious, some more subtle. Let's take a look at them.
For instance, suppose you copy-and-paste the same presentation logic to multiple projects. Then one of your customers or clients spots a bug in the implementation. Now you must go through all your projects where you initially copied the presentation logic to fix the eminent bug in all your projects. Or you can assume that your project manager wants to see new values included in the views. Also, you'll need to go through all projects again and show these values in the multiple copies of the view. All of these issues come at a price, namely time, which essentially boils down to cost. Wouldn't it be great to eliminate these costs somehow, or at least reduce them and save you money?
In this article, I'll outline a pattern to eliminate these issues. It's been available for some time, under the name Model-View-Presenter-ViewModel or similar names. The main idea is rather simple: Split up the responsibilities of the ViewModel.
For that purpose, let's extract the responsibilities from the overloaded and over-responsible ViewModel and put them into individual classes. This will give us several benefits, like some famous -ilities in software engineering, such as maintainability. At the same time, it allows you to reuse many parts of your UI presentation logic in multiple applications and platforms. Suddenly also aggregating UI components becomes an easy task, and your presentation logic turns into a well-testable piece of source code. Finally, rolling out fixes becomes super-fast, because changes concentrate in one spot of your code base.
Let's Have a Look at MVVM as a Starter
In the early days of software development, the most common approach to writing presentation logic was Model-View-Controller (MVC). This pattern was fully generically applicable to almost all programming languages that provide user interfaces in any sense (for instance a Java application with UI or a console-only output). The view presents values to the user and the model corresponds to the business logic. The controller sits in between those two and mediates changes from the model to the view.
At some point, Microsoft introduced the Windows Presentation Foundation (WPF) together with the eXtensible Markup Language (XAML). From an architectural and design perspective, this resulted in a new pattern, named Model-View-ViewModel (MVVM), due to the data binding feature of WPF. Data binding was also the main differentiation from MVC in the end. In case you're not familiar with data binding and MVVM, I'll provide a short introduction.
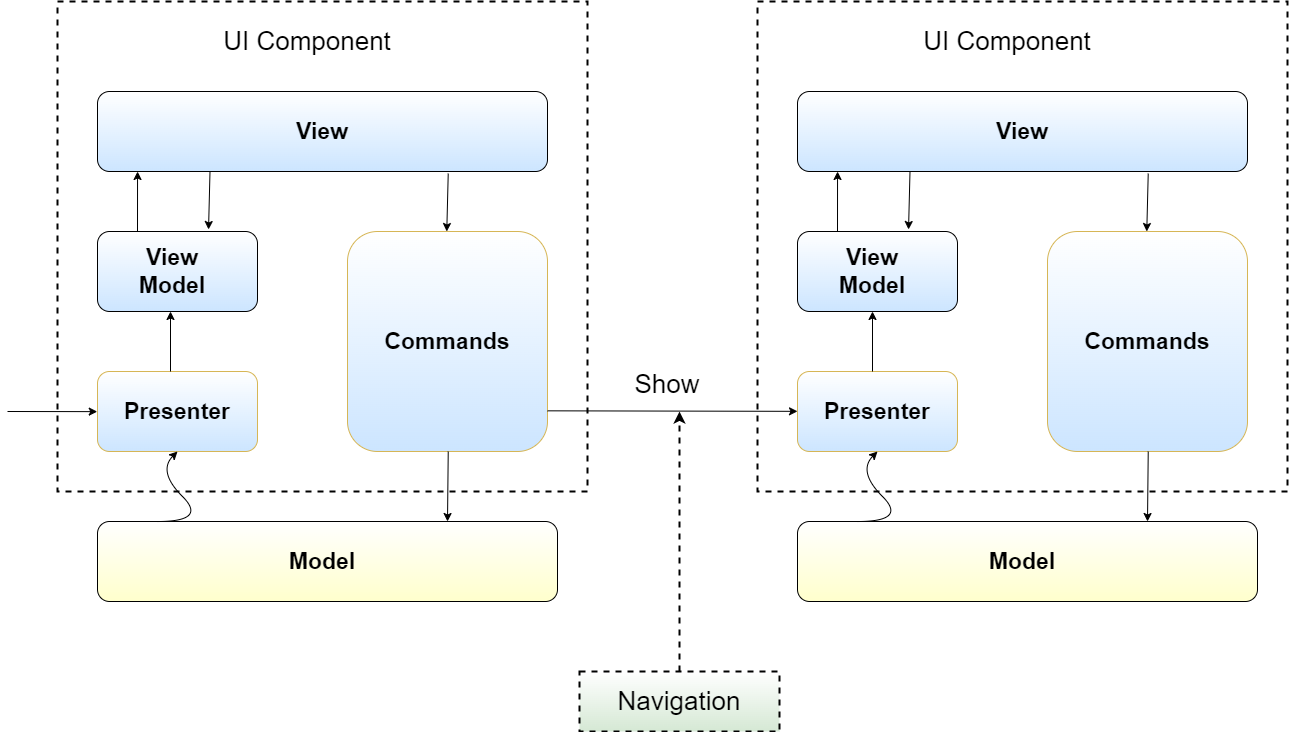
MVVM corresponds to the de facto standard for writing presentation logic and user interfaces in the .NET environment. In this approach, the presentation logic breaks down into three main parts, namely View, ViewModel, and Model, as you can see in Figure 1.
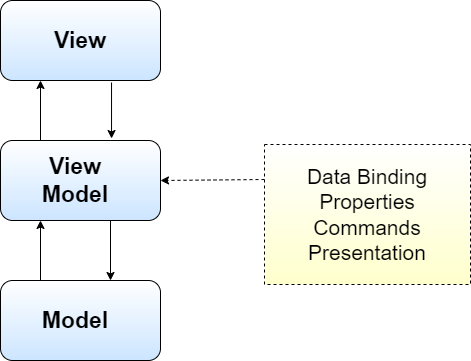
You specify the view in terms of XAML code, which corresponds to an XML derivate. A view in WPF consists of basically two files, a .xaml.cs and a .cs file. The .xaml.cs file contains the description of the view in terms of XML tags whereas the .cs file, also called code-behind file, contains C# code that associates with the view. Hence, XAML corresponds to a description language of user interfaces. WPF comes with plenty of built-in types for XAML, like TextBox, Grid, or StackPanel. In case you need more sophisticated controls, WPF enables developers to write their own custom controls, and integrate them with existing items. Importantly, controls bind to data for visualization but also for modification via a technique called data binding.
Using data binding, your view exchanges data with the binding context. The binding context accepts instances of classes. These classes, later called ViewModel, define the values to which the view binds in terms of properties. On changes of these values, the ViewModel notifies (via the INotifyPropertyChangedEvent) the view to re-render or update the screen. In the other direction, whenever a value in the user interface changes, the view changes the value of the bound property in the ViewModel. The view also triggers user actions through commands, which the ViewModel implements. For instance, when a user clicks a button, it triggers a command within the ViewModel to perform the corresponding actions in the model.
The ViewModel corresponds to the mediator between the view and the model itself. For that purpose, the view uses the ViewModel to visualize values from the model to the end user through data binding. At the same time, also through data binding, the user performs changes to the ViewModel by entering values of selection items from a list, for instance. The ViewModel could even implement some validation logic for the values the user enters and return errors in case a user enters unexpected values. In the end, the ViewModel contains all the commands that the view triggers. For example, if a user enters a username and a password and then clicks on a log in button, the implementation of the command bound to the log in button resides within the ViewModel. This command consequently triggers some changes to the model, like sending a log in request to a back-end service.
Finally, the model implements the domain logic of your application. For e-Commerce applications, this could be banking tasks or transaction handling, whereas for a fitness app, this could be logic for tracking workouts and heart rate while working out.
Let's review the responsibilities in this pattern. The view part has the responsibility of visualizing values to the user. Additionally, it also provides the interface for the user to interact with the application in terms of commands. Hence, it is responsible for interacting with the user in the broadest sense. The ViewModel has the responsibility of providing all the glue code between view and model. For that, it offers properties to the view for visualization and maybe some validation logic. It also implements commands to trigger changes in the model. Lastly, and I didn't talk about this yet, but the ViewModel also needs to navigate to the next view. Somehow, it's clear, because the user interacts with the software through commands. However, I believe it makes sense to clearly state it. The responsibility of the model is obvious: it's the model of your application and provides the business logic.
Okay, now you know the responsibilities. The view visualizes, the model corresponds to the business logic, and the ViewModel performs all the stuff in between. Wait, all the stuff in between? Let us take a closer look at this stuff in between one more time. The ViewModel offers properties for data binding and potentially also validates data (I know this could be done somewhere else, but I assume the developer implemented it in the ViewModel). Further, the ViewModel also implements the commands to interact with the model. Updates from the model must also bubble up somewhere to the view, hence the ViewModel also needs to listen to changes from the model. Lastly, the ViewModel also navigates to upcoming views.
That last paragraph contains at least five responsibilities for the ViewModel. Observe that the ViewModel usually corresponds to a single class, at least in the standard MVVM pattern. From an engineering perspective, ask yourself now: Doesn't this somehow violate the Single Responsibility Principle? I'll answer for you: Yes, it does. Furthermore, think about unit testing. That sounds like a hard task because the commands reside within the ViewModel, or somewhere else. Essentially, the dependencies of the ViewModel make it hard to test it, because you need to provide all the dependencies of each command to unit test one. Rather painful, no? So, to unit test a single command, you need to implement and provide mocks for the dependencies of all other, untested commands. Lastly, the situation with this ViewModel gets even more painful when you think about the aforementioned copy-and-paste approach in multiple projects.
Suppose you have a quite big ViewModel, for, perhaps, a banking application, showing all the transactions with details in a single view. This view contains tons of UI elements, and therefore, the ViewModel becomes rather complicated and overloaded. Now one of your customers identifies a bug in the presentation logic of your application, specifically in the ViewModel. If you applied the copy-and-paste pattern to the presentation logic, this bug appears in all projects. Depending on how difficult the bug is to fix, and who hosts the projects' codebases (just imagine one team per project), this single bug costs you a lot of time to fix it everywhere. The question now is: How can you do better? Is there a way out? Fortunately, the answer is yes, and I'll show you how.
MVPVM: A Modular Approach to Presentation Logic
The idea is rather simple, as is true most of the time in software engineering: Divide the responsibilities! Here, in concrete, the different responsibilities overload the ViewModel, which makes the presentation logic hard to maintain, hard to reuse, and also hard to test. That's our starting point. From the ViewModel, extract the following components:
- ViewModel: The ViewModel now deals solely with data binding and data validation logic, not more.
- Presenter: This component deals only with the interaction between ViewModel and model. For that purpose, the presenter registers to events of the business logic (aka the domain or the model) and fills up the entire ViewModel with the values from the model initially.
- Commands: This component corresponds to multiple classes. Each class implements a command that the user triggers through interaction with the view. For example, if the view contains a “Submit” button to send username and password to a back-end service, there exists a
SubmitCommand(orSubmitUICommandI use the term command andUICommandinterchangeably). TheSubmitCommandinvokes the required action in the model to deliver the credentials of the user to the back-end service. If the view contains aCancelbutton in the view, there is aCancelCommandclass in the source code, which deals with cancelling the current operation. It invokes the necessary actions for cancelling the current operation in the model.
View and model stay the same in the MVPVM pattern because the responsibilities were already quite clear before. Figure 2 shows the pattern.
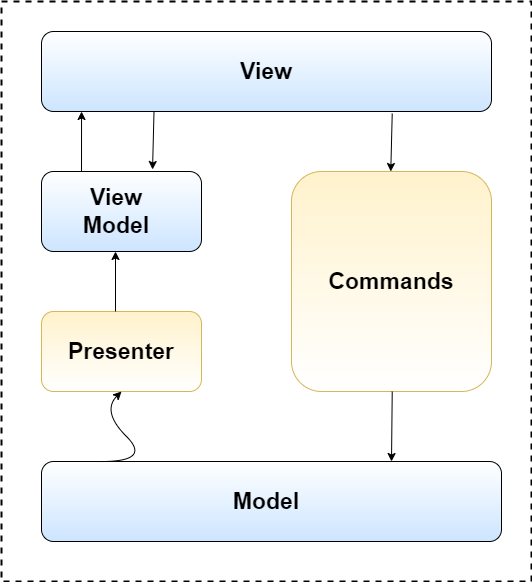
You can also think about the view together with the ViewModel and the commands as one UI component. This UI component visualizes and interacts with one part of your model. The UICommands trigger changes in the model due to the interaction of the user with the view. The presenter of the UI component deals with updates of the ViewModel due to events the model raises. So, if you group those parts together, you have a UI component with presenter. But how do you now navigate from window to window or view to view, because the user won't like to stay on the same screen all the time.
It's rather simple. Each presenter implements a Show method. This method takes, if necessary, all parameters which it requires to fill up the ViewModel initially. The Show method creates the view and ties it via data binding to the ViewModel. After that, it returns the instance of the view for presentation to the invoker of the Show method. That's because sometimes you need to remember the history of views you've shown, like on mobile devices. We usually call this navigation. But how and from where to call the Show method of a presenter, and who creates the presenter? Listing 1 shows the IPresenter interface.
Listing 1: IPresenter interface
/// <summary>
/// The interface for presenters
/// </summary>
public interface IPresenter
{
    /// <summary>
    /// Performs steps to show a new view
    /// </summary>
    /// <param name="param"></param>
    /// <returns></returns>
    IView Show(object param);

    /// <summary>
    /// Close the presenter
    /// </summary>
    void Close();

    /// <summary>
    /// Event when finished closing
    /// </summary>
    event EventHandler<EventArgs> Closed;
}
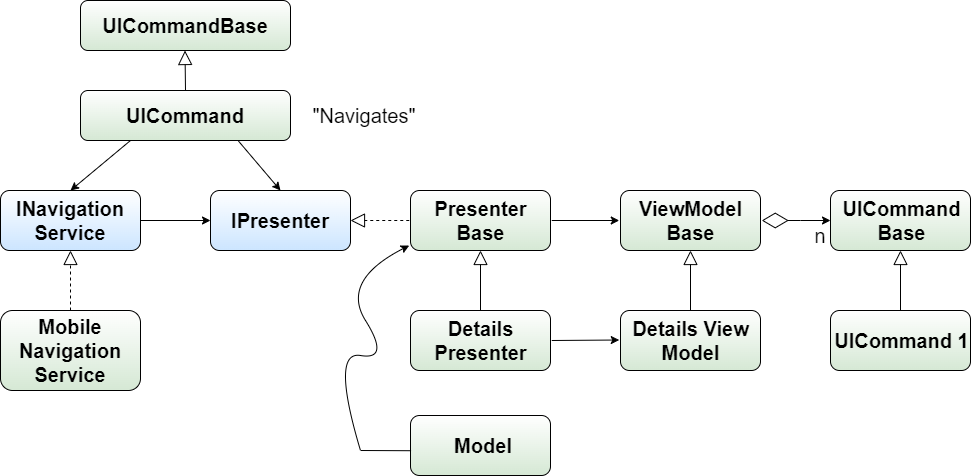
Again, it's a simple answer. A user triggers showing a new presenter by clicking on a button, most of the time. The UICommand handling this event simply gets an instance of the follow-up presenter (through dependency injection, as you'll see later) and provides this instance to some form of navigation. The navigation invokes the Show method with the corresponding parameters from the command which returns a view instance. Navigation then takes care of bringing the view to the screen. Figure 3 illustrates the idea.
In MVPVM, we split up the responsibility of ViewModel into Presenters, Commands, and ViewModel.
Extension Points and Testability
In the beginning, I was promising several benefits, like, for example extensibility, testability, and reusability of code. Now I can clarify them because you have an idea of the basic pattern. For that purpose, imagine that you're building a user interface for a mobile application, and your business logic assembly targets .NET standard. The user interface you already have shows essential values to the user, because the screens on mobile phones tremendously limit the amount of information you can show in a meaningful way.
Now the product owner wishes to have a desktop application. Because the business logic assembly already targets the .NET standard, you easily integrate the business logic into your desktop application. But what about the presentation logic? For the moment, the presentation logic resides in some assembly that ultimately targets a mobile platform, and it only shows some values of the domain in a minimalistic fashion. But, and this is important, the presentation logic already contains some vital interactions with the domain, like, for instance, commands, or event handling. Of course, you'd like to reuse what's there already in your desktop application, but you struggle regarding how. Let me show you a way.
For that, you need to understand how the MVPVM pattern works and where to extend it. The first, and certainly the most important extension point is the presenter. The presenter implements the interaction with the model on instantiating a new view and on reacting to events that the model raises. Hence, you decide how much information you want to propagate and to react on the individual events. Depending on the level of detail, a minimalistic presenter, for instance, would ignore several domain events, and only fills very few values into the ViewModel up with values. In contrast, a detailed presenter loads all values from the model, and propagates them all to the ViewModel. Usually, such detailed presentations form parts of user interfaces in desktop applications where screen sizes don't impose restrictions on the user interface size and the amount of information it shows.
To distinguish between a minimalistic and a detailed approach, I suggest having a presenter base implementation which performs basic steps and integrations with the model. This includes subscribing to the essential domain events, instantiating the view (via dependency injection) together with the ViewModel, and setting up the commands if required (usually dependency injection also handles this). The base presenter uses a base form of the ViewModel, which contains all the properties that the minimal view of the UI component requires. If you require more details in the view, you extend the base presenter into a DetailsPresenter. It subscribes to more events than the PresenterBase and fills up the ViewModel with way more information. Of course, for that you also require more details in the ViewModel, potentially. Hence you also implement a DetailsViewModel containing all the additional properties the view requires. I also saw implementations where the ViewModel contained all potential properties that could be used already. This has the advantage that you don't need to extend the ViewModel to show more details, which is also appealing. But it's a matter of taste which approach you choose; both serve the same goal.
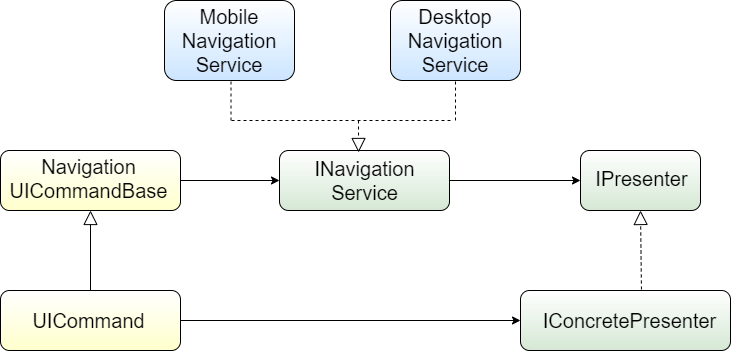
Another topic is how the navigation really works. Let me expand on my earlier explanations. More specifically, you abstract navigation in terms of an interface, the INavigationService interface. This interface hides all the implementation details from the caller of how navigation works, like where to put a window or a frame or a view. Because INavigationService corresponds to an interface, the caller doesn't need to know the implementation. Further, commands form an essential part of the pattern. Namely, each command corresponds to a class, and it captures exactly one user interaction. Hence, navigating between views boils down to a command that gets an instance of INavigationService, and it provides to a method of INavigationService an instance of the presenter or just the interface type of the presenter to show next together with all required parameters. The snippet below illustrates the idea.
protected override void Execute (IEnduranceMainViewModel viewModel)
{
    var presenter = environment.Resolve<IPurchasePresenter>();
    var navigationService = environment.Resolve<INavigationService>();
    navigationService.Navigate(presenter, null);
}
The ViewModel contains one property for each command the view triggers. Such a property is of type ICommand. Most of the commands contain similar private/protected fields, like for example INavigationService, or maybe some basic validation logic. Hence, you factor out a UICommandBase, which serves as base class for all commands you implement. The UICommandBase class also contains a generic CanExecute method, for example. Listing 2 illustrates the idea.
Listing 2: Base implementations for all UI commands
Public abstract class UICommandBase<T> : ITriggeredCommand where T:class
{
    public event EventHandler CanExecuteChanged;

    public bool CanExecute(object parameter)
    {
        return CanExecute(parameter as T);
    }

    public void Execute(object parameter)
    {
        Execute((T)parameter);
    }

    public void TriggerCanExecuteChanged()
    {
        CanExecuteChanged?.Invoke(this, EventArgs.Empty);
    }

    protected abstract bool CanExecute(T viewModel);

    protected abstract void Execute(T viewModel);
}
Figure 4 summarizes navigation, presenter extensions, and commands.
So far, so nice. But what about testing? In the original MVVM pattern, the testing of commands turns out to be really complicated. If you want to test a specific command that a ViewModel implements, you must instantiate a new ViewModel instance and provide all the dependencies of ViewModel for testing to execute the test. Observe that for a ViewModel with ten or more commands where you want to test only one command, you still have to provide all the dependencies. It's really a pain.
The pattern I discuss here solves this issue almost trivially. I mentioned before that the pattern builds a lot around using dependency injection, but I wasn't specific about it. Now is the time to be specific. So, recall that the entire MVPVM pattern uses dependency injection. Precisely, for each piece in the pattern you have an interface, and at least one implementing class.
Let's step through an example. Suppose you build a user interface for a purchase view. In the view, the user either finishes a purchase or cancels the current purchase. Then you have the following artifacts in your solution:
- IView: Interface that all views implement
- IPresenter: Interface that all presenters implement
- IViewModel: Interface that all ViewModels implement
- ViewModelBase: Base class for all ViewModels
- IPurchaseView: Interface defining the purchase view and extending
IView - IPurchaseViewModel: Interface defining all properties (including commands) that a purchase view requires and extends
IViewModel - IPurchasePresenter: Interface that defines the purchase presenter and extends the
IPresenterinterface - PurchaseView: Class that implements the
IPurchaseView(XAML + code behind) - PurchaseViewModel: Class that implements the
IPurchaseVIewModel - PurchasePresenter: Class that implements the
IPurchasePresenter - FinishPurchaseUICommand: Class that implements the
ICommandinterface by extendingUiCommandBaseto finish the purchase - CancelPurchaseUICommand: Class that implements the
ICommandinterface by extendingUiCommandBaseto cancel the existing purchase
The PurchaseView class implements the IPurchaseView interface, and it requires an instance of IPurchaseViewModel in the constructor. It sets this instance as DataContext of the WPF view. The PurchaseViewModel class implements all the properties that the IPurchaseViewModel interface defines such that the PurchaseView class binds successfully to these properties using data binding. The commands, i.e., FinishPurchaseUICommand and CancelPurchaseUICommand, both implement the ICommand interface by extending UiCommandBase, thereby providing an implementation of the Execute method to change the state of the purchase model. Finally, and most importantly, the PurchasePresenter class implements the IPurchasePresenter interface. The snippet below shows how the PurchaseView sets up the data binding.
public PurchaseView(IPurchaseViewModel viewModel)
{
    InitializeComponent();
    DataContext = viewModel;
}
Observe that I added an interface for each moving part of the pattern, like view, ViewModel, and presenter, but also commands. Remember that the presenter corresponds to the main element that defines the entire scope of the UI component it presents. It provides the entry point via the Show method. Therefore, the presenter is responsible for defining the boundaries of the UI component it defines, abstractly speaking. When using dependency injection (DI), as I did here, this implies that the presenter creates a child container (or child scope) on construction in the dependency injection component. Furthermore, the presenter ties all interfaces in the scope of its UI component to concrete classes, thereby essentially establishing the afore mentioned boundary.
For example, the PurchasePresenter in the example first creates a child container in the DI framework, and then registers there that PurchaseView implements IPurchaseView and that PurchaseViewModel implements IPurchaseViewModel, and so on. Importantly, notice that in the context of one Purchase UI component, there exists only one PurchaseVIew and one PurchaseViewModel, therefore the PurchasePresenter registers them as singletons. Now, every time a command or the PurchasePresenter asks the dependency injection container for an instance of IPurchaseViewModel, the container returns the same instance in the scope of this Purchase UI component.
When the presenter registers the interfaces together with implementations to the DI container, it perfectly encapsulates the UI component and hides all implementation details of the UI component from the application. Listing 3 shows the idea. However, you can even do better, because, for the moment, the only way to change implementing classes is to extend the presenter in a sub-class and perform new registrations.
Listing 3: Method to register all types which the purchase UI component requires
public override void RegisterTypes(IPurchasePresenter presenter)
{
    Container.RegisterInstance(presenter);
    container.RegisterInstance(this as IPurchaseEnvironment);

    container.RegisterSingleton<IPurchaseView, PurchaseView>();
    container.RegisterSingleton<IPurchaseViewModel, PurchaseViewModel>();

    container.Register<ICommand, FinishPurchaseUICommand>
        (nameof(FinishPurchaseUICommand));
    container.Register<ICommand, CancelPurchaseUICommand>
        (nameof(CancelPurchaseUICommand));
}
You extend the base pattern now slightly to enable easy testability and switching among environments in the MVPVM pattern. This turns out especially useful when switching between development and production environments, or even test environments. For that purpose, you abstract the DI registration mechanism of the presenter through two interfaces, namely IEnvironment and IContainer. The IEnvironment interface offers a basic interface containing the following functionality:
- Resolve
: This method resolves an instance ofIInterfaceregistered in the DI container.
The second interface is the IContainer interface. This interface implements the following functions:
- Resolve
: This method resolves an instance ofIInterfaceregistered in the DI container. - CreateChildContainer: This method returns an
IContainerinstance of smaller scope. - Register<IInterface, ClassImpl>: This registers in the DI container that every time a caller asks for an instance of
IInterfacethe container responds with a new instance ofClassImpl. - RegisterSingleton<IInterface, ClassImpl>: This is the same as
Register, but performs the registration as singleton instance in the DI container.
Listing 4 and Listing 5 show the two interfaces.
Listing 4: The IEnvironment interface
/// <summary>
/// The interface which defines an environment
/// </summary>
public interface IEnvironment<IPresenterInterface> : IDisposable
    where IPresenterInterface : IPresenter
{
    /// <summary>
    /// Register all types
    /// </summary>
    /// <param name""presenter""></param>
    void RegisterTypes (IPresenterInterface presenter);

    /// <summary>
    /// Resolve an interface
    /// </summary>
    /// <returns></returns>
    IInterface Resolve<IInterface>();

    /// <summary>
    /// Resolve an interface for a given name
    /// </summary>
    /// <param name""nam""></param>
    /// <returns></returns>
    IInterface Resolve<IInterface>(string name);
}
Listing 5: The IContainer interface
/// <summary>
/// Interface for dependency injection
/// </summary>
public interface IContainer : IDisposable
{
    /// <summary>
    /// Creates a child container/scope
    /// </summary>
    /// <returns></returns>
    IContainer CreateChildContainer();

    /// <summary>
    /// Register a class for an interface
    /// </summary>
    void Register<IInterface, Impl>() where Impl : IInterface;

    /// <summary>
    /// Register a class for an interface
    /// </summary>
    /// <param name""nam""></param>
    void Register<IInterface, Impl>(string name) where Impl : IInterface;

    /// <summary>
    /// Register a singleton
    /// </summary>
    void RegisterSingleton<IInterface, Impl>() where Impl:IInterface;

    /// <summary>
    /// Register a particular interface instance
    /// </summary>
    void RegisterInstance<IInterface> (IInterface iinterface);

    /// <summary>
    /// Resolve an interface
    /// </summary>
    IInterface Resolve<IInterface>();

    /// <summary>
    /// Resolve an interface for a given name
    /// </summary>
    IInterface Resolve<IInterface>(string name);

}
What is all this abstraction good for? I mean, do you really want that much abstraction? At a first glance, the answer is no, at least nowadays when we strive for simple solutions. However, when you think about changing environments, and maybe even changing DI frameworks, it suddenly makes sense to implement it that way. Or does it?
Imagine that you have a presenter class, let's say PurchasePresenter, that runs in an environment. Then I suggest you do the following: Implement the PurchasePresenter class according to the guidelines here, but instead of receiving the dependency injection container in the constructor directly, let the PurchasePresenter class get an instance of IPurchaseEnvironment. Of course, you must implement the IPurchaseEnvironment interface. For that, create a class that implements IPurchaseEnvironment, let's say PurchaseProductionEnvironment. The responsibility of this class corresponds to tying all interfaces that the PurchasePresenter requires to classes. In other words, the PurchaseProductionEnvironment class registers in the DI container all instances and classes in terms of interface that the Purchase UI component requires. To do so, the PurchaseProductionEnvironment class uses an instance of IContainer, which abstracts the underlying DI framework. Hence, the PurchaseProductionEnviroment class tells the IContainer instance which interface maps to which class. In this approach, you easily swap between environments from the perspective of the presenter, but also the dependency injection container. Listing 6 illustrates the idea.
Listing 6: The IPurchaseEnvironment interface and an implementation of it for production environments
public interface IPurchaseEnvironment : IEnvironment<IPurchasePresenter>
{
}

class PurchaseProductionEnvironment : EnvironmentBase<IPurchasePresenter>,
  IPurchaseEnvironment
{
    public PurchaseProductionEnvironment(IContainer container) : base(container)
    {
    }

    public override void RegisterTypes(IPurchasePresenter presenter)
    {
        container.RegisterInstance(presenter);
        container.RegisterInstance(this as IPurchaseEnvironment);

        container.RegisterSingleton<IPurchaseView, PurchaseView>();
        Container.RegisterSingleton<IPurchaseViewModel, PurchaseViewModel>();

        container.Register<ICommand,
           FinishPurchaseUICommand>(nameof(FinishPurchaseUICommand));
        container.Register<ICommand,
           CancelPurchaseUICommand>(nameof(CancelPurchaseUICommand));
    }
}
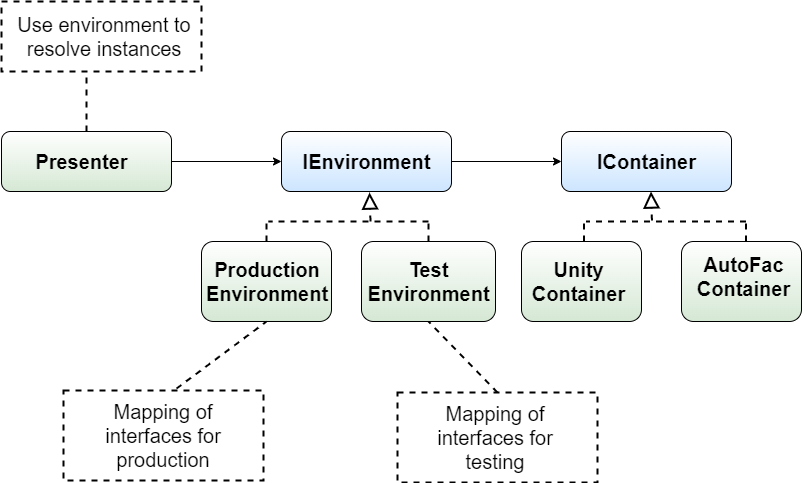
Suppose you want to test the PurchasePresenter implementation. Then you simply create a PurchaseTestEnvironment class that implements IPurchaseEnvironment and registers mock implementations, and voila, the PurchasePresenter doesn't need any change. Similarly, if you want to run the PurchasePresenter in a mobile environment, you could do the same if anything else stays the same. Ultimately, if you want to change the underlying DI framework, let's say from UnityContainer to AutoFac, you just implement a new class implementing the IContainer interface for the technology of your choice. Figure 5 summarizes the environment and container approach.
The approach above also lets you easily reuse an existing presenter within multiple environments like mobile or desktop, given that the presenter stays the same. That's basically because exchanging the behavior of commands or a new user interface for the same values of the view model only boils down to a new environment.
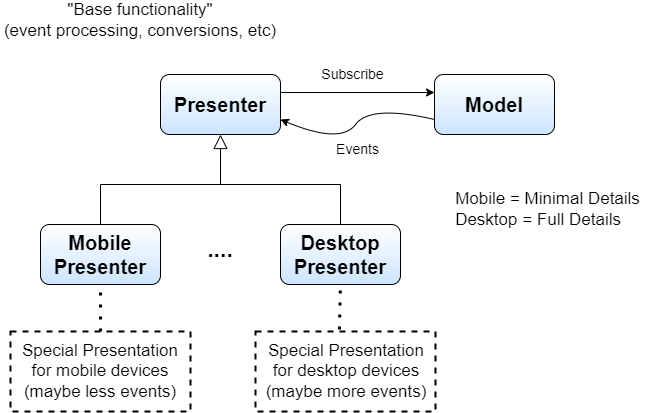
But what about when you must subscribe to different components or even additional components depending on your platform? How the heck to do that now? Well, for that, by looking at the responsibilities in the pattern, you again extend the presenter. In case the interaction for mobile and desktop application with regard to the model differ, then you implement a dedicated presenter for each platform. Thanks to .NET standard in former days, and .NET 5 (6) nowadays, you implement a presenter class covering all the basic functionality. This includes base event processing, interaction with environment, conversions, or similar. The chosen target framework allows you to reuse the base class everywhere and it enables you to implement a MobilePresenter class for mobile devices and a DesktopPresenter class for desktop applications, both extending the base presenter. Of course, you may also implement new environments as you require, but in case they stay the same, no changes are required. What a nice flexible framework we have! We have reusability and extensibility at its best.
Finally, when talking about reusability, I need to emphasize the modularization of the approach. All elements of the pattern are designed for reuse. Recall that a view binds to a ViewModel that contains properties, including commands. Assume that you define a particular user control covering one reoccurring UI element throughout your application. When adopting this approach, you reuse the View (as user control) together with the ViewModel as data context and the UI commands (in case the user control always hits the same model; otherwise not, of course).
Working Toward a UI Framework
I've shown before how to tackle different platforms, but I want to dig a bit deeper, because you'll run into some details that will annoy you when not considering them from the beginning. Certainly navigation corresponds to one of the most painful ones, especially on mobile platforms. We've been talking about navigation twice, now we'll finalize it.
Let's Have a Look at Navigation in Detail
Previously I introduced the INavigationService interface. And for a good reason. Navigation forms an essential part of every application, and it depends a lot on the platform the application runs on. For instance, on mobile phones, you navigate from page to page, and navigation manages pages on a stack. Hence, every time you navigate to a new page, the navigation components pushes the new page on top of the existing stack. Conversely, when you navigate backwards, navigation pops the current page from the stack and removes it.
Navigation on mobile platforms also supports modal pages, which don't enter the navigation stack. They're like modal dialogs in desktop applications, and they don't really follow a concept of direction like navigating forward or backward.
In the MVPVM pattern, you abstract navigation through the INavigationService interface to allow the reuse of all parts of the pattern on multiple platforms. Just imagine for a second that you hardcode the pattern to use the navigation component of mobile platforms. Then you can't reuse all this code on multiple platforms, because the code requires the navigation from mobile platforms. Hence, you implement navigation in the pattern in the following way: You define an INavigationService interface. This interface defines the following methods:
- Navigate
: This generic method defines the navigation to instances implementing theIPresenterinterface. The argument of this method is oftypeobject and namedargs. Particularly, theargsargument encodes the data transfer object that the presenter requires to show the view to which the user wants to navigate. This could correspond to a Guid identifying a model instance that the user interface needs to show. - NavigateModal
: The same as theNavigatemethod, but now the navigation is modal.
The following code listing shows the interface.
/// <summary>
/// Interface declaring how to navigate
/// </summary>
public interface INavigationService
{
    /// <summary>
    /// Navigates forward to a new presenter
    /// </summary>
    /// <param name""presente""></param>
    /// <param name""ar""></param>

    void Navigate(IPresenter presenter, object arg);
    /// <summary>
    /// Navigates forward to a new presenter
    /// </summary>
    /// <param name""presente""></param>
    /// <param name""ar""></param>
    void NavigateModal(IPresenter presenter, object arg);
}
Further, to enable reuse at its best, I also define a NavigationUICommandBase that gets an instance of INavigationService in the constructor. When you need to implement a navigation command, simply extend the NavigationUICommandBase, and navigate to the presenter to show in the implementation of the Execute method.
The INavigationService interface corresponds to the pivot point for the platform-dependent navigation. You implement (platform-dependent like Xamarin, for example) one NavigationService class to encapsulate navigation specific logic for each supported navigation kind. This again enables for a maximum in terms of reuse. Figure 7 shows the idea.
As you see, navigation in this approach takes place at the level of presenters rather than at the level of views or ViewModels. Sounds confusing at the beginning, and imposes some overhead, but the benefits outweigh the additional development efforts. Observe that instead of simply instantiating new views and popping them on the stack directly, you go through the navigation service. The navigation service instantiates the presenter and invokes the Show method together with the parameters. Finally, the navigation service gets an instance of iView as a return value from the Show method, which corresponds to either a page (for mobile platforms) or a window or similar for desktop applications.
Navigating backwards is also straightforward. In case a user leaves the current page or window, the presenter's close method must be invoked from within a UI command, for example. Internally, the presenter raises the Closed event, to which the implementation of INavigationService must listen. The navigation service uses this event then to look up the corresponding presenter and its view and removes them. You can also have a look at the full example, which clears things up, probably.
Also notice that all the code in the examples here is written without async, but it's straightforward to implement the entire framework for applications using async. You easily do this by simply introducing the necessary statements like Task, await, or async in the framework interfaces and implementation like, for example, INavigationService, IEnvironment, etc.
Now I'll conclude the entire multi-platform story by summarizing and centralizing some things.
Turn It into a Framework Now
The ultimate goal of software development is to find the right trade-off between simplicity and reusability. You wonder why? Well, simplicity often implies duplication and copy-and-paste approaches. That's a very convenient way to ship the same feature, the same UI, or the same back-end service in multiple applications without changing anything. However, saving costs here often comes with the price of complicated and tedious bug fixes, because a bug got spread over tons of applications.
On the other end of the spectrum resides full reusability. To achieve that, development focuses a lot on generalizations and abstractions to make most pieces of the source code reusable. That's essentially one of the fundamental goals of framework development. You write code once and use it in many different applications. The development of such frameworks, if done for full generality, takes a considerable amount of time and effort. Therefore, you spend more time in the beginning, but reuse code in many places. As you see, it's a trade-off between those two ends of the spectrum.
However, in the world of MVPVM, it makes sense to extract certain parts into a UI framework, which forms the backbone of your applications. The design goals of such a framework enumerate as follows:
- Reusability across platforms: The abstract framework for MVPVM should be reusable across multiple platforms.
- Reusability across applications: The abstract framework for MVPVM should be independent of any application.
These two design rationales together imply two very important consequences. First, the target .NET version of the abstract framework needs to be reusable on all target platforms. Therefore, the target .NET framework either corresponds to .NET standard 2.0 or .NET 5 (6), for instance. Second, all definitions within such an abstract framework are completely independent of any application. In other words, the interfaces, classes, and other source code artifacts present themselves fully agnostic to any business logic. How do you achieve this?
You start by creating a new assembly that declares all interfaces of the MVPVM framework. The interface includes at least the following:
- IView: The interface all views implement
- IViewModel: The interface all ViewModels implement
- IPresenter: The interface all presenters implement
- INavigationService: The interface all navigation services implement
- IEnvironment: The interface all environments implement
- IContainer: The interface all dependency injection containers implement
There are also some additional base classes that you want to implement agnostic of any business logic, like for example:
- ViewModelBase: Provides a base implementation for all ViewModels. It implements the
PropertyChangedevent handlers or similar generic code - EnvironmentBase: Provides a base implementation common for all environments, like, for example, deferring the resolution of interfaces or the creation of child containers to
IContainer - PresenterBase: Provides a base implementation common for all presenters. It could contain an implementation of the
Showmethod that checks the parameter type of the arguments.
Of course, feel free to extend this abstract framework with functionality if it stays platform-independent and agnostic to any business logic. Let's name this abstract framework containing all the interfaces and base implementations “MVPVM framework.”
Up to now, there is only an abstract framework and you must implement the interfaces somewhere. For that purpose, I suggest the following. You create an assembly containing all the platform-dependent but still application-agnostic code for each platform. Such assemblies usually contain navigation service implementations, for example. Hence, in case you target both desktop and mobile platforms, you have two further assemblies, namely “MVPVM Mobile Framework” and “MVPVM Desktop Framework.”
Now you're closer to a running UI application by tackling the platform-dependent, application-agnostic code parts. What's left to be dealt with is the application-dependent code. For such code, I suggest that you implement the MVPVM framework interfaces into another abstract assembly that contains application-specific, but platform-independent code. Most of the time, such code corresponds to base presenter implementations that couple to the underlying application model. For example, for a game, you create an assembly with the name “Game UI component.” This component contains all the presenters of the game in a platform-independent way. The presenters couple to a minimum set of events to be reacted upon in the user interface, and potentially also some view model initialization.
In the final step, you implement the abstract presenter implementations of the Game UI component in a platform-dependent way in one assembly for each platform. If your product owner requires that you run the game on mobile and desktop platforms, you create a “Mobile Game UI component” and a “Desktop Game UI component.” For a visualization of this entire approach, have a look at Figure 8.
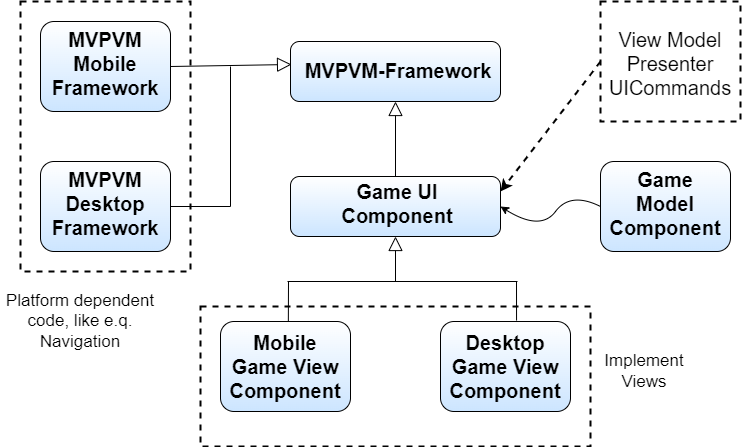
Develop your own UI presentation framework for a maximum of reuse.
Aggregation in the MVPVM Pattern
You may also wonder how to aggregate these small UI components into larger pieces. Assume that you followed the pattern, and you ship one of your UI components for a particular part of business logic to your customers. They're happy with the UI, but they want to see multiple views from several different parts of the application in a single screen, like a dashboard. In case you followed the pattern here, this turns out to be a simple task. Otherwise, it's a considerable effort of refactoring. But where do we start now?
Recall the responsibilities within the pattern. The presenter's responsibility corresponds to presenting values through the ViewModel on the screen of the user. So, in this case, if you want to aggregate multiple views into a single dashboard, you do so by introducing another presenter that acts like a mediator or coordinator among the presenters you aggregate. This essentially allows you to have a single class to coordinate actions across presenters, but also to minimize the amount of code required to present all these views to the end user.
Of course, you're also going to need a view class that aggregates all of these smaller views, but that's almost trivial. Similarly, and also trivial, you need a ViewModel for the coordination presenter that contains all child ViewModels as properties to achieve proper data binding. But that's just some boilerplate code you build for perfect reuse. Importantly, you don't need to modify your existing implementations, you reuse-as-is rather than reuse-with-many-modifications. Figure 9 shows the aggregation approach.
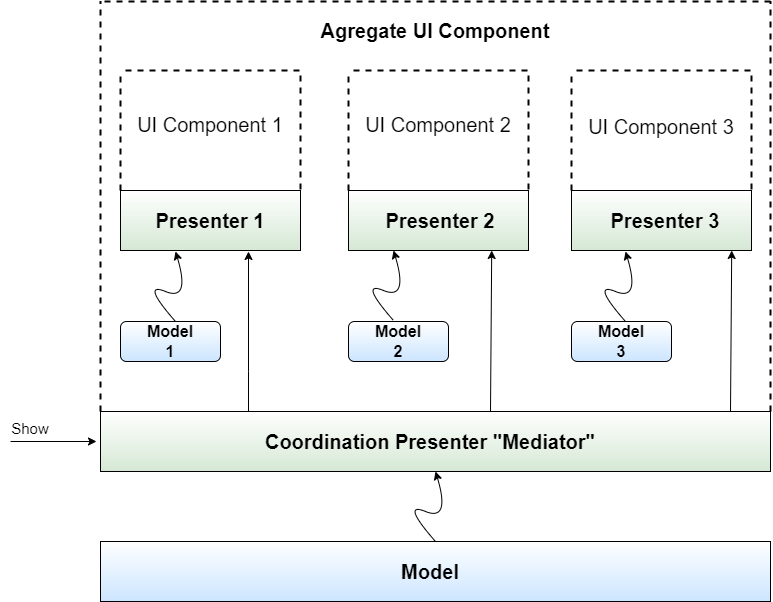
Aggregating multiple views together in this approach is as easy as it appears. So, what's left to complete in the MVPVM pattern? Actually, nothing. You're done. So, let's start to summarize stuff.
Aggregate existing presenters together to create larger UI components.
Recap of the Pros and Cons
As with any pattern, you must somehow balance the pros and cons of applying a pattern. Here is a checklist of potential questions you may ask yourself:
- Is there a chance for reusing the presentation logic on multiple platforms?
- Is there a chance of showing different views on the same model, like minimalistic or detailed?
- Could the view appear in larger views like, for instance, dashboards?
- Do you intend to test your presentation logic?
These questions form a baseline for when to apply the pattern. If you answer any of these questions with yes, consider applying the pattern, because it makes your life easier. Furthermore, and importantly, applying this pattern repeatedly through an entire codebase or even across different software products unifies the implementation of presentation logic. This also makes it easier to move developers from team to team, because they all follow the same pattern.
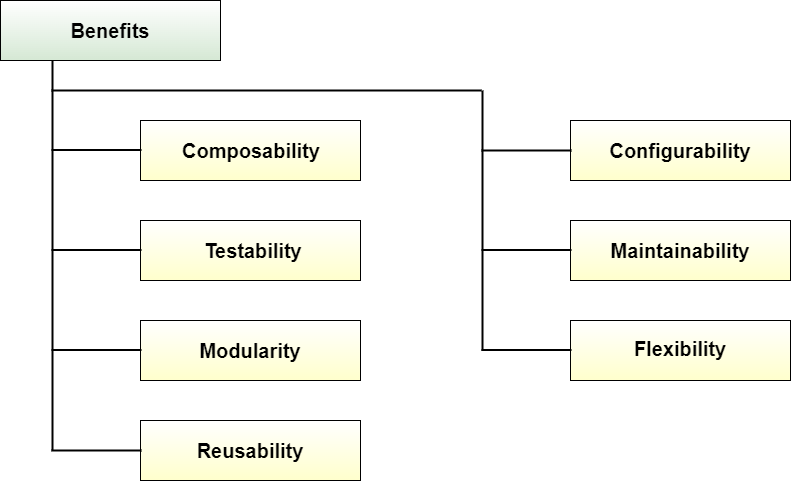
Figure 10 summarizes again the quality attributes of the approach in terms of -ilities.
Conclusions
In this article, I've shown a way to approach presentation logic in a highly modular manner. By introducing presenters as an additional element to the standard MVVM pattern and factoring out the UI commands, you gain a lot more flexibility to reuse and adapt the presentation logic of your application. Furthermore, it enables you to write presentation logic like in software product line approaches and framework development. It allows you to test your code in a much simpler way than in standard MVVM pattern and unifies the implementation of presentation logic across platforms.
