


Last year, the .NET team introduced the .NET Upgrade Assistant tool to make migrating from .NET Framework to modern .NET targets easier. Since then, the team has been hard at work iterating on the upgrade tooling story to improve functionality and fill gaps.
With .NET 7's release, there are now more tooling options for easing the transition from .NET Framework to .NET 7. This article walks through those improvements - both the new capabilities in Upgrade Assistant and some new tooling focused specifically on web scenarios with the ASP.NET Incremental Migration Tooling and System.Web Adapters.
Although there are more tools to choose from now, each has a particular role in the upgrade process:
- Use Upgrade Assistant for analyzing the work required to upgrade, both with the existing analysis mode and the new binary analysis mode explained in more detail later in this article.
- Use Upgrade Assistant for upgrading class libraries or WPF, WinForms, console, or WCF apps in-place.
- Use ASP.NET Incremental Migration Tooling to upgrade ASP.NET applications by incrementally moving endpoints to a new ASP.NET Core project.
- Use System.Web Adapters in conjunction with ASP.NET Incremental Migration (to help the old and new projects interoperate) and to migrate class libraries with System.Web dependencies.
You can find the latest docs and news about Upgrade Assistant on GitHub at https://github.com/dotnet/upgrade-assistant.
You can find the latest docs and news about the ASP.NET Incremental Migration Tooling and System.Web Adapters on GitHub at https://github.com/dotnet/systemweb-adapters.
Upgrade Process Overview
Although there's new tooling to help, the overall process to migrate from .NET Framework to .NET 7 is still the same. The steps are shown in Figure 1.
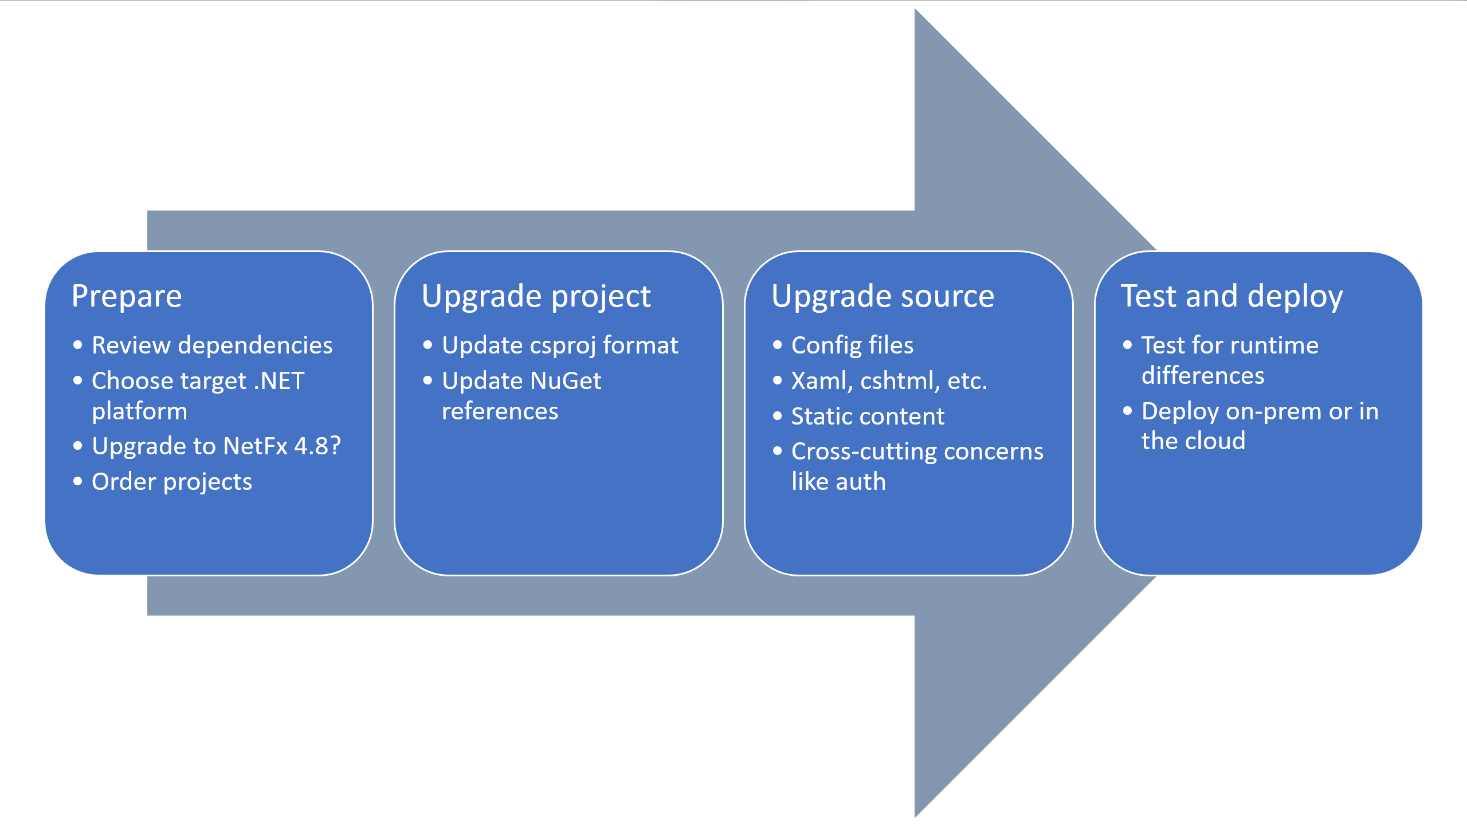
Step 1: Preparation
The first step in upgrading a project from .NET Framework to .NET 7 is to get ready for the upgrade by understanding what work is ahead and possibly by making preliminary changes to the solution.
Specific actions during this step of migration include:
- Reviewing the project's dependencies. This includes the .NET Framework APIs your app depends on, third-party packages, and other projects you own. While reviewing APIs or dependencies (like NuGet packages) that won't work on .NET 7, be on the lookout for any that will be difficult to replace. If missing APIs or NuGet packages are used in common or high priority code paths, this may be a red flag that an upgrade will require larger changes.
- Upgrade Assistant has a new binary analysis command in preview. Details on how to use this new command are in the Upgrade Assistant section of this article. Upgrade Assistant's binary analysis command will report on which .NET Framework APIs your project uses and whether those APIs are supported on .NET 7 or not.
- Upgrade Assistant's existing Analyze command is also useful while preparing for an upgrade because it highlights changes that Upgrade Assistant recommends, such as specific NuGet packages that will need to be updated or other changes that are required in the source or configuration of the project.
- Choosing a target framework. When upgrading from .NET Framework, you might want to target .NET 7, .NET 6, or .NET Standard 2.0. If you'll be using Upgrade Assistant, it recommends an appropriate target based on your project and whether you prefer Long Term Support (LTS) or Current versions. More details on .NET support policy are available at https://dotnet.microsoft.com/platform/support/policy/dotnet-core. If you're using incremental migration tooling or updating the project file by hand, you need to choose the target framework yourself. Things to consider include:
- A .NET Standard 2.0 target allows libraries to be shared between .NET 6/7 callers and .NET Framework callers. Because of this valuable portability, it's recommended that class libraries should target .NET Standard 2.0 unless they have dependencies that require a more restrictive target framework. Executable projects (console apps, Windows desktop apps, and web apps like ASP.NET Core MVC or WebAPI projects) cannot target .NET Standard because it's only an API definition and not a runnable product.
- .NET 6 is the most recent LTS release of .NET. This means that it will be supported longer than .NET 7. LTS releases are supported for three years from their release date compared to 18 months for Current releases. If you need longer-term support for your project and don't need any of .NET 7's new features, .NET 6 is a great choice.
- .NET 7 is the most recent Current release of .NET. That means it has the latest features and best performance. If you intend to take advantage of .NET 7's improvements in your project, choose it as the target framework moniker.
- Upgrading to .NET Framework 4.8. In some cases, it may make sense to retarget projects to .NET Framework 4.8 prior to upgrading to .NET 7. For very large projects or projects targeting old versions of .NET Framework (before .NET Framework 4.5, for example), this can be valuable because it allows you to address breaking changes between older and newer versions of .NET Framework separate from further breaking changes moving from .NET Framework to .NET 7. For small or medium-sized projects or those targeting more recent .NET Framework versions, upgrading to .NET Framework 4.8 isn't necessary because the number of breaking changes moving to .NET Framework 4.8 is likely to be small.
- Order projects. Finally, if your solution contains many projects, consider in which order you will upgrade them to .NET 7 (or .NET Standard). It's usually best to upgrade lower-level dependencies (“leaf nodes” of the project graph) to .NET Standard first and then upgrade their callers. If you use Upgrade Assistant to upgrade a solution, it recommends an ordering based on the dependencies of projects in the solution and based on which project you ultimately want upgraded to .NET 7.
Step 2: Upgrading the Project File
Once you've prepared for the upgrade by understanding the project's dependencies and, possibly, by upgrading it to a newer version of .NET Framework, you're ready to begin modernizing the project's assets. The best place to start is the project file itself because .NET 7 uses new, simpler SDK-style project files.
Both Upgrade Assistant and the Incremental Migration Tooling can help with this step.
- If you're using Upgrade Assistant to upgrade a non-web project, it upgrades the project file in-place. In one of Upgrade Assistant's early steps, it updates the project's
csprojorvbprojfile so that it uses the new SDK-style format while being functionally equivalent to the old project file. - If you're using Incremental Migration Tooling to upgrade an ASP.NET app, it creates a new ASP.NET Core project that you can gradually move endpoints into. The new project starts out empty with references and other items added as more of the project is migrated.
As part of upgrading the project file, you will also want to review your NuGet package references and make sure they're correct. The packages.config method of referencing NuGet packages that were probably used in the original project lists all NuGet packages needed, whereas, in an SDK-style project, only the packages your project uses directly need to be referenced (those packages' references do not need to be referenced). Again, tooling helps with this. Upgrade Assistant automatically removes unneeded package references and Incremental Migration Tooling won't even add unnecessary package references to the new project in the first place.
Of course, the version of NuGet references may also need to be updated in order to work with the new .NET target you'll be using (.NET 6 or .NET 7). Both Upgrade Assistant and Incremental Migration update package versions.
Finally, as part of upgrading the project file, the target framework moniker for the project should be set to the .NET platform that you're upgrading to. Upgrade Assistant automatically detects whether .NET 6, .NET 7, or .NET Standard makes the most sense for the project and updates it accordingly. With Incremental Migration, the UI for creating the new project allows the user to select .NET 6 or .NET 7.
Step 3: Upgrading Project Source
The third step of upgrading from .NET Framework to .NET 7 is upgrading the contents of the project: the source code, config files, and other assets. This is usually the bulk of the upgrade work.
Both Upgrade Assistant and Incremental Migration Tooling have the ability to automatically apply some fixes to source code while upgrading. For Upgrade Assistant, fixes are applied automatically across the whole project while, for Incremental Migration Tooling, fixes are made as the source code is copied over from the old project to the new one as needed to migrate specific vertical slices of the app.
Remember that no upgrade tooling can completely automate the changes needed to upgrade from .NET Framework to .NET 7. Especially for application models (like web apps) that have significant differences from .NET Framework, it will be necessary to make manual updates the tooling wasn't able to automate. Although the upgrade tooling will address the “easy” changes, allowing you to focus on those that require more understanding of the project, the tooling won't address all necessary changes in any but the simplest of projects. In most cases, source code upgraded to .NET 7 won't immediately build and requires manual work to complete the upgrade before the project will successfully compile and run on the new target.
Step 4: Testing and Deploying
Once the project builds against the new .NET target, you're nearly done. But don't forget to test thoroughly before deploying the upgraded project. There are runtime behavioral differences between .NET Framework and .NET 7 that can cause apps to fail when run even if they build correctly. Make sure that any test suites are ported and passing in addition to exercising the upgraded project manually to confirm that everything's working as expected.
Once that's done, you're ready to deploy. With the upgraded app running on .NET 7, deployment may look a bit different - it's now an option to run on Linux or in Linux-based containers. You can also choose between framework-dependent deployment (which will use the .NET runtime on the user's machine) or self-contained deployment that includes the .NET runtime and libraries needed with the application. More details on .NET deployment models and options (including ahead-of-time compilation and single-file deployment) are available at https://docs.microsoft.com/dotnet/core/deploying.
ASP.NET Incremental Migration
One of the most exciting new options for upgrading is ASP.NET Incremental Migration Tooling. This tooling is a Visual Studio extension that allows developers to use a simple GUI interface to create new ASP.NET Core projects in parallel with existing ASP.NET apps. The tooling takes care of connecting the two apps (using a YARP proxy) so that requests coming into the ASP.NET Core app are first handled by that app and, if the ASP.NET Core app is unable to handle them, are then proxied to the original ASP.NET app. This applies the Strangler Fig pattern, allowing developers to gradually move functionality from their ASP.NET app into a new ASP.NET Core app one controller or action method at a time without changing their original ASP.NET app. From an end user's perspective, the experience of using the app will be unchanged. Behind the scenes, the app will be slowly moving to ASP.NET Core as more and more of its components are upgraded.
Although Upgrade Assistant is still the recommended tool for upgrading class libraries and non-web apps, ASP.NET Incremental Migration Tooling is recommended for ASP.NET scenarios.
Getting Started with Incremental Migration
To get started, install the Visual Studio extension from https://marketplace.visualstudio.com/items?itemName=WebToolsTeam.aspnetprojectmigrations.
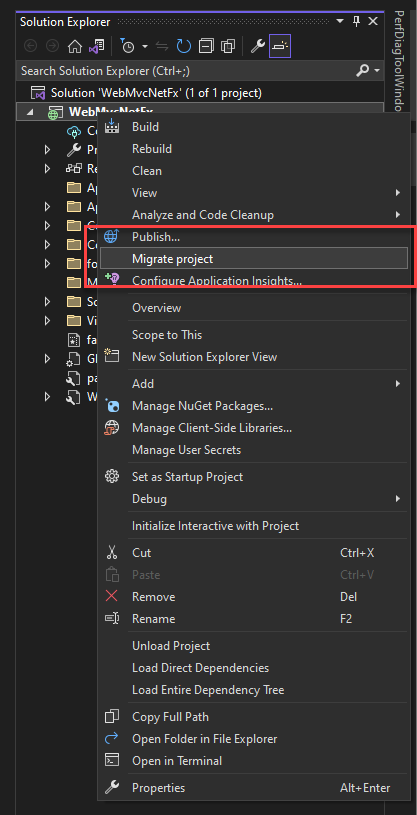
Once the extension is installed, you can choose “Migrate project” in the context menu when right-clicking on an ASP.NET app, as shown in Figure 2.
A UI appears allowing the user to select the target framework (.NET 6 or .NET 7) and template to use (MVC or WebAPI) for the new project and a new ASP.NET Core project is created, configured with a YARP proxy to automatically forward any requests it can't handle to the original ASP.NET app. Project launch configuration is also updated so that pushing F5 in Visual Studio begins debugging both the old and new web projects.
Incrementally Migrating Project Components
Once the new project is created, you can choose to migrate classes, controllers, or views. Simply right-click on the component to migrate (either in Visual Studio's editor or in the solution explorer) and choose the Migrate menu option. The UI will display a tree view of the selected component and its dependencies, as shown in Figure 3. Dependencies could include other classes, views, NuGet packages, or project-to-project references. From the migration UI, you can choose which of the dependencies to migrate (by default, all direct dependencies are selected).

Clicking the Migrate selection button copies the selected item along with all selected dependencies into the new project. While copying source files, the tooling updates source code with some transformations to get it closer to what's needed to run on ASP.NET Core (fixing up some common ASP.NET namespace changes, for example, or replacing types with near equivalents in ASP.NET Core). While copying NuGet dependencies, the tooling updates the packages to more recent versions that work with the newer .NET version in the new project. Of course, as mentioned previously, there will be additional manual fixups needed in migrated source files before they will build and work in the new project. But by using the Incremental Migration Tooling, you're able to tackle that challenge one small part of the app at a time.
Except for a couple properties in the csproj file to enable the migration process, the original ASP.NET app isn't changed, so it will keep working the same as always.
System.Web Adapters
The ASP.NET team has created an open-source project called “System.Web Adapters” that pairs with the Incremental Migration Tooling extension to make it easier to transition code from ASP.NET to ASP.NET Core. The project can be found at https://github.com/dotnet/systemweb-adapters. In that GitHub repository, you can learn more about the project, file issues, or even submit pull requests to contribute.
The System.Web Adapters project has two parts:
- A core package of adapters.
- Extensions that make it easier to work with an ASP.NET and ASP.NET Core project side-by-side, as in the case of incremental migration.
Adapters Package
The lowest-level component of the System.Web Adapters is the Microsoft.AspNetCore.SystemWebAdapters package. This package targets .NET Standard and contains adapters for common System.Web APIs, such as HttpContext.Current and APIs on HttpRequest, HttpResponse, and many other types. When used by a .NET Framework caller, the adapters type-forwards references to these types to the actual implementations in System.Web. When used from a .NET 6 or .NET 7 caller, the package shims the calls to equivalent ASP.NET Core calls.
Using Microsoft.AspNetCore.SystemWebAdapters, developers can use code that depends on these common System.Web APIs while targeting .NET Standard 2.0 and have it work on either ASP.NET or ASP.NET Core. This has benefits in two scenarios:
- By using the adapters package, class libraries with
System.Webdependencies can be upgraded to target .NET Standard 2.0 with minimal code changes. This makes upgrading a large web solution much simpler. By targeting class libraries to .NET standard, they can be used by upstream callers that are still targeting .NET Framework and by callers that are upgraded to ASP.NET Core and .NET 7. This is especially useful in incremental migration scenarios because it allows the original ASP.NET app and the new ASP.NET Core app in the migration scenario to share class libraries. - Using the System.Web Adapters can also help minimize code changes when initially migrating code to an ASP.NET Core project during incremental migration. Although the APIs supported by the adapters package are prioritized around what's most likely to be used in libraries, there's enough overlap with APIs used in MVC scenarios that they provide some value getting migrated classes working on ASP.NET Core, as well. It will be necessary to update instances of
System.WebAPIs being used from the migrated ASP.NET Core app eventually, but the System.Web Adapters can be useful in getting things working initially.
Services Packages
In addition to the adapters package, the System.Web Adapters project includes new functionality that helps ASP.NET and ASP.NET Core apps work together better in incremental upgrade scenarios. This new functionality ships in two packages: one package for use in the ASP.NET app (Microsoft.AspNetCore.SystemWebAdapters.FrameworkServices) and one for use in the ASP.NET Core app (Microsoft.AspNetCore.SystemWebAdapters.CoreServices).
The services are enabled in the ASP.NET Core app by calling AddSystemWebAdapters and UseSystemWebAdapters in their main method, as shown in this code snippet. This makes SystemWebAdapters services available in the app's dependency injection container and registers SystemWebAdapters middleware.
using Microsoft.AspNetCore.SystemWebAdapters;
var builder = WebApplication.CreateBuilder(args);

// Add System.Web adapter services to the container
builder.Services.AddSystemWebAdapters();

builder.Services.AddReverseProxy()
  .LoadFromConfig(builder.Configuration.GetSection("ReverseProxy"));

builder.Services.AddControllersWithViews();

var app = builder.Build();

// Additional middleware goes here

// Add System.Web adapter middleware
app.UseSystemWebAdapters();

app.MapDefaultControllerRoute();
app.MapReverseProxy();
Once the System.Web Adapter middleware is registered, endpoints in the ASP.NET Core app can opt into behaviors to emulate ASP.NET behaviors to match how they functioned in the old app. These optional ASP.NET-emulated behaviors include setting the value of Thread.CurrentPrincipal, forcing a request to be served by a single thread, pre-buffering requests, or buffering responses. Controllers and action methods can opt into these behaviors using attributes or they can be enabled by default using extension methods in the app's startup path. More information is available in the System.Web Adapters documentation at https://github.com/dotnet/systemweb-adapters/blob/main/docs/usage_guidance.md.
On the ASP.NET side of things, System.Web Adapter services are enabled by registering the SystemWebAdapters module in the app's web.config (this happens automatically when the FrameworkServices package is installed) and by calling Application.AddSystemWebAdapters() in the app's Application_Start method.
It's recommended to enable the System.Web Adapter services' proxy support, which will cause values like the request URL to match the app's public entry point even though the requests have been proxied to the ASP.NET app. That support is enabled by calling AddProxySupport in the app's Application_Start method:
protected void Application_Start()
{
    SystemWebAdapterConfiguration.AddSystemWebAdapters(this).AddProxySupport(
        options => options.UseForwardedHeaders = true);
}
Full details on setting up the ASP.NET app to take advantage of new functionality in the System.Web Adapters is available in documentation at https://github.com/dotnet/systemweb-adapters/blob/main/docs/framework.md.
Remote App Authentication and Session
The System.Web Adapters services packages also enable sharing authentication and session state between the ASP.NET and ASP.NET Core apps. This means that if a user signs in using an endpoint in the original ASP.NET app or sets session items on such an endpoint, the same identity and session items will be available when the user navigates to an endpoint served by the ASP.NET Core app. Similarly, session items written from the ASP.NET Core app will be available to the ASP.NET app.
Although session and authentication work differently in ASP.NET and ASP.NET Core, the System.Web Adapters enable these features to work in incremental migration scenarios by allowing the ASP.NET Core app to make requests to the ASP.NET app behind the scenes to determine user identity and session items. Any changes to session state are similarly written to the ASP.NET app. So, the ASP.NET app serves as the source of truth for authentication and session information.
These features are enabled by calling AddRemoteAppClient on the ASP.NET Core app's ISystemWebAdapterBuilder (returned by adding System.Web services to the app's services) and by calling AddRemoteAppServer on the ASP.NET app's ISystemWebAdapterBuilder (returned by the call to Application.AddSystemWebAdapters). These remote app calls allow the user to configure the connection between the ASP.NET Core and ASP.NET apps - specifying a security key so that the ASP.NET app knows requests for session or auth information are legitimate and specifying the base URL of the ASP.NET app for the ASP.NET Core app to communicate with.
To enable sharing session information between the two apps, the ASP.NET app must call AddSession and configure a serializer that will be used for writing and reading sessions state to/from the ASP.NET Core app. Serialization is typically done with the System.Web Adapters' JsonSessionSerializer, but users can implement their own serializers if needed. As part of configuring the serializer, the developer must register session item keys that will be used and specify the types of the corresponding session items. This registration with typing information is necessary to securely deserialize session items.
Similarly, to enable shared authentication to work, the ASP.NET app must add a call to AddAuthentication in order to enable endpoints that will deliver user identity to the ASP.NET Core app.
Altogether, with both remote authentication and remote session enabled, the code in global.asax.cs ends up looking like this:
SystemWebAdapterConfiguration
      .AddSystemWebAdapters(this)
      .AddProxySupport(options => options.UseForwardedHeaders = true)
      .AddRemoteAppServer(remote => remote.Configure(options =>
          options.ApiKey = "MySecureKey")
      .AddAuthentication()
      .AddSession())
      .AddJsonSessionSerializer(o =>
          {
              o.KnownKeys.Add("myInt", typeof(int));
              o.KnownKeys.Add("mObject", typeof(DemoModel));
          });
On the ASP.NET Core side, sharing session state and shared authentication are enabled in the same way. AddSession and AddAuthentication are called while configuring the ISystemWebAdapterRemoteClientAppBuilder, and a serializer is registered with the ISystemWebAdapterBuilder along with session items that are expected.
builder.Services.AddSystemWebAdapters()
                .AddRemoteAppClient(remote =>
                    remote.Configure(ConfigureRemoteAppOptions)
                .AddAuthentication(true)
                .AddSession())
                .AddJsonSessionSerializer(o =>
                {
                    o.KnownKeys.Add("myInt", typeof(int));
                    o.KnownKeys.Add("mObject", typeof(DemoModel));
                });
Notice that on the ASP.NET Core side, the call to AddAuthentication takes a Boolean parameter. This parameter indicates whether remote app authentication should be the default authentication scheme for the app or not. If remote app authentication is the default scheme, user identity is retrieved from the ASP.NET app for every request to the ASP.NET Core app. If it's not the default, identity will only be retrieved from the ASP.NET app for requests to endpoints decorated with an authentication attribute specifically requesting authentication with this scheme:
[Authorize(AuthenticationSchemes = "Remote")]
Using remote app authentication as the default scheme avoids needing to add these attributes and makes the user's identity available everywhere but comes with the downside of having an HTTP call to the ASP.NET app to retrieve identity for every request the ASP.NET Core app serves. Not using remote app authentication as the default scheme allows the remote identity to be used more tactically only in cases where it's needed.
Similarly, because sharing session state requires HTTP requests to the ASP.NET app, it's not enabled by default. Instead, controllers or action methods that need to share session state with the ASP.NET app should be annotated with the [Session] attribute.
Because the System.Web Adapters libraries are still in preview at the time this article is being written, some small changes may be made to the API (method names, etc.) prior to the article being published. Full details and all the latest details on configuring and using shared session and shared authentication in incremental migration scenarios are available in the System.Web Adapter documentation at https://github.com/dotnet/systemweb-adapters/tree/main/docs.
.NET Upgrade Assistant
Although Incremental Migration Tooling and the System.Web Adapters offer migration assistance for ASP.NET scenarios, the .NET Upgrade Assistant is still the recommended tool for upgrading class libraries, console apps, Xamarin apps, and Windows Desktop apps in-place. Since Upgrade Assistant's release last year, a number of new features have been added, most notably the ability to scan binaries and compare the .NET Framework APIs used against the surface area of .NET 7 and the ability to upgrade a new type of project: WCF server projects.
Binary Analysis
Previously, when upgrading from .NET Framework to a more modern .NET target, users would use the .NET Portability Analyzer to gauge how many of the .NET Framework APIs they'd used were unavailable on the .NET platform they were migrating to. The .NET Portability Analyzer is in the process of being deprecated and this functionality has been added to Upgrade Assistant. Now you can use the same tool to analyze .NET API usage and upgrade your projects.
Upgrade Assistant's binary analysis feature differs from its existing analyze command in that the analyze command works by running the same analysis as the upgrade command and reports on items to be changed (source code to update, package versions to update, etc.) and the binary analysis feature instead looks at API usage compared to a catalog of which APIs are available on which .NET platforms.
Binary analysis is still in development, so until it's fully released, you need to set an environment variable to enable it in Upgrade Assistant.
Set UA_FEATURES=ANALYZE_BINARIES
Once the UA_FEATURES variable is set to ANALYZE_BINARIES, Upgrade Assistant has a new command available to it: analyzebinaries. There are several useful options that can be passed to the analyzebinaries command. Among them are:
-f <format>: This option allows specifying the output format for the report that's generated. Options are HTML or Sarif. Sarif is a well-known JSON format used to store diagnostic information. Visual Studio can display data from Sarif files in its error list and extensions are available to visualize Sarif in Visual Studio Code.-t <Current | LTS | Preview>: This option allows specifying which .NET target you intend to upgrade to so APIs used in the app can be compared to that target. Specifying Current compares against .NET 7 and LTS compares against .NET 6. Preview also compares against .NET 7 for the time being but soon it will compare against .NET 8 previews.-p <Linux | Windows>: The platform option allows specifying whether the upgrade project will run on Windows or Linux so that the API surface area can be adjusted for the desired environment.
Unlike other Upgrade Assistant commands, the analyzebinaries command runs on compiled binaries rather than project or solution files. So, for input, you'll need to specify a dll or a folder containing one or more .NET assemblies. This means that you can run the analyzebinaries command even against dependencies you don't own. This can be useful if you need to gauge whether a binary dependency is likely to work on .NET 7, but be careful about running the command on NuGet binaries. NuGet packages often have different binaries for different targets, so seeing whether a specific assembly from NuGet uses unsupported APIs or not is typically not useful. There may be other assemblies available for the package for different targets or newer versions of the package available with more supported .NET platforms. NuGet dependencies are better analyzed with Upgrade Assistant's analyze command.
To use analyzebinaries, it's recommended to copy the assemblies you own source code for as well as any binary dependencies that cannot be upgraded to newer .NET 7-native versions through other means (not NuGet output or .NET Framework binaries) into a temporary folder. Then, run the analyzebinaries command using options appropriate for your scenario. For example:
upgrade-assistant analyzebinaries -t LTS -f html .\binaryoutput
Upgrade Assistant reads the assemblies and generates a report showing any APIs that aren't supported on the target version of .NET, as well as APIs that are available but require additional NuGet references, as shown in Figure 4.

CoreWCF
In April of 2022, version 1.0 of the CoreWCF community project was released. This project makes many server-side WCF APIs available for .NET 6 and .NET 7. At the same time as the 1.0 release, Microsoft announced that it would support CoreWCF usage in production scenarios and that it was a recommended path forward for customers with server-side WCF dependencies who wanted to upgrade to .NET 6 or .NET 7, but who could not easily remove the dependency on WCF. More details on CoreWCF and Microsoft support for the project is available at https://devblogs.microsoft.com/dotnet/corewcf-v1-released. To learn more about CoreWCF, be sure to check out Sam Spencer's article on CoreWCF elsewhere in this issue of CODE Magazine or go to https://github.com/corewcf/corewcf.
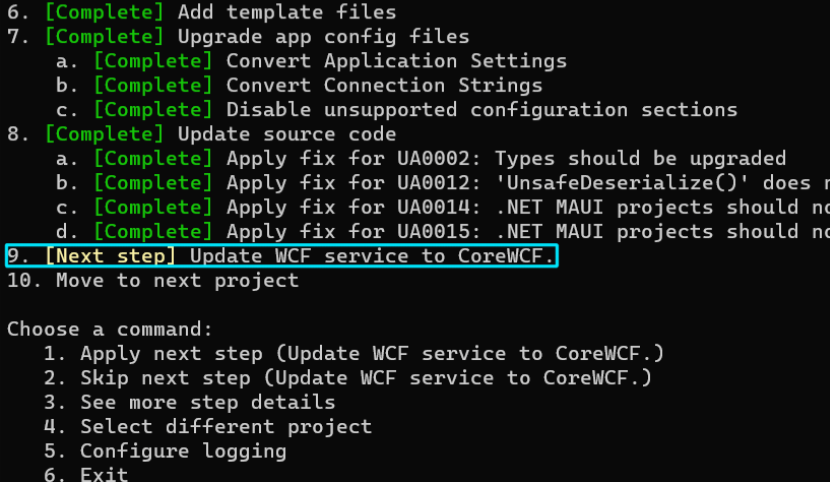
To help customers looking to use CoreWCF as a means of upgrading to .NET 7, Upgrade Assistant now supports upgrading self-hosted WCF scenarios to CoreWCF. No new commands are needed - just use a recent version of Upgrade Assistant and a new upgrade step (shown in Figure 5) will look for self-hosted WCF services and, if found, help to upgrade them to CoreWCF.
Most of the changes moving to CoreWCF are related to setting up the ServiceHost. Some WCF settings that were previously specified in configuration are now set up programmatically. Upgrade Assistant's new CoreWCF upgrade step will help to move the parts of the configuration that need to be changed into code while leaving the rest of the config file for CoreWCF to use. CoreWCF runs on top of ASP.NET Core, so the new code paths will look familiar to anyone who's configured an ASP.NET Core web host before. Because CoreWCF tries to be as compatible with WCF as possible, existing service contracts and implementations should work unchanged.
Upgrade Tooling Roadmap
This article has introduced a lot of new upgrade tooling options: new Upgrade Assistant features, including a binary analysis command, new Incremental Migration tooling for ASP.NET scenarios through a Visual Studio extension, and adapter libraries to make upgrading web scenarios easier.
Going forward, the teams working on these tools will be focused both on adding more functionality to the tools and aligning them with each other. It's great that there's now more tooling available for upgrading to .NET 7 but, in the future, these tools will begin to consolidate and support each other better. There will continue to be a command-line experience through Upgrade Assistant and a Visual Studio experience through the Incremental Migration extension, but planning is underway to share the internal logic of these two tools so that they will give similar experiences (through different user interfaces) and allow users to write extensions that will work with either toolset.
The upgrade tooling for .NET is still young and developing rapidly. As you work with the tools, please get involved with their development efforts. By sending feedback, filing issues, and creating pull requests, you can help to shape the future of .NET upgrade tooling. You can provide feedback and contribute to Upgrade Assistant at https://github.com/dotnet/upgrade-assistant.
Similarly, you can connect with the System.Web Adapters project and create issues or pull requests at https://github.com/dotnet/systemweb-adapters. Although the Incremental Migration Visual Studio extension isn't currently open source, you can still provide feedback on it through the System.Web Adapters GitHub repo.
Wrap Up
.NET 7 offers a host of new features and performance improvements. Targeting .NET Framework, while supported, keeps projects from using the latest runtime features, language features, performance improvements, and community libraries. Upgrading from .NET Framework to .NET 7 can be a challenge, especially for some app models like ASP.NET that have seen major changes, but tools like Upgrade Assistant and Incremental Migration Tooling for ASP.NET can help.
No tooling can completely automate the transition from .NET Framework to .NET 7, but Upgrade Assistant can help analyze the work that needs to be done and assist in making many of the changes needed to move libraries, console apps, and Windows Desktop or Xamarin apps to .NET 7. Meanwhile, the new Incremental Migration Tooling for ASP.NET provides a visual interface for gradually moving functionality in an ASP.NET app to ASP.NET Core on .NET 7 one component at a time. The System.Web Adapters libraries enable sharing web-based code between .NET Framework and .NET 7 and enable important interoperability scenarios between ASP.NET and ASP.NET Core apps in incremental upgrade scenarios.
Please try the tools out and engage with us on GitHub to share feedback or any issues you run into!
