


Where your users are, that's where you want to be, where you need to be. On their phones, on their tablets, on their computers, and generally everywhere they interact with your app. This is reach - being present where your users are and where they're most effectively interacting with your app in order to help them to achieve their goals. The foundation of this omnipresence is being on both mobile and Web. The question is: How do you get there faster than your competition, with better quality, and at a lower cost?
Microsoft offers a variety of ways to create client applications for everything from games and virtual reality to forms over data. The catalog includes low-code solutions with Power Apps, Teams apps, C++ SDKs for desktop and mobile, and .NET, of course. It's great to have choice, and Microsoft knows first-hand from talking to many companies that each has a place. So, where does .NET fit in this mix and when should you use it?
We have shaped .NET Multi-platform App UI (MAUI) first and foremost for you to deliver client applications that feature rich user interactions, high performance, and native platform experiences. You can then leverage all a device and platform has to offer because .NET MAUI builds upon the native UI frameworks of Android, iOS, macOS, and Windows.
So that we start off on the same page, let me begin by defining how I'll be using some common and thus commonly fuzzy terms.
- Native means using the technology specifically designed and optimized for the best experience on a particular platform.
- A client application is any application a user interacts with that runs on devices such as mobile, tablet, desktop, etc., typically via a graphical interface.
- Platform capabilities refer to features such as camera, RFID, GPS, secure storage, accelerometer, file system, notifications, system tray, menus, Bluetooth, and so on.
- Integrations are hardware and software that can be leveraged by your application such as scanners, color sensors, printers, medical devices, and more.
One .NET
“If you are a .NET developer, then you are already a .NET MAUI developer,” I heard a developer say recently on YouTube. This is exactly the confidence we want everyone to get from using .NET MAUI when applying their .NET experience to building mobile and desktop applications. We have designed this familiarity into .NET MAUI.
Your .NET code works the same in .NET MAUI as it does in Blazor, ASP.NET, or any other .NET app. It all uses the same base class library and runtime. The only difference is how the runtime on mobile is optimized for resource-constrained devices.
The startup and configuration of a .NET MAUI app should look very familiar to you. We employ the same builder pattern to create your app instance, configure dependencies, tap into lifecycle events, and more.
public static class MauiProgram
{
    public static MauiApp CreateMauiApp()
    {
        var builder = MauiApp.CreateBuilder();

        builder.UseMauiApp<App>()
               .ConfigureFonts(fonts =>
                   {
                       fonts.AddFont("Regular.ttf", "OpenSansRegular");
                       fonts.AddFont("Semibold.ttf", "OpenSansSemibold");
                   });

        return builder.Build();
    }
}
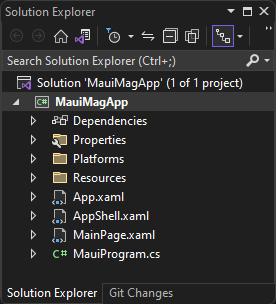
The project structure itself, as you see it in Visual Studio 2022 (see Figure 1), looks a lot like your other .NET solutions where your app is a single project. Historically, you'd have had a separate project for each platform you targeted and then a library project for any shared code. .NET MAUI gives you direct access to each platform from just one project by using .NET multi-targeting and unifies a bunch of common resource tasks. I'll explain more on that in the next section.
One Project, Many Platforms
You choose a development platform to build your app, not to wrangle with underlying platform idiosyncrasies, reconciling the differences between multiple platforms. In .NET MAUI, we decided it didn't need to be so complicated to build cross-platform apps that remain native, so we've abstracted away the meaningless differences. Each platform is still close within reach. You should have to do as little as needed to get the most from each platform, including resources, styles, lifecycle events, and writing platform code.
Any Resource in One Place
Managing images and other visual assets can be a labor-intensive process and one that often involves both a developer and a designer. Each platform has different requirements for file formats, naming conventions, screen densities, and more. In .NET MAUI, you can place your source image in any of the supported formats in the Resources/Images folder, and .NET MAUI automatically generates the various artifacts needed.
Images
.NET MAUI supports source PNG, JPG, GIF, and SVG, which is a great vector file format that lends itself well to upscaling as well as downscaling. By default, all images are treated the same, starting from the original size. To get more control, open the csproj file and add some additional information for that image. For example, if you want to constrain an image to a different base size than the original, set a BaseSize.
<MauiImage Source="Resources/Images/global_map.svg" BaseSize="300,600"/>
The original size may be much larger, which isn't ideal for mobile. Or perhaps the image is exactly the size you want, so you can tell .NET MAUI to not resize anything by adding Resize="false". In this way, you can easily constrain the artifacts and keep your memory footprint low on mobile. Then, to use this image anywhere in your application, you need only reference the filename.
<Image Source="global_map.png"/>
Notice that here, the file extension changed from svg to png. This is because it references the resource optimized for runtime performance, which is a png, and not the source file, which, in this case, is an svg. To directly use svg at runtime, look to SkiaSharp or another library that supports that format.
You also configure your app icons and splash screen the same way in .NET MAUI by denoting which resources should be used to generate all the different sizes (see Figure 2) for the platforms you're targeting.
<MauiIcon Include="Resources\AppIcon\appicon.svg"
          ForegroundFile="Resources\AppIcon\appiconfg.svg"
          Color="#512BD4" />
<MauiSplashScreen Include="Resources\Splash\splash.svg"
                  Color="#512BD4"
                  BaseSize="128,128" />

Fonts for Typography and Icons
Fonts are another notoriously bothersome thing to get right across multiple platforms and .NET MAUI makes this simple. Place any TrueType or OpenType in your Resources/Fonts folder, and then give the file a name in the MauiProgram that you'll use in your styles.
.ConfigureFonts(fonts =>
{
    fonts.AddFont("OpenSans.ttf", "OpenSans");
    fonts.AddFont("fabmdl2.ttf", "Fabric");
})
Apply the font family by that name to your styles or directly on any control, and if your font includes icon glyphs, you can use them for image sources as well. You can see this in Figure 3, where the down chevron glyph is beside the button label.
<Label Text="{x:Static a:FabIconFont.ChevronDown}" FontFamily="Fabric"/>
Styles
From a new project, .NET MAUI provides a complete stylesheet with a default .NET brand-inspired color palette, sensible defaults for all controls including light and dark themes, and visual states for interactive controls. You can use this as a starting point or as a reference guide to add your own global styles to your project (see Listing 1). The styles are implicit, which means any new control, such as a Button that you add to the screen, inherits those characteristics.
Listing 1: Default implicit Button style
<Style TargetType="Button">
    <Setter Property="TextColor"
            Value="{AppThemeBinding Light={StaticResource White},
                                    Dark={StaticResource Primary}}" />
    <Setter Property="BackgroundColor"
            Value="{AppThemeBinding Light={StaticResource Primary},
                                    Dark={StaticResource White}}" />
    <Setter Property="FontFamily" Value="OpenSansRegular"/>
    <Setter Property="FontSize" Value="14"/>
    <Setter Property="CornerRadius" Value="8"/>
    <Setter Property="Padding" Value="14,10"/>
    <Setter Property="VisualStateManager.VisualStateGroups">
        <VisualStateGroupList>
            <VisualStateGroup x:Name="CommonStates">
                <VisualState x:Name="Normal" />
                <VisualState x:Name="Disabled">
                    <VisualState.Setters>
                        <Setter Property="TextColor"
                                Value="{AppThemeBinding
                                    Light={StaticResource Gray950},
                                    Dark={StaticResource Gray200}}" />
                        <Setter Property="BackgroundColor"
                                Value="{AppThemeBinding
                                    Light={StaticResource Gray200},
                                    Dark={StaticResource Gray600}}" />
                    </VisualState.Setters>
                </VisualState>
            </VisualStateGroup>
        </VisualStateGroupList>
    </Setter>
</Style>
<Button Text="Save" />
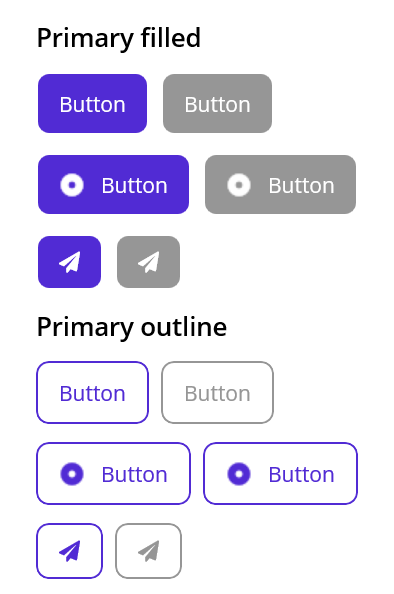
In your application, you may wish to have different button styles for different uses (see Figure 4), such as primary action, secondary action, or by solid and outlined styles. For this, you can define a button style just like above and give it an x:Key to reference explicitly.
<Button Text="Save" Style="{StaticResource OutlineButton}" />

// Resources/Styles/Styles.xaml
<Style TargetType="Button" x:Key="OutlineButton">
    <Setter Property="CornerRadius" Value="8"/>
    <Setter Property="TextColor" Value="Black"/>
    <Setter Property="BorderWidth" Value="1"/>
    <Setter Property="BorderColor" Value="Black"/>
    <Setter Property="Background" Value="Transparent"/>
</Style>
App and View Lifecycle Events
Lifecycle events differ from platform to platform, not always firing in the same order. .NET MAUI provides a consistent cross-platform set of lifecycle events for your app itself and each view element, and platform-specific lifecycle events for when you need more control. App lifecycle events (as you see in Figure 5) include:
- Created: After the native window has been created
- Activated: When the created window becomes the focused window
- Deactivated: When the window is no longer the focused window
- Stopped: When the window is no longer visible
- Resumed: When the app resumes from being stopped
- Destroying: When the native window is being destroyed
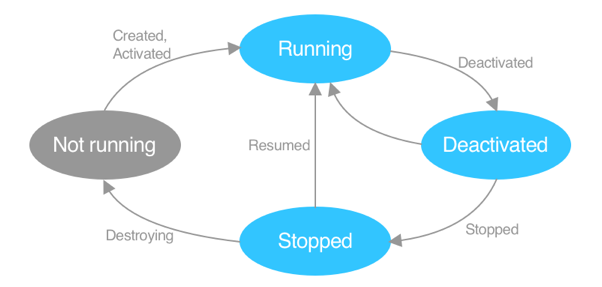
Now in your app, you can access an event like Created from the window to perform cross-platform or even platform-specific work.
protected override Window CreateWindow(IActivationState activationState)
{
    Window window = base.CreateWindow(activationState);
    window.Created += (s, e) =>
    {
        var mauiWindow = (Window)s;

        #if WINDOWS
            var nativeWindow = (
                MauiWinUIWindow)mauiWindow.Handler.PlatformView;
            nativeWindow.GetAppWindow().MoveAndResize(
                new RectInt32(x, y, width, height));
        #endif
    };

    return window;
}
From the cross-platform window control, you can access the platform view through the handler, the part of .NET MAUI responsible for mapping cross-platform to native platform APIs. Using multi-targeting compiler directives like #if WINDOWS, you can then use those platform-specific APIs to do things like centering the WinUI window on the user's screen.
Awesome for Mobile
.NET MAUI is the fastest .NET mobile we've ever shipped for Android and iOS. .NET 6 is 68% faster than Xamarin.Android, and 44% faster than Xamarin.Forms. Our full-featured .NET MAUI podcast app starts in under 240ms on modern iPhone and iPad devices. With each release of .NET, your client applications benefit from these improvements and many others made across the entire .NET stack.
Performance is only the beginning of what makes .NET MAUI great on mobile devices. Our product team is heavily focused on building a product that serves you, our customers, from small to enterprise-size companies. You have helped us and continue to help us become experts in what it takes to build apps that are successful for your businesses: a complete set of UI controls, a vibrant ecosystem of libraries, developer tooling, enterprise patterns and practices, and abundant learning resources.
UI Controls
Use C# or XAML to build rich UI with more than 40 cross-platform controls and layouts, plus all the platform-specific controls provided by each native framework. Compose and style them together to get infinitely more!
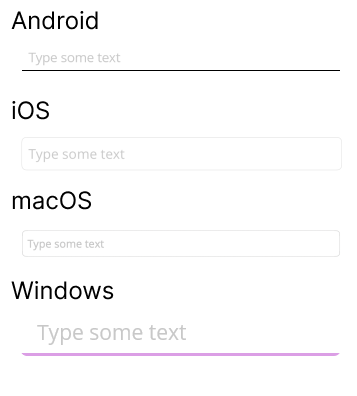
By default, each control is styled consistently while maintaining the characteristics that make it native to the platform. A perfect example is the Entry control for text input, as you can see in Figure 6. As you can see from the static image, this control looks quite different on all four platforms. The behavior also differs. Are these differences meaningful to your users? Often, they are, and this is the experience you want to ship.
When it's not the experience you were going for and you wish to unify the look and feel across all platforms, you can tap into the power of .NET MAUI handlers. Handlers are the implementations that drive each control, loosely coupled to the native platform. You can think of the architecture of controls this way: The cross-platform Control has common characteristics (properties, events, etc.) that a Handler maps to each platform control. Any of those mapped things can be overridden, or code added before or after by you. For example, the first step to unifying the look of the Entry across platforms is to remove the underline and outlines.
EntryHandler.Mapper.AppendToMapping("MyCustomization", (handler, view) =>
{
    #if ANDROID
        // Android specific code here
    #elif IOS || MACCATALYST
        // iOS specific code here
    #elif WINDOWS
        // Windows specific code here
    #endif
});
By appending my own custom method to the handler map, my code will be run when any Entry is created. I just need to call this code somewhere in the startup of my application or before I put my first Entry on screen. Three methods are provided to customize handlers:
- PrependToMapping: Modifies the mapper for a handler before the .NET MAUI control mappings have been applied
- ModifyMapping: Modifies an existing mapping
- AppendToMapping: Modifies the mapper for a handler after the .NET MAUI control mappings have been applied
With just a few lines of code, you can make deep platform customizations to your cross-platform app.
Amazing for Desktop
.NET MAUI is the first product at Microsoft for building native client applications that run on Android, iOS, macOS, and Windows. For desktop platforms, you get the most modern toolkit in WinUI with Windows App SDK and Mac Catalyst for macOS. This is more than just bringing .NET MAUI mobile apps to the desktop. We have added support for multiple app windows; New in .NET 7 are desktop-specific controls for app-level menus, context menus, and tooltips, plus gestures for mouse hover and right-click. The true innovation in .NET MAUI is enabled by the BlazorWebView: Blazor hybrid apps.
Blazor Hybrid
If you've heard of hybrid apps before, withhold judgment; this is not the same. Why? Because in the end, it's all .NET. Here's how this works, as seen in our .NET Podcast open-source app (see Listing 2).
Listing 2: PodcastService.cs
using System.Net.Http.Json;

namespace Podcast.Shared;

public class PodcastService
{
    private readonly HttpClient _httpClient;

    public PodcastService(HttpClient httpClient)
    {
        _httpClient = httpClient;
    }

    public Task<Category[]?> GetCategories() =>
        _httpClient.GetFromJsonAsync<Category[]>("v1/categories");

    public Task<Show[]?> GetShows(int limit, string? term = null) =>
        _httpClient.GetFromJsonAsync<Show[]>($"/v1/shows?limit={limit}&term={term}");

    public Task<Show[]?> GetShows(int limit, string? term = null,
        Guid? categoryId = null) => _httpClient.GetFromJsonAsync<Show[]>
            ($"/v1/shows?limit={limit}&term={term}&categoryId={categoryId}");

    public Task<Show?> GetShow(Guid id) =>
        _httpClient.GetFromJsonAsync<Show>($"v1/shows/{id}");
}
You start with the usual .NET MAUI application and enable the Blazor integration in the MauiProgram builder.
public static MauiApp CreateMauiApp()
{
    var builder = MauiApp.CreateBuilder();
    builder.UseMauiApp<App>();
    builder.Services.AddMauiBlazorWebView();
    return builder.Build();
}
Add a BlazorWebView to the page and reference your razor file.
<ContentPage>
    <b:BlazorWebView HostPage="wwwroot/index.html">
        <b:BlazorWebView.RootComponents>
            <b:RootComponent Selector="app" ComponentType="{x:Type local:Main}" />
        </b:BlazorWebView.RootComponents>
    </b:BlazorWebView>
</ContentPage>
From there, you build your UI using Blazor components and blend in native pages of UI components as needed. Because everything compiles to .NET, the Blazor components have all the same access to device services, file system, sensors, secure storage, app menus, and more, that you would normally access in a .NET MAUI app. The only difference is that the UI of a Blazor component is rendered via HTML. Any barrier between the code running inside the BlazorWebView (aka browser) and the rest of the app is imagined. There is no need for the JavaScript bridge that's common in other hybrid scenarios.
Any barrier between the code running inside the BlazorWebView and the rest of the app is imagined. There's no need for a JavaScript bridge.
This excerpt from Listing 3 displays a list of programs that are retrieved right in the razor file from a native HttpClient request.
Listing 3: DiscoverPage.razor
<PageTitle>.NET Podcasts - Discover</PageTitle>
<SearchBar OnSearch="@FetchShows" />
<div class="containerPage containerPage--featured">
    <div class="categories">
        <NavLink href="categories"
                 class="appLink"
                 title="See all categories">See all categories</NavLink>
        <Tags Items="@topCategories" TItem="Category">
            <ItemTemplate Context="item">
                <NavLink href="@($"category/{item.Id}")"
                         title="@item.Genre">@item.Genre</NavLink>
            </ItemTemplate>
        </Tags>
    </div>

    foreach (var group in groupedShows)
    {
        <div class="titleWrapper">
            <TitlePage Label="@group.Key" />
        </div>

        <Grid Items="@group.Value" TItem="Show">
            <ItemTemplate Context="item">
                <NavLink @key="item.Id" href="@($"show/{item.Id}")">
                    <ShowCard Id="@item.Id" Title="@item.Title"
                              Author="@item.Author" Image="@item.Image" />
                </NavLink>
            </ItemTemplate>
            <EmptyResults></EmptyResults>
        </Grid>
    }
</div>
protected override async Task OnInitializedAsync()
{
    persistingSubscription = ApplicationState.RegisterOnPersisting(PersistShows);

    if (!ApplicationS tate.TryTakeFromJson<Show[]>("shows", out var restored))
        allShows = await PodcastService.GetShows(MaxShows, null);
    else
        allShows = restored!;

    UpdateGroupedShowsAndCategories(allShows);
}
This code is 100% shared between the web app and the mobile and desktop .NET MAUI apps. You need write no JavaScript to make this work because it's all running on a device in the .NET process.
Visual Studio 2022 supports hot reload for this scenario as well, and you can create your Blazor components with CSS styling and share them across all your .NET apps in the browser, mobile, and desktop.
Desktop Specific Controls
For most of your desktop scenarios, BlazorWebView may be the best solution, and you get the bonus of 100% code share with your web apps. .NET MAUI also has you covered when you want deeper, desktop native features like app-level menus. And, new in .NET 7, we've responded to the feedback from our customers targeting desktop with .NET MAUI to add context menus, tooltips, and mouse-related gestures for hover and right-click. .NET MAUI doesn't just give you mobile experiences on the desktop, but rich desktop client experiences to support your demanding business requirements.
To add app-level menus to your application, from any ContentPage, you can add a hierarchy of menu items and wire them to events or bind to commands. In the .NET Point of Sale sample app, for example, I added a menu (see Figure 7) for quick access to adding new products to the menu.
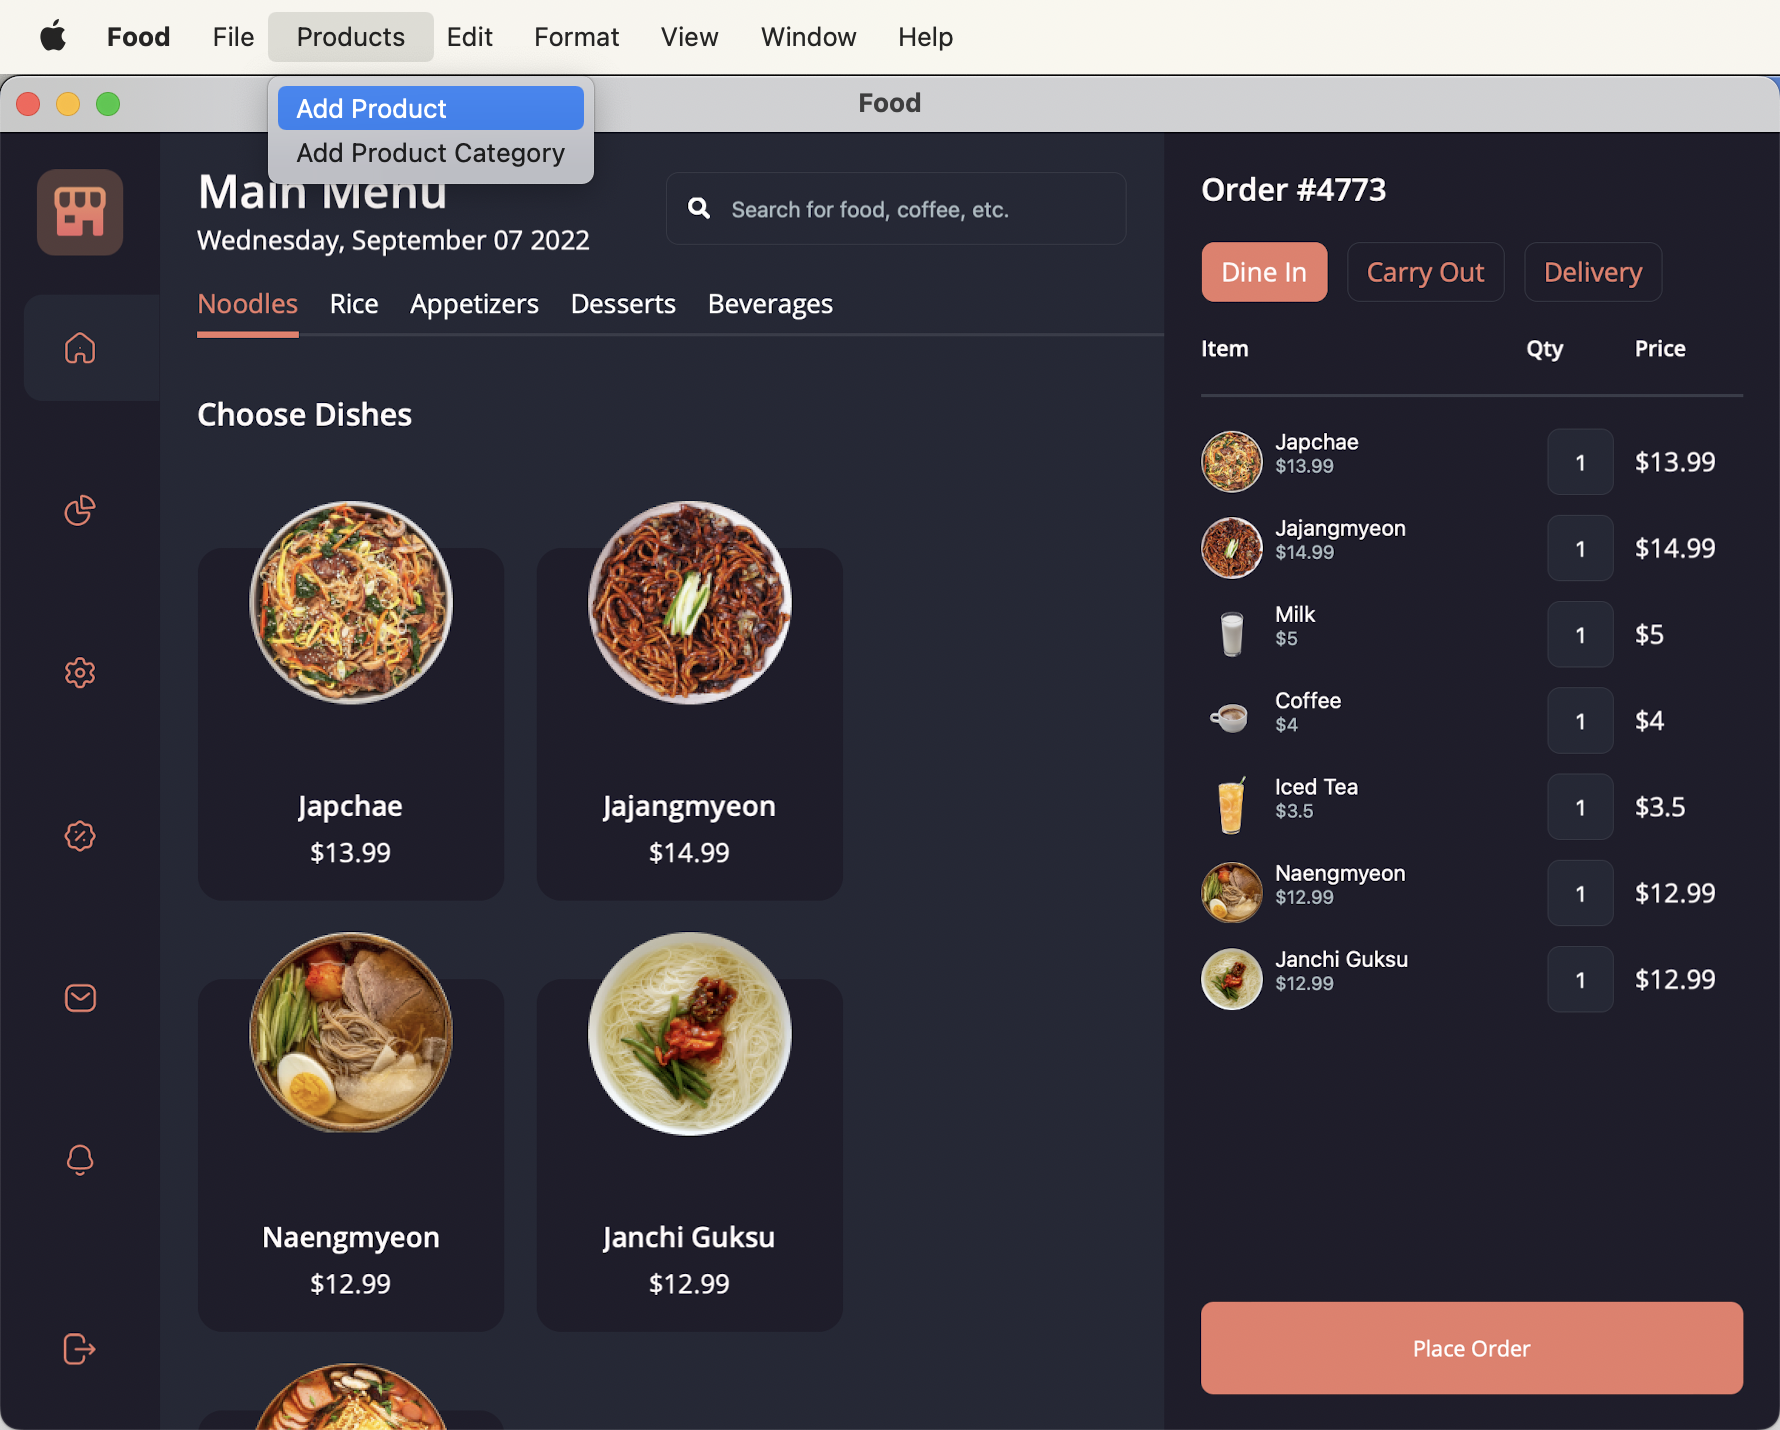
<ContentPage.MenuBarItems>
    <MenuBarItem Text="Products">
        <MenuFlyoutItem Text="Add Product" Command="{Binding AddProductCommand}"/>
        <MenuFlyoutItem Text="Add Product Category"/>
    </MenuBarItem>
</ContentPage.MenuBarItems>
Using a similar API, you can add menus to any control in .NET 7 and they'll be revealed in a context menu (see Figure 8) when you right-click.
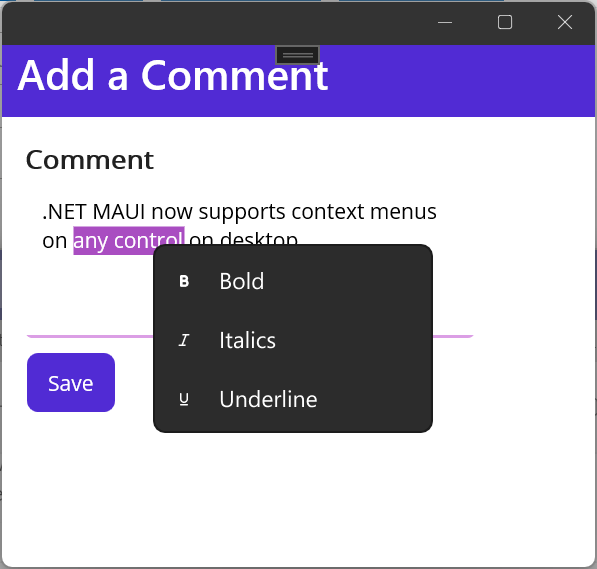
<Editor>
    <FlyoutBase.ContextFlyout>
        <MenuFlyout>
            <MenuFlyoutItem Text="Bold" Clicked="OnBoldClicked"/>
            <MenuFlyoutItem Text="Italics" Clicked="OnItalicsClicked"/>
            <MenuFlyoutItem Text="Underline" Clicked="OnUnderlineClicked"/>
        </MenuFlyout>
    </FlyoutBase.ContextFlyout>
</Editor>
Tooltips can provide simple contextual clues in your UI, and then with PointerGesture, you can add other visual animations to enhance the UI, such as a color change or underline or scaling - anything you can imagine.
<Label Text="https://docs.microsoft.com/dotnet/maui"
       ToolTipProperties.Text="dotnet/maui">
    <Label.GestureRecognizers>
        <PointerGestureRecognizer PointerEntered="HoverBegan"
                                  PointerExited="HoverEnded"
                                  PointerMoved="HoverMoved" />
    </Label.GestureRecognizers>
</Label>
Developer Tooling
Visual Studio 2022 on Windows and Mac provides the most productive developer experience for .NET MAUI, beginning with hot reload. Whether you use XAML for UI or C# for everything, as you make changes to your debugging app, you can apply those changes and see them live. This saves countless hours in stopping, rebuilding, and deploying changes just to see the differences made. To get started, you only need to start debugging your app (aka F5) from Visual Studio. Once debugging, the output indicates that hot reload is connected.
XAML Hot Reload
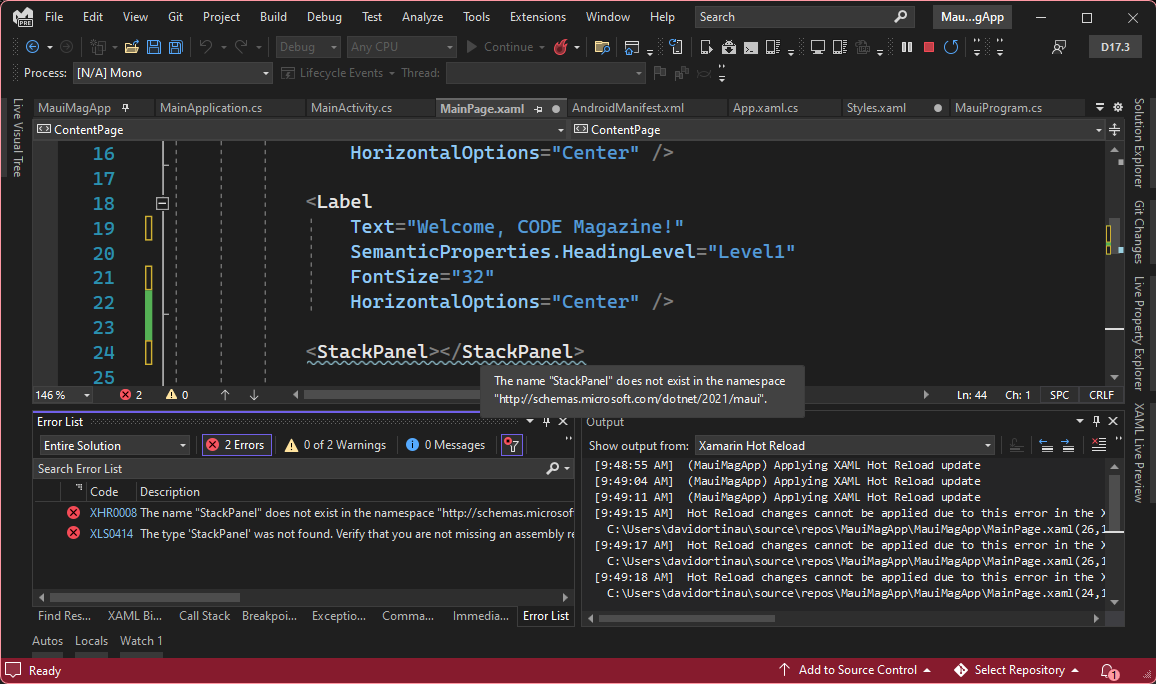
XAML changes are reloaded in your app as soon as they're valid, so no saving is required. You'll also notice that your UI and app state are preserved as you make changes, which is another massive time saver. Of course, editing a running application is tricky, and invalid code changes could cause the app to crash, so those won't be reloaded. Watch first for squiggles in your XAML indicating a syntax error to see when this happens. Then check the errors panel for any XHR errors that report why a XAML Hot Reload may not have been successful. And finally, the XAML Hot Reload output panel (see Figure 9) shows a running log of all activity related to your session.
.NET Hot Reload
C# changes are reloaded a bit differently. Once you have a change that you wish to apply, click the hot reload flame button near the debug button in the Visual Studio toolbar. Alternatively, you can tell Visual Studio to apply changes on file save. If the changes are valid and successful, all will be well, and you can proceed to retrigger the code path that you changed to see the new behavior. Visual Studio otherwise indicates if the changes could not be applied in a modal and give you the next steps to choose from.
Notice that I said you need to retrigger the code path? In a case where you edit a click handler, you click the button again. If you want to rerun the same method, like a UI build method, when you make a change, you can tap into a .NET hot reload handler event. To do this in your application, add a class that implements the MetadataUpdateHandlerAttribute like Listing 4.
Listing 4: HotReloadService.cs
#if DEBUG
    [assembly: MetadataUpdateHandlerAttribute(typeof(HotReloadService))]
    namespace MauiApp
    {
        public static class HotReloadService
        {
            public static event Action<Type[]?>? UpdateApplicationEvent;

            internal static void ClearCache(Type[]? types) { }
            internal static void UpdateApplication(Type[]? types) {

            UpdateApplicationEvent?.Invoke(types);
        }
    }
}
#endif
In your ContentPage, listen for the UpdateApplicationEvent and then execute the method you want to retrigger, such as Build().
HotReloadService.UpdateApplicationEvent += (obj) =>
{
    MainThread.BeginInvokeOnMainThread(() =>
    {
        Build();
    });
}
In this way, the Build() method is always called anytime a .NET hot reload is applied to the app, which is more convenient than navigating away and back or adding an extra button click to retrigger the method. When you're done working on that page and method, you can simply comment it out. It's also a good idea to wrap such things in #if DEBUG so you don't accidently release an app with this code.
Live Preview and Live Visual Tree
One of the hottest new features for developers in Visual Studio is the ability to see your app right inside the IDE, zooming in on the area you're actively working on, aligning to the very pixel, and even inspecting UI to navigate to code. This is another of the many massive time savers, especially when you might be working on a code base with which you are unfamiliar. Start debugging your .NET MAUI application and open the XAML Live Preview panel, as shown in Figure 10.
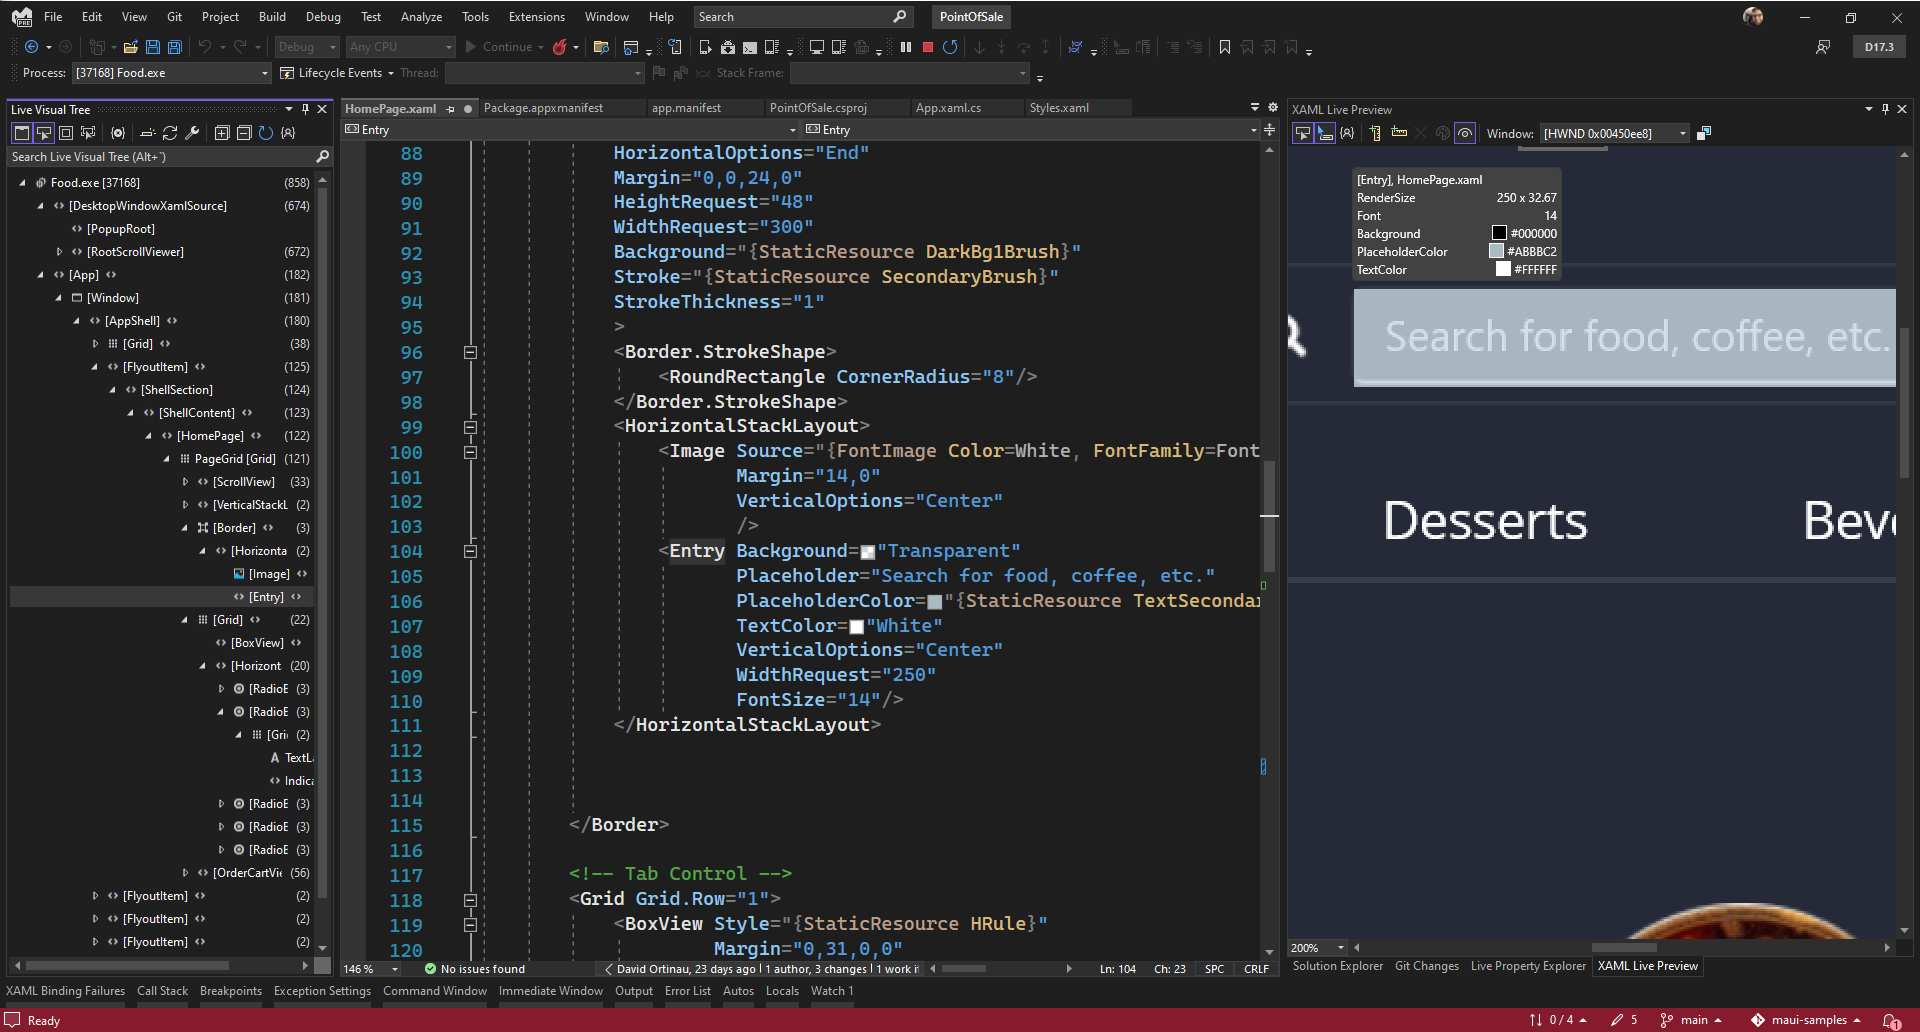
Click the target tool in the top toolbar of the panel and roll over the UI to see details about the controls. Find any control and click it. This navigates you to the Live Visual Tree - a tree view representation of the UI hierarchy. To then go further and see the line of code where the control resides, click the eye icon beside it in the tree. From the code, you can hot reload and continue forward building your cross-platform application.
Enterprise Patterns and Practices
Writing robust yet performant code that can be readily tested is a must for most organizations. .NET MAUI fully supports the Model-View-ViewModel (MVVM) architectural pattern for separation of concerns, data binding, commanding, dependency injection, and a loosely coupled messaging bus. With this, you can roll your own app architecture or add on community libraries to make your development even nicer. If you're looking for a deep dive into enterprise development with .NET MAUI, check out the e-book “Enterprise Application Patterns Using .NET MAUI” available at https://docs.microsoft.com/en-us/dotnet/architecture/maui/ and downloadable from https://aka.ms/maui-ebook.
The most popular MVVM libraries available work with .NET MAUI, and now the Microsoft Community Toolkit has shipped an MVVM library that includes some fantastic source generators to help you deliver better code faster. Consider a common property and command you might add to a ViewModel in your application that you would then bind to a control for display. Typically, you'd need to manually implement the INotifyPropertyChanged interface and express the entire property with getter, setter, a backing property, and implementations. Let's compare the differences.
Compare Listing 5 with the simplicity of the same HomeViewModel using the .NET Community Toolkit MVVM helpers:
Listing 5: HomeViewModel without helpers
public class HomeViewModel : INotifyPropertyChanged
{
    ObservableCollection<Item> _products;

    public ObservableCollection<Item> Products
    {
        get
        {
            return _products;
        }
        set
        {
            if (_products != value)
            {
                _products = value;
                OnPropertyChanged(nameOf(Products));
            }
        }
    }

    public Command AddProductCommand => new Command(AddProduct);

    async Task AddProduct()
    {
        await MessagingCenter.Send<HomeViewModel, string>(this, "action", "add");
    }

    #region INotifyPropertyChanged
    public event PropertyChangedEventHandler PropertyChanged;

    void OnPropertyChanged([CallerMemberName] string propertyName = null)
    {
        PropertyChanged?.Invoke(this, new PropertyChangedEventArgs(propertyName));
    }
    #endregion
}
[INotifyPropertyChanged]
public partial class HomeViewModel
{
    [ObservableProperty]
    ObservableCollection<Item> _products;

    [RelayCommand]
    async Task AddProduct()
    {
        await MessagingCenter.Send<HomeViewModel, string>(this, "action", "add");
    }
}
C# generators create a partial class (notice that this class is partial) to fill out the code that you don't have to write for the properties and commands making them bindable! This is wonderful for many reasons, not least of which is that you get IntelliSense in the UI for those generated methods. You can bind the list control to a public property called Products and then bind the menu item to a command called AddProductCommand. Even if you don't know or remember those naming conventions, the IntelliSense provided by Visual Studio based on the generated partial classes will easily guide you. This is less code for you to maintain!
The toolkit does much more than this, so be sure to check it out in-depth at https://docs.microsoft.com/dotnet/communitytoolkit/mvvm/.
Get Started Today
This is an all-new beginning for building powerful client applications for your businesses with .NET. Each year, you'll get the newest C# language features along with a faster, more secure .NET platform with which to build mobile and desktop applications using .NET MAUI. Begin your journey today at https://dot.net/maui.
.NET MAUI is the only first-party supported framework for building cross-platform apps, and I encourage you to bookmark our official support policy page at https://aka.ms/maui-support-policy. With each annual major release of .NET, we support .NET MAUI for 18 months in accordance with our Modern Lifecycle Policy. Every other release of the .NET SDK and runtime is covered by a three-year-long-term support policy. You'll never see a gap in coverage for the SDKs you depend upon.
Our .NET 7 release focus for .NET MAUI is to help developers upgrade their mobile applications from .NET Framework to .NET, and then enabling our five-million-plus and growing .NET developers to see that they too are .NET MAUI developers.
