


If you're a .NET developer, like me, you've likely been used to storing your data as relational data even in cases when it wasn't the most logical way to store state. Changing our thinking about relational and non-relational stores has been going on for some time now. If you're building Azure hosted projects and have a need for document-based storage, Cosmos DB is a great way to gain high-availability and redundancy. In this article, I'll show you what Cosmos DB is and how you can use the SDK to store, search, and update your own documents in the cloud.
What Is Cosmos DB?
In a world where NoSQL databases are a dime a dozen, Cosmos DB is a different beast. Although at its core, it's just a document database, Cosmos DB is a hosted data platform for solving problems of scale and availability. Ultimately, it's a document database as a service that supports low latency, high availability, and geolocation. With features like SLA-backed availability and enterprise-level security, small and large businesses can rely on the Azure deployed service.
Cosmos DB is accessible through a variety of APIs and language integration. In general, you can use the following ways to interact with Cosmos DB:
- SQL API (via libraries)
- MongoDB wrapper
- Cassandra wrapper
- Goblin wrapper
- Table API
- Entity Framework Core provider
If you're already using MongoDB, Cassandra, or Goblin, you can use Cosmos DB as a drop-in replacement via these APIs. Essentially, CosmosDB has compatible APIs to support using a connection to Cosmos DB.
Cosmos DB also supports a Table API, which can be a good replacement for Azure Table Storage. If you're thinking that you came here to replace your relational database (e.g., SQL Server, Postgres, etc.), that's not really what it's about. Let's talk about NoSQL versus relational data stores first. It's easy to think about data storage as relational databases first because that's likely many developers' first experience with storing data.
Although many developers (including .NET developers) think about the world in terms of objects, relational data stores think about data in different way. Mechanisms like Object Relational Mappers (ORM) have tried to hide this difference from developers. Understanding the basics of relational databases like schema, constraints, keys, transactions, and isolation level are often lost for the sake of quickly getting up to speed and getting projects completed. This has left many developers holding onto relational databases as their one and only way to store data.
Using Cosmos DB with .NET Core
Although Cosmos DB provides several mechanisms to connect to the service (listed above), this article focuses on accessing the service with a .NET Core project. The .NET Core Cosmos DB library supports documents to be stored in Cosmos DB.
What do I mean by documents? If you're coming to Cosmos DB from a traditional relational database, you're used to thinking about data in a two-dimensional matrix (that is, a table). Tables store data in rows made up of columns that are typically (but not always) primitives (such as strings, numbers, etc.). In order to include complex objects, tables are related to each other through foreign keys, as seen in Figure 1.
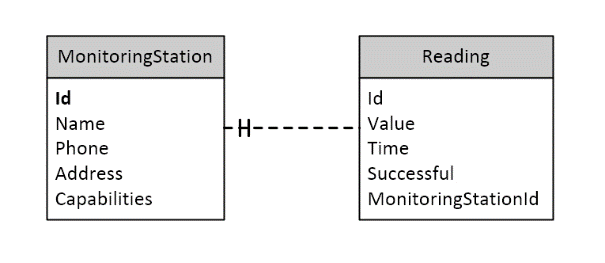
In document stores, the data is stored as a single entity. Typically, they are atomic but because they can store more complex objects, the type of data you can store is more expressive. For many solutions, document databases make more sense. This isn't a matter of one model being better than the other, rather that for some situations, document databases make more sense.
It's thought that because of the object orientation of many languages we use, document databases make more sense; but that's a bad reason to use a document database. Instead, you should look at the use of the data. When you're storing something like customers and orders, relational could make more sense, as those relationships are important to enforce in the database server. Being able to reason about the kinds of data stored often makes relational stores more logical.
On the other hand, some data is reasonably atomic. Something like a stock transaction isn't something that you need to break apart and reason over. In this case, something like a document makes more sense. In some solutions, mixing the two makes a ton of sense. For example, earlier in my career, I was responsible for storing medical papers and making them searchable. For the data that was important to quickly index, I built a relational store. Under that relational store, I stored the research papers themselves as documents so they could be retrieved as atomic objects. The benefit was that the document store wasn't tuned for writing but was tuned for reading. Because the papers rarely changed, it made more sense to marry the two.
A lot has changed in document stores since then. Now, you can not only store your documents, but you can index them for searchability and scale them out like never before. That's where Cosmos DB comes in. Let's dig in.
The Emulator
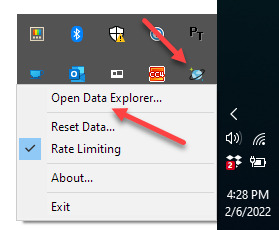
Azure's Cosmos DB is a hosted service. This service is meant to be used so you can gain from the sheer scale that Cosmos DB works with. This means scaling up to high loads as well as geographically locating your data close to where it's going to be used. That's all well and good, but for this exercise, you should use a local emulator to do your primary development. To get the emulator, visit https://aka.ms/cosmosdb-emulator and install the emulator. Once installed, it opens up a webpage to show the emulator working. If this doesn't happen, look for the icon in the system tray and pick “Open Data Explorer,” as seen in Figure 2.
Currently, the emulator only works on Windows, but you can connect to it from Mac environments (see https://shawnl.ink/cosmosdb-on-mac for more information).
The main Web page of the emulator shows you the connection information you can use to connect to the Cosmos DB instance. For this article, I'll be using the connection string, as seen in Figure 3.
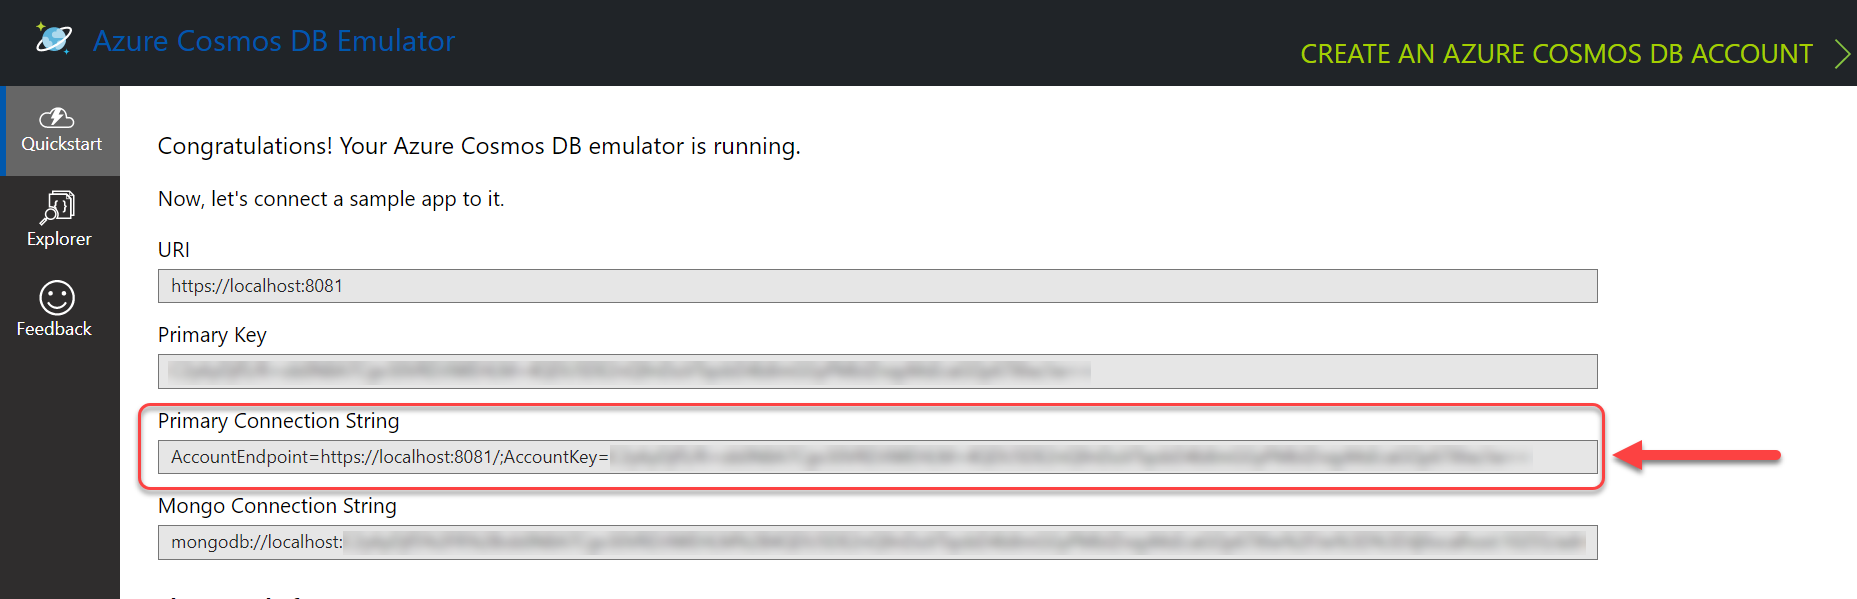
I'll come back to the Explorer tab in this UI as soon as I get into the code.
Enough set up. Let's connect to Cosmos DB with ASP.NET Core.
Getting Started
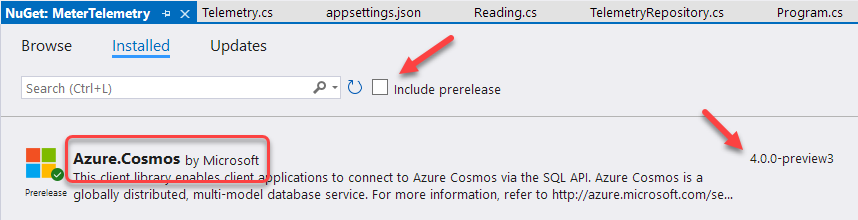
As I stated earlier, there are multiple ways to access Cosmos DB, but for this article, I'm focusing on the Azure.Cosmos NuGet package. The first thing is to add the package to your project, as seen in Figure 4. Note that as of the writing of this article, the v4 of this package is in preview, so you'll need to check Include prerelease to see the latest version of the package.
Now that you've included the package, you'll need that connection string from Figure 3. Add it to the ConnectionStrings settings in appsettings.json in your project:
{
    "Logging": {
        "LogLevel": {
            "Default": "Information",
            "Microsoft.AspNetCore": "Warning"
        }
    },
    "AllowedHosts": "*",
    "ConnectionStrings": {
        "Cosmos": "YOUR CONNECTION STRING"
    }
}
Of course, you can store this in any way you see fit, but for my purposes, I'll include it here. You're now ready to start working with it. For this example, I'm going to use a repository pattern to provide access to the data. Start with a pretty simple class:
public class TelemetryRepository
{
    private readonly IConfiguration _config;
    private readonly ILogger<TelemetryRepository> _logger;
    private readonly IHostEnvironment _enviroment;

    public TelemetryRepository(
        IConfiguration config,
        ILogger<TelemetryRepository> logger,
        IHostEnvironment enviroment)
    {
        _config = config;
        _logger = logger;
        _enviroment = enviroment;
    }
}
I'm going to provide this by adding it to ASP.NET Core's service provider (using top-level statements):
var builder = WebApplication.CreateBuilder(args);

builder.Services.AddScoped<TelemetryRepository>();

var app = builder.Build();
Finally, in my API call, I'll just inject it in the Minimal API (see my prior article for more information on that - https://www.codemag.com/Article/2201081/Minimal-APIs-in-.NET-6):
app.MapGet("/meter/telemetry",
    async (TelemetryRepository repo) =>
    {
        return Results.Ok(await repo.GetAll());
    });
Now you're ready to implement the calls to Cosmos. Of course, at this point you don't have any data, but let's start by connecting to and creating the database. First, you need to create an instance of the CosmosClient. This can be done by just passing in the connection string to a new instance of the client, like so:
var connString =
    _config.GetConnectionString("Cosmos");
_client = CosmosClient(connString);
You first get the connection string from the IConfiguration object that you injected into the constructor, then just create the new client as necessary.
Creating Databases and Collections
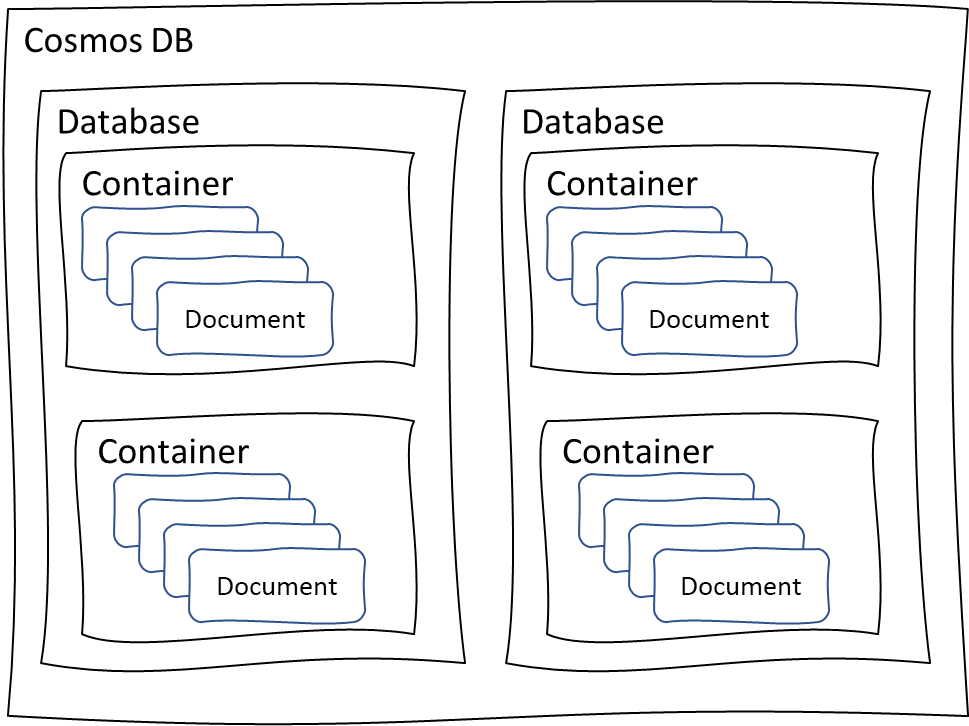
In Cosmos DB, a database is a container for collections of data. These two terms are just part of the hierarchy, as seen in Figure 5.
Before you can store documents, you need a database and a container. You could create these in the user interface of the emulator, but I suggest you do it with code. First, you need to define a database name and a name for the container for the data:
private const string DBNAME = "TelemetryDb";
private const string CONTAINERNAME = "Telemetry";
There are two steps to setting up the data store: creating the database and the container. The database is just a named object that can contain one or more containers. So creating the database only requires a database name:
var result = await _client.CreateDatabaseIfNotExistsAsync(DBNAME);
Containers are used to store specific types of documents. Unlike a relational data store, the structure of the document isn't enforced except for two key pieces of information:
- A unique identifier: A primary key to uniquely ID the document, typically a string
- A partition key: A shared identifier to logically group documents
The primary key (or ID property) is merely a unique string that identifies a document. The partition key requires more consideration. A partition key allows Cosmos DB to logically group together documents that might be related. For example, you might have a container for invoices and use the customer ID as a partition key. This partition key is used for maintaining logical groups of documents together. It's required. There's a magic to the partition key in that it speeds up queries if the different objects are in the same partition key. Although you could use any information in the document, try to use one that creates a finite number of partitions. It's easy to make the mistake of making the ID also the partition key, which then makes a partition for every document.
In this example, the document consists of a Telemetry object and related Reading objects:
public class Telemetry
{
    public string Id { get; set; } = Guid.NewGuid().ToString();
    public string MonitorId { get; set; } = "";
    public ICollection<Reading>? Readings
    {
        get;
        set;
    }
    public string Notes { get; set; } = "";
    public MonitorStatus MonitorStatus { get; set; }
}

public class Reading
{
    public DateTime ReadingTime { get; set; } = DateTime.UtcNow;
    public double WindSpeed { get; set; }
    public double Temperature { get; set; }
    public double Altitude { get; set; }
}
In this example, the MonitorId is the partition key so that when you need to get all the readings for a particular Monitor, the query should be more efficient. This doesn't prevent you from searching across partitions; it's just a hint of how you want to shard the data store. Once defined, it's mostly invisible in day-to-day development. With that knowledge, you can create the container:
await result.Database.CreateContainerIfNotExistsAsync(CONTAINERNAME,
    "/MonitorId");
With that information set, you can create a method that's called to ensure that both the database and collection exist (and only run it in development):
async Task InitializeDatabaseAsync()
{
    if (_enviroment.IsDevelopment())
    {
        var result = await _client.CreateDatabaseIfNotExistsAsync(DBNAME);
        await result.Database.CreateContainerIfNotExistsAsync(
            CONTAINERNAME, "/MonitorId");
    }
}
The portal to accessing data in Cosmos DB is the container object. You need to get the container. You can do this by wrapping access in a method so you can call the InitializeDatabase call to ensure that the database has been created and returning the container object:
async Task<CosmosContainer> GetContainer()
{
    await InitializeDatabaseAsync();
    return _client.GetContainer(DBNAME, CONTAINERNAME);
}
With all of that in place, you can move forward and start to work with data.
Creating Documents
The next step to using Cosmos DB is to start storing documents. Cosmos DB stores objects as JSON, which means that you need to think about the objects you're storing to make sure that they're a real hierarchy. The actual storage is pretty simple:
var container = await GetContainer();
var result = await container.CreateItemAsync(model,
    new PartitionKey(model.MonitorId));
The CreateItemAsync creates a new instance of an object in the data store. But if you add your object, you might get a failure (via an exception). You need to have a valid identifier and partition key for the new object. Calling CreateItemAsync lets you specify the partition key, but for the ID, you need to give it a little help.
In v4 of the Cosmos DB SDK, it uses the .NET Core System.Json for serialization. Cosmos DB expects that the identifier field is called id. Unfortunately, by default, System.Json serializes objects maintaining the property case (e.g., Pascal case in my example). So you need to use an annotation to change the case of the ID field:
public class Telemetry
{
    // Uses System.Json by default in v4
    [JsonPropertyName("id")]
    public string Id { get; set; } = Guid.NewGuid().ToString();
    public string MonitorId { get; set; } = "";
    public ICollection<Reading>? Readings
    {
        get;
        set;
    }
public string Notes { get; set; } = "";
public MonitorStatus MonitorStatus { get; set; }
}
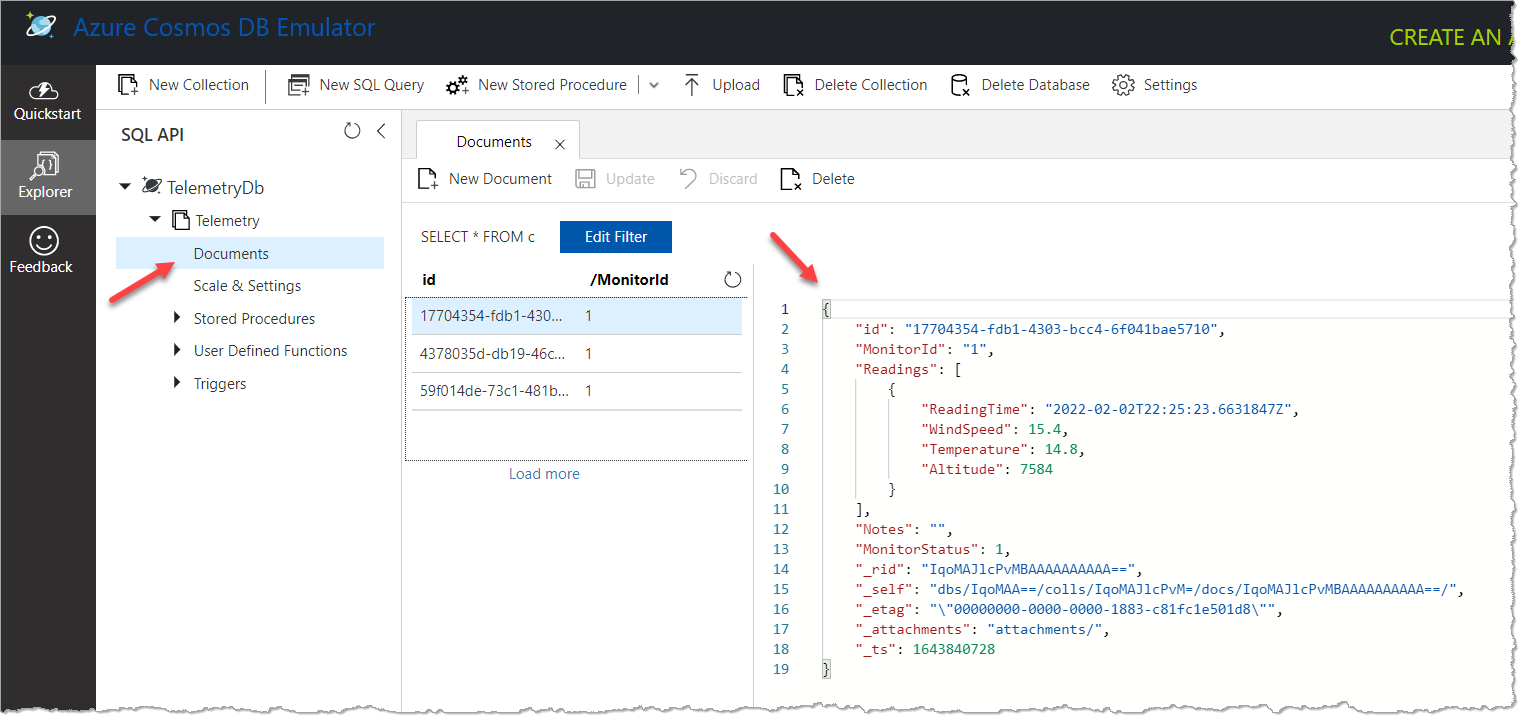
With that in place, you can store the object with CreateItemAsync. To check this, you can go to the emulator's Explorer tab to look at the data in the database, as seen in Figure 6.
You now have data stored, but how do you work with it? Let's look at how to read documents next.
Reading Documents
You can read individual items out of Cosmos DB but you'll need both the identifier and the partition key:
var response = await container.ReadItemAsync<Telemetry>(
    id,
    new PartitionKey(monitorId));

if (response.GetRawResponse().Status == 200)
{
    return response.Value;
}
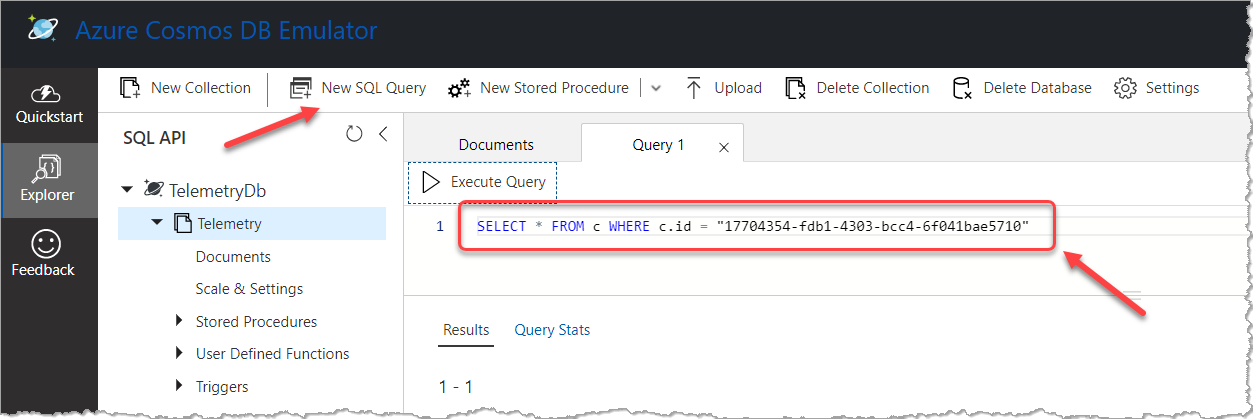
Although this is possible, usually you'll be querying for documents instead. The Cosmos DB SDK supports its SQL API. So you can do the same with a simple query:
SELECT * FROM c WHERE c.id = "17704354-fdb1-4303-bcc4-6f041bae5710"
This syntax is pretty close to standard SQL that you might be familiar with in relational databases, although you'll notice that the “FROM” points at an unnamed object. The main stored documents don't have a name, so you just alias it with a “c” (or other name) in this example. You can test out the query in the emulator page, as seen in Figure 7.
To use queries in the Cosmos DB SDK, you can create a QueryDefinition by using the SQL text. Notice that in this example, I'm using a parameter (Cosmos DB, just like any other SQL, shouldn't use concatenated strings - please parameterize your queries):
var sql = $"SELECT * FROM c WHERE c.id = @id";
var query = new QueryDefinition(sql).WithParameter("@id", id);
Once you have the query definition, you can create an iterator to allow you to execute the query:
var container = await GetContainer();

var iterator = container.GetItemQueryIterator<Telemetry>(query);
This assumes that you'll have more than one result, but because the query is for a single result, you can just get an enumerator and get the first object:
var enumerator = iterator.GetAsyncEnumerator();
if (await enumerator.MoveNextAsync())
{
   return enumerator.Current;
}
The enumerator.Current will be that first element (if the MoveNextAsync succeeds). If your query will return multiple results, you can use an async enumerator, like so:
var sql = @"SELECT VALUE c
              FROM c
              WHERE c.MonitorId = @monitorId";

var query = new QueryDefinition(sql)
    .WithParameter("@monitorId", monitorId);

var results = new List<Telemetry>();

var iterator = container
    .GetItemQueryIterator<Telemetry>(query);

await foreach (Telemetry result in iterator)
{
    results.Add(result);
}

return results;
In this case, you're using the await foreach to walk through the results and add them to a list to return. Lastly, you can query against the complete object using a dot-syntax and JOINs, like this query:
SELECT VALUE c
FROM c
JOIN r IN c.Readings
WHERE r.WindSpeed > 10
In this case, you're using a JOIN to execute the where clause against the collection of readings, but still just returning the entire object by using VALUE c. The VALUE keyword tells Cosmos DB's SDK that you want the entire value, not just part of it. You can still use production in SELECT as well, but I think these examples will get you started with most use-cases.
Updating Documents
Now that you can read and create documents, you're likely not surprised that you need to be able to update documents as well. Although Cosmos DB supports partial updates (through a Patch mechanism that you can read about here: https://shawnl.ink/cosmos-db-partialupdate), often, what update really means is to replace the old document. The API for this is straightforward, as it takes the object to be saved and the ID of the old document:
public async Task<Telemetry>
Update(Telemetry model)
{
    var container = await GetContainer();
    var result = await container.ReplaceItemAsync(model, model.Id);

return result.Value;
}
There is also support for Upsert, which creates the object if it doesn't exist and replaces it if it does, like so:
var result = await container.UpsertItemAsync(model,
    new PartitionKey(model.MonitorId));
Unless you don't know whether an item exists, use create and replace to be specific about the operation that you expect.
Deleting Documents
Finally, you can also delete documents with a similar call to updating and creating documents:
var result = await container.DeleteItemAsync<Telemetry>(item.Id,
    new PartitionKey(item.MonitorId));
This removes the object completely from the data store.
What About Entity Framework?
I've been talking about the Cosmos DB SQL SDK, but there's also support for an Entity Framework Core provider for Cosmos DB. Although this is a valid way of connecting with the Cosmos DB, mapping your documents to entities requires some proficiency with the Entity Framework mappings. If you're already familiar and comfortable with Entity Framework Core, this might be the simplest path to using Cosmos DB. In my very informal survey of Cosmos DB users (a Twitter poll), the majority of users seemed to use the Cosmos DB SDK, and a smaller set of users used the Entity Framework provider. Either method is usable and competent.
Where Are We?
Cosmos DB represents a different way of thinking about data in modern .NET applications. Treating your data as documents is a use-case that you need to consider when you architect solutions. When you need high availability and redundancy, using the Cosmos DB is a smart strategy for many Azure-based projects. Hopefully this article has shown you how to use it and that it's fairly straightforward and easy to use.
