


This is the third and final part of the PHP Laravel on the Google Cloud Platform series. In the second part, you added support for a local MySQL database and configured the app to start using it. Then, you introduced the Google Cloud SQL (https://cloud.google.com/sql) and configured the app to use a Cloud MySQL database. Finally, the article concluded by adding support for running Laravel Migrations (https://laravel.com/docs/8.x/migrations) inside the Cloud Build configuration file. Every time you push new changes to the app, the Cloud Build Workflow deploys the new source code and runs the application database migrations (if a new one exists). The solution works by adding a new Cloud Build step that sends an HTTP POST request to a new application endpoint, that in turn, runs the Laravel Migration. However, as noted, this solution was plain and insecure.
Now, you'll go a step further and secure the POST request by authorizing the endpoint and making sure that only the Google Cloud Platform (GCP) is the source of the POST request.
In addition, I'll introduce two new features:
- Allowing a Laravel app to upload files and store them on Google Cloud Storage buckets.
- Adding a new Cloud Build Workflow step to take a backup snapshot of the Cloud MySQL database.
Please note that I've made some changes to the underlying Google Cloud Platform Project:
- The Project ID is now changed from prismatic-grail-323920 to code-magazine-336519
- The Google App Engine URL is now changed from
https://prismatic-grail-323920.appspot.comtohttps://code-magazine-336519.appspot.com.
By the time you're reading this article, the live app on Google Cloud Platform will be turned off.
Using the Google Cloud Secret Manager to Authorize Running Laravel Migrations
The Google Cloud Secret Manager is a secure cloud storage system for storing API keys, passwords, certificates, and other sensitive data. It's considered a single source of truth for managing, accessing, and auditing secrets across the Google Cloud Platform.
Why am I introducing the Secret Manager service? It's to authorize the Cloud Build POST request to run the Laravel Migrations makes use of the Secret Manager.
This involves the following steps:
- Create a new secret variable inside the Secret Manager.
- Send the new secret variable and value as a payload to the HTTP POST request.
The Laravel app retrieves the request payload (secret variable name and secret value). The app then queries the Secret Manager service for the value of the secret variable that it retrieved from the request payload. The app compares the values retrieved from the Secret Manager service to the ones received from the request payload. If both values are equal, it allows the request to be performed and the Laravel Migrations to be run. Otherwise, it aborts the request with a 403 Forbidden response.
Let's start!
You can use the Google Secret Manager to store sensitive data that other Google Services need.
Step 1: Update the cloudbuild.yaml File to Use Secrets
Open the /ci/cloudbuild.yaml file and replace the Cloud Build step to run the Laravel Migrations with the step shown in Listing 1.
Listing 1: Add Secrets to the Cloud Build Step to Run Laravel Migrations
- name: gcr.io/cloud-builders/gcloud
  entrypoint: "bash"
  secretEnv: [ 'APP_SETUP_URL', 'APP_SETUP_TOKEN' ]
  args:
  -   "-c"
  - |
    RESPONSE=$(curl -o /dev/null -s -w   "%{http_code}" \
        -d "APP_SETUP_TOKEN=$$APP_SETUP_TOKEN" \
        $_APP_BASE_URL/$$APP_SETUP_URL)

    if [ "200" != "$$RESPONSE" ];
    then
      echo "FAIL: migrations failed"
      exit 1;
    else
      echo "PASS: migrations ran successfully"
    fi
Look at the new Cloud Build step in Listing 1 and notice the following additions:
- It defines a new section named secretEnv. This section lists all the environment variables that reference the Secret Manager variables used inside this step. I'm using the
APP_SETUP_URLandAPP_SETUP_TOKENenvironment variables. - The CURL (
https://everything.curl.dev/) HTTP POST request now defines a POST payload. The request uses the CURL -d option to attach a payload to the request. It consists of adding the keyAPP_SETUP_TOKENand giving it a value stored in the Secret Manager represented by the$$APP_SETPUP_TOKENenvironment variable.
To refer to an environment variable inside the Cloud Build Workflow, you need to prefix the variable name with a double $$ sign.
Now, when the Cloud Build step runs, it issues an HTTP POST request with a payload in the form of a key/value. The secret variable name is together with the secret value.
To complete this step, you need to define the mapping between the environment variables and their corresponding secret variables. The Cloud Build schema offers the availableSecrets section to define those mappings.
availableSecrets:
    secretManager:
  - versionName: $_SETUP_URL_RESOURCE_ID
    env: 'APP_SETUP_URL'
  - versionName: $_SETUP_TOKEN_RESOURCE_ID
    env: 'APP_SETUP_TOKEN'
The environment variable APP_SETUP_URL maps to a secret variable whose ID is stored in the Cloud Build Trigger variable named _SETUP_URL_RESROUCE_ID. Similarly, the environment variable APP_SETUP_TOKEN maps to a secret variable whose ID is stored in the Cloud Build Trigger variable named _SETUP_TOKEN_RESOURCE_ID.
In the coming steps, you'll define the secret variables inside the Secret Manager service. In addition, you'll customize the Cloud Build Trigger and add the two variables used now in the cloudbuild.yaml file.
Step 2: Enable the Secret Manager API
Before you can start using the Secret Manager, you need to enable its API. Locate the Secret Manager API and enable it.
To enable any API or Library on the GCP, on the left-side menu, click the APIs and Services menu item. Then, once you're on the APIs and Service page, click the Library menu.
Search for any API and enable it by clicking ENABLE.
Step 3: Add Secret Manager Permissions
To access and read secrets from the Secret Manager API, you need to give the following services the Secret Manager Secret Accessor permission:
- Google Cloud Build service
- Google App Engine service
The Cloud Build service needs to read the values of the secret variables. Also, the Laravel app, hosted in a Google App Engine, needs to query the secret variables.
Follow the steps to add the permission:
- Navigate to the IAM & Admin section.
- Locate the service account that ends with
@cloudbuild.gserviceaccount.com. Click the edit icon and add the Secret Manager Secret Accessor permission. Figure 1 shows this addition.
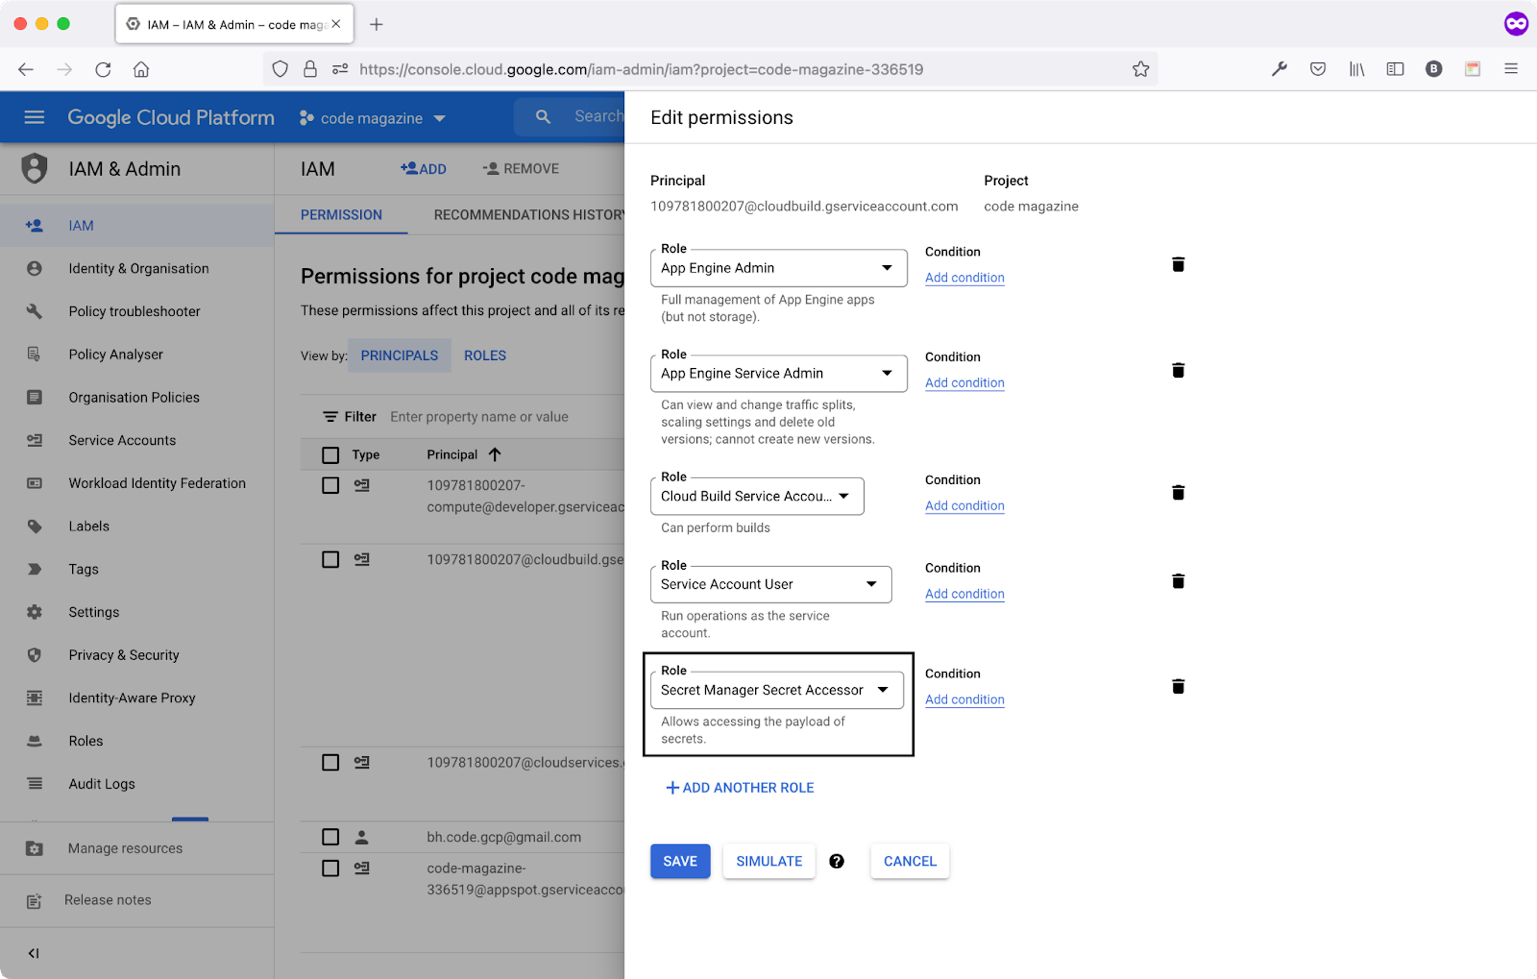
- Repeat the step above by adding the permission to the service account that ends with
appspot.gserviceaccount.com.
Now that you've added the permissions, let's move on and create the secrets.
Notice this pattern with all Google Cloud Services. Every service requires certain permissions to be accessible and usable.
Step 4: Create the Secret Variables
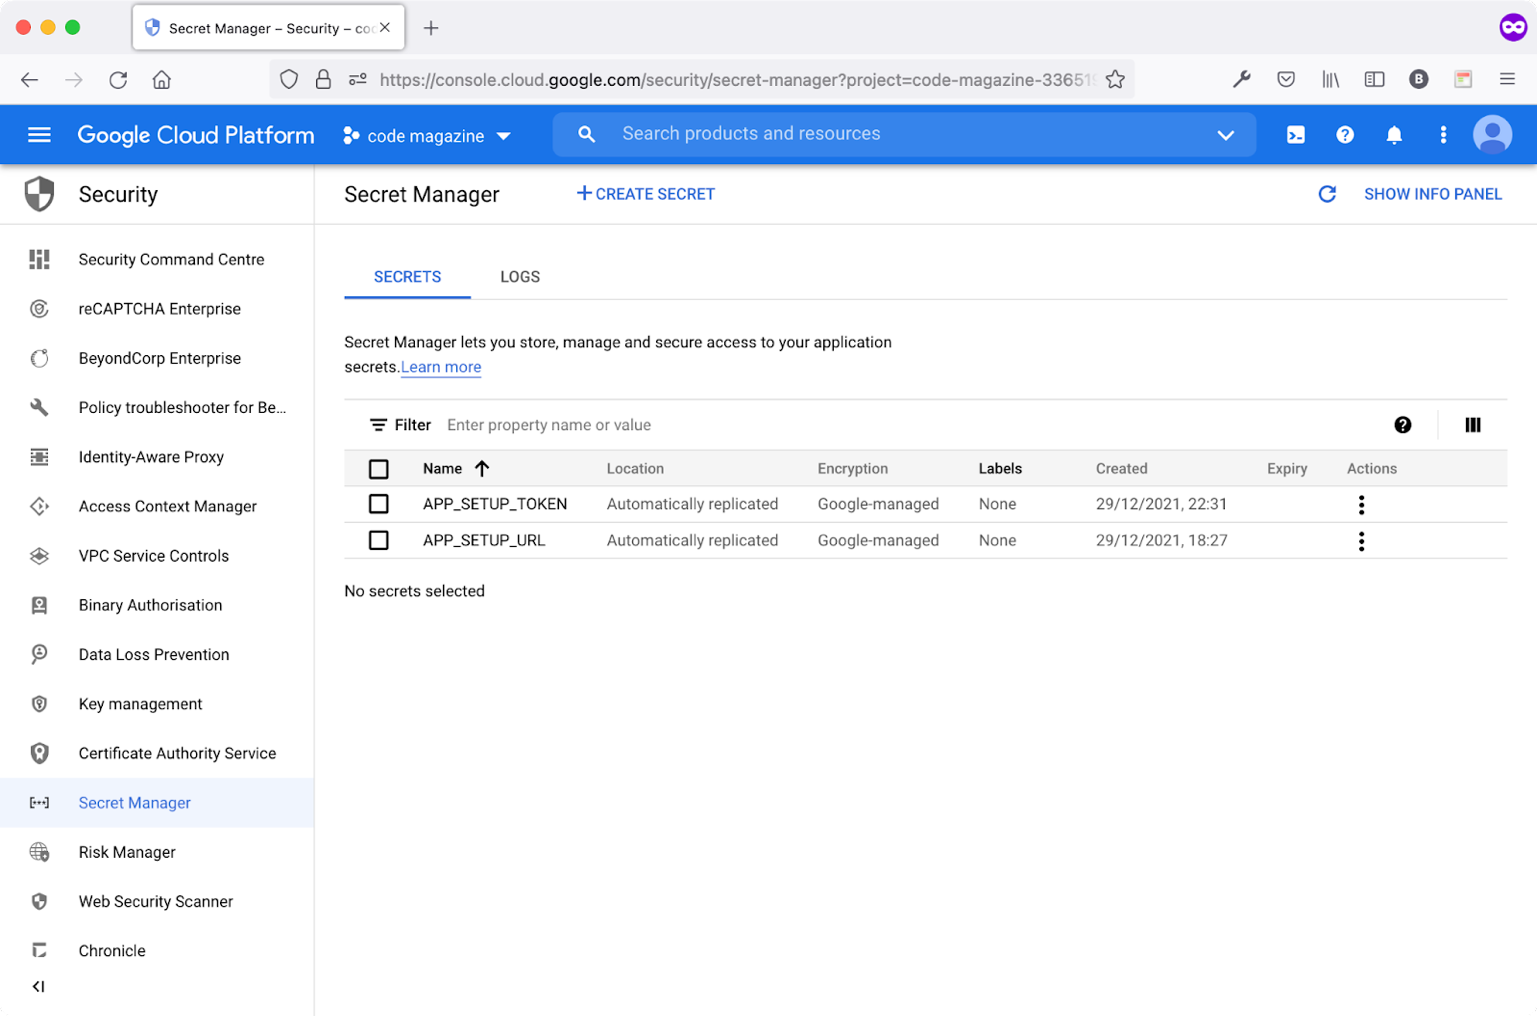
Navigate to the Security section. Click the Secret Manager menu item.
Figure 2 shows the secret manager dashboard.
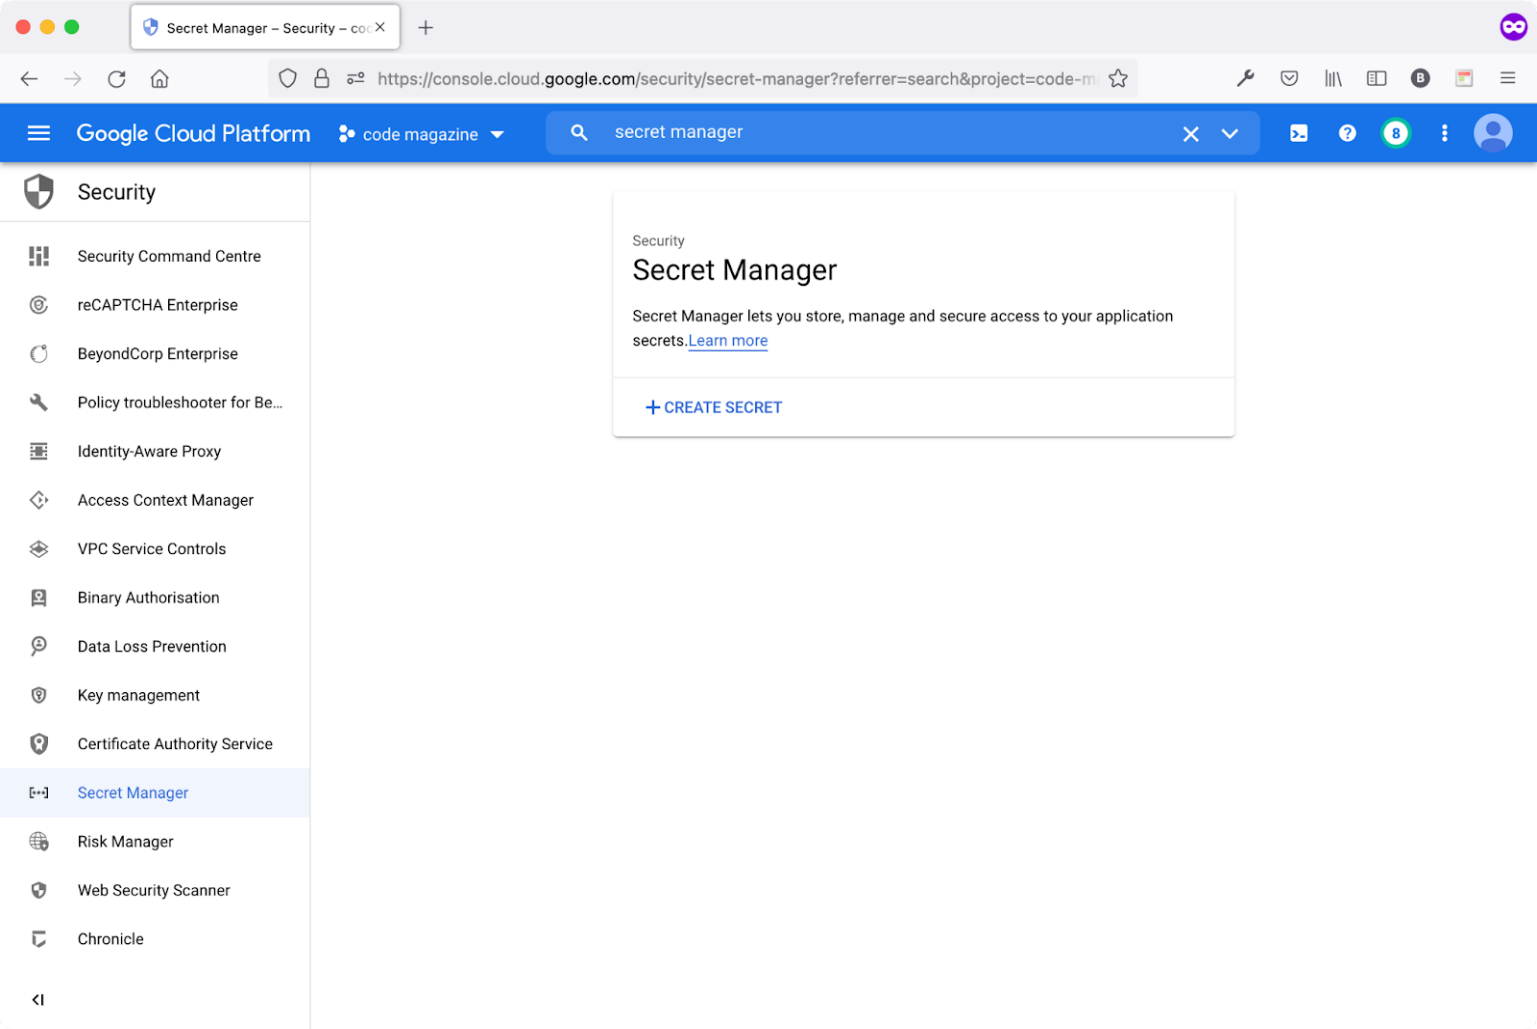
Locate and click the CREATE SECRET button to create your first secret variable in this project.
Let's create the APP_SETUP_URL secret variable, as shown in Figure 3.
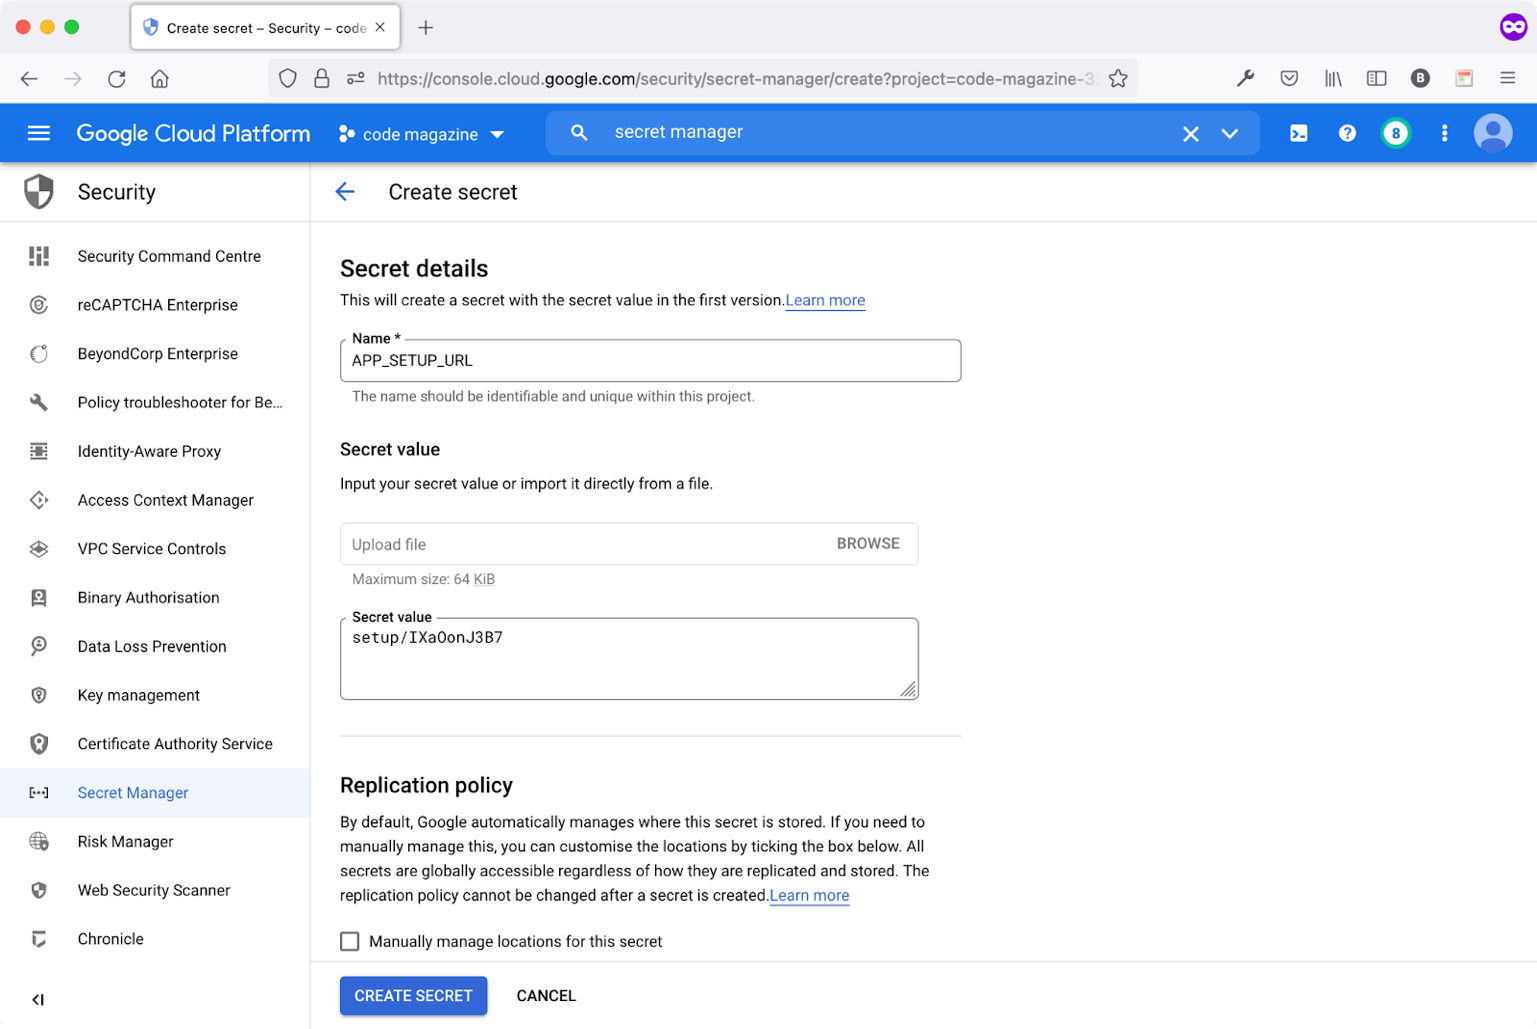
The two most important fields to fill are:
- Name of the secret variable
- Secret value
The secret value for the APP_SETUP_URL is the endpoint that you've already defined and used in Part 2 of this series. This endpoint maps to a Laravel Controller that runs the Migrations.
Repeat the steps above to create a new secret variable with the following details:
- Name: APP_SETUP_TOKEN
- Secret value: OtoSIKuVEZ (or any other random string you pick)
Figure 4 shows all the secret variables available so far in the project.
Now that the secrets are available, let's update the Cloud Build Trigger to make use of those secrets.
Step 5: Update the Cloud Build Trigger
Remember from Step 1, the cloudbuild.yaml file references the two secret variables that you've just created.
At this moment, you need to update the Cloud Build Trigger to add the two secret variables so that the Cloud Build Workflow runs successfully.
Navigate to the Cloud Build section and click the Triggers menu item. Figure 5 shows the available triggers.
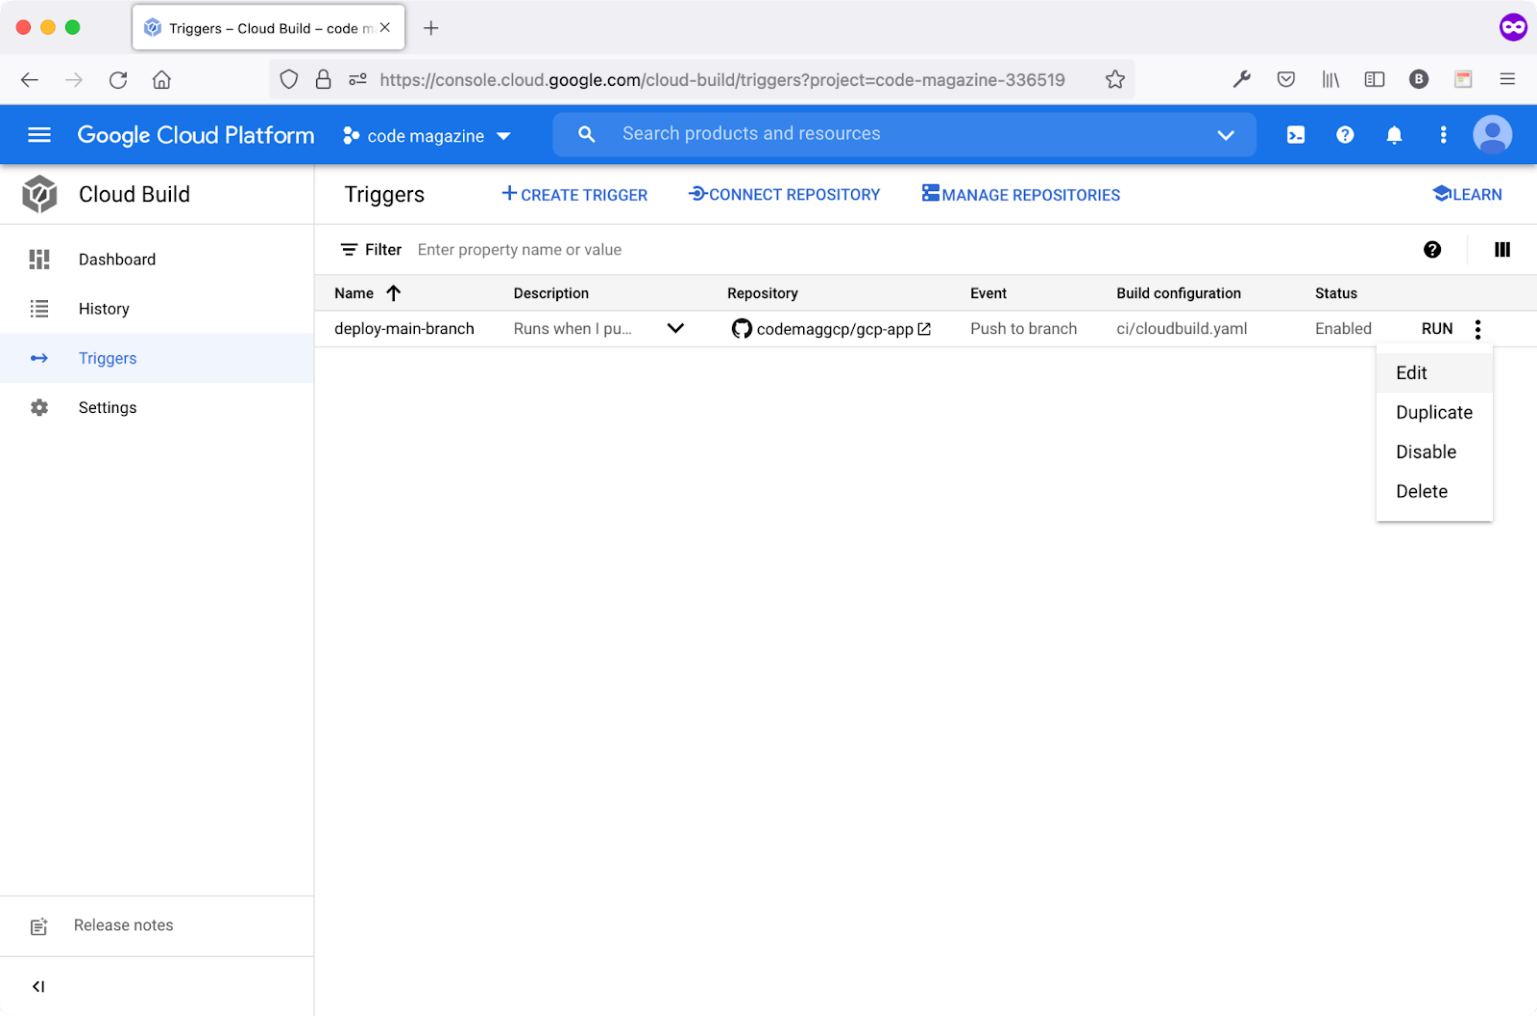
Locate the deploy-main-branch trigger from the Actions menu, click the Edit action item to edit the trigger, and add the required secret variables.
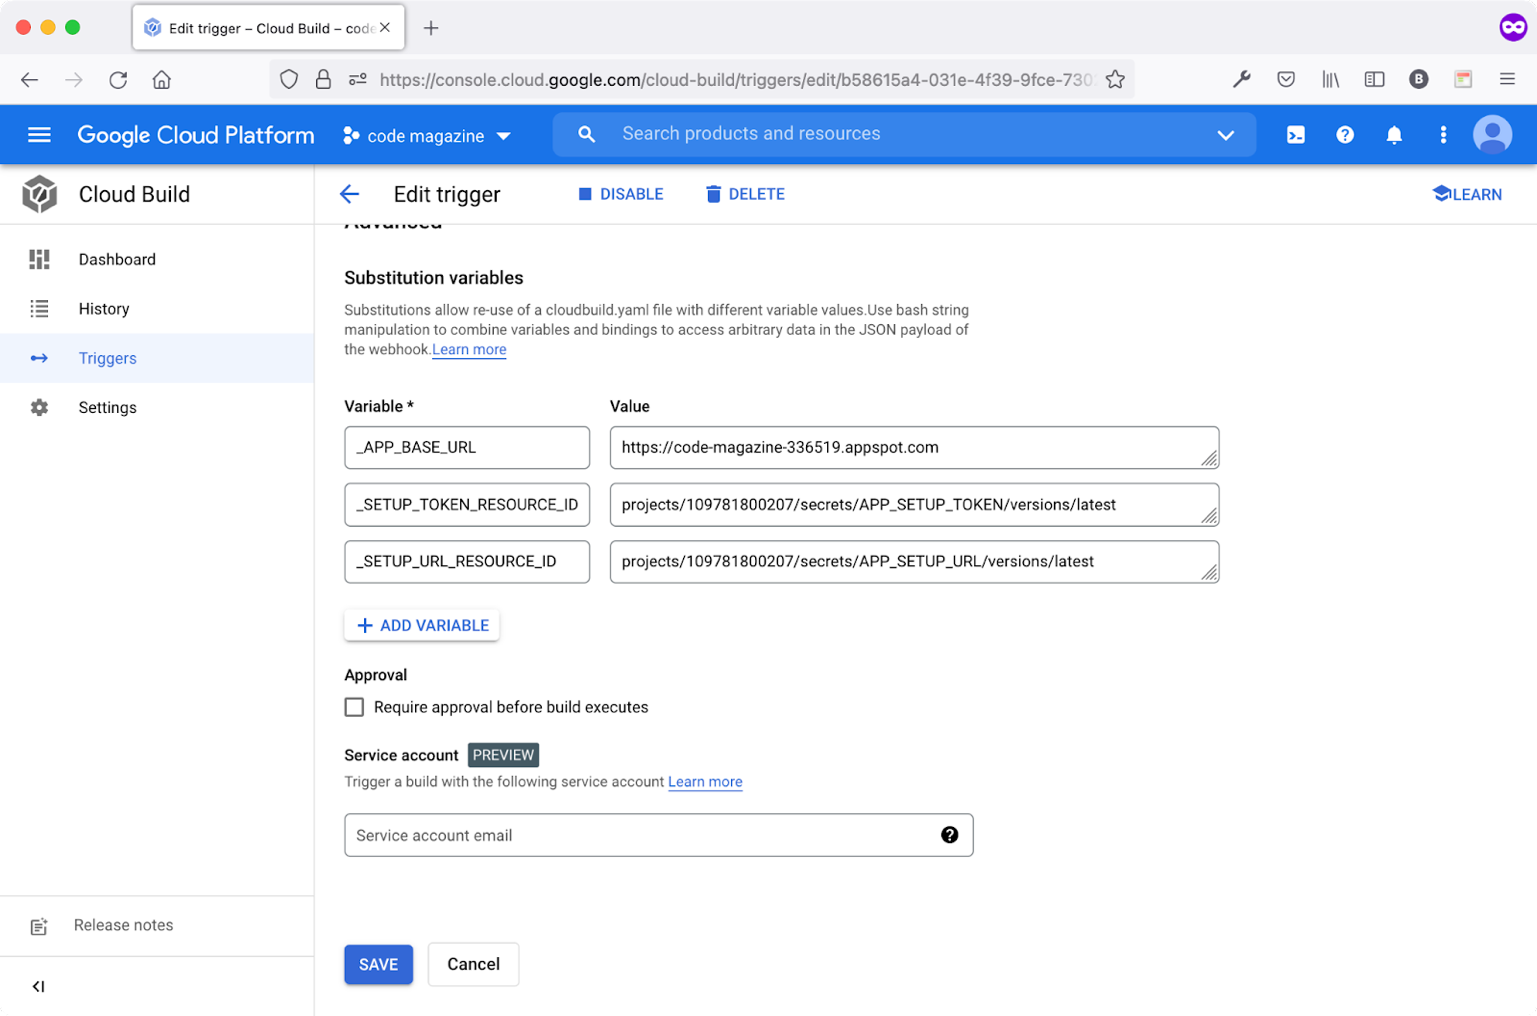
Scroll down to the section named Substitution variables. Locate and click the ADD VARIABLE button.
Add the following variables:
- Variable: _SETUP_URL_RESOURCE_ID
- Value: APP_SETUP_URL secret variable unique ID.
- Variable: _SETUP_TOKEN_RESOURCE_ID
- Value: APP_SETUP_TOKEN secret variable unique ID.
Update the following variables:
- Variable: _APP_BASE_URL
- Value: Google APP Engine App Base URL
Figure 6 shows the variables added together with their values.
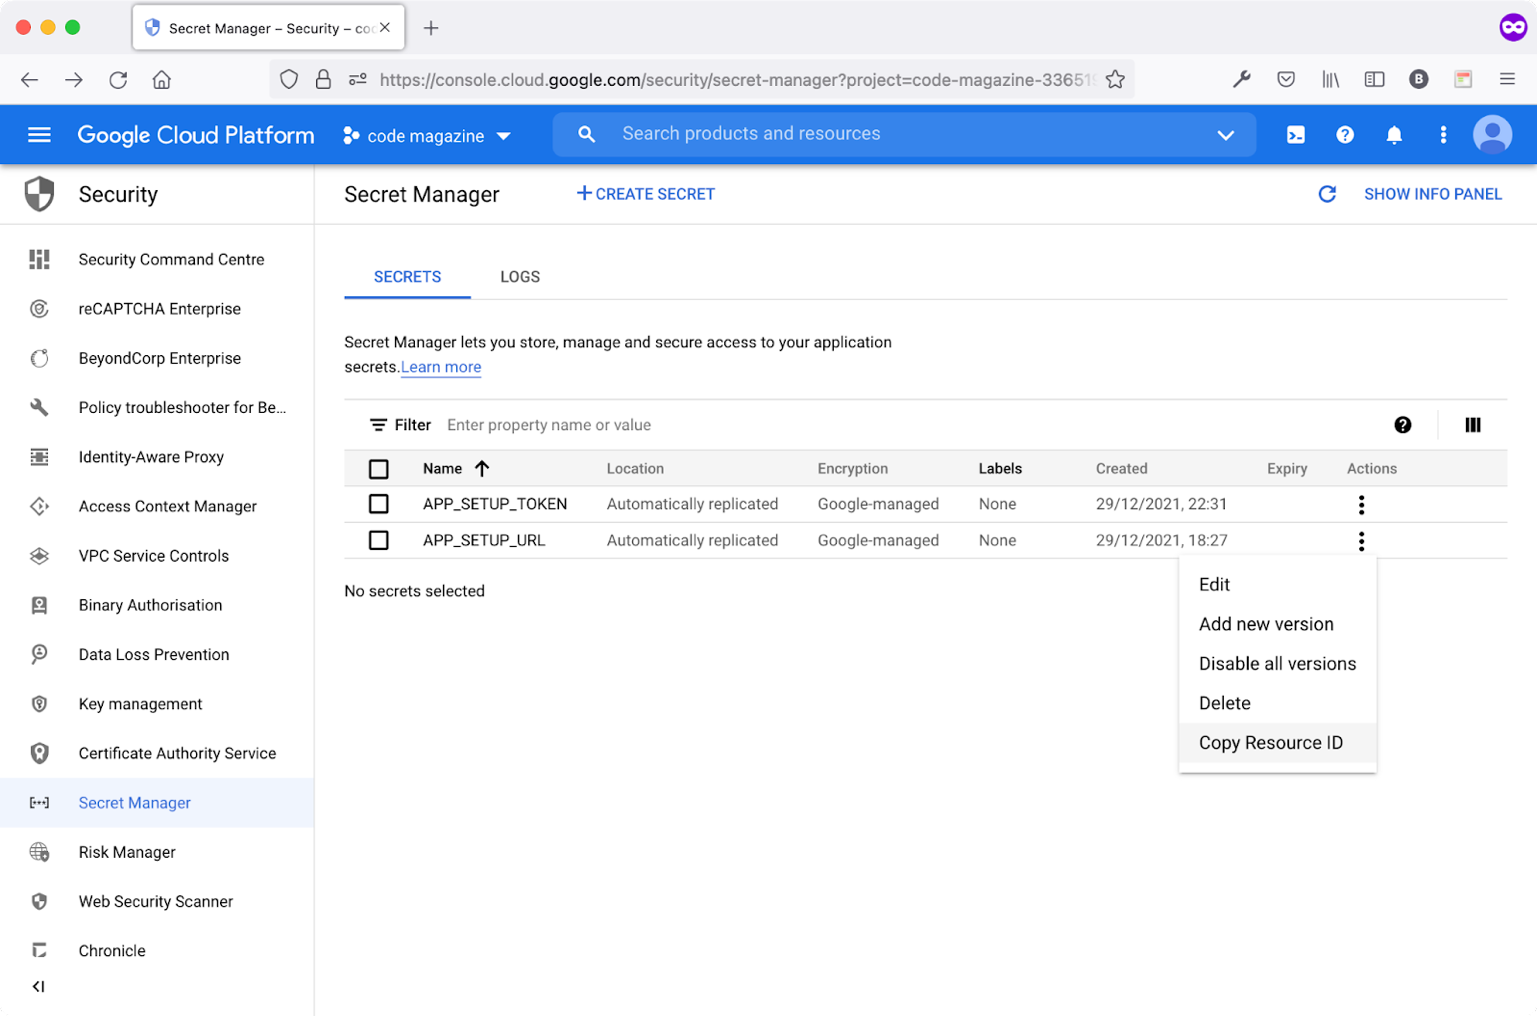
In order to locate the secret variable unique ID, follow these steps:
- Navigate to the Security section.
- Locate and click the Secret Manager menu item.
- Click the actions menu for any secret variable.
- Click the Copy Resource ID.
Figure 7 shows how to copy a secret variable unique ID.
The secret variable ID looks like the following:
projects/109781800207/secrets/APP_SETUP_URL
In case you have multiple versions of a secret variable, you can specify the version by appending the following to the secret variable ID:
{SECRET_VARIABLE_ID}/versions/1
Another option is to always append the latest version of the secret variable. This is done by appending /versions/latest.
When you check the Cloud Build Trigger variables again, you'll notice that I appended the /versions/latest to all the secret variables used. This guarantees that Cloud Build always receives the latest value of a secret variable.
Step 6: Update the Laravel App Setup Controller
Let's now switch to the Laravel app and update the SetupController to authorize the incoming POST requests to run the Laravel Migrations.
Start by installing the package google/cloud-secret-manager. This package contains all the classes needed to access and manage the Google Cloud Secret Manager service.
Run the following command to install the package:
composer require google/cloud-secret-manager
The next step is to update the app.yaml file to include the following environment variables:
SETUP_SECRET_KEY: APP_SETUP_TOKEN
GOOGLE_CLOUD_PROJECT_ID: code-magazine-336519
The value of APP_SETUP_TOKEN corresponds to the secret variable APP_SETUP_TOKEN.
In line with specifying the environment variables, you need to add the above variables to the Laravel Configuration system.
Locate and open /config/services.php file and add the following section:
'gcp' => [
    'project_id' => env('GOOGLE_CLOUD_PROJECT_ID', 'code-magazine-336519'),
    'sm_setup_secret_key' => env('SETUP_SECRET_KEY', 'APP_SETUP_TOKEN'),
]
Now, switch to the SetupController file, and let's add the necessary code to authorize the incoming requests.
Add the one liner inside the __invoke() method to authorize the request:
public function __invoke(Request $request):\Illuminate\Http\Response
{
    // Authorize this request
    $this->authorizeRequest($request);
The authorizeRequest() method is a private one and is defined in Listing 2.
Listing 2: The AuthorizeRequest Method
private function authorizeRequest (Request $request)
{
    // Get secret key
    $setupSecretKey = config('services.gcp.sm_setup_secret_key');

    // Get secret value from request
    abort_if($request->missing($setupSecretKey), '403',
        'Authentication Token is missing');

    // Get project Id
    $projectId = config('services.gcp.project_id');

    // Create the Secret Manager client.
    $client = new SecretManagerServiceClient();

    // Build the resource name of the secret version.
    $name = $client->secretVersionName($projectId,
        $setupSecretKey, 'latest');

    // Access the secret version.
    $response = $client->accessSecretVersion($name);

    abort_if(!$response, 403, 'Authentication Token is missing');

    // Get secret value
    $setupSecretValue = $response->getPayload()->getData();

    // Get secret value from current request
    $incomingSecretValue = $request->input($setupSecretKey);

    // only App Engine request pass through
    abort_unless($setupSecretValue === $incomingSecretValue, 403,
          'You are not authorized to perform this action'
    );
}
The authorizeRequest() method performs the following steps in order to authorize the incoming request:
- Retrieves the secret variable name from the configuration files that correspond to the
APP_SETUP_TOKENsecret. - If the incoming POST request is missing this secret, it aborts the request with a 403 Forbidden exception.
- Retrieves the Project ID environment variable name.
- Instantiates a new instance of the
SecretManagerServiceClientclass. - Builds the resource name of the secret variable by using the
$client->secretVersionNamemethod and passing over as parameters the Project ID, secret variable name, and secret variable version. - Queries the Secret Manager Service by using the
$client->accessSecretVersionmethod. - If the secret variable is present, it then compares the value of the retrieved secret variable to the value received in the POST request.
- If both values are equal, it authorizes the request. Otherwise, the request fails with a 403 Forbidden error.
That's it! Now you have a secure endpoint to run the Laravel Migrations.
Add a Cloud Build Step to Back Up the Cloud SQL
Now that you've secured the step to run the Laravel Migrations, let's look at how you can take a snapshot or backup every time the Cloud Build Workflow runs and deploys a new copy of the application.
Before delving into the technical aspect of adding this new step, it's worth mentioning that this step is optional. However, it is very handy when your application grows big in terms of source code and the number of users using it. If, for any reason, the Cloud Build Workflow crashes and the deployment is halted, you always have a backup of the database you can restore at any time. It's an extra measure to secure the proper functioning and availability of the application.
Only two steps are needed to enable this feature. Let's check them out!
Google Cloud Build has a rich library of Docker images ready to use in the Workflow
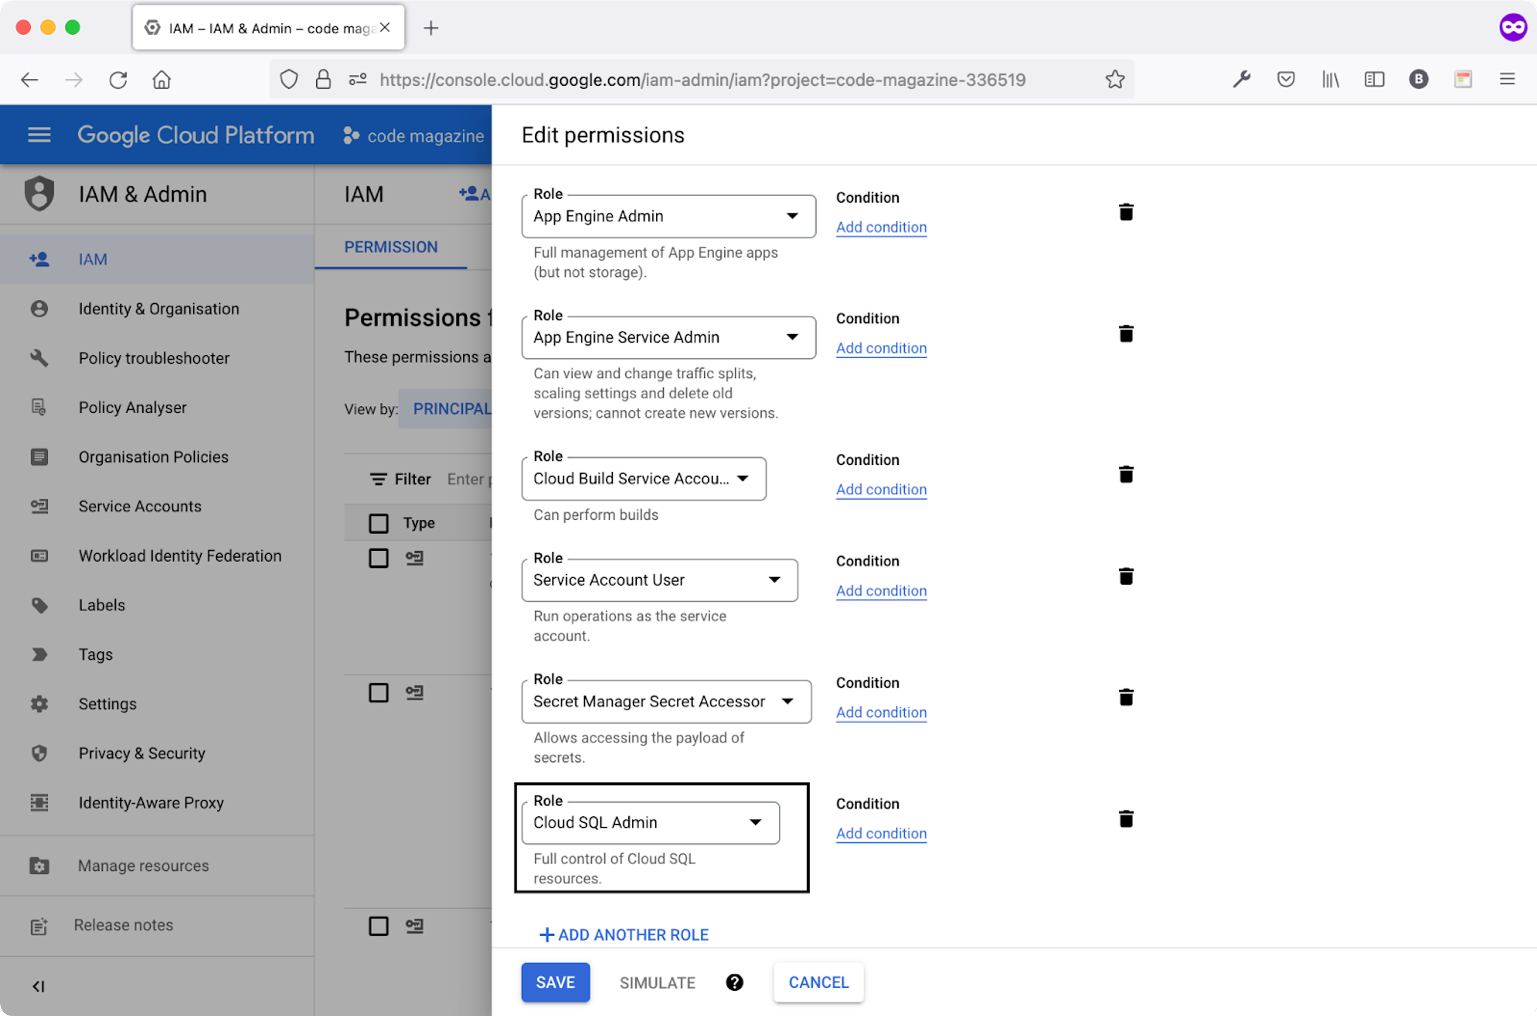
Step 1: Add Cloud SQL Admin Permission
The Cloud Build Workflow runs under the realm of the Cloud Build Default service account. This account usually ends with cloudbuild.gserviceaccount.com. This account requires specific permission to enable it to take a snapshot of the Cloud SQL Database.
Navigate to the IAM & Admin, locate the Cloud Build default service account. Click the edit icon to add the new permission. The name of the permission to add is Cloud SQL Admin.
Figure 8 shows how to add this specific permission.
Let's switch gears and add the new Cloud Build Workflow step.
Step 2: Add the Backup Cloud SQL Cloud Build Step
Locate and open the /ci/cloudbuild.yaml file once again. Right after the deployment step, and just before running the Laravel Migrations, add the following new step:
- name: 'gcr.io/google.com/cloudsdktool/cloud-sdk'
  entrypoint: 'bash'
  args:
  - '-c'
  - |
    gcloud sql backups create \
         -i=$_CLOUD_SQL_INSTANCE \
         --project=$PROJECT_ID \
         --description=$BUILD_ID
This new Cloud Build step uses the Cloud-SDK Docker image to run a gcloud sql command to create a new backup of the database referenced by the CLOUD_SQL_NSTANCE variable.
The gcloud SDK is a rich library of commands that allows you to interact with the Google Cloud Platform from the command line. You can read more about gcloud sql command here: https://cloud.google.com/sdk/gcloud/reference/sql.
Now let's adjust the Cloud Build Trigger to provide the new variable.
Step 3: Update the Cloud Build Trigger
At this moment, you need to update the Cloud Build Trigger to add the new variable CLOUD_SQL_INSTANCE.
Navigate to the Cloud Build section and locate and click the Triggers menu item.
Locate the deploy-main-branch trigger from the Actions menu, click the Edit action item to edit the trigger, and add the required secret variables.
Scroll down to the section named Substitution variables. Click the ADD VARIABLE button.
Add the following variable:
- Variable: _CLOUD_SQL_INSTANCE
- Value: Copy the Cloud SQL Instance ID
To grab the Cloud SQL Instance ID, navigate to the SQL section, locate the current SQL instance, and copy its name. Figure 9 shows the Cloud SQL Instances page.
Copy the Instance ID and navigate back to the Cloud Build Triggers page and paste the value under the CLOUD_SQL_INSTANCE variable.
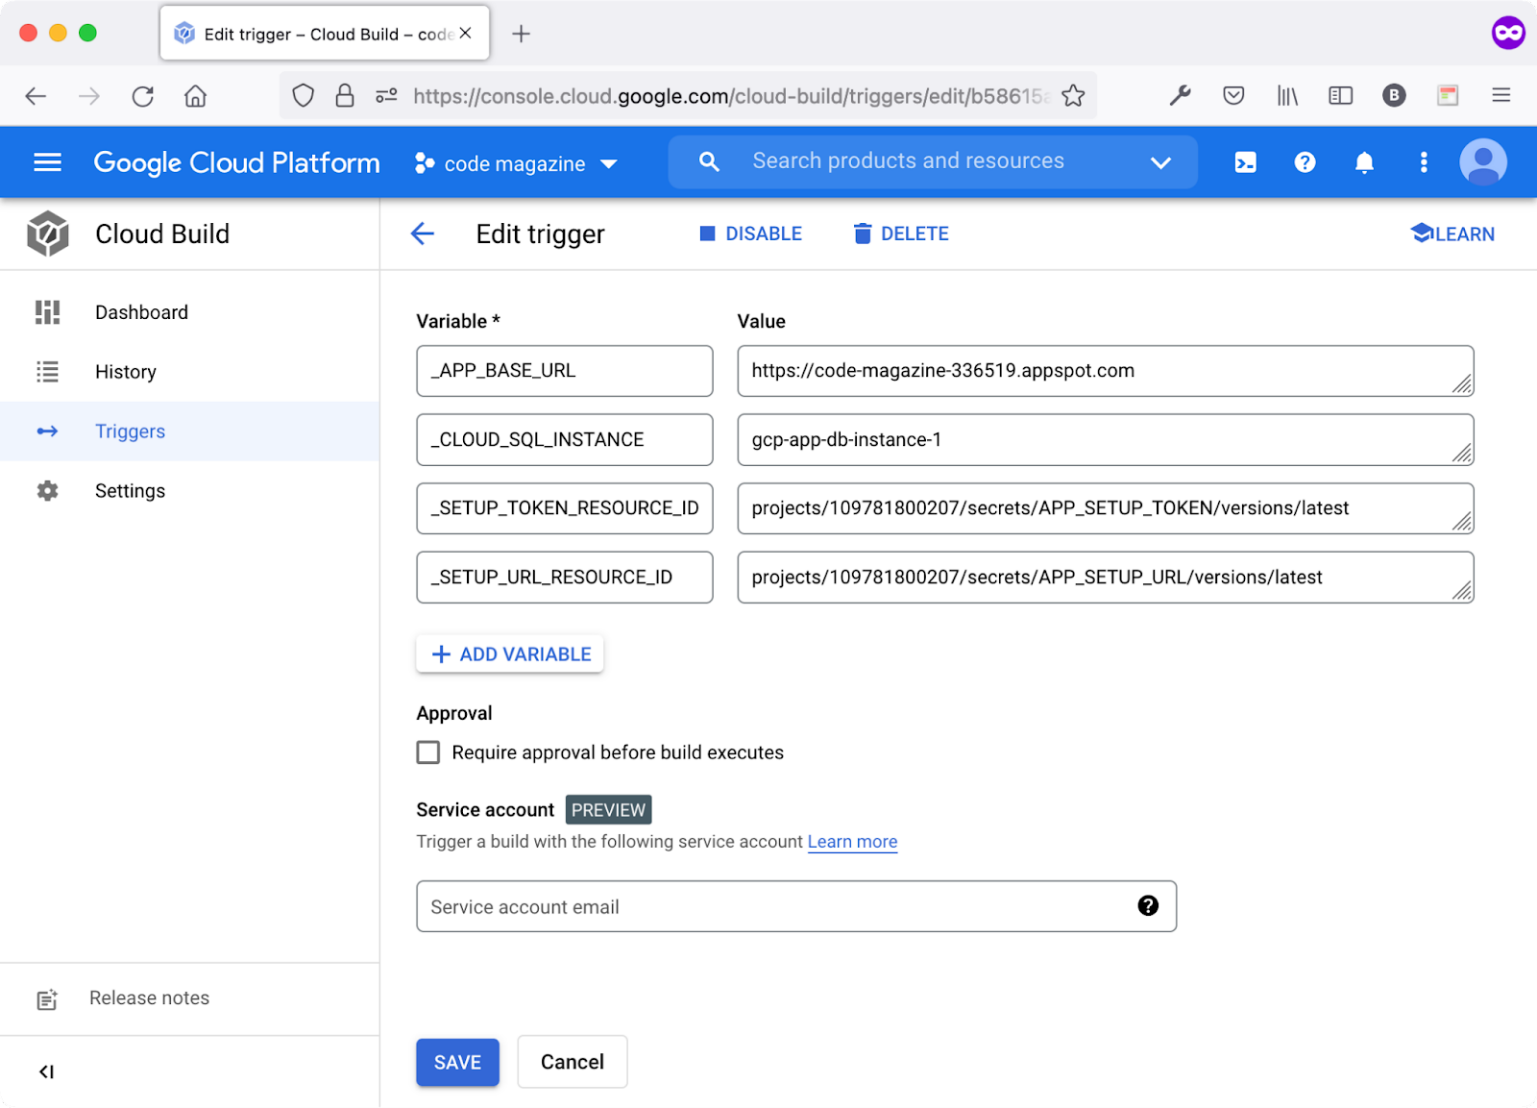
Figure 10 shows all the variables already created and used on the trigger.
Let's run the Cloud Build Trigger and go check the database snapshot.
Step 4: Locate the Database Backup
Run the Cloud Build Trigger to generate a new database backup.
You can choose one of these ways to do it:
- Run the trigger manually by navigating to the Cloud Build Triggers page and clicking the RUN button on the trigger.
- Do a Git Push on the main branch to run the trigger.
Right after running the trigger successfully:
- Navigate to the SQL section.
- Click the current Cloud SQL Instance ID.
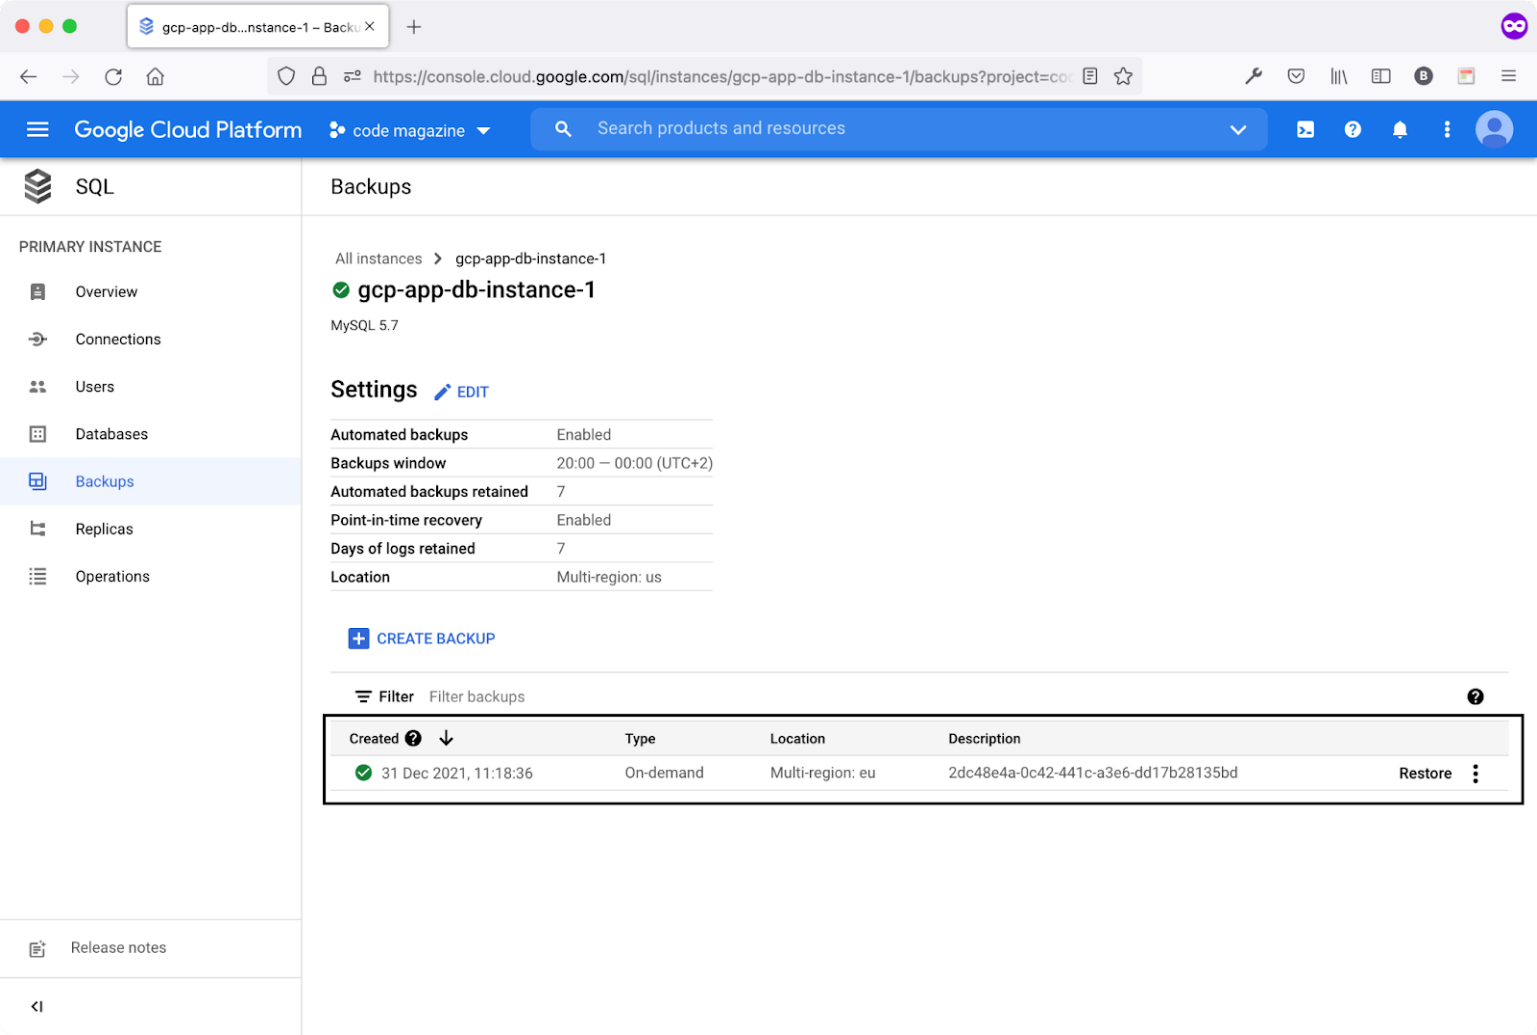
- Locate and click the Backups menu item.
Figure 11 shows the first database backup created by the Cloud Build Workflow.
Now that the app is up and running on Google Cloud Platform, let's extend the Editors page to allow the user to upload an editor Logo file.
Use Google Cloud Storage for File Uploads
Google Cloud Storage is an object storage service that allows you to store all kinds of files. It groups different objects into unique namespaces called Buckets. Think of Buckets as containers that can hold your data. Everything you store in the Cloud Storage must be contained in a Bucket.
You can use Buckets to organize and control access to your data. Unlike a directory or folder, you cannot nest Buckets inside each other.
Google Cloud Platform creates a new Bucket when you create a new Google App Engine app. You may use this Bucket to upload files in your app or even create more Buckets, as you see fit.
Navigate to the Cloud Storage section, and you'll notice a set of Buckets already created by the Google Cloud Platform.
Figure 12 lists all the Buckets available.
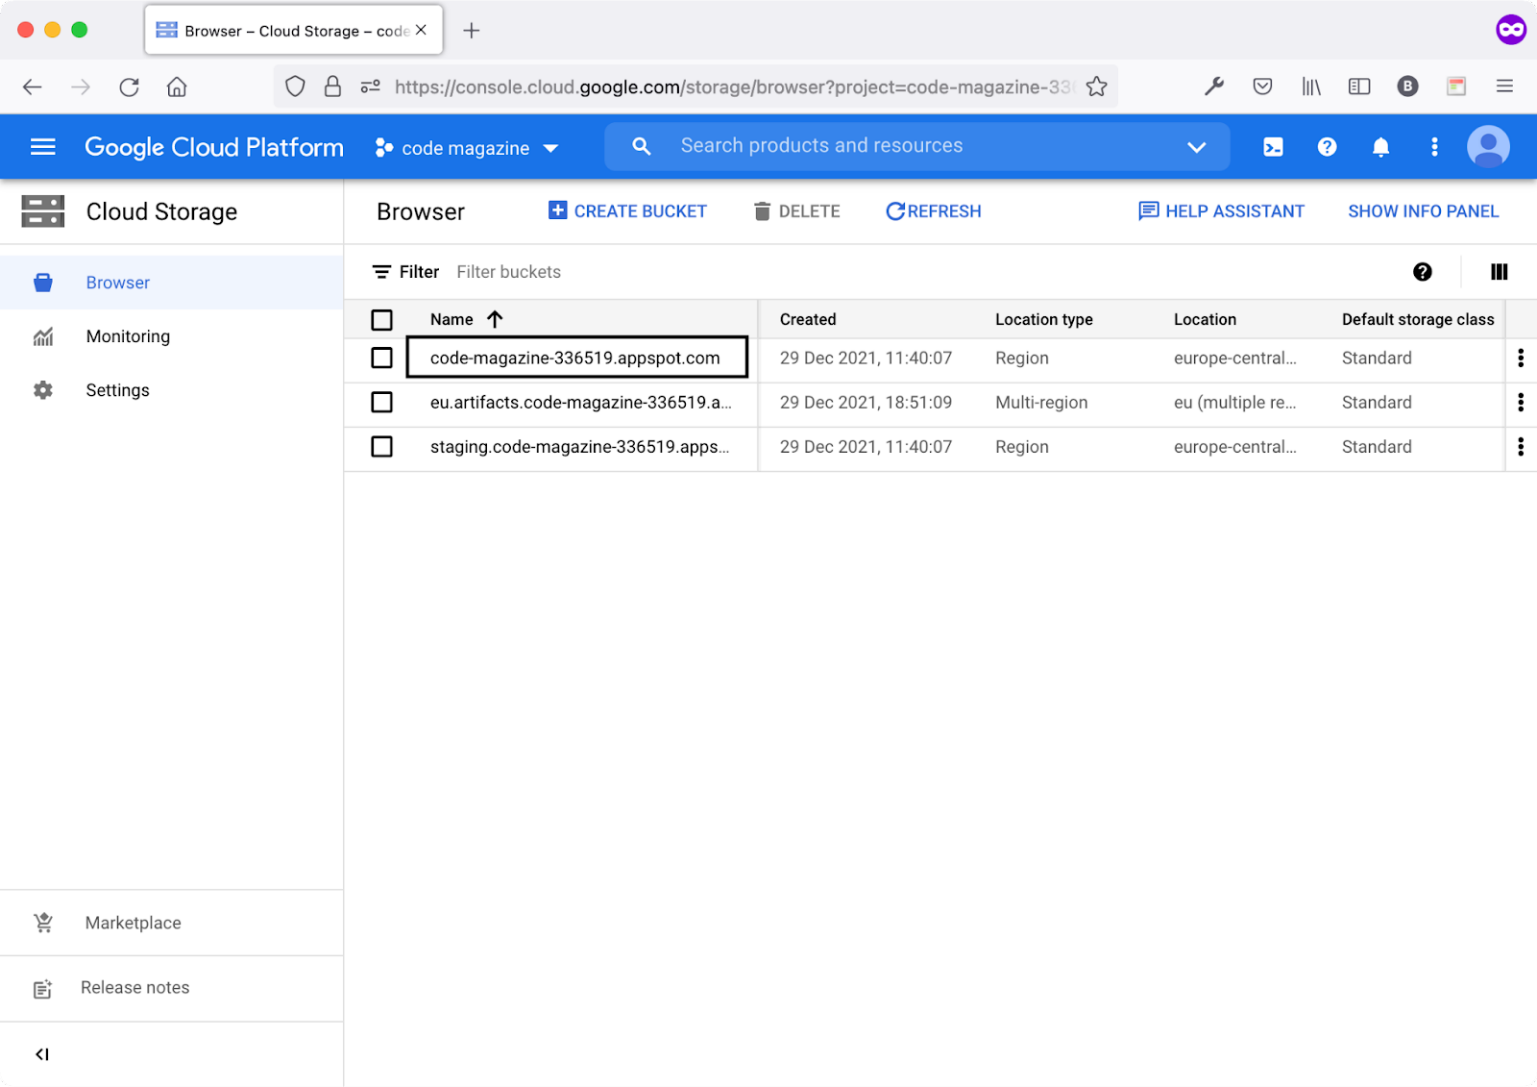
You're now interested in the code-magazine-336519.appspot.com Bucket. Think of the Bucket as a directory or folder. Click on this Bucket to see a list of all objects stored inside it.
Let's follow the steps below to add a Logo file upload feature on the Editors page.
Step 1: Install a Third-Party Package to Upload Files
Start by installing a third-party package that enables you to access and manage a Google Cloud Storage Bucket.
On the command line, run the following command to install the following package.
composer require \
    superbalist/laravel-google-cloud-storage
Next, navigate to the /config/filesystems.php file and add the following disk under the array disks.
'gcs' => [
    'driver' => 'gcs',
    'project_id' => env('GOOGLE_CLOUD_PROJECT_ID',''),
    'key_file' => env('GOOGLE_CLOUD_KEY_FILE',''),
    'bucket' => env('GOOGLE_CLOUD_STORAGE_BUCKET',''),
    'path_prefix' => env('GOOGLE_CLOUD_STORAGE_PATH_PREFIX', ''),
    'storage_api_uri' => env('GOOGLE_CLOUD_STORAGE_API_URI', '')
],
You've just added the gcs disk to use in your app to upload and download files. Let's delve further into each setting in this new disk.
The new disk uses a custom Laravel Storage Driver defined by the new package you have just installed. This driver allows the communication between the Laravel app and the Google Cloud Storage service.
Next, the disk specifies the Google Cloud Project ID. The value is retrieved from the GOOGLE_CLOUD_PROJECT_ID environment variable.
There are many third-party packages you can use to upload/download file on Google Cloud Storage. The package I've used in this article is one that I've used for several years now.
In case you want to test and upload files to Google Cloud Storage while running the app locally, you need to specify the location of a Service Account Key file. You can use this to test your app locally before deploying it to the cloud. The GOOGLE_CLOUD_KEY_FILE environment variable holds the location of the key file on the local system.
You can read more about Service Account Keys here: https://cloud.google.com/iam/docs/creating-managing-service-account-keys.
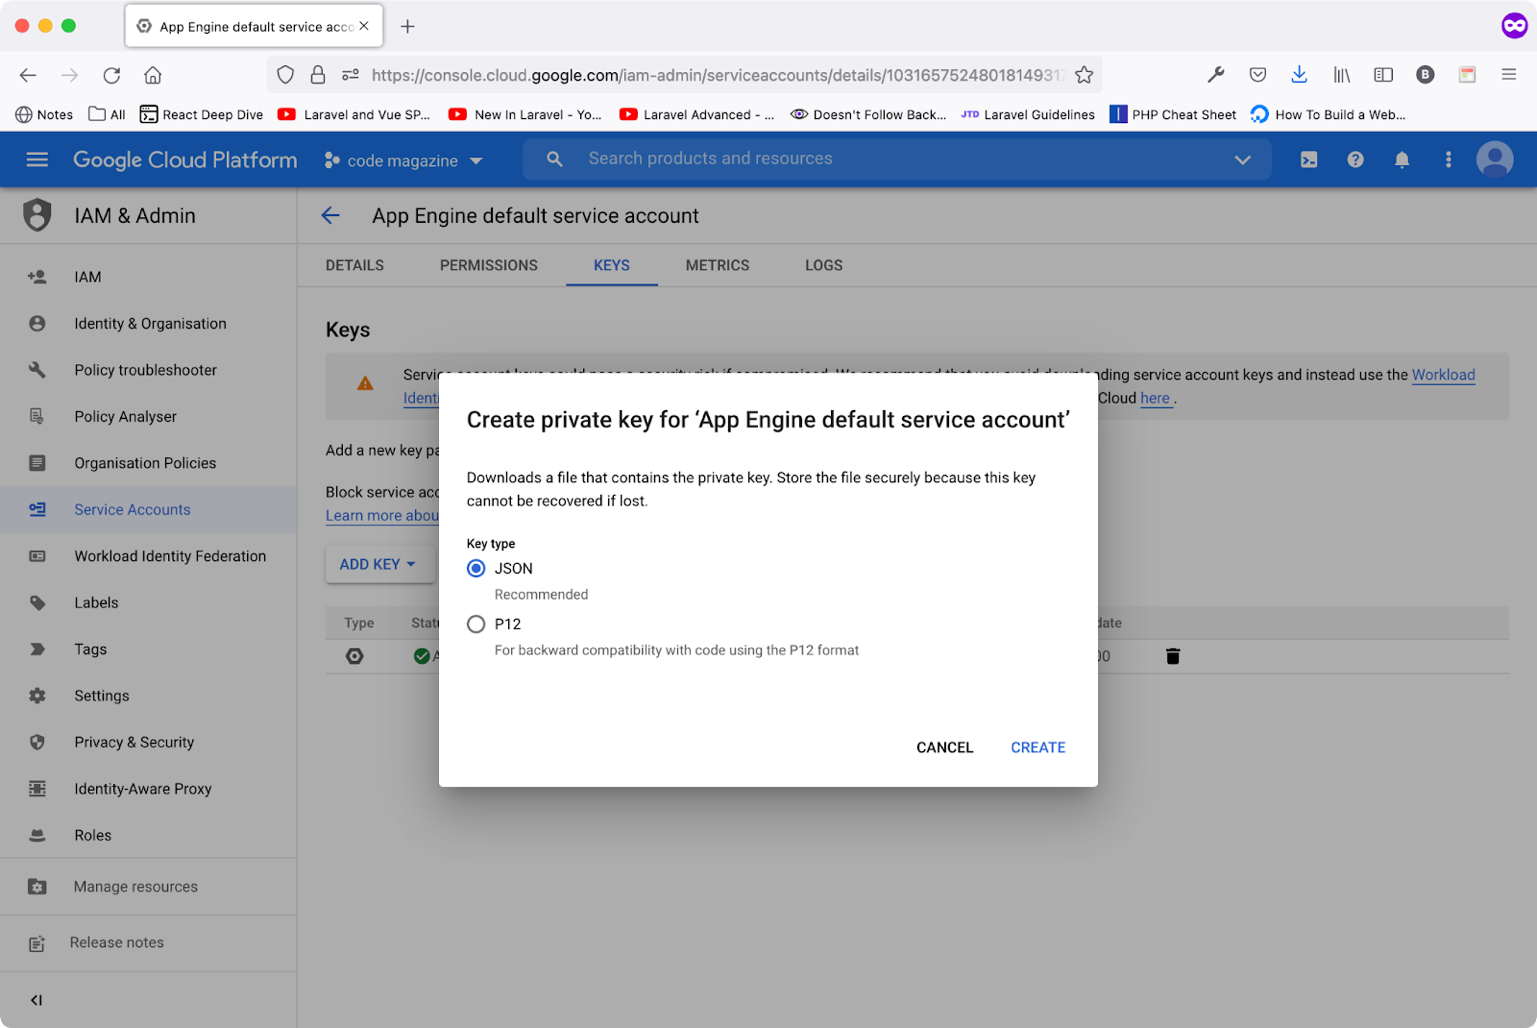
If you are wondering how to create a service account key file, follow these steps:
- Navigate to the IAM & Admin section.
- Click on the Service Accounts menu item.
- Locate and click the service account that ends with
@appspot.gserviceaccount.com(the App Engine Default Service Account). - Click the Keys tab.
- Click the ADD KEY button. Then choose Create new key.
- Keep the selection as JSON and then click the CREATE button.
Figure 13 shows all the steps together.
The next entry is a bucket. This refers to the name of the Bucket where you want to store your files. The name of the Bucket is stored in the GOOGLE_CLOUD_STORAGE_BUCKET environment variable.
The path_prefix entry allows you to store your files inside a sub-path. It's optional. The sub-path is stored inside the GOOGLE_CLOUD_STORAGE_PATH_PREFIX environment variable.
Finally, the storage_api_uri entry defines the Bucket Base Public URI used when you want to access files stored in the Bucket.
The value is stored inside the GOOGLE_CLOUD_STORAGE_API_URI environment variable.
Step 2: Update the app.yaml File
Locate the app.yaml file and let's add a few environment variables to support the Google Cloud Storage service.
GOOGLE_CLOUD_STORAGE_BUCKET: code-magazine-336519.appspot.com

GOOGLE_CLOUD_STORAGE_API_URI:
    https://storage.googleapis.com/code-magazine-336519.appspot.com/
In addition, let's configure Laravel to use the gcs disk when deployed on Google App Engine.
Locate the FILESYSTEM_DRIVER environment variable and change its value to gcs.
FILESYSTEM_DRIVER: gcs
Step 3: Add a Logo File Upload on the Editors Page
Let's open the /resources/views/editors.blade.php file and add the Logo File Upload control.
Locate the end of the Form tag just before the Submit button and add the HTML snippet shown in Listing 3.
Listing 3: File Upload Control
<div class="mb-6">
    <label class="block text-gray-700 text-sm font-bold mb-2"
           for="logo">
        Logo File
    </label>
    <input class="shadow appearance-none border rounded w-full py-2 px-3 text-gray-700 leading-tight focus:outline-none focus:shadow-outline"
           type="file" name="logo" accept="image/*">
</div>
To show the Logo on the table, you need to add new head and data cells. Listing 4 shows both snippets.
Listing 4: Display Logo File on Table
<th scope="col"
    class="px-6 py-3 text-left text-xs font-medium text-gray-500 uppercase tracking-wider">Logo</th>

<td class="px-6 py-4 whitespace-nowrap">
    <div class="flex items-center">
        <img src="{{ $editor->logo }}" alt="Logo" class="object-contain w-20">
    </div>
</td>
That's it! Let's create a Laravel Migration to add a new column on the Editors table.
Step 4: Add a Laravel Migration to Support Logo File Upload
Let's create a new Laravel Migration to add the Logo column on the Editor Model. Run the following command to create the migration:
sail artisan make:migration\add_column_logo_to_table_editors
This command creates a new empty migration. Inside the up() method add the new column. Inside the down() method drop the column.
Listing 5 shows the entire migration file.
Listing 5: Add Logo Column Migration File
<?php

use Illuminate\Database\Migrations\Migration;
use Illuminate\Database\Schema\Blueprint;
use Illuminate\Support\Facades\Schema;

class AddColumnLogoToTableEditors extends Migration
{
    /**
     * Run the migrations.
     *
     * @return void
     */
    public function up()
    {
        Schema::table('editors', function($table) {
            $table->string('logo')->nullable();
        });
    }

    /**
     * Reverse the migrations.
     *
     * @return void
     */
    public function down()
    {
        Schema::table('editors', function($table) {
            $table->dropColumn('logo');
        });
    }
}
Let's run the migration by issuing the following command:
sail artisan migrate
This command runs the new migration and adds the Logo column on the editors' table.
Step 5: Add Logo Accessor on the Editor Model
Locate and open the /app/Models/Editor.php file and add the following property accessor.
public function getLogoAttribute($value)
{
    return $value ? env('GOOGLE_CLOUD_STORAGE_API_URI')
        .'images/editors/' . $value : null;
}
You can read about Laravel Accessors here: https://laravel.com/docs/8.x/eloquent-mutators.
This accessor returns the correct Logo path whether the app is running locally or on the Google Cloud Platform. This accessor depends on the GOOGLE_CLOUD_STORAGE_API_URI environment variable. This variable can be a Bucket Base Public URL or simply the /storage/ path (when running locally).
Now anytime you want to access the Logo file name and path on an Editor Model, you just call $editor->logo property.
Step 6: Add the Missing Environment Variable
Locate and open the .env file and add the following environment variable.
GOOGLE_CLOUD_STORAGE_API_URI='/storage/'
When the app runs locally, a Logo file will be accessible on /storage/images/editors/ path. This same environment variable is defined inside the app.yaml and has a value of the Bucket Base Public URL.
Step 7: Update EditorController to Store the Logo File
Locate and open the /app/Http/Controllers/EditorController.php file. Inside the store() method add the following code:
$fileName = Str::uuid() .
            '.' .
            $request->logo->getClientOriginalExtension();

Storage::putFileAs('images/editors', $request->logo, $fileName, 'public');

$editor->logo = $fileName;
$editor->save();
The code snippet generates a file name for the Logo and stores these values inside the Logo column on the Editors table. It also stores the actual Logo file under the path /images/editors. Notice how you only store the Logo file name in the database. The actual Logo file is stored on the file system when running locally or inside the Bucket when running the app on Google Cloud Platform.
Also, you need to add a new validation on the incoming request to enforce the Logo file as a mandatory field on any request to store a new editor. Also, the field should only allow images and should be a maximum of 2 MB file.
Add to the validation block at the beginning of the store() method with the following entry:
'logo' => 'required|mimes:jpeg,jpg,png,gif|max:2048',
Listing 6 shows the entire store() method source code.
Listing 6: Store() Method with Logo Upload
public function store(Request $request):\Illuminate\Http\RedirectResponse
{
    $request->validate([
        'name' => 'required',
        'company' => 'required',
        'operating_system' => 'required',
        'license' => 'required',
        'logo' => 'required|mimes:jpeg,jpg,png,gif|required|max:2048',
    ]);

    $editor = new Editor($request->except(['logo']));

    // save logo
    $fileName = Str::uuid() .
           '.' .
           $request->logo->getClientOriginalExtension();

    Storage::putFileAs('images/editors', $request->logo, $fileName, 'public');

    $editor->logo = $fileName;

    $editor->save();

    return redirect()->route('editors.index')
        ->with('success', 'Editor created successfully.');
}
That's all! Let's run the application locally and check the Editors page after the update.
Figure 14 shows the page in action.
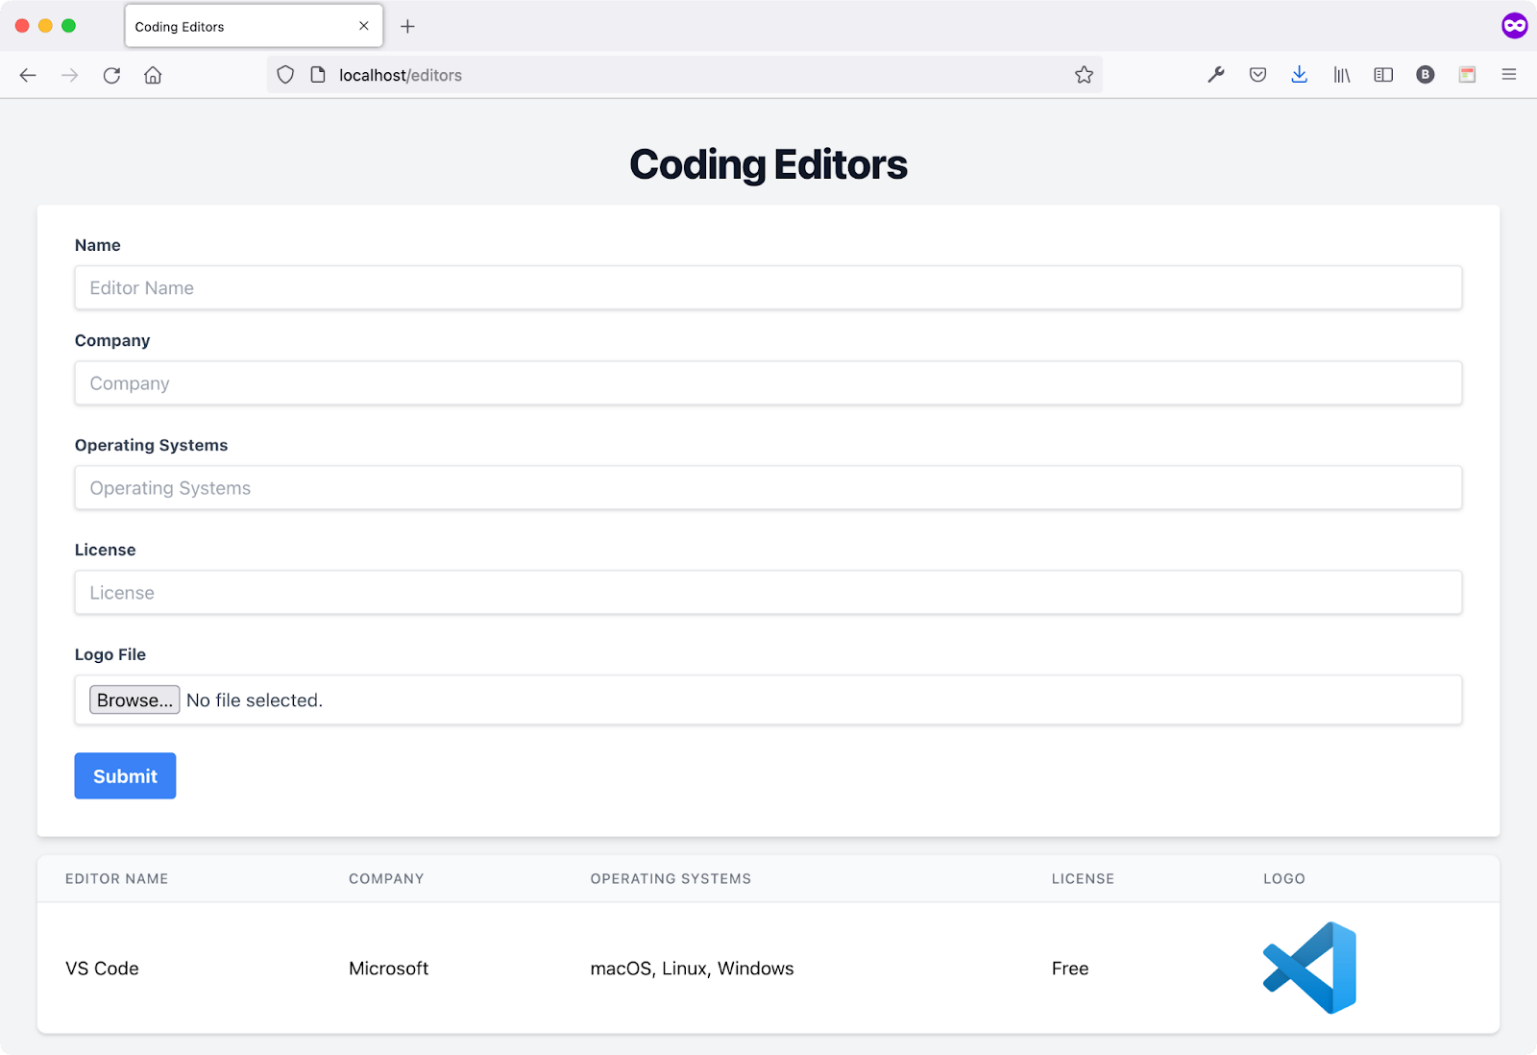
The page now supports uploading a Logo file and showing it on the list of editors.
Cloud Laravel Queue
Laravel offers Queues to run expensive and long jobs in the background. The Laravel Queue supports multiple drivers such as Database, Redis, and others. You can read all about Laravel Queues here: https://laravel.com/docs/8.x/queues#introduction.
After reading the documentation, you'll notice that there's a single Artisan command that you should execute for the Queue to work and function properly. The command is:
php artisan queue:work
This command runs the Laravel Queue and keeps it running to serve all future jobs. The Queue keeps running until you manually stop it.
Let's configure the Queue and run it on Google App Engine.
Step 1: Configure the Queue Database Driver
To use the Database driver, you need to create a database table to hold the queued jobs. Luckily, Laravel has all the commands to run, get the job done, and properly configure the driver.
Start by running the following command to create a Laravel Migration defining the structure of the database table.
sail artisan queue:table
Then, let's migrate the database to create the table using this command:
sail artisan migrate
Save your work, commit your changes, and push the source code. This triggers the Cloud Build Trigger to deploy the app and run the new migration.
Step 2: Set the Queue Connection
Now you need to tell Laravel which Queue driver the app is using. You need to set an environment variable to the correct Queue driver.
Locate and open the app.yaml file. Add a new environment variable as follows:
QUEUE_CONNECTION=database
Locate and open the .env file. Add the same environment variable:
QUEUE_CONNECTION=database
Step 3: Run the Laravel Queue Worker
To run the Queue Worker locally, you need to run the following command:
sail artisan queue:work
Now, when running the app on the Google App Engine you need to keep the queue:work processes running all the time. A queue:work process might be halted for many reasons, such as a timeout.
Therefore, you need to use a Process Monitor system such as Supervisord (http://supervisord.org/). It detects when the process crashes and restarts it right away. This behavior ensures, for example, that the queue:work processes are always running. Moreover, a process monitor system supports defining the number of processes to run concurrently for a specific program.
The Laravel Queue documentation explains in detail how to configure Supervisord. You can read more on how to configure Supervisord to run the Queue Worker (https://laravel.com/docs/8.x/queues#supervisor-configuration).
Luckily, the Google App Engine Flexible Environment supports Supervisord. You can read about this integration here: https://cloud.google.com/appengine/docs/flexible/php/reference/app-yaml.
Create a new additional-supervisord.conf file at the root of the project folder. Paste in this file the configuration you see in Listing 7.
Listing 7: additional-supervisord.config file
[program:queue-worker]
process_name=%(program_name)s_%(process_num)02d

command = php %(ENV_APP_DIR)s/artisan queue:work \
    --sleep=3 --tries=3

stdout_logfile = /dev/stdout
stdout_logfile_maxbytes=0
stderr_logfile = /dev/stderr
stderr_logfile_maxbytes=0
user = www-data
numprocs=2
autostart = true
autorestart = true
priority = 5
stopwaitsecs = 20
This configuration guarantees that at any moment of time, two processes are running the Queue Worker. For more information on using and configuring Supervidord, check this complete guide: https://csjourney.com/managing-processes-with-supervisor-in-depth-tutorial/.
Now that you've properly configured to keep the Laravel Queue running all the time, commit the changes, and push the code to GitHub. The Cloud Build Trigger once again executes and deploys a new version of the app. This time, the app is deployed together with two processes running the Laravel Queue Worker. The Queue is now ready to receive new jobs!
Cloud Laravel Scheduler
Laravel supports scheduling commands on the server. A command can be anything from sending emails to database maintenance. You can read more about Laravel Task Scheduling here: https://laravel.com/docs/8.x/scheduling#introduction.
The Laravel Scheduler should run every minute to check for any scheduled task to handle and execute. While running your app on Google App Engine, there are multiple ways to guarantee that the Laravel Scheduler runs every minute.
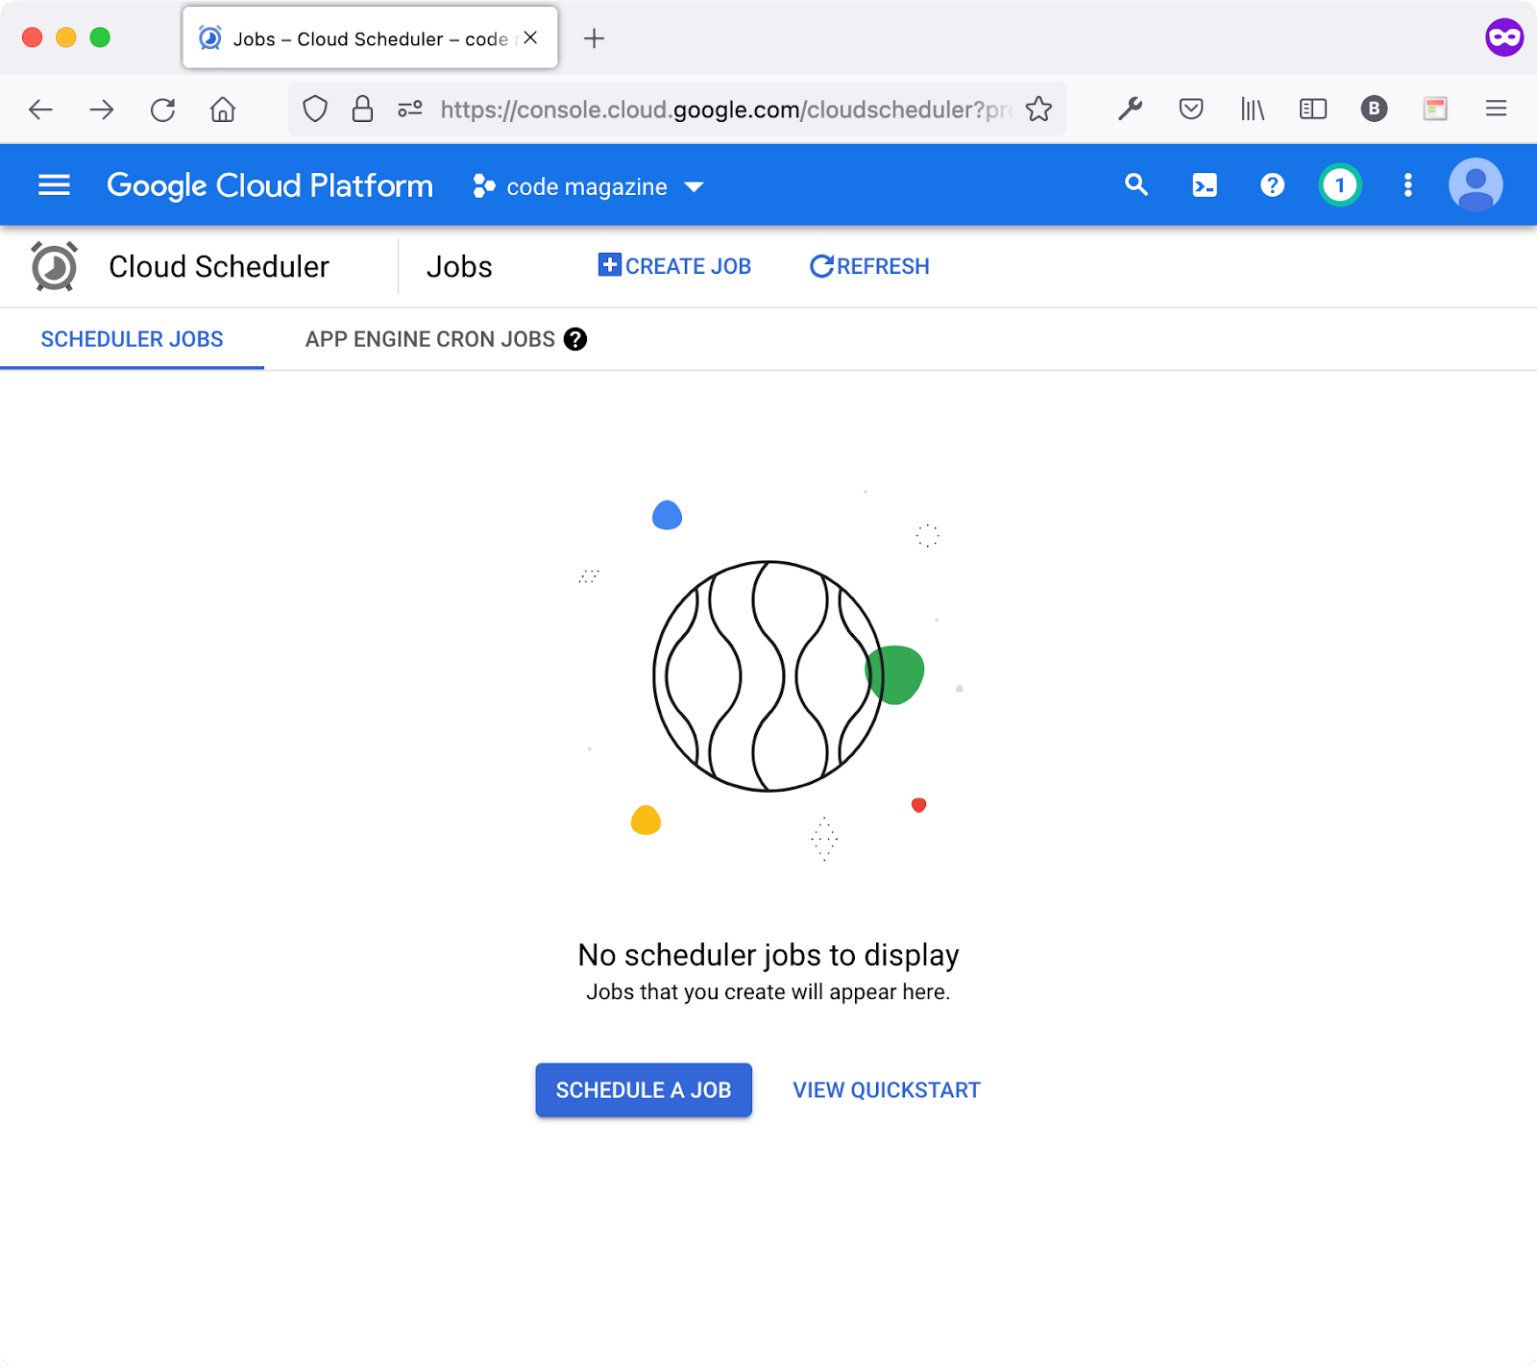
Option 1: Using Google Cloud Scheduler and App Engine Cron Service
This option involves using the Google Cloud Scheduler to schedule a new job. The scheduler supports multiple target audiences including the App Engine HTTP service. This means you schedule a new job that runs every minute and executes an HTTP Endpoint hosted on App Engine.
Figure 15 shows the Google Cloud Scheduler dashboard.
You should create a new Laravel HTTP Endpoint, like what you've done in running the Laravel Migrations. This endpoint runs an Artisan command that starts the Laravel Scheduler, executes any scheduled commands, and then it exits. The command is:
php artisan schedule:work
Define a new POST route to this new endpoint, such as run-laravel-scheduler.
Switch back to Google Cloud Scheduler, create the new job and make sure to define the frequency to run every minute using the cron pattern of * * * * *. Also, set the target type to App Engine HTTP.
Figure 16 illustrates all of the details required.
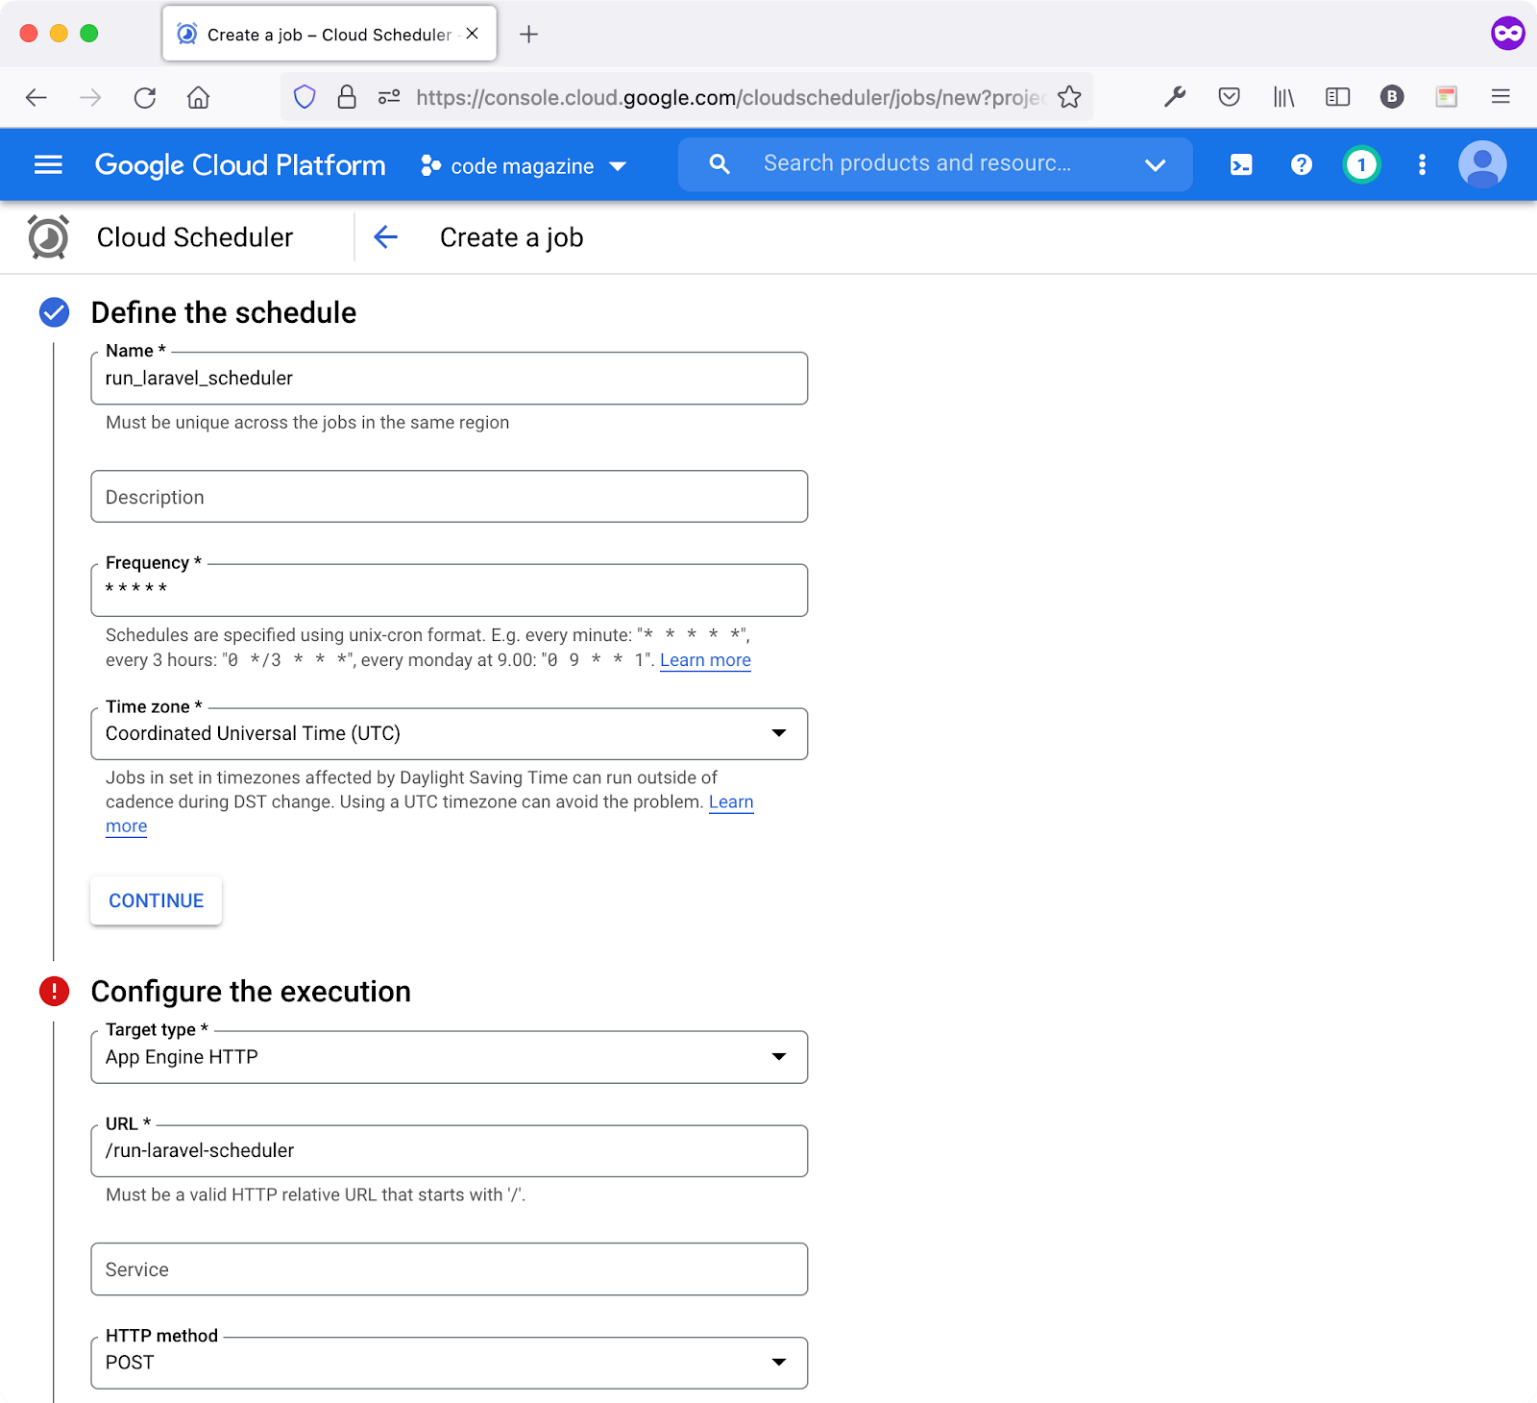
Every minute, the Google Job runs and issues a POST request to the /run-laravel-scheduler route defined on the Laravel app. This endpoint in turn executes an Artisan command to activate and run the Laravel Scheduler.
In case you face any problems in implementing this solution, you can always contact me via email and we can discuss this further.
Option 2: Using Supervisord Service
This second option involves using, once again, the Supervisord process monitoring system. The following online guide implements this option: Get Laravel Production-Ready in the Google App Engine (https://medium.com/hypefactors/get-laravel-production-ready-in-the-google-app-engine-b06dba35e23b).
That's it! You've deployed your Laravel app to Google App Engine.
There are other ways too to configure Laravel Scheduler on Google Cloud Platform, such as using Cloud Run.
Conclusion
This is the third and last episode in the series on deploying a Laravel app to the Google Cloud App Engine Flexible environment.
By now, you should be able to do the following:
- Create a new Laravel app
- Push the app source code to a GitHub repository
- Create a Google App Engine app.
- Create a Google Cloud Build Workflow.
- Create a Google Cloud Build Trigger and connect it to the GitHub repository.
- Connect your app to Google Cloud SQL.
- Take a database backup just before deploying a new version of the app.
- Run Laravel Migrations as part of the Google Cloud Build Workflow.
- Run the Laravel Queue on App Engine.
- Run the Laravel Scheduler on App Engine.
If you have any questions or need help deploying your Laravel app on Google Cloud Platform, feel free to contact me at bhaidar [at] gmail.com, where I'll reply to discuss your concerns, options, and map out a solution that's feasible.
