


Microservices architecture is a structural approach that organizes an application as a collection of small independent services modeled around a business domain that can communicate with one another, if need be.
In a typical distributed environment, dealing with unexpected errors or failures is challenging. When building microservices, you should consider resilience to failures. Hence, your design should support resilience and high availability. The resiliency of an application is defined as its capability to extricate from failures. Resilient microservices are adept at withstanding faults and unexpected failures.
This article talks about how you can design your microservices for failure, i.e., make them resilient and fault-tolerant.
Prerequisites
If you're going to work with the code examples discussed in this article, you should have the following installed in your system:
- Visual Studio 2022 Preview (an earlier version will also work but Visual Studio 2022 is preferred)
- .NET 6.0 Preview
- ASP.NET 6.0 Runtime Preview
You can download Visual Studio 2022 from here: https://visualstudio.microsoft.com/downloads/.
The Problem with Monoliths
A monolithic application creates problems in maintaining the code base, implementing continuous deployment, and even adding new features when needed. In an application based on monolithic architecture, a single fault can bring down the entire application.
Moreover, unlike a microservice, a monolith can scale in a single dimension only. If you're working on an application with dispersed teams, it makes more sense to use microservices architecture instead of monolithic architecture.
Distributed teams often find it helpful to use microservices architecture because it allows them to work independently. Microservices architecture offers an incredible amount of modularity and flexibility. Moreover, several teams can work on a single microservice built using homogenous or heterogeneous technologies. Microservices architecture is more cost-effective and can help you to scale the application seamlessly.
Distributed teams flourish with microservices because they can work independently, yet connected, with the larger whole of the application.
Introduction to Microservices Architecture
Microservices architecture is an architectural style used to create flexible, extendable, and independently deployable services built using a collection of homogenous or heterogeneous technologies. In microservices, you have a single application comprised of a suite of small, independently deployable services, each of which executes and communicates with the others via lightweight communication mechanisms. Given the distributed nature of a microservices-based architecture, you should develop scalability strategies that protect microservices-based systems against outages and make them fault-tolerant.
A microservices-based application comprises loosely connected services developed and deployed separately and can run on heterogeneous platforms. It's an architectural style used to build applications by splitting business components into small autonomous services. The Microservices Architecture pattern imposes a degree of modularity that's very difficult to accomplish with a monolithic codebase.
Advantages of Microservices Architecture
Improved Scalability: To scale a microservices-based application, you'd need to scale only specific components - this optimizes resource usage to a considerable extent. The decoupled nature of the microservices enables them to be modified independent of other services, eliminating the possibility of interfering with the operation of other services.
Reduced coupling: Reduced coupling between the components of an application makes it adaptable for changes over time easily.
Better ROI: Microservices architecture facilitates the separation of responsibilities that's essential for developing highly scaled applications. It allows developers to work independently on individual services without interfering with the work of other developers.
Faster Deployment and Reduced Development Time: Different teams can collaborate on independent services when you use microservices, allowing you to deploy more rapidly. Usage of microservices architecture cuts down on the development time because of the loosely coupled and autonomous nature of microservices.
Faster Releases: You don't have to rebuild your whole codebase if you want to add or change a feature because microservices operate with loosely connected services. The decentralized nature of developing, maintaining, and updating applications allow for faster deployments and releases. Each microservice can be built, tested, and deployed individually. So, you can treat each microservice as an independently deployable unit.
The Need for Resilient Microservices
In today's ever-changing world of IT, legacy architectures are not sufficient for the needs of the business. Modern day applications should be able to run 24x7 with an uptime as close as possible to 100%, and they must be resilient, scalable, and cloud native.
The capability of an application to recover from failures is referred to as resiliency. In a typical distributed environment, dealing with unexpected errors or failures is challenging. Despite all the benefits provided by microservices, there are new challenges, because the services must communicate with one another or communicate with a database over a network.
Unlike a microservices application, in a monolithic application, one error might bring down the entire application. Because a microservices application comprises several small independently deployable units, failure of one part of the application doesn't bring down the entire application.
When building microservices, consider resilience to failures. Your design should support resilience and high availability. This article presents a discussion on the strategies that can be adopted for building resilient microservices so that your applications can be fault-tolerant and can handle failures gracefully.
A microservices application is not resilient to failures by default so you must design your application with failure in mind. A microservices-based application should be architected in such a way that even if a service is down (for whatever reason, such as network failure, bug in the application, network outage, or system failure), the application should continue to function and be able to recover gracefully from the failure with minimal effort.
Patterns of Microservices Architecture
There are several patterns you can follow to build resilient applications using microservices architecture.
Retry
In a typical microservice-based application, the services might often have several dependencies, such as back-end services and components or databases. There might be network outages, due to which a service call might fail. One possible solution to this problem is using the Retry pattern.
The Retry mechanism can be used for intermittent or instantaneous failures and is typically used to retry a failed operation after a specified duration for a specified number of times, both of which are usually configurable. The objective of this pattern is to ensure that failed services are invoked one or more times after a specific time interval until the expected response from the service is received.
Note that you should avoid chaining retries and only retry transient failures. You should also log appropriately so that you can examine these logs later and then determine the cause of failures. You should give your service the time needed to recover to avoid cascading failures. In doing so, you can save on network resources while, at the same time, allow the failed service to recover.
Circuit Breakers
When working in microservices-based applications, you might invoke a failed service several times until you get the desired result. However, invoking the service in this way might result in more damage and cascading failures. The Circuit Breaker pattern can be used as a solution to this problem - you can take advantage of this pattern to shield your application against non-transient faults.
Your microservices-based application may suffer from faults for several reasons. Such faults can broadly be categorized into the following:
- Transient: These faults are often intermittent, and they may cause the application to be unavailable for a brief period, usually a few seconds.
- Non-transient: These faults can bring down the application for minutes or even hours
A circuit breaker is a state machine that begins in a closed state and enables requests to pass through it. When a fault is determined, the circuit breaker switches to an open state, which prevents the processing of requests for a predetermined duration. The circuit breaker switches to a half-open condition once that time has elapsed, and the initial request is considered a test request. If this request is successful, the circuit is closed, and normal functioning restored. If the request is unsuccessful, the circuit is reset to an open state. It stays there for a predetermined amount of time before being reset to a half-open state once again. See Figure 1 for an illustration.
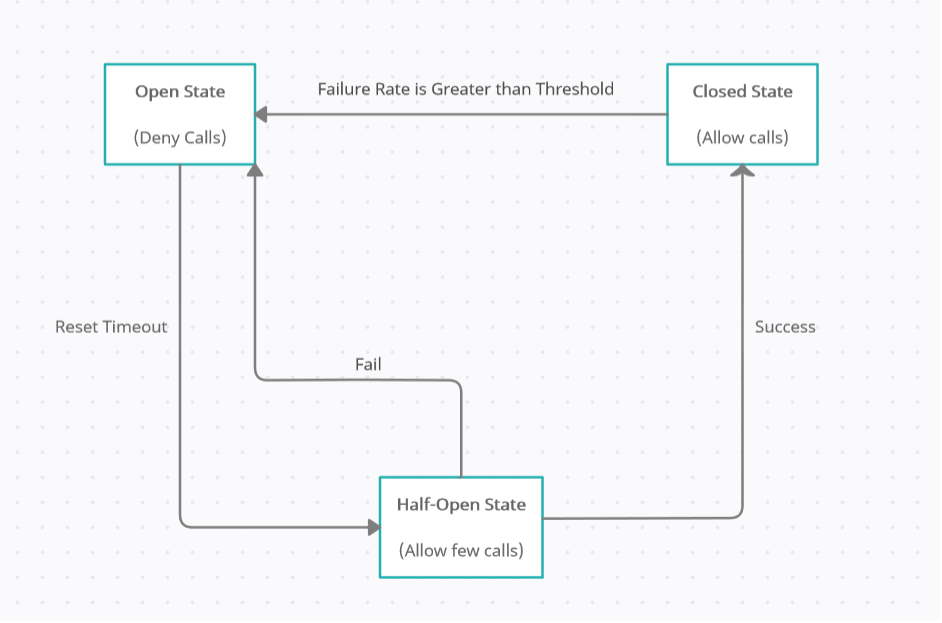
Essentially, the circuit breaker is a component that sits in between the caller of the service (i.e., the service consumer) and the service endpoint. Here's how the circuit breaker pattern works:
- When the services are communicating under normal circumstances, the caller invokes the circuit breaker, which, in turn, delegates the call to the service endpoint. Note that currently, the circuit breaker is in a closed state.
- When the services are communicating in a faulty state, i.e., when there is an invocation failure, the circuit breaker continues in the closed state and maintains a count of the number of times a service call has failed. When this count reaches or exceeds a pre-defined threshold, the circuit breaker opens the circuit.
- When the circuit breaker is in an open state, the circuit breaker itself sends back the response rather than delegating the service call request to the actual service. Typically, this response consists of an error code and an error message. After the circuit reset timeout has elapsed, the service is re-invoked to determine whether the connectivity has been restored.
- The circuit breaker can also be in a half-open state. In this state, the caller makes another request to the circuit breaker. This call is then delegated to the service endpoint and the response from the service is passed all the way to the service caller.
- When the state becomes stable, i.e., when the service can be called again successfully, the circuit breaker goes back to the closed state. Calls to the service endpoint from the service caller are deemed appropriate and the response from such calls are returned to the service caller.
The circuit breaker can be used in conjunction with the retry pattern to reduce or eliminate resource wastage and prevent cascading failures. You should design the circuit breaker in such a way that it's able to examine the service failures and then change the strategies as appropriate. The circuit breaker should also be thread-safe and asynchronous to make it high performant and scalable.
Bulkheads
This is yet another pattern ensuring that faults in one component of the application don't affect the other components. The bulkhead achieves this by partitioning the application into granular, independent components. These components usually have business logic that's isolated from the rest of the application. In the event of a service call failure, the component or components that are affected don't bring the entire application to a standstill.
The Bulkhead pattern is analogous to the bulkheads used in ships. A bulkhead is a wall that separates different cargo sections of a cargo ship, ensuring that any fire or flood in one section is limited to that section only and doesn't affect the other sections of the ship.
The Bulkhead design isolates the elements into pools such that the failure of one pool wouldn't bring the entire application down. As a result of this isolation, the application's components will continue to function even if one of them has failed. To implement the Bulkhead pattern, you can take advantage of the single responsibility, asynchronous communication, and fail-fast patterns.
Other Considerations
You can use rate limiters to limit the number of calls to your service within a specified time interval. This ensures that the service isn't overloaded with service calls - typically a load balancer is used to increase scalability if needed.
Load balancing is another option for you; you can take advantage of load balancing to distribute the load as appropriate among several services and, in the event of a service failure, invoke an alternate service.
Implementing the Circuit Breaker Pattern in ASP.NET Core 6
This is a simple Order Management application with two microservices: Order and Product. I'll build two applications: one that throws an exception at runtime (the Product microservice) randomly and another that leverages the circuit breaker pattern (the Order microservice) to implement resilience.
Note that I'll be using the terms “Order microservice” and “OrderApi” interchangeably - they refer to the same project. Likewise, I'll use the terms “Product microservice” and “ProductApi” interchangeably - both point to the same project.
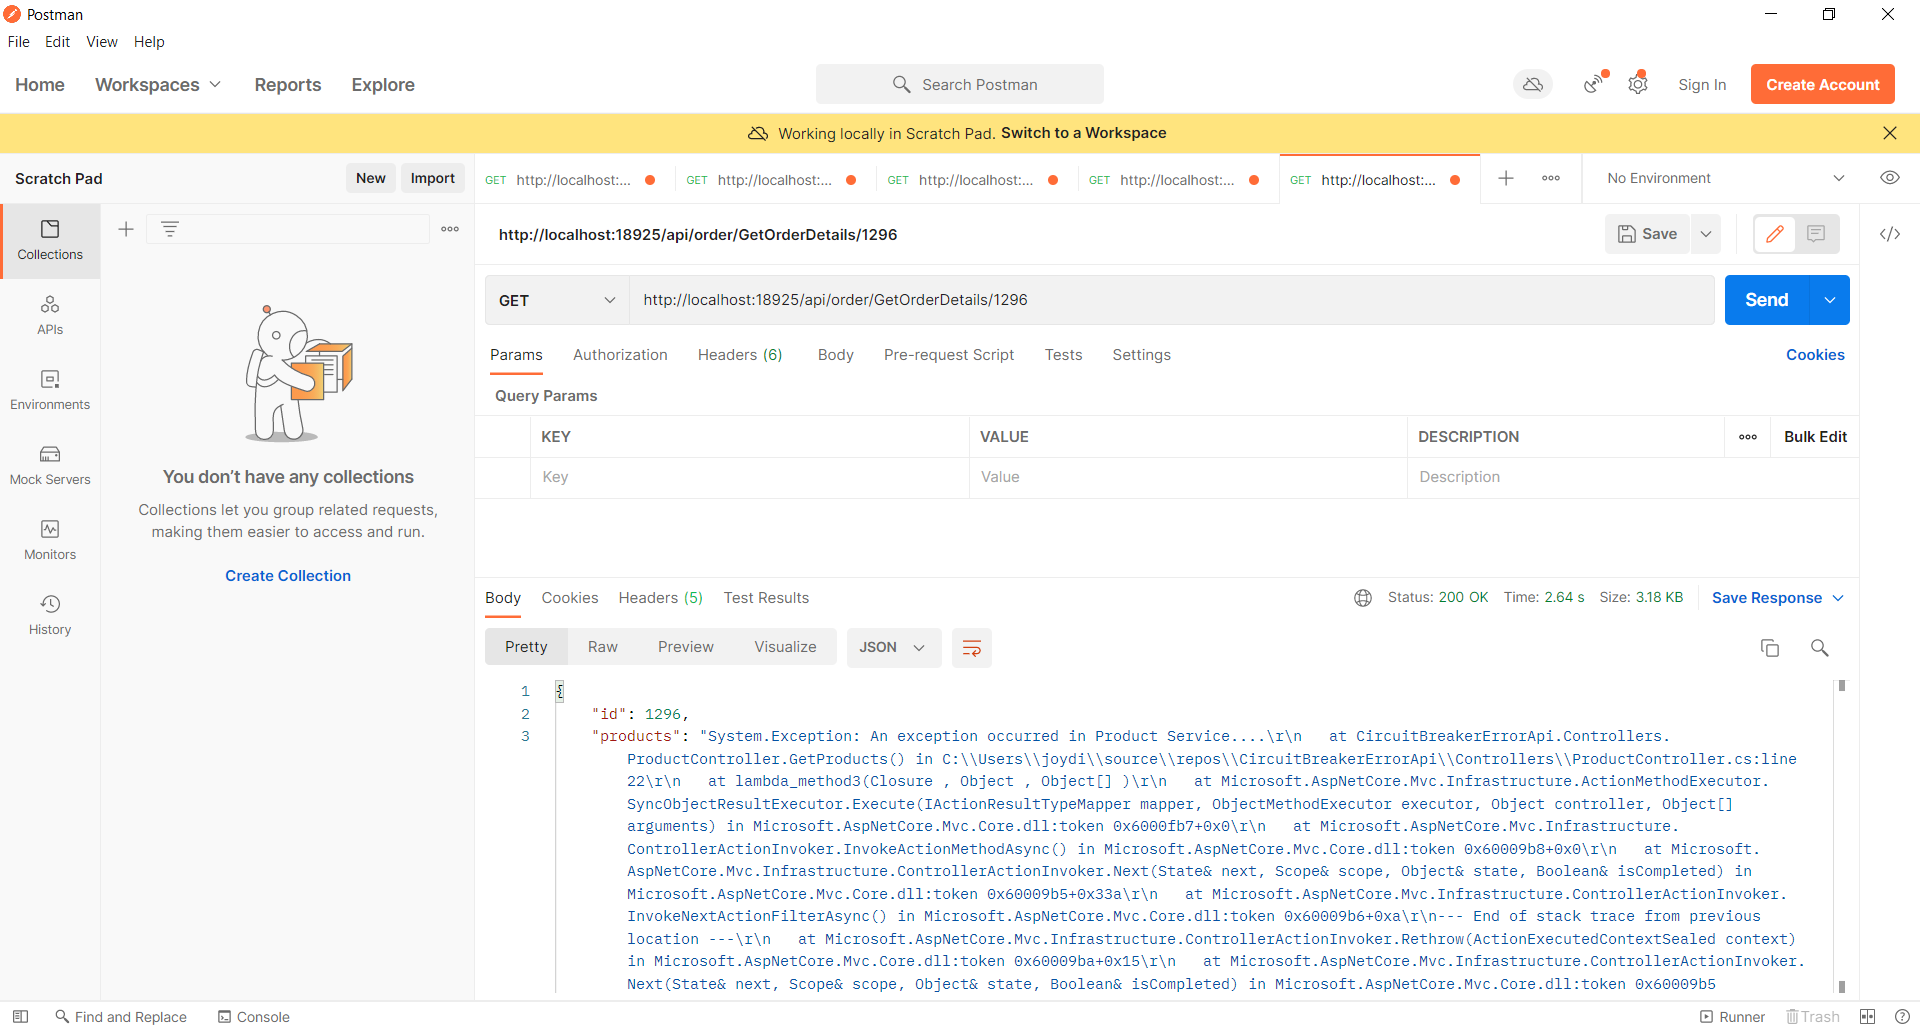
An order can have several products, so you should be able to know the product details, such as product code, product name, price, etc. The Order microservice calls the GetProducts method of the Product microservice to get a list of the products to prepare OrderDetails and send it back to the client. When an exception is thrown in the Product microservice, the GetOrderDetails method of the Order microservice doesn't return any data. Rather, detailed exception trace information will be displayed, as shown in Figure 2.
I'll now build both these applications in the sections that follow.
Create a New ASP.NET 6 Project in Visual Studio 2022
Let's start building the Product microservice first. You can create a project in Visual Studio 2022 in several ways. When you launch Visual Studio 2022, you'll see the Start window. You can choose “Continue without code” to launch the main screen of the Visual Studio 2022 IDE.
To create a new ASP.NET 6 project in Visual Studio 2022:
- Start the Visual Studio 2022 Preview IDE.
- In the “Create a new project” window, select ASP.NET Core Web API and click Next to move on.
- Specify the project name as ProductApi and the path where it should be created in the “Configure your new project” window.
- If you want the solution file and project to be created in the same directory, you can optionally check the “Place solution and project in the same directory” checkbox. Click Next to move on.
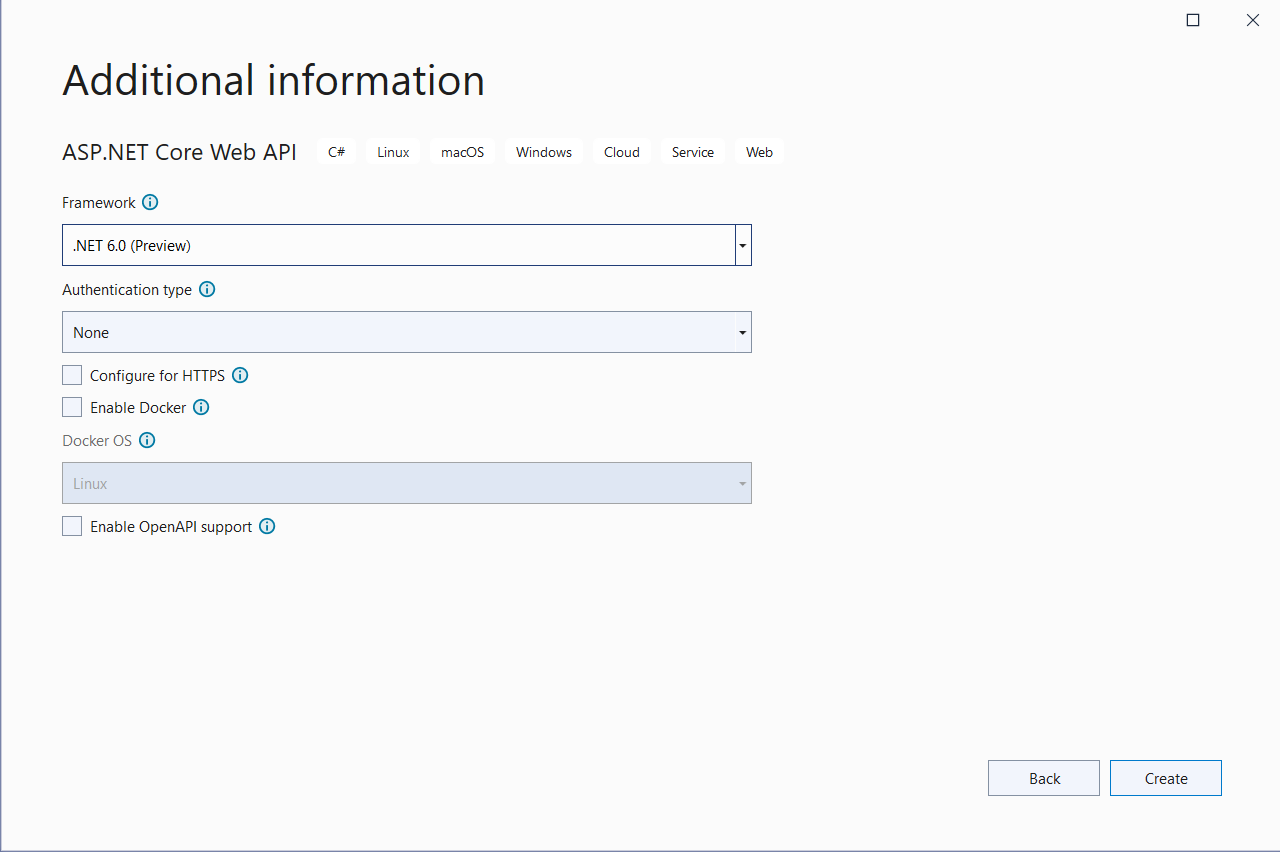
- In the next screen, specify the target framework and authentication type as well. Ensure that the “Configure for HTTPS,” “Enable Docker Support,” and the “Enable OpenAPI support” checkboxes are unchecked because you won't use any of these in this example.
- Click Create to complete the process.
Follow the same steps outlined above to create another ASP.NET Core 6 Web API project. Name this project OrderApi. Note that you can also choose any meaningful name for both these projects. You now have two ASP.NET Core 6 Web API projects: the ProductApi and the OrderApi.
Let's now create the classes and interfaces for both of the two microservices.
Build the Product Microservice
Let's start building the Product microservice first.
Create the Model
Create a new file at the root of the ProductApi project named Product.cs and write the following code in there:
namespace ProductApi;
public class Product
{
    public int Id { get; set; }
    public string Code { get; set; }
    public string Name { get; set; }
    public double Price { get; set; }
}
Create the Product Service
The ProductService class creates a list of products and populates it with some data in the constructor. It contains a method called GetProducts that returns the list of products. The IProductService interface contains the declaration of the GetProducts method. The following code snippet shows the IProductService interface.
namespace ProductApi;
public interface IProductService
{
    public List<Product> GetProducts();
}
The ProductService class implements the IProductService interface. Listing 1 illustrates the ProductService class:
Listing 1
namespace ProductApi;
public class ProductService: IProductService
{
    public List<Product> GetProducts()
    {
        var random = new Random().Next(1, 25);

        if (random > 10)
        {
            throw new Exception
            ("An exception occurred in Product Service....");
        }

        List<Product> products = new List<Product>()
        {
            new Product { Id = 1, Code = "P0001",
                Name = "Lenovo Laptop",
                Price = 1200.00 },
            new Product { Id = 2, Code = "P0002",
                Name = "DELL Laptop",
                Price = 1300.00 },
            new Product { Id = 3, Code = "P0003",
                Name = "Asus Laptop",
                Price = 1100.00 },
            new Product { Id = 4, Code = "P0004",
                Name = "HP Laptop",
                Price = 1400.00 }
        };

        return products;
    }
}
Note the use of Random class in the GetProducts method of the ProductService class. This method generates a random number between 1 and 25 and checks whether its value is more than 10. If the random number has a value more than 10, an exception is thrown.
Register the ProductService class
You should register the ProductService class in the ConfigureServices method so that you can use dependency injection to access its instance in the ProductController class as shown in Listing 2.
Listing 2
public void ConfigureServices (IServiceCollection services)
{
    services.AddScoped<IProductService, ProductService>();
    services.AddControllers();
}
Create the ProductController Class
The ProductController takes advantage of ProductService to return a list of products as shown in Listing 3.
Listing 3
using Microsoft.AspNetCore.Mvc;
using ProductApi;

namespace CircuitBreakerErrorApi.Controllers
{
    [Route("api/[controller]")]
    [ApiController]
    public class ProductController : ControllerBase
    {
        private readonly IProductService_productService;
        public ProductController(IProductService productService)
        {
            _productService = productService;
        }
        [HttpGet("GetProducts")]
        public ActionResult<List<Product>> GetProducts()
        {
            return _productService.GetProducts();
        }
    }
}
Build the Order Microservice
So far so good. Let's now create the classes and interfaces of the Order microservice.
Create the Model
The Order class represents the only model class in the OrderApi project. The following snippet illustrates the Order class.
namespace OrderApi
{
    public class Order
    {
        public int Id { get; set; }
        public string Products { get; set; }
    }
}
Note that the Products property in the Order class would hold the list of products returned by the Product microservice. This property is of type string for simplicity.
Install NuGet Packages
In this article, I'll take advantage of Polly, a mature library available as a NuGet package used for implementing the retry and circuit breaker patterns. Polly is a .NET and .NET Core compliant library that can be used to build resilient applications. You can take advantage of Polly to define policies that dictate what should happen when an error or exception occurs.
A NuGet package is represented as a file that has a .nupkg extension and comprises compiled code (also called DLLs), other related files, and a manifest that provides information related to the package, such as version number, etc.
Let's now install the necessary NuGet package(s) in the OrderApi project. To install the required packages into your project, execute the following commands at the NuGet Package Manager Console.
dotnet add package Microsoft.Extensions.Http.Polly
dotnet add package Microsoft.Extensions.Configuration
dotnet add package Microsoft.Extensions.DependencyInjection
Configure Polly
Listing 4 illustrates how you can configure Polly and specify Circuit-Breaker Policy in the ConfigureServices method of the Order microservice.
Listing 4
public void ConfigureServices(IServiceCollection services)
{
    var productApiEndpointAddress = new
    Uri("http://localhost:49510");
    services.AddHttpClient("ProductApi", c =>
    {
        c.BaseAddress = productApiEndpointAddress;
    })
    .AddTransientHttpErrorPolicy(p => p.
    CircuitBreakerAsync(2, TimeSpan.FromMinutes(1)));
    services.AddControllers();
}
Create the OrderController Class
Create a new controller named OrderController in the Controllers solution folder the OrderApi project and replace the default code with the code illustrated in Listing 5.
Listing 5
using Microsoft.AspNetCore.Mvc;
using System.Net.Http;
using System.Threading.Tasks;

namespace OrderApi.Controllers
{
    [Route("api/[controller]")]
    [ApiController]

    public class OrderController : ControllerBase
    {
        private readonly IHttpClientFactory_httpClientFactory;
        public OrderController(IHttpClientFactory httpClientFactory)
        {
            this._httpClientFactory = httpClientFactory;
        }

        [HttpGet("GetOrderDetails/{orderId}")]
        public async Task<ActionResult<Order>>
            GetOrderDetails(int orderId)
        {
            var client = _httpClientFactory.CreateClient("ProductApi");
            var response = await client.GetAsync("api/product/getproducts");
            var products = await response.Content.ReadAsStringAsync();
            return new Order() {Id = orderId, Products = products };
        }
    }
}
Execute the Application
Run both the applications and then hit the HTTP Get endpoint GetOrderDetails of the Order microservice, as shown in Figure 4.
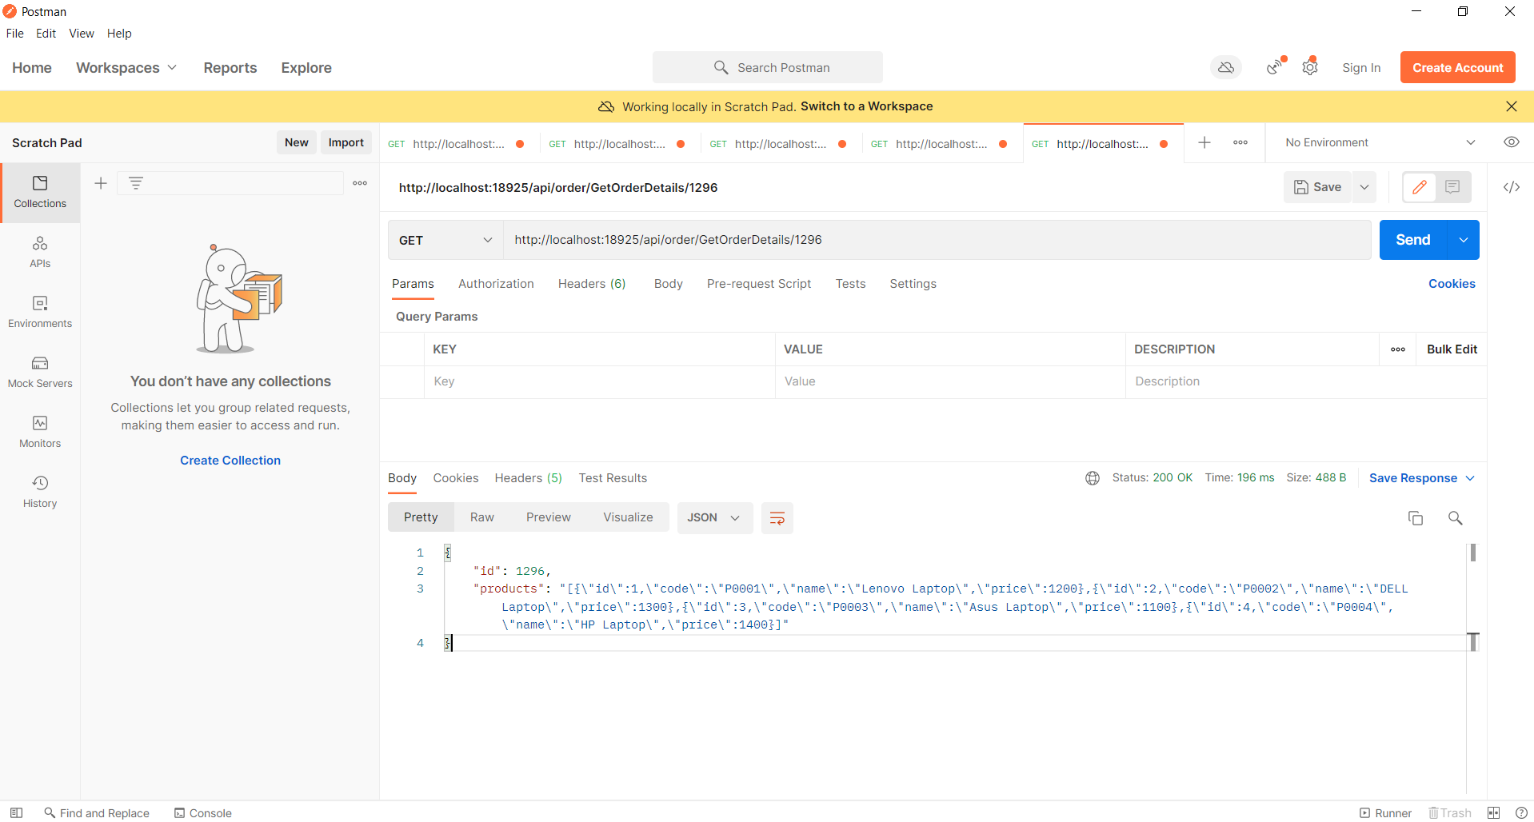
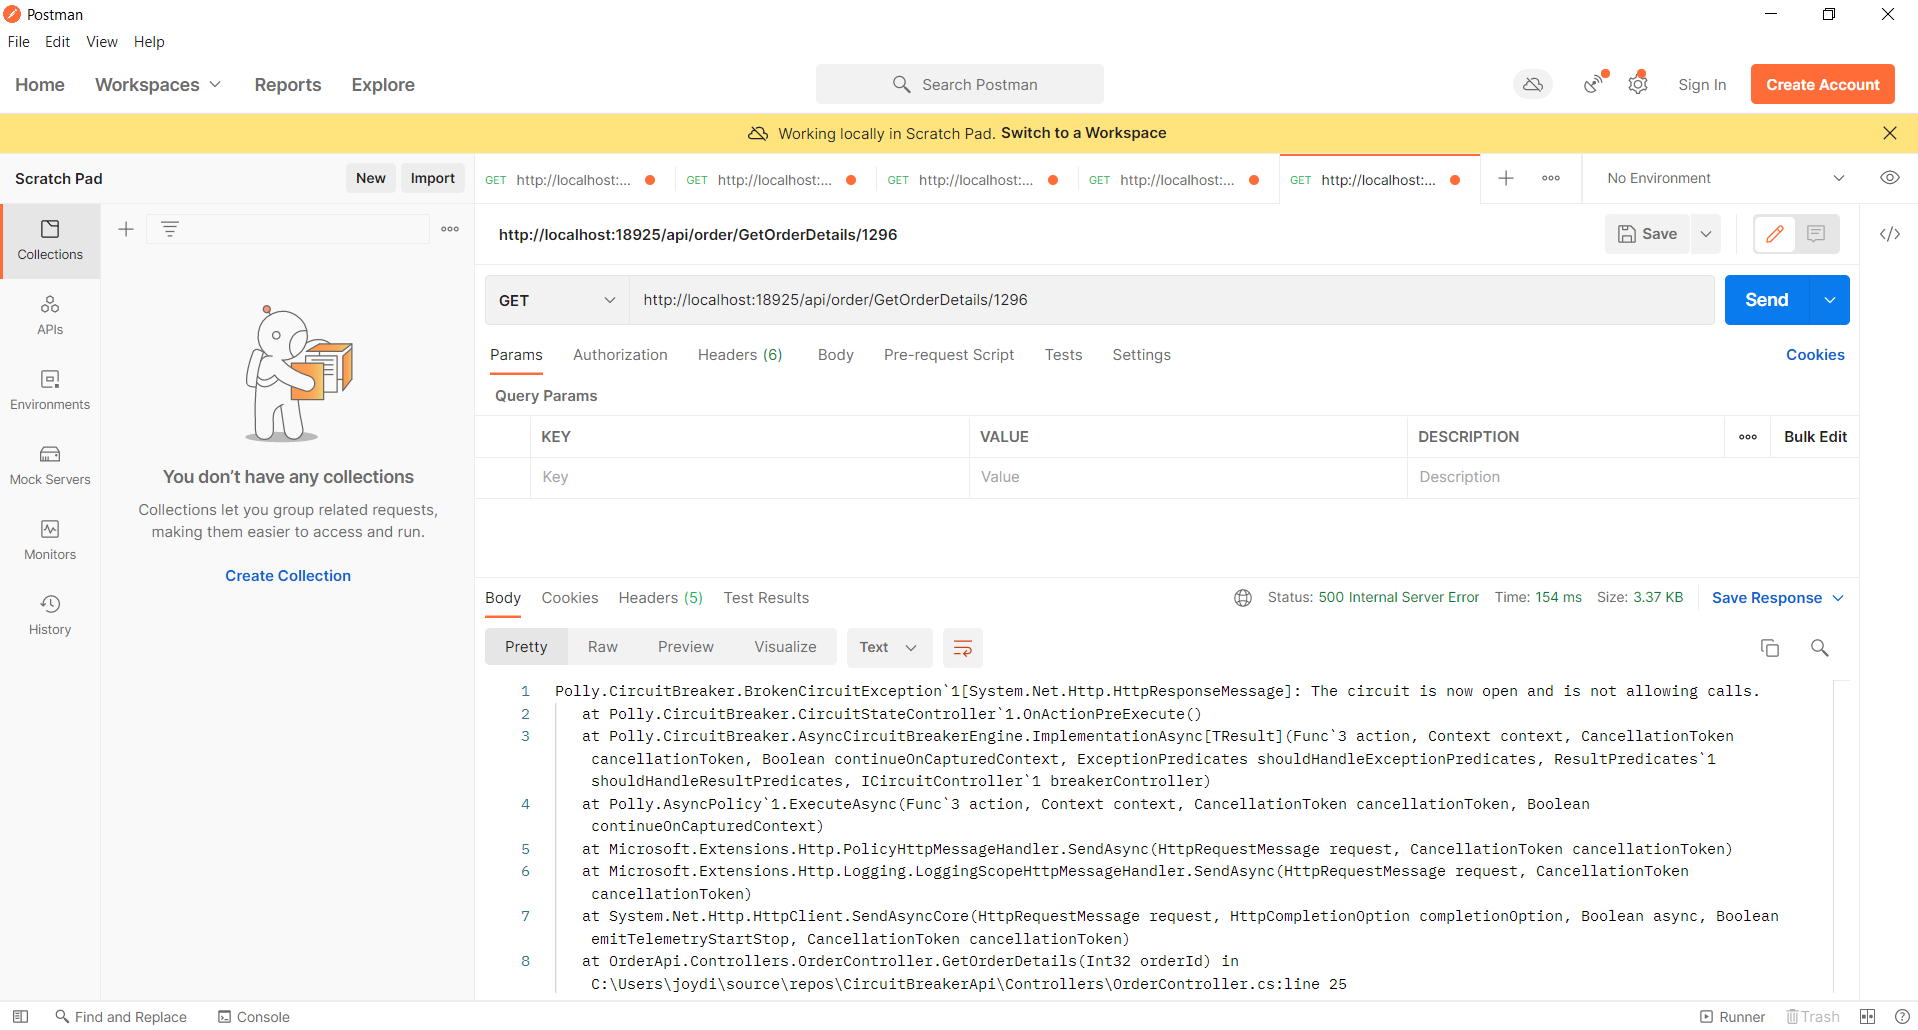
You can see the data this time. Now, send the request multiple times and you encounter the circuit breaker error. After two consecutive failures (exception thrown by the Product microservice), the circuit opens, and a circuit breaker exception is thrown with the error message shown in Figure 5.
Summary
Microservice architecture has been an emerging trend in software architecture over the past few years and holds many promises: faster time to market, better scalability, and loosely coupled components. However, this conglomeration of several small autonomous services modeled around a business domain comes at a cost - it complicates service to service communication, handling data consistency, and increases the attack surface manifold.
A microservice-based application must be reliable. Your microservices should fail fast and open the circuit. You should design your microservices so that you can revert to a previous version if needed. Your microservices should not only be fault-tolerant but should be able to handle failures gracefully, such as using the circuit breaker pattern to manage resilience in microservices-based applications.
