


.NET 6 brings many exciting innovations to the .NET ecosystem. Compared to the .NET Framework, .NET 6 is faster and can work cross-platform on Windows, Mac, or Linux. .NET 6 and its successors are the future of .NET and going forward, all new features will come to .NET 6+ rather than to .NET Framework. Because of these benefits, it's valuable to upgrade existing .NET Framework projects to build and run as .NET 6 apps instead. Transitioning from .NET Framework to .NET 6 can be challenging, though, because of the differences between the platforms, especially for some app models, like Web apps.
To help make upgrading to .NET 6 easier, Microsoft's .NET team has created a tool known as the .NET Upgrade Assistant (sometimes referred to as just Upgrade Assistant). Upgrade Assistant is an open-source command-line tool for automating some of the changes necessary to upgrade to .NET 6 and for highlighting other changes that need to be made manually. Upgrading from .NET Framework to .NET 6 is a complex process and, for many projects, can't be completely automated. Upgrade Assistant doesn't aim to completely upgrade projects automatically; instead, its goal is to automate away the many simple changes needed when upgrading to .NET 6 so that developers can focus on the most interesting changes. By partially automating the upgrade process, the .NET Upgrade Assistant can make adopting .NET 6 quicker. Upgrade Assistant currently supports upgrading class libraries, console apps, ASP.NET MVC, and WebAPI projects, plus WinForms and WPF projects. The tool works with either C# (csproj) or VB (vbproj) projects.
The .NET Upgrade Assistant is developed as an open-source project at https://github.com/dotnet/upgrade-assistant. This article introduces the basics of using the tool, and additional documentation and samples are available on the GitHub page. Users can also submit issues, questions, or pull requests via GitHub.
Installing the .NET Upgrade Assistant
Before installing the .NET Upgrade Assistant, make sure the following prerequisites are installed:
The .NET SDK. Upgrade Assistant is a .NET SDK command-line tool, so the .NET SDK is required to install and run it. The SDK can be installed from https://dotnet.microsoft.com/download.
The infrastructure needed to build the projects being upgraded. As part of execution, Upgrade Assistant builds the projects being upgraded. Therefore, any tooling required to build the projects needs to be present on the computer running Upgrade Assistant. At the very least, this means that MSBuild needs to be present and, in many cases, Visual Studio 2019 or above also needs to be installed.
As a .NET SDK tool, Upgrade Assistant can be easily installed and managed from the command line. To install the latest release of the tool from NuGet, run the command dotnet tool install -g upgrade-assistant. Similarly, Upgrade Assistant can be updated to the latest version by running dotnet tool update -g upgrade-assistant.
Because Upgrade Assistant is installed from NuGet, the installation process considers any NuGet configuration present on the computer. If you see errors about not being able to find Upgrade-Assistant on custom feeds or if you encounter issues related to authentication, it may be because custom NuGet configuration is interfering with the install process. You can work around these issues by ignoring inapplicable NuGet sources: dotnet tool install -g upgrade-assistant --ignore-failed-sources.
By default, the latest released version of Upgrade Assistant is installed. New versions are released approximately twice a month as new features become available in the tool. If you'd like to get even more frequent updates, nightly builds can be installed from the Upgrade Assistant team's CI feed. These builds are produced every time the code changes in the GitHub repo and provide immediate access to the latest features. The CI builds are not as well tested, though, so they should only be used until the features you need are incorporated into a regular bi-monthly release to NuGet. Installing from the CI feed can be done with: dotnet tool install -g upgrade-assistant --add-source https://pkgs.dev.azure.com/dnceng/public/_packaging/dotnet-tools/nuget/v3/index.json.
Using the .NET Upgrade Assistant
The .NET Upgrade Assistant can be executed by simply running upgrade-assistant from a command prompt. When running the tool, you need to specify either the analyze command or the upgrade command.
The Upgrade Command
The most common command for Upgrade Assistant is upgrade. This is the command that walks the user through different upgrade steps and begins getting the input project or solution ready to run on .NET 6. Upgrading with Upgrade Assistant is as simple as running upgrade-assistant upgrade <Input File>, where <Input File> is either a project file (csproj or vbproj) targeting an older version of .NET or a solution (sln) containing one or more projects to be upgraded.
Other optional parameters that can be used with the upgrade command include:
--target-tfm-supportallows the user to specify which .NET version Upgrade Assistant should upgrade to. They can choose LTS, Current, or Preview. With .NET 6's release, any of these options results in upgrading to .NET 6 (as it's both the most current and the latest LTS release of .NET). Once preview versions of .NET 7 are available, the Preview option upgrades to that target.-- vs-pathallows the user to specify which version of Visual Studio to use when loading/building the project in cases where multiple versions of Visual Studio are available.--skip-backupdisables backing up the project before upgrading and can be useful when running on projects that are in source control, as backups may not be needed in that scenario.--verboseenables more verbose logging but is mostly used for diagnosing problems in the tool as the output includes much more detail and may be less useful for normal use cases than the typical tool output.
Once Upgrade Assistant has started the Upgrade command, it guides the user through applying a series of changes to their project with an interactive command line interface. This upgrade process is explored in more detail in the “Example Walkthrough” section of this article.
The Analyze Command
If you'd like to see what changes the .NET Upgrade Assistant recommends for a given project or solution without changing anything, you can use the Analyze command. Like the Upgrade command discussed earlier, the Analyze command takes a single required parameter - the path of the solution or project (csproj or vbproj) to analyze. The same optional parameters mentioned above also work for the Analyze command.
Unlike the Upgrade command, the Analyze command isn't interactive. Instead, it evaluates the projects using the same heuristics the Upgrade command uses to identify necessary changes based on the desired version of .NET (LTS, Current, or Preview) and outputs a report summarizing the findings. This process doesn't make any changes to the input projects. Instead, it provides analysis of what changes are required to upgrade the projects.
The output file is in the SARIF format, a well-known JSON-based OASIS standard used by analysis tools. An example output file is shown in Figure 1. SARIF files can be opened using extensions for either Visual Studio or VS Code (available from https://marketplace.visualstudio.com), or even in some Web-based viewing apps (https://microsoft.github.io/sarif-web-component, for example).
Example Walkthrough
To give more detail on how the .NET Upgrade Assistant works and what sorts of changes it can help with, let's run the tool on a sample app. For this exercise, I'll run the tool on the eShop sample app, a simple ASP.NET MVC e-commerce sample available at https://github.com/dotnet-architecture/eShopModernizing/tree/master/eShopLegacyMVCSolution.
Because I want to upgrade the Web app to ASP.NET Core, I'll use Upgrade Assistant's upgrade command. From the eShopLegacyMVCSolution folder, execute this command: upgrade-assistant upgrade eShopLegacyMVC.sln.
Upgrade Assistant can run either on solutions (sln files) or projects (csproj or vbproj files). In the case of a solution with multiple projects, Upgrade Assistant asks the user which project is the solution's entry point. The entry point project is the top-level project the user wishes to upgrade. Typically, this is the project that's executed - usually an exe, Web app, or test project. Once Upgrade Assistant knows the solution's entry point, it analyzes project-to-project dependencies to determine which projects need to be upgraded to support ultimately upgrading the entry point project and will recommend in which order the projects should be upgraded (for example, beginning with moving the lower-level dependent projects first). It then walks the user through upgrading each of those projects in turn.
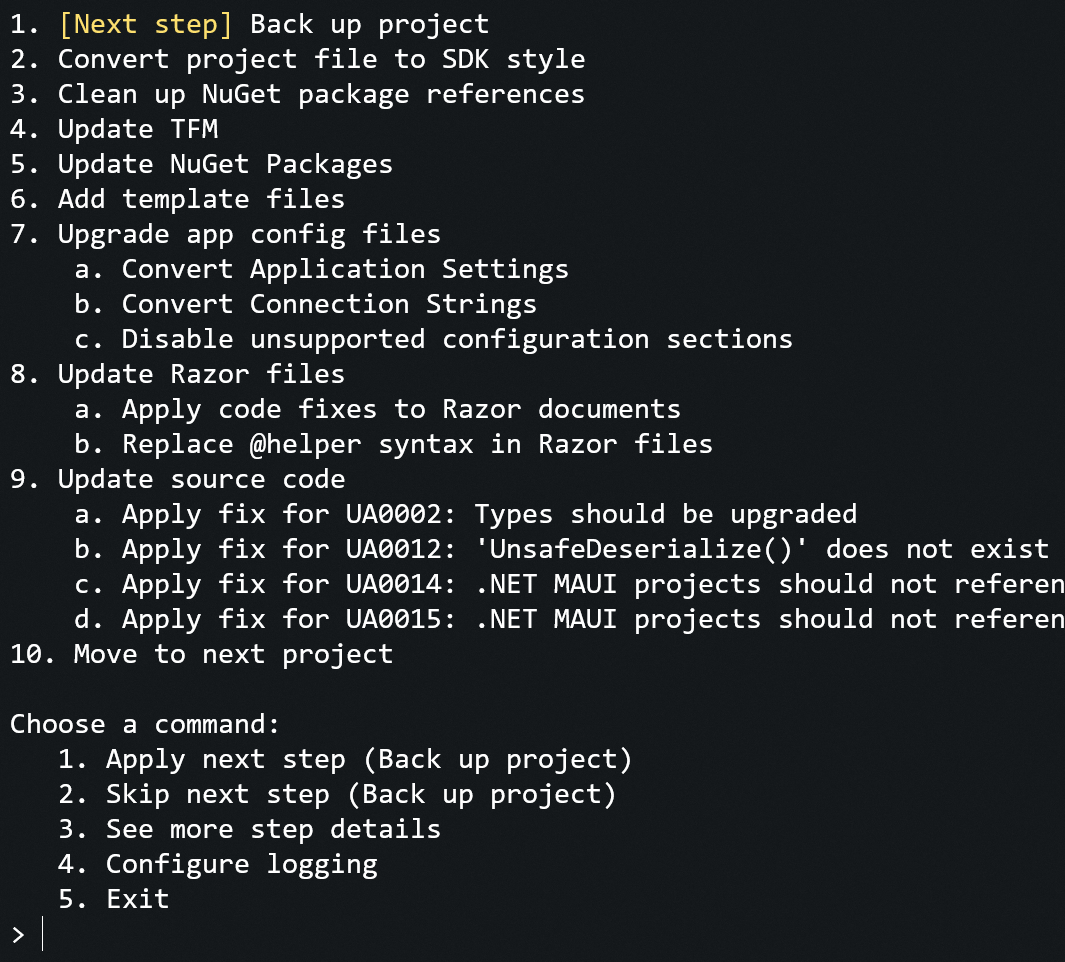
In the case of the eShop sample, the solution only contains a single project. So, even though I ran the tool on the eShop solution, Upgrade Assistant recognizes that there's only one project to upgrade and jumps directly to project-level upgrade steps, as shown in Figure 2. For each upgrade step, the user can choose a command from a list of options. Typically, users choose the first action (apply) to apply the upgrade step to the project. In some cases, they may choose to learn more details about the step first, or to skip it. Commands are chosen by entering their corresponding number and pressing enter. As a shortcut, pressing enter without specifying a number executes the first command in the list.
Project Backup
The first step of the upgrade is to back the project up by copying it (and its source files) to another location. This is important because, by design, Upgrade Assistant leaves many projects in a non-building state after it's finished executing (because it applies some of the changes needed to upgrade to .NET 6 but others need to be applied manually). Backing up the project makes it possible for users to easily roll back to a version that successfully builds and works, in case they abandon the upgrade.
Project File Format Update
After backing up the project, the next step Upgrade Assistant applies is updating the project file to use the SDK style project file format. SDK style projects are more concise and more human-readable. They use globbing patterns and automatically include common source files. They also use the <PackageReference> format for referencing NuGet packages (instead of a packages.config file).
After applying this step, you can look at the eShopLegacyMVC.csproj file to see that it's considerably simpler and that package references have been updated to use the <PackageReference> format. Notice that the project still targets .NET Framework 4.7.2. Although the new project file format is required for .NET 6, it can also be used with older .NET Framework targets. Some users find it useful to run the first few steps of Upgrade Assistant to update to newer csproj and package reference formats without updating the .NET platform they're building against. In order to enable that scenario, the retargeting to .NET 6 occurs later in the upgrade process in a separate step.
NuGet Package Cleanup
The next upgrade step, after updating the project file format, is cleaning up NuGet package references. This is necessary because of differences between the old packages.config method of referencing NuGet packages and <PackageReference> references. A packages.config file lists all NuGet packages needed by a project regardless of whether those packages are referenced directly from the project or if they're only needed transitively by the project's dependencies. When using the <PacakgeReference> format for references, though, only top-level direct references need to be listed. When NuGet packages are restored, the NuGet client automatically finds other packages needed by the project's direct dependencies and downloads them also.
When Upgrade Assistant converted from the old-style project file to the new one, it copied over all NuGet references. During this step, Upgrade Assistant cleans up NuGet package references by removing those that are referenced transitively by other package references. It also performs other low-risk cleanup, such as replacing some assembly references with equivalent NuGet package references, which work for both .NET Framework and .NET 6.
After applying this step, you'll notice that the list of NuGet packages referenced from the eShop project is reduced to only those that are used directly by eShop. Applying this step to the eShop project also replaces the Framework reference to System.Configration with a package reference to System.Configuration.ConfigurationManager.
Update TFM
The next upgrade step is the one that retargets to .NET 6 by changing the target framework moniker (TFM) used in the project's <TargetFramework> property. Up until now, the project still targeted .NET Framework. The changes were only about modernizing the project file and NuGet package references. For non-Web scenarios, it's possible to exit the tool prior to applying the TFM change and have a project that still builds and works as before, except that the project file is updated to SDK-style.
Once the update TFM step is applied, the project is re-targeted to a new .NET platform. The specific target framework to which Upgrade Assistant chooses to upgrade a project depends on a set of heuristics that consider input parameters and characteristics of the project itself. For library projects, Upgrade Assistant attempts to retarget to .NET Standard 2.0 because that TFM makes it possible to use the library from the widest variety of consumers. In cases where the project can't target .NET Standard (because it's an exe or Web app, for example), Upgrade Assistant targets .NET 6. This step also considers dependencies because a project's TFM must be at least as restrictive as the targets of its dependencies. Because of this, Upgrade Assistant may choose a more specific TFM, like .NET 6.0 (represented by the TFM short name “net6.0” in the project file) or even an OS-specific TFM like net6.0-windows if that's necessary based on the dependencies the project has.
Console output from the TFM upgrade step explains which TFM will be used and why. In the case of the eShop sample, logging explains that the .NET 6 TFM will be used because the project builds to an executable (a Web app), so .NET Standard can't be used.
After applying this step, you can see that the <TargetFramework> property of the project file has been updated to net6.0 (representing .NET 6.0 as the target).
Update NuGet Packages
The next step is a second round of updating NuGet package dependencies. Whereas the first NuGet package update step was about cleaning up package references after converting to the new project file format, this second NuGet update step is about updating NuGet package references based on the updated TFM. Some of the NuGet packages referenced by the project may not work with the new target. This upgrade step queries NuGet (and any additional NuGet sources configured for the project) to look for updated packages that work with the new TFM. The step also considers manually configured mappings of some NuGet packages to known .NET 6-compatible equivalents.
The second NuGet update step is about updating NuGet package references based on the updated TFM.
In the case of the eShop sample, logging tells us that this step replaces EntityFramework version 6.2 with version 6.4 because the latter version works with .NET 6. It also removes some packages like Antlr, WebGrease, and Autofac.Mvc5 that were useful in ASP.NET scenarios but are unnecessary for ASP.NET Core.
There are also some warnings in the console output for this step. These warnings occur if a NuGet package is referenced that doesn't support the new TFM and no newer version of the package that will work with the updated target can be found. In these cases, developers need to manually update the packages to more modern equivalents or restructure the project to not have these dependencies. For eShop, logging informs us that the Microsoft.ApplicationInsights.Web package reference could not be automatically updated and should be manually reviewed.
Add Template Files
Upgrade Assistant's next step is to add some additional files to the project that will be useful after upgrade. For Web scenarios like the eShop sample, Upgrade Assistant adds common files that are needed in ASP.NET Core apps. By using the See more step details command, you can see more information about the files to be added. They include: program.cs, startup.cs, appsettings.json, and appsettings.development.json. All of those are files that are expected to be part of an ASP.NET Core app but weren't present in the ASP.NET version of eShop. The files that are added provide a starting point for important ASP.NET Core components in the upgraded app and include comments explaining to the user what the files are for and where to go to learn more about them. This step is also useful because adding these files to the project makes it possible for future upgrade steps to further update them based on other project details, as will be shown in future steps.
If any of these files already exist in the project, Upgrade Assistant analyzes them to determine whether the files already present are likely to fill the same role as the template files and, if they were, skips adding the templates. If the files looked like different files that just shared a common name, however, the existing file is renamed and the new file added. After applying this step to the eShop sample, you'll see the four new files listed previously added to the project.
Update Config Files
ASP.NET Core apps don't use web.config files. The next step - upgrading config files - is all about migrating important data that would have existed in web.config or app.config files into new homes that are appropriate for .NET 6. This step has a number of sub-steps to perform different tasks with the project's web.config file:
- The first sub-step moves application settings from
web.configintoappsettings.json. After applying this to the eShop sample, you'll see that settings likeUseCustomizationDataare added toappsettings.jsonbased on data inweb.config. - The next sub-step is similar but moves connection strings rather than app settings. Again, when run on eShop, you'll notice that the app's database connection string moved into
appsettings.json. - The next sub-step disables
web.configsections that are no longer supported on .NET 6, such asSystem.ServiceModelorSystem.Diagnostics. In the case of the eShop sample, none of these sections are present in the config file, so the step is marked as complete even before you get to it, as no work is necessary. - Finally, the
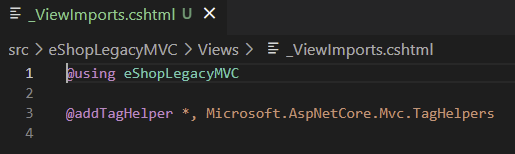
system.web.webPages.razor/pages/namespacesconversion sub-step finds any namespaces that are automatically imported into Razor pages and moves those imports into a_ViewImports.cshtmlfile, which is the correct way to auto-import namespaces in ASP.NET Core. After running this step, notice the new_ViewImports.cshtmlfile added to the project'sViewsfolder (shown in Figure 3).
Update Razor Files
The next upgrade step fixes up Razor (cshtml) files to work after the upgrade. It has two sub-steps. The first sub-step applies source-level fixes to C# code embedded in Razor files. The rules used to update the C# code are the same as are applied to .cs files in the next step. The second sub-step replaces usage of the @helper function syntax in Razor files with local methods because @helper isn't supported in ASP.NET Core.
The eShop sample doesn't use @helpers, so the second sub-step is already marked complete when you get to the Razor file update step. There are code fixes to be applied, however. Applying that step updates the _Layout.cshtml file in the eShop project to include a @using Microsoft.AspNetCore.Http import and replaces HttpContext.Current usage with HttpContextHelper.Current. HttpContextHelper is a class that Upgrade Assistant can insert into projects as a way to deal with HttpContext.Current usage in Web apps. HttpContext.Current was a commonly used static property in ASP.NET that returned the HTTP context for the current request. In ASP.NET Core, these sorts of global statics aren't used. The HttpContextHelper class is added to upgraded projects to act as a bridge that provides the ability to statically request the current HTTP context until call sites can be updated to not use that pattern.
Update Source Files
The final upgrade step before moving on to the next project (if there is one) is to update C# source files to fix up code patterns that won't work on .NET 6. This step has many sub-steps, one for each rule that will be applied. As with some of the previous steps, any sub-steps that are unnecessary (because the project doesn't contain the relevant code pattern) are marked as complete. You may notice that the list of sub-steps for this step (shown in Figure 4) isn't the same as the sub-steps that were listed here when Upgrade Assistant first started up. The reason for the difference is that some of the source updater's sub-steps are conditional on the type of project being upgraded and, prior to the project being converted to an ASP.NET Core project, some of the sub-steps didn't apply.

Over time, the list of code fixes that are applied by the source code update step will grow. In the case of the eShop sample, the source update rules that are applied are:
- Removing imports for
System.Webnamespaces - Replacing common ASP.NET Web types (like
ControllerorActionResult) with equivalents that exist in ASP.NET Core in different namespaces - Replacing
HttpContext.Currentusage withHttpContextHelper.Current, as discussed in the Update Razor Views section of this article - Updating or removing ASP.NET attributes such as
[Authorize](which exists in a different namespace) or[AllowHtml](which is no longer needed and can be removed)
Each of the code fixes is applied in turn and logs which files were updated so that users understand what code was changed in their project, as shown in Figure 5.

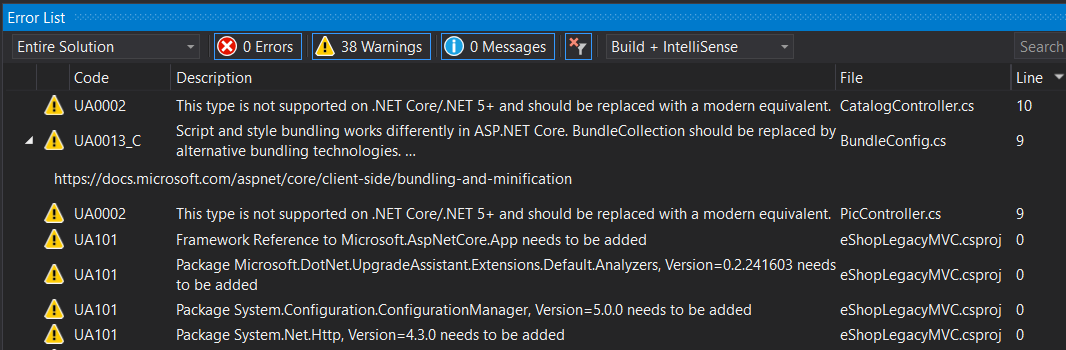
Finally, after all code fixes are applied, the source update step notifies the user (via warnings in the console) if there are any other code patterns found that couldn't be automatically addressed and require manual fix-up. In the case of eShop, after applying all the code fixes from this step, Upgrade Assistant informs you that manual changes are needed to address the project's use of bundling APIs in BundleConfig.cs that aren't supported on ASP.NET Core.
After applying the source update step, upgrade of the eShop project is complete. There are still manual updates needed to get the project building and working, but many of the initial changes have been taken care of automatically by Upgrade Assistant and you've been alerted to some of the other changes that will be needed as follow-ups. Upgrade Assistant also adds a reference to a set of Roslyn Analyzers (Microsoft.DotNet.UpgradeAssistant.Extensions.Default.Analyzers) that causes any of the source issues identified by the source update step (including those like the bundling warning that couldn't be fixed automatically) to show up as warnings in the project. This makes it easy to identify next steps in the upgrade process when working with the project afterwards.
Manual updates are still needed to get the project building and working, but many of the initial changes have been taken care of automatically by Upgrade Assistant.
Advanced Usage
In addition to the basic workflow discussed above, there are a few other commands and command line options that can be useful for customizing the .NET Upgrade Assistant's behavior.
Automating Upgrade Assistant
By default, Upgrade Assistant runs in an interactive mode that requires the user to step through upgrade steps individually. It's important that users understand the changes Upgrade Assistant is making during the upgrade process because it's likely that the project won't build after the tool finishes and the user will need to understand what state the project's in and how to complete the upgrade manually.
After using Upgrade Assistant for a while, though, users may become familiar with the upgrade process and want the tool to run more autonomously, especially if they will be running the tool on many different solutions. To enable this, the --non-interactive option can be passed to the upgrade command to cause Upgrade Assistant to automatically apply all upgrade steps without pausing for user interaction. In the case of solution files with many projects, this can be combined with the --entry-point option to specify which project is the entry point when launching Upgrade Assistant. The entry point option can be specified multiple times or use wildcards to select multiple entry points.
Using Extensions
The .NET Upgrade Assistant includes first-class support for extensions so that users can fine-tune its behavior to meet their needs. Extensions can modify the behavior of existing upgrade steps or even add their own completely custom steps. There are a couple of ways to use extensions. To quickly use an extension, the --extension option can be used when running Upgrade Assistant to specify an extension to use. A more robust way to use extensions, though, is through the Upgrade Assistant extensions command.
The extensions command allows users to install extensions for use with specific projects. Running upgrade-assistant extensions add <name> installs the specified extension for use when Upgrade Assistant is run in the current directory. Extensions installed using this command are installed as NuGet packages. By default, Upgrade Assistant queries NuGet.org for the latest version of extension packages that are added. Optional --source and --version arguments can be used to indicate the NuGet source to use and the specific version of an extension to install.
Installed extensions are stored in a JSON file (upgrade-assistant.json) that can be checked into source control to ensure that everyone working with the project is using the same extensions (and the same versions of extensions) when running Upgrade Assistant.
Other useful extensions commands include:
Upgrade-assistant extensions list: Lists currently installed extensionsUpgrade-assistant remove <name>: Uninstalls the specified extensionUpgrade-assistant update <name>: Updates the specified extension to the latest versionUpgrade-assistant restore: Downloads all extensions listed inupgrade-assistant.json, which is useful if the extensions were originally installed on a different computer and theupgrade-assistant.jsonfile has been shared.
Authoring Extensions
Besides using the .NET Upgrade Assistant's default steps or extensions published by others, developers and organizations may want to create their own Upgrade Assistant extensions to modify the tool's behavior.
A deep dive into how to create Upgrade Assistant extensions is out of scope for this article, but all the details are available at https://github.com/dotnet/upgrade-assistant/blob/main/docs/extensibility.md and several sample extensions can be found at https://github.com/dotnet/upgrade-assistant/tree/main/samples.
At a high level, the key components of an extension are:
- A manifest file (called
ExtensionManifest.json) that lists all the files and config settings that comprise the extension. - Assemblies (called extension service providers) that contain types implementing the
Microsoft.DotNet.UpgradeAssistant.Extensions.IExtensionServiceProviderinterface. This interface provides a mechanism for extensions to register types with Upgrade Assistant's dependency injection container. - The
IExtensionServiceProviderinterface and many other Upgrade Assistant APIs useful to extension authors are available in theMicrosoft.DotNet.UpgradeAssistant.AbstractionsNuGet package.
All services in Upgrade Assistant are resolved from its dependency injection container, so by using an extension service provider to register additional types, you can change the tool's behavior. Common types to register in the DI container include:
- Types derived from
Microsoft.DotNet.UpgradeAssistant.UpgradeStep. These are the upgrade steps that show up in the Upgrade Assistants list of steps when the tool executes. - Roslyn analyzers and code fix providers. Upgrade Assistant's source updater step uses these types to automatically address source-level changes (if both an analyzer and code fix provider are available) or to alert the user to a change that needs to be made manually (if only an analyzer is available).
- Implementations of
Microsoft.DotNet.UpgradeAssistant.IUpdater<T>to be used by Upgrade Assistant steps, like the config updater or Razor file updater to modify their respective file types.
By implementing these types and creating associated configuration, extensions can either customize the behavior of the existing upgrade steps or add their own new ones.
Road Map
As Upgrade Assistant continues to evolve, additional features will be added based on customer input. Be sure to provide feedback through the GitHub project (https://github.com/dotnet/upgrade-assistant/issues) to weigh in on the features you'd like to see added. Once you've tested the tool out, you can also provide feedback directly to the Upgrade Assistant team through a survey at https://aka.ms/DotNetUASurvey.
Some of the areas the Upgrade Assistant team is already exploring for future investment are listed in the tool's roadmap document (https://github.com/dotnet/upgrade-assistant/blob/main/docs/roadmap.md). These areas include possible investments in:
- Additional analyzers and code fix providers to expand the set of source updates the tool can make
- Support for multi-targeting
- Support for migrating GC configuration
- Additional reporting options
- Support for WebForms projects
- Graphical user interface on top of the existing CLI
- Support for applying some upgrade steps (such as NuGet cleanup) to an entire solution at once rather than one project at a time
Wrap-Up
Upgrading projects from .NET Framework to .NET 6 is a non-trivial task and one that will probably never be completely automated. Hopefully the .NET Upgrade Assistant will make the process more approachable by providing guidance to users and by automating away some of the simpler but more numerous changes required so that developers can focus on the more interesting and challenging parts of the upgrade.
For additional information about the .NET Upgrade Assistant, you can look at the project's GitHub repository and docs. Additional guidance on upgrading, in general, is available both in documentation (https://docs.microsoft.com/dotnet/core/porting) and in an ebook focused on ASP.NET to ASP.NET Core upgrades (https://docs.microsoft.com/dotnet/architecture/porting-existing-aspnet-apps).
