


Nuxt.js is a Web development framework that builds on top of the Vue.js framework. It's not a new framework and nor does it add much to the Vue.js codebase. Rather, it makes Vue.js development easier, in terms of setting up the application and its various components, such as routing and store, and following best practices in structuring out a Vue.js app. More importantly, it generates a highly optimized bundle of your app.
In addition, Nuxt.js makes server-side rendering a breeze. If you are a Vue.js developer, you already know that Vue.js offers server-side rendering. The guide to server-side rendering is a click away, right here (https://ssr.vuejs.org/). Nuxt.js takes advantage of the Vue.js server-side rendering capabilities and enables you to build a server-side rendering app in no time.
What's unique about Nuxt.js is enforcing convention over configuration strategy. In Nuxt.js, you don't need to write a lot of configuration files. Instead, you organize the folder structure in a way that Nuxt.js can understand and build the final bundle of the app accordingly. For example, in Nuxt.js, you don't write a configuration file for the routes available in the app. Rather, you create Vue.js components inside the /page/ folder, and consequently, Nuxt.js creates a single route for each Vue.js component in that folder.
This article assumes that you have enough experience working and using Vue.js. If you don't or you need a quick refresher, I recommend checking out this resource: Vue.js Beginners Guide (https://welearncode.com/beginners-guide-vue/).
Taking Advantage of Nuxt.js
The power of Nuxt.js lies in the fact that you can develop a variety of Web apps. Currently, you can build the following apps:
- Server-side rendering (SSR)
- Single page apps (SPAs)
- Static site generation (SSG - pre-rendered)
Server-Side Rendering (SSR)
Server-side rendering apps are also known as Universal Apps or “Isomorphic” apps. This is a Vue.js app that gets rendered on the server-side before it's displayed and presented to users. It loads faster and is more performant. In summary:
- Pre-rendering on the server happens purely on the Node.js server
- Prepare the HTML before loading
- SEO-friendly
Figure 1 demonstrates the concept of SSR apps.

Single Page Apps (SPAs)
A SPA is the standard Vue.js app. The app content, composed of JS and CSS files, loads one time only. Thus, navigating from one page to another is just a change of a Component on the client-side. That's the reason it's super-fast!
Figure 2 demonstrates the concept of SPA apps.

The client-side, or the browser, requests the app's main html file from the server. Then, it requests the JavaScript (JS) and CSS files, and any other related content. The server responds with the html file, empty with no data. Also, it serves the JS and CSS files as requested. This is like a normal HTTP Request.
By this time, the main Vue.js component is rendered and displayed on the browser. The app might send additional requests to the server to retrieve the data needed on the page.
As you navigate to other pages, the app sends further requests to the server to retrieve additional data.
This is great and all, but a SPA does have some shortcomings. One of the major downfalls of a SPA is SEO. The original html file that the client-side receives from the server is just a blank page! The client sends additional requests to the server to retrieve data in order to display it.
Static Site Generation (SSG - Pre-Rendered)
Static site generation (SG) is the third option available to you when working with Nuxt.js. You can pre-render the entire Web app pages at build time. Then, the entire app is nothing but simple static html files that you can serve from a Content Delivery Network (CDN) only! This, by far, is the cheapest, fastest, most secure, and highest performant option you have. Apps like blogs, Jamstack apps (https://jamstack.org/), or other static ones are best suited for SSG.
The Power of Nuxt.js
Even though you can build SPAs with Nuxt.js, the full power of this framework lies in its Universal mode or SSR for building Universal apps.
Nuxt.js is best used to build Universal or Isomorphic Apps
Nuxt.js exists due to the shortcomings of the traditional SPA and the server-side rendering of multi-page applications (MPAs). By nature, it's a hybrid win/win solution between the two.
On one hand, Nust.js pre-renders the first request on the server-side and acts like an MPA. On the other hand, when you navigate from one page to another, it behaves like any other SPA. That's why it's known as Universal or Isomorphic.
How Do Vue.js and Nuxt.js Relate?
Nuxt.js is built on top of the Vue.js framework. However, it's supercharged with extra features such as:
- Asynchronous data hooks: Used to fetch data on both the server-side and client-side.
- Middleware: There are two types of middleware:
- The routing middleware that can be run before rendering a page or group of pages under one layout.
- The server-side Node.js middleware that runs on the server only.
- Layouts: A template that applies and groups together pages an interface that provides a single look and feel. You can have multiple layouts in a single app.
- Modules: A top-level JavaScript function that is executed when Nuxt.js is started. It adds specific functionality to the app. For example, the core module @nuxtjs/axios (https://axios.nuxtjs.org/) is managed by the Nuxt.js team and provides a secure and easy integration with Axios (https://www.axios.com/) inside your app.
Also, Nuxt.js comes with a set of pre-installed Vue.js modules and libraries such as:
- Vue Framework (https://vuejs.org/)
- Vue Router (https://router.vuejs.org/)
- Vuex (https://vuex.vuejs.org/)
- Vue Server Renderer (https://ssr.vuejs.org/)
- VueMeta (https://vue-meta.nuxtjs.org/)
Finally, Nuxt.js uses Webpack (https://webpack.js.org/) and Babel (https://babeljs.io/) to compile and bundle your source code with the following Webpack loaders:
- Vue Loader (https://vue-loader.vuejs.org/)
- Babel Loader (https://webpack.js.org/loaders/babel-loader/)
Nuxt.js collects together the powerful Vue.js modules in one app and offers you a neat and structured app.
Create a Nuxt.js App
Enough theory! Let's get our hands dirty and create your first Nuxt.js app. I'll use the create-nuxt-app CLI. It's maintained and supported by the Nuxt.js team. The CLI source code is available at https://github.com/nuxt/create-nuxt-app.
Before you start, let's make sure you have all the required prerequisites to create, build, and run Nuxt.js apps locally on your computer.
Prerequisites for Installing and Using Nuxt.js
To work with Nuxt.js apps, you need to be familiar and knowledgeable in JavaScript ES6. Here's one of my favorite tutorials; ES6 for Beginners (https://codeburst.io/es6-tutorial-for-beginners-5f3c4e7960be).
In addition, a clear understanding and distinction between server-side and client-side development is necessary to understand how Nuxt.js behaves and acts with both. Here's a good read that will explain it: Client-Side vs. Server-Side Code: What's the Difference? (https://www.seguetech.com/client-server-side-code/).
As for the hardware and software aspect, the supported operating systems are:
- Windows 10 or above with PowerShell
- macOS with a terminal
- Linux's systems, such as Ubuntu with a terminal
The suggested cross-platform software is:
- Node.js
- Node Package Manager (npm)
You need to have a text editor such as Visual Studio Code (https://code.visualstudio.com/) with the Veutur Extension (https://marketplace.visualstudio.com/items?itemName=octref.vetur) or WebStorm (https://www.jetbrains.com/webstorm/).
Finally, you need a terminal, Visual Studio Code's integrated terminal, or WebStorm terminal.
Let's create your first Nuxt.js app.
Create a New Nuxt.js App
There are two ways to create a new Nuxt.js. Either you start from scratch and add all the components manually or you use the create-nuxt-app CLI provided by the Nuxt.js team. Today, I'm not going to sweat it out and start from scratch. That would defeat the purpose of this article. Instead, I'll use the create-nuxt-app CLI. It creates all the required scaffolding and gives you a ready Nuxt.js app in a matter of seconds.
Start by running one of the following commands:
// yarnyarn
create nuxt-app <project-name>

// npxnpx
create-nuxt-app <project-name>

// npmnpm
init nuxt-app <project-name>
During the process of creating the new Nuxt.js project, the CLI asks some questions. I'll go through them to create the app. Figure 3 shows the starting point of the CLI command.
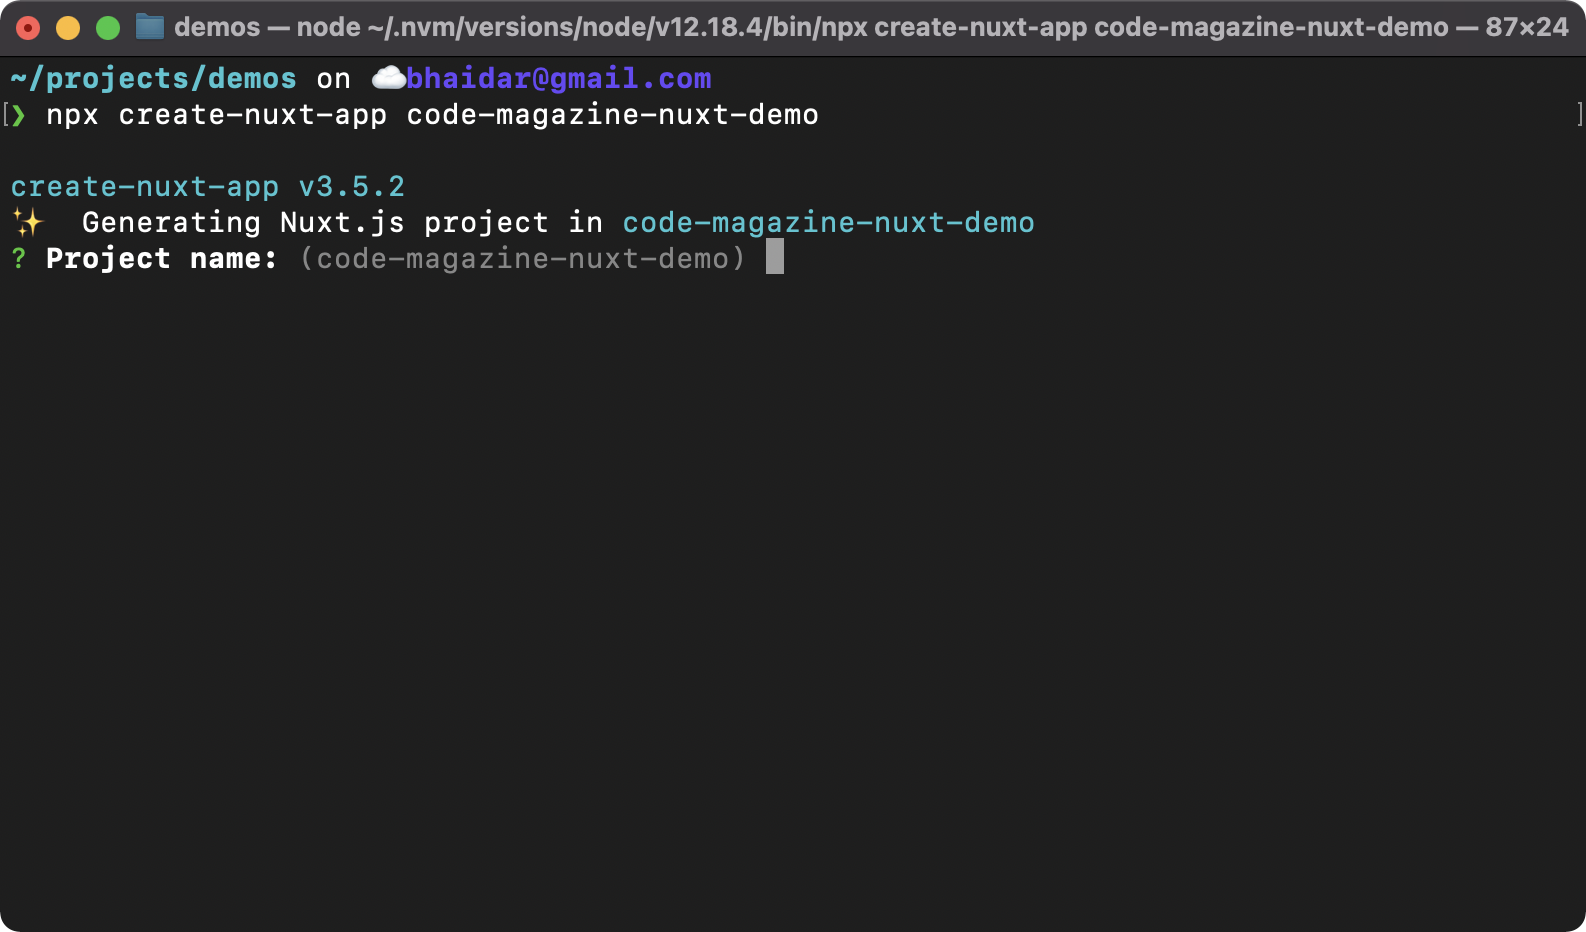
The create-nuxt-app CLI is by far the best option for creating a new Nuxt.js app.
Let's answer each of the questions:
- Project name: You can pick any name for your new project. Use dashes (-) to separate words instead of spaces.
- Programming language: You have the choice of selecting either TypeScript or JavaScript. I chose JavaScript.
- Package manager: Select either yarn or npm. I picked npm.
- UI framework: You have a variety of supported UI frameworks to choose from. Nuxt.js automatically installs any framework you pick and integrates it inside the app. I picked Tailwind CSS.
- Nuxt.js modules: These are offered by the Nuxt.js team. I'll explore these modules shortly and discuss them. I opted for Axios.
- Linting tools: The CLI comes to you with a set of linting tools out of the box. I picked ESLint, Prettier, and Lint staged files. The CLI will handle the configuration of all the tools for you.
- Testing framework: You can choose any testing framework you want. I picked None as I won't be doing testing for this demo app.
- Rendering mode: Here you select whether you want your app to be rendered on the server-side or client-side. Let's explore this in more depth.
- When you select server-side rendering mode, this means you're either building an SSR or SSG app. On the other hand, if you select client-side rendering mode, this means you're building a SPA. Your selection at this stage is eventually stored in the Nuxt.js config file under the key ssr. This option can be either
trueorfalse. You can read more about Nuxt.js rendering by visiting this article: https://nuxtjs.org/docs/2.x/features/rendering-modes. For now, I'll pick Universal (SSR/SSG) as I want to create a Universal app for this demo.
- When you select server-side rendering mode, this means you're either building an SSR or SSG app. On the other hand, if you select client-side rendering mode, this means you're building a SPA. Your selection at this stage is eventually stored in the Nuxt.js config file under the key ssr. This option can be either
- Deployment target: You can think of the deployment target as the hosting environment where you'll host your app. This can be either static or server.
- If you select static, this means you're going to use Nuxt.js as a static site generator. Statically render your Nuxt.js application and get all the benefits of a universal app without a server. Nuxt.js generates a static version of your website. It takes all the routes you define in the app and stores them as separate html files inside the /dist/ folder.
- On the other hand, if you select server, it means a server is required to host your app. Nuxt.js uses Node.js as the hosting server for the app. With server-side rendering, a page is rendered on the server before it's served to the client browser. Note that when you select client-side rendering mode, the deployment target can only be set to server.
- For now, I'll pick the Server, Node.js hosting, as I want to create a Universal app.
- Development tools: I chose the first option, which is jsconfig.json. This file is used to configure the JavaScript compilation in your app.
- Continuous integration: You won't be using continuous integration, so pick None.
- Version control system: I will pick Git for this.
That's it! Press the Enter key and let the CLI do its magic and scaffold a brand new Nuxt.js app.
Figure 4 shows the final part of the installation process.
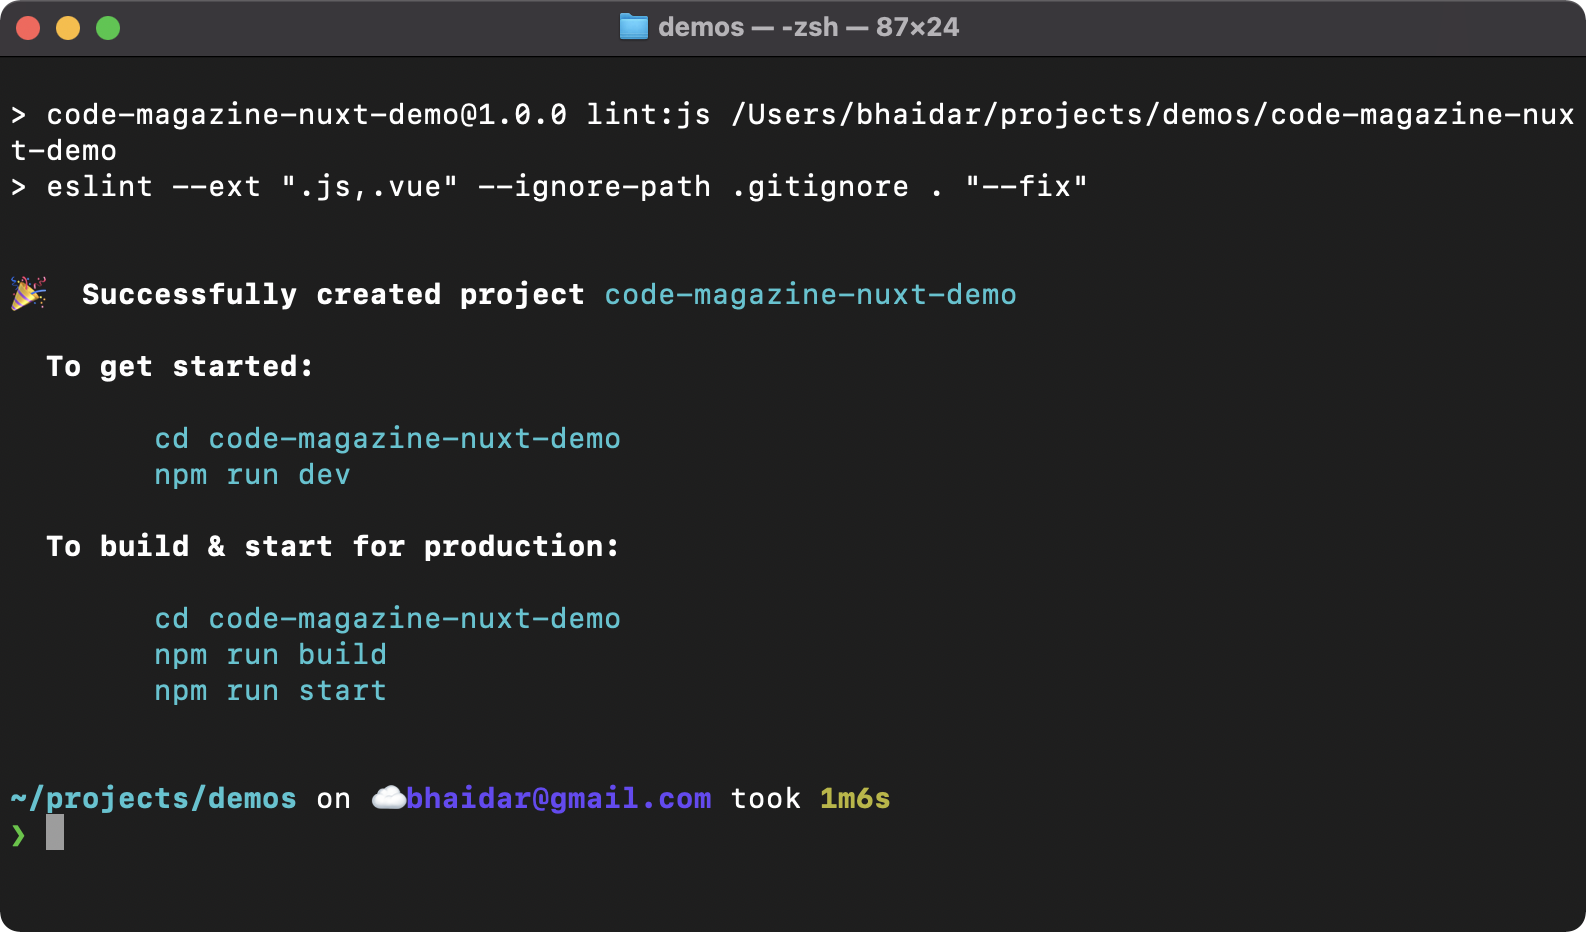
The CLI gives you instructions on how to run the app locally and how to build it and generate a package.
Let's try to run the app by issuing the following two commands:
cd code-magazine-nuxt-demo
npm run dev
The CLI compiles both the client-side and server-side before it generates the final files to be served.
Figure 5 shows when the CLI finishes building your app.
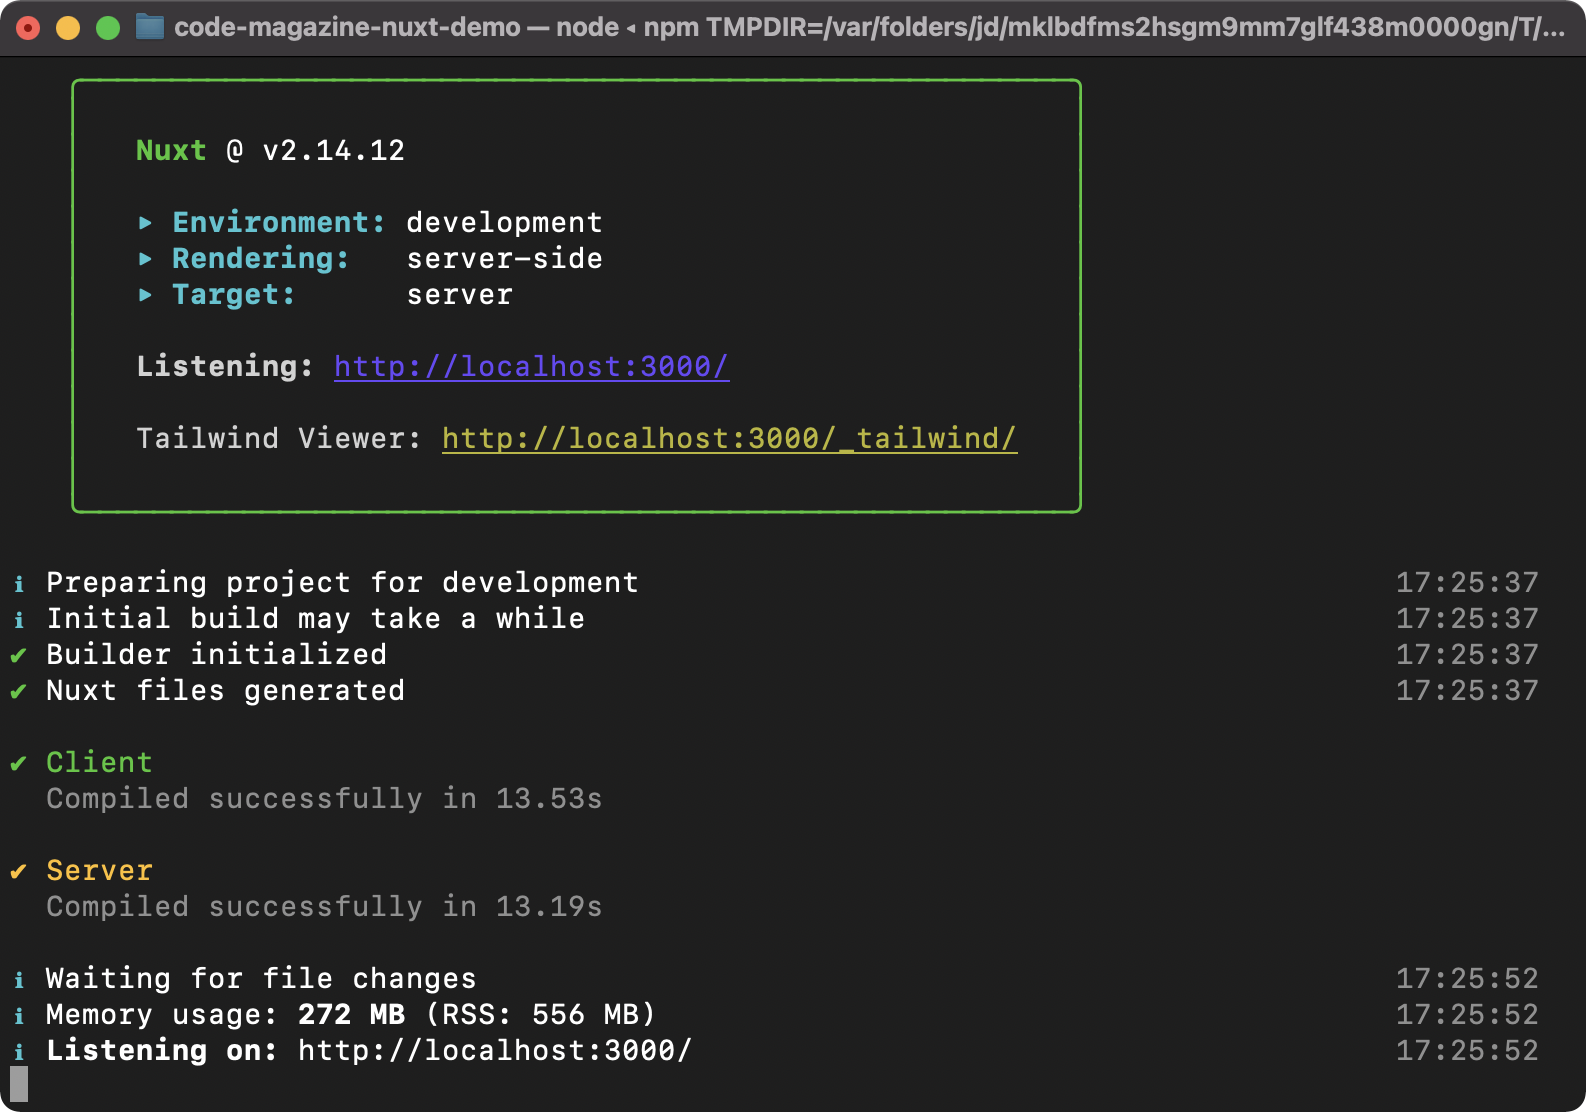
The CLI gives you enough information about the application. The benefits of the CLI are many, whether it's rendering on the server-side or client-side, responding to whatever the target deployment is, reconciling the status of building and compilation, or recognizing the URL where you can serve the app locally.
Let's visit the URL that the CLI makes available for us at: http://localhost:3000/. Figure 6 shows the app running.

Let's open the app inside VS Code and check the folder structure together. Figure 7 shows the app folders and files inside VS Code.
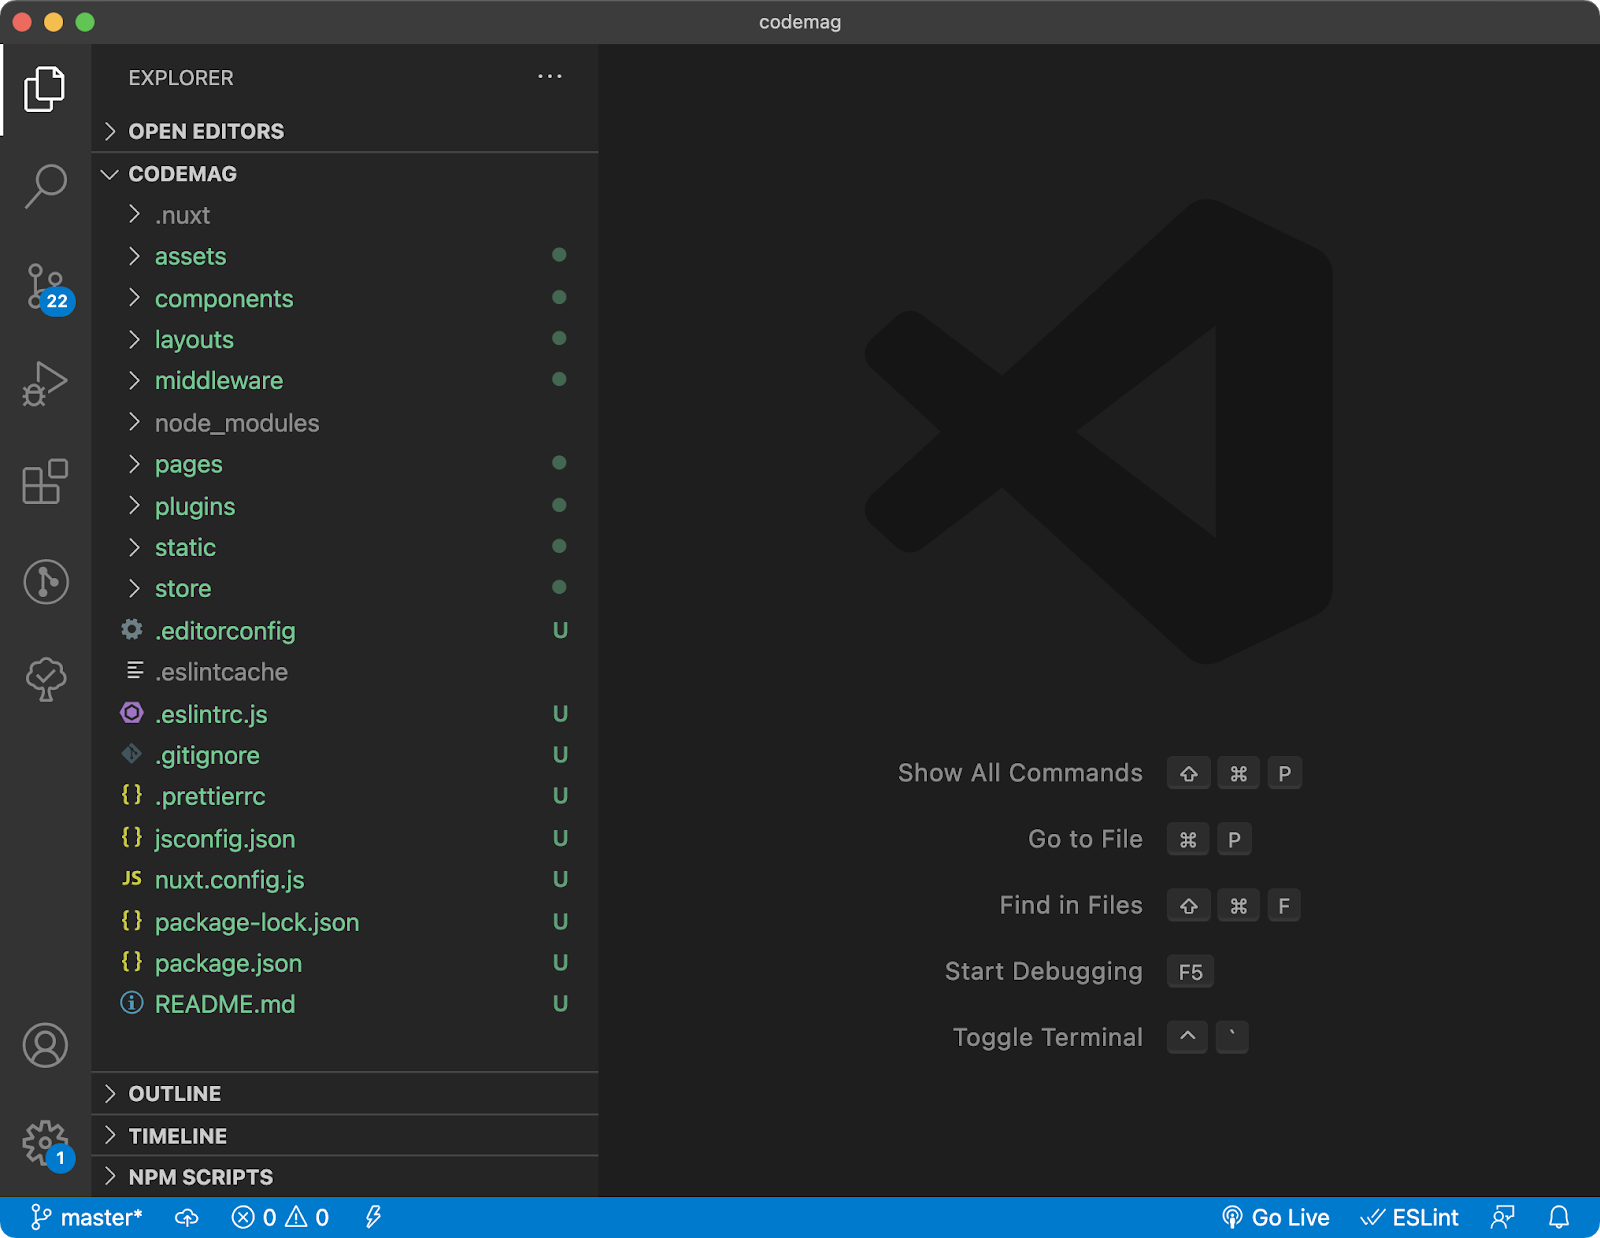
The CLI created a bunch of folders for you. In the next section, I'll go through each one and explain its use and give a sample code of what content might go inside each folder.
Exploring the Nuxt.js App Folder Structure
The create-nuxt-app CLI creates many folders inside the Nuxt.js app. Some of these folders are optional while others are required. In this section, I'll go through all the generated folders and try to make sense out of them.
Nuxt.js enforces convention over configuration strategy. You don't need to write a lot of configuration files. Instead, you organize the folder structure in a way that Nuxt.js can understand.
/.nuxt/
The /.nuxt/ directory is also called the build directory. It's dynamically generated when you run the app locally or when you build it for production for SSR apps. It contains all the files required to run the app. Furthermore, it's fully managed by Nuxt.js, and you need not worry about it. Just know that Nuxt.js compiles the app files and creates this folder that's ready to be deployed on your server hosting. For instance, Nuxt.js creates a Vue Store instance, then it locates all the Vue components inside the /pages/ folder and creates a single route for each component. Nuxt.js generates the router file and puts it inside the /.nuxt/ folder.
You can read the full documentation for the /.nuxt/ folder here: https://nuxtjs.org/docs/2.x/directory-structure/nuxt.
/assets/
The /assets/ folder is used to contain the assets of your project, such as images, fonts, Less files, Stylus files, or Sass files, that need to be compiled by Webpack upon building the app. If you have any resource that you want to compile, place it inside this folder.
Let's say you have stored a logo image inside this folder named logo.svg. How do you reference it inside the Vue component? Here's how you do it:
<template> <img src="~/assets/logo.svg" /> </template>
You can use the same method of referencing resources inside the /assets/ folder whether you're inside the Vue component or any CSS file.
You can read the full documentation for the /assets/ folder here: https://nuxtjs.org/docs/2.x/directory-structure/assets.
/components/
When building a Vue app, you normally break down the app into Views/Pages and Components. Views or Pages are the main UI that the user will access via a URL in the browsers. Views or Pages are composed of smaller units called Components. They're the building blocks of any app. You promote reusability and DRY concepts (https://en.wikipedia.org/wiki/Don%27t_repeat_yourself) when using components in your app.
In a Nuxt.js app, you store all your components inside the /components/ folder. Later, you'll learn about the /pages/ folder that can also hold Vue components. Here's a quick comparison between the two folders:
- Nuxt.js creates routes for the components stored inside the /pages/ folder. Then, they'll be directly accessible for navigation. Vue components stored inside the /pages/ folder are composed of components stored inside the /components/ folder.
- The Vue components stored inside the /pages/ folder can use the
asyncData()hook to fetch data and run on both environments: the server-side and client-side. Components stored inside the /components/ folder cannot use this same hook. You'll learn more about this hook later. - Both components stored inside the /pages/ and /components/ folders can make use of
fetch()hook to load data from the server-side. You'll learn more about this hook in a minute.
Nuxt.js 2.13+ can scan and auto import all your components without registering them manually.
To define a new component inside the /components/ folder, just create a new Vue component. Nothing special here.
You can read the full documentation for the /components/ folder here: https://nuxtjs.org/docs/2.x/directory-structure/components.
/layouts/
The /layouts/ folder contains the layouts of the app. A layout defines the general look and feel of your app. You can have one or more layout pages, depending on the requirements for your app.
By default, the CLI scaffolds a single layout component named /layouts/default.vue. This default layout is always used for pages that don't define a specific or custom layout.
Not only can you create custom layouts, but also modify the default layout component as per your needs.
This is the default layout file generated by Nuxt.js:
// layouts/default.vue
<template>
    <nuxt />
</template>
The layout component is simply a Vue component. Notice the use of the <nuxt /> component in the template section of the layout. It's part of the Nuxt.js framework and is located inside the /.nuxt/components/nuxt.js. What happens at run time is that the <nuxt /> component gets replaced with the currently accessed Nuxt.js Page.
Therefore, to include links to the different pages available in your app, you can specify them, as shown in Listing 1.
Listing 1: Default.vue layout component
// layouts/default.vue
<template>
    <header>
    <nuxt-link to="/">Home</nuxt-link>
    <nuxt-link to="/about">About us</nuxt-link>
    <nuxt-link to="/contact">Contact us</nuxt-link>
    </header>
    <nuxt />
</template>
Think of the <nuxt /> component as the <router-view /> component in Vue.js. The page you're navigating to will be rendered in place of the <nuxt /> component.
In case you have a custom layout file, you can configure the page to use this custom layout as follows:
// pages/about.vue
export default {layout: 'about'}
You can read the full documentation for the Nuxt.js layouts here: https://nuxtjs.org/docs/2.x/directory-structure/layouts.
Similarly, the <nuxt-link /> component is also provided by the Nuxt.js framework. It resembles a traditional <router-link /> component in Vue.js, with a few more goodies. The <nuxt-link /> component should be used everywhere you want to have internal links in your app.
The <nuxt-link /> component offers smart prefetching out-of-the-box. Nuxt.js detects when a link of type <nuxt-link /> is visible, either in the viewport or when scrolling and prefetches the JavaScript for those pages so that they are ready when the user clicks the link. Nuxt.js is smart enough to load the resources when the browser isn't busy.
You can disable prefetching on a <nuxt-link /> component as follows:
<nuxt-link to="/about" no-prefetch>
    About us
</nuxt-link>
Read the full documentation for the <nuxt-link /> component here: https://nuxtjs.org/docs/2.x/features/nuxt-components#the-nuxtlink-component.
/middleware/
The /middleware/ folder contains all the custom middleware you define in your app. A Nuxt.js middleware is a JavaScript function that runs before rendering a page or a group of pages. This means that a middleware runs at the page level or layout level.
In an SSR app, the middleware runs once at the server-side and then after every page navigation, it runs once at the client-side.
For example, you want to write a middleware to retrieve the user-agent and store it on the Nuxt.js Context, here's how you do it:
// middleware/userAgent.js
export default function (context) {
    context.userAgent = process.server
    ? context.req.headers['user-agent'] : navigator.userAgent
}
Nuxt.js provides three Boolean values in the global process object that will help you determine whether your app was rendered on the server or fully on the client, as well as checking for static site generation.
The middleware function expects the Nuxt.js Context object as an input parameter.
This middleware checks whether the app is now running on the server to retrieve the user-agent from the request headers. Otherwise, it uses the Navigator API to retrieve the user-agent value. Finally, it injects the user-agent onto the Nuxt.js Context object.
The Nuxt.js Context object is available in some functions in Nuxt.js and contains the entire app context. It gives access to other parts of the app from within specific functions. Here's the full documentation on Nuxt.js Context for you to go over and read: https://nuxtjs.org/docs/2.x/concepts/context-helpers.
Going back to middleware in Nuxt.js, what defines the order in which middleware are called inside the app? The order depends on the location where they are configured and set:
- Inside
nuxt.config.jsfile. A middleware defined inside the main Nuxt.js config file will run first. Typically, this middleware runs for all pages in the app. - Matched layouts. A middleware is specified on the layout component and runs for every page that uses this layout. For example, you access the /about page. It uses the default.vue layout page. When accessing the /about page, the middleware configured at the layout level runs.
- Matched pages. A middleware is specified on the page itself. This has the least priority to run.
How do you define a middleware inside the nuxt.config.js file? Here's how you do it:
export default {
    router: {
        middleware: 'userAgent'
    }
}
The middleware defined inside the nuxt.config.js is referred to as a router middleware. It runs before every navigation to every page in the app.
How do you define a middleware on a layout or page? Here's how you do it:
export default {
    middleware: ['userAgent'],
}
Finally, Nuxt.js allows you to write server middleware. These are usually stored inside the /server-middleware/ folder. Don't confuse it with router middleware. You define a server-middleware, then you add this inside the serverMiddleware property of the nuxt.config.js file. Nuxt.js makes sure to run it on the server-side only and before the vue-server-render kicks in and generates the Vue app.
Think of a server-middleware as a Node.js middleware you add into a Nuxt.js app without the need for an external server. Nuxt.js internally creates a connect (https://github.com/senchalabs/connect) instance that you can add your own custom middleware to.
With server middleware, the sky's the limit. Imagine that your Nuxt.js can send emails, use a server logger, or create an Express REST API. By using server middleware, you can achieve all this without having an external Node.js app and more!
Let's define a server logger.
Create the /server-middleware/logger.js file as shown in Listing 2.
Listing 2: Logger.js server middleware
    // server-middleware/logger.js
export default function (req, res, next) {
    // req is the Node.js http request object
    console.log(req.url)

    // res is the Node.js http response object

    // next is a function to call to invoke the next middleware
    // Don't forget to call next at the end if your middleware
    //          is not an endpoint!
    next()
}
The logger simply logs to console the URL of the current request. Inside a server middleware, you have access to the Node.js Response and Request objects.
The next step is to register the server middleware inside the nuxt.config.js file as follows:
// nuxt.config.js
...
serverMiddleware: ['~/server-middleware/logger']
...
Here's an example of building a CRUD app using Nuxt.js and Express https://aslamdoctor.com/blog/simple-crud-app-using-express-nuxtjs-using-servermiddleware-part-1-2/239.
/pages/
The /pages/ folder contains Vue.js components. Nuxt.js creates a new route for every Vue.js component placed inside this folder.
For example, let's say that you define the following Vue.js components:
/pages/about.vue
/pages/contact.vue
Nuxt.js creates the following routes for you:
http://localhost:3000/about
http://localhost:3000/contact
While we are inside the /pages/ folder, let's explore the routing in Nuxt.js app in more depth.
How does Nuxt.js handle basic routes? Let's say you have the following structure inside the /pages/ folder:
pages/
--| users/
-----| index.vue
-----| foo-bar.vue
--| index.vue
You define a folder named users. Inside the folder, you add two Vue.js components: index and foo-bar.
Accordingly, Nuxt.js adds the routes shown in Listing 3.
Listing 3: Router auto-generation
router: {
    routes: [{
        name: 'index',
        path: '/',
        component: 'pages/index.vue'
    },{
        name: 'users',
        path: '/users',
        component: 'pages/users/index.vue'
    },{
        name: 'users-foo-bar',
        path: '/users/foo-bar',
        component: 'pages/users/foo-bar.vue'
    }]
}
How does Nuxt.js handle dynamic routes? Let's say you have the following structure inside the /pages/ folder:
pages/
--| _slug/
-----| index.vue
--| users/
-----| _id.vue
--| index.vue
Accordingly, Nuxt.js adds the routes shown in Listing 4.
Listing 4: Router auto-generation dynamic routes
router: {
    routes: [{
        name: 'index',
        path: '/',
        component: 'pages/index.vue'
    },{
        name: 'users-id',
        path: '/users/:id?',
        component: 'pages/users/_id.vue'
    },{
        name: 'slug',
        path: '/:slug',
        component: 'pages/_slug/index.vue'
    }]
}
Dynamic routes are generated by Nuxt.js when using underscores.
How does Nuxt.js handle nested routes? Let's say you have the following structure inside the /pages/ folder:
pages/
--| users/
-----| _id.vue
-----| index.vue
--| users.vue
Accordingly, Nuxt.js adds the routes shown in Listing 5.
Listing 5: Router auto-generation nested routes
router: {
    routes: [{
        path: '/users',component: 'pages/users.vue',
        children: [{
            path: '',
            component: 'pages/users/index.vue',
            name: 'users'
           },{
            path: ':id',
            component: 'pages/users/_id.vue',
            name: 'users-id'
            }
        ]
    }]
}
To have nested routes (children) you give the same name to the Vue.js component and a folder. Start by creating the /pages/users.vue component as follows:
// pages/users.vue
<template>
    <div>
        <h1>Users</h1>
        <nuxt-child/>
    </div>
</template>
Nuxt.js provides the <nuxt-child /> component. It plays the role of a marker to tell Nuxt.js where to render the child component. In this case, when the user visits /users route, the /pages/users/index.vue component is rendered in place of the <nuxt-child /> component. On the other hand, when the user visits /users/1 route, the /pages/users/_id.vue component is rendered in place of the <nuxt-child /> component.
Right after that, create the /pages/users/index.vue component as shown in Listing 6.
Listing 6: /pages/users/index.vue component
// pages/users/index.vue
<template>
    <ul>
    <li v-for="user in users" v-bind:key="user.id">
        <nuxt-link :to="`users/${user.id}`">
                {{ user.name }}
        </nuxt-link>
    </li>
    </ul>
</template>

<script>
import axios from 'axios'

export default {
    async asyncData () {
        let { data } = await
        axios.get('https://jsonplaceholder.typicode.com/users')
    return { users: data }
    }
}
</script>
The component in Listing 6 uses the asyncData() hook to send a GET request to some fake REST API out there, retrieving a list of users. Finally, it renders each user by name using a <nuxt-link /> component to allow users to navigate into a single user component.
Finally, let's create the component that renders a single user. Listing 7 shows the code for this component. The /pages/users/_id.vue component shown in Listing 7 once again communicates with a remote fake REST API to retrieve details of the user.
Listing 7: /pages/users/_id.vue component
// pages/users/_id.vue
<template>
    <div v-if="user">
    <h2>{{ user.name }}</h2>
    <nuxt-link class="button" to="/users">
        Users
    </nuxt-link>
    </div>
</template>

<script>
import axios from 'axios'

export default {
    async asyncData ({ params }) {
        let { data } = await
            axios.get('https://jsonplaceholder.typicode.com/users/' + params.id)
        return { user: data }
    }
}
</script>
This component uses the params object to get access to the route parameters. Nuxt.js allows you to validate the parameters passed to a component using the validate() method as follows:
// pages/users/_id.vue
export default {
    validate ({ params }) {
    return /^\d+$/.test(params.id)
    }
}
Here, you're making sure the params.id route parameter is an integer number and nothing else.
The validation should always return true to move forward. Nuxt.js stops the route and immediately throws a 404-error page if it gets a false Boolean.
You can read the full documentation on /pages/ folder here: https://nuxtjs.org/docs/2.x/directory-structure/pages.
/plugins/
The /plugins/ folder contains all of the plug-in JavaScript files in your app. Nuxt.js runs your plug-ins before the root Vue instance is instantiated.
Let's remember together what Vue.js plug-ins are. Vue.js plug-ins are global JavaScript functions encapsulated in .js files that can be installed in your app using the Vue.use() global function.
Both Vue.js and Nuxt.js share the same concept of plug-ins. They both serve the same purpose. In Nuxt.js, you build your plug-in, import it inside the nuxt.config.js file, and Nuxt.js runs this plug-in before the root Vue instance is instantiated.
How do you create a Nuxt.js plug-in from scratch? You create a Nuxt.js plug-in and inject it into any of the following modes of operation for a Nuxt.js plug-in: client-side, server-side, mixed mode with both server and client side.
Vue.js Instance (client-side)
// plugins/<function-name>.js
import Vue from 'vue'

Vue.prototype.$<function-name> = () => {
    //...
}
Nuxt.js Context (server-side)
// plugins/<function-name>.js

export default (context, inject) => {
    context.app.$<function-name> = () => {
        //...
    }
}
Both Vue.js instance and Nuxt.js context (server-side and client-side)
// plugins/<function-name>.js
export default (context, inject) => {
    inject('<function-name>', () => {
        //...
    })
}
Let's build a Nuxt.js plug-in to create a single instance of Axios in your app with a specific base URL. The plug-in is available at the Nuxt.js Context and on both the server-side and client-side. Listing 8 shows the code for this plug-in.
Listing 8: Basic plug-in
// plugins/axios-typicode.js
import axios from 'axios'

const instance = axios.create({baseURL: 'https://jsonplaceholder.typicode.com'})

export default (context, inject) => {inject('axiosTypicode', instance)}
Then, you can register this plug-in inside the nuxt.config.js file as follows:
export default {
    plugins: ['~/plugins/axios-typicode.js']
}
Listing 9 shows how you can use this Axios instance on any page by calling $axiosTypeicode.
Listing 9: Using the basic plug-in
export default {
    mounted() {
        // on the client-side
        $axiosTypicode.get('/users').then((data) => console.log(data));
    },

    asyncData({ app, $axiosTypicode }) {
        // both on the client and server side
        let { data } = await $axiosTypicode.get('/users');
    },
}
Let's see how you can use the v-tooltip Vue.js plug-in inside a Nuxt.js app.
Start by installing the plug-in by running this command:
npm install --save v-tooltip
Create a new /plugins/v-tooltip.js file and paste this content:
// plugins/v-tooltip.js
import Vue from 'vue'
import VTooltip from 'v-tooltip'

Vue.use(VTooltip)
Next, include the plug-in inside the nuxt.config.js file:
// nuxt.config.js:
export default {
    plugins: ['~/plugins/v-tooltip]
}
Because you want to run this plug-in only on the client-side where you'll use this tooltip plug-in, add it to the nuxt.config.js as follows:
// nuxt.config.js
export default {
    plugins: [
        { src: '~/plugins/v-tooltip, mode: 'client' }
    ]
}
The plug-in registration now has a mode of client only.
Before closing the discussion on Nuxt.js plug-ins, here's a link to a very expressive and meaningful diagram by the Nuxt.js team on plug-ins that you can always keep as a reference when building plug-ins. You can access the image here: https://d33wubrfki0l68.cloudfront.net/30bec410ab88bd5ca84fb1a07ed576479a5d2420/cbbe5/docs/2.x/plugins.svg.
You can read the full documentation on /plugins/ folder and how to build plug-ins here: https://nuxtjs.org/docs/2.x/directory-structure/plugins.
/static/
The /static/ folder is used to store all static resources that you don't want to be compiled by Webpack such as favicon files, or any other file type. All files in this folder are mapped to the server directly, so they are accessible under the root URL directly. For instance, /static/logo.png is mapped as /logo.png, so you can access it as follows:
http://localhost:3000/logo.png
You can read the full documentation on /static/ folder here: https://nuxtjs.org/docs/2.x/directory-structure/statics.
/store/
The /store/ folder contains the Vuex (https://vuex.vuejs.org/) store files. Nuxt.js has the Vuex installed by default, so you don't have to worry about installing it yourself. By default, Vuex is disabled and to enable it, you create an empty /store/index.js file.
To create a store root, you need to pass the code in Listing 10 inside the /store/index.js file.
Listing 10: Vuex Store set up
// store/index.js:
export const state = () => ({state1: null})

export const mutations = {
    mutation1 (state) { /* code here */ }
}

export const getters = {
    getter1 (state, getter) { /* code here */ }
}

export const actions = {
    action1 ({ state, commit }) { /* code here */ }
}
Unlike Vue.js apps, in Nuxt.js, namespacing is enabled on all Vuex modules. You can read more about Vuex modules and namespacing here: https://vuex.vuejs.org/guide/modules.html. This promotes writing modular Vuex store files in your Nuxt.js app.
You can read the full documentation on the /store/ folder here: https://nuxtjs.org/docs/2.x/directory-structure/store.
Nuxt.js Concepts and Features
In this section, I'll go over some features and concepts that are a bit more involved because it's likely you'll encounter them while building apps with Nuxt.js.
Data Fetching
Whatever you've learned in Vue.js and have been using to load data asynchronously inside Vue.js components is still valid for Nuxt.js apps. However, what's new in this regard is the server-side rendering feature in Universal apps. Therefore, while building an SSR, you need to use Nuxt.js-specific hooks that allow Nuxt.js to render data on the server-side.
There are two such hooks:
- asyncData() hook
- fetch() hook
Let's explore each of these hooks in more detail.
You can read the full documentation on Data Fetching in Nuxt.js here: https://nuxtjs.org/docs/2.x/features/data-fetching.
asyncData() Hook
The asyncData() hook is only available for Vue.js components defined inside the /pages folder. Nuxt.js runs this hook before creating the Vue.js component. You don't have access to this object inside this hook. It's one of the few functions in Nuxt.js that receives the Nuxt.js Context as an input parameter.
The hook runs on the server-side once and on every navigation on the client-side. Nuxt.js redirects the user to the app error page in case this hook fails to execute whether on the server-side or client-side. In addition, this hook blocks navigation until it's resolved.
What's unique about this hook is that Nuxt.js merges its result value into your component's local state that is the data property of the component. Usually, the hook's result takes precedence over whatever is being defined locally on the component and having the same key name.
Listing 11 shows an example of using the asyncData() hook.
Listing 11: asyncData() hook example
<template>
    <div>
    <h1>{{ post.title }}</h1>
    <p>{{ post.description }}</p>
    </div>
</template>

<script>
    export default {
        async asyncData({ params, $axios }) {
            const post = await $axios.$get(`https://api.nuxtjs.dev/posts/${params.id}`)
        return { post }
        }
    }
</script>
Right after this hook runs, the local state of the component now contains a property called post.
You can read the full documentation on asyncData() hook here: https://nuxtjs.org/docs/2.x/features/data-fetching#async-data.
fetch() Hook
The fetch() hook was recently introduced in Nuxt.js 2.12. Nuxt.js calls this hook during server-side rendering after the component instance is created and before it's rendered, and on the client-side after the component is mounted, when navigating between pages. It should return a Promise directly or indirectly (via async/await).
This hook has a richer API than the asyncData() hook. It exposes a set of properties that come in handy when building your components and managing the loading or error states. It exposes the $fetchState at the component level with the following properties:
- pending is a Boolean variable that's in the truth state as long as the hook is running. You can use it to display a placeholder to signal to users that there's an ongoing request to the back-end and is not yet resolved.
- error is a mixed variable that can either hold a value of null or an Error object that's thrown by the
fetch()hook. You can use this variable to display a meaningful error message to the user. - timestamp is a variable that holds the timestamp of the last
fetch()request. This is useful when dealing with caching and the keep-alive feature. I won't be covering this topic in this article, but you can read more about it here: https://nuxtjs.org/docs/2.x/features/data-fetching#caching.
Listing 12 shows an example of using the fetch() hook:
Listing 12: fetch() hook example
<template>
    <p v-if="$fetchState.pending">Fetching mountains...  </p>
    <p v-else-if="$fetchState.error">An error occurred :( </p>
    <div v-else>
        <h1>Nuxt.js Mountains</h1>
        <ul>
            <li v-for="mountain of mountains"> {{ mountain.title }} </li>
        </ul>
        <button @click="$fetch">Refresh</button>
    </div>
</template>

<script>
    export default {
        data() {return {mountains: []} },
        async fetch() {
            this.mountains = await fetch(
                'https://api.nuxtjs.dev/mountains').then(res => res.json())
        }
    }
</script>
Notice how the fetch() hook has access to this object. In fact, it's setting the value of mountains, which is locally defined on the local state of the component.
In addition, you can dispatch actions or commit mutations on the Vuex store from inside this hook.
Something else to note is the event handler of the button click event. It simply calls $fetch. This is a reference to the fetch() hook that Nuxt.js injects into the components so that you can manually call fetch() hook whenever needed.
You can read the full documentation on the fetch() hook here: https://nuxtjs.org/docs/2.x/features/data-fetching#the-fetch-hook.
Error Page
Nuxt.js includes the /.nuxt/components/nuxt-error.vue component. It displays this component whenever an error occurs in the app (404, 500, etc.). Nuxt.js gives you the chance to customize this error page to fit your needs and requirements. Let's create your own custom Error page.
Start by creating a new layouts page by adding a new Vue.js component at /layouts/error.vue and pasting the Vue.js component content shown in Listing 13.
Listing 13: Error.vue component
// layouts/error.vue
<template>
    <div>
        <h2 v-if="error.statusCode === 404"> Page not found </h2>
        <h2 v-else>An error occurred</h2>
        <nuxt-link to="/">Home page</nuxt-link>
    </div>
</template>

<script>
    export default {props: ['error']}
</script>
That's all! Nuxt.js uses this component the next time it needs to render the error page. It's important to note that the error.vue component is just a normal Vue.js component and not a layouts component. However, Nuxt.js decided to place this custom error page inside the /layouts/ folder.
You can read the full documentation on Error pages here: https://nuxtjs.org/docs/2.x/directory-structure/layouts#error-page.
Nuxt.js Configuration File
The nuxt.config.js file exists to contain all of your custom configuration. Nuxt.js comes with a set of configurations and this file helps you amend the existing configurations and add more. For instance, you can change the meta tags, title, and links for the main page Head tag. As you've seen before, you also use this configuration file to list your plug-ins, middleware, and other related configurations that directly affect your app.
Let's edit the Home page meta tags, title, and add a link to the favicon. Listing 14 shows the entire block.
Listing 14: Page Head property
export default {
    head: {
        title: 'My First Nuxt.js app!',
        meta: [
            { charset: 'utf-8' },
            { name: 'viewport', content: 'width=device-width, initial-scale=1' },
            { hid: 'description', name: 'description', content: 'My first attempt to learn Nuxt.js!'}
        ],
        link: [
            { rel: 'icon', type: 'image/x-icon', href: '/favicon.ico' }
        ]
    }
}
The nuxt.config.js file has a property called Head. This property represents the HTML Head of the page in Nuxt.js. It can host any HTML Head elements and meta tags. The head property applies to all pages in the Nuxt.js app. However, you can still override them on the page level as you will see shortly.
The head.meta property is of type array of objects. Every object represents a different element or meta tag. Notice the user of hid property in one of the objects inside the meta property.
{
    hid: 'description',
    name: 'description',
    content: 'My first attempt to learn Nuxt.js!'
}
This is very important to have at this level inside the nuxt.config.js file. Later, you'll see how you can override the meta tag description from inside the Nuxt.js page itself. Using this property allows you to override this description on the page level. Otherwise, you'll have two duplicate description meta tag elements on the generated HTML page.
Another configuration that you can set at the nuxt.config.js file is the CSS property. This comes in very handy, especially when you're starting your journey with Nuxt.js.
export default {
    css: [
        '~/assets/css/main.css',
        '~/assets/css/animations.scss'
    ]
}
The CSS property is an array of paths to CSS files. The files you specify at this level are globally included on all pages in your app.
There are plenty more configuration settings you can add to the nuxt.config.js file. You can read the full documentation on nuxt.config.js file here: https://nuxtjs.org/docs/2.x/directory-structure/nuxt-config.
Modules
When you scaffold a new Nuxt.js app using the CLI, it doesn't create a /modules/ folder for you. Most probably because creating modules in Nuxt.js is considered an advanced move and would rarely occur unless necessary.
A module defined in Nuxt.js is a top-level JavaScript function that's executed when Nuxt.js starts. Nuxt.js calls each module in order and waits for all modules to finish executing before continuing to call the Vue instance, the Vue plug-ins, and the creation of the Context.
Why do you need modules? With modules, you can override templates, configure Webpack loaders, add CSS Libraries, add a plug-in programmatically, and perform other tasks that you need for your app.
A Nuxt.js module is a unit of packing offered by Nuxt.js. Say, for example, you have a plug-in that you want to share as an NPM package. You create a new module that loads and injects the plug-in into a Nuxt.js app. Then you create an NPM package for this module and share it with the Nuxt.js community.
How do you write a basic module? Let's build a simple module that accesses some configuration saved inside the nuxt.config.js and logs the data on the screen.
Create a new file under /modules/basicModule.js with the following content:
// modules/basicModule.js
export default function (moduleOptions) {
    console.log(moduleOptions)
    console.log(this.options['basic'])
}
Inside the nuxt.config.js file, register this new module as follows:
// nuxt.config.js
export default {
    modules: [
        ['~/modules/basicModule', {}
        /* module options */],
    ]
}
Then, add to the nuxt.config.js a new configuration section as follows:
// nuxt.config.js
export default {
    basic: { // custom configuration options
        option1: false,
        option2: true,
    }
}
That's really it! When the app runs, the module logs the content of the basic property as shown in Figure 8.

Inside a module, this refers to an instance of the ModuleContainer (https://nuxtjs.org/docs/2.x/internals-glossary/internals-module-container).
To access the nuxt.config.js file content inside a module, you use the this.options() function. In this case, the module accesses the basic property. The module is kept simple and the idea is to show how to build a module skeleton and run it successfully.
Let's explore a more advanced module. This plug-in reads configuration data from the nuxt.config.js file, customizes a plug-in based on the configuration data, and finally registers the plug-in programmatically.
Create a new file /modules/advancedModule.js and paste inside the content in Listing 15.
Listing 15: Advanced plug-in
//modules/advancedModule.js
const { resolve } = require('path')

export default function (moduleOptions) {
    // Add plugin.
    this.addPlugin({
        src: resolve(__dirname, 'plugin.js'),
        fileName: 'basicConfig.js',
        this.options['basic']
    })
}
The module starts by calling the this.addPlugin() function that's defined on the ModuleContainer class. This function accepts a plug-in template file as its first parameter. A second parameter specifies the name of the plug-in that is generated. And finally, a third parameter for any options you want to pass to this plug-in template.
Create a new plug-in template file /modules/plugin.js with the content in Listing 16.
Listing 16: Plug-in Lodash Template file
var options = []

<% if (options.option1 === true) { %> options.push('option 1') <% } %>

<% if (options.option2 === true) { %> options.push('option 2') <% } %>

const basicConfig = function () {return options}

export default ({ app }, inject) => {inject(basicConfig, basicConfig)}
The template makes use of Lodash templates (http://nicholasjohnson.com/javascript/javascript-for-programmers/exercises/lodash-templates/).
Inside the template file, based on the options passed via the addPlugin() function, you can push new items into a locally defined options array variable.
Then, define the basicConfig() function with a function body that returns the local options array variable. Finally, define the plug-in function that in turn injects the basicConfig() function into both the server-side and client-side channels of the Nuxt.js app. The addPlugin() function internally generates a new plug-in file based on the specified template, and pushes the plug-in into the Nuxt.js context.
Let's include the module file inside the nuxt.config.js file as well as the basic configuration section. Listing 17 shows the entire source code.
Listing 17: Register advanced module
// nuxt.config.js
export default {
   modules: [
       ['~/modules/advancedModule', { /* module options */ }  ],
   ],
   basic: { option1: false, option2: true, }
}
Run the app and access the home page. You'll see the data printed on the console.
You can build more interesting stuff with Nuxt.js modules. That was just an example of how things work together to build a feature in your app that could potentially be shared with the rest of the community via a module.
Before closing the discussion on Nuxt.js modules, here's a very expressive and meaningful diagram by the Nuxt.js team on modules that you can always keep as a reference when building modules. You can access the image here: https://nuxtjs.org/docs/2.x/modules.svg.
SEO
Going back to the beginning of the article, you learned that Nuxt.js is SEO friendly. This is one of the main advantages over Vue.js apps. To achieve this, build an SSR app with Nuxt.js combined with customized HTML Head meta tags and elements.
Nuxt.js allows you to customize the HTML Head globally at the nuxt.config.js file or at the page level. You've already seen the former and how to customize HTML Head globally. Now let's see how you can customize the meta tags for a specific page.
Open the /pages/index.vue component and add the Head property as shown in Listing 18:
Listing 18: Page-level head property
// pages/index.vue
export default {
    head () {
        return {
            title: 'Hello World!',
            meta: [
                {
                    hid: 'description',
                    name: 'description',
                    content: 'My Nuxt portfolio'
                }
            ]
        }
    }
}
The page changes the title and the description meta-tag. Note the use of the hid property so that the description set on this page overrides the global one defined at the nuxt.config.js file level.
That's all!
You can read the full documentation on the Head property here: https://nuxtjs.org/docs/2.x/configuration-glossary/configuration-head.
Conclusion
The Nuxt.js framework is young and fresh! The team behind this framework is doing a great job in offering rich and detailed documentation. In this article, I just touched the surface of Nuxt.js and gave you a quick guide to most of the features and concepts you need to start building apps with Nuxt.js.
Another interesting topic in Nuxt.js is the content module. It makes a Nuxt.js app behave more like a Headless CMS! Using this module, you can create your own content in Markdown, JSON, YAML, XML and CSV files. You store your content inside the /content folder and consume them inside the Vue components using a MongoDB-like API.
In addition, Nuxt.js has an active community backing it up with awesome modules, plug-ins, and libraries. You don't have to reinvent the wheel or build everything from scratch!
You can visit them at:
- Awesome Nuxt.js modules: https://github.com/nuxt-community/awesome-nuxt#official
