


My path to Visual Studio for Mac almost happened by accident. Actually...I blame the iPhone. You're probably thinking that I went to Visual Studio for Mac because I wanted to write software for iOS. Nope. The guilty party was iMessage. Almost everyone I regularly talk to was or is on iMessage. The difficulty was that I'd spent my life in Windows either writing .NET applications or working with Azure DevOps (formerly Team Foundation Server). I've been writing ASP.NET Web applications with Visual Studio since the early betas of the .NET Framework. But that's on Windows and, well, there's no iMessage client on Windows.
Several years went by with me being super annoyed about the lack of a Windows iMessage client. Along the way, Azure became a thing. Silverlight, a framework for rich Internet apps and Windows Phone, came and went and JavaScript is no longer a curse word. Then, Visual Studio Code, .NET Core, and ASP.NET Core got released. Docker and containers are now a pretty popular paradigm and SQL Server runs on Linux. My Microsoft-centric Windows-only world is getting a whole lot more cross-platform. I thought about the future of my career and realized that the next 10 years look distinctly less Windows-y and a whole lot more cloud-y. What should I do?
It turns out that I wasn't the only person wondering how to fit the cross-platform cloud into their career. In a conversation with Entity Framework expert Julie Lerman, I learned that she really wanted to increase her proficiency in cross-platform .NET Core. She felt that if she continued working primarily with Visual Studio on Windows, she'd never really learn it because Visual Studio was way too helpful. Her solution? Buy a MacBook. (Gasp!)
Huh. Well, that's a pretty darned good idea. Throw yourself into the deep end of the .NET Core pool and force yourself to swim (well, code). And hey! There would be iMessage! I went out and bought a MacBook Pro.
Life with a MacBook
Although my journey started off a little rough, I loved having an iMessage client and a WhatsApp client with a proper keyboard. (By the way, it seems that I'm the only person on the planet who doesn't mind the current incarnation of the MacBook Pro keyboard.) I tried as much as I could to write code using Visual Studio Code on the Mac but I still spent a fair amount of time running Visual Studio on a Windows virtual machine (VM). I probably spent 40% of my time on MacOS and 60% of my time on Windows.
The summer of 2018 was when the real shift happened. I decided to write and record a Pluralsight course “Architecting an ASP.NET Core MVC Application for Unit Testability” on the Mac. (https://www.pluralsight.com/courses/architecting-aspnet-core-mvc-unit-testability) I did almost all of the demos on the Mac. That was the shove that really got me comfortable with the development of .NET Core applications on the Mac.
So far, I've been talking about Visual Studio Code despite this being an article about Visual Studio for Mac. Let's get into my experiences with Visual Studio for Mac and the fateful lunch that got me to give Visual Studio for Mac a try with .NET Core.
Assumptions Are Corrected and Lunches Are Eaten
You might not know this about Mono and Xamarin: they got started in and around Boston, Massachusetts, which is, coincidentally, where I live, too. The Mono team bounced around between companies for a number of years, eventually becoming an independent startup, Xamarin, that was purchased by Microsoft. Xamarin Studio, an IDE for the development of cross-platform mobile apps, morphed into Visual Studio for Mac after that purchase.
Microsoft hosted a launch event in March of 2019 for the Visual Studio 2019 suite of tools. Visual Studio for Mac was included as a part of these festivities. For years, my experience of the typical Microsoft launch keynote consisted of someone delivering a conference talk. Microsoft decided to start the event with a launch video featuring a whole lot of different people. One of those people was Joseph Hill, the principal director program manager for Xamarin and Visual Studio for Mac. I've known Joseph for about a decade but hadn't seen him for a while.
I dropped him a line, which ended up in us grabbing lunch together. Our conversation centered around what we'd both been working on lately and I ended up telling Joseph that I was writing a lot of .NET Core code. He asked if I was using Visual Studio for Mac.
My reply to Joseph was, “Nope. I'm writing .NET Core apps, not Xamarin apps.” He said, “Do me a favor and give Visual Studio for Mac a try. It's not just for Xamarin apps.”
Give Visual Studio for Mac a try. It's not just for Xamarin apps.
My Pivot to Visual Studio for Mac
I went home after that lunch and installed Visual Studio for Mac on my computer. It turned out that it's not bad. It's better than not bad; it's really good! It was a pleasant change to be in a full IDE again after all the time I'd been spending in Visual Studio Code.
The first thing I noticed was that, unlike Visual Studio Code, Visual Studio for Mac knows about Solution files (*.sln). I could just double-click a solution file for an existing project I'd created on Visual Studio for Windows and it worked. I'd gotten pretty comfortable working with ASP.NET Core via the command line and via Visual Studio Code, but this was nice. I had an integrated test runner for my unit tests, a Solution Explorer panel, and debugging all this code just worked. I'd gotten rather adept at setting up my launch.json and tasks.json files in Visual Studio code but sometimes (ok, almost always) getting debugging working on complex project structures and for my unit tests was hard.
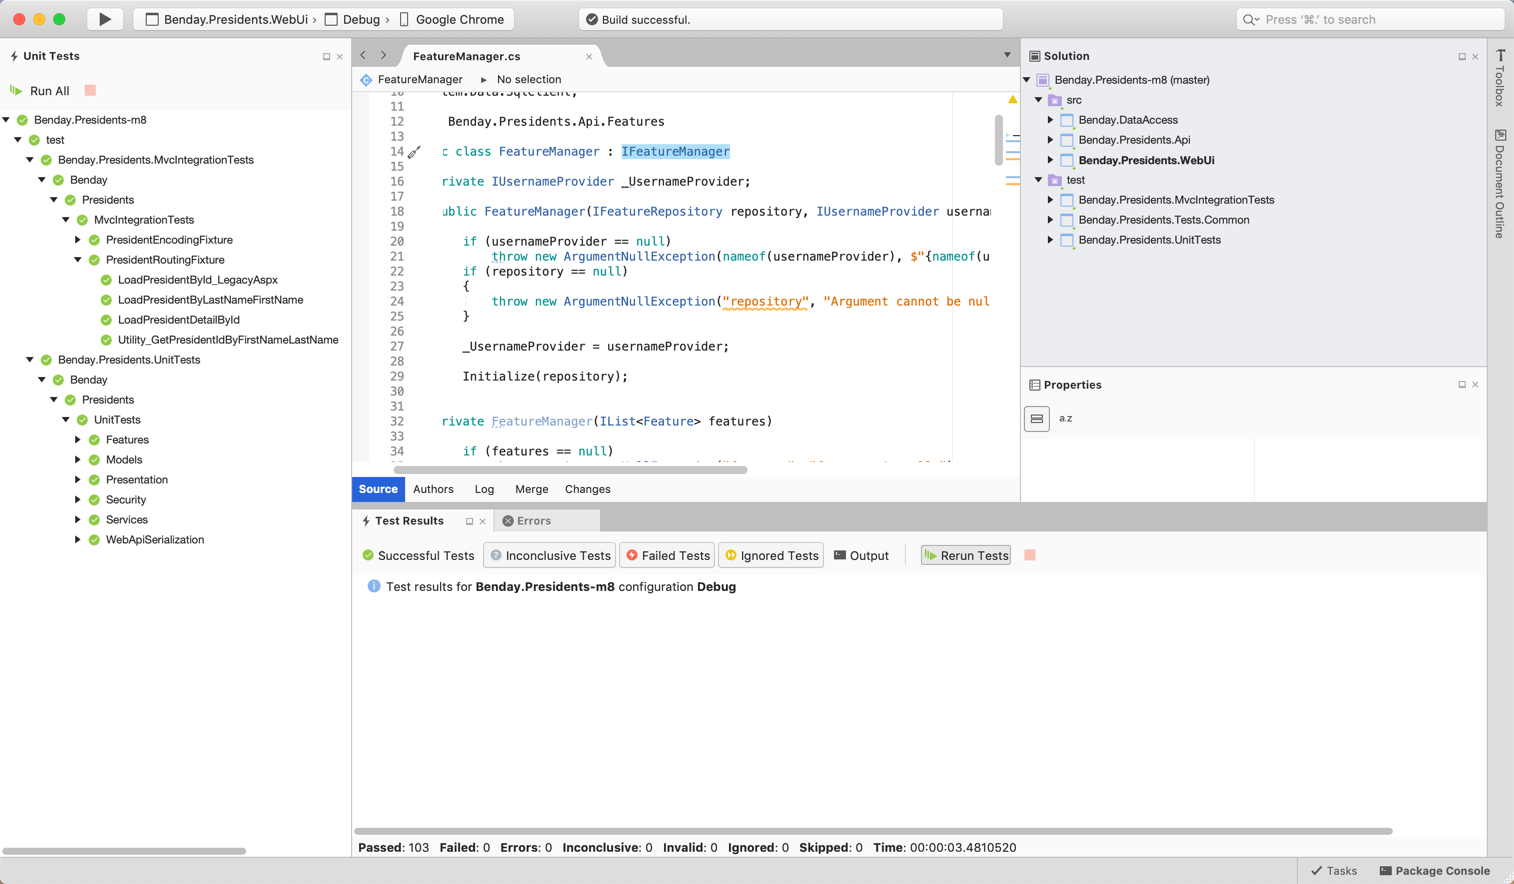
Don't get me wrong: Visual Studio Code has great support for debugging. It just takes some effort to get it set up properly. I'm not ashamed to admit that I sometimes simply couldn't get Visual Studio Code debugging working the way I needed. In those moments of frustration, I'd almost always spin up my Windows VM and do my debugging with Visual Studio. The great thing about Visual Studio for Mac is that, because it reads Solution files and therefore my projects, debugging is as easy as dropping a breakpoint and hitting F5. See Figure 1 for how Visual Studio for Mac handles solution files.
Because Visual Studio for Mac reads Solution files and therefore my projects, debugging is as easy as dropping a breakpoint and hitting F5.
Battery Life
As a travelling consultant and frequent conference speaker, I spend a lot of time working in airports and on planes. Battery life matters. Battery life on a MacBook Pro is pretty solid…unless you spend a lot of time running Windows in a VM. Those times where I'd hop into my Windows VM to do something tricky with Visual Studio happened often enough that I'd just leave that VM running in the background. When I wasn't connected to an outlet, that would mean that my battery deflated a lot faster than I wanted.
Moving a lot of my tricky stuff into Visual Studio for Mac let me seriously trim down the amount of time I spend in a VM. My battery has never been happier. In macOS, if I look at the list of applications using significant energy, I almost never see Visual Studio for Mac in that list. Microsoft has done a great job of making Visual Studio for Mac power efficient.
Microsoft has done a great job of making Visual Studio for Mac power efficient.
Code Snippets
One of the big things I noticed moving over to a Mac was that I really missed my code snippets from Visual Studio. Over the years, I'd written a ton of custom code snippets that I used all the time. I prioritized learning how to write code snippets for Visual Studio for Mac. I also wrote some ugly code to convert my snippets between the formats used by Visual Studio for Windows, Visual Studio Code, and Visual Studio for Mac.
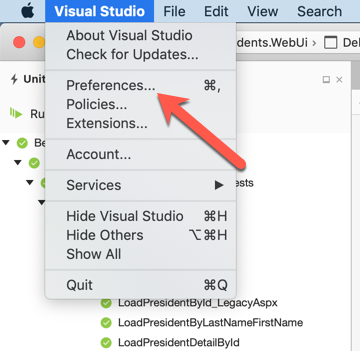
Visual Studio for Mac comes with a solid selection of snippets by default. To view the default snippets, open Visual Studio for Mac, go to the Visual Studio menu, and choose Preferences, as shown in Figure 2.
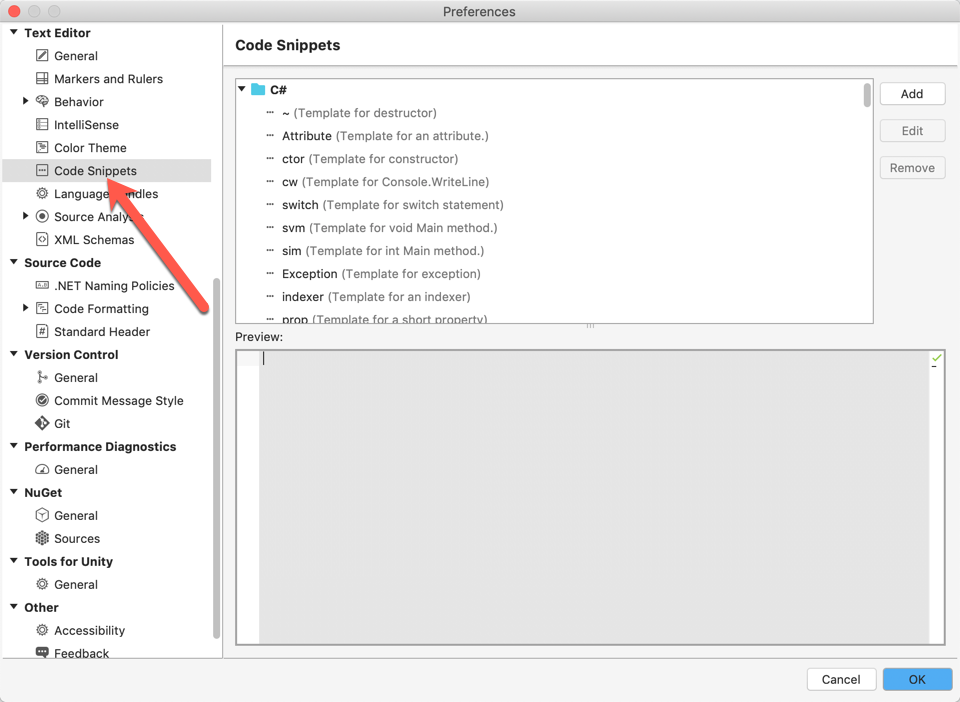
This brings up the Preferences editor. From the left menu bar, locate the Text Editor section and choose Code Snippets, which is highlighted in Figure 3.
If you're thinking that you'd like to start creating your own snippets, your first instinct is probably to go to the snippet directory for Visual Studio for Mac. That directory is ~/Library/VisualStudio/8.0/Snippets and, by default, doesn't exist. This directory doesn't start getting populated with snippet files until you add new snippets or customize existing ones.
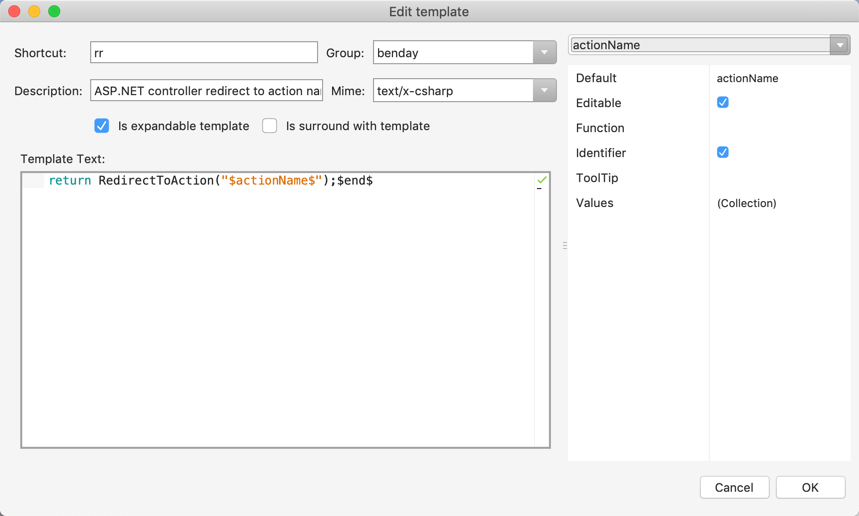
Most of my snippets are on the simple side, but you can definitely create some quite complex snippets. Figure 4 shows a simple snippet that I created for ASP.NET Core that issues a redirect to an action on an MVC Controller. A snippet has a shortcut phrase that triggers the shortcut and a body. If I type rr followed by the tab key, this code is dropped in and it prompts me to supply the name of the action. In the template's body definition, there are two variables: $actionName$ and $end$. The $actionName$ variable is a placeholder that prompts me for input when I trigger the template. The $end$ variable defines where the cursor should be positioned after I'm done with the snippet.
This is just one of the 90+ snippets that I ported over from Visual Studio. If you'd like to download them, they're available at https://www.benday.com/2019/06/20/code-snippets-for-visual-studio-visual-studio-code-and-visual-studio-for-mac/.
Key Bindings and Keyboard Shortcuts
One thing that was a little confusing and difficult for me when I moved to Visual Studio on the Mac were the keyboard shortcuts. When I'm coding, I try to use keyboard shortcuts for as much as I possibly can because it helps me to stay focused on the task that I'm working on. The keyboard shortcuts are different among Visual Studio, Visual Studio Code, and Visual Studio for Mac but they are customizable.
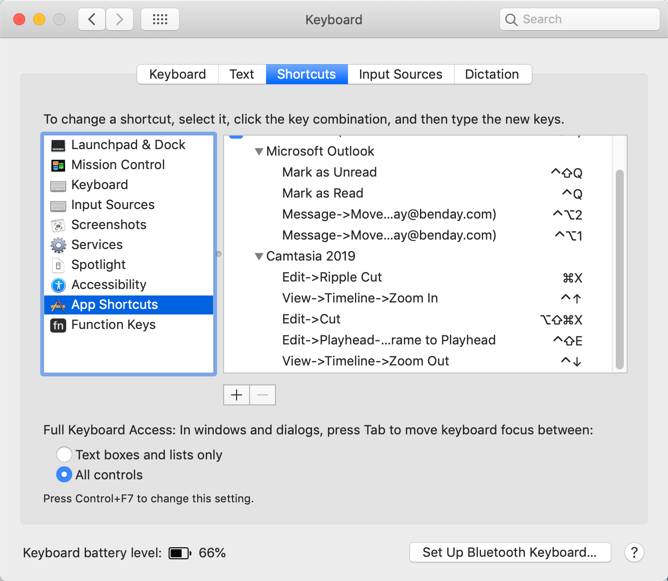
Keyboard shortcuts in Visual Studio for Mac behave a little bit differently than a lot of other Mac applications. For most Mac apps, if you want to define or change a keyboard shortcut, you figure out what the name of the command is in the application's menu and then create an App Shortcut in the Keyboard section of System Preferences. In Figure 5, you can see the custom keyboard shortcuts that I've created for Microsoft Outlook and for Camtasia 2019. This isn't the way it works in Visual Studio for Mac.
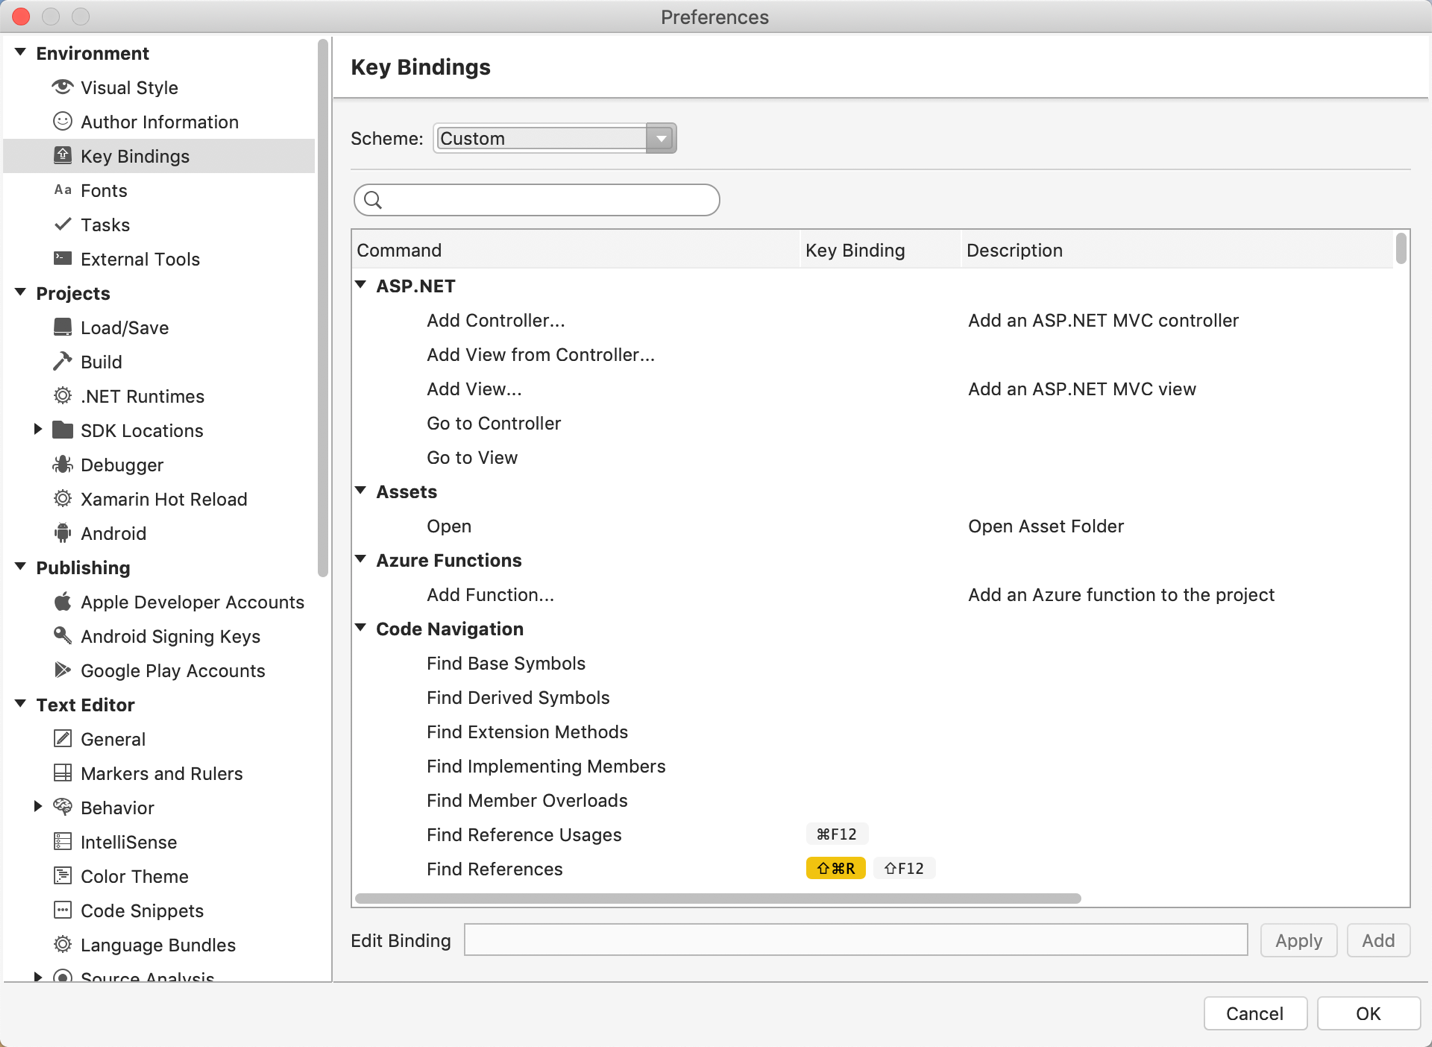
Visual Studio for Mac uses its own logic for processing keyboard shortcuts and mapping them to commands. To edit the key bindings in Visual Studio for Mac, open the Preferences editor, locate the Environment section, and choose Key Bindings. This brings up the Key Bindings editor (Figure 6). From here, you can start making changes, including completely changing the binding scheme to match XCode, Visual Studio on Windows, Visual Studio Code, or Resharper/Rider.
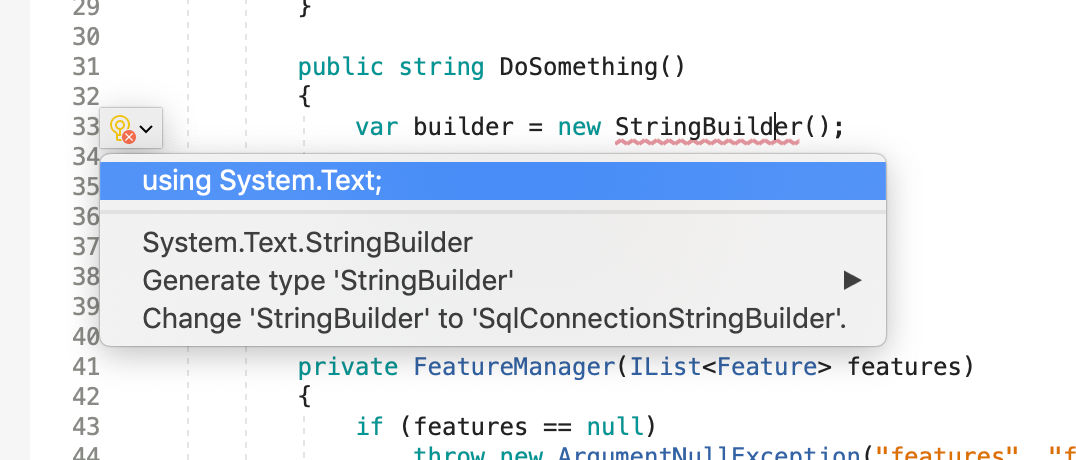
The number one most handy keyboard shortcut I learned was for the Quick Fix menu. The Quick Fix menu (Figure 7) helps you to quickly fix problems in your code. For example, in Figure 7, Visual Studio for Mac gives me a warning of a problem and provides me with a solution by showing me the light bulb icon. In this case, I need to add a Using statement in order to import the StringBuilder type. You can bring up the Quick Fix menu by typing Option+Return.
Running Multiple Instances of Visual Studio for Mac Simultaneously
You may have run into this problem in the past: Running multiple instances of a program on macOS can be a little difficult. It seems like macOS's goal and intent is for its users to only run one instance of a given program at a time. When I'm writing code, it's not unusual for me to have more than one solution open in Visual Studio at a time. I rely on multiple instances of the Visual Studio process.
On Windows, I'd double-click a solution and end up with that same solution in a new, additional instance of Visual Studio. Let's say that I try that on macOS. I've got a solution open in Visual Studio for Mac and then I open up Finder, navigate to a different solution file and double-click it. The new solution opens - but first it closes the solution that I already had open. Grrrrr.
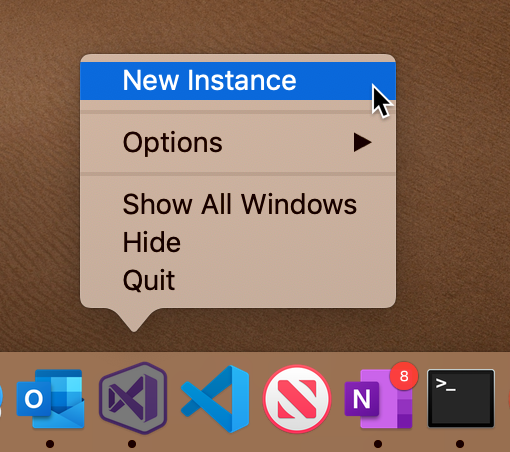
Thankfully, you can easily open an additional instance of Visual Studio for Mac by right-clicking on the Dock icon and choosing New Instance. I know that there are ways to start new instances of applications from Terminal in order to get around this limitation but having that New Instance option right there without having to try to remember the command line syntax is a serious time-saver.
Debugging ASP.NET Applications in a Browser
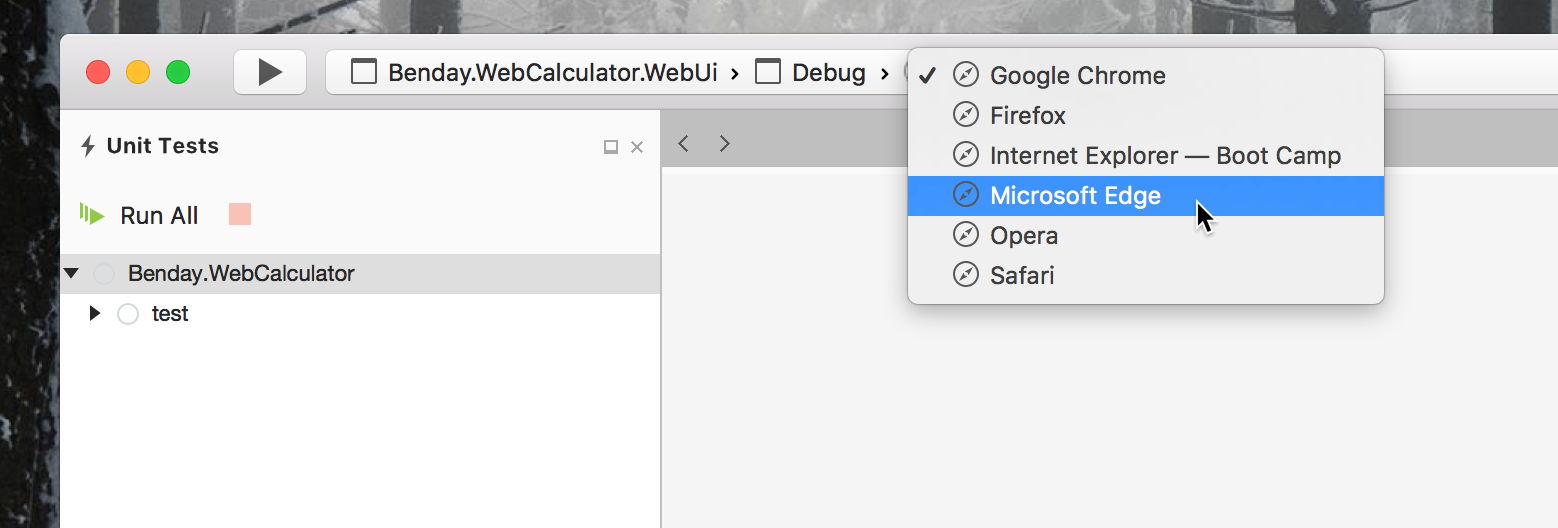
When you're writing an ASP.NET application, you'll most likely want to run it in a browser. You can start debugging by clicking F5 just like you would in Visual Studio for Windows. You can also use the official keyboard command: Command+Return. Without any further input, your app launches in your system's default browser. But what if you want to run your application with a different browser?
To launch your application with a different browser, click on the current browser name in the menu bar. This displays a list of registered browsers on your computer and you can choose the one you want from the list (see Figure 9). After you've chosen your browser, you can just start debugging.
Deploy to Azure from Visual Studio for Mac
Before I start my next tip, I want to add a little bit of a disclaimer. Among other things, I work with companies to help improve their DevOps practices. One of the most important things I try to teach my students and customers is that you should never “right-click deploy” your application. A “right-click deploy” is when you open your application in Visual Studio, right-click the project, and then deploy the application to production. In DevOps, you want to automate as much as you possibly can so that things are repeatable. Right-click deploys aren't automated and they aren't repeatable because your workstation tends to change unpredictably, and therefore, things in your deployment tend to break. To quote Damian Brady from Microsoft, “Friends don't let friends right-click publish”. https://damianbrady.com.au/2018/02/01/friends-dont-let-friends-right-click-publish/
“Friends don't let friends right-click publish.”
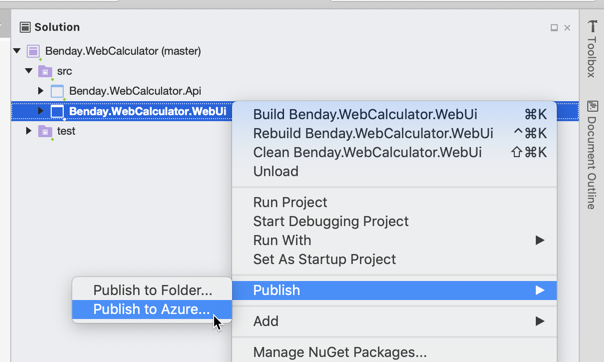
Now that I've said that all that, I must admit that it can be really nice to do a “right-click deploy.” (Yah. DevOps blah blah blah. Whatever.) A relatively new feature in Visual Studio for Mac is the right-click publish to either the file system or to Azure. This can be particularly helpful when you're just trying to get something done without having to worry about a DevOps pipeline. Open your solution, right-click your Web project, choose the Publish submenu, and then choose Publish to Azure. You can see how easy this is in Figure 10.
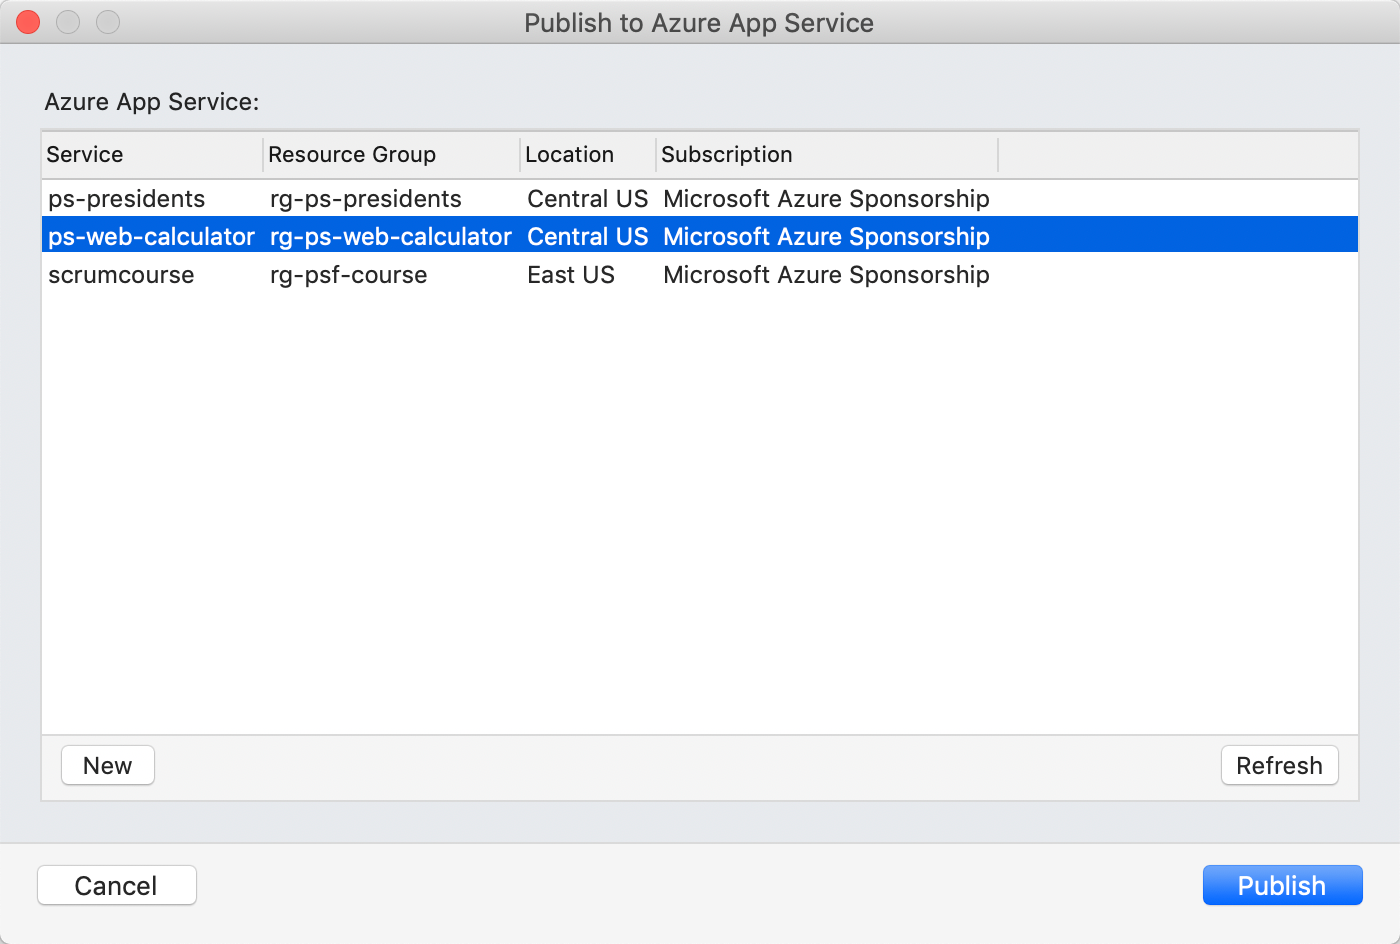
Visual Studio for Mac prompts you to log on using your credentials for your Azure Subscriptions and then it shows you the list of existing Azure App Services (Figure 11). From this screen, you can either choose an existing Azure App Service to deploy to or you can create a new Azure App Service. If you need to create a new Azure App Service, you can click the New button to start a wizard that walks you through the creation process and then returns you to the list of App Services in your account. When you're ready, choose the Azure App Service that you want and click the Publish button.
Recent Improvements in Visual Studio for Mac
There have been a lot of changes and improvements to Visual Studio for Mac lately. Earlier this year, Visual Studio 2019 for Mac version 8.1 brought a new editing experience for C# files as part of an initiative to improve the general code editing experience in the IDE. The team has continued to make investments in improving the C# editing experience and are also working to enhance the overall code editing experience in Visual Studio for Mac.
The new C# editor brought improved multi-caret functionality, support for right-to-left languages, quick navigation via Document Outline and an improved Go to Line implementation, the ability to drag-and-drop across views, and enhanced analyzer functionality with inline lightbulbs (“quick fixes”). Many of these items were requested by the Visual Studio for Mac user community via Twitter (@visualstudiomac) or on Developer Community (developercommunity.visualstudio.com), a Web portal for providing suggestions and feedback as well as for posting any issues with the product experience. One of the most requested features before the release of Visual Studio for Mac 8.1 was the ability to use code snippets within a C# file. They're a great way to add blocks of common code quickly, such as properties and constructors, to your project by tapping into the power of IntelliSense.
Although this article has focused mostly on writing C# applications and ASP.NET Core applications, there have been numerous improvements to the existing Xamarin workloads, too. The team continued making the editing experience better in Visual Studio for Mac 8.2. By using the XAML language service from Visual Studio on Windows and by building on the same core as the previously introduced C# editor, they improved the XAML and AXML editing experience. This brought more accurate and powerful IntelliSense, faster performance, better matching, improved linting, and an overall increase in general editing reliability. Basically, all of the features I was enjoying in the new C# editor made their way over to the XAML editor.
What's New in Visual Studio for Mac 8.3
Since the first version of Visual Studio 2019 for Mac from earlier this year, the team has been working to update all of its editors. As you know from my previous commentary, the C# and XAML editors were replaced in version 8.1 and 8.2 respectively. Now, in 8.3, the Web editors join the club. The new Web editors are based on the same underpinnings as their C# and XAML counterparts and support all the advanced features I've already talked about. They also all share the same UI, so you'll feel at home in all of them! And they're all powered by the Visual Studio on Windows core, so you can expect the same language service features you might have become accustomed to on Windows, if you're like me.
This is only a partial list, but the new Web editors support .html, .cshtml, .css, and .js files in addition to .cshtml embedded support for CSS, JavaScript, and C#. Suggestions and IntelliSense are tailored to the filed types you're working on, too, providing a superb experience.
Visual Studio for Mac 8.3 has shaped up to be one of the most significant releases in its few-year history. It seems that the team focused on pulling top feedback themes from their developer base - which often centered around the ASP.NET Core experience. Over the course of the 8.3 previews, I've already had a chance to try out some of these new experiences. I'll call out the big ones below:
Visual Studio for Mac 8.3 has shaped up to be one of the most significant releases in its few-year history.
Manage Your NuGet Packages at the Solution Level
I often work with large projects that contain unfathomable amounts of NuGet packages. One feature that was sorely missing when I started working with Visual Studio for Mac was a solution-level package manager for NuGet. Visual Studio for Mac 8.3 ships with a new package manager that allows you to easily update, remove, and consolidate packages across your solution from one central location. This has proven to be a time-saver for me.
Develop with .NET Core 3 and C# 8
.NET Core 3 is the latest version of the .NET Core ecosystem and brings improvements to performance, a refined deployment experience, and more streamlined project files. In addition to .NET Core 3, Visual Studio for Mac supports the latest iteration of the C# language.
Target Multiple .NET Frameworks
This is yet another instance of Visual Studio for Mac 8.3 making the overall experience of development on the Mac a little bit nicer. You'll often find the need to target a variety of platforms and devices. .NET Standard is usually the best solution for adding support for multiple platforms, but there are cases where you may need to use APIs in .NET frameworks that don't support it. The solution to that is multi-targeting your applications. This allows you to build your application targeting multiple frameworks by using the Target Framework drop-down at the top of the editor window.
Publish Your .NET Core and .NET Standard Library Projects
A previous release of Visual Studio for Mac brought the ability to publish an ASP.NET Core project to a folder. Visual Studio 8.3 expands on this feature and allows you to publish .NET Core Console and .NET Standard Library projects, too. After using the Publish > Publish to Folder feature via the context menu for your project, Visual Studio for Mac creates a publish profile in the Publish fly-out. You can always create additional publish profiles, each of which will be easily accessible via this menu.
Configure launchSettings.json in ASP.NET Core
This one is neat: During the development process, ASP.NET Core applications allow you to configure the way in which the app is launched using the launchSettings.json file. Adding this support brings Visual Studio for Mac in line with Visual Studio Code, Visual Studio, and the .NET CLI (Command Line Interface). What does this mean if you're developing on multiple computers or working with a team on other operating systems? There's parity among all of your options and a smoother code-sharing experience.
Nest Your ASP.NET Core Files
File nesting for ASP.NET Core projects in Visual Studio for Mac is now handled in the same way as Visual Studio. When this feature is enabled, generated files are nested under their relevant parents and infrequently edited files are nested under other related files. This cleans up the solution pad and makes it much easier to navigate large projects.
Set Up Your Keyboard Shortcuts from the Start
New users to Visual Studio for Mac will be greeted with a brand-new keyboard shortcut screen (Figure 12) when they launch the IDE for the first time. I've been told that this screen was added to aid in informing developers starting out in the IDE about the ability to customize their keyboard shortcuts.
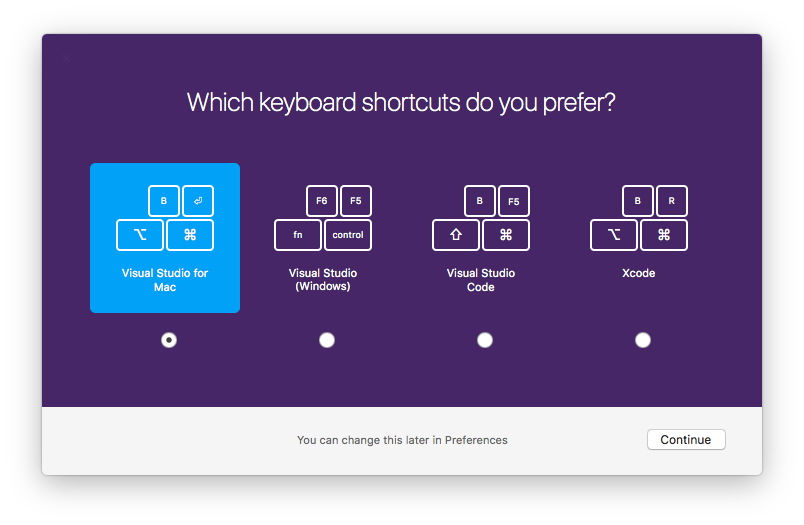
Remember: You're never locked into a specific shortcut scheme. As I said earlier, you can always browse to the Visual Studio > Preferences > Environment > Key Bindings page to make minor adjustments, add custom key bindings, or switch your theme entirely if you'd like to try something different.
Summary
I hope after reading through all these pages that you can agree with me: Visual Studio for Mac has come a long way since its initial Xamarin development days. So for all you .NET Core developers out there, if you haven't already done it, go download Visual Studio 2019 for Mac 8.3 from http://visualstudio.microsoft.com/vs/mac/ and give it a try. Be sure to provide any feedback you have to Microsoft via @visualstudiomac on Twitter or via http://developercommunity.visualstudio.com. I know the Visual Studio for Mac team would appreciate any feedback you might have. I'm truly looking forward to continuing to use Visual Studio for Mac and to the further improvements the team brings to my experience.
