


If you're a developer who's written any applications other than a Hello World, chances are you need to persist data. And very often, you need to store the data on a database server so that the data can be synchronized across a wide range of devices. However, setting up a back-end database server isn't a walk in the park, especially for developers who are already grappling with the business logic and the various ever-changing front-end technologies. Fortunately, you don't have to set up your own database server just for that purpose. You can use the Cloud Firestore service from Google, which allows you to store your data on the cloud, thereby allowing you to focus on building responsive apps that are able to work both online and offline.
In this article, I'll walk you through the use of the Cloud Firestore through a React Native application. I won't go into the various specific features of Cloud Firestore because my focus is on getting you started. To get the most out of this article, you should be familiar with JavaScript, but most people should have no problem in following along.
What is Cloud Firestore?
Cloud Firestore is a NoSQL document database that's designed for your client- and server-side apps. It's part of Google's Firebase suite of services, which includes services like Cloud Functions (for running serverless apps), Hosting (for hosting your Web apps), Authentication (for you to authenticate users in your apps), and more.
Using Cloud Firestore, you can save your data on the cloud and at the same time keep your clients synchronized through real-time listeners. It also provides support for offline access, which is especially useful for mobile apps.
Basic Concept of NoSQL
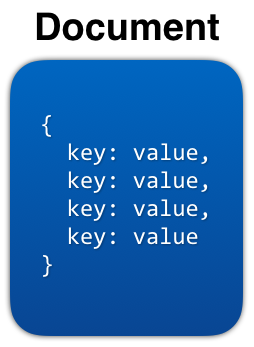
Unlike traditional relational databases where data are stored in table-based formats, NoSQL has the concept of documents. Let's start with the most basic. To represent your data, you use key/value pairs (see Figure 1). For example, you can represent the age of a user using age:25, and the name of the user using name:“Wei-Meng Lee”.

All of these key/value pairs can then be grouped together, forming a Document (see Figure 2).
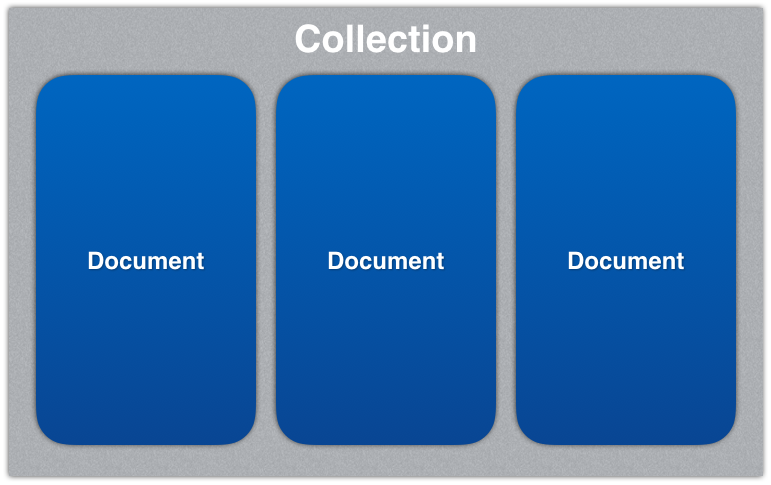
A collection of these documents is called, as you guessed, a Collection (see Figure 3).
Unlike relational databases where every row in a table has the same fields, a NoSQL database can have a collection of documents, each with its own unique structure, without needing to predefine the structure.
Figure 4 shows a collection of three documents, each with its own structure.

In addition, you can add fields to a document as you go, giving you maximum flexibility in the way you store your data. Besides storing the data in a document, a document itself may reference another document or collection. Figure 5 shows this visually.

Logging In to Firebase
Now that you have a good idea of how the data model of NoSQL works, it's the perfect time to jump into Cloud Firestore and create your first project.
Using a browser, navigate to https://firebase.google.com. Click GET STARTED (see Figure 6).
Click Add project (see Figure 7).
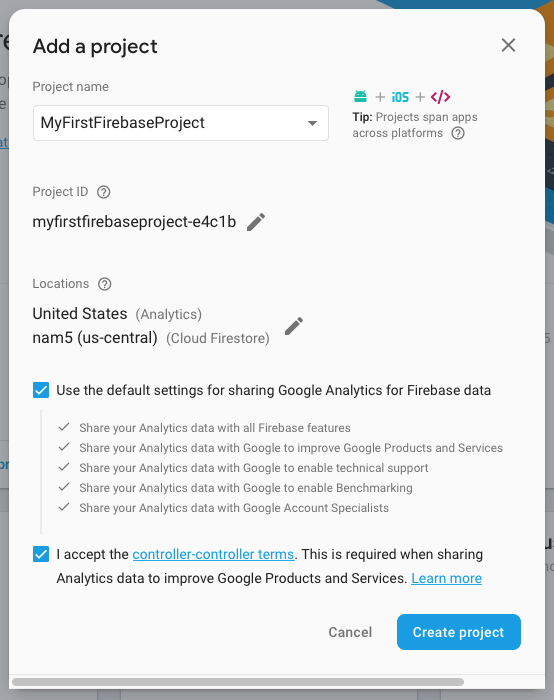
Name the project and check the options as shown in Figure 8. Once it's done, click Create project.
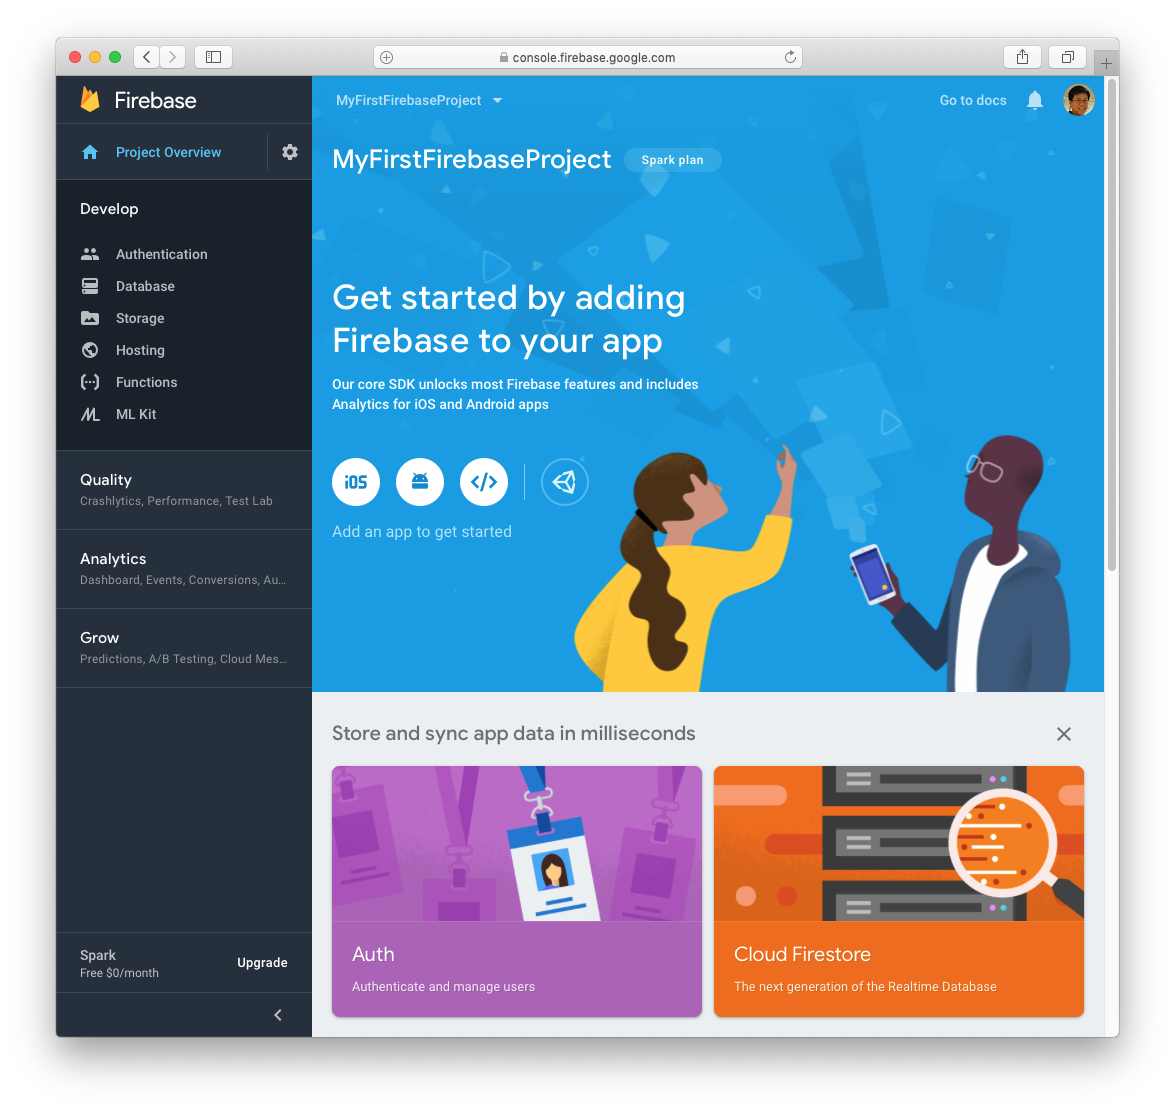
When the project is created, click Continue. You should now see the screen as shown in Figure 9.
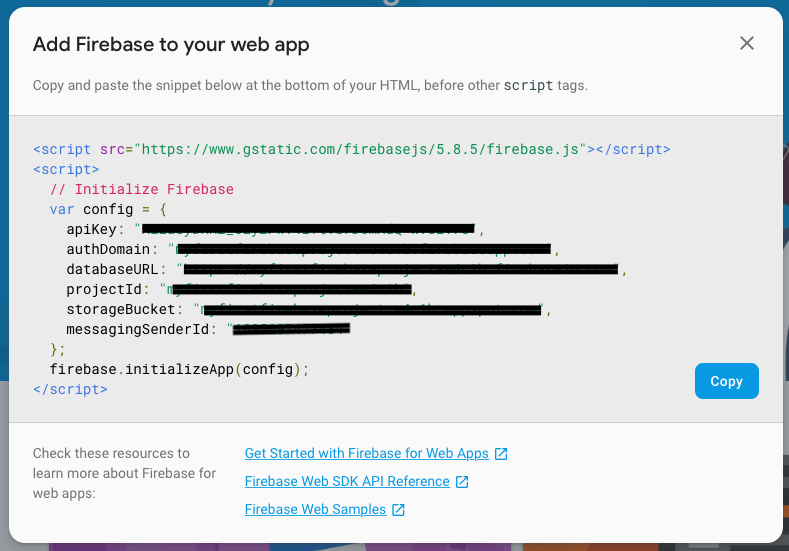
Click the third icon (</>) to add Firebase to your Web project (see Figure 10).

You should now see the credentials (see Figure 11) to access Firebase from your Web project. Save the information to a text file. You'll need it later.
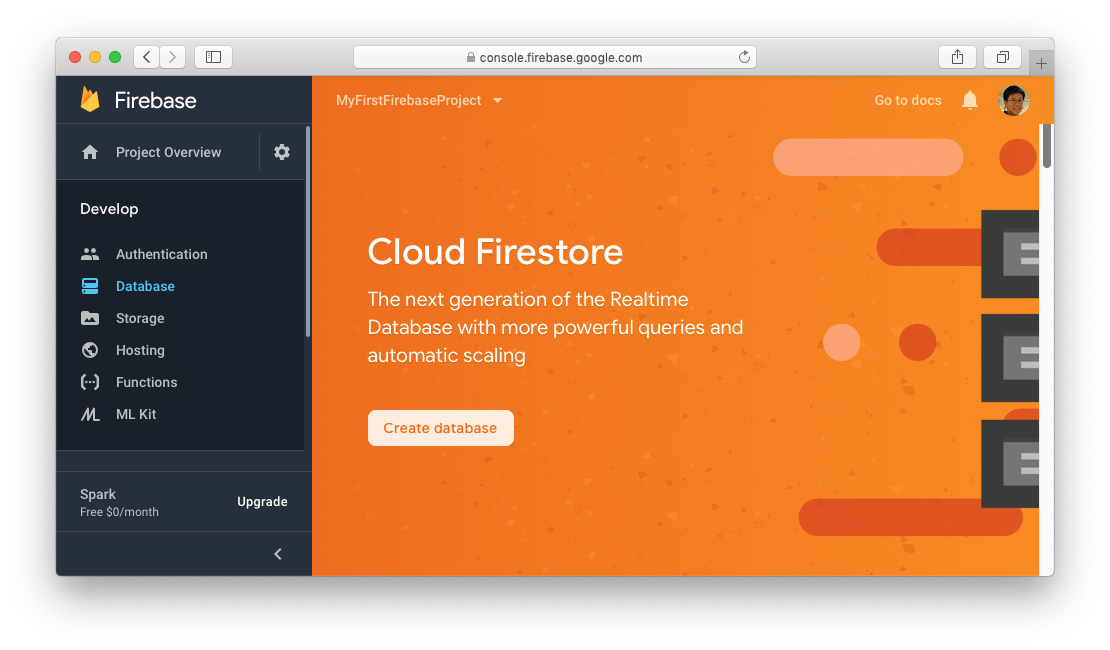
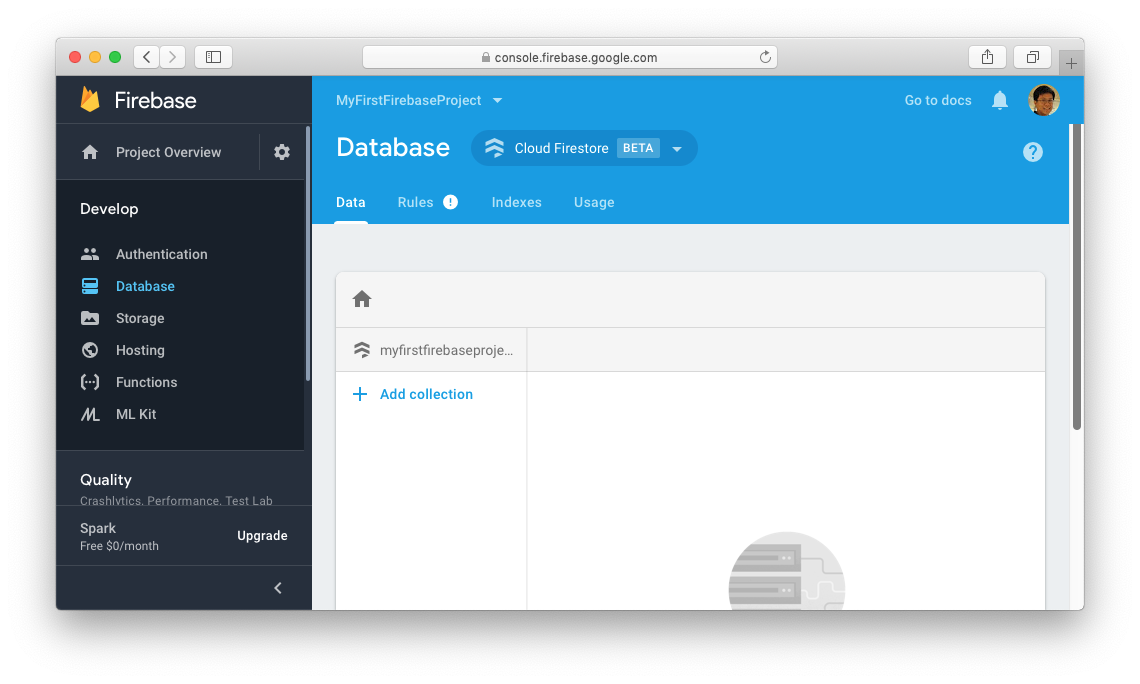
Click on Database in the Firebase project console and then click Create database (see Figure 12).
Select the Start in test mode option and then click Enable (see Figure 13).
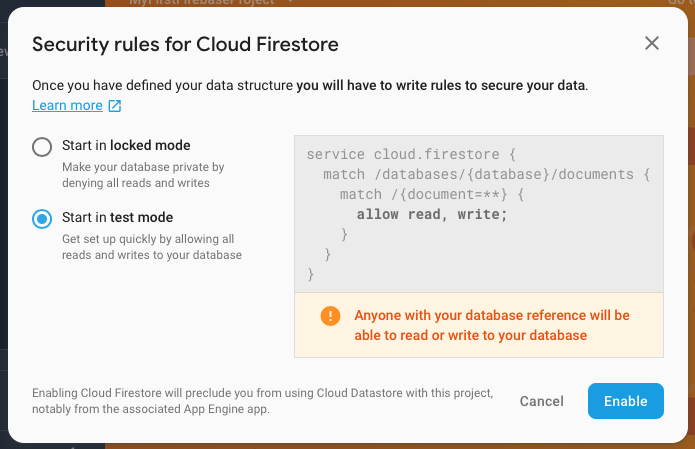
Choosing the “Start in test mode” option allows you to read and write to your database. For real-world usage, you need to set the necessary authentication options to ensure that your database is properly secured.
Creating the Project
For this article, you'll use React Native to create a cross-platform mobile app to use Cloud Firestore. To get you started, you'll learn how to perform the following in Cloud Firestore:
- Subscribe to document change notifications so that changes to the collections in Cloud Firestore notifies all clients about the changes
- Create a document and obtain its document reference ID
- Retrieve a document based on its document reference ID
- Retrieve all of the documents stored in a collection
- Perform queries to retrieve specific documents
- Modify a document based on its document reference ID
- Delete a document based on its document reference ID
In Terminal, type the following command to create a React Native project:
$ react-native init Demo
Once the project is created, type the following command to install the firebase module using npm:
$ cd Demo
$ npm install firebase --save
$ touch config.js
Populate the config.js file with the following:
import * as firebase from 'firebase';
import firestore from 'firebase/firestore'
const settings = {timestampsInSnapshots: true};
var config = {
  apiKey            : "xxxxxxxxxxxxxxxxxxxxxx",
  authDomain        : "xxxxxxxxxxxxxxxxxxxxxx",
  databaseURL       : "xxxxxxxxxxxxxxxxxxxxxx",
  projectId         : "xxxxxxxxxxxxxxxxxxxxxx",
  storageBucket     : "xxxxxxxxxxxxxxxxxxxxxx",
  messagingSenderId : "xxxxxxxxxxxxxxxxxxxxxx"
};
firebase.initializeApp(config);
export default firebase;
The config.js file contains the details needed to access the database on Cloud Firestore. Replace the various values with the credentials you obtained earlier.
Add the statements in bold to the App.js file (see Listing 1).
The following statement creates a reference to the collection named ‘courses' located in the Cloud Firestore. Using this reference, you'll be able to manipulate the collection, such as add, modify, delete, and query for documents:
    this.ref =
      firebase.firestore().collection('courses');
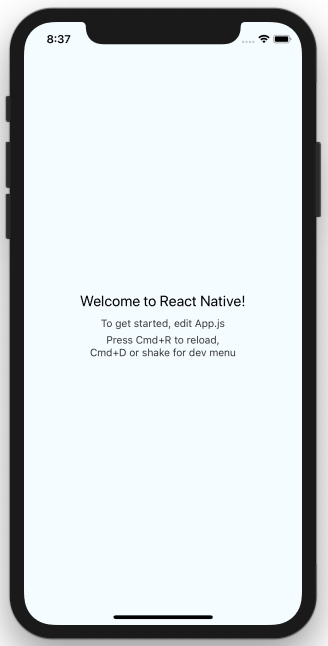
Using Xcode, open the iOS project located in the Demo folder. Run the application on the iPhone Simulator. If there's no error, you should see the default UI as shown in Figure 14.
Creating the User Interface of the Application
Let's now populate the UI of the iPhone application with the necessary views so that users can enter details to be saved in Cloud Firestore.
Add the statements in bold to the App.js file as shown in Listing 2. Specifically, you are adding the following views to the UI:
- Button
- TextInput
- Text
For this project, you'll allow users to enter details of courses to store in the Cloud Firestore. Each course has the following details:
- Course code
- Course title
You'll use four state variables to bind to the UI:
this.state = {
  id          : "", // to store the
                    // document reference ID
  coursecode  : "", // store the course code
  coursetitle : "", // store the course title
  courses     : ""  // store the list of courses
};
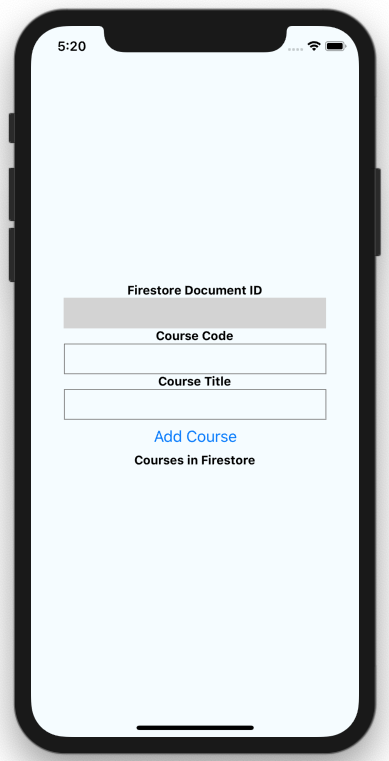
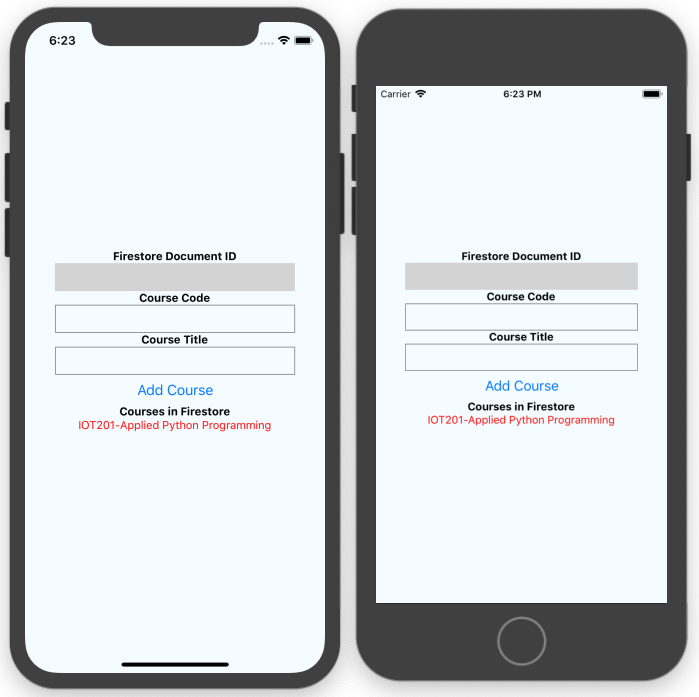
Refresh the iPhone Simulator (press Command-R) and you should now see this the UI as shown in Figure 15.
In Xcode, run the application on another iPhone Simulator (see Figure 16).
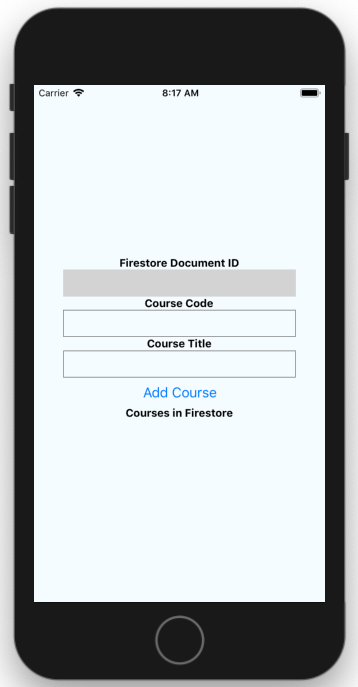
I want to launch the app on two instances of the iPhone Simulator so that in the next section, you'll see that changes made to a document in Cloud Firestore cause an update to be pushed automatically to all the apps listening for the update.
Subscribing to Document Changes
Now that you have all of the UI set up, let's start by seeing how apps can subscribe to changes in the Cloud Firestore.
Add the statements in bold to the App.js file as shown in Listing 3. To subscribe to updates, use the onSnapshot() function from the collection object and pass it a function to handle the event:
//---subscribing to collection updates---
this.ref.onSnapshot(this.onCollectionUpdate);
In this example, you're subscribing to changes to the courses collection. Any time there's any change made to the collection, the onCollectionUpdate() function is called:
  //---fired whenever someone adds a document to
  // the collection---
  onCollectionUpdate = (querySnapshot) => {
    courses = "";
    querySnapshot.forEach((doc) => {
      courses += doc.data().CourseCode + "-" +
                 doc.data().CourseTitle + "\n";
    });
    //---update the state so that the courses
    // can be refreshed---
    this.setState(
      {
        courses: courses
      }
    );
  }
For this implementation, you'll iterate through the snapshot and show the list of courses added to the collection so far.
Refresh the iPhone Simulator.
Adding a Document to the Collection in the Firebase Console
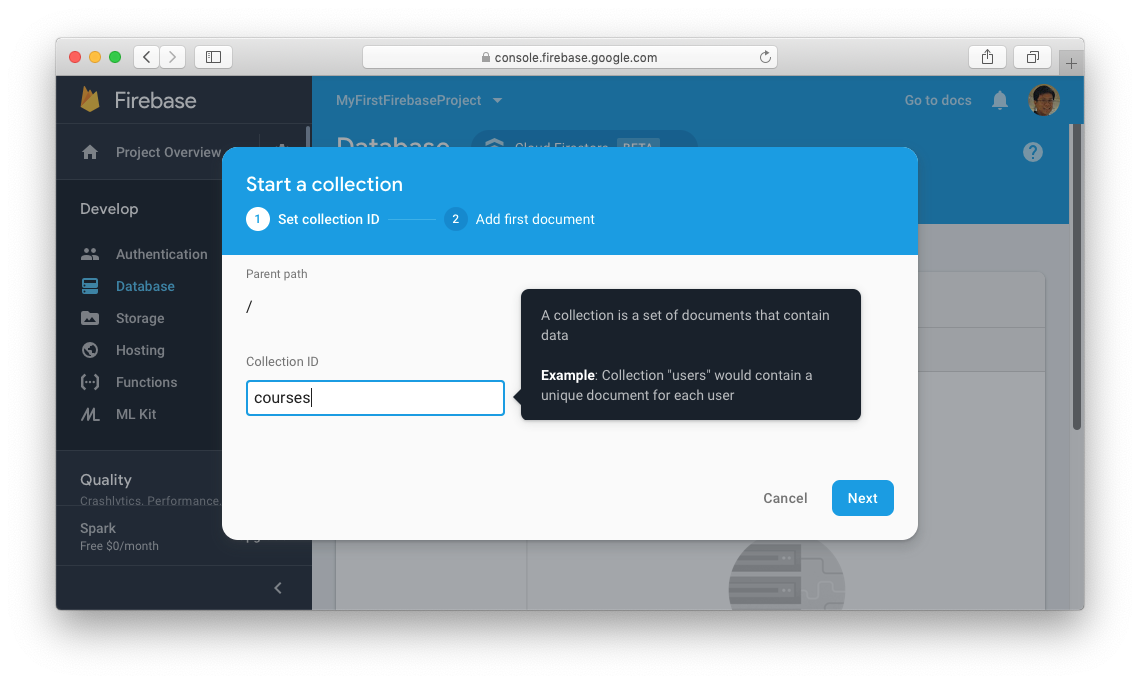
Back in the Firebase console, click the Add collection link as shown in Figure 17.
For the Collection ID, enter courses. Click Next (see Figure 18).
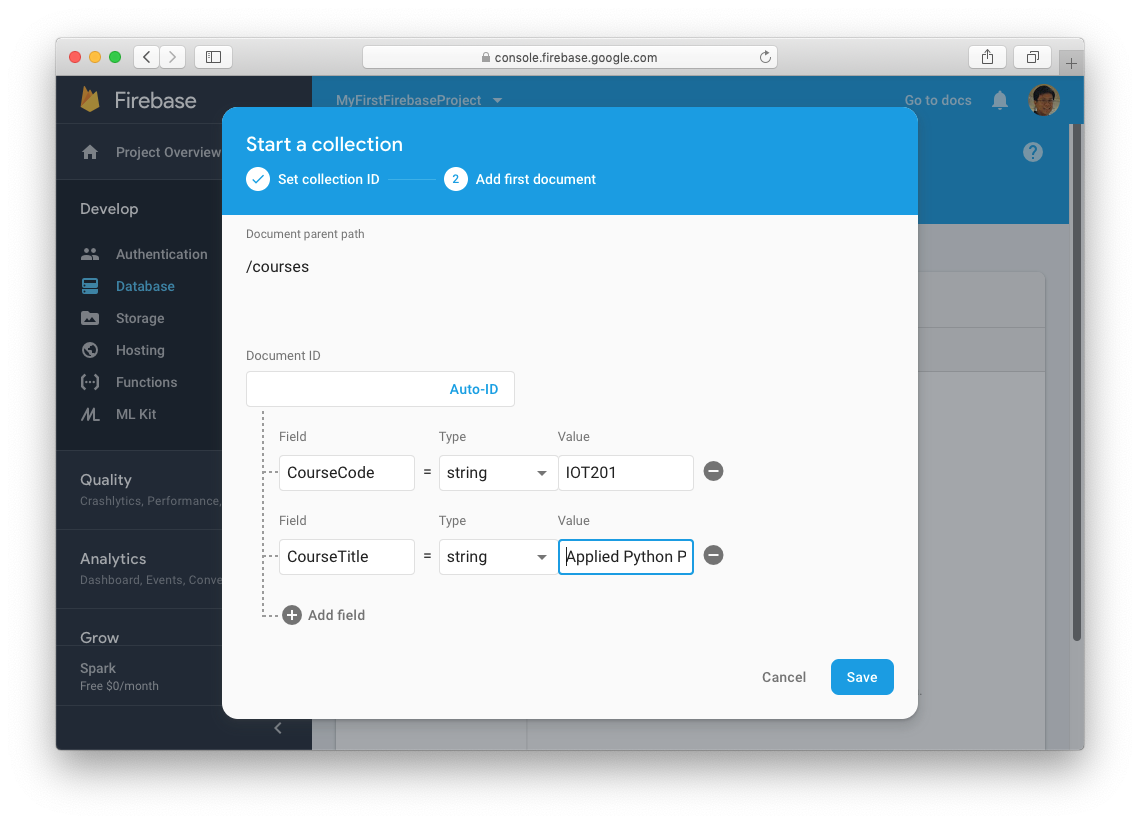
Enter CourseCode for the first field and CourseTitle for the second field. Set their values as shown in Figure 19. Click Save.
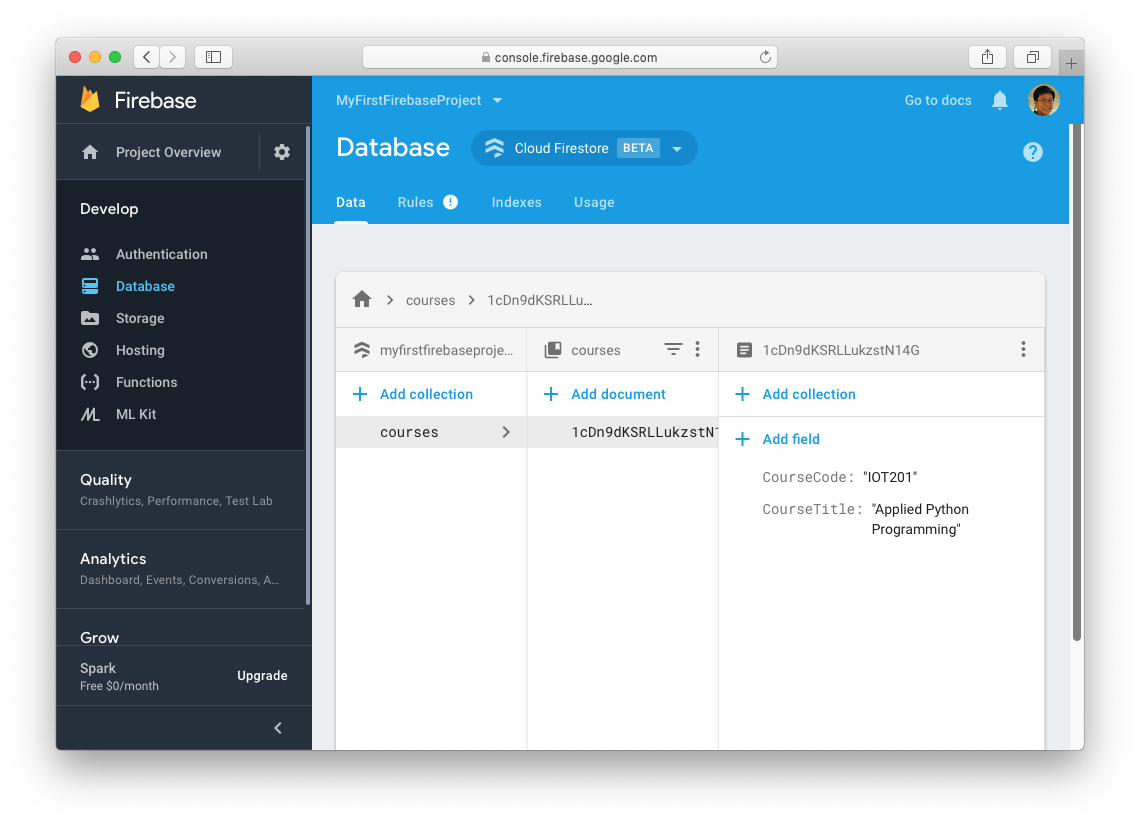
Leave the Document ID empty so that Firestore generates the ID for you automatically. The document is now created (see Figure 20).
Observe that the newly added document now automatically appears on both simulators (see Figure 21).
Back in the Firebase console, click the icon with the three dots (displayed in the second column next to the courses title) and select Delete all documents (see Figure 22).

Click Start delete (see Figure 23).
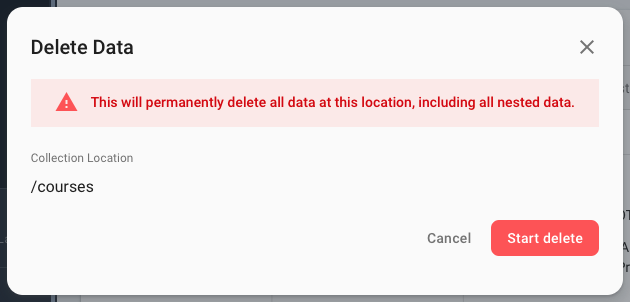
This will delete the document that you have just created. The iPhone simulators now automatically removes the document and no longer shows it.
Adding a Document
You have seen how to add a document to a collection in the Firebase console, so let's now see how it's done in code.
Add the statements in bold to the App.js file as shown in Listing 4.
To add a new document to the collection, use the add() function and pass in the content of the document to add. When the document is added successfully, it returns a document reference ID (which in this case is automatically generated by Cloud Firestore):
  addCourse() {
    //---add a new document to the collection---
    this.ref.add({
      CourseCode : this.state.coursecode,
      CourseTitle : this.state.coursetitle,
    })
    .then((docRef) => {
      //---update the id---
      this.setState(
      {
        id:docRef.id
      });
    })
    .catch(function(error) {
      Alert.alert("Status",
        "Error adding document: " + error);
    });
  }
For this project, you will keep the document reference ID in the state variable so that it can be displayed at the top of the page.
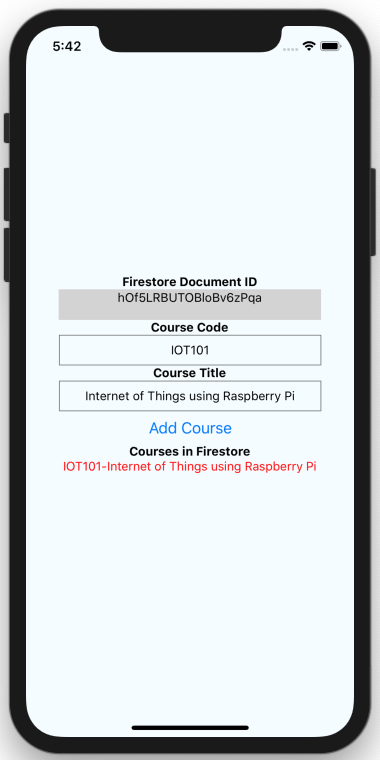
Refresh the iPhone Simulator. Enter the information as shown below and click the Add Course link. When the document has been added successfully, you'll see the document ID displayed at the top of the page (see Figure 24).
Retrieving a Document
To retrieve a specific document, you need to use its document reference ID.
Add the statements in bold to the App.js file as shown in Listing 5. To retrieve a specific document, use the doc() function and pass it the document reference ID. When the function returns, you need to check if the document exists using the exists property. If the document exists, you then use the data() function to get the content of the document:
   getCourse() {
    //---exit function if id is empty===
    if (this.state.id == "") return;
    //---get a reference to the document---
    var docRef = this.ref.doc(this.state.id);
    docRef.get()
    .then(function(doc) {
      if (doc.exists) {
          Alert.alert(doc.data().CourseCode,
                      doc.data().CourseTitle);
      } else {
          //---doc.data() will be undefined---
          console.log("Can't find document");
      }
    })
    .catch(function(error) {
        console.log("Error getting document: ",
          error);
    });
  }
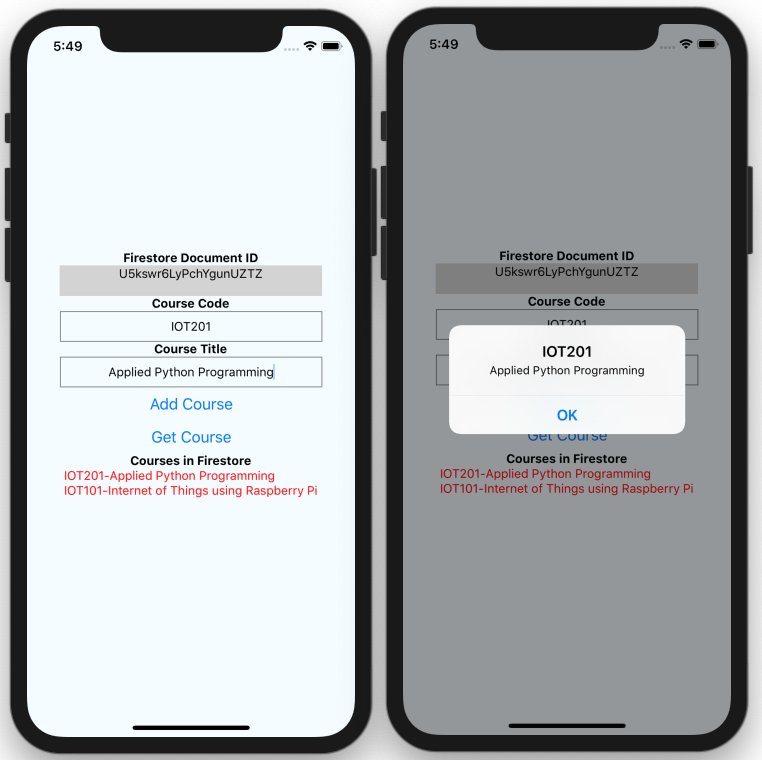
Refresh the iPhone Simulator. Add a new document by entering the information as shown in Figure 25 and click the Add Course link. When the document has been added successfully (when you see the document ID displayed at the top), click the Get Course link. You should see an alert showing the document that you have just added.
Retrieving All Documents
If you want to retrieve all the documents in a collection, you can simply use the get() function. Add the statements in bold to the App.js file as shown in Listing 6. Once the documents are fetched, you can iterate through each of them individually:
  getAllCourses() {
    this.ref
    .get()
    .then(function(querySnapshot) {
      str = "";
      querySnapshot.forEach(function(document) {
        doc = document.data();
        str += document.id + "\n" +
          doc.CourseCode + " - " +
          doc.CourseTitle + "\n\n";
      });
      Alert.alert("All Courses", str);
    });
  }
Refresh the iPhone Simulator. Click the Get All Courses link and you should see all the courses as shown in Figure 26.
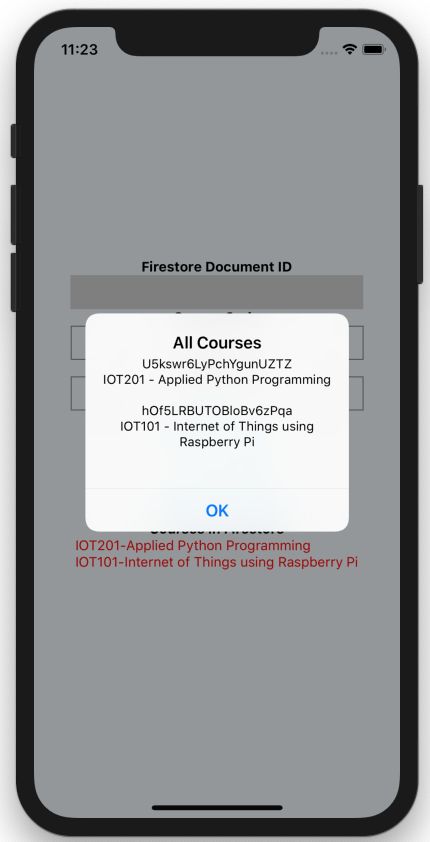
Performing Queries
Earlier, you saw how to retrieve a document based on its document reference ID. However, sometimes you don't have the ID and you need to perform a query to retrieve the relevant documents.
Add the statements in bold to the App.js file as shown in Listing 7.
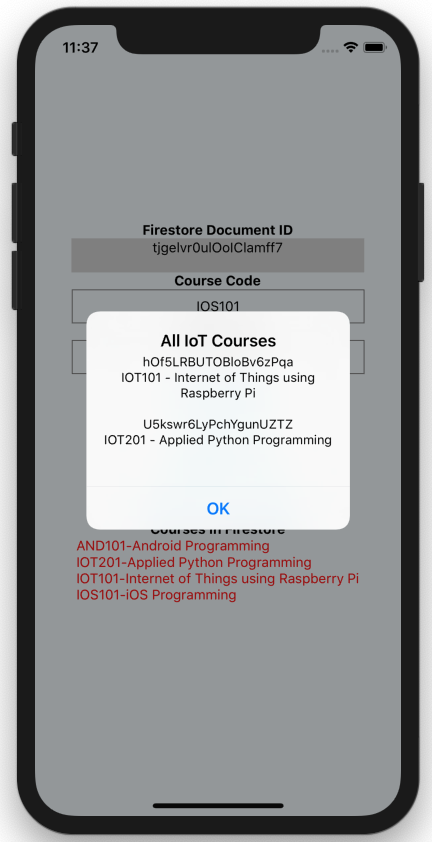
In this example, you want to retrieve all the courses that have the course code starting with the word “IOT”. You use the where() function to specify the condition for the query:
  getAllIOTCourses() {
    this.ref
      .where("CourseCode", ">=", "IOT")
      .where("CourseCode", "<", "IOU")
      .get()
      .then(function(querySnapshot) {
        str = "";
        querySnapshot.forEach(function(document)
        {
          doc = document.data();
          str += document.id + "\n" +
            doc.CourseCode + " - " +
            doc.CourseTitle + "\n\n";
        });
        Alert.alert("All IoT Courses", str);
      });
  }
Refresh the iPhone Simulator. Go ahead and add a few more documents. Click on the Get All IoT Courses link and you will see all courses that has course code starting with the word “IOT” (see Figure 27).
Updating a Document
To update a document, you need the document reference ID of the document.
Add the statements in bold to the App.js file, as shown in Listing 8.
To modify a document, you first retrieve the document using the doc() function. You can then update the document using the update() function:
  modifyCourse() {
    //---exit function if id is empty===
    if (this.state.id == "") return;

    //---get a reference to the document---
    var doc = this.ref.doc(this.state.id);
    doc.update(
      {
        CourseCode : this.state.coursecode,
        CourseTitle : this.state.coursetitle,
      }
    )
    .then((document) => {
      Alert.alert("Document modified");
    })
    .catch(function(error) {
      console.error(
        "Error modifying document: ",
        error);
    });
  }
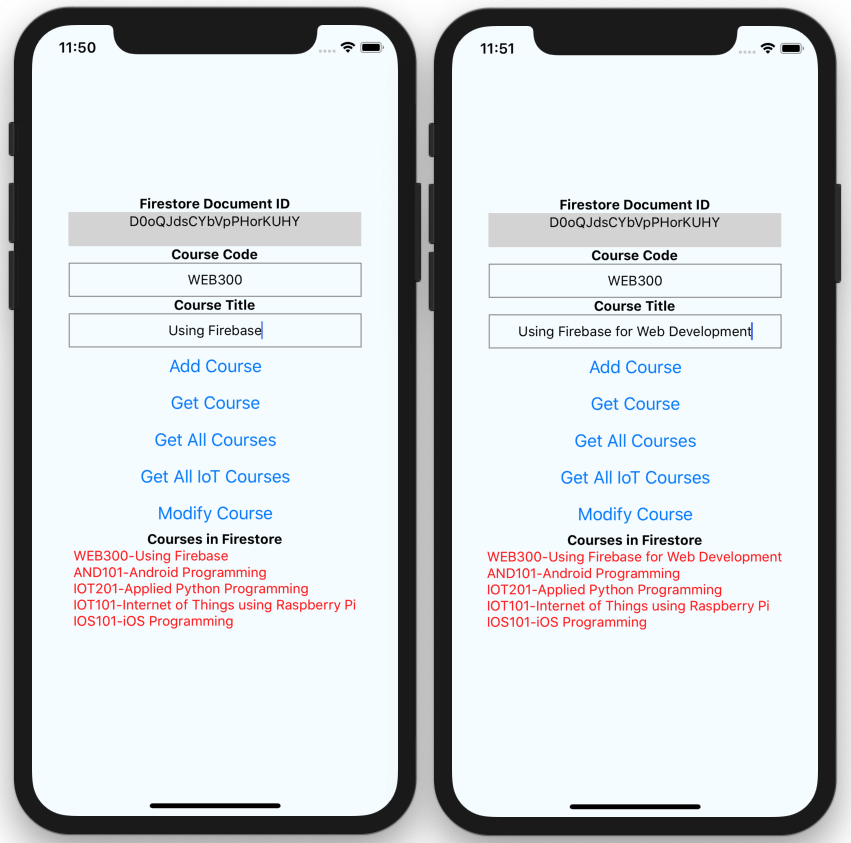
Refresh the iPhone Simulator. Add a new document by entering the information as shown below and click the Add Course link. When the document has been added successfully (when you see the document ID displayed at the top), make some changes to the course title and click the Modify Course link. When the changes have been successfully applied, you'll see it updated automatically in the list (see Figure 28).
Deleting a Document
Finally, you'll learn how to delete a document.
Add the statements in bold to the App.js file, as shown in Listing 9. To delete a document, get a reference to it using the document reference ID, and use the delete() function:
  deleteCourse() {
    //---exit function if id is empty===
    if (this.state.id == "") return;
    //---get a reference to the document---
    var doc = this.ref.doc(this.state.id);
    doc.delete()
      .then((document) => {
        Alert.alert("Document deleted");
        //---update the state---
        this.setState(
          {
            id          : "",
            coursecode  : "",
            coursetitle : ""
          }
        );
      })
      .catch(function(error) {
        console.error(
          "Error removing document: ",
          error);
      });
  }
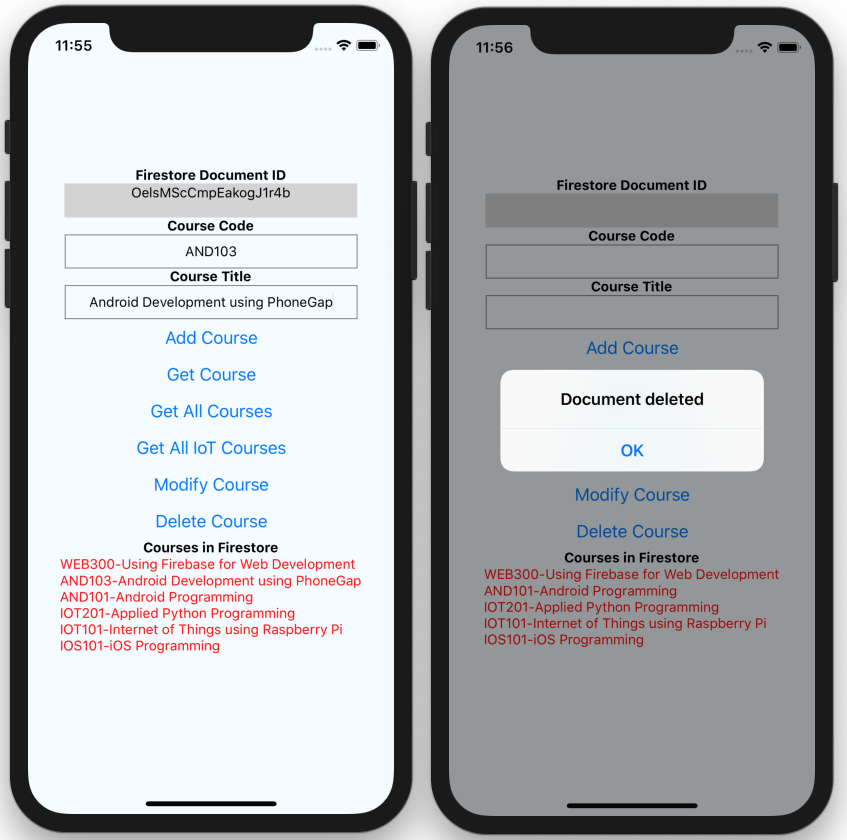
Refresh the iPhone Simulator. Add a new document by entering the information as shown in Figure 29 and click the Add Course link. When the document has been added successfully (when you see the document ID displayed at the top), click the Delete Course link to delete the document.
Summary
In this article, you learned the basics of the Cloud Firestore, which is one of the various services in Firebase. Using Cloud Firestore, you can store your data on the cloud without needing to worry about hosting your own back-end database—all of the services you need are taken care of. There's much more to learn about Cloud Firestore, but hopefully this article got you on the right track. Let me know how you are using Cloud Firestore.
Listing 1: Getting a reference to the collection on the Cloud Firestore
import React, {Component} from 'react';
import {Platform, StyleSheet, Text, View} from 'react-native';

import * as firebase from 'firebase';
import 'firebase/firestore';
import config from './config';

const instructions = Platform.select({
  ios: 'Press Cmd+R to reload,\n' +
       'Cmd+D or shake for dev menu',
  android:
    'Double tap R on your keyboard to reload,\n' +
    'Shake or press menu button for dev menu',
});

type Props = {};
export default class App extends Component<Props> {

  constructor() {
    super();
    this.ref = firebase.firestore().collection('courses');
  }

  render() {
    return (
      <View style={styles.container}>
        <Text style={styles.welcome}>
            Welcome to React Native!</Text>
        <Text style={styles.instructions}>
            To get started, edit App.js</Text>
        <Text style={styles.instructions}>{instructions}
        </Text>
      </View>
    );
  }
}

const styles = StyleSheet.create({
  container: {
    flex: 1,
    justifyContent: 'center',
    alignItems: 'center',
    backgroundColor: '#F5FCFF',
  },
  welcome: {
    fontSize: 20,
    textAlign: 'center',
    margin: 10,
  },
  instructions: {
    textAlign: 'center',
    color: '#333333',
    marginBottom: 5,
  },
});
Listing 2: Building the user interface for the application
import React, {Component} from 'react';
import {Platform, StyleSheet, Text, View,
        TextInput, Button, Alert} from 'react-native';

import * as firebase from 'firebase';
import 'firebase/firestore';
import config from './config';

const instructions = Platform.select({
  ios: 'Press Cmd+R to reload,\n' + 'Cmd+D or shake for dev menu',
  android:
    'Double tap R on your keyboard to reload,\n' +
    'Shake or press menu button for dev menu',
});

type Props = {};
export default class App extends Component<Props> {

  constructor() {
    super();
    this.ref = firebase.firestore().collection('courses');

    this.state = {
      id          : "",
      coursecode  : "",
      coursetitle : "",
      courses     : ""
    };
  }

  render() {
    return (
      <View style={styles.container}>
        <Text style={{fontWeight:"bold"}}>
          Firestore Document ID
        </Text>
        <Text style={styles.idContainer}>
          {this.state.id}
        </Text>

        <Text style={{fontWeight:"bold"}}>
          Course Code
        </Text>
        <View>
          <TextInput
            style={styles.inputContainer}
            onChangeText={(coursecode) =>
              this.setState({coursecode})}
            value={this.state.coursecode} />
        </View>
        <Text style={{fontWeight:"bold"}}>
          Course Title
        </Text>
        <View>
          <TextInput
            style={styles.inputContainer}
            onChangeText={(coursetitle) =>
              this.setState({coursetitle})}
            value={this.state.coursetitle} />
        </View>

        <Button
          onPress={() => this.addCourse()}
          title="Add Course" />

        <Text style={{fontWeight:"bold"}}>
          Courses in Firestore
        </Text>
        <Text style={{color:"red"}}>
          {this.state.courses}
        </Text>
      </View>
    );
  }
}

const styles = StyleSheet.create({
  container: {
    flex: 1,
    justifyContent: 'center',
    alignItems: 'center',
    backgroundColor: '#F5FCFF',
  },
  welcome: {
    fontSize: 20,
    textAlign: 'center',
    margin: 10,
  },
  instructions: {
    textAlign: 'center',
    color: '#333333',
    marginBottom: 5,
  },
  inputContainer: {
    textAlign: 'center',
    height: 35,
    width:300,
    borderColor: 'gray',
    borderWidth: 1,
  },
  idContainer: {
    textAlign: 'center',
    height: 35,
    width:300,
    borderColor: 'lightgrey',
    borderWidth: 1,
    backgroundColor:'lightgrey'
  },
});
Listing 3: Subscribing to changes in the collection
...
type Props = {};
export default class App extends Component<Props> {

  constructor() {
    super();
    this.ref = firebase.firestore().collection('courses');

    this.state = {
      id          : "",
      coursecode  : "",
      coursetitle : "",
      courses     : ""
    };

    //---subscribing to collection updates---
    this.ref.onSnapshot(this.onCollectionUpdate);
  }

  //---fired whenever someone adds a document to
  // the collection---
  onCollectionUpdate = (querySnapshot) => {
    courses = "";
    querySnapshot.forEach((doc) => {
      courses += doc.data().CourseCode + "-" +
                 doc.data().CourseTitle + "\n";
    });
    //---update the state so that the courses can
    // be refreshed---
    this.setState(
      {
        courses: courses
      }
    );
  }

  render() {
    ...
Listing 4: Adding a new document to the collection
  ...
  //---fired whenever someone adds a document to
  // the collection---
  onCollectionUpdate = (querySnapshot) => {
    courses = "";
    querySnapshot.forEach((doc) => {
      courses += doc.data().CourseCode + "-" +
                 doc.data().CourseTitle + "\n";
    });
    //---update the state so that the courses can
    // be refreshed---
    this.setState(
      {
        courses: courses
      }
    );
  }

  addCourse() {
    //---add a new document to the collection---
    this.ref.add({
      CourseCode : this.state.coursecode,
      CourseTitle : this.state.coursetitle,
    })
    .then((docRef) => {  // the callback has a different
                         // context than the object you
                         // are working with, hence you
                         // need use an arrow function in
                         // order to access the state object
      //---update the id---
      this.setState(
      {
        id:docRef.id
      });
    })
    .catch(function(error) {
      Alert.alert("Status", "Error adding document: " + error);
    });
  }

  render() {
  ...
Listing 5: Retrieving a document from a collection
  ...
  addCourse() {
    ...
  }

  getCourse() {
    //---exit function if id is empty===
    if (this.state.id == "") return;

    //---get a reference to the document---
    var docRef = this.ref.doc(this.state.id);
    docRef.get()
    .then(function(doc) {
      if (doc.exists) {
          Alert.alert(doc.data().CourseCode,
                      doc.data().CourseTitle);
      } else {
          //---doc.data() will be undefined---
          console.log("Can't find document");
      }
    })
    .catch(function(error) {
        console.log("Error getting document: ", error);
    });
  }

  render() {
    return (
      <View style={styles.container}>
        <Text style={{fontWeight:"bold"}}>
          Firestore Document ID
        </Text>
        <Text style={styles.idContainer}>
          {this.state.id}
        </Text>
        ...
        <Button
          onPress={() => this.addCourse()}
          title="Add Course" />

        <Button
          onPress={() => this.getCourse()}
          title="Get Course" />

        <Text style={{fontWeight:"bold"}}>
          Courses in Firestore
        </Text>
        <Text style={{color:"red"}} >{this.state.courses}</Text>
      </View>
    );
  }
}
Listing 6: Retrieving all documents from a collection
  ...
  getCourse() {
    ...
  }

  getAllCourses() {
    this.ref
    .get()
    .then(function(querySnapshot) {
      str = "";
      querySnapshot.forEach(function(document) {
        doc = document.data();
        str += document.id + "\n" +
          doc.CourseCode + " - " + doc.CourseTitle + "\n\n";
      });
      Alert.alert("All Courses", str);
    });
  }

  render() {
    return (
      <View style={styles.container}>
        <Text style={{fontWeight:"bold"}}>
          Firestore Document ID
        </Text>
        <Text style={styles.idContainer} >{this.state.id}</Text>
          ...
        <Button
          onPress={() => this.getCourse()}
          title="Get Course" />

        <Button
          onPress={() => this.getAllCourses()}
          title="Get All Courses" />

        <Text style={{fontWeight:"bold"}}>
          Courses in Firestore
        </Text>
        <Text style={{color:"red"}} >{this.state.courses}</Text>
      </View>
    );
  }
}
Listing 7: Performing query on a collection
  ...
  getAllCourses() {
    ...
  }

  getAllIOTCourses() {
    this.ref
      .where("CourseCode", ">=", "IOT")
      .where("CourseCode", "<", "IOU")
      .get()
      .then(function(querySnapshot) {
        str = "";
        querySnapshot.forEach(function(document) {
          doc = document.data();
          str += document.id + "\n" +
            doc.CourseCode + " - " +
            doc.CourseTitle + "\n\n";
        });
        Alert.alert("All IoT Courses", str);
      });
  }

  render() {
    return (
      <View style={styles.container}>
        <Text style={{fontWeight:"bold"}}>
          Firestore Document ID
        </Text>
        <Text style={styles.idContainer}>
          {this.state.id}
        </Text>
          ...
        <Button
          onPress={() => this.getAllCourses()}
          title="Get All Courses" />

        <Button
          onPress={() => this.getAllIOTCourses()}
          title="Get All IoT Courses" />

        <Text style={{fontWeight:"bold"}}>
          Courses in Firestore
        </Text>
        <Text style={{color:"red"}} >{this.state.courses}</Text>
      </View>
    );
  }
}
Listing 8: Modifying a document in a collection
  ...
  getAllIOTCourses() {
    ...
  }

  modifyCourse() {
    //---exit function if id is empty===
    if (this.state.id == "") return;

    //---get a reference to the document---
    var doc = this.ref.doc(this.state.id);
    doc.update(
      {
        CourseCode : this.state.coursecode,
        CourseTitle : this.state.coursetitle,
      }
    )
    .then((document) => {
      Alert.alert("Document modified");
    })
    .catch(function(error) {
      console.error("Error modifying document: ", error);
    });
  }

  render() {
    return (
      <View style={styles.container}>
        <Text style={{fontWeight:"bold"}}>
          Firestore Document ID
        </Text>
        <Text style={styles.idContainer} >{this.state.id}</Text>

        ...

        <Button
          onPress={() => this.getAllIOTCourses()}
          title="Get All IoT Courses" />

        <Button
          onPress={() => this.modifyCourse()}
          title="Modify Course" />

        <Text style={{fontWeight:"bold"}}>
          Courses in Firestore
        </Text>
        <Text style={{color:"red"}} >{this.state.courses}</Text>
      </View>
    );
  }
}
Listing 9. Deleting a document from a collection
  ...
  modifyCourse() {
    ...
  }

  deleteCourse() {
    //---exit function if id is empty===
    if (this.state.id == "") return;

    //---get a reference to the document---
    var doc = this.ref.doc(this.state.id);
    doc.delete()
      .then((document) => {
        Alert.alert("Document deleted");

        //---update the state---
        this.setState(
          {
            id          : "",
            coursecode  : "",
            coursetitle : ""
          }
        );
      })
      .catch(function(error) {
        console.error("Error removing document: ", error);
      });
  }

  render() {
    return (
      <View style={styles.container}>
        <Text style={{fontWeight:"bold"}}>
          Firestore Document ID
        </Text>
        <Text style={styles.idContainer} >{this.state.id}</Text>
          ...
        <Button
          onPress={() => this.modifyCourse()}
          title="Modify Course" />

        <Button
          onPress={() => this.deleteCourse()}
          title="Delete Course" />

        <Text style={{fontWeight:"bold"}}>
          Courses in Firestore
        </Text>
        <Text style={{color:"red"}} >{this.state.courses}</Text>
      </View>
    );
  }
}
