


When building any kind of application, it's important to start with a good architecture, a set of reusable helper classes, and design patterns. In this first of a multi-part series of articles, you'll learn to use a message broker to eliminate strong coupling between classes. You'll see how to display status and informational messages to the user while resources are loading. Instead of having a ton of open windows, you'll learn to load user controls onto a single window and how to aggregate controls and build large screens.
This article is the first in a multi-part series on how to create a WPF business application. Instead of starting completely from scratch, I've created a starting architecture that you can learn about by reading the blog post entitled “An Architecture for WPF Applications” located at https://pdsa.com/blog. Download the samples that go along with the blog post to follow along step-by-step with this article. This series of articles is also a Pluralsight.com course that you may view at https://bit.ly/2SjwTeb.
Related Articles
- A Design Pattern for Building WPF Business Applications: Part 2
- A Design Pattern for Building WPF Business Applications: Part 3
- A Design Pattern for Building WPF Business Applications: Part 4
Create a Message Display Area
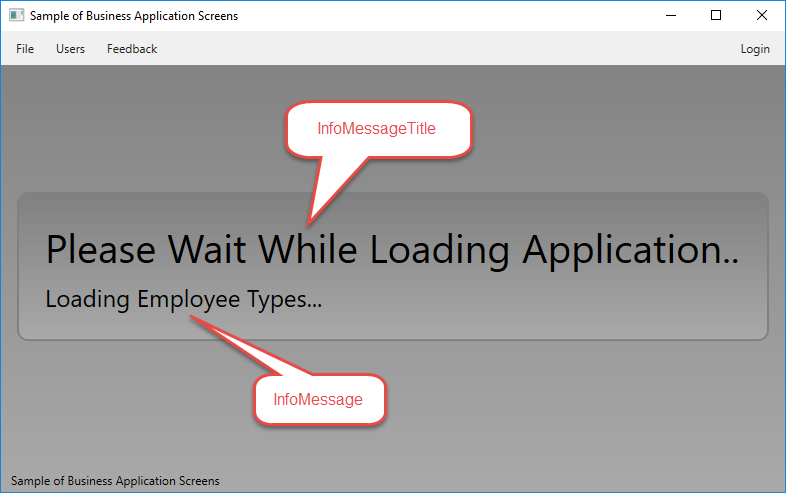
On the main window, you're going to create a Border control with a couple of text block controls on which you can display messages, as shown in Figure 1. You can use this message area for displaying messages while your application loads. You can also use it to display informational messages that automatically disappear after a few seconds.
Add Properties to Display Messages
If you haven't already done so, download the samples for this article so you can follow along. Open the solution file included in the sample files, go to the project WPF.Sample.ViewModelLayer, and open the MainWindowViewModel.cs file. This View Model class is bound to the MainWindow class, so any messages to display or controls you need to manipulate require you to add properties in this View Model class.
As seen in Figure 1, a large and a small message may be displayed within the message area. These messages are displayed within a border that appears in the middle of the MainWindow. Add three properties (Listing 1) to this class; one to control the visibility of the border (IsInfoMessageVisible), a message for the large title message (InfoMessageTitle), and the small message (InfoMessage), as shown in Figure 1.
Listing 1: Add three properties to help you display messages on the main window
private bool _IsInfoMessageVisible = true;
private string _InfoMessageTitle = string.Empty;
private string _InfoMessage = string.Empty;

public bool IsInfoMessageVisible
{
    get { return _IsInfoMessageVisible; }
    set
    {
        _IsInfoMessageVisible = value;
        RaisePropertyChanged("IsInfoMessageVisible");
    }
}

public string InfoMessage
{
    get { return _InfoMessage; }
    set
    {
        _InfoMessage = value;
        RaisePropertyChanged("InfoMessage");
    }
}

public string InfoMessageTitle
{
    get { return _InfoMessageTitle; }
    set
    {
        _InfoMessageTitle = value;
        RaisePropertyChanged("InfoMessageTitle");
    }
}
Set the Starting Message to Display
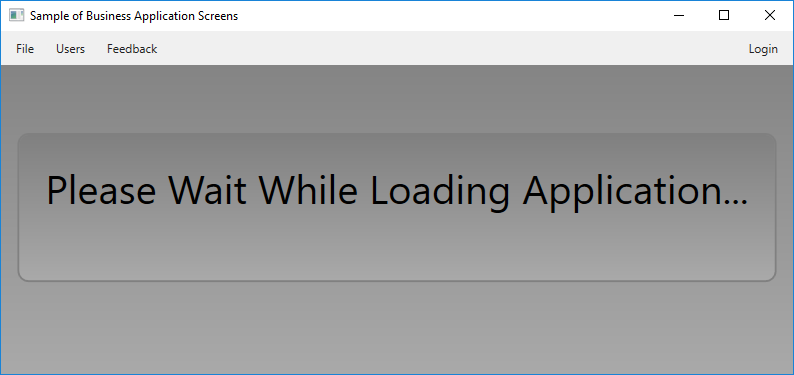
After entering the properties in the MainWindowViewModel class, build the project. Open the MainWindow.xaml file and locate the <Window.Resources> element. Add the property, InfoMessageTitle, on the View Model object created in the <Window.Resources> element. Set the value of the InfoMessageTitle property to "Please Wait While Loading Application...". This message displays in the large text block in the message area.
<Window.Resources>
  <vm:MainWindowViewModel x:Key="viewModel"
                          InfoMessageTitle="Please Wait While Loading Application..."
                          StatusMessage="Sample of Business Application Screens" />
</Window.Resources>
Add XAML to Display Messages
Add a <Border> element after the closing </Menu> element. The <Border> is the splash screen/informational message area used to display messages to the user. In the next code snippet is the XAML to enter.
<!-- Informational Message Area -->
<Border Grid.Row="1"
        Panel.ZIndex="2"
        Visibility="{Binding Path=IsInfoMessageVisible, Converter={StaticResource visibilityConverter}}"
        Style="{StaticResource infoMessageArea}">
  <StackPanel>
    <TextBlock FontSize="40" Text="{Binding Path=InfoMessageTitle}" />
    <TextBlock FontSize="24" Text="{Binding Path=InfoMessage}" />
  </StackPanel>
</Border>
Try It Out
Save all of your changes and run the application. When the application starts, you should see a screen that looks like Figure 2. Once you verify that the message is displayed, close the application and return to Visual Studio.
Access View Model in the Code Behind
WPF creates an instance of your MainWindowViewModel class because you created an element referencing it in the <Window.Resources> element. You're going to want to use that instance of the MainWindowViewModel from the code-behind of the MainWindow class. You can do that by opening the MainWindows.xaml.cs file and adding a new Using statement to reference the View Model namespace. Besides that namespace, also add one to System and to System.Windows.Threading. You're going to use classes from these namespaces as well.
using System;
using System.Windows.Threading;
using WPF.Sample.ViewModelLayer;
Add a private variable in the MainWindow class that is of the type MainWindowViewModel, as shown in the following code snippet.
// Main window's view model class
private MainWindowViewModel _viewModel = null;
Modify the MainWindow constructor to set this private variable to the instance of the View Model created by XAML. Access the Resources collection of the main window and locate the key with the name of viewModel. Cast the resource returned as a MainWindowViewModel class and assign it to the _viewModel variable.
public MainWindow()
{
    InitializeComponent();

    // Connect to instance of the view model created by the XAML
    _viewModel = (MainWindowViewModel)this.Resources["viewModel"];
}
Remove Messages After a Few Seconds
To remove the messages after a few seconds, you'd think you could just add a Thread.Sleep(2000) to the Window_Loaded event procedure, then set the IsInfoMessageVisible property to false to make the informational message area disappear as shown below.
private void Window_Loaded(object sender, RoutedEventArgs e)
{
    // NOTE: This does NOT work
    System.Threading.Thread.Sleep(2000);
    _viewModel.IsInfoMessageVisible = false;
}
However, because WPF has only one thread of execution, the UI hasn't completely rendered fully when the Loaded event runs. So, if you execute the above code, you'll see the main window, but not the informational message area.
To solve this problem, use the Dispatcher class. The Dispatcher class allows you to invoke a separate thread of execution in the background. This allows the UI to continue to draw, while other code is now executing on a separate thread. This separate thread is where you may now sleep for two seconds, then set the IsInfoMessageVisible property to false. Of course, in a real application, it's in this code that you load any resources you need or perform other tasks while the user is seeing the message on the screen. Open the MainWindow.xaml file and add a Loaded event.
Loaded="Window_Loaded"
Write the following code in the Window_Loaded event to display a message for two seconds. Because you're using the await keyword, you need to mark the Window_Loaded event procedure with the async keyword.
private async void Window_Loaded(object sender, RoutedEventArgs e)
{
    await Dispatcher.BeginInvoke(new Action(() => {
        System.Threading.Thread.Sleep(2000);
        _viewModel.IsInfoMessageVisible = false;
    }), DispatcherPriority.Background);
}
Try It Out
Run the application again and you should now see the message displayed, and then the message disappears after a couple of seconds.
Load Resources in the Background
As mentioned previously, there's only one thread of execution. Thus, if you were to start making a bunch of calls to load data from a database, the UI wouldn't be able to redraw. You want to be able to inform the user of what you're doing while loading data in the background. To do this, you're going to take advantage of the Dispatcher class again. However, let's first create some methods that simulate loading of data. Open the MainWindowViewModel.cs file and add a constant for how long you want to simulate a load process happening.
private const int SECONDS = 1500;
Add three methods to simulate loading some global resources. It's in here that you eventually write code to hit a database, or maybe call a Web API to retrieve data. To keep this article simple, simulate the retrieval process by just sleeping the number of milliseconds you put in the constant SECONDS.
public void LoadStateCodes()
{
    // TODO: Write code to load state codes
    System.Threading.Thread.Sleep(SECONDS);
}

public void LoadCountryCodes()
{
    // TODO: Write code to load country codes
    System.Threading.Thread.Sleep(SECONDS);
}

public void LoadEmployeeTypes()
{
    // TODO: Write code to load employee types
    System.Threading.Thread.Sleep(SECONDS);
}
Add a method to clear the informational message properties after all the global resources have been loaded. This method also makes the informational message area invisible by setting the IsInfoMessageVisible property to false.
public void ClearInfoMessages()
{
    InfoMessage = string.Empty;
    InfoMessageTitle = string.Empty;
    IsInfoMessageVisible = false;
}
Display Messages While Loading Resources
Let's now create a method to call each of the three methods you added to the View Model class. Open the MainWindow.xaml.cs file and add a new using statement.
using System.Threading.Tasks;
Add a method named LoadApplication() in the MainWindow class. You'll find it in Listing 2.
Listing 2: Create an asynchronous method to call your loading methods in your view model
public async Task LoadApplication()
{
    _viewModel.InfoMessage = "Loading State Codes...";
    await Dispatcher.BeginInvoke(new Action(() => {
        _viewModel.LoadStateCodes();
    }), DispatcherPriority.Background);

    _viewModel.InfoMessage = "Loading Country Codes...";
    await Dispatcher.BeginInvoke(new Action(() => {
        _viewModel.LoadCountryCodes();
    }), DispatcherPriority.Background);

    _viewModel.InfoMessage = "Loading Employee Types...";
    await Dispatcher.BeginInvoke(new Action(() => {
        _viewModel.LoadEmployeeTypes();
    }), DispatcherPriority.Background);
}
In Listing 2, set the InfoMessage property to "Loading State Codes...". Use the Dispatcher class to call the LoadStateCodes() method in the view model. As this takes place on a separate thread of execution, the message can update on the message area of the main window. Next, the InfoMessage property is set to "Loading Country Codes...", followed by another call through the Dispatcher class. You can perform this code over and over until all your global resources are loaded.
Call the LoadApplication() method from the Window_Loaded event. Delete the other code within the Window_Loaded event and replace it with the code shown in the following code snippet.
private async void Window_Loaded(object sender, RoutedEventArgs e)
{
    // Call method to load resources application
    await LoadApplication();

    // Turn off informational message area
    _viewModel.ClearInfoMessages();
}
Try It Out
Run the application and you should see each of your messages appear in the informational message area. Each message disappears after about 1.5 seconds.
Load User Controls Dynamically in WPF
As your application grows larger, you're going to have a lot of user controls and/or windows to display. Instead of having a large switch...case statement to load each of these individually, you can take advantage of Reflection to dynamically load each. Let's add three user controls that can be called from the menu system. The complete name of the control is going to be stored in the Tag property of each menu item.
As your application grows larger, you're going to have a lot of user controls and/or windows to display.
Add a Login Control
Right mouse-click on the WPF.Sample project and add a new folder named UserControls. Right mouse-click on the new UserControls folder and select Add > User Control... from the menu. Set the name of this new user control to LoginControl.xaml and press the Add button. Add a Style attribute to the <UserControl> element as shown below.
<UserControl x:Class="WPF.Sample.UserControls.LoginControl"
             xmlns="..."
             ...
             Style="{StaticResource screenStyle}">
  <Grid>

  </Grid>
</UserControl>
Remove the <Grid> element in the user control and replace it with a Border control. Within the Border control, add a TextBlock control to display the name of this user control. Later in this article series, you're going to build a complete log in UI to ask a user to log in with. For now, let's just add a placeholder with some text to display.
<Border Style="{StaticResource screenBorder}">
  <TextBlock Text="Login Screen" FontSize="18" Margin="20,80" />
</Border>
Add a User Feedback Control
Right mouse-click on the UserControls folder and select Add > User Control... Set the name to UserFeedbackControl.xaml and press the Add button. Add a Style attribute to the <UserControl> element just like you did with the Login user control.
Style="{StaticResource screenStyle}"
Remove the <Grid> element in the user control and replace it with a Border control. Within the Border control, add a TextBlock control to display the name of this user control. Later in this article series, you're going to build a complete UI for this user feedback screen.
<Border Style="{StaticResource screenBorder}">
  <TextBlock Text="User Feedback Screen" FontSize="18" Margin="20,80" />
</Border>
Add User Maintenance Control
Right mouse-click on the UserControls folder and select Add > User Control... Set the name to UserMaintenanceControl.xaml and press the Add button. Add the Style attribute to the <UserControl> element just like you did with the previous two controls.
Style="{StaticResource screenStyle}"
Remove the <Grid> element in the user control and replace it with a Border control. Within the Border control, add a TextBlock control to display the name of this user control.
<Border Style="{StaticResource screenBorder}">
  <TextBlock Text="User Maintenance Screen" FontSize="18" Margin="20,80" />
</Border>
Because you created each of these user controls within the UserControls folder, the fully qualified type of each control is the following:
- WPF.Sample.UserControls.LoginControl
- WPF.Sample.UserControls.UserFeedbackControl
- WPF.Sample.UserControls.UserMaintenanceControl
To instantiate each of these controls using Reflection, you're going to use each of the above names.
Dynamically Create User Controls
Each control in WPF has a Tag property. This property is of the data type Object and isn't used by WPF. This means that you can use it for whatever you want. You're going to use it for either a command to execute or for the name of a user control to create dynamically.
First, add a Tag property to the Exit menu and set it to simply “exit”. This is a specific command to execute. Open the MainWindow.xaml and add the Tag property as shown below.
<MenuItem Header="E_xit" Tag="exit" Click="MenuItem_Click" />
For each user control you're going to create, locate the appropriate menu item, and add the Tag property. Place the complete namespace and control name within the Tag property.
<MenuItem Header="Users" Click="MenuItem_Click" Tag="WPF.Sample.UserControls.UserMaintenanceControl" />
<MenuItem Header="Feedback" Click="MenuItem_Click" Tag="WPF.Sample.UserControls.UserFeedbackControl" />
<MenuItem Header="Login" HorizontalAlignment="Right" Click="MenuItem_Click" Tag="WPF.Sample.UserControls.LoginControl" />
Display User Controls on the Main Window
Open the MainWindow.xaml file and notice that just below the Border control you added for the information messages, there's a Grid control with the name set to contentArea.
<!-- Content Area -->
<Grid Grid.Row="1" Panel.ZIndex="1" Name="contentArea" Style="{StaticResource contentAreaStyle}" />
It's into this area you're going to display all of your screens. Instead of having multiple windows open and cluttering your desktop, you're going to keep all screens displayed within the main window. Each screen you create is going to be a user control. Thus, each WPF application you create will generally have many user controls and only a few windows.
Display a User Control
Open the MainWindow.xaml.cs file and add a new method named DisplayUserControl(). This method takes an instance of a user control and adds it to the Grid control named contentArea on the main window.
public void DisplayUserControl(UserControl uc)
{
    // Add new user control to content area
    contentArea.Children.Add(uc);
}
Close a User Control
If you have a method to display a user control, you're going to need a method to close a user control. Add a new method named CloseUserControl(). This method clears the Children collection in the Grid control named contentArea on the main window.
private void CloseUserControl()
{
    // Remove current user control
    contentArea.Children.Clear();
}
Load a User Control Using Reflection
Now that you know how to display and remove a user control from the main window, write code to take the value from the Tag property and create an instance of that user control. Add a new method named LoadUserControl(), as shown in Listing 3. This method uses reflection to load the user control name specified in the Tag property.
Listing 3: The LoadUserControl() method loads a user control using reflection
private void LoadUserControl(string controlName)
{
    Type ucType = null;
    UserControl uc = null;

    // Create a Type from controlName parameter
    ucType = Type.GetType(controlName);
    if (ucType == null)
    {
        MessageBox.Show("The Control: " + controlName + " does not exist.");
    }
    else
    {
        // Close current user control in content area
        CloseUserControl();

        // Create an instance of this control
        uc = (UserControl)Activator.CreateInstance(ucType);
        if (uc != null)
        {
            // Display control in content area
            DisplayUserControl(uc);
        }
    }
}
The code in Listing 3 attempts to get a .NET type by calling Type.GetType() on the string that contains the namespace and user control name. If that's successful, any current control within the content area is closed. Next, the Activator.CreateInstance() method is called with the type returned from the Type.GetType() method to create an instance of this user control. If the user control is created successfully, the DisplayUserControl() method is called, passing in the newly created user control.
Execute a Command or Load a User Control
If you remember, you added a Tag property to the Exit menu item with a value of exit. This isn't the name of a user control. You are going to need another method to process anything that isn't a user control name. Go to the top of the MainWindow class and add a new using statement:
using System.Windows.Controls;
Next, add a new method named ProcessMenuCommands() to the MainWindow class. This method is going to handle any commands within the Tag property. Create a switch statement within this method to process the exit command. As your application grows, you'll have other commands to process.
private void ProcessMenuCommands(string command)
{
    switch (command.ToLower())
    {
        case "exit":
        this.Close();
        break;
    }
}
Locate the MenuItem_Click() event and modify it to look like Listing 4. In this event procedure, check to see if the Tag contains a period. If it does, assume that you have a user control to load. Each fully qualified user control needs to be in the format of namespace.controlname; thus if you have a period in the Tag property, assume that you need to load a user control. Call the LoadUserControl() method passing in the value from the Tag property to display that user control. If there isn't a period, assume that it's a command like exit and call the ProcessMenuCommands() method passing in the value from the Tag property.
Listing 4: The MenuItem_Click event determines whether to process a command or load a user control
private void MenuItem_Click(object sender, RoutedEventArgs e)
{
    MenuItem mnu = (MenuItem)sender;
    string cmd = string.Empty;

    // The Tag property contains a command or the name of a user control to load
    if (mnu.Tag != null)
    {
        cmd = mnu.Tag.ToString();
        if (cmd.Contains("."))
        {
            // Display a user control
            LoadUserControl(cmd);
        }
        else
        {
            // Process special commands
            ProcessMenuCommands(cmd);
        }
    }
}
Try It Out
Now that you have a command and some user controls to process from the menu items on the main window, let's try it out. Open the MainWindowViewModel.cs file and modify the constant named SECONDS to a value of 500. This eliminates a little wait time when you're starting the application. Run the WPF application and click on each of the menu items to see each user control displayed. Click on the Exit menu item and the application should close.
Don't Load a User Control Twice
If the user clicks on the Feedback menu and then clicks on it again, you don't want to load the same control twice. Write a method, named ShouldLoadUserControl(), to check whether the current user control loaded into the content area is the same one the user is trying to load.
private bool ShouldLoadUserControl(string controlName)
{
    bool ret = true;

    // Don't reload a control already loaded.
    if (contentArea.Children.Count > 0)
    {
        if (((UserControl)contentArea.Children[0]).GetType().FullName == controlName)
        {
            ret = false;
        }
    }

    return ret;
}
Locate the LoadUserControl() method and wrap the code within an if statement. The if statement calls the ShouldLoadUserControl() method, passing in the control name. If it's not the same control, or the contentArea is empty, execute the code to load the new user control to display or the command to execute.
private void LoadUserControl(string controlName)
{
    Type ucType = null;
    UserControl uc = null;

    if (ShouldLoadUserControl(controlName))
    {
        // ALL OTHER CODE GOES HERE
    }
}
Close Screens from View Models
So far, you've learned how to display a user control on the main window. You also wrote code to close a user control, but from where do you close that control? The best place is from the view model. However, the view model doesn't know anything about the UI, so how do you communicate from the view model to the main window? The answer is a message broker. You can read more about a message broker in this blog post: https://weblogs.asp.net/psheriff/a-communication-system-for-xaml-applications.
Create Login View Model
Just like the main window creates an instance of a view model in XAML, you should do the same thing for all the user controls you add to your project. Right mouse-click on the WPF.Sample.ViewModelLayer project and select Add > Class... from the menu. Set the name of the class to LoginViewModel. Replace the code in this file with the following code snippet.
using Common.Library;

namespace WPF.Sample.ViewModelLayer
{
    public class LoginViewModel : ViewModelBase
    {
    }
}
Bind View Model to Login Control
After you add the view model, build the solution so the new View Model class is available for user. Open the LoginControl.xaml file and add an XML namespace to reference the view model project.
xmlns:vm="clr-namespace:WPF.Sample.ViewModelLayer;assembly=WPF.Sample.ViewModelLayer"
Add a <UserControl.Resources> element and create an instance of the newly created LoginViewModel class.
<UserControl.Resources>
  <vm:LoginViewModel x:Key="viewModel" />
</UserControl.Resources>
Locate the <Border> element you created earlier and move the TextBlock control inside a StackPanel control. Below the TextBlock control add a Button control and create the Click event procedure named CloseButton_Click as shown in the following code snippet.
<Border Style="{StaticResource screenBorder}">
  <StackPanel>
    <TextBlock Text="Login Screen" FontSize="18" Margin="20,80" />
    <Button Content="Close" HorizontalAlignment="Left" Click="CloseButton_Click" />
  </StackPanel>
</Border>
Modify Code-Behind
Open the LoginControl.xaml.cs file and add a using statement so you can use the LoginViewModel class.
using WPF.Sample.ViewModelLayer;
Create a private variable to hold an instance of the LoginViewModel class.
// Login view model class
private LoginViewModel _viewModel = null;
Modify the constructor to assign the instance of the UserFeedbackViewModel created by XAML to the local private variable named _viewModel.
public LoginControl()
{
    InitializeComponent();

    // Connect to instance of the view model
    _viewModel = (LoginViewModel)
    this.Resources["viewModel"];
}
Modify the CloseButton_Click() event to call the Close() method on the View Model class.
private void CloseButton_Click(object sender, RoutedEventArgs e)
{
    _viewModel.Close();
}
In the ViewModelBase.cs class, located in the Common.Library project, there's a method named Close(). This method uses the MessageBroker class to send a “Close User Control” message as shown below.
public virtual void Close(bool wasCancelled = true)
{
    MessageBroker.Instance.SendMessage(MessageBrokerMessages.CLOSE_USER_CONTROL, wasCancelled);
}
Respond to Close Message in Main Window
Most of the messages sent from user controls and view models are going to communicate with the MainWindow class. So write code to respond to the MessageReceived event in the MainWindow. Open the MainWindow.xaml.cs file and add a using statement.
using Common.Library;
Add the code shown below to the constructor. This code connects to the MessageReceived event and hooks it to an event procedure you create in this class.
public MainWindow()
{
    InitializeComponent();

    // Connect to instance of the view model
    _viewModel = (MainWindowViewModel)
    this.Resources["viewModel"];

    // Initialize the Message Broker Events
    MessageBroker.Instance.MessageReceived += Instance_MessageReceived;
}
Add the Instance_MessageReceived event and add the following code to respond to the “Close User Control” message.
private void Instance_MessageReceived(object sender, MessageBrokerEventArgs e)
{
    switch (e.MessageName)
    {
        case MessageBrokerMessages.CLOSE_USER_CONTROL:
            CloseUserControl();
            break;
    }
}
When the CLOSE_USER_CONTROL message is received from the login view model class, the CloseUserControl() method you wrote earlier is called. This method clears the Children collection of the contentArea where the user controls are loaded.
Try It Out
Run the application and click on the Login menu. Click the Close button on this log-in screen and you should see the user control disappear. If you want, set a break point in the CloseButton_Click() and in the Instance_MessageReceived event procedure to see how the message is transmitted from the View Model base class to the main window.
Create Other User Controls and View Models
You now have a design pattern for instantiating a view model by a user control and closing the user control. Use this same design pattern for the user feedback control you created. Right mouse-click on the WPF.Sample.ViewModelLayer project and select Add > Class... from the menu. Set the name of the class to UserFeedbackViewModel. Replace the code in this new file with the following:
using Common.Library;

namespace WPF.Sample.ViewModelLayer
{
    public class UserFeedbackViewModel : ViewModelBase
    {
    }
}
Bind View Model to User Feedback Control
Build the solution and have the user feedback user control create an instance of the UserFeedbackViewModel class. Open the UserFeedbackControl.xaml file and add an XML namespace to reference the view model project.
xmlns:vm="clr-namespace:WPF.Sample.ViewModelLayer;assembly=WPF.Sample.ViewModelLayer"
Add a <UserControl.Resources> element and create an instance of the UserFeedbackViewModel class.
<UserControl.Resources>
  <vm:UserFeedbackViewModel x:Key="viewModel" />
</UserControl.Resources>
Locate the <Border> element you created earlier and move the TextBlock control inside a StackPanel control. Below the TextBlock control, add a Button control, and create the Click event procedure named CloseButton_Click, as shown in the following code snippet.
<StackPanel>
  <TextBlock Text="User Feedback Screen" FontFamily="18" Margin="20,80" />
  <Button Content="Close" HorizontalAlignment="Left" Click="CloseButton_Click" />
</StackPanel>
Modify Code-Behind
Open the UserFeedbackControl.xaml.cs file and add a using statement so you can use the UserFeedbackViewModel class.
using WPF.Sample.ViewModelLayer;
Create a private variable to hold an instance of the UserFeedbackViewModel class.
private UserFeedbackViewModel _viewModel = null;
Modify the constructor to assign the instance of the UserFeedbackViewModel created by XAML to the local private variable named _viewModel.
public ucUserFeedback()
{
    InitializeComponent();

    // Connect to instance of the view model
    _viewModel = (UserFeedbackViewModel)
    this.Resources["viewModel"];
}
Modify the CloseButton_Click() event to call the Close() method on the view model class.
private void CloseButton_Click(object sender, RoutedEventArgs e)
{
    _viewModel.Close(true);
}
Try It Out
Run the application and click on the Feedback menu. Click the Close button and watch the control disappear.
Add User Maintenance Screen View Model
Right mouse-click on the WPF.Sample.ViewModelLayer project and select Add > Class... from the menu. Set the name of the class to UserMaintenanceViewModel. Replace the code in this new file with the following:
using Common.Library;

namespace WPF.Sample.ViewModelLayer
{
    public class UserMaintenanceViewModel : ViewModelBase
    {
    }
}
Bind View Model to User Maintenance Control
Build the solution and have the User Feedback user control create an instance of the UserMaintenanceViewModel class. Open the UserMaintenanceControl.xaml file and add an XML namespace to reference the view model project.
xmlns:vm="clr-namespace:WPF.Sample.ViewModelLayer;assembly=WPF.Sample.ViewModelLayer"
Add a <UserControl.Resources> element and create an instance of the UserMaintenanceViewModel class.
<UserControl.Resources>
  <vm:UserMaintenanceViewModel x:Key="viewModel" />
</UserControl.Resources>
Locate the <Border> element you created earlier and move the TextBlock control inside a StackPanel control. Below the TextBlock control add a Button control and create the Click event procedure named CloseButton_Click as shown in the following code snippet.
<StackPanel>
  <TextBlock Text="User Maintenance Screen" FontFamily="18" Margin="20,80" />
  <Button Content="Close" HorizontalAlignment="Left" Click="CloseButton_Click" />
</StackPanel>
Modify Code-Behind
Open the UserMaintenanceControl.xaml.cs file and add a using statement so you can use the UserMaintenanceViewModel class.
using WPF.Sample.ViewModelLayer;
Create a private variable to hold an instance of the UserMaintenanceViewModel class.
private UserMaintenanceViewModel _viewModel = null;
Modify the constructor to assign the instance of the UserMaintenanceViewModel created by XAML to the local private variable named _viewModel.
public ucUserFeedback()
{
    InitializeComponent();

    // Connect to instance of the view model
    _viewModel = (UserMaintenanceViewModel)
    this.Resources["viewModel"];
}
Modify the CloseButton_Click() event to call the Close() method on the View Model class.
private void CloseButton_Click(object sender, RoutedEventArgs e)
{
    _viewModel.Close(true);
}
Try It Out
Run the application and click on the Users menu. Click the Close button and watch the control disappear.
Summary
In this article, you added an area to your main window to display messages when an application first loads. Using the Dispatcher class, you can display messages while running other code to perform actions in the background. You learned to load user controls dynamically by using the Tag property of menu item controls. A message broker class is useful to send messages from user controls or view models to the main window in order to perform UI actions. This reduces coupling between classes and increases the reusability of your controls and classes. In the next article, you'll learn to display informational messages for a small amount of time and build a log in screen.
