


Server-side development has always been a delicate topic for iOS developers. For many years, iOS developers had to rely on other technologies to build their back-end service, which involved learning other technologies like Ruby on Rails, ASP.NET, Python, PHP, etc. Later, several new platforms evolved, providing easy integration for iOS applications without having to learn a new language. These platforms included Parse, Firebase, and CloudKit.
Parse was once among the most popular back-ends as a service platform and was introduced and maintained by Facebook. A lot of iOS developers flocked to Parse and used it as their back-end service. Unfortunately, few years later, Facebook decided to kill Parse, leaving thousands of developers stranded without a back-end.
Apple introduced the Swift language in 2014 and it instantly became one of the most loved languages by developers. In 2015, Swift went open source, allowing it to run on the cloud. Several server-side Swift frameworks emerged during this time and one of them was from IBM, called Kitura. In this article, I'm going to build a complete Kitura service that can be consumed by iOS, Web, and Android applications.
At present, the three most popular server-side Swift frameworks are Kitura, Vapor, and Perfect. Try them all!
Setting Up a Kitura Project
Kitura projects can be set up using the Swift Package Manager. Before setting up the project, make sure you have Xcode 8 or later installed. The Swift Package Manager is installed by default on Xcode 8 or later and is required to install Kitura packages.
First, create a folder called “hello-kitura” and from inside the folder, run the following command:
swift package init --type executable
This creates a default Swift package project. The project contains the following files.
- Package.swift: This Swift file lists all the packages included in the project.
- main.swift: This is the starting point of the application.
Open the Package.swift file and add a dependency to include the Kitura package, as shown in Listing 1. Once the dependency has been added, you need to update the main.swift file to add the code to start and run the Kitura server. Open the main.swift file and include the implementation, as shown in Listing 2. Next, build the project by executing the swift build command from the terminal. This also downloads any dependencies included in the Package.swift file.
Listing 1: Configuring the Kitura Package
import PackageDescription

let package = Package(
    name: "hello-kitura", dependencies: [
        .Package(url: "https://github.com/IBM-Swift/Kitura.git",
        majorVersion: 1, minor: 7)
    ])
Listing 2: Hello Kitura
import Kitura

// Create a new router
let router = Router()

// Handle HTTP GET requests to /
router.get("/") {
    request, response, next in
    response.send
    ("Hello, World!")
    next()
}

// Add an HTTP server and connect it to the router
Kitura.addHTTPServer
(onPort: 8080, with: router)

// Start the Kitura runloop
(this call never returns)
Kitura.run()
Once the dependencies have been downloaded, run the following command from the terminal to run the application:
.build/debug/hello-kitura
The command won't display anything on the terminal because you don't have any network log framework added to the application. Open a browser and visit the http://localhost:8080/ URL. Port 8080 is the default port on which the Kitura server runs. When you visit the URL, you should see the result shown in Figure 1.
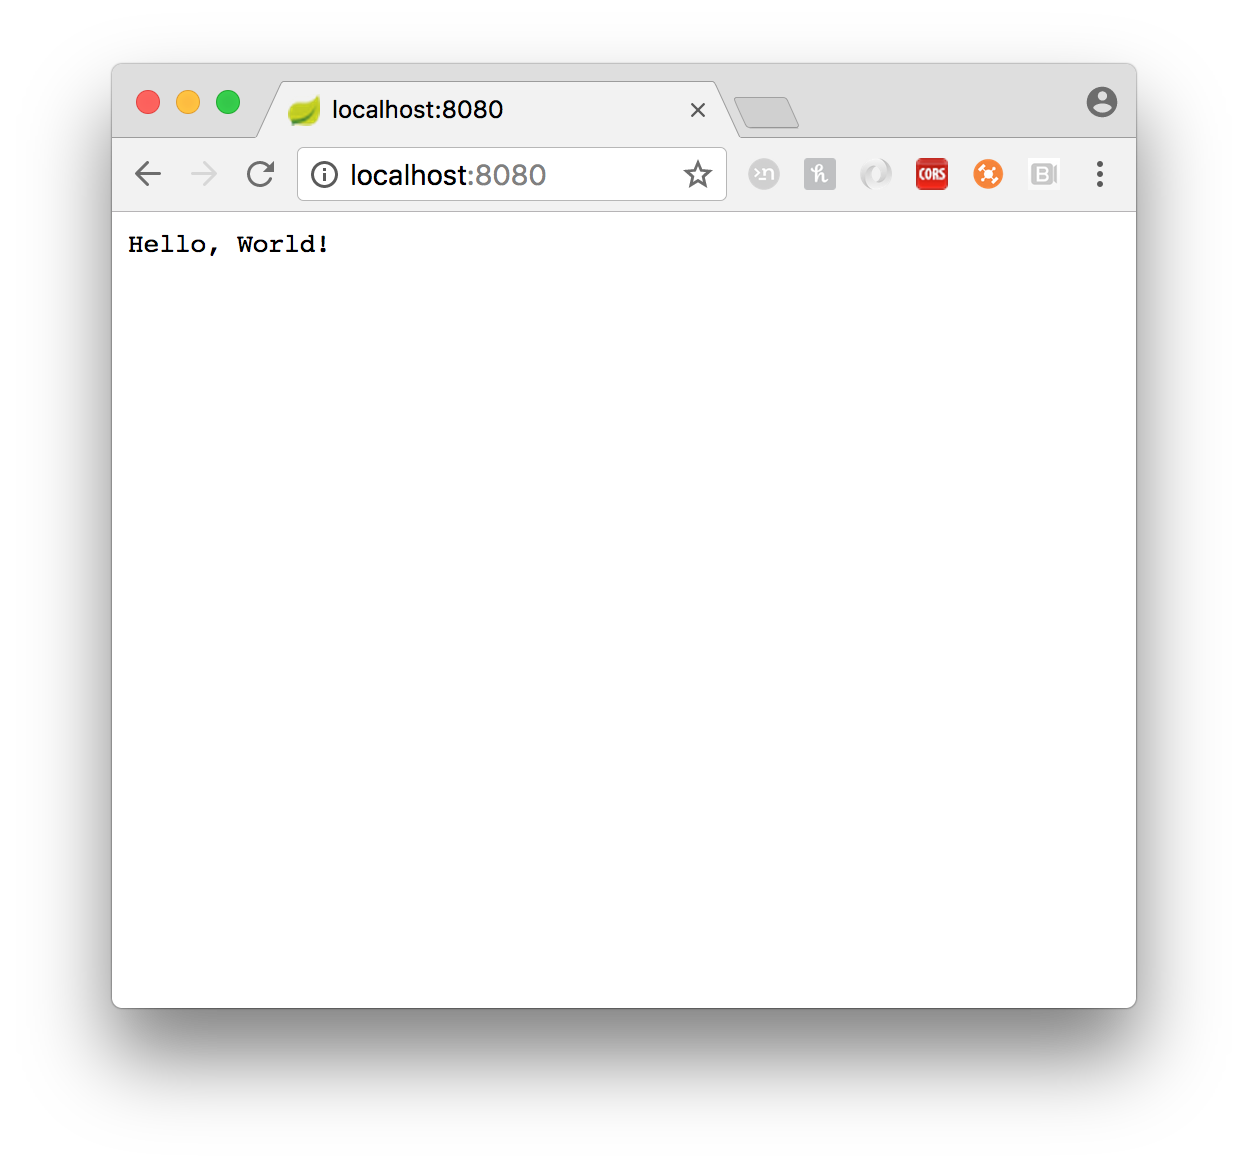
Congratulations! You've just created your first server-side service using the Swift programming language. Before I jump into the next section, let's discuss the implementation in the main.swift file.
The main.swift file is the entry point of the application. After importing the Kitura module, you created an instance of the Router class. The Router class is responsible for initiating networking requests in the Kitura framework.
The get function of the Router class takes a closure as an argument. The closure consists of three parameters: request, response, and next. The parameter definitions are shown below:
- request: The user's request
- response: The response sent from the server
- next: Closure for the continuation of the response
From inside the get closure, you call response.send and the next() closure, which ends the response. It's very important to call either next() or response.end, which end the response.
The project isn't compatible with Xcode. In the next section, you're going to learn how to generate an Xcode project and also configure a logger, so you'll have a better idea what's going on behind the scenes.
Generating an Xcode Project and Configuring Logger
You can create an Xcode project for your Kitura app using the commands provided by the Swift Package Manager. From the terminal inside your project folder, run the following command to generate the Xcode project:
swift package generate-xcodeproj
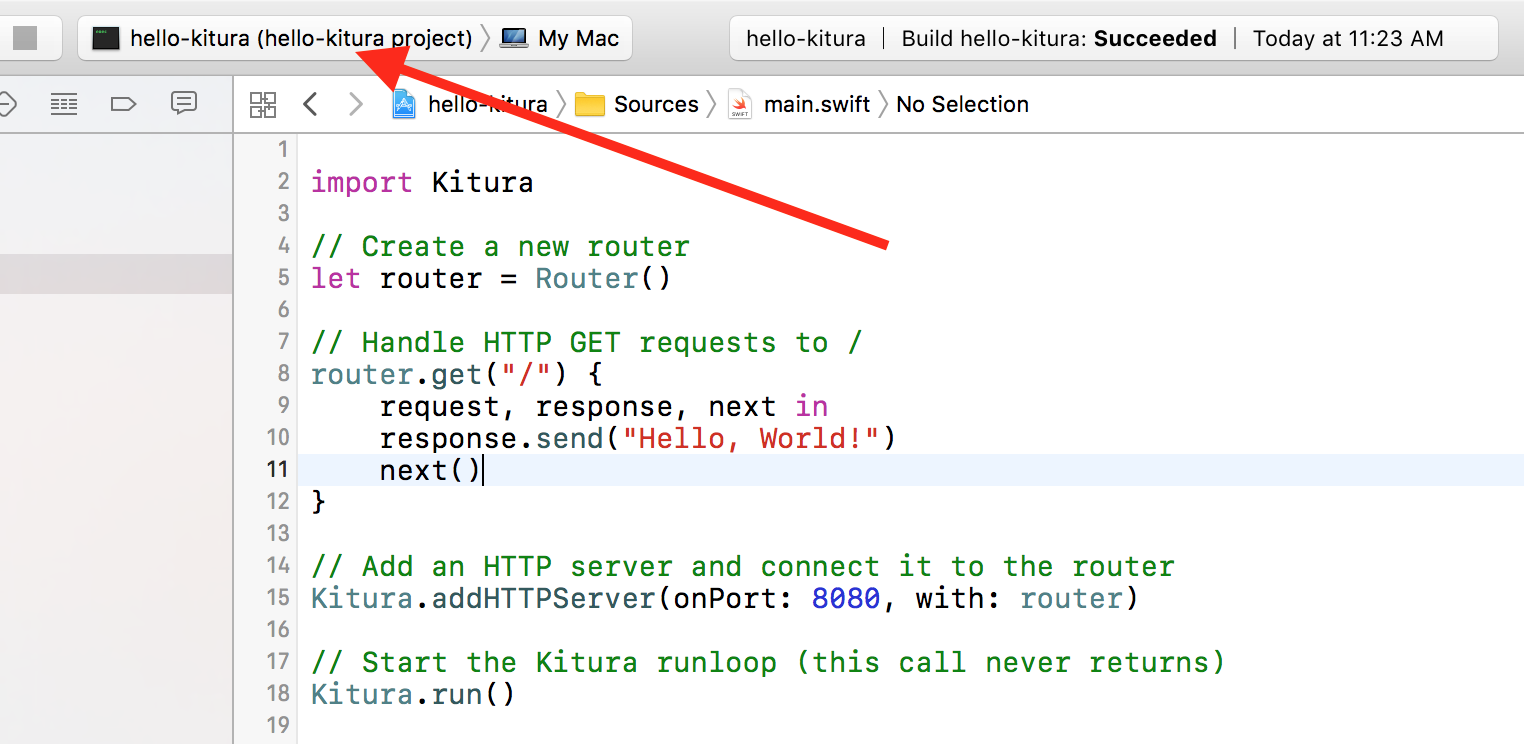
Open the Xcode project hello-kitura.xcodeproj. Before building the project, make sure that the executable scheme is selected with Mac as the platform, as shown in Figure 2.
Once everything is set up, run the project by pressing Command + Run. This starts the Kitura server on the default port 8080 and you can visit the URL http://localhost:8080/ to view “Hello World” displayed on the screen.
One thing you'll notice is that Kitura never notifies you when the server has successfully started. This is because logging isn't enabled on the Kitura project. Logging is part of a separate package called HeliumLogger, which can be integrated using the Swift Package Manager. Update the Package.swift file to include the dependency on HeliumLogger, as shown in Listing 3.
Listing 3: Adding a HeliumLogger Package
import PackageDescription

let package = Package(
    name: "hello-kitura",
    dependencies: [
        .Package(url: "https://github.com/IBM-Swift/Kitura.git",
            majorVersion: 1, minor: 7),
        .Package(url: "https://github.com/IBM-Swift/HeliumLogger.git",
            majorVersion: 1, minor: 7)
    ])
After adding the HeliumLogger package, you still need to tell Kitura to update the dependencies. This can be done by executing the swift build command from the terminal, as shown in Figure 3.

Once the HeliumLogger dependency has been downloaded, the next step is to regenerate the Xcode project so it can see the new dependencies.
swift package generate-xcodeproj
Finally, update the main.swift file, as shown in Listing 4, to enable the Helium Logger. It's that simple.
Listing 4: Enabling the HeliumLogger
import Kitura
import HeliumLogger

// Initialize HeliumLogger
HeliumLogger.use()

// Create a new router
let router = Router()

// Handle HTTP GET requests to /
router.get("/") {
    request, response, next in
    response.send("Hello, World!")
    next()
}

Kitura.addHTTPServer(onPort: 8080, with: router)

Kitura.run()
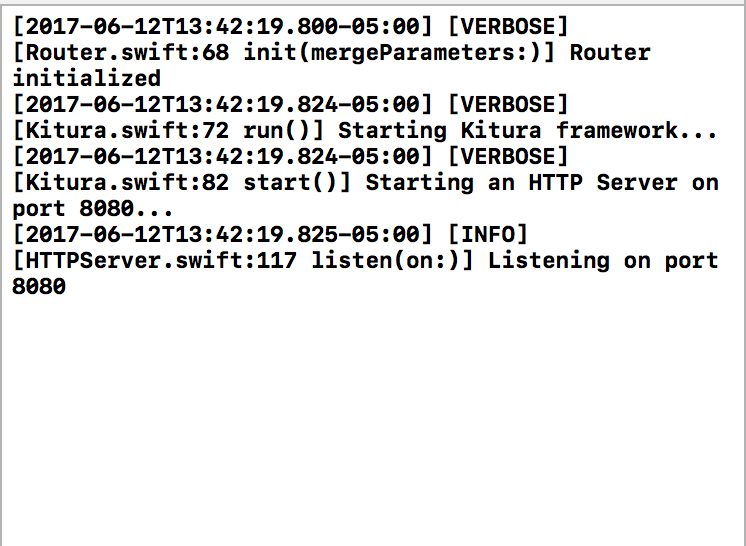
Once the logger has been enabled, run your Kitura app again and this time, notice the output window of Xcode. Xcode now displays the log messages received from the Kitura app using Helium Logger. This will prove to be very beneficial when debugging larger apps. Figure 4 shows the output window logging Kitura events using Helium Logger.
In the next section, you'll learn how to return data to the user in JSON format.
Returning JSON Data
In the previous section, you learned how to send simple string text back to the user. This was great to get started but in real world apps, you'll be sending back either XML or, preferably, JSON. Kitura allows you to easily send back the response in JSON format. Listing 5 shows the complete implementation, which returns a task object as a JSON response.
Listing 5: Returning a Response as JSON
struct Task {

    var title :String

    func toDictionary() -> [String:Any] {
        return ["title":self.title]
    }
}

router.get("task"){
    request, response, next in

    let task = Task(title: "Mow the lawn")
    return try response.send(json:task.toDictionary()).end()
}
The Task struct defines a toDictionary function that returns the dictionary representation of the task object. This dictionary object is then passed to the send function of the Response, which returns it back to the user in JSON format.
In order to send back a collection of objects instead of a single object, you need to go through each item inside the collection and call the toDictionary function on each instance. In the next section, you will learn how to parse user requests.
Parsing a User Request
The real power of creating a back-end service using Kitura comes from the requests that users can send to the server and get a response. Kitura allows you to extract data from a user's request in several different formats. Let's take a look at each approach separately.
Parsing URL Encoded Parameters
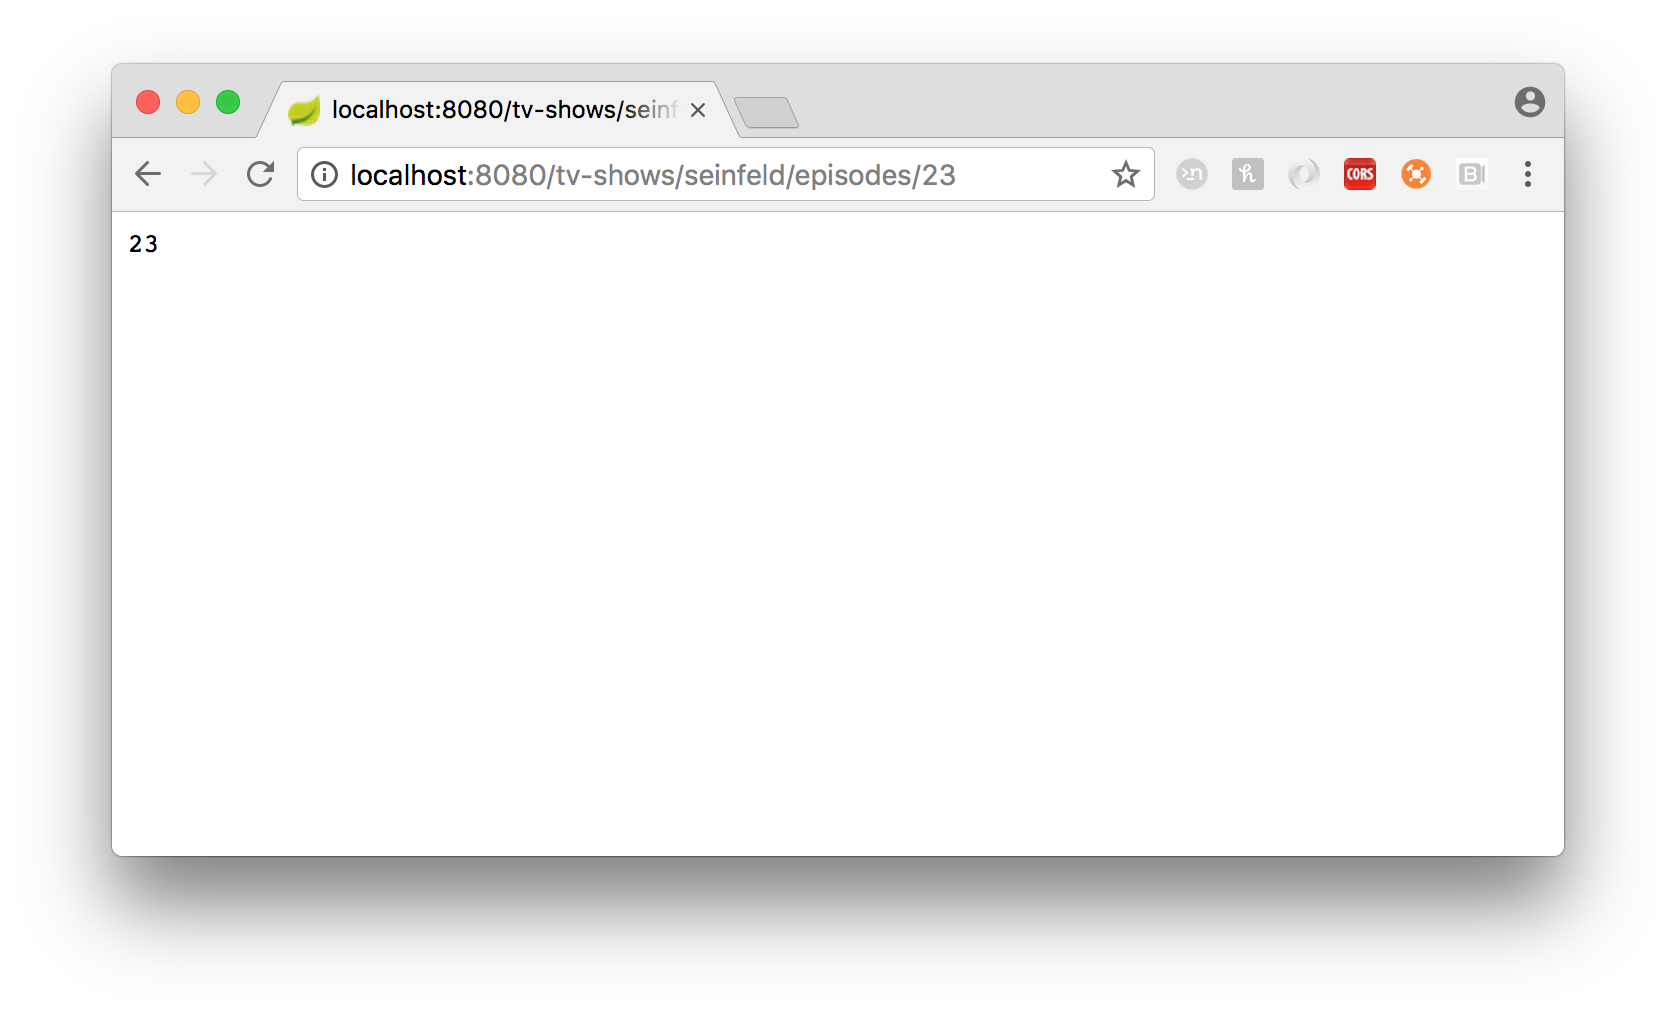
URL-encoded parameters allow the user to pass data as part of the URL. Consider an example. Let's say you're searching for an episode of a TV show and you include the episode number in the URL. Listing 6 shows the necessary code to extract the episode number out of the request.
Listing 6: Parsing URL-Encoded Parameters
router.get("tv-shows/seinfeld/episodes/:no")
{ request, response, next in

    let name = request.parameters["no"] ?? ""
    try response.send(name).end()
}
The request instance has a parameters property that contains all the parameters that were passed by the user. After retrieving the parameter, you simply send back the response with the parameter value, as shown in Figure 5.
Parsing a Query Parameter
Query string parameters allow the user to pass search strings right inside the URL. Query strings can be used to dictate the search term, sort order, number of pages, and much more. The Kitura framework provides an easy way to access the query string parameters.
Listing 7 shows the implementation where you extract the query string values out of the URL. The request instance provides a queryParameters property, which contains all of the query strings associated with the URL. If a particular query string parameter isn't found, instead of throwing an error, you send back an informative message to the user.
Listing 7: Parsing Query String Parameters
router.get("search") { request, response, next in

    guard let searchText = request.queryParameters["text"],
    let sortOrder = request.queryParameters["sort"]
    else {
        return try response.send("Incorrect parameters").end()
    }

try response.send("Search Text is \(searchText) and the Sort Order is\(sortOrder)").end()
}
Parsing JSON
JSON (JavaScript Object Notation) is one of the most popular data transfer mechanisms used between the client and the server. Kitura uses the SwiftyJSON library to perform actions relating to JSON and provides an easy-to-use API to extract JSON data from the user's request.
Before you look at the JSON parsing code, you need to tell Kitura that it can expect JSON requests. This can be done by adding the middleware for the router instance. Listing 8 shows the complete implementation for setting up the middleware as well as retrieving JSON data from the request.
Listing 8: Parsing a JSON Request
// Create a new router
let router = Router()

router.all("/customer", middleware: BodyParser())

router.post("customer"){
    request, response, next in

    guard let body = request.body,
    let json = body.asJSON,
    let name = json["name"].string
    else {
        try response.send("Error parsing JSON").end()
        return
    }

    try response.send("The name is\(name)").end()
}
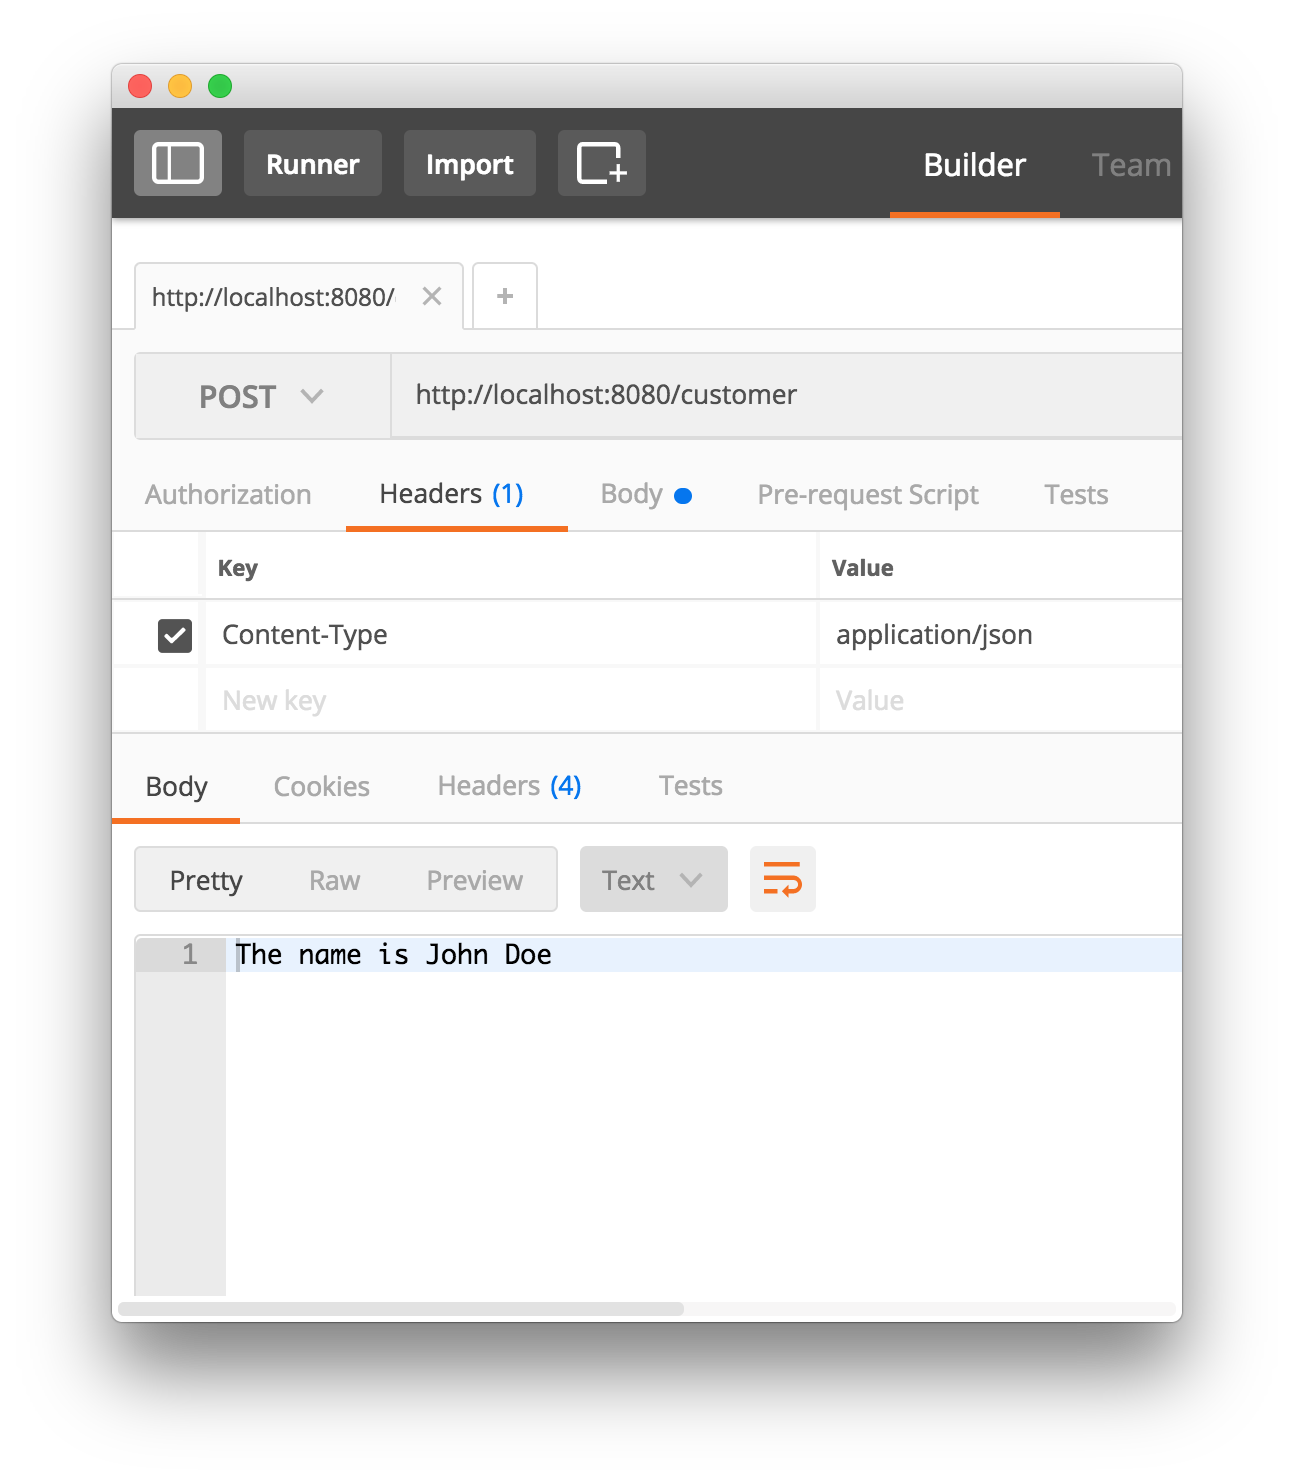
You can use any networking tool to invoke the post request. Figure 6 shows the result when the action was invoked using POSTMAN.
Integrating with SQLite Database
The real benefit of back-end systems is their ability to integrate with the databases. Kitura allows open-source Swift providers to integrate with SQLite, PostgreSQL and even CouchDB databases. In this section, you're going to see how Kitura can be integrated with a SQLite relational database.
The first step in integrating with the SQLite database is to add a SQLite provider in a Package.swift file. Update the Package.swift file to add a dependency on the Vapor SQLite provider, as shown in Listing 9.
Listing 9: Adding a SQLite Package Dependency
import PackageDescription

let package = Package(
    name: "hello-kitura",
    dependencies:[
        .Package(url:"https://github.com/IBM-Swift/Kitura.git",majorVersion:1),
        .Package(url:"https://github.com/IBM-Swift/HeliumLogger.git",majorVersion:1),
       .Package(url:https://github.com/vapor/sqlite,majorVersion:1)
    ]
)
Next, run the swift build command, which downloads all the dependencies mentioned in the Package.swift file. Finally, run the generate-xcodeproj command to regenerate the Xcode project with the new dependencies, like this:
swift package generate-xcodeproj
At this point, your Kitura project has successfully added a dependency on the SQLite database. In the next section, you'll create your database with some dummy records.
Creating a SQLite Database
There are tons of different ways to create a SQLite database. I'm going to use the Base Mac App, which provides a GUI for creating databases. Using it, create a database called todolistDB.sqlite that consists of a single table called tasks, as shown in Figure 7.
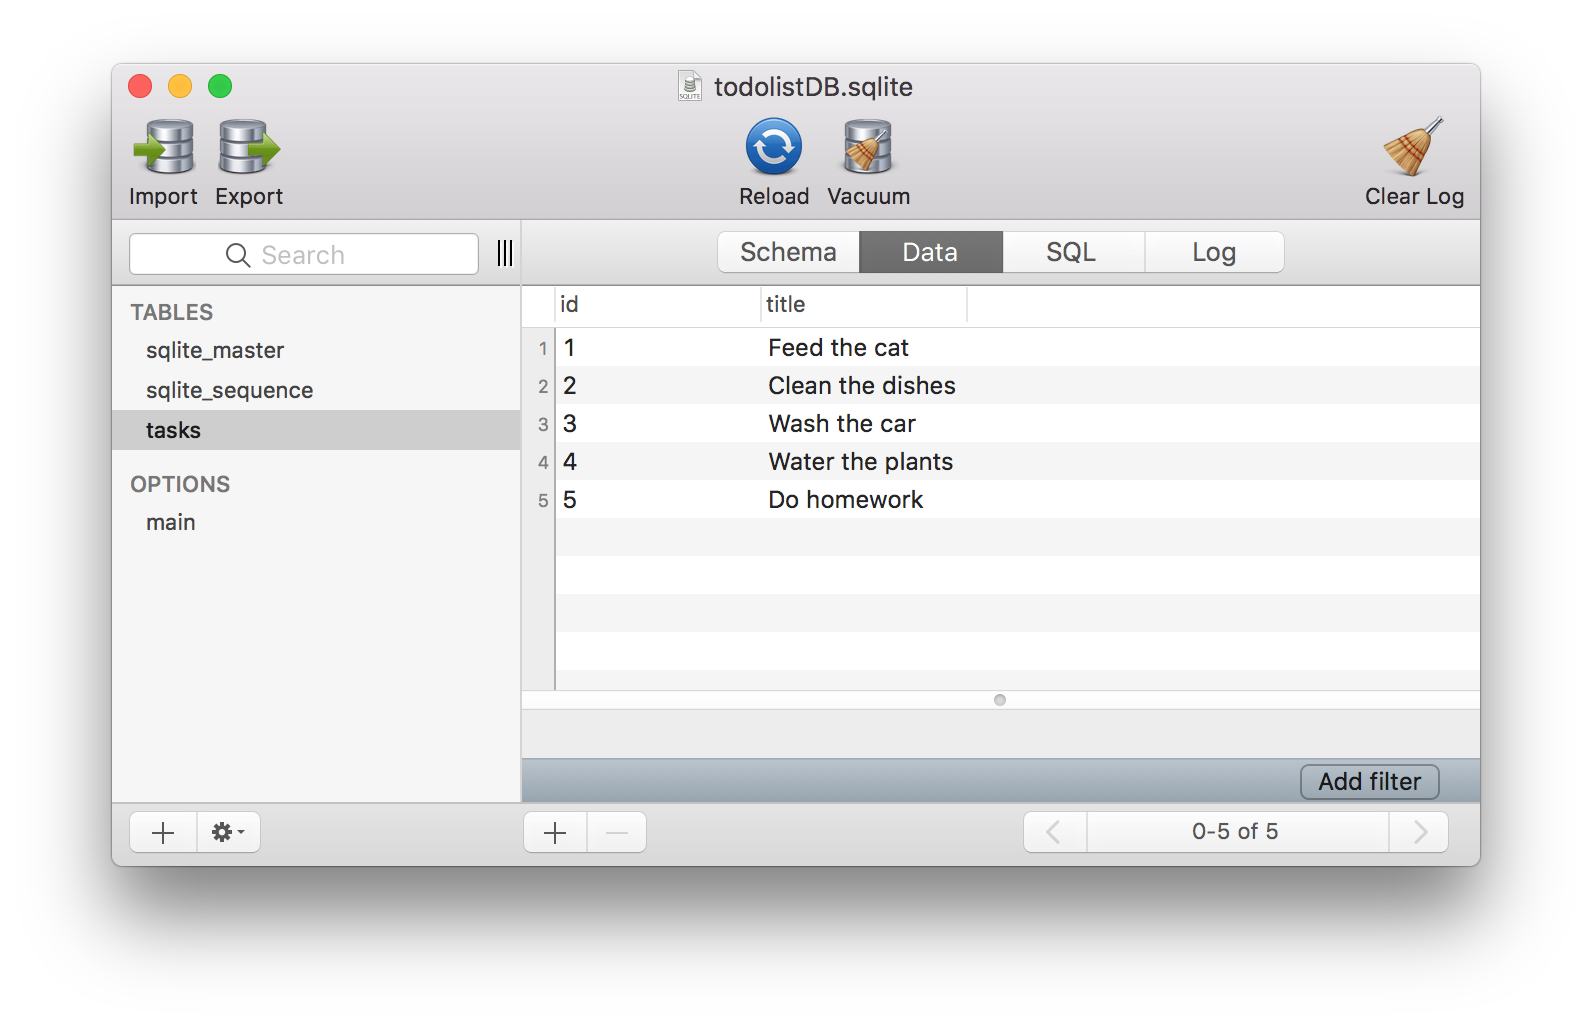
The database consists of a few records, which you fetch using the Kitura SQLite provider. Please also note that the database file todolist.sqlite is placed inside the Documents directory of your Mac.
Integrating SQLite with the Kitura App
After the package has downloaded, the next step is to integrate SQLite with your Kitura App. Remember that you stored the database, todolist.sqlite, in the Documents directory. You need to get a reference to the Documents directory so you can refer to the database. Using the path to the database, you can initialize a SQLite instance that can be used for communicating with the database. Listing 10 shows the code used to initialize the SQLite object.
Listing 10: Integrating a SQLite Instance
import SQLite

guard let documentsDirectory = NSSearchPathForDirectoriesInDomains (
    .documentDirectory,
    .userDomainMask, true)
    .first else {
        fatalError
        ("Documents directory not accessible")
    }

let filePath = documentsDirectory.appending("/todolist.sqlite")

let sqlite = try SQLite(path: filePath)
Once the SQLite object has been initialized, you can use the functions provided by the class to perform the SQL queries against the SQLite database.
Fetching Records from the Database
Let's start with retrieving all of the records from the database. The SQLite object consists of an execute method that can execute a SQL query. Listing 11 shows the implementation of the tasks/all action used to fetch all of the tasks from the database.
Listing 11: Fetching all the records from the database
router.get("tasks/all") {
    request, response, next in

    let sql = "select * from tasks;"
    let result = try sqlite.execute(sql)
    let tasks = result.map(Task.init)

    let dictionaries = tasks.map {$0.serialize()}

    response.send(json :dictionaries)
    next()
}
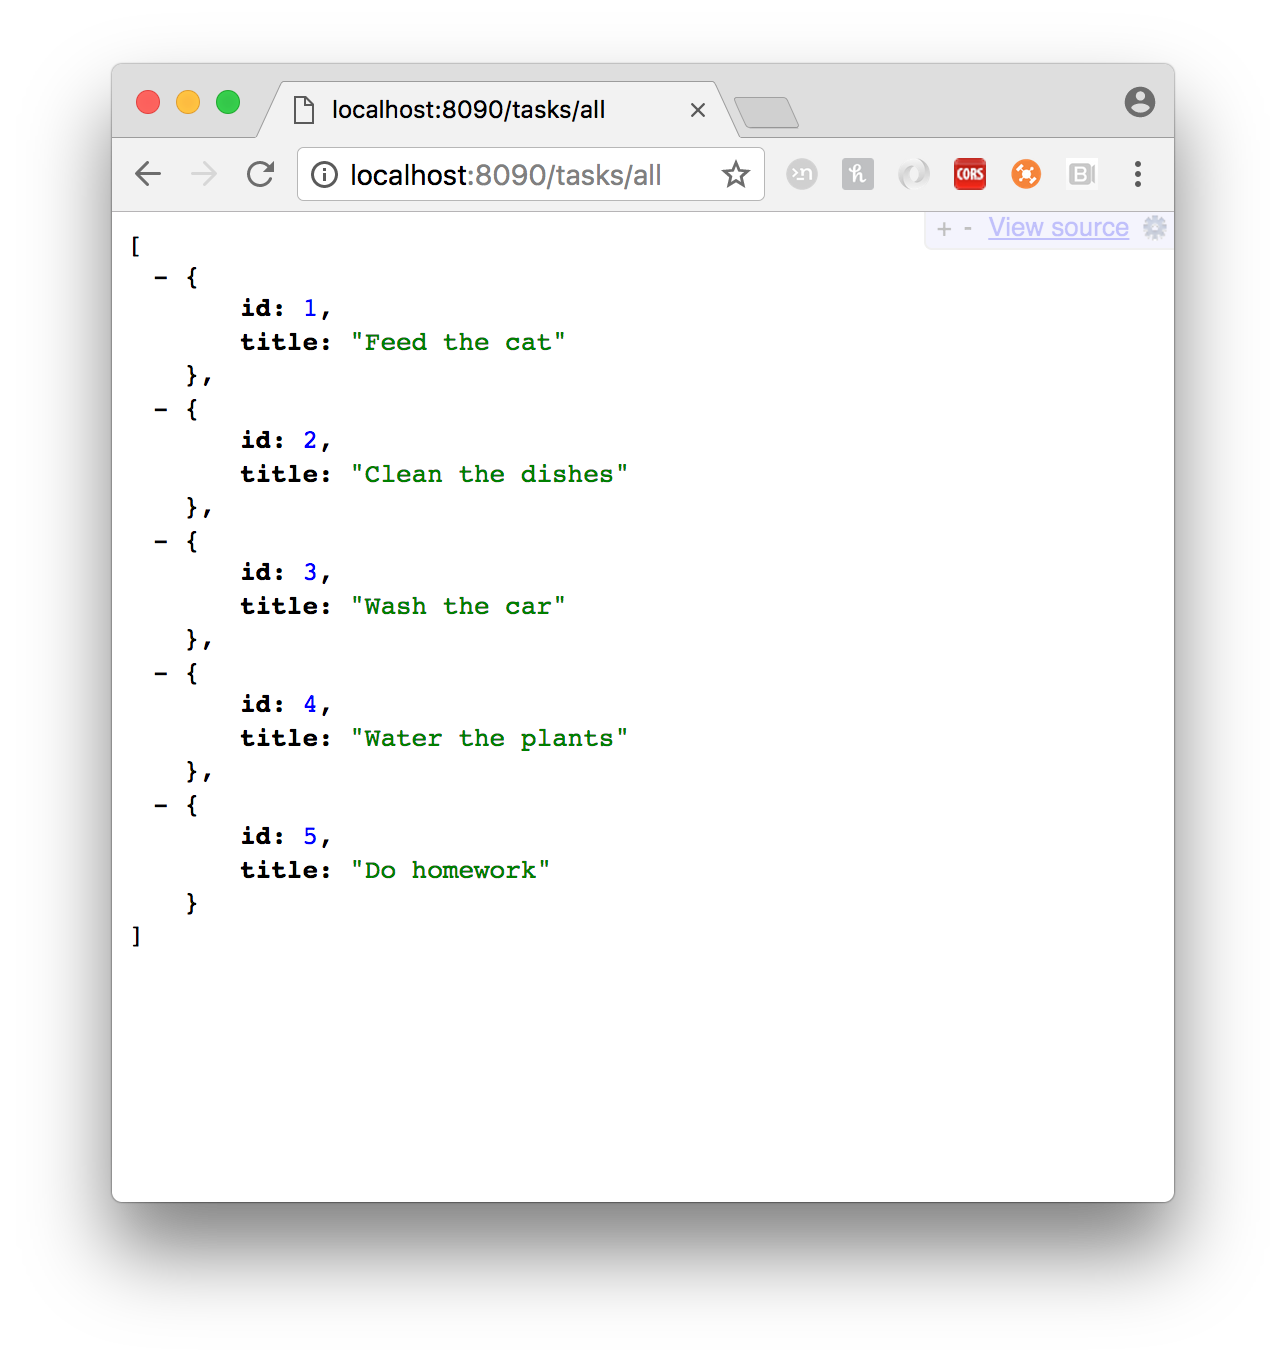
For each retrieve task, you create the Task object and then add it to the Tasks collection. Finally, you convert all of the items in the collection to the Dictionary and send them back as a JSON response. Figure 8 shows the JSON response displayed in the browser.
Persisting a Record in the Database
In the last section, you learned how to fetch all of the records from the Tasks table. Now you're going to insert a new record in the Tasks table. Once the new task has been inserted, you're going to return the newly generated database ID in the response. The user is going to pass a new task in the form of JSON using a POST request.
Listing 12 shows the complete implementation of the ask action that extracts the new task title from the user request and then generates an Insert SQL query. Once the query is generated, it's executed using the SQLite execute method. Finally, you used the lastId property of the SQLite object to return the newly created primary key to the user.
Listing 12: Inserting New Task in the SQLite database
router.post("task") {
    request, response, next in

    guard let body = request.body,
    let json = body.asJSON,
    let title = json["title"].string
    else {
        try response.status
        (.badRequest).end()
        return
    }

    let sql = String(format: "insert into tasks(title) values('%@')", title)

    _ = try sqlite.execute(sql)

    let result = ["lastId":sqlite.lastId]

    response.send(json :["result":result])
    next()
}
Conclusion
Server-side Swift is the next frontier for the Swift language. Now iOS developers can take their existing skills and use their favorite language, Swift, to implement back-end services on the Cloud. This is a major step forward in the advancement and the future of Swift language. The Kitura framework provides an easy-to-use API to meet your Web service needs.
