


In my last article (CODE Magazine Sept/Oct 2016), I provided an overview of ASP.NET Core and a low-level introduction about how to build an ASP.NET application from the ground up using only command line tooling. In this article, I want to take a different tack and build a more realistic, yet still simple, API-based application that interfaces with an Angular 2.0 browser-based front end. The application is a small AlbumViewer that lets you browse albums, artists, and tracks. As in my last article, I'll start with the basics and then transition into more realistic scenarios, such as breaking out business logic into a separate project and using repository classes to consolidate data access code and deal with complex relationships and updating data. The focus of this article is the server, so I won't cover the Angular 2.0 front end in this article - I'll cover that in a future issue.
To get an idea of what I'm talking about, you can check out the live AlbumViewer application running and the source code on GitHub:
- Angular 2.0 with ASP.NET API backend: https://albumviewer.west-wind.com
- Github: https://www.github.com/RickStrahl/AlbumViewerVNext
If you want to follow along with this article, make sure to first clone or copy the GitHub repo and either run it once or use the AlbumViewerSqlServerData.sql script to create the database and sample data.
Creating a New Project
I'll use Visual Studio to demonstrate a typical workflow for a project that includes data and business logic as well as a number of support features. I'll break up the application into three separate projects:
- AlbumViewerNetCore ASP.NET Core Project
- AlbumViewerBusiness class library
- Westwind.Utilities class library
The Web project is the main project that provides both the API and MVC front ends. The business project contains the data entity model and the business objects that retrieve and manipulate the data. It also contains a base Repository implementation for each of the major components of this small application. The utilities project is a small project that includes various helper classes that are used both by the business object project and the Web project.
To start, I create a new ASP.NET Core Project:
- Use New Project > ASP.NET Core Web Application (.NET Core).
- Choose Web API > No Authentication.
- Name the new project
AlbumViewerNetCore.
First, let's make sure that the project works by just running it. Click on the run icon and select IIS Express, which runs the application and displays the default ASP.NET Home page.
An ASP.NET Core project is a console application that has a Main() method entry point. The application launches with Main() and a Startup initialization class that configures both the dependency injection engine and the actual components using the ConfigureServices() and Configure() methods. If you're curious, you can look at the Startup.cs that's generated when you created the project, which is very simple for now. I'll add more functionality as I add features to the application.
Adding a New API Controller
In ASP.NET Core, API and MVC controllers have been merged into a single controller paradigm that can handle either API- or MVC-style logic. The single model is great because, unlike ASP.NET MVC 4 and ASP.NET Web API that came before, ASP.NET Core's controllers always use the same infrastructure. You can create filters and attributes and use them on API or MVC operations. The new controller application model follows the old MVC model more closely than the Web API model when it comes to parameter parsing and filter implementation style.
To start the application, create a new API Controller that houses the API endpoints. Start with a simple Helloworld() test method in this controller to verify that the API is accessible.
To create a new controller in Visual Studio, do the following:
- From the Web Project, choose Add New Item.
- Choose .NET Core > ASP.NET > Web API Controller Class.
- Name the class
AlbumViewerApiController
Then create the controller with the following code:
public class AlbumViewerApiController:Controller
{
    [HttpGet("api/helloworld")]
    public object Get(string name)
    {
        return new
        {
            message = $"Hello world, {name}.",
            time = DateTime.Now
        };
    }
}
You can now navigate to http://localhost:26448/api/helloworld?name=Rick, which produces this JSON output:
{
    message: "Hello world, Rick.",
    time: "2016-10-04T23:05:24.0584596-10:00"
}
And voila! You've created your first API endpoint that returns a JSON response.
APIs use Content Negotiation based on the Accept HTTP header to determine how the result is returned. The default is JSON if no explicit Accept header is used or none of the default providers - XML and JSON - have been specified. Content Negotiation lets the client choose what type of data is returned. In this article, I only use the default JSON output.
The operation above uses Attribute Routing to define the URL that the request responds to. Use HttpGet(“api/helloworld”) to map the URL used above to access the page relative to the root of the site. Traditional controller/action route definitions can also still be used and are configured by default, although I turned them off because I don't use them. I prefer explicit attribute routes for clarity.
Note that the ?name=Rick QueryString value is automatically mapped to the name parameter of the method. Alternately, you can also map route parameters from the route definition to the method. Let's change the code slightly by changing the route declaration to this:
[HttpGet("api/helloworld/{name}")]
public object Get(string name)
You can now navigate to http://localhost:26448/api/helloworld/Rick to get the same result as the previous request.
Adding Data
Now that you have a working Web API, you need to hook some data to it. Create a new .NET Core class library project called AlbumViewerBusiness and add an Entity Framework model to it.
- Below the
srcfolder in the solution, choose Add Project. - Add a Class Library and name it
AlbumViewerBusiness. - Create a new folder called
Model.
Next, add an AlbumViewerContext class and a set of entity model classes using Entity Framework Core (EF Core). Listing 1 shows a combined view of these entity and context classes.
Listing 1: The AlbumViewer Entity Framework Model and Context
public class AlbumViewerContext : DbContext
{
    public AlbumViewerContext(DbContextOptions options)
          : base(options)  { }

public DbSet<Album> Albums { get; set; }
public DbSet<Artist> Artists { get; set; }
public DbSet<Track> Tracks { get; set; }
public DbSet<User> Users { get; set; }

    protected override void
        OnModelCreating(ModelBuilder builder)
    {
        base.OnModelCreating(builder);
    }
}

public class Album
{
    public int Id { get; set; }
    public int ArtistId { get; set; }
    public string Title { get; set; }
    public string Description { get; set; }
    public int Year { get; set; }
    public string ImageUrl { get; set; }
    public string AmazonUrl { get; set; }
    public string SpotifyUrl { get; set; }

    public virtual Artist Artist { get; set; }
    public virtual IList<Track> Tracks { get; set; }

    public Album()
    {
        Artist = new Artist();
        Tracks = new List<Track>();
    }
}

public class Artist
{
    public int Id { get; set; }
    public string ArtistName { get; set; }
    public string Description { get; set; }
    public string ImageUrl { get; set; }
    public string AmazonUrl { get; set; }
}

public class ArtistWithAlbum : Artist
{
    public int AlbumCount { get; set; }
}

public class Track
{
    public int Id { get; set; }
    public int AlbumId { get; set; }
    public string SongName { get; set; }
    public string Length { get; set; }
    public int Bytes { get; set; }
    public decimal UnitPrice { get; set; }
}

public class User
{
    public int Id { get; set; }
    public string Username { get; set; }
    public string Password { get; set; }
    public string Fullname { get; set; }
}
The model is based on convention: Each table has an ID field used for the primary key that automatically creates the key field binding. As with older versions of Entity Framework, you can also use Attributes to explicitly specify a [Key], or other metadata like [Tablename], [ForeignKey], and validation rules like [Required], [MaxLength], etc. Keep in mind that EF Core has fewer features than EF6, which ran on the full framework, so some common features (like lazy loading, Group By support, and a number of other features) are not yet supported (see https://docs.microsoft.com/en-us/ef/efcore-and-ef6/ for feature comparison). On the flip side, EF Core is, for the most part, faster than older versions of EF as the engine itself is much leaner.
The hardest part of ASP.NET Core is figuring out how to configure components and find packages that you want to include.
Some Configuration Needed
To work with Entity Framework in the code, you have to add the EntityFramework reference to the AlbumViewerBusiness project.json file:
"Microsoft.EntityFrameworkCore": "1.0.1"
Then add the EF reference plus specific data providers that will be used in the AlbumViewerNetCore Web project.json file:
"Microsoft.EntityFrameworkCore": "1.0.1",
"Microsoft.EntityFrameworkCore.SqlServer": "1.0.1",
"Microsoft.EntityFrameworkCore.Sqlite": "1.0.1",
"AlbumViewerBusiness": ""
Also add the AlbumViewerBusiness project and reference it in the Web project with an empty version number. Figuring out which packages are required is arguably one of the most frustrating things in .NET Core applications. For some help with finding packages, see the Finding Package References sidebar.
Finally, configure Entity Framework in Startup.cs and the ConfigureServices() method by providing the data provider to use and add a connection string to the database:
public void ConfigureServices(IServiceCollectionservices)
{
    services.AddDbContext<AlbumViewerContext>(builder =>
    {
        var connStr = Configuration["Data:SqlServerConnectionString"];
        builder.UseSqlServer(connStr);
    });
    services.AddMvc();
}
This configures the AlbumViewerContext and makes the data model available for the application to consume via Dependency Injection (DI). When I want to use an instance of the Context (for example, in the API controller later), DI can provide a pre-configured instance of this context.
The connection string in the example above is pulled from the appsetting.json file via the Configuration object, which provides custom configuration settings. There's a Data property with values and you use a colon (:) to denote JSON hierarchy for Configuration["Data:SqlServerConnectionString"] to pull the connection string from:
{
    "Data": {
        "SqlServerConnectionString":
            "server=.;database=AlbumViewer; _
            integrated security=true; "
    }
}
Configuration can be accessed in a number of different ways, but during start up, the only way to get at the configuration is through this key-based mechanism.
Controller Methods with Data
Now I'm ready to query some data against the model. Let's flip back to the API Controller and add the following method:
[HttpGet("api/artists")]
public async Task<List<Artist>> GetArtists()
{
    return await Context.Artists
        .OrderBy(a => a.ArtistName)
        .ToListAsync();
}
But you can't run the project just yet - you're still missing a reference to the Context. EF Core's default modus operandi wants you to use DI in order to get a reference to a configured context object. Earlier, you configured the context with AddDbContext<AlbumViewerContext> in ConfigureServices(). There, you implicitly registered the context for DI. You can now use constructor injection to inject the context into the controller with the following constructor and storage field:
private AlbumViewerContext Context;
public AlbumApiController(AlbumViewerContext context)
{
    Context = context;
}
This gives you the Context instance you need in GetArtists() to run the Artist query. It takes a bit more effort to set up for the first query, but for subsequent requests, the Context is already available and no further set up is required.
Now you're ready to run the controller operation with http://localhost:26448/api/artists. You'll get the following JSON response:
[{ id: 1,
    artistName: "AC/DC",
    description: "AC/DC's...",
    imageUrl: "http:...",
    amazonUrl: "http:..."
},
{...},{...}]
Yay! A JSON data result!
ASP.NET Core and EF Core rely heavily on Dependency Injection to provide object instances.
Entity Framework and (No) Lazy Loading
But wait! Things don't quite work right when you query Albums using this same approach:
[HttpGet("api/albums")]
public async Task<List<Album>> GetAlbums()
{
    return await Context.Albums
        .OrderBy(a => a.Title)
        .ToListAsync();
}
The Album entity includes sub-types for Artist and Tracks that correspond to the one-to-one and one-to-many relationships defined on the Album entity:
public virtual Artist Artist { get; set; }
public virtual IList<Track> Tracks { get; set; }
The JSON result that's returned from the operation doesn't properly include the Artist and Tracks:
[{ id: 516,
    artistId: 331,
    title: "Ace of Spades",
    description: "Motörhead...",
    year: 1980
    imageUrl: "...",
    artist: {
        id: 0,
        artistName: null,
        description: null,
        imageUrl: null,
        amazonUrl: null
    },
    tracks: [ ]
},
{...},{...}]
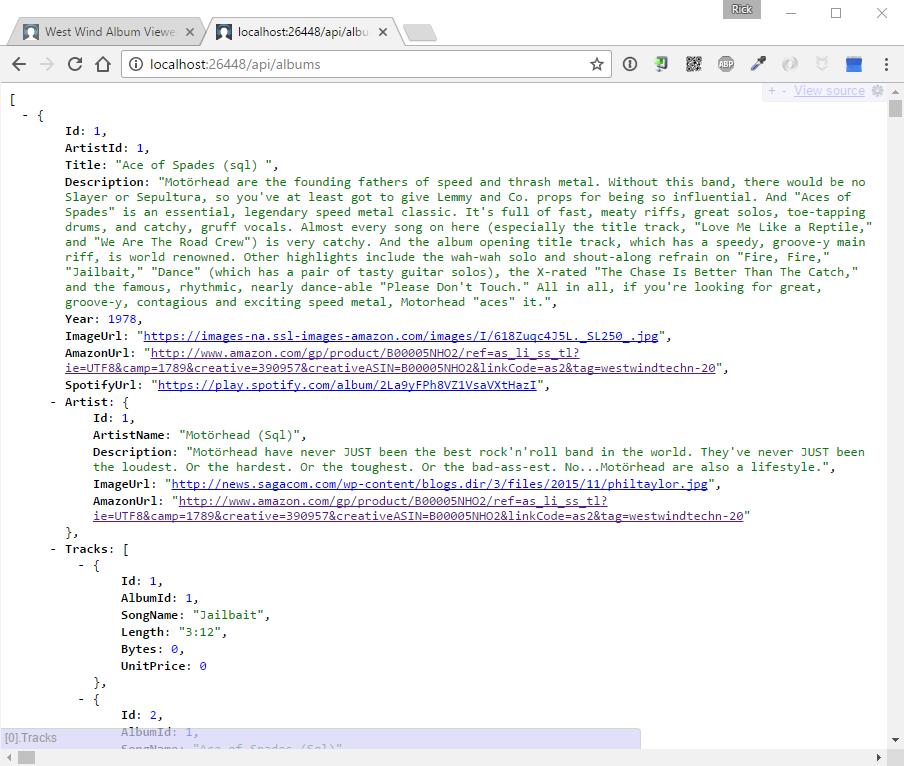
Notice that artist is an empty object and tracks is an empty array. The problem is that Entity Framework 7 doesn't support lazy loading. This means that you have to either explicitly load the relationships, or include() them as part of the query. Let's re-write the query to include the child objects like this:
return await Context.Albums
    .Include(ctx=> ctx.Artist)
    .Include(ctx=> ctx.Tracks)
    .OrderBy(a => a.Title)
    .ToListAsync();
And voila! You now get the proper JSON result that includes the Artist and Track data, as shown in Figure 1.
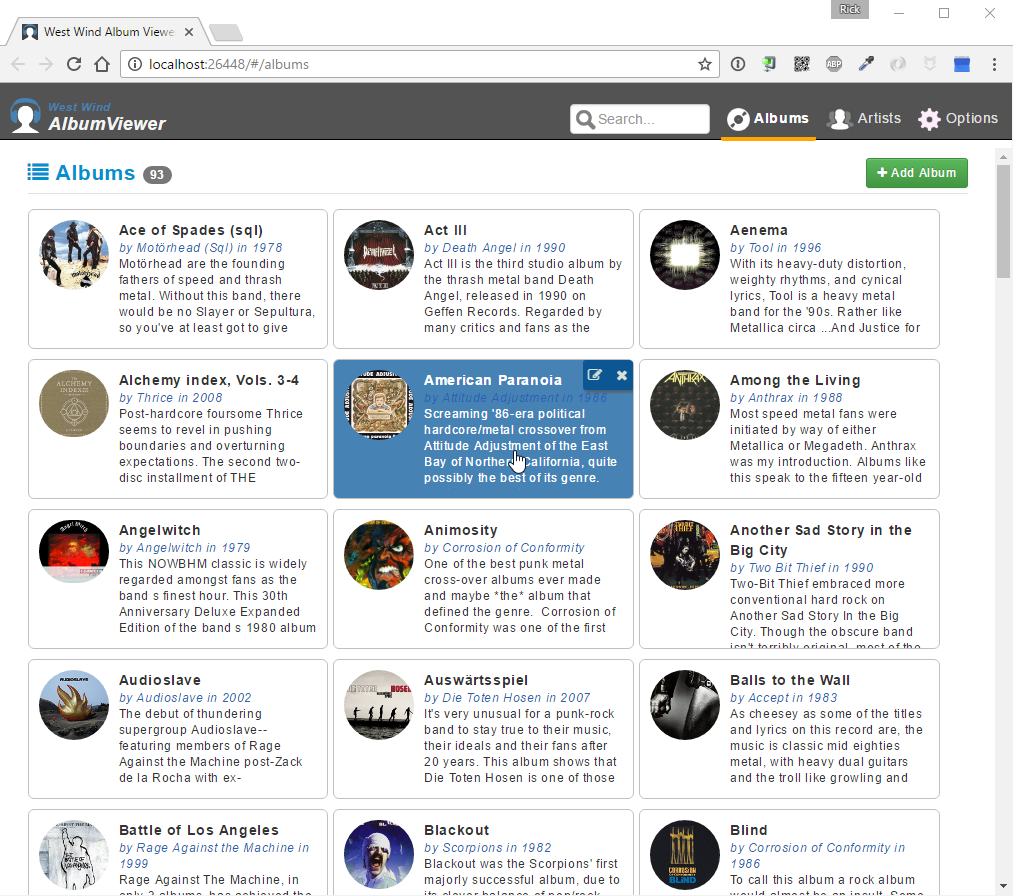
The client application can then turn this into the list of initial AlbumList, as shown Figure 2.
Entity Framework 7 doesn't support lazy loading so you have to explicitly include related entities.
Offloading Data Access Code to a Repository
At this point, you've verified that data access works. Great! But in a typical application, you really want the data access logic separate from API controller code. So rather than putting the data access code inline in the controller, move the code into a separate repository class in the AlbumViewerBusiness project.
I like to use a base repository class called EntityFrameworkRepository that's part of the AlbumViewerBusiness project. The code is quite lengthy so you can check it out on GitHub at https://goo.gl/9DbbD3. The base class provides basic CRUD operations plus validation features and a few small helper functions. A repository is one good way to organize business logic away from interface or in this case API code to help separate concerns.
Next, create an ArtistRepository that inherits from EntityFrameworkRepository and add a GetAllArtists() method:
public class ArtistRepository :
    EntityFrameworkRepository<AlbumViewerContext, Artist>
{
    public ArtistRepository(AlbumViewerContext context)
        : base(context)  { }
    public async Task<IList> GetAllArtists()
    {
        return await Context.Artists
            .OrderBy(art => art.ArtistName)
            .Select(art => new ArtistWithAlbumCount
        {
            ArtistName = art.ArtistName,
            Description = art.Description,
            ...
            AlbumCount = Context.Albums
                .Count(alb =>alb.ArtistId == art.Id)
        })
        .ToListAsync();
    }
}
The repository takes Context and Entity types as generic parameters. You need to implement a constructor that takes any dependencies you want injected as parameters. For now, the only thing you need injected is a AlbumViewerContext that you configured earlier in ConfigureServices().
The main reason for a repository is to keep the business code in one place so it's easy to find, test, and maintain. This first method retrieves all artists with an additional album count, so it returns a special ArtistWithAlbumCount type.
Async is Best
Note that the method returns an async result usable with async/await. This is in line with the .NET Core recommendations to use async code whenever possible for IO bound operations like data access. Although EF Core supports synchronous code, there are a number of operations that require async, so it's more consistent to always opt for async code. It's always easy to fall back to sync code from async code, but it's much harder to transition from sync code into async code. In the future, you can also expect significant scalability improvements with async operations, although that's not really the case currently, as performance is roughly the same for sync and async code.
ASP.NET Core is optimized for async operations, so try to use async/await whenever possible.
Injecting the ArtistRepository
To use ArtistRepository in the API controller, it needs to be registered for DI and then added to the constructor parameters of the controller.
First, register a transient (always created) instance in Startup.cs and ConfigureServices():
services.AddTransient<ArtistRepository>();
Next, the repository is injected into the AlbumViewerApiController via the constructor:
private AlbumViewerContext Context;
private ArtistRepository ArtistRepo;

public AlbumApiController(
    AlbumViewerContext context,
    ArtistRepository artistRepo)
{
    Context = context;
    ArtistRepo = artistRepo;
}
Now, whenever the controller is created, DI automatically injects a new instance of the ArtistRepository into the constructor. The constructor parameter value is stored in a property so you can access it in the controller methods.
Finally, you can use the repository in the controller method, which now becomes a one liner:
[HttpGet]
[Route("api/artists")]
public async Task<IEnumerable> GetArtists()
{
    return await ArtistRepo.GetAllArtists();
}
Phew! A lot happened to get here, but now that this infrastructure is in place, it's easy to add additional methods to the ArtistRepository and just use it in the controller without any further configuration. By using the repository, most controller operations will be only a few lines of code.
Multiple Repositories
The AlbumViewer application has both an ArtistRepository (for full code see: https://goo.gl/A6mpUw) and an AlbumRepository (https://goo.gl/WnPZul). The client app has separate areas that deal with Artists and Albums and these two repositories map these logical application concerns.
A typical repository has methods that deal with data access and logical manipulation of the entities in the model. All data query methods should be in the repository and although these are often little more than Entity Framework query results that are forwarded, having them grouped with the rest of the data access methods in one place is a big reason for using a repository class.
Note that the mapping isn't necessarily per table, but per logical abstraction. For example, an album really manages albums, artists, and tracks because they're all related to an album. And artists also perform some operations against albums. The goal is to have all common operations against a logical entity or problem domain performed in one place.
To give you a taste of what goes into a typical repository, Listing 2 shows a truncated version of the ArtistRepository.
Listing 2: A typical Repository Implementation
public class ArtistRepository :
EntityFrameworkRepository<AlbumViewerContext, Artist>
{
    public ArtistRepository(AlbumViewerContext context):
        base(context)  { }

    public async Task<List<ArtistWithAlbumCount>>
    GetAllArtists()
    {
        return await Context.Artists
            .OrderBy(art => art.ArtistName)
            .Select(art => new ArtistWithAlbumCount()
        {
            ArtistName = art.ArtistName,
            Description = art.Description,
            ImageUrl = art.ImageUrl,
            Id = art.Id,
            AmazonUrl = art.AmazonUrl,
            AlbumCount = Context.Albums.Count(alb => alb.ArtistId == art.Id)
        })
        .ToListAsync();
    }

    public async Task<List<ArtistLookupItem>>
    ArtistLookup(string search = null)
    {
        if (string.IsNullOrEmpty(search))
        return new List<ArtistLookupItem>();

        var term = search.ToLower();
        return await Context.Artists
            .Where(a => a.ArtistName.ToLower()
            .StartsWith(term))
            .Select(a => new ArtistLookupItem
        {
            name = a.ArtistName,
            id = a.ArtistName
        })
        .ToListAsync();
    }

    public async Task<Artist> SaveArtist(Artist postedArtist)
    {
        int id = postedArtist.Id;

        Artist artist;
        if (id < 1)
            artist = Create<Artist>();
        else
        {
            artist = Context.Artists.FirstOrDefault(a => a.Id == id);
            if (artist == null)
                artist = Create<Artist>();
        }

        DataUtils.CopyObjectData(postedArtist, artist, "Id");

        if (!await SaveAsync())
            return null;

        return artist;
    }

    public async Task<bool> DeleteArtist(int id)
    {
        var artist = await Context.Artists
            .FirstOrDefaultAsync(art => art.Id == id);

        // already gone
        if (artist == null)
        return true;

        var albumIds = await Context.Albums
            .Where(alb => alb.ArtistId == id)
            .Select(alb => alb.Id)
            .ToListAsync();

        var albumRepo = new AlbumRepository(Context);

        foreach (var albumId in albumIds)
        {
            // don't run async or we get p
            bool result = await albumRepo
                .DeleteAlbum(albumId);
            if (!result)
                return false;
        }

        Context.Artists.Remove(artist);

        return await SaveAsync();
    }

    protected override bool OnValidate(Artist entity)
    {
        if (entity == null)
        {
            ValidationErrors.Add("No artist to validate.");
            return false;
        }

        if (string.IsNullOrEmpty(entity.ArtistName))
            ValidationErrors.Add("Please...", "AritistName");
        else if (string.IsNullOrEmpty(entity.Description) ||
                entity.Description.Length < 30)
            ValidationErrors.Add("Desc...", "Description");

        return ValidationErrors.Count == 0;
    }

}
Loading an Individual Artist
One of the advantages of the base repository class is that you get some built-in behavior for accessing entities. So to implement the simple load of an artist, you don't have to write any new code but can just use the built in Load() method to retrieve an entity by ID:
[HttpGet("api/artist/{id:int}")]
public async Task<Artist> GetArtist(int id)
{
    return await ArtistRepo.Load(id);
}
This operation lets you access an artist at http://localhost:26448/api/artist/1 and get a JSON object for that artist.
Due to EF Core's shortcomings when it comes to loading entities with their associated relationships, it isn't always so easy. The Artist object has no related entities, but an Album does, and so the Load() method for an album in the AlbumRepository is a little more work and has to override the Load() method with custom code to include dependencies:
public override async Task<Album> Load(object id)
{
    Album album = null;
    try
    {
        album = await Context.Albums
            .Include(ctx => ctx.Tracks)
            .Include(ctx => ctx.Artist)
            .FirstOrDefaultAsync(alb => alb.Id == (int) id);
    }
    catch (Exception ex)
    {
        SetError(ex);
    }
    return album;
}
Although I had to explicitly create the Artist.Load() method, using the method follows the same pattern I showed with the Artist's Load() method, which makes for good consistency and easy readability. You can easily determine what's happening in this code:
[HttpGet("api/album/{id:int}")]
public async Task<Album> GetAlbum(int id)
{
    return await AlbumRepo.Load(id);
}
You can then use http://localhost:26448/api/album/1 to retrieve an album with its associated album and tracks attached.
Saving Data
To save data, you can often take advantage of the built in CRUD features, but at other times, you need custom code to make things work properly. The Artist save operation is simple because it's a single entity that has to be saved and can be saved easily via the default SaveAsync() base method:
[HttpPost("api/artist")]
public async Task<ArtistResponse> SaveArtist([FromBody] Artist artist)
{
    if (!ArtistRepo.Validate(artist))
        throw new ApiException(
            ArtistRepo.ValidationErrors.ToString(),
            500,ArtistRepo.ValidationErrors);

    if (!await ArtistRepo.SaveAsync(artist))
        throw new ApiException("Unable to save artist.");

    return new ArtistResponse()
    {
        Artist = artist,
        Albums = await ArtistRepo.GetAlbumsForArtist(artist.Id)
    };
}
Here, you can see some of the benefits of using the repository. You can call Validate(), which validates the business rules defined in the OnValidate() method of the repository. Calling the SaveAsync() method automatically attaches the POSTed entity and either updates or saves the entity into the database.
The Save operation for Artists works because it's a single entity, but if you need to update multiple related entities, things can be more complex. EF Core is not very good about reattaching complex entities, so using the SaveAsync() doesn't work as is to properly update the Artist and Tracks collections.
To work around this, create a custom SaveAlbum method, as shown in Listing 3, which explicitly updates all involved entities.
Listing 3: Manually saving Album data by updating existing Entities
public async Task<Album> SaveAlbum(Album postedAlbum)
{
    int id = postedAlbum.Id;

    Album album;

    if (id < 1)
        album = Create();
    else
        album = await Load(id);

    // check for existing artist and assign if matched
    if (album.Artist.Id < 1)
    {
        var artist = await Context.Artists
            .FirstOrDefaultAsync(art => art.ArtistName ==
                        postedAlbum.Artist.ArtistName);
        if (artist != null)
        album.Artist.Id = artist.Id;
    }

    DataUtils.CopyObjectData(postedAlbum.Artist, album.Artist, "Id");

    // new artist
    if (album.Artist.Id < 1)
        Context.Artists.Add(album.Artist);

    album.ArtistId = album.Artist.Id;
    DataUtils.CopyObjectData(postedAlbum, album,
                            "Tracks,Artist,Id,ArtistId");

    // add or udpate tracks
    foreach (var postedTrack in postedAlbum.Tracks)
    {
        var track = album.Tracks.FirstOrDefault(
                        trk => trk.Id == postedTrack.Id);
        if (postedTrack.Id > 0 && track != null)
            DataUtils.CopyObjectData(postedTrack, track);
        else
        {
            track = new Track();
            Context.Tracks.Add(track);
            DataUtils.CopyObjectData(postedTrack, track,
                                    "Id,AlbumId,ArtistId");
            album.Tracks.Add(track);
        }

    }

    // then find all deleted tracks not in new tracks
    var deletedTracks = album.Tracks
        .Where(trk => trk.Id > 0 &&
                    !postedAlbum.Tracks
                        .Where(t => t.Id > 0)
                        .Select(t => t.Id)
                   .Contains(trk.Id) )
        .ToList();

    foreach (var dtrack in deletedTracks)
        album.Tracks.Remove(dtrack);

    if (!await SaveAsync())
        return null;

    return album;
}
The gist of this code is that you load an existing entity or create new one, and then copy the data from the posted data into the existing entity. This ensures that the entities are properly attached to the context. Use a helper function DataUtils.CopyObjectData() (https://goo.gl/X1bSpf) to copy object properties, minus property exclusions, from the posted album onto the loaded or new album and child entities. This object mapping is pretty straightforward for the Album and Artist entities, but for Tracks, some additional code is required to deal with deleted entities. You'd think that you could just clear Tracks and add them back in, but Entity Framework doesn't allow that because once an entity is tracked, it can't be added again to the context with the same ID. Rather, this code explicitly determines which entities don't exist in the posted album and removes them.
All of this code updates the in-memory model for the Album entity and when done, calls SaveAsync() to submit the changes to the database.
Calling the SaveAlbum() method from the controller is now fairly lean:
[HttpPost("api/album")]
public async Task<Album> SaveAlbum([FromBody] Album postedAlbum)
{
    if (!ModelState.IsValid)
        throw new ApiException("Model binding failed.", 500);
    if (!AlbumRepo.Validate(postedAlbum))
        throw new ApiException(
                    AlbumRepo.ErrorMessage, 500,
                    AlbumRepo.ValidationErrors);
    var album = await AlbumRepo.SaveAlbum(postedAlbum);
    if (album == null)
        throw new ApiException(AlbumRepo.ErrorMessage, 500);
    return album;
}
The controller code is - as it should be - very short, with the heavy lifting handled by the business logic in the repository.
Entity Framework's lack of easy attachment of related entities requires workarounds.
Handling API Errors
You may have noticed that I captured errors in most of the operations above and then re-threw explicit errors using a custom ApiException class that adds parameters for an optional result status code and an error collection. The main purpose of this custom Exception class is as a marker interface, so you can capture the exception in an error filter and pass a JSON response back to the client.
ASP.NET Core's default error behavior is to throw an error page; it's either the developer error page in debug mode or a standard error page for a generic error, which is useless for a client application that needs to display error information. I prefer to pass back a JSON response with the error information embedded so the client application can display a meaningful error message in the client UI.
To handle exceptions in MVC 6, use a custom ApiExceptionFilter (shown in Listing 4) that can be assigned globally to all controllers or individually via an attribute like this:
[ApiExceptionFilter]
public class AlbumViewerApiController:Controller
Listing 4: An API error handler that returns any exceptions as JSON messages
public class ApiExceptionFilter : ExceptionFilterAttribute
{
    public override void OnException(ExceptionContext context)
    {
        ApiError apiError = null;
        if (context.Exception is ApiException)
        {
            // handle explicit 'known' API errors
            var ex = context.Exception as ApiException;
            context.Exception = null;
            apiError = new ApiError(ex.Message);
            apiError.errors = ex.Errors;

            context.HttpContext.Response.StatusCode = ex.StatusCode;
        }
        else
        {
            // Unhandled errors
#if !DEBUG
            var msg = "An unhandled error occurred."
#else
            var msg = context.Exception.Message;
#endif
            apiError = new ApiError(msg);
            context.HttpContext.Response.StatusCode = 500;
        }

        context.Result = new JsonResult(apiError);

        base.OnException(context);
    } }
public class ApiException : Exception
{
    public int StatusCode { get; set; }

    public ValidationErrorCollection Errors { get; set; }

    public ApiException(string message,
                        int statusCode = 500,
            ValidationErrorCollection errors = null) :
        base(message)
    {
        StatusCode = statusCode;
        Errors = errors;
    }
    public ApiException(Exception ex,
    int statusCode = 500) : base(ex.Message)
    {
        StatusCode = statusCode;
    }
}
Now when an error occurs in any operation, a JSON response is always returned. For example, if you save an album and have a description that's too short, you get this JSON error response:
{
    "isError": true,
    "message": "Please provide a description...",
    "detail": null,
    "errors": [{
        "Message":"Please provide a description...",
        "ControlID": "",
        "ID": ""
    }]
}
The client application can now pick up this error and display it in the UI, as shown in Figure 3.

Using an effective way to handle API errors is important when communicating errors to the client.
Setting Up CORS
When building an API application - especially an Angular 2.0 application - one thing you have to deal with is cross-domain access to your API. Angular 2.0's development server runs on a separate port, which acts as a separate domain, and so is rejected as a cross-domain request by XHR clients. To get the server to work with a front end hosted on a different server or port, you have to implement CORS (Cross Origin Resource Sharing). CORS is a protocol that requests confirmation from a server whether or not it allows access to a given domain. If allowed, the server sends HTTP headers that specify which domains and for what type of request headers the server allows access. Without CORS confirmation from a server, XHR requests that go across domains fail in major browsers, so CORS is a requirement for just about any API implementation.
The server-side headers returned for a GET request from a server that supports CORS look like this:
HTTP/1.1 200 OK
Vary: Origin
Access-Control-Allow-Origin: localhost:3000
Access-Control-Allow-Credentials: true
Content-Type: application/json; charset=utf-8
Server: Kestrel
Note that these results are returned only on requests that have a different origin than the server's domain. Luckily getting ASP.NET to generate CORS headers is fairly easy:
- Create a CORS Policy and register it with DI.
- Apply the CORS Policy either globally or on each Controller.
Start by creating a policy and adding the CORS functionality to DI by adding the following to the ConfigureServices() method in Startup.cs:
services.AddCors(options =>
{
    options.AddPolicy("CorsPolicy",
        builder => builder
            .AllowAnyOrigin()
            .AllowAnyMethod()
            .AllowAnyHeader()
            .AllowCredentials());
});
You can then apply the policy globally in the Configure() method, where it applies to all server requests:
app.UseCors("CorsPolicy");
Make sure this line is applied before the app.UseMvc() call.
Alternately you can also apply the policy on each controller, which is the route I took:
[ApiExceptionFilter]
[EnableCors("CorsPolicy")]
public class AlbumViewerApiController:Controller
Database Support and Multi-Platform
In my last article, I talked about cross-platform support and made a show of taking the simple example I created and moving it over to my Mac and running it there unchanged. Let's see what I have to build in order to run the AlbumViewer application on my Mac.
Adding Support for SQLite
So far, I've used SQL Server for data access, but if I want to run the application on a non-Windows computer, it'd be nice to use a database that can access the data directly on all platforms. SQLite is a local data engine that runs in-process of the application and provides data access that's more than adequate for this simple example. Note that you can still use and connect to a SQL Server back end from Mac or Linux, but you have to have SQL Server running somewhere.
To configure the application to support both SQL Server and SQLite, add the following the Configure() method of Startup.cs:
services.AddDbContext<AlbumViewerContext>(
builder => {
    string useSqLite = Configuration["Data:useSqLite"];
    if (useSqLite != "true")
    {
        var connStr = Configuration[
            "Data:SqlServerConnectionString"];
        builder.UseSqlServer(connStr);
    }
    else
    {
        var connStr = "Data Source=" + "AlbumViewerData.sqlite");
        builder.UseSqlite(connStr);
    }
});
This code uses configuration settings in appsettings.json to determine whether to use SQL Server or SQLite.
{
    "Data": {
        "useSqLite": "true",
        "SqlServerConnectionString": "...",
    }
}
You also need the SQLite Entity Framework access library in project.json:
"Microsoft.EntityFrameworkCore.Sqlite": "1.0.1"
If useSqLite is true in the configuration, the application uses the SQLite provider. The sample application includes startup logic that creates a model by loading data from a static JSON file using an AlbumViewerDataImporter class that automatically creates the database file the first time you run the application in SQLite mode.
Moving to a Mac
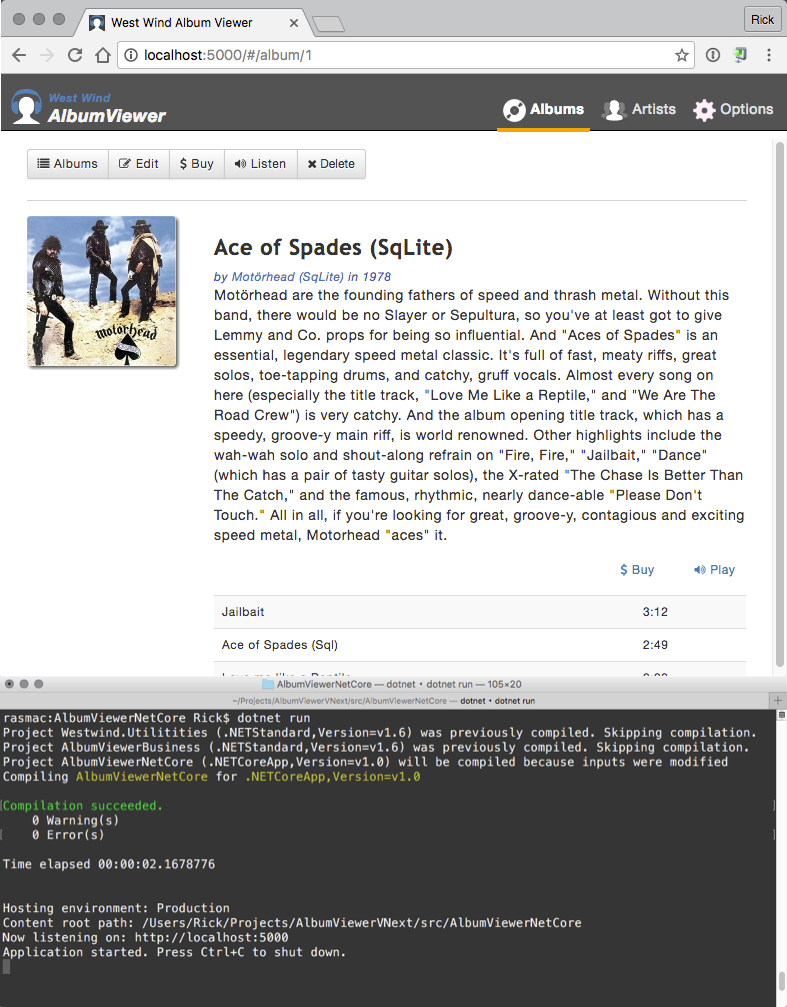
To move the application to the Mac, package the project folder into a zip file or simply pull the project from the AlbumViewerVNext GitHub repository (https://github.com/RickStrahl/AlbumViewerVNext). On the Mac (or Linux), make sure that .NET 1.01 is installed by going to dot.net and following the instructions for your platform. Follow the installation directions to get .NET onto the computer, which should take just a few minutes.
Once .NET is installed, clone or unpack the project and change to the project folder in the Terminal. The first thing you need to do is restore all of the packages for each of the three projects: AlbumViewerNetCore, AlbumViewerBusiness, and Westwind.Utilities. In the solution root do dotnet restore, which restores packages in all the child projects. Then change to the AlbumViewerNetCore folder, which is the main project directory, and type dotnet run. Then open your browser on http://localhost:5000. Figure 4 shows the running AlbumViewer application on the Mac.
It's pretty exciting to see this sort of cross-platform behavior for .NET applications. You can now make changes to the code on the Mac and simply do dotnet run again to recompile the updated code. Awesome!
Summing Up
ASP.NET Core makes creating API applications fairly straightforward. If you've used ASP.NET MVC 5 or earlier, or Web API, ASP.NET Core's MVC implementation that supports both MVC and API services feels very familiar and comfortable. The combined Controller implementation that supports both MVC and APIs from a single model is a welcome change that makes it easier to handle common support tasks consistently.
Building APIs with ASP.NET Core feels very natural - you simply create class methods for HTTP operations. But the devil is often in the details and I tried to cover a few important ones like error handling and CORS support in this article. Also data access with Entity Framework Core is still a bit of a challenge with missing features and differing behavior from EF 6, but even so, it's feels quite workable and as a bonus, performance for most operations appears to be much better.
My overall feeling is that ASP.NET Core's development model is easy going and predictable, just as you would expect from ASP.NET. The hardest part, for me, at least, has been to be completely forced into the dependency injection model and the general feeling of “where has my cheese moved to” in regard to finding the right packages. But the underlying behaviors of the .NET Framework are familiar and generally unchanged. Anybody who's worked with previous versions of ASP.NET should have no problem getting comfortable with ASP.NET Core.
