


How to use NetBeans to develop a PHP application
Although a text editor is adequate for developing simple PHP applications like the ones for this book, most professional PHP developers use an Integrated Development Environment (IDE) that’s designed for developing PHP applications. However, an IDE can also be useful as you’re learning how to develop PHP applications.
If you’re interested, we recommend the NetBeans IDE for PHP. This free IDE runs on all major operating systems, and it provides many features that make it easier to edit and test PHP applications. To learn how to install this IDE, please refer to the appendixes. To learn how to get started with this IDE, please read the three topics that follow.
How to work with PHP projects and files
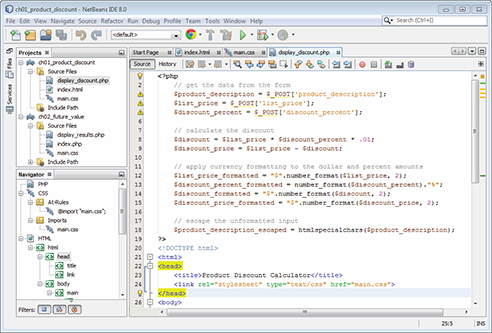
When you use NetBeans, all of the directories and files for an application are grouped within a project. You can also have more than one project open at the same time. In figure 1-16, the Projects tab of NetBeans shows that two projects are open: ch0l_product_discount and ch02_future_value.
When you work with NetBeans, you can start commands by using the menus, clicking on the toolbar buttons, or right-clicking on an object and using the resulting shortcut menu, just as you would with any application. In this figure, for example, you can see how to open a project, start a new project, or close a project by using the toolbar buttons, but you can get the same results by using the commands in the File menu.
To work with the files in a project, you can use the Projects tab to view the files for the project. Then, you can open any file by double-clicking on the filename in the Projects tab. In this figure, for example, three of the files for the ch01_product_discount project are open in the text editor, and the file named display_discount.php is displayed. To start a new file, you can select the project in the Projects tab and click the New File button in the toolbar.
Incidentally, when you create a NetBeans project, NetBeans adds a subdirectory named nbproject to the application root directory. It uses this subdirectory and its files to manage the project. However, this has no effect on the operation of the project, and you can still edit the files using a standard text editor.
In addition, the applications you download from our website are Netbeans projects that contain an nbprojects subdirectory, so you should be able to open them by using the Open Project button and then navigating to the \xampp\htdocs\ folder.
How to work with projects
- To open a project, use the Open Project button in the toolbar and navigate to the project you want to open. This is how you will open the downloaded book applications.
- To start a new project, use the New Project button in the toolbar.
- To close a project, right-click on the project in the Projects tab and select the Close command from the resulting menu.
How to work with files
- To open a file, use the Projects tab to navigate to the file and then double-click the file.
- To start a new file, select the project and click the New File button in the toolbar.
Description
- NetBeans is an Integrated Development Environment (IDE) for developing PHP applications that makes it easier to create, edit, and test all of the HTML, CSS, and PHP files that you need for a web application.
- A NetBeans project consists of a top-level directory that contains the subdirectories and files for an application.
- When you create a NetBeans project, NetBeans adds an nbproject subdirectory that contains the extra files that NetBeans needs for managing the project.
Mac OS X note
- To enable right-clicking with Mac OS X, you can edit the system preferences for the mouse.
How to edit and test a PHP application
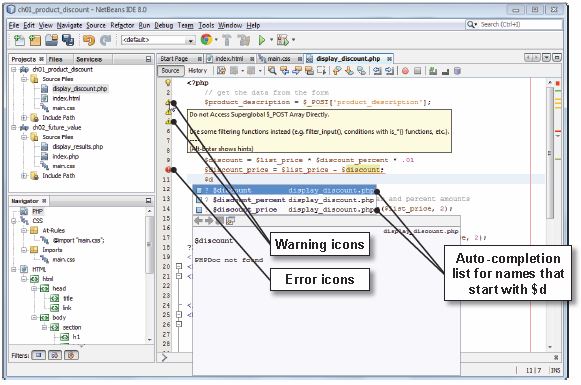
Figure 1-17 shows how to edit and test a PHP application. In general, the PHP editor works like any other text editor so you shouldn’t have any trouble using it. However, its auto-completion feature does an even better job of offering the variable names that you might want to use.
In addition, the PHP editor does more error checking as you type than most text editors. In this figure, for example, you can see a red circle error icon at the start of line 10 because the previous statement doesn’t end with a semicolon. This as-you-type error checking is also done for HTML and CSS code. The benefit, of course, is that you find and fix errors before you test the application, which is far more efficient than finding and fixing them later on.
The PHP editor also checks for other issues that aren’t errors but that might cause problems. In this figure, for example, you can see yellow triangle warning icons on lines 3, 4, and 5. If you hover your mouse over the icon, as shown in the figure, the PHP editor gives you details about what the issue is.
In this figure, the warning icons display a message that says that you shouldn’t access the global $_POST array directly. That’s because doing so can lead to security vulnerabilities if you don’t validate the data input or escape the data output. However, since this is only a warning, this code will run. As a result, you can ignore this warning for now. Later in this book, you’ll learn how to validate data input and how to escape data output.
After you’ve edited the files for an application, NetBeans also makes it easier to test them. To test the project that’s currently selected in the Projects window, for example, you just press the F6 key. This opens the default file for the application in the default browser of your system so the application is ready for testing. You can use the other techniques in this figure to run a project that isn’t currently selected in the Projects window or to run a specific file.
How to edit a PHP file
- Use normal editing techniques as you enter PHP code.
- When you see an auto-completion list, you can highlight an entry and press the Enter key to enter it into your code or you can double-click on it.
- If you see a red error icon at the start of a line, you should fix whatever errors the line contains before you test the application.
- If you see a yellow warning icon at the start of a line, you can hover the mouse over the icon to read the warning. Then, you can fix the issue if you want.
How to test a PHP application
- To run the current project, click on the Run Project button in the toolbar or press F6.
- To run other projects, right-click on the project and select the Run command.
- To run a file, right-click on the file and select the Run command.
Description
- The auto-completion feature of NetBeans provides lists of possible entries after you enter the starting characters for an entry.
- NetBeans uses a red error icon to identify lines that contain errors.
- NetBeans uses a yellow warning icon to identify lines that might not follow best practices.
- To remove some types of warnings, select the Tools(Options item and click on the Hints tab.
How to import and configure a PHP project
If you’ve created an application without using NetBeans, you need to import the application into a NetBeans project before you can edit and test the project. To do that, you can use the techniques described in figure 1-18.
It’s important to note that this only applies to applications created outside of NetBeans. For example, if you used Notepad++ to create the application for this chapter, you’d need to follow the importing procedure to edit and test the project in NetBeans. However, because the downloaded book applications were created in NetBeans, you don’t have to import them. You should be able to work with the downloaded book application projects in NetBeans just by opening them, as described in figure 1-16.
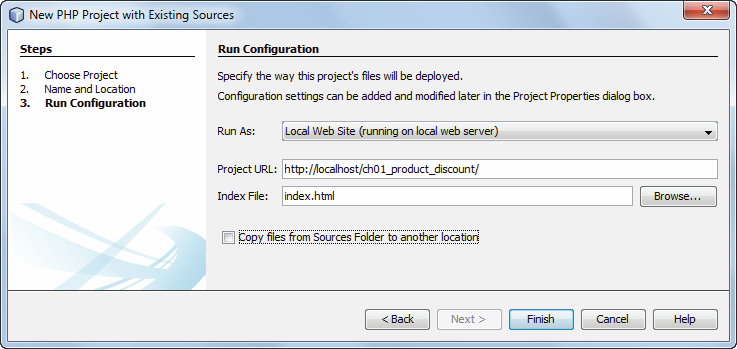
As part of the importing procedure, NetBeans prompts you to check the run configuration for the project. In this figure, for example, the second dialog box shows the configuration for an application named ch01_product_discount as it is being imported into NetBeans. Here, you need to make sure that the Project URL text box contains the correct path for running the project.
If the directory for the application is stored within the htdocs directory, NetBeans usually sets the Project URL correctly. As a result, you don’t need to change it. However, if you want to store the application in another directory, such as the book_apps directory, you can edit this URL. In addition, if you rename or copy an existing NetBeans project, the Project URL in the run configuration may no longer be correct. Then, when you run the application from NetBeans, the browser may display the wrong application. In that case, you can fix the problem by editing the run configuration as shown in this figure.
So be forewarned. If you only work with the book applications and exercise starts that you download from our website and install as shown in the appendix, you shouldn’t have any problems with run configurations. But as you import and copy applications of your own, keep the run configuration in mind.
How to check the run configuration for an existing project
- Right-click on a project in the Projects tab and select the Properties command.
- Then, click on Run Configuration in the Categories list and check the Project URL.
How to import a project
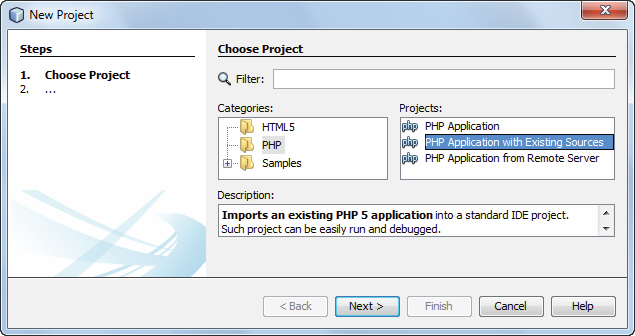
- To import a project, use the New Project command, but select PHP Application with
- Existing Sources in the Projects list. This will step you through the import procedure.
- In the third step, you are asked to check the run configuration. Here, you need to make sure the URL for running the project is correct.
Description
- Before you can run an existing application with NetBeans, you need to import it. Then, NetBeans creates the files it needs for managing the project in its nbproject directory.
- When you import a new Project, you need to check its configuration to make sure the URL for running the project is correct. You also need to check this URL if you copy a NetBeans project from one directory to another and then open it in NetBeans.
