


As a developer, you probably spend a lot of time testing and debugging your code. Visual Studio 2013 introduces new debugging tools and updates some existing ones, continuing in its purpose of offering the most productive environment ever.
64-bit Edit and Continue
Visual Studio 2013 finally introduces Edit and Continue for 64-bit applications. As you know, with Edit and Continue, you can break the application’s execution, edit your code, and then restart. So far, this has been available only for 32-bit applications. It is very easy to demonstrate how this feature works. Consider a very simple Console application, whose goal is retrieving the list of running processes and displaying the name of the first process in the list; the code is the following.
Visual C#
    class Program
    {
        static void Main(string[] args)
        {
            var runningProcesses = System.Diagnostics.
                                   Process.GetProcesses();
            Console.WriteLine(runningProcesses.First().ProcessName);
            Console.ReadLine();
        }
    }
Visual Basic
Module Module1

    Sub Main()
        'Add a breakpoint here and make your edits at 64-bits!
        Dim runningProcesses = System.Diagnostics.Process.GetProcesses()
        Console.WriteLine(runningProcesses.First().ProcessName)
        Console.ReadLine()
    End Sub

End Module
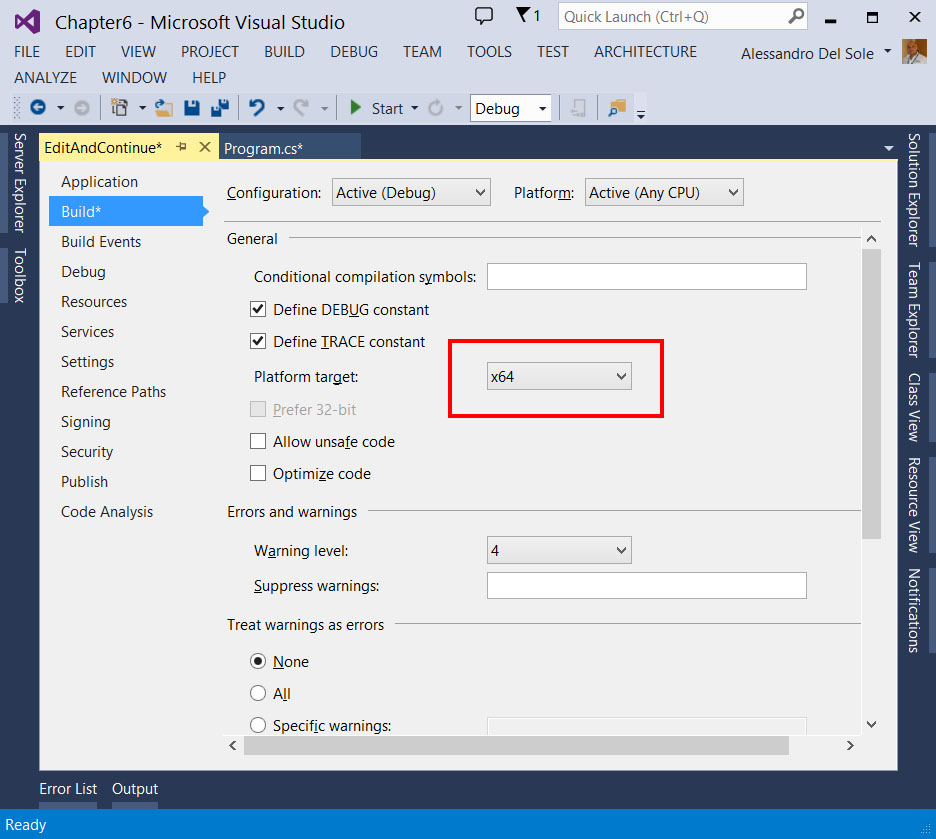
Before running the application, open the project’s properties, select the Build tab, and change the platform target to x64, as shown in Figure 75.
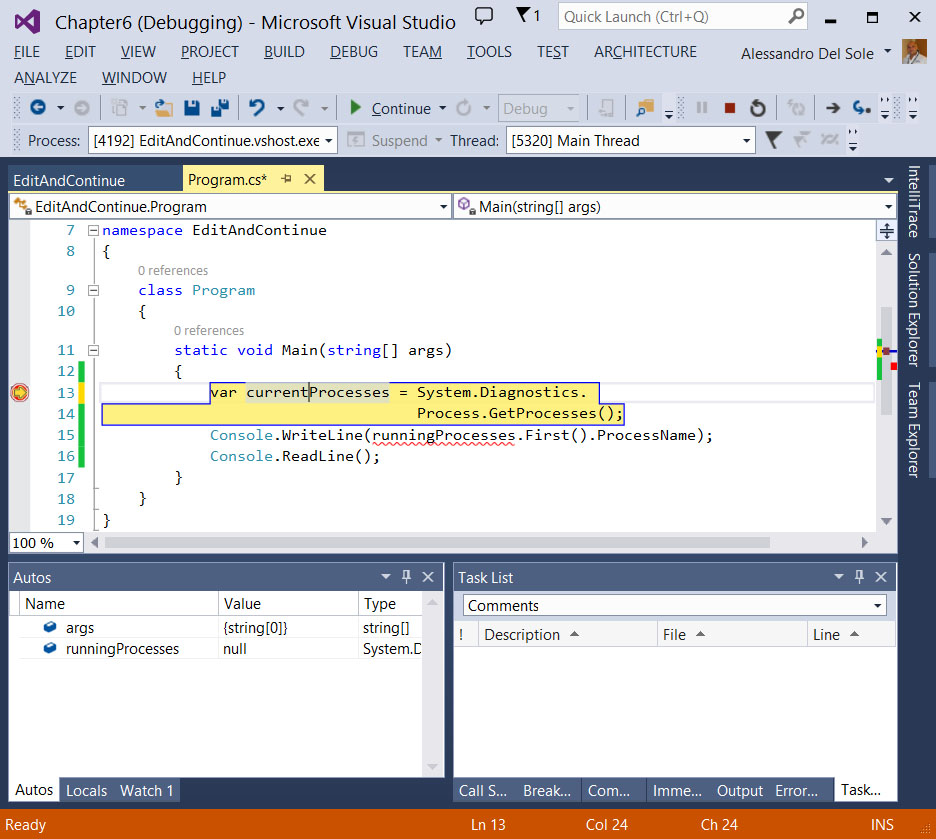
Now go back to the code, and place a breakpoint on the line containing the declaration of the runningProcesses variable by pressing F9. Finally, press F5 to run the application. When the debugger encounters the breakpoint, the code editor is shown. You can simply rename the runningProcesses variable into currentProcesses (see Figure 76); this is enough to demonstrate how Edit and Continue is now working. Before Visual Studio 2013, if you tried to edit your code, at this point you would receive an error saying that Edit and Continue is only supported in 32-bit applications.
Asynchronous debugging
Visual Studio 2012 and the .NET Framework 4.5 introduced a new pattern for coding asynchronous operations, known as the Async/Await pattern based on the new async and await keywords in the managed languages. The goal of this pattern is making the UI thread always responsive; the compiler can generate appropriate instances of the Task class and execute an operation asynchronously even in the same thread. You will see shortly a code example that will make your understanding easier, however there is very much more to say about Async/Await, so you are strongly encouraged to read the MSDN documentation if you’ve never used it. If you are already familiar with this pattern, you know that it is pretty difficult to get information about the progress and the state of an asynchronous operation at debugging time. For this reason, Visual Studio 2013 introduces a new tool window called Tasks. The purpose of this new tool window is to show the list of running tasks and provide information on active and pending tasks, time of execution, and executing code. The Tasks window has been very much publicized as a new addition to Windows Store apps development, but it is actually available to a number of other technologies, such as WPF. This is the reason why this feature is discussed in this chapter rather than in the next one about Windows 8.1.
Create a sample project
To understand how this feature works, let’s create a new WPF Application project called AsyncDebugging. This application will create a new text file when the user clicks a button. The XAML code for the user interface is very simple, as represented in the following listing.
<Window x:Class="AsyncDebugging.MainWindow"
        xmlns="http://schemas.microsoft.com/winfx/2006/xaml/presentation"
        xmlns:x="http://schemas.microsoft.com/winfx/2006/xaml"
        Title="MainWindow" Height="350" Width="525">
    <Grid>
        <Button Width="100" Height="30" Name="FileButton" Content="Create file" Click="FileButton_Click"/>
    </Grid>
</Window>
The code-behind file for the main window will contain the following code (see comments inside).
Visual C#
using System.IO;

        //Asynchronous method that passes some variables to
        //the other async method that will write the file
        //You wait for the async operation to be completed by using
        //the await operator. This method cannot be awaited itself
        //because it returns void.
        private async void WriteFile()
        {
            string filePath = @"C:\temp\testFile.txt";
            string text = "Visual Studio 2013 Succinctly\r\n";

            await WriteTextAsync(filePath, text);
        }


        //Asynchronous method that writes some text into a file
        //Marked with "async"
        private async Task WriteTextAsync(string filePath, string text)
        {
            byte[] encodedText = Encoding.Unicode.GetBytes(text);

            using (FileStream sourceStream = new FileStream(filePath,
                FileMode.Append, FileAccess.Write, FileShare.None,
                bufferSize: 4096, useAsync: true))
            {
                //new APIs since .NET 4.5 offer async methods to read
                //and write files
                //you use "await" to wait for the async operation to be
                //completed and to get the result
                await sourceStream.WriteAsync(encodedText, 0,
                      encodedText.Length);
            };
        }

        private void FileButton_Click(object sender, RoutedEventArgs e)
        {
            //Place a breakpoint here...
            WriteFile();
        }
Visual Basic
    Imports System.IO
    'Asynchronous method that passes some variables to
    'the other async method that will write the file
    'You wait for the async operation to be completed by using
    'the await operator. This method cannot be awaited itself
    'because it returns void.
    Private Async Sub WriteFile()
        Dim filePath As String = "C:\temp\testFile.txt"
        Dim text As String = "Visual Studio 2013 Succinctly"

        Await WriteTextAsync(filePath, text)
    End Sub

    'Requires Imports System.IO
    'Asynchronous method that writes some text into a file
    'Marked with "async"
    Private Async Function WriteTextAsync(filePath As String,
            text As String) As Task
        Dim encodedText As Byte() = Encoding.Unicode.GetBytes(text)

        Using sourceStream As New FileStream(filePath, FileMode.Append,
                                             FileAccess.Write,
                                             FileShare.None,
                                             bufferSize:=4096,
                                             useAsync:=True)
            'new APIs since .NET 4.5: async methods to read and write files
            'you use "await" to wait for the async operation
            'to be completed and to get the result
            Await sourceStream.WriteAsync(encodedText, 0,
                  encodedText.Length)
        End Using
    End Function

    Private Sub FileButton_Click(sender As Object, e As RoutedEventArgs)
        WriteFile()
    End Sub
In order to run the code without any errors, ensure you have a C:\Temp folder; if not, create one or edit the code to point to a different folder. If you start the application normally, after a few seconds you will see that the text file has been created correctly into the C:\Temp folder. If you already have used the Async/Await pattern in the past, you know that the debugging tools available until Visual Studio 2012 could not show the lifecycle of tasks; you could not know what task was active and which one was waiting. Let’s see how Visual Studio 2013 changes things at this point.
Understanding the Tasks lifecycle with the Tasks window
Place a breakpoint on the WriteFile method invocation inside the button’s click event handler (see the comment in the previous listing). Start the application and, when ready, click the button. When Visual Studio breaks the execution on the breakpoint, go to Debug, Windows, and select Tasks. The Tasks tool window will be opened and docked inside the IDE. Start debugging with Step Into by pressing F11. While asynchronous methods are invoked, the Tasks window shows their status, as demonstrated in Figure 77.
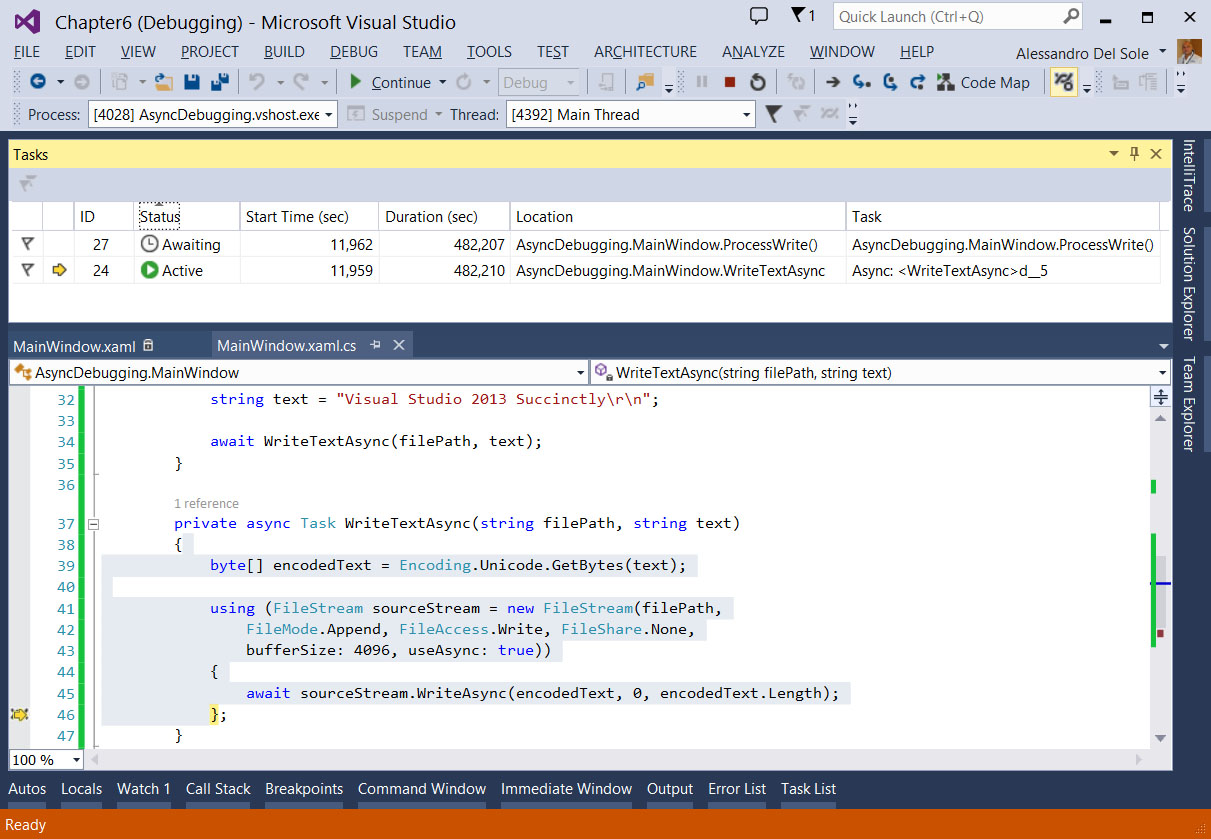
By default, the Tasks window shows the following columns and related information:
- ID, which represents the task identifier.
- Status, which indicates whether the task is active or awaiting.
- Start Time (sec), which indicates the start time in seconds for the tasks.
- Location, which shows the name of the method where the task has been invoked.
- Task, which summarizes the operation in progress.
You can customize the Task window by adding or removing columns. If you right-click any column and then select Columns, a popup menu will show the full list of available columns; for instance, you might be interested in the Thread Assignment column to see what thread contains the selected task. The Tasks window is definitely useful when you need a better understanding of asynchronous operations’ lifecycle, including when you need to analyze a task’s performance. If the Tasks window does not display information as you step through lines of code using F11, and you are working with a desktop application, restart debugging and retry. This is a known issue. If you are working with a Windows Store app instead, you will not encounter this problem.
