


My Windows 8 By Katherine Murray Published Sep 11, 2012 by Que. Part of the My... series. Sample Chapter is provided courtesy of Que Publishing.
This chapter shows you how to get started with your Windows 8 PC and use touch, mouse, and keyboard to perform common tasks.
In this chapter, you learn how to get started with your Windows 8 PC and use touch, mouse, and keyboard to perform tasks such as
- Exploring Windows 8
- Using touch in Windows 8
- Getting around with the mouse and keyboard
- Shutting down or putting Windows 8 to sleep
- Finding the help you need
It’s probably safe to assume that you’ve already learned something about Windows 8-maybe you’ve heard about the high energy, the colors, the touch interface, and the new styling. You may be feeling excited to try something completely different in terms of the way computer operating systems typically behave. Or you might be a bit anxious-what if it’s so much of a change that Windows 8 makes your life more complicated than it already is? Nobody needs that!
Relax. That’s what this book is here to help you do-learn the basics of Windows 8 in a way that helps you keep your stress level low and your productivity level high. I personally think Windows 8 is smart and fun. I love the color, the movement, the touch capability, and the flexibility. I hope as you go through the chapters in this book, you’ll feel a bit of that “fun vibe” rubbing off as you expand your experience and increase your mastery of Windows 8.
Perhaps you are just now getting a chance to try Windows 8, either as the sleek operating system on your brand-new Windows 8 PC or Microsoft Surface, or as an upgrade you’ve added to your Windows 7 computer. This chapter opens the door on your Windows 8 experience and gives you a chance to navigate the operating system using touch, mouse, and keyboard. You’ll also find out how to put your computer to sleep (no, don’t worry-no singing required) and power down the system completely, when you’re ready to do that.
Exploring Windows 8
If you’ve just upgraded to Windows 8, the utility will restart your computer after installation is complete. When your computer restarts, Windows 8 quickly appears on your screen, and, after asking you a series of Express Setup questions (which help Windows 8 get you connected to the Internet, set your sharing preferences, and turn on the Do Not Track setting in Internet Explorer), you are ready to start exploring.
If you’re powering up your brand-spanking-new Windows 8 computer for the first time, Windows 8 launches (and very quickly, too!) and asks you those same Express Setup questions. Just respond as prompted and soon you’ll be looking at the beautiful new Windows 8 Start screen. That’s where we’ll begin our exploration.
A First Look!
Your computer needs the operating system in order to do what it does, which means that powering up your computer and launching Windows 8 are really the same thing. Here are the simple steps required for starting your computer and getting to the Windows 8 Start screen:
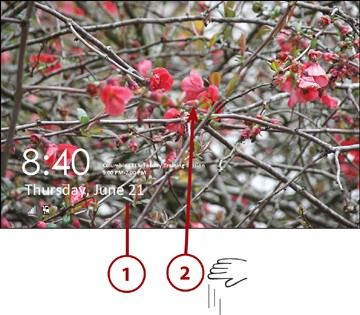
- Press your computer’s Power button. Your computer starts and your Windows 8 Lock screen appears.
- Swipe up on the screen (if you have a touch-capable computer) or press any key to display your login information.
- Enter your password and press Enter or click the arrow.
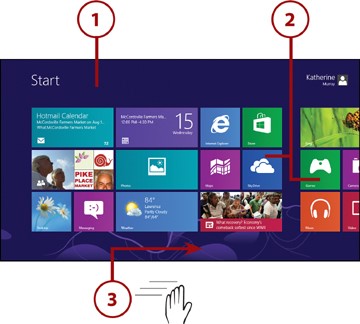
- Now you’re ready to review the various elements on the Windows 8 Start screen.
Touring the Start Screen
You’ve probably seen pictures online that show how colorful the Windows 8 Start screen is, but it’s likely when you see it with your own eyes for the first time, you’re going to be wowed. Or confused. Or both. The beautiful color and easy, smooth movement of the screen are really something to see. But once you get over that first glimpse, you’re going to wonder how you actually use this beautiful tool. Here are some of the big features in Windows 8, which you’ll find described in more detail throughout this book:
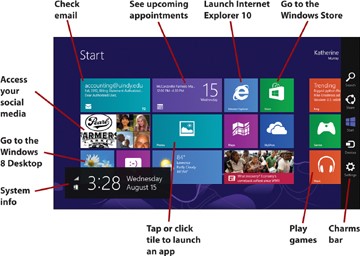
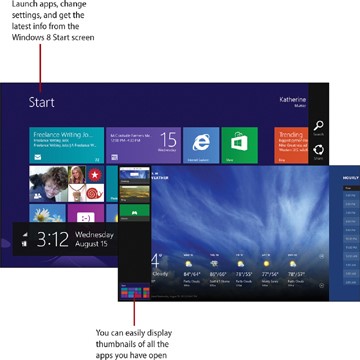
- Use the Windows 8 Start screen. This is where all the fun begins. You can get an enormous amount of information from this one screen in Windows 8. You can see at a glance the number of email messages you have, what your day’s appointments look like, what the news headlines are, and much more. Plus you can start your favorite apps, play media, change system settings, and even customize the look of Windows 8, all from this one screen. You’ll learn more about the Start screen in Chapter 3 and find out how to personalize your Start screen in Chapter 5.
- Go to your Windows 8 Desktop. The Windows 8 Desktop will look familiar to you if you’ve used previous versions of Windows. Here you’ll work with programs designed for Windows versions prior to Windows 8 (known as legacy programs). You find out how to use and personalize the Windows 8 desktop in Chapter 4.
- Launch and work with apps. The colorful tiles on the Windows 8 Start screen represent apps, or programs, you can launch with a simple click or tap. Some apps display “live” information and update on the Start screen, and others don’t. You learn how to work with, organize, and get new apps in Chapter 7. Also be sure to check out the Apps Gallery in this book’s appendix to find out more about the apps included with Windows 8 as well as popular apps in the Windows Store.
- Browse the web with Internet Explorer 10. The IE10 is the newest web browser from Microsoft, and in Windows 8 it comes in a newly designed version and a Desktop version. Both allow you to surf the web, find the information you want, and connect with others-they just look different depending on whether you launched the browser from the Windows 8 Start screen or the Windows 8 desktop. You find out more about using Internet Explorer 10 in Chapter 9.
- View, organize, and share photos. The Photos app in Windows 8 enables you to easily view, organize, and share all the photos you take, whether you’ve stored them on your computer, in photo-sharing sites, or in your favorite social media accounts. You’ll be learning more about managing your photos in Chapter 11.
- Stay up to date with friends and family. The People app pulls together your favorite social media contacts and displays updates in live feeds that you can use to stay in sync with what your favorite folks are posting. You’ll learn more about using the People app in Chapter 10.
- Find new favorites in the Windows Store. The Windows Store is a new addition in Windows 8, and it’s where you can find apps of all sorts, free and otherwise. The Windows Store offers apps in the following categories: games, social media, entertainment, photos, music and video, sports, books, news, health, food, lifestyle, shopping, travel, finance, productivity, tools, security, business, education, and government. You’re sure to find something you like! You’ll find out more about browsing and shopping in the Windows Store in Chapter 7 as well. You’ll also get additional information about the Windows Store in the appendix to this book.
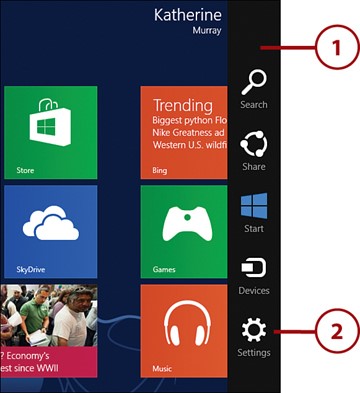
- Display the Charms bar. A simple swipe in from the right side of the screen (or moving the mouse to the lower-right corner of the screen) displays the Charms bar, where you’ll find the tools you need for searching for files, apps, and settings; sharing content and apps; returning to the Start screen; connecting devices; and changing system settings.
These items don’t represent all there is to do in Windows 8, certainly, but they give you a quick bird’s-eye-view of some of the major places we’ll be stopping along the way.
Using Touch in Windows 8
If you’ve seen any of the videos about Windows 8 (you can watch one I created using Windows 8 Developer Preview by going to http://www.quepublishing.com/articles/article.aspx?p=1766168">http://www.quepublishing.com/articles/article.aspx?p=1766168), you have probably noticed that you can tap, drag, flick, and pinch your new operating system to get it to do the things you most want it to do. That’s a great change for Windows, when you consider that we’ve been pointing and clicking mouse buttons for decades.
Touch capability is no longer the wave of the future-it’s the way many of us navigate today. In case you haven’t noticed, human beings are touchy-feeling animals. We like to make good use of our fingers and opposable thumbs, and (or so my theory goes) we feel more in control of our world when we have a tactile sense that we are operating it correctly.
If you have a smartphone, you already know about touch. You tap the surface of your phone to dial a friend’s number, you swipe through photos, you pinch a webpage to make the print larger (so you can read it on that small screen). The gestures you’ll use on your tablet or multi-touch monitor are similar to the ones you’re probably already using on your smartphone, but for good measure (and for those readers who don’t go for the smartphones), let’s go through the gestures you’re likely to use most often in Windows 8.
Single Tap
You tap the screen to launch an app on the Windows 8 Start screen, select a setting, or choose an item to display.
Tap and Hold
If you want to select an item (and not activate it, as you did with the single tap) or perhaps display more information about an item, you can touch the item and hold your finger there until you see a small square surround the area. When you release your touch, a popup list of options appears. You can then tap the item you want to select.
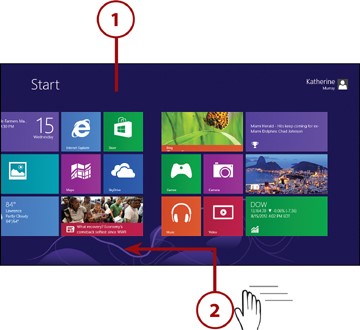
Swipe Left
The swipe left gesture enables you to scroll screen quickly, from right to left and back again, and, if you’re using Internet Explorer to browse the web, up and down as well.
Scroll Too Far?
One of the great things about touch is how natural it feels to make corrections. If you scroll the screen too far one way or another, simply reverse your swipe direction slightly to correct the display. It happens so easily you won’t even have to think about it! Nice.
Swipe Right
You use the swipe right gesture to cycle through open apps in Windows 8.
- Drag in from the left to right a second time to replace the first open app with the second. You can repeat this gesture as needed and also dock apps in the Start screen so that you can see more than one at one time.

Docking Open Apps
You can continue scrolling through apps as long as you like; and you can also dock an app so that it stays visible in the Windows Start screen. You’ll learn how to dock apps in Chapter 7, “Exploring Windows 8 Apps.”
Swiping Charm
When you swipe in from the right edge of your screen, the Charms bar appears, giving you the tools you need for searching for apps and files, sharing apps, choosing program settings, and using other devices.
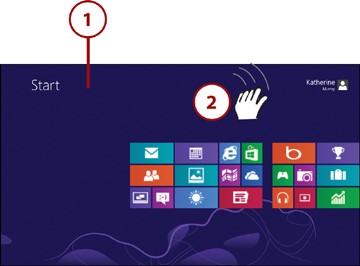
Swipe Up and Down
Swiping down from the top and up from the bottom of the Windows 8 screen enables you to unlock your Lock screen, select or close apps, and choose options.
- Swipe down when you are using an app to display options related to that app.


Options, Schmoptions
Don’t be dismayed if the options you see available for the particular app you have open differ from those shown here. Different apps offer different choices. For example, the Calendar app gives you different choices than the Maps app.
Swipe Down to Close
One of the big criticisms of Windows 8 Developer Preview was that initially Windows developers didn’t provide a way to close apps because Windows 8 actually suspends apps not in use. Now in Windows 8, you swipe down, from the top to the bottom of the screen, to close an open app.
Pinch Zoom
The Pinch Zoom gesture enables you to enlarge and reduce the size of the content on the screen. On the Start screen, for example, when you pinch your fingers together, you reduce the size of the tiles so that you can easily move them around or group them the way you want them. When you want to enlarge an area of the screen, you use your fingers to expand the area, and the screen magnifies along with your gesture.
Semantic Zoom
You might see this feature referred to as semantic zoom, so named because it allows you to magnify a specific region of the display without disturbing other parts of the screen. If the app you’re using was designed for Windows 8, chances are that it supports the pinch zoom gesture so that you can use two fingers to change the size of the content displayed on the screen.
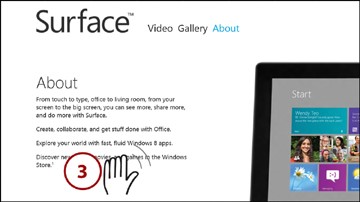
>>>Go Further: Introducing Microsoft Surface
On June 18, 2012, Microsoft unveiled the new Microsoft Surface, a state-of-the-art tablet with a built-in keyboard in the smartcover. Although you can use many tablets and touch devices with Windows 8, Microsoft Surface is beautifully optimized to work with the new operating system. Multiple touch points on the screen make navigating by touch as responsive and accurate as possible; and a live screen all the way out to the screen margins gives you the largest touch surface possible.
No matter what touch device you’re using with Windows 8, if the device was capable of running Windows 7, you will be able to successfully navigate Windows 8. If you want the best Windows 8 experience on a tablet you can get, get in line for a Microsoft Surface tablet.
Getting Around with the Mouse and Keyboard
Windows 8 developers took a lot of heat initially when they talked about the touch interface of the new operating system. People talked and wrote about the “split personality” of the operating system, and mouse users worried that opening and closing programs, working with files, and changing system settings would be more difficult if they opted not to use touch techniques to carry out the tasks.
As the versions of Windows 8 have continued to evolve, however, Microsoft has made it clear that mouse users aren’t being left in the dust. Windows 8 works equally well with touch, mouse, and keyboard.
Using the Mouse
The mouse can get you anywhere you want to go in Windows 8. Anything you can do with touch, you can do with your mouse-and then some. Whether you have a touch-capable device or not, you can still use your mouse for all of the common tasks you’ll perform in Windows 8: start apps, find and open files, and choose program settings. By now, this operation may be old hat, but here’s a refresher.

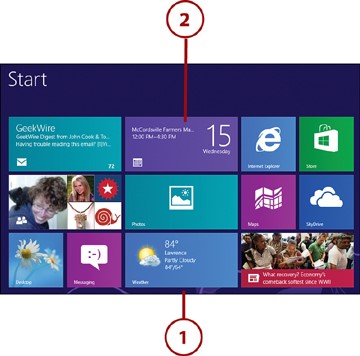
- Move the mouse to the bottom of the Windows 8 Start screen. The horizontal scroll bar appears. You can click the right arrow to move the display one screen to the right.
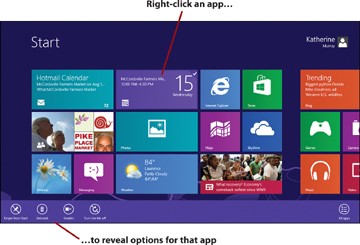
- To see the options for an app in the lower-right corner of the Start screen, right-click an app tile. From there, you can click the option you want to use.

- Point to the upper-left corner of the screen to see a thumbnail of the most recently used app.
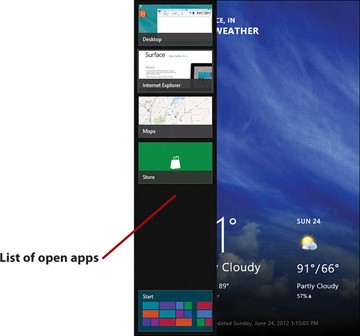
- Click and drag the mouse down the left side of the screen to display the thumbnail strip of open apps. Click the app you want to display.
Selecting Multiple Items
In File Explorer, you can use the mouse and keyboard together to select multiple items at once. If you want to choose several files in a folder, for example, you can click the first item and then press and hold the Shift key and click the last item you want to select. All items between the two clicked items are selected.
If you want to select multiple items that aren’t next to each other, click the first item and press and hold the Ctrl key; then click all the other items you want to include.
>>>Go Further: Getting to It
How do you feel about the disappearance of the Start menu? Lots of people are wringing their hands about that change, because the Start menu has stood for the place everything seemed to begin in since Windows 95. Now in Windows 8, we can just jump in and start anywhere, tapping and scrolling and flicking and zooming to our hearts’ content. But as you already know if you’ve ever stood in front of a 31-flavors ice cream counter, sometimes having too much choice has a paralyzing effect.
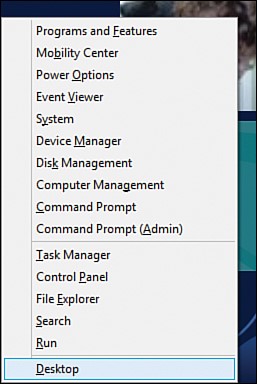
If you know what you’re looking for in Windows 8 and want to get right to it, you may enjoy using what some people are calling the “power user commands” in Windows 8. You’ll find it by pressing Windows + X on your computer keyboard or your tablet’s on-screen keyboard. The list of features includes many of those you are accustomed to working with in the Control Panel: Programs and Features, Mobility Center, Power Options, Device Manager, Command Prompt, Run, and more. Click the feature you want to use, or, to hide the feature list, simply tap or click anywhere outside the list.
Using the (Real) Keyboard
Some things you’ll need to do in Windows 8 you’ll want a real, live keyboard to do. Sure you can type a quick memo or answer an email message on your tablet, using the on-screen keyboard. But when you need to write a 10-page report for a departmental meeting or you have lots of work to do storyboarding the next team presentation, chances are good that you’ll want to use a real keyboard.
In addition to using touch and the mouse, you can also use your keyboard for navigating in Windows 8. When you use your keyboard to navigate the Start screen, move among apps, and manage windows, you use special keys, shortcut key combinations, and function keys.

- The Windows key, located on the lowest row of your keyboard on the left side between the Ctrl and Alt keys, takes you back to the Start screen no matter where you are in Windows 8.
- You can use the Pg Up and Pg Dn keys as well as the arrow keys to move among apps on the Windows 8 Start screen.
- You use the Tab key to move from option to option in a dialog box.
- You can press key combinations (such as Ctrl and the letter assigned to a specific menu option) to perform operations.
A Keyboard Is a Keyboard Is a Keyboard ... Right?
Depending on the type of computer you are using, you may notice some differences in the ways certain keys appear on your keyboard. The keyboard mentioned here is a “basic” keyboard layout. Your keyboard may or may not have a separate numeric keypad, function keys across the top, and a set of cursor-control keys that are separate from the alphanumeric keys. Additionally, you may notice that your Delete key or Backspace key is in a slightly different place than other keyboards you see. Take the time to learn where to find the common keys on your Windows 8 keyboard-once you know the lay of the land, finding the right key at the right time will be second nature.
Using a Touch Keyboard
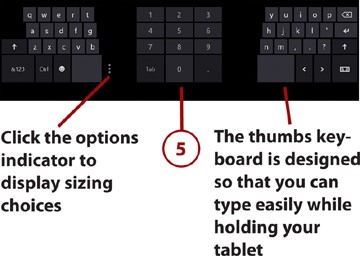
In addition to the physical keyboard attached to your computer, there’s also another kind of keyboard on touch devices like tablets you can use to add information and navigate in Windows 8. When you’re using an app on a tablet that requires input-whether that input is a status update, a tweet, or a document-the touch keyboard appears in Windows 8. You can type on the touch keyboard as you would a normal physical keyboard, with one added benefit: You may also be able to display the keyboard as a “thumbs” keyboard, where the keys are arranged within the reach of your thumbs if you are holding a tablet device. Very smart!
Begin by launching an app that will require you to type something on your tablet. For example, you might open the Calendar app and start a new appointment. Then follow these steps to display and work with the Windows 8 touch keyboard:

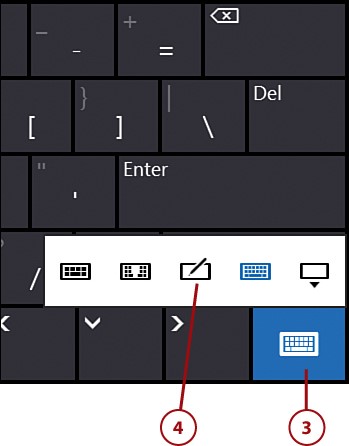
Displaying the Standard Keyboard
The first keyboard option available to you displays the on-screen tablet keyboard, which doesn’t include function keys or special keys like the Windows key or Alt. The standard keyboard options is available to the left of the drawing pad icon, but if this keyboard isn’t enabled in your PC settings, the item may be unavailable to you.
If the standard keyboard icon is grayed out, you can have Windows 8 display it as an option by swiping to display the Charms bar, tapping Settings, tapping Change PC Settings, and selecting General. Scroll down to the Touch Keyboard settings, and move the slider for the Make the Standard Keyboard Layout Available to the On position. When you return to the on-screen keyboard display, you’ll now be able to select and use the standard keyboard as one of the keyboard options.
Resizing the Thumbs Keyboard
Windows 8 lets you change the size of the thumbs keyboard so that typing is as easy as possible. To display your sizing choices, tap the three vertical dots just to the right of the keyboard segment on the left side of the screen. Medium is selected by default, but you can tap Small or Large to change the size of the keyboard.
>>>Go Further: Say What?!
Windows 8 has made some improvements to its Narrator accessibility feature, which reads the screen so that people with visual challenges can interact successfully with Windows 8. Narrator now offers a smoother performance and offers more natural-sounding voices (you can choose from three different PC voices-two female voices and one male voice). You can also control the speed at which Windows 8 narrates your experience, which can be helpful if you’re just learning the lay of the land.
You can turn on Narrator as soon as you open the Lock screen, before you even log in to your computer. Simply tap the button in the lower-left corner of the login screen to begin the narration. You can also turn on Narrator by pressing and holding the Windows key and tapping the Volume Up button on your keyboard.
Internet Explorer 10 now includes Narrator support as well, so users can listen to web content, understand links, and make choices about commands on webpages.
Shutting Down or Putting Windows 8 to Sleep
One of the other basic tasks you’ll need to do regularly with Windows 8 is turn your computer off. There’s no obvious Shut Down command like the one placed so conspicuously on the Windows 7 Start menu.
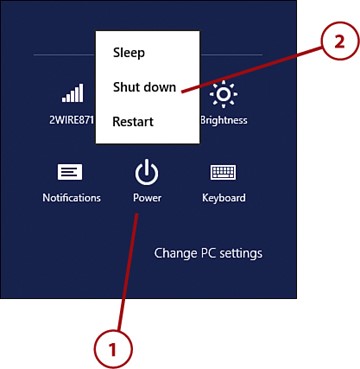
The secret is that Windows 8 tucks away the Shut Down command in the Settings charm in the Windows 8 Charms bar. You can easily turn the computer off-or just send it off to sleep-by selecting the option of your choice from the Settings charm.
Putting Windows 8 to Sleep
When you’re going to be away from your computer for a period of time but you aren’t ready to turn everything off for the day, you can put your computer in Sleep mode to conserve energy and protect your files and programs while you’re away.

Wake Up, Little Fella
One of the great things about Sleep mode is that it is designed to help your computer spring back to life quickly as soon as you’re ready. So even though it’s a little distressing to see everything fade to black so fast after you tap Sleep, you’ll be pleased to know a quick tap of the Power button on your PC brings everything back to full wakefulness almost instantly.
Shutting Down Windows 8
When you’re ready to power down your computer, just tap or click Shut down instead.
Starting Over
Of course you have one more option when you tap or click the Settings charm and select Power. If you want to restart your computer, you can tap Restart, and Windows 8 will power down and then reboot. You may be asked to restart your computer after you install an app or make a system setting change.
Finding the Help You Need
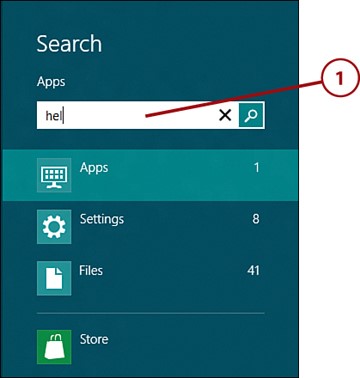
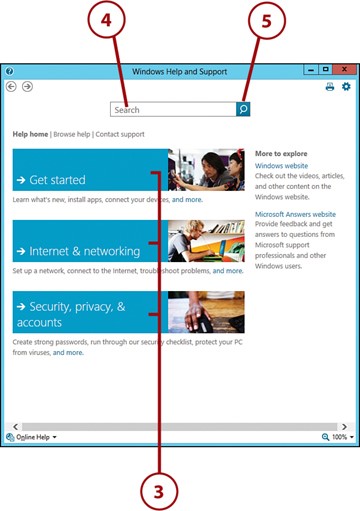
Windows 8 has revamped the look and feel of Help and Support to make finding articles, tips, and troubleshooting techniques easier than ever. If you’ve been looking for the little Help icon in Windows 8 you won’t find it on the Start screen (it does still appear in File Explorer, though). But as you’ll see getting Help in Windows 8 is as easy as typing four little characters.
Displaying Windows Help and Support
What’s the first thing to do when you feel like yelling “Help!”? How about this:
- Tap or click Help and Support. The Windows Help and Support window appears.

Changing Text Size
You can easily increase the text size in Help and Support by displaying the Windows Help and Support dialog box and then clicking Change Zoom Level in the lower-right corner of the Help window. Click Zoom In to magnify the text or Zoom Out to reduce the size of the text. You can also choose one of the other zoom percentages listed or click Custom to enter a zoom percentage of your own choosing.
Printing Help
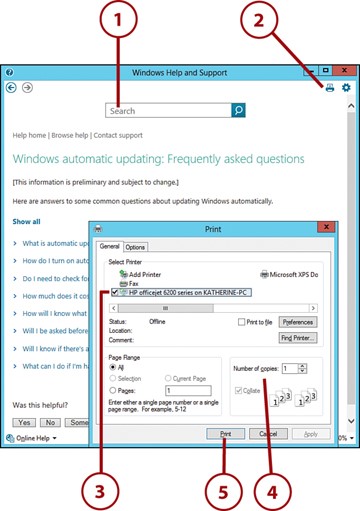
If you find that you are looking up a certain task repeatedly, you might want to print the help information to keep close to your computer until you commit it to memory.
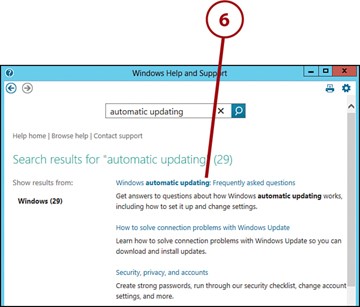
- Search for the help information you need.
- Click Print at the top of the help window.
- Choose your printer.
- Set your print options.
- Click Print.
Including Online Resources
To the right of the Print tool in the Help window, you’ll find a Tools icon. When you click or tap that tool, the Help Settings dialog box appears, displaying two help settings: Get Online Help, and Join the Help Experience Improvement Program, both of which are selected by default. The first option gives you access to the latest online help content when you search for help in Windows 8, and the second gives Microsoft permission to collect data about the way you’re using the Help feature. If you don’t want to send that type of information to Microsoft (even though you cannot be personally identified from the data collected), simply click to uncheck the box. Click OK to save any changes you made.
>>>Go Further: And That’s Just the Beginning...
In addition to the help that’s available to you in Windows 8 on your computer, you can visit Microsoft’s Windows 8 site (www.windows.microsoft.com) to learn more about Windows 8 features, watch videos, and learn about basic tasks.
Check out the Windows Community forums to find out what other users are asking about Windows 8. You’ll see responses from Microsoft MVPs (Most Valuable Professionals) that might just help solve a problem you’re having. Check it out if you have one of those hard-to-answer Windows 8 questions that has been keeping you awake at night.
