


I have a client that has a few Windows Services and some EXEs that run on a computer to perform various business functions. Every once in a while, the processes fail and need to be restarted. I helped the client write a Windows Service to monitor their running processes and ensure that they are up and running and to notify them and to attempt to restart those processes. As part of this process, I had to write a class to get a list of all of the processes running on the current computer or on another computer on their network.
Read All Processes
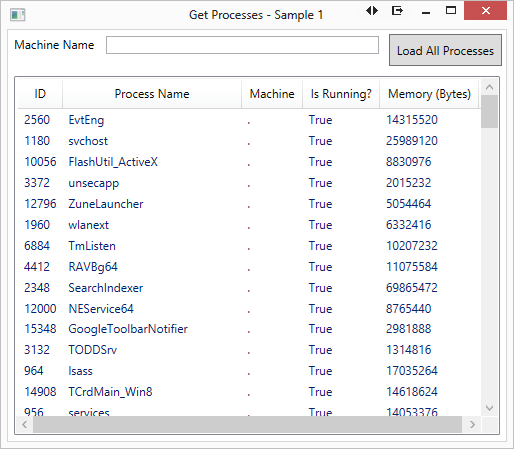
To read all processes running on a computer, use the .NET Process class located in the System.Diagnostics namespace. The GetProcesses method returns a string array of Process objects from the current (or a remote) computer. From this Process object, you can retrieve information about the process (Figure 1) such as its unique ID, its name, whether or not it is running, and how much memory that process is consuming.
You can pass a computer name to the GetProcesses method to have it attempt to read the processes running on that remote computer. You must have the appropriate network/computer permissions to read the processes on the other computer or this call will fail. Certain properties for the remote process cannot be filled in because they cannot be retrieved remotely.
The code in Listing 1 is what fills in the process information on the XAML screen shown in Figure 1. A Process array is initialized as a variable named List. Another variable, machineName, is used to hold the computer's name that is entered into the text box on the form. A call to the GetProcesses method, with or without the computer name, returns the array of Process objects into the List variable. This string array is placed into the DataContext property of the ListView control to display all the properties from each Process object.
Listing 1: Read all processes on a specified computer
using System.Diagnostics;

private void btnLoad_Click(object sender, RoutedEventArgs e)
{
    Process[] list = null;
    string machineName = string.Empty;

    if (!string.IsNullOrEmpty(txtMachineName.Text))
        machineName = txtMachineName.Text;

    try
    {
        // Get all Processes using the .NET Process class
        if (string.IsNullOrEmpty(machineName))
            list = Process.GetProcesses();
        else
            list = Process.GetProcesses(machineName);

        lstProcesses.DataContext = list;
    }
    catch (Exception ex)
    {
        MessageBox.Show(ex.Message);
    }
}
Create a Custom Process Class
There are a couple of things missing from the .NET Process class that you will probably want to add. First, the MachineName property is filled in with a period (.) when you are running on the current computer. You probably want this to be filled in with the current computer's name. Another important property is whether or not this Process object was retrieved from a remote computer. A useful set of properties is the amount of memory used, expressed in both kilobytes and megabytes. All of these properties are easy to add by creating your own process class.
In order to work more effectively with a collection of processes, create a couple of new classes for your process listing service that can add additional properties and functionality. I have called mine PDSAProcess and PDSAProcessBase, but feel free to name them what you want. The PDSAProcess class inherits from the PDSAProcessBase class. The Base class implements the INotifyPropertyChanged event and adds two properties called LastMessage and LastException. These two properties can be used to keep track of the last display or error message and the last exception object when you are loading your process objects. You can look at the sample source code that comes with this article to see the implementation of the PDSAProcessBase class.
NOTE: Using INotifyPropertyChanged in XAML applications is a well-known design pattern and there are many articles on the subject, so I won't cover it here.
Listing 2 shows the PDSAProcess class but with some of the normal property get/set methods not fully documented because they are all the same. You will see the full code for those properties that have special code in Listing 2. Notice the MachineName “property set” procedure calls the SetMachineName method. Also note the calculations for the MemoryInKb and MemoryInMb properties.
Listing 2: Your own custom process class will let you add more information than you can get from the .NET Process class.
public class PDSAProcess : PDSAProcessBase
{
    private int _Id = 0;
    private long _Memory = 0;
    private string _ProcessName = string.Empty;
    private string _MachineName = string.Empty;
    private string _MemoryInMB = string.Empty;
    private bool? _IsResponding = null;
    private bool _IsRemote = false;
    private Process _TheProcess = null;

    public int Id
    {
        get { return _Id; }
        set
        {
            _Id = value;
            RaisePropertyChanged("Id");
        }
    }

    public string ProcessName
    {
        // Normal Get/Set Code
    }

    public string MachineName
    {
        get { return _MachineName; }
        set
        {
            SetMachineName(value);

            RaisePropertyChanged("MachineName");
        }
    }

    public long Memory
    {
        // Normal Get/Set Code
    }

    public string MemoryInKB
    {
        get
        {
            string ret = "n/a";
            decimal value = 0;

            if (Memory > 0)
            {
                value = Convert.ToDecimal(Memory) / 1024;
                ret = value.ToString("###,###,###") + "kb";
            }

            return ret;
        }
        set { string temp = value; }
    }

    public string MemoryInMB
    {
        get
        {
            string ret = "n/a";
            decimal value = 0;

            if (Memory > 0)
            {
                value = Convert.ToDecimal(Memory) / 1024 / 1024;
                ret = value.ToString("###,###,##0.0") + "mb";
            }

            return ret;
        }
        set { string temp = value; }
    }

    public bool? IsResponding
    {
        // Normal Get/Set Code
    }

    public bool IsRemote
    {
        // Normal Get/Set Code
    }

    public Process TheProcess
    {
        // Normal Get/Set Code
    }

    private void SetMachineName(string machineName)
    {
        if (string.IsNullOrEmpty(machineName) ||
            machineName == "." ||
            machineName.ToLower() == Environment.MachineName.ToLower())
        {
            _MachineName = Environment.MachineName;
            IsRemote = false;
        }
        else
        {
            _MachineName = machineName;
            IsRemote = true;
        }
    }
}
The end result of creating the PDSAProcess class is shown in Figure 2. As you can see, there is better information displayed in the ListView control and the data displayed is sorted by the process name.

The PDSAProcess class also has many of the same properties as the .NET Process class, but the properties in this class raise the property changed event for use with XAML applications. Notice that the MachineName property shown in Figure 2 displays the current computer name rather than the period (.) that is reported by the .NET Process class. In the Set procedure of the MachineName property, a private method called SetMachineName is called to set the current computer name and to set the IsRemote property at the same time.
To load the custom process collection shown in Figure 2, click on the Load All Processes button shown on the form. The button's Click event procedure fires and runs the code shown in the following code snippet:
private void btnLoad_Click(object sender, RoutedEventArgs e)
{
    if (string.IsNullOrEmpty(txtMachineName.Text))
        lstProcesses.DataContext = LoadAllProcesses(string.Empty);
    else
        lstProcesses.DataContext = LoadAllProcesses(txtMachineName.Text.Trim());
}
Check the text box to see if the user entered a computer name or not. If they have entered one, pass in the computer name to a method called LoadAllProcesses. If there is no computer name in the text box, pass in an empty string to the LoadAllProcesses method. Listing 3 shows the code to load the processes from the .NET Process object into a PDSAProcess object and then into an ObservableCollection of those PDSAProcess objects.
Listing 3: Load all processes using a simple loop and create your ObservableCollection of PDSAProcess objects.
private ObservableCollection<PDSAProcess>
    LoadAllProcesses(string machineName)
{
    Process[] list = null;
    ObservableCollection<PDSAProcess> ProcessList =
        new ObservableCollection<PDSAProcess>();

    try
    {
        // Get all Processes using the .NET Process class
        if (string.IsNullOrEmpty(machineName))
            list = Process.GetProcesses();
        else
            list = Process.GetProcesses(machineName);

        foreach (Process prc in list)
        {
            PDSAProcess proc = new PDSAProcess();

            // Store process name
            proc.ProcessName = prc.ProcessName;
            // Set computer name
            // this also sets the IsRemote property
            proc.MachineName = prc.MachineName;
            // Store the actual 'Process' object
            proc.TheProcess = prc;
            // Store the ID
            proc.Id = prc.Id;
            // The 'Responding' Property is not
            // supported on remote computers
            if (!proc.IsRemote)
                proc.IsResponding = prc.Responding;
            // Store memory usage
            proc.Memory = prc.WorkingSet64;

            // Add to collection
            ProcessList.Add(proc);
        }

        // Sort the list
        ProcessList = new ObservableCollection<PDSAProcess>
            (ProcessList.OrderBy(p => p.ProcessName));
    }
    catch (Exception ex)
    {
        MessageBox.Show(ex.Message);
    }

    return ProcessList;
}
The code in the LoadAllProcesses method is fairly straight-forward. You are primarily moving the properties from the .NET Process class into the corresponding properties in the PDSAProcess class. The PDSAProcess class takes care of filling in the real computer name, and setting whether or not the computer is remote Be careful accessing the IsResponding property on the .NET Process class because it is not available on remote Process objects. In fact, if you try to access this property, an exception is thrown. That is why you see an “if” statement surrounding the code that attempts to access the IsResponding property.
The .NET GetProcesses method does not return the processes in any sort of order. Most users like to see sorted data, so it is probably a good idea to sort your process collection by the process name. Toward the bottom of Listing 3, you can see the following code snippet:
ProcessList = new ObservableCollection<PDSAProcess>
    (ProcessList.OrderBy(p => p.ProcessName));
This line of code uses the OrderBy method of the ObservableCollection class to create a new ObservableCollection of PDSAProcess objects. You pass a lambda expression (p => p.ProcessName) that informs the OrderBy method the name of the property by which to sort the collection.
A Process Manager Class
Instead of writing the code to load a ListView or other list-type of control, you might want to move the code you just wrote in the XAML window to a method in a class. Create a “Manager” class with the appropriate method to manage the process of creating a collection of process objects.
In preparation for creating a Manager class, move the IsRemote and MachineName properties from the PDSAProcess class into the PDSAProcessBase class. Move the SetMachineName method into the PDSAProcessBase class as well, because the set property of the MachineName property relies on this method. The Manager class you are going to write needs these two properties IsRemote and MachineName, so you might as well take advantage of inheritance by placing them into the Base class. The following code snippet shows the declaration for your new process manager class.
public class PDSAProcessManager : PDSAProcessBase
{

}
In this new process Manager class, you are going to add a method to retrieve memory instead of merely accessing the WorkingSet64 property of the .NET Process class. The WorkingSet64 property does not report the same amount of memory as the Task Manager utility and it can sometimes be confusing if you are looking at Task Manager, and then at your program, and you see different memory values. The method you are going to write will use a PerformanceCounter object in .NET to get the same value reported by Task Manager. The basics of how to retrieve memory using a performance counter is coded like this:
PerformanceCounter pc = null;
long ret = -1;

pc = new PerformanceCounter("Process", "Working Set - Private", prc.ProcessName);

if(pc != null)
    ret = pc.RawValue;
Although the above code works, you may also need to pass in a computer name to the constructor of the PerformanceCounter if you are accessing a remote computer. Be aware that in order to access a performance counter on another computer, you need to either be a member of the Performance Monitor Users group or have administrative privileges on that computer.
Within the new PDSAProcessManager class, add a constant called PERF_COUNTER_MEMORY that holds the name of the performance counter you use. Add an ObservableCollection of PDSAProcess classes to hold the list of PDSAProcess objects as well. These two items are shown in the following code snippet:
private const string PERF_COUNTER_MEMORY = "Working Set - Private";

private ObservableCollection<PDSAProcess> _ProcessList
    = new ObservableCollection<PDSAProcess>();

public ObservableCollection<PDSAProcess> ProcessList
{
    get { return _ProcessList; }
    set
    {
        _ProcessList = value;
        RaisePropertyChanged("ProcessList");
    }
}
You are now ready to write the LoadAllProcesses method in your process Manager class. Listing 4 shows the complete LoadAllProcesses method. As you will notice when you read the code, there are a few differences from the method you wrote earlier in this article.
Listing 4: The LoadAllProcesses method uses LINQ to create a collection of PDSAProcess objects.
public ObservableCollection<PDSAProcess>
    LoadAllProcesses(string machineName)
{
    Process[] list = null;

    // Set MachineName property
    // Also sets the IsRemote Property
    MachineName = machineName;

    LastMessage = string.Empty;
    LastException = null;
    try
    {
        ProcessList.Clear();

        LastMessage = "Reading all Processes on computer: "
            + this.MachineName;
        // Get all Processes using the .NET Process class
        if (this.IsRemote)
            list = Process.GetProcesses(this.MachineName);
        else
            list = Process.GetProcesses();

        // Create Collection using LINQ
        ProcessList = new ObservableCollection<PDSAProcess>(from prc in list
        select new PDSAProcess
        {
            MachineName = this.MachineName,
            IsRemote = this.IsRemote,
            TheProcess = prc,
            ProcessName = prc.ProcessName,
            Id = prc.Id,
            IsResponding = (this.IsRemote ? default(bool?) : prc.Responding),
            Memory = GetMemory(prc)
        });

        // Sort the list
        ProcessList = new ObservableCollection<PDSAProcess>
            (ProcessList.OrderBy(p => p.ProcessName));
    }
    catch (Exception ex)
    {
        LastException = ex;
        LastMessage = ex.Message;
    }

    return ProcessList;
}
The first difference is that you are using LINQ to create a collection of PDSAProcess objects. LINQ simplifies the process of creating a collection and is more concise than looping through the string array of .NET Process objects. However, if you like using a loop, you can modify this code to use the loop like you did in Listing 3. The second difference is the call to set the Memory property on the PDSAProcess object by calling a method named GetMemory.
The GetMemory method is where you attempt to get the PerformanceCounter object from either the local or the remote computer. You need to wrap up the creation of the PerformanceCounter object into a try...catch block in case you can't access the performance counter for one of the reasons stated above. Also notice that you need a finally block when accessing a performance counter, in order to close and dispose of the performance counter object properly. You can wrap this call into a using block if you prefer. If, for some reason, you can't access the performance counter to get the memory and you still want to have a valid memory value, and if the memory value is not set, get the WorkingSet64 property on the .NET Process object to set the return value from this method. See Listing 5.
Listing 5: A more accurate measure of a process' memory can be retrieved using a performance counter.
protected virtual long GetMemory(Process prc)
{
    PerformanceCounter pc = null;
    long ret = -1;

    try
    {
        if (!this.IsRemote)
            pc = new PerformanceCounter("Process",
                PERF_COUNTER_MEMORY, prc.ProcessName);
        else
            pc = new PerformanceCounter("Process",
                PERF_COUNTER_MEMORY, prc.ProcessName, this.MachineName);

        if (pc != null)
            ret = pc.RawValue;
    }
    catch (Exception ex)
    {
        LastException = ex;
        LastMessage = ex.Message + Environment.NewLine +
            "Attempting to access performance counter on computer: "
                + this.MachineName;;
    }
    finally
    {
        if (pc != null)
        {
            pc.Close();
            pc.Dispose();
        }
    }

    // Can't get memory from the Performance Counter
    // Get the WorkingSet from the Process
    if (ret == -1)
    {
        try
        {
            ret = prc.WorkingSet64;
        }
        catch
        {
        }
    }

    return ret;
}
Now that you have this process Manager class written, you can use it as a view model on your WPF Window. (Some of the XAML has been removed in the code snippet below because it was not important to show it.) You create an XML namespace to reference the .NET namespace that the PDSAProcessManager is contained within. In the Window.Resources section of the XAML, create an instance of the PDSAProcessManager class and assign it a key of “viewModel”. Bind the ItemsSource property of the ListView to the ProcessList property in the PDSAProcessManager class. This is the collection of process objects retrieved when you call the LoadAllProcesses method. Finally, you bind each of the GridViewColumn objects in the ListView to each property of the PDSAProcess class that you wish to display.
<Window x:Class="ProcessSample.MainWindow"
            xmlns:vm="clr-namespace:PDSA.Common.Monitor">
    <Window.Resources>
        <vm:PDSAProcessManager x:Key="viewModel" />
    </Window.Resources>
    <ListView ItemsSource="{Binding Path=ProcessList}">
        <GridViewColumn DisplayMemberBinding="{Binding Path=Id}" />
        <GridViewColumn DisplayMemberBinding="{Binding Path=ProcessName}" />
// MORE XAML HERE
To load the process collection into the ProcessList property, call the LoadAllProcesses method when the user clicks on the Load All Processes button shown in Figure 2. The MachineName property of the PDSAProcessManager class is bound to the TextBox shown on Figure 2. In the constructor of this main window, you bind the instance of the view model class created in the XAML to a variable called _ViewModel. Call the LoadAllProcesses method, as shown in the following code snippet:
public partial class MainWindow : Window {
    PDSAProcessManager _ViewModel = null;
    public MainWindow() {
        InitializeComponent();
        _ViewModel = (PDSAProcessManager)this.Resources["viewModel"];
    }

    private void btnLoad_Click(object sender, RoutedEventArgs e)
    {
        _ViewModel.LoadAllProcesses();
    }
}
The LoadAllProcesses method retrieves all the processes on the specified computer, builds the collection class, sorts the collection class, and sets the ProcessList property. As the ProcessList property is an ObservableCollection, any bindings to it are automatically updated when the collection changes. Thus, the ListView control is refreshed once it is set in the LoadAllProcesses method.
Summary
In this article, you learned how to read the list of processes running on the current computer or a remote computer using the .NET Process class. Create your own process class so that you can add additional properties and functionality that is not available with the .NET Process class. One feature you might want to add includes returning the amount of memory in both kilobytes and megabytes. Also, whether or not the process was read from a remote computer is very useful. Setting the computer name is more readable than displaying a period (.) as the .NET Process class does. Sorting the data using an ObservableCollection makes the display of the data easier for the user. Finally, wrapping the loading of process classes into a Manager class makes creating a list of processes quick and easy.
