


By Alessandro Del Sole, Published Jan 18, 2013 by Sams. Part of the Unle,ashed series. Copyright 2013, ISBN-10: 0-672-33631-6 ISBN-13: 978-0-672-33631-7. http://www.informit.com/store/visual-basic-2012-unleashed-9780672336317">http://www.informit.com/store/visual-basic-2012-unleashed-9780672336317
Chapter 2 - Getting Started with the Visual Studio 2012 IDE
Sample Chapter is provided courtesy of Sams Publishing.
Although the Visual Studio IDE is a complex environment, this chapter provides you with an overview of the most common tasks you will perform from within Visual Studio 2012 and the most important tools you will utilize so that you can feel at home within the IDE.
- What’s New in Visual Studio 2012
- Status Bar and Start Page
- Working with Projects and Solutions
- Working with Tool Windows
- My Project
- Compiling Projects
- Browsing the Visual Basic and .NET Documentation
- “Quick Launch” Tool
You develop Visual Basic applications using the Visual Studio 2012 Integrated Development Environment (IDE), which is the place where you will spend most of your developer life. Before diving deep into the Visual Basic language, you need to know what instruments you need to develop applications. Although the Visual Studio IDE is a complex environment, this chapter provides you with an overview of the most common tasks you will perform from within Visual Studio 2012 and the most important tools you will utilize so that you can feel at home within the IDE. You get an introduction to some of the new features introduced by the new version of the development environment, which can provide the basis for the rest of the book. You also learn about other advanced IDE features in the last part of the book.
What’s New in Visual Studio 2012
The Visual Studio 2012 IDE retakes the infrastructure that was first introduced by its predecessor, which is written in managed code and in which several parts are based on the Windows Presentation Foundation framework, such as the code editor, menus, and floating windows. On the other hand, Visual Studio 2012 has a completely different look, which is now based on the Microsoft Design Style, with a simplified approach to commands and tools via a flattened user interface in which there are only a few colors.
What is the Microsoft Design Style?
The Microsoft Design Style is a design language for user interfaces that Microsoft started to introduce with the first version of Windows Phone; it is also one of the most important characteristics of Windows 8. This design language relies on the principles of abstraction, simplicity, and geometric shapes. Its goal is avoiding complex and overcolored user interfaces in favor of simple drawings. For example, it is common in the Microsoft Design Style to find monochromatic shapes rather than drawings with millions of colors that can be confusing. After its adoption in Windows Phone and Windows 8, Microsoft is bringing the new design style into a number of other programs. Visual Studio 2012 is an example of how the layout of a powerful and complex desktop application can be simplified by following some of the Microsoft Design Style principles. You can find a more detailed explanation of such principles at: http://goo.gl/uqA5V.
The goal is helping the developer focus on writing code or on designing the application, not on the development environment. So, the environment now has fewer colors than in the previous versions, but commands are still recognizable via familiar icons; parts of the IDE that you interact the most with (typically the code editor and designers) are still rich with helpful colorizations. Although this innovation is important, you will still feel at home with the new version. This is because the instrumentation is located and behaves the same as in the past. This chapter gives you an overview of the most common tools you need for developing your Visual Basic applications. (Deeper details on advanced IDE features are provided starting from Chapter 53, “Advanced IDE Features.”)
Status Bar and Start Page
When you first run Visual Studio 2012, you notice a new layout and the Start Page, as shown in Figure 2.1.
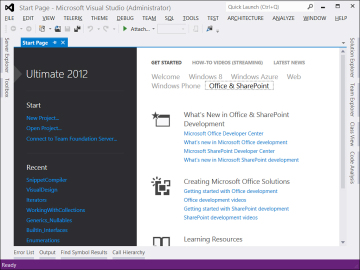
You can immediately notice the new look of Visual Studio 2012 based on Microsoft Design Style. The colored status bar is new in Visual Studio 2012, and its color changes according to the particular task Visual Studio is running. Following is a list of possible colors for the status bar (see Figure 2.2 for a graphical representation):
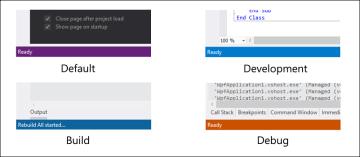
- Violet-This is the color for the status bar when Visual Studio is ready (for example, at startup).
- Light blue-This is the color for the status bar at development time, which means coding, designing the user interface, or any other task you run before compiling the code and running the application.
- Blue-This is the color for the status bar when Visual Studio 2012 is building the solution and compiling the code.
- Orange-This is the color for the status bar when you are running the application in debugging mode (that is, by pressing F5).
Themes for Visual Studio 2012
Visual Studio 2012 ships with two themes, Light and Dark. Light is the default setting and is also the one that is used in this book. The Dark theme reproduces the look of Microsoft Expression Blend and is based on the black color and dark tones. You can change the theme by going to Tools, Options and then selecting a different theme in the Color Theme drop-down box in the Environment tab. At the time this chapter is being written, there are no additional themes, but you can download a nice extension called Visual Studio 2012 Color Theme Editor, available at: http://visualstudiogallery.msdn.microsoft.com/366ad100-0003-4c9a-81a8-337d4e7ace05">http://visualstudiogallery.msdn.microsoft.com/366ad100-0003-4c9a-81a8-337d4e7ace05. This extension provides a number of ready-to-use themes and allows creating custom ones.
The Start Page is a central point in the IDE. First, it offers a better organization of the most common tasks, based on tabs. Tabs are located on the right side of the screen and enable access to specific contents. On the left side of the screen you can instead find links for creating new projects and opening existing projects, as well as the list of recently opened projects. You can easily remove recent projects by right-clicking the project name and then selecting the deletion command. It is worth mentioning that the Start Page relies on the Windows Presentation Foundation technology and is completely written in XAML code. This means that it can be customized according to your needs. Customizing the Start Page is beyond the scope of this chapter, whereas a deeper discussion on the default settings is absolutely necessary. The two default tabs are Get Started and Latest News. The following paragraphs discuss them in detail.
Get Started Tab
The Get Started tab (refer to Figure 2.1) offers links to important resources, such as MSDN Walkthroughs (which are step-by-step tutorials on specific topics related to Visual Studio 2012); community and learning resources, and extensions for the IDE; such as custom add-ins or third-party components. (This topic is discussed later in the book.) This tab is divided into subcategories, each related to a specific development area such as Windows 8, Web, and Windows Azure. When you click each subcategory, you access a number of links to resources for learning about the selected area. The Get Started tab’s purpose is to offer links to useful resources about the development environment and to new and existing .NET technologies.
The Latest News Tab
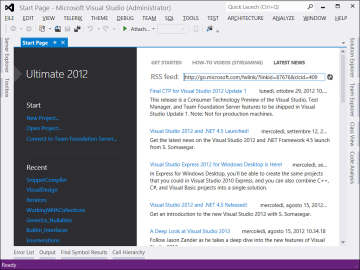
As in its predecessors, Visual Studio 2012 can also show a list of news based on RSS feeds so that you can stay up-to-date with your favorite news channels. Now the list appears in the Latest News tab, as shown in Figure 2.3.
By default, the news channel is an RSS feed pointing to the MSDN developer portal, but you can replace it with one of your favorites. To accomplish this, you have the following alternatives:
- Open the Latest News tab and replace the default link in the RSS feed field with a valid XML feed link (this is the easiest way).
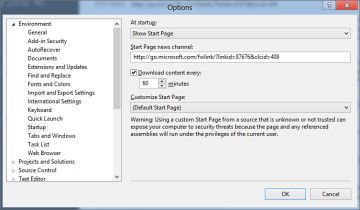
- Open the Options window (for example, by clicking the Settings link in the Visual Studio tab), and then select the Startup item. In the text box named Start Page news channel (see Figure 2.4), you can insert your favorite link. Just be sure you are writing a valid XML feed link.
If you want to stay up-to-date with Visual Basic news, consider replacing the default news channel with the Visual Basic page of the Visual Studio Developer Center, which is at the following: http://sxp.microsoft.com/feeds/3.0/msdntn/VB_featured_resources">http://sxp.microsoft.com/feeds/3.0/msdntn/VB_featured_resources. After this brief overview of the Start Page, we can begin discussing the tooling that you use for creating Visual Basic projects within Visual Studio 2012.
Working with Projects and Solutions
Each time you want to develop an application, you create a project. A project is a collection of files, such as code files, resources, data, and every kind of file you need to build your final assembly. A Visual Basic project is represented by a .Vbproj file, which is an Extensible Markup Language (XML) file containing all the information required by Visual Studio to manage files that constitute your project. Projects are organized into solutions. A solution is basically a container for projects. In fact, solutions can contain infinite projects of different kinds, such as Visual Basic projects, projects produced with programming languages other than Visual Basic, class libraries, projects for Windows client applications, Windows Communication Foundation services, and so on. In other words, a solution can include each kind of project you can create with Visual Studio 2012. Solutions also can contain external files, such as documents or help files, and are represented by a .Sln file that has an XML structure and stores information required to manage all the projects contained in the solution. Visual Studio 2012 can also open solutions created with previous versions of the IDE.
Project Upgrades and “Round-Tripping”
You can upgrade previous versions of your solutions by simply opening them in Visual Studio 2012. The new version of the IDE introduces the so-called project round-tripping, which means that solutions created with Visual Studio 2010 with Service Pack 1 can be opened in Visual Studio 2012 with no upgrades; then you can open the same solution back in Visual Studio 2010 with SP 1. For solutions created with other versions, the Upgrade Wizard can guide you through the upgrade process in a few steps. There are some exceptions to project round-tripping, which you can read in the specific MSDN page: http://msdn.microsoft.com/en-us/library/hh266747">http://msdn.microsoft.com/en-us/library/hh266747(v=vs.110).aspx.
Typically you manage your projects and solutions using the Solution Explorer window discussed later in this chapter. We now focus on the creation of Visual Basic 2012 projects.
Creating Visual Basic Projects
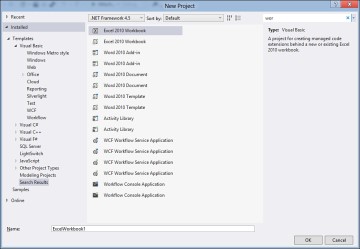
Creating a new Visual Basic project is a simple task. You can click either the File, New Project command or the New Project link from the Start Page. In both cases, Visual Studio shows the New Project window, which you can see in Figure 2.5.
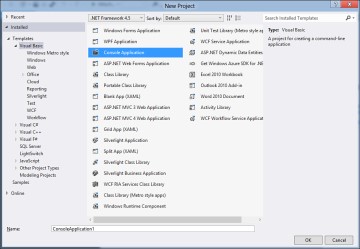
As you can see, the look of the New Project window is quite different from previous versions of Visual Studio and still retakes the Windows 8 style. To understand what kind of Visual Basic applications you can create, you simply need to select the Visual Basic node on the left side of the window. After you click the node, you see a lot of different kinds of applications you can create with Visual Basic 2012, such as Windows applications, web applications, Office System customizations, Silverlight applications, Windows Communication Foundation Services, the new Windows 8 Store Apps for Windows 8, and so on.
Note About Available Project Templates
The list of installed project templates can vary depending on either the Visual Studio 2012 edition or additional items installed later (for example, from the Visual Studio Gallery).
Each kind of application is represented by a specific project template, which provides a skeleton of a project for that particular kind of application, including all the references or the basic code files required. For example, the WPF Application project template provides a skeleton of a project for creating a Windows application using the Windows Presentation Foundation technology, therefore including references to the WindowsBase.dll assembly, specific Imports directives, and WPF objects represented by the appropriate code files. Moreover, Visual Studio will automatically enable the WPF designer. Notice the detailed description for each template on the right side of the window every time you select a particular template.
NOTE
In the second part of this book you find several kinds of applications you can build with Visual Basic 2012. For this reason, a full description of each project template will be provided in the proper chapters. At the moment, the description provided by Visual Studio for project templates is sufficient. Also consider that in this first part of the book the Console Application project template is used because it is the most appropriate for learning purposes.
When you create a new project, Visual Studio usually creates a solution containing that project. If you plan to add other projects to the solution, it can be a good idea to create a directory for the solution. This allows for a better organization of your projects, because one directory can contain the solution file and this directory can then contain subdirectories, each of them related to a specific project. To accomplish this, ensure that the Create Directory for Solution check box is selected. The New Project window also offers some interesting features: the .NET Framework multi-targeting, the ability of searching through templates, the ability of managing templates, and finding samples on the Internet. We now discuss each of these features.
Multi-targeting
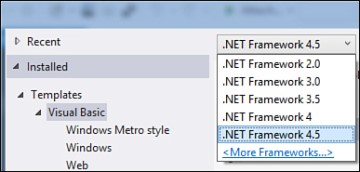
Like in Visual Studio 2010, in Visual Studio 2012 you can choose which version of the .NET Framework your application targets. This can be useful if you plan to develop applications with high compatibility levels and without new language features but still want to take advantage of the new features of the IDE. You can choose one of the following:
- .NET Framework 4.5 (proposed by default)
- .NET Framework 4.0
- .NET Framework 3.5
- .NET Framework 3.0
- .NET Framework 2.0
To accomplish this, just select the appropriate version from the combo box at the top of the window, as shown in Figure 2.6.
NOTE
Remember that, depending on the version of the .NET Framework you choose, you might not be able to use some libraries or technologies. For example, if you choose .NET Framework 3.0 as the target version, you cannot use LINQ, which is instead exposed by .NET Framework 3.5 and higher. So keep in mind these limitations when developing your applications on previous Framework versions.
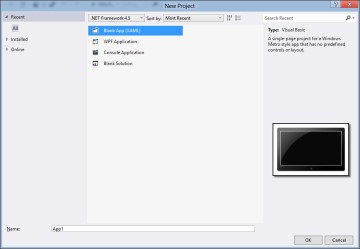
Accessing Recent and Online Templates
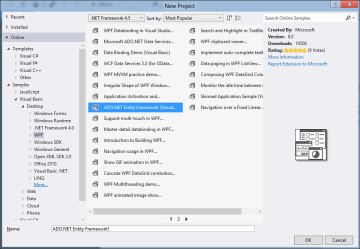
Visual Studio 2012 provides the capability to access the most recently used templates and install additional templates from the Internet. You can easily access the most recently used project templates by clicking the Recent Templates item on the left side of the New Project window. In this way, you get a list of the recently used project templates in case you still need them (see Figure 2.7). You can also find additional online templates and install them to the local system. To accomplish this, simply click the Online Templates item in the New Project window. Visual Studio checks for the availability of online templates and shows a list of all the available templates (see Figure 2.8).
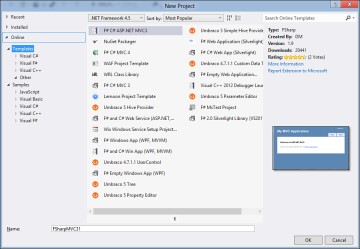
As you can see, Visual Studio is listing all the online templates for both Visual Basic and Visual C#, showing a description of the template, information about the author, and a small picture with ratings when available. To download and install a template, simply double-click its name. After a few seconds you will be prompted to agree to the installation. You will be warned in the case that the new extension for Visual Studio does not contain a digital signature. If you trust the publisher and want to continue, click Install. After a few seconds, you will see the newly installed project templates available among the other ones.
As in the previous versions of Visual Studio, you can still export projects as reusable project templates. We discuss this feature later in Chapter 53, “Advanced IDE Features.”
Searching for Installed Templates
Visual Studio 2012 provides lots of default project templates, and as you saw before, you have the ability of adding your own custom ones. Therefore, finding the necessary template at a certain moment can be difficult. Because of this, the New Project window provides a search box that is located in the upper-right corner of the window (seeFigure 2.9). Just begin typing the name of the project template you are looking for, and the New Project window shows all the project templates that match your choice. Each time you type a character, the window updates showing the results matching your search string. As you can see in Figure 2.9, Visual Studio is showing all the project templates whose names match the wor search string.
NOTE
Remember that the search functionality can retrieve all project templates related to your search string. This means that the search result can contain not only Visual Basic projects but also every template name matching your criteria (for example, Visual C#, Visual F#, and so on).
Finding Code Samples on the Internet
One of the great new features of Visual Studio 2012 is the ability to search for sample code on the Internet directly from the New Project dialog box. Visual Studio performs this search inside the MSDN Code Gallery (http://code.msdn.microsoft.com">http://code.msdn.microsoft.com), a website where developers can publish sample code they want to share with others. To find code samples, click the Samples item at the bottom of the list of templates in the New Project dialog box (see Figure 2.5). After you select this item, you will be able to browse the Code Gallery from within the dialog box. For example, if you search for a specified language, you will then be able to discover samples of each language based on technologies (such as Windows, Web, Cloud, Windows Phone, and so on). For each of these categories, you will find additional subcategories where samples are divided by framework; for instance, Windows development samples are divided into WPF, Windows Forms, Windows Runtime, and so on. Figure 2.10 shows how you can browse samples online from Visual Studio 2012.
You select a sample from the list and then click OK or simply double-click the sample. Visual Studio 2012 will download the sample to your hard disk and will ask you to accept the license agreement that the developer who published the code added to the sample. After it’s downloaded, the sample is opened in Visual Studio 2012 under the form of a normal project. This is possible because, to upload a sample to the gallery, you must supply a full project (or an entire solution) to enable other developers to reuse your code with ease.
Creating Reusable Projects and Items Templates
As in the previous versions, in Visual Studio 2012 you can create your custom projects and items templates, exporting them to disk and making them available within the IDE. (This topic is discussed in Chapter 53.) Now that you have seen the main new features for project creation, you are ready to create your first Visual Basic project.
To finish this excerpt click here: http://www.informit.com/store/visual-basic-2012-unleashed-9780672336317">http://www.informit.com/store/visual-basic-2012-unleashed-9780672336317
