


I give up! I can’t really explain how the cloud works unless I cover the topic of authentication in the cloud first. If I didn’t tackle this topic first, I could only explain boring unauthenticated applications. The issue is, for all practical purposes the authentication fit for the cloud is claims based. There is no worldwide active directory you can rely on. There is no single aspnetdb.mdf database. What’s more, there are many kinds of authentications already - Facebook, Twitter, Google, OpenID, Windows Live ID, etc.
Users are fed up with having to remember so many passwords, and yet security breaches are rampant.
The funny thing is, security breaches are almost always the user’s or the IT staff’s fault. It is rarely the technology’s fault. At the heart of security is SSL and the RSA algorithm. How secure is SSL, really? If you were to use 128-bit encryption, it would take you significantly longer than the age of the universe to crack such a key. For an interesting reading on just really how secure SSL is, you should read this article http://www.inet2000.com/public/encryption.htm">http://www.inet2000.com/public/encryption.htm.
The good news is, claims-based authentication (CBA) is built on the same secure foundation as SSL. There is plenty of RSA encryption and certificates for everyone to go around. Not only is it quite secure, it is also suitable for the Internet, and extremely, extremely flexible. Let’s examine in depth what CBA means to cloud-based applications, and specifically to SharePoint.
What Is Claims-Based Authentication?
The process of establishing your identity is referred to as authentication. Claims-based authentication is the process of establishing your identity by presenting unarguable, trustable, and non-tamperable claims about who you are. For instance, if you saw me outside union station, hungry, begging for five dollars. But you recognized me based on trustable assertions I made about myself - my eyes, hair, height, voice, perhaps I am talking about SharePoint - you’d trust that was me! What I have done there is I have established my identity by providing you claims about myself.
Claims-based authentication is the process of establishing your identity by presenting unarguable, trustable, and non-tamperable claims about who you are.
Now, with this identity, you would loan me $5 for a sandwich. But what if I asked for your car keys? You’d probably walk away! Unless of course, I was able to provide you further claims (trustable, untamperable), proving to you that I’m a secret agent and unless you gave me your car keys the world would end. If you were convinced, you’d probably hand me your car keys. This is referred to as the process of claims augmentation. I have augmented my identity by providing you with additional claims about who I am, thereby allowing me an elevated level of access.
Now imagine, I intend to drive your fancy car on an Autobahn in Germany, and the Polizei pulled me over. The Polizei would probably also insist on me establishing my identity. I guess I’d show him my passport. Based on that claim, my identity would be established. What just happened here? The policeman didn’t call the US embassy to verify if my passport was real or not. Plus the fact that a US passport is a valid identity claim in Germany - is a trust relationship that was previously established. So effectively, I was able to authenticate over the Internet (in another country) without an active directory (the US embassy being the domain controller).
In .NET, claims-based authentication is performed using Windows Identity Foundation. SharePoint 2010 uses Claims-based authentication out of the box. SharePoint 2007 can be made to use claims-based authentication. And those fancy tokens (the passport for instance), that are untamperable, and can be easily passed around the Internet - are called SAML tokens. And they can participate in all sorts of protocols. They can work with WS-Federation, or they can be passed using REST-based API using OAUTH. This is what makes them not just suitable, but absolutely essential for cloud-based applications.
Claims-based Authentication in SharePoint
SharePoint 2010 by default uses classic Windows authentication. This means, a web.config with the following:
<authentication mode="windows"/>
This is pure ASP.NET-based authentication - it uses either Kerberos or NTLM. I wrote about this topic in a previous CODE Magazine article (http://www.code-magazine.com/Article.aspx?quickid=0909031">http://www.code-magazine.com/Article.aspx?quickid=0909031). The IPrincipal on the server in this case will be a WindowsPrincipal. Put simply, if you’re on an intranet, with the domain controller always reachable, and you have no reason to use claims-based authentication - stick with this for now. There are too many backend systems that do not understand claims-based identities, so when you’re trying to connect to something such as SQL Server Reporting Services using claims-based authentication, you won’t be able to - because SQL Server does not understand claims-based identities.
There is a workaround to this issue though. And that is Claims to Windows Token Service or C2WTS for short. C2WTS can convert Windows-based claims back into WindowsPrincipal identities. This means, you could float an active directory identity across the Internet, bring it back into the AD, and convert it back from claims to a Windows identity. This is what the next version of SQL Server (Denali) reporting services will use. You can, of course, write your own C2WTS. For more information, please see http://msdn.microsoft.com/en-us/library/ee517278.aspx">http://msdn.microsoft.com/en-us/library/ee517278.aspx. You should remember, however, that only Windows-based claims can be converted to Active Directory identities. In other words, identities such as Live ID, Google, forms-based authentication, or even ADFS v2.0 cannot be converted to Active Directory-based identities.
Setting up claims-based authentication on SharePoint is quite trivial, and there are many tutorials on the Internet that walk you through it. Specifically, in my book, in Chapter 12, I walk you through how to use simple forms-based authentication inside claims-based authentication. The steps look almost too simple. The reality is that they mask a lot of complexity. Here is how claims-based authentication works in SharePoint.
- The user requests a resource from SharePoint, but the first request is unauthenticated.
- SharePoint sends an HTTP 401 (unauthorized) informing the user that the following kinds of identities are accepted. The list provided are the trusted identity providers - security token service (IP-STS) that is previously registered as trusted inside of SharePoint. SharePoint 2010 out of the box has two such identity providers registered - Active Directory, and Forms Based Authentication (membership provider). In order to add more, such as ADFSv2, you can use some simple PowerShell commands.
- The user then authenticates themselves to the IP-STS and in return receives a security token.
- The user then does a service token request by passing the security token from step #3 to another STS built into SharePoint, which then fills claims in the ClaimsPrincipal.Claims collection for the user.
- The user receives the security token response from the SharePoint STS.
- The user is able to access the resource from step #1 with this service token.
There are two notable things to see here.
- The user, at the end of all this hullaballoo, is still represented as an SPUser object. In other words, Windows authentication or claims authentication - SharePoint doesn’t care.
- The login process is really when claims are filled for the user, so the process of claims augmentation in SharePoint cannot be done without a logout/login process.
Claims Augmentation in SharePoint
As I indicated above, claims augmentation occurs in SharePoint only when you login. So, for instance, if you were to login using a forms-based identity, then your roles from the RoleProvider are filled in as claims when you login. If your roles change while you are logged in - SharePoint will never know, because those do not take effect until you logout/login again. The same applies to Active Directory Groups, or any such other claim. The important thing to remember here is that SharePoint cannot do claims augmentation unless a new login operation is performed. The good news is that you can write your own claims providers to perform custom claims augmentation. You do so by writing a custom claims provider. Writing a custom claims provider is incredibly simple:
- You create a class that inherits from Microsoft.SharePoint.Administration.Claims.SPClaimsProvider. This is where all the logic goes.
- You create a farm-level feature that inherits from Microsoft.SharePoint.Administration.Claims.SPClaimsProviderFeatureReceiver. This is responsible for hooking up your claims provider into SharePoint at a farm level.
Claims providers are incredibly useful. This allows you to interject custom attributes about a user’s identity as claims, and then check for those custom attributes for three main purposes: providing hierarchy, providing search and name resolution.
Providing Hierarchy
Claims providers allow you to specify a custom hierarchy of your security principals (Figure 1).
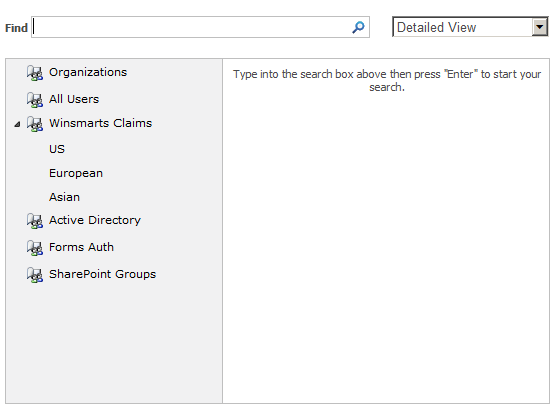
In order to implement a basic claims provider, you need to implement the FillClaimsForEntity, FillClaimTypes and FillClaimValueTypes methods in your claims provider. In order to provide hierarchy, you need to have the SupportsHierarchy property return true, and implement the FillHierarchy method.
Providing Search
Once you have provided claims, you can also search for them. You can write custom code for this search, but you can also hook into the browse dialog box shown in Figure 1. The idea here is that when the user types in a search query in the “Find” Textbox, you have a hook where you can search through the claims and see if any of them matches your searched criterion. In order to implement search, you need to have SupportsSearch and SupportsResolve properties on the claims provider return true, and you need to implement the FillSearch, FillSchema, and FillEntityTypes methods on your claims provider.
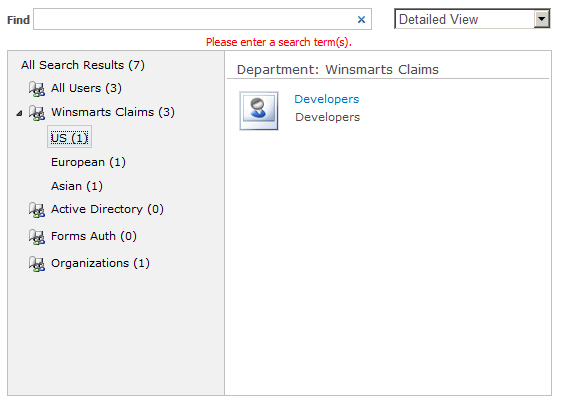
But what happens when the user has searched, found the user they like, and clicked ok? SharePoint will then call the FillResolve method.
In addition, you need to implement the FillResolve method, so you need to implement that too. But if you observe the Claims Provider Base class, there are two possible FillResolve methods - one that accepts the input as a string, and another that accepts the input as a claim. In this case, you need to implement the FillResolve method that accepts the input as a claim. Think of it this way: When you search using a string, you can have multiple resolved parties with lesser confidence on who exactly is in that collection. But with a predefined claim that you have already searched for, it is much less ambiguous. The FillResolve method accepts the following overload:
protected override void
FillResolve(Uri context, string[]
entityTypes, SPClaim resolveInput,
List<Microsoft.SharePoint.WebControls.
PickerEntity> resolved)
The resolved parameter is where you would add a PickerEntity using the resolved.Add(PickerEntity) method. A PickerEntity is what finally shows up in the browser, as shown in Figure 2.
Name Resolution
After you perform a search, you do resolution, but you do resolution using Claims. What if your input was just a string, as shown in Figure 3?
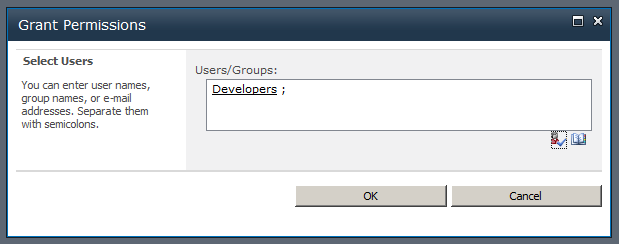
What caused that underline to appear after I hit the person with the checkmark button? That would be the process of Name Resolution. And for your claims provider to do Names Resolution, you need to implement the FillResolve method that accepts a string as the resolveInput. Also, the SupportsResolve property in your ClaimsProvider needs to return true.
Why Is Claims a Big Deal?
With the basics of claims-based authentication behind us, let’s also examine why exactly claims-based authentication is something you should care about.
- Claims-based authentication is extremely flexible. You can authenticate based on any criterion that is a claim. While a membershipprovider was basically a username password, experience has taught us that it was woefully inadequate. Frequently people would put RSA tokens or smartcards on top of membershipproviders. What they are doing there is asserting claims about who they are. Sadly, before claims-based authentication all these different mechanisms were “Mickey-Moused” into our architectures as a mish mash of non-standard mechanisms and third-party products. So they were not interoperable, extensible or maintainable.
- Claims-based authentication is not just white (authenticated) or black (unauthenticated). It allows for a whole level of shades of gray. This is where claims augmentation comes into play where, depending upon the level of access you need, you can provide additional claims. So finally, your Hotmail password and your Bank of Afghanistan password can be different.
- Claims can be stacked on top of each other. What this means in SharePoint is multiple users with different kinds of authentication can participate on the same web application.
- Claims are Internet ready. Because they use algorithms such as RSA, they are extremely secure and trustable even when you cannot talk to the IP-STS directly.
- Claims are extremely flexible. You know they are flexible because even oData and libraries such as datajs support them using a simple protocol such as REST. You can read more about datajs here: http://datajs.codeplex.com/documentation">http://datajs.codeplex.com/documentation. This means, an iPhone web-based application can authenticate to a claims-aware WCF service running in Azure or SharePoint, or any other such combination.
- Claims do not care about the platform. They are an open standard that everyone understands.
- Finally, there is a complexity surrounding many different kinds of authentications. For instance, if your SharePoint site needs to support Live ID, Google, FaceBook and Twitter identities, the implementation and PowerShell scripts for each of these can be an arduous task. Luckily there is Azure ACS, which allows you to work with Azure ACS, everyone else to work with Azure ACS, and Azure ACS takes care of handling the intricacies and differences between these various identity providers. You can read more about Azure ACS here: http://www.microsoft.com/windowsazure/features/accesscontrol/">http://www.microsoft.com/windowsazure/features/accesscontrol/.
Summary
I hope this article managed to convince you of the problems that classic authentication modes deal with. Authentication is more than a username password, and a domain controller isn’t always around on the Internet. Given how disperse cloud-based applications can be, claims-based authentication is a godsend. Built on Windows Identity foundation, I would encourage you to try out the WIF SDK. In later articles I will be armed with this knowledge to build cloud-ready applications that understand identity.
