


LightSwitch is a new development tool and extensible application framework for building data-centric business applications. LightSwitch simplifies the development process because it lets you concentrate on the business logic and does a lot of the remaining work for you. With LightSwitch, an application can be designed, built, tested, and in your user’s hands quickly. LightSwitch is perfect for small business or departmental productivity applications that need to get done fast.
LightSwitch applications are based on Silverlight and a solid .NET application framework using well known patterns and best practices like n-tier application layering and MVVM as well as technologies like Entity Framework and RIA Services (Figure 1). The LightSwitch team made sure not to invent new core technologies like a new data access or UI layer; instead we created an application framework and development environment around these existing .NET technologies that a lot of developers are already building upon today.
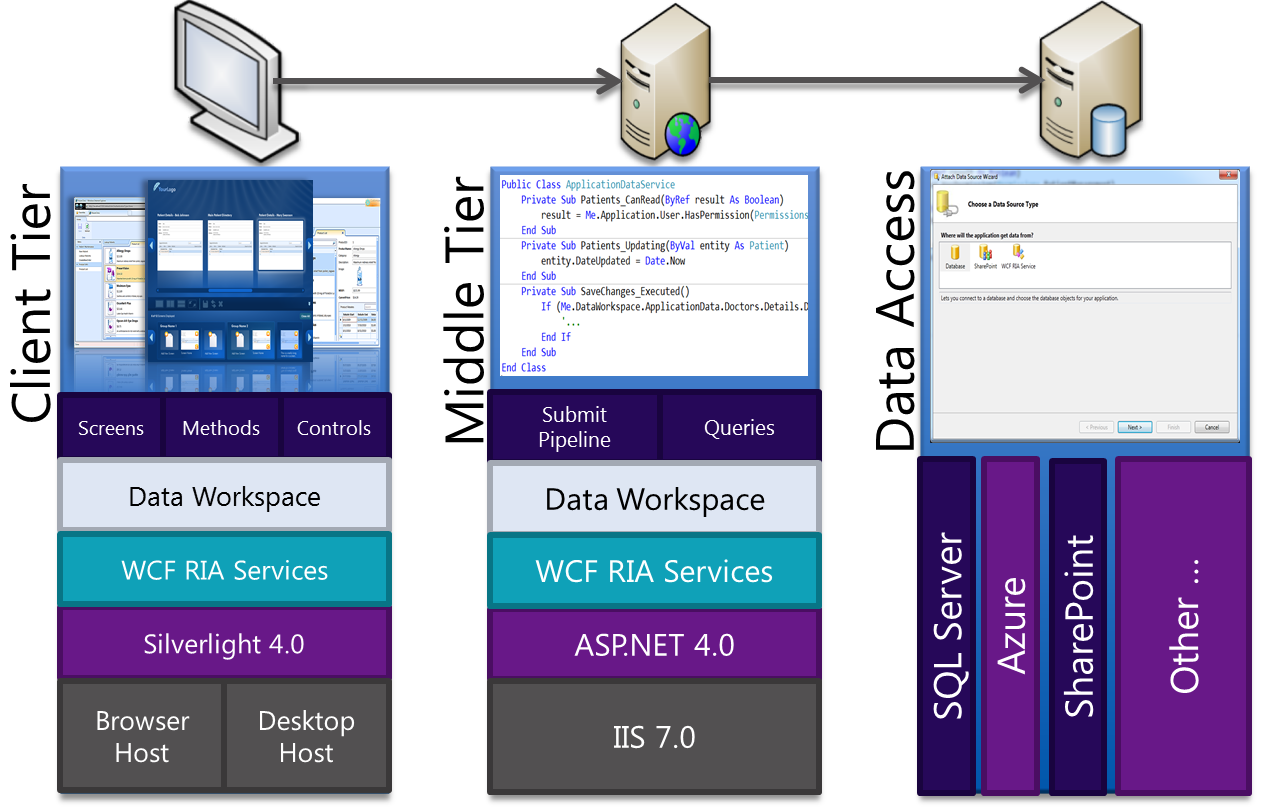
This architecture allows LightSwitch applications to be deployed as desktop applications, giving them the ability to integrate with hardware devices such as a scanner or bar code reader as well as other applications like Microsoft Word and Excel, or they can be deployed as browser-based applications when broader reach is required.
Users expect certain features like search, the ability to sort and rearrange grids, and the ability to export data. With every LightSwitch application those features are already built in. You don’t have to write any code for navigation, toolbars/ribbons, dirty checking or database concurrency handling. Common data operations such as adding, updating, deleting are also built in, as well as basic data validation logic. You can just set some validation properties or write some simple validation code based on your business rules and you’re good to go. We strived to make it so that the LightSwitch developer only writes code that only they could write; the business logic. All the plumbing is handled by the LightSwitch application framework.
Let’s take a little deeper look at the development experience.
Developing a LightSwitch Application
LightSwitch is all about data and screens. You connect to data, create a screen to bind the data to the controls, add some validation and business logic, and then test and deploy. These are common steps when building any type of data-centric application with Visual Studio. However, with LightSwitch each one of those steps is simplified.
Tables, or data entities in LightSwitch, can be created in the built-in application database, or can be brought in from an external database, SharePoint list, or other data sources. Any data source with an Entity Framework provider is supported and we’ve also enabled SharePoint lists and SQL Azure as a data source as well. If you have a completely custom data source then you can expose it through a RIA service and LightSwitch will connect to it, so there is a lot of extensibility here. You can create relationships between entities, even between entities from different data sources. This is a unique feature of LightSwitch. This allows you to federate multiple data stores, relate them together, and LightSwitch will handle managing the navigation between them and saving changes back to them.
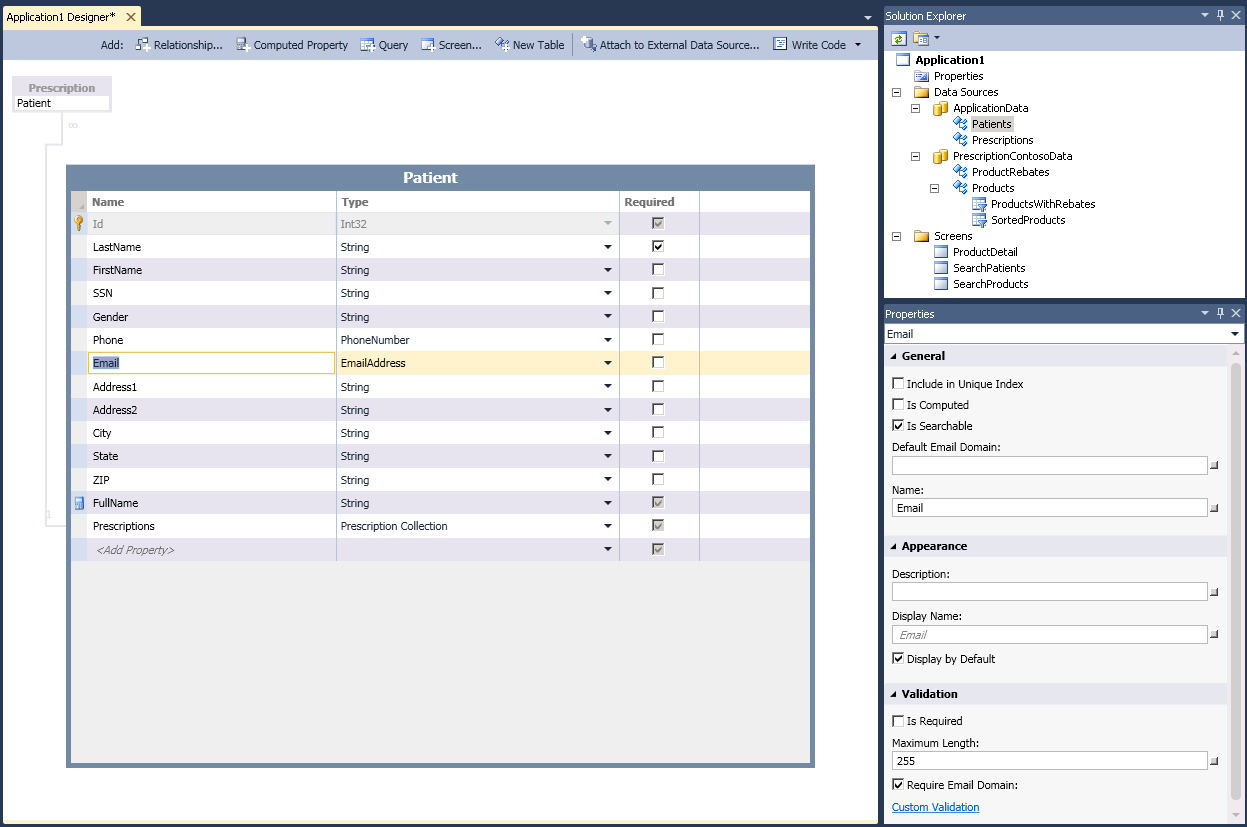
When you design a data entity in LightSwitch you can specify declarative formatting and validation rules in addition to alternate display labels, data types and lengths for each of the properties on an entity. You can then write custom validation logic on these properties or on the entire entity itself which exposes a variety of events as data moves through the pipeline. You can also use custom business types which help reduce the validation code that you write. For example, the EmailAddress, Money, Image, and PhoneNumber data types are built in (Figure 2). This eliminates the requirement to apply formatting in the user interface.
You can also create queries over the data entities using a graphical designer that helps you specify filters and sorts. Complex queries can be extended in code as needed. You can even base queries on other queries so they can be built-up or used individually across the application. You then can use these queries as the basis of your screens as needed.
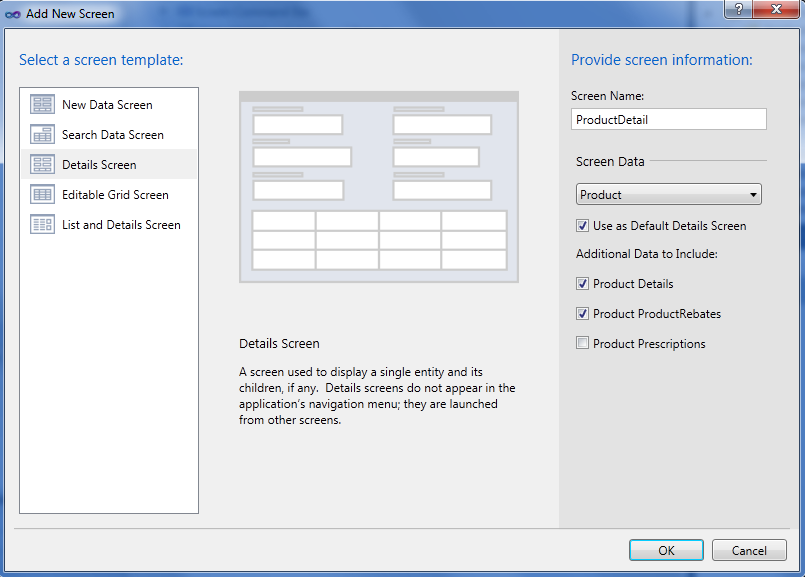
Screens in LightSwitch are based on an extensible set of predefined templates that provide good starting points which can be customized later (Figure 3). In addition to the screen templates that LightSwitch offers out-of-the-box, you can download more templates provided by the community and control vendors via the Visual Studio Gallery which is accessible via the Extension Manager directly inside of the LightSwitch development environment. Data binding is as simple as specifying which entities or queries will be displayed as the screen data.
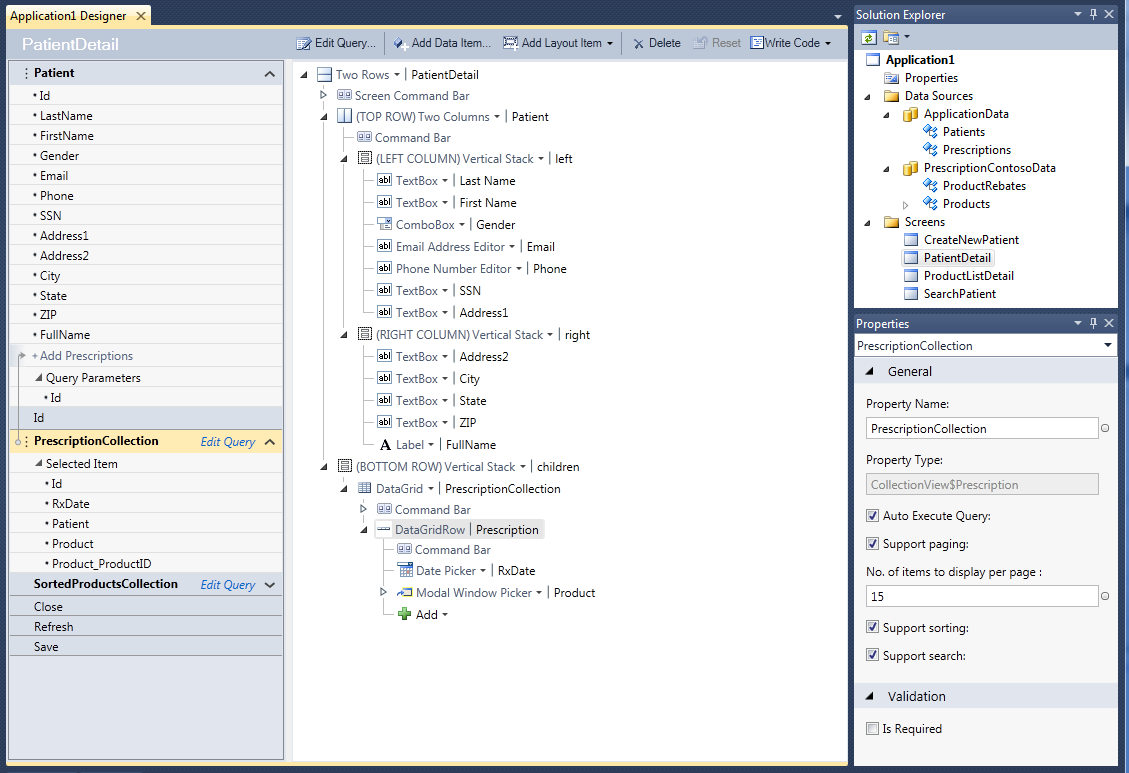
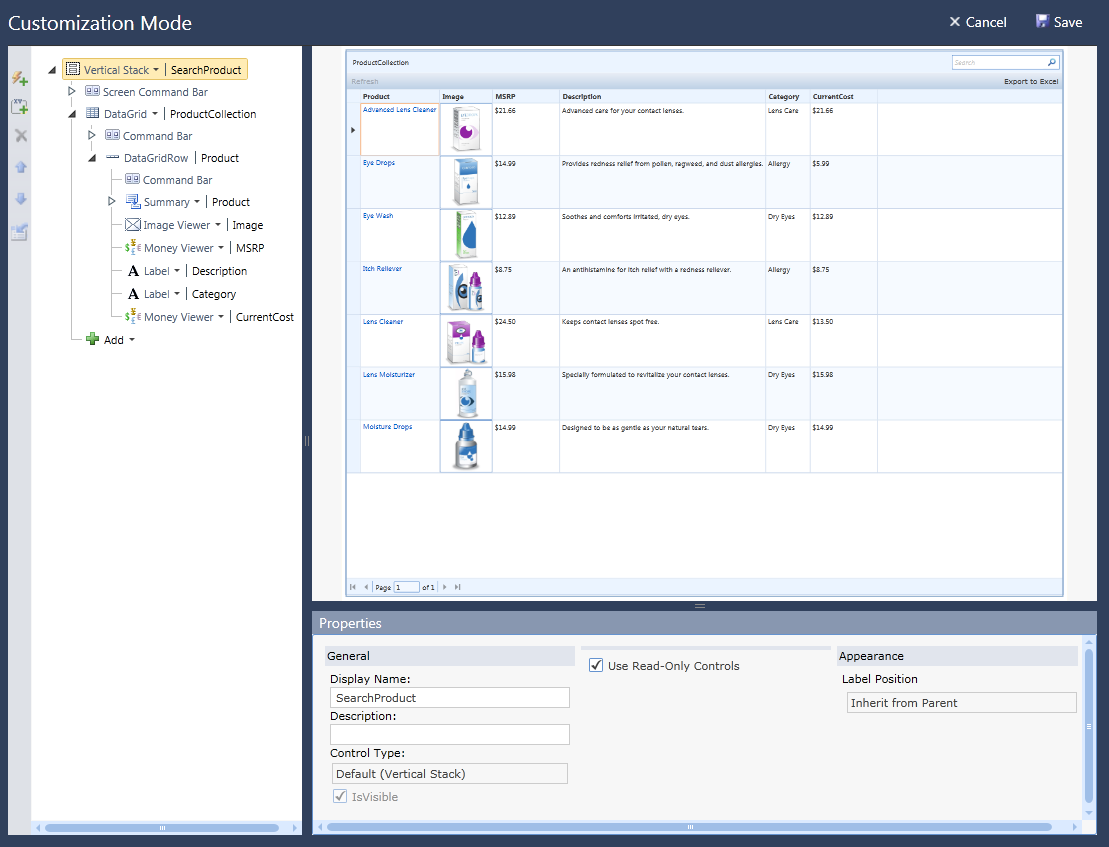
The screen designer presents a hierarchical view of the controls on the screen based on the template you picked. This is the View in the center of the designer. To the left is the View Model that shows the data collections and queries as well as any commands or other data items you add to the screen. When you write screen code you are writing code against this View Model. On the right side, the Properties window displays properties for the selected item in the designer. For instance, if you select a screen query you can specify the data paging size as shown in Figure 4.
While running in debug mode you can quickly change the look and feel of the UI by clicking the “Customize Screen” button at the top of the running application as shown in Figure 5. This is particularly helpful since you can see real data loaded in the app as you make UI tweaks. Typically once you pick a screen template you immediately hit F5 to run and customize the screen in real time.
Screens can also be generated by LightSwitch at runtime if you don’t specify all of them yourself. This is why it’s important to fully describe your data entities and business rules on those entities. This allows LightSwitch to generate screens for editing an entity when a user clicks on a record in a search screen for instance. LightSwitch also looks at the relationships you’ve defined between your entities and creates smart controls like modal window data pickers for connecting parent records or lookup lists.
There are numerous places to add custom business logic code. You can handle simple validation such as required fields and string lengths in the designer, or you can write code to handle more complex validation and business rules. In the running application, the validation logic is then automatically built into the screens and validation errors are displayed to the end user for you. Inserting custom actions in the data save pipeline and authorization checkpoints are other examples of where you can write custom business logic code.
LightSwitch has a robust validation framework which knows when to run the business rules. LightSwitch supports validation for screens, entities and the provider for entities called the DataService. Screen validation rules validate screen properties and screen data and only run on the client. Entity validation rules validate entity properties and entities and run on both the client and middle tier. DataService validation rules validate entities before saving to storage and run only on the server.
For instance, entity property validation rules always run on the client first and then the middle tier so that users get immediate feedback before sending the data all the way to the middle tier. To write a validation rule for an entity property, just select the property in the entity designer and click on the “Write Code” button at the top of the designer or property window and a method stub is created for you. When a rule fails you simply specify an error message to return.
Private Sub StartDate_Validate(
  ByVal results As EntityValidationResultsBuilder)
    If StartDate > EndDate Then
        results.AddPropertyError(
     "Start Date should be earlier than end date")
    End If
End Sub
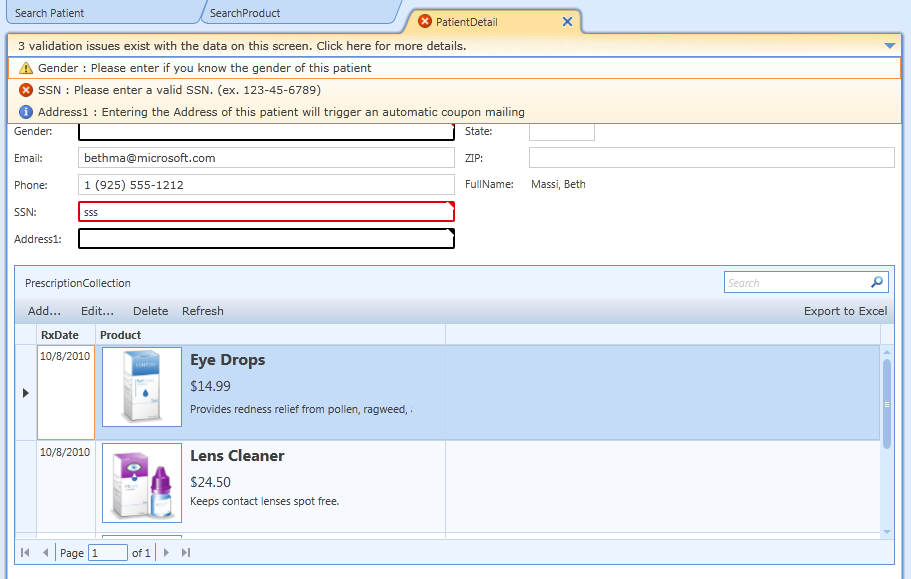
There are three types of validation results that are supported by LightSwitch; Validation Errors, Validation Warnings, and Validation Information. If any validation error is present, then the data will not be saved until all the errors are corrected. Validation warnings and information results are used to present warning or informational messages in the UI when entering data and they do not prevent the user from saving. The validation framework will handle displaying the error in a summary control on the screen, drawing a border around the control with a tool-tip of the message, and will also handle removing the errors when data is corrected.
To create a fully working application from scratch, all you need to do is create your entities, decide on how you want to query and display the data and hit F5. LightSwitch will create a full-blown application shell for you with a screen navigation pane, a ribbon across the top with default commands and a tabbed area displaying the open screens. The application also has built in “dirty checking” right off the bat - meaning if you edit data on a screen and navigate away from it or try to close it, the application will prompt you. All this comes for free without having to write the code yourself.
In addition to built-in features, LightSwitch applications follow N-tier architecture patterns, and incorporate best practices by default like data paging, async data loading, database concurrency checking, and well-known UI patterns to produce usable, scalable, and robust applications.
Controlling User Access
Access control is a big feature in LightSwitch and there are hooks built in all over screens, queries and entities that allow you to easily check permissions you define to determine whether a user should be able to perform an action. To implement the access control, you first define a set of permissions and select how you want the application to authenticate users. You do this from the Project -> Properties and then select the Access Control tab as shown in Figure 7.
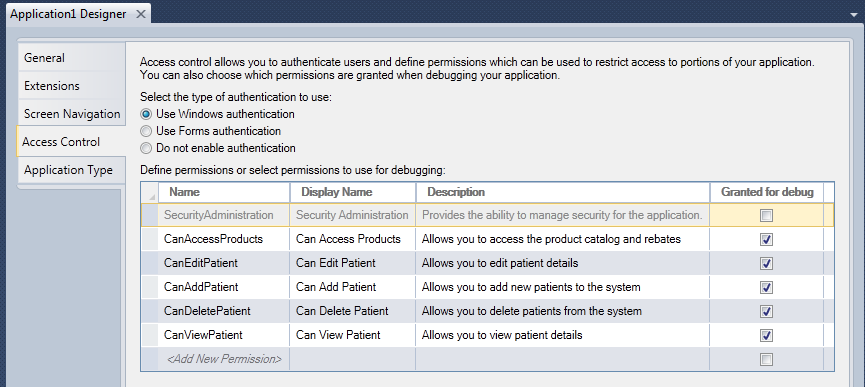
LightSwitch uses the standard ASP.NET membership providers for authentication and authorization. You can choose between two types of authentication, Windows Authentication or Forms Authentication. Windows Authentication is recommended if all your users are on a Windows domain and you want to trust whoever logged into their computer is the same user that is using the application. This means you do not have to provide an additional login or store and manage passwords outside of Windows itself. This makes the application very secure, however, this is usually only practical if the application is running in a corporate/domain Intranet environment. The second option is Forms authentication which means that a username/password is prompted for when the application opens and these values are checked against the database. This works nicely for clients running across the Internet that are not on a Windows domain.
Next you define the authorization rules or permissions. There is one built-in permission that controls whether someone can see the security administration screens. You then define your own permissions and check them in code anywhere you want, but typically you define permissions on entities, queries and screens. There is a set of security methods that allow you to define whether a screen can open, and on the entity, whether it can be viewed, edited, deleted, or added across any screen in the system. There is also a checkbox column available on the right of each permissions row that allows you to check off what permissions should be granted while debugging. This makes it easy to test combinations of permissions without having to log into the application. So even if Forms authentication is selected, in debug mode you will not see a login form.
In order to implement these permissions in code, select the “Write Code” button at the top of the entity, query or screen designer and select the appropriate security method you want to handle. For instance, for an entity you can handle the CanDelete, CanInsert, CanRead, CanUpdate, CanSave methods. These methods run on the middle-tier so they are always checked when performing actions on an entity no matter what screen is running on the client. For instance, say you defined a permission called CanDeleteCustomerEntity, then you could check that permission in code like so:
Private Sub Customers_CanDelete(
    ByRef result As Boolean)

       result = Me.Application.User.HasPermission(
            Permissions.CanDeleteCustomerEntity)
End Sub
When you deploy the application, LightSwitch will deploy the permissions you define. You also specify the username/password of the administrator account that LightSwitch should add to the database for you so that they can set up roles based on these permissions and assign them to users of your application. Permissions in roles are additive so it doesn’t matter which order you add them to users. This also means if you grant a permission in one role and not in another but you add both roles to a user, then that user will be granted that permission.
Deploying a LightSwitch Application
LightSwitch applications can be deployed as desktop applications, or they can be deployed as browser-based web applications when broader reach is required. Because LightSwitch applications are based on Silverlight and a .NET n-tier application framework, you can create both web browser and desktop applications that look and act the same. In most cases, you can even switch from a web browser application to a desktop application and back again by changing a single setting and redeploying. Additionally, LightSwitch applications can be hosted on premise or in Windows Azure.
Desktop applications are out-of-browser Windows client applications that give you access to COM and the local file system. Use this type of deployment when you need to control Office applications like Word and Excel or need access to devices connected to Windows. Web browser applications run in the browser sandbox and do not have access to COM or the local file system, however the application can run on Windows and Mac operating systems through a variety of browsers. Use this type of deployment for public-facing Internet applications when more reach is required.
When you are ready to deploy your LightSwitch application, select Project -> Properties and then select the Publish Settings tab. There you can choose from a desktop or web application as shown in Figure 8. A desktop application can be deployed as a 2-tier application where the middle-tier runs on the user machine. Otherwise you can choose to host the middle-tier as a 3-tier application running in IIS or Windows Azure.
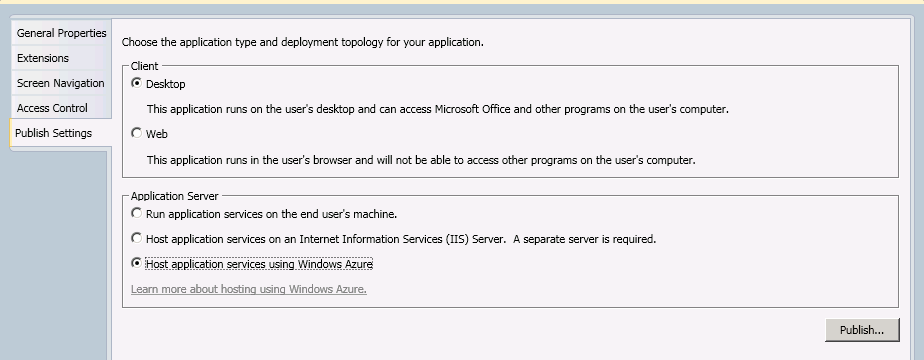
A 2-tier application connects directly to the database so it is appropriate for applications running on a local area network or small intranet. A 3-tier application hosts a web service layer for the middle-tier components which then connects to the database. This allows for easier client deployment and access over the Internet.
In the case of a 2-tier deployment, all the LightSwitch components and UI are packaged up into a ClickOnce package. When installed, the whole set of UI and middle-tier components run on the client. In the case of a 3-tier deployment, the LightSwitch middle-tier components are hosted in IIS on top of ASP.NET. If you select a desktop 3-tier application then the client will run as a Silverlight out-of-browser application and users will see an icon in their start menu and an entry in their Add/Remove Programs just as in the case of a 2-tier deployment. If you select a web 3-tier application, users simply navigate their favorite browser to your site.
In all cases, LightSwitch will publish the database for you to the server you specify. Additionally, in the case of the 3-tier deployment, it will also set up the website to host the middle-tier components. To publish the application, simply right-click on the project and select Publish.
LightSwitch Extensibility
There are many extensibility points available in a LightSwitch application. We knew that people may need to customize screens and data sources or would want to create entirely different themes or shells for their applications. A good application framework always has extensibility points built in for these cases and LightSwitch is no different.
On one end of the spectrum, you may have a need to create a custom control for a screen. You can simply create your own custom Silverlight control and then use that control on any screen. Because all the code you write against a screen is in the View Model this makes it possible to manipulate the View with your own Silverlight controls. You can specify the binding in the control itself or via a LightSwitch dialog when you add the custom control to the screen.
Another area is with custom data sources that we may not support out of the box. In this case you can create your own RIA service and use that as a data source for LightSwitch. You can consume OData sources this way.
Besides custom controls and data sources you can create entire shells, themes, custom business types, and screen templates. This level of extensibility is deeper by creating .VSIX packages, and allows you to distribute broadly to users via the Visual Studio Gallery. A LightSwitch developer can then install the extensions via the Extension Manager directly inside of the LightSwitch development environment. You can expect control vendors as well as the broader community to create many extensions for LightSwitch as the ecosystem grows.
Conclusion
To get started, head to http://msdn.com/lightswitch and watch training videos, read tutorials, download samples and interact with the team in our forums and blogs. We’d love to hear from you!
