


Make no mistake, ASP.NET 4.0 is a major release with a long-awaited list of new features and technologies for Web developers to take advantage of. We’ve divided the new features we’ll cover in this article into four primary areas: Web Forms, ASP.NET AJAX 4, Dynamic Data, and Core Services. Some of the things you will want to learn about are
improvements over existing capabilities like how client-side ID generation has been improved while other improvements offer new technologies like Dynamic Data. We’ll show you where you want to take advantage of these new features and capabilities to expand your skill set and ultimately improve your productivity.
We have teamed up to bring you the latest and greatest that Microsoft has added to their flagship Web development platform, ASP.NET 4.0. We’ll cover all of the areas mentioned in the previous paragraph with the exception of ASP.NET MVC since you can find coverage on that topic elsewhere in this issue of CODE Magazine.
If there is one underlying theme with the Web Forms enhancements, it’s that Microsoft has focused on rendering HTML that is standard compliant.
Web Forms
Let’s start off making something perfectly clear. No, the Grim Reaper isn’t wandering around Microsoft Building 42, waiting to snatch up the freshly discarded, lifeless body of ASP.NET Web Forms. Many developers have incorrectly assumed that the release ASP.NET MVC started a countdown timer ticking off the days until Microsoft leaves Web Forms for dead. That couldn’t be farther from the truth. As proof, you can see all the new features and enhancements Microsoft has made in Web Forms in ASP.NET 4.0. The time and effort Microsoft has invested in Web Forms clearly indicates that they have no plans to let Web Forms wither on the vine, so go ahead and put the defibrillator away. No one’s going to die here, move it along people, nothing to see here.
We see a long list of new features added in the Web Forms space. If Microsoft has one underlying theme with the Web Forms enhancements, it’s that Microsoft has focused on rendering HTML that is standard compliant. You can see this evident in the changes Microsoft made to how controls use CSS styles.
Project Template Changes
Microsoft made significant changes to the project templates. For example, selecting the new Empty ASP.NET Application template creates a project consisting of references and a near-empty web.config file.
<?xml version="1.0"?>
<configuration>
  <system.web>
    <compilation debug="true"
       targetFramework="4.0" />
  </system.web>
</configuration>
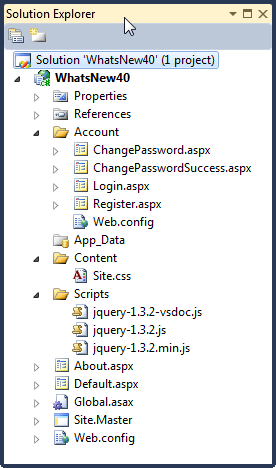
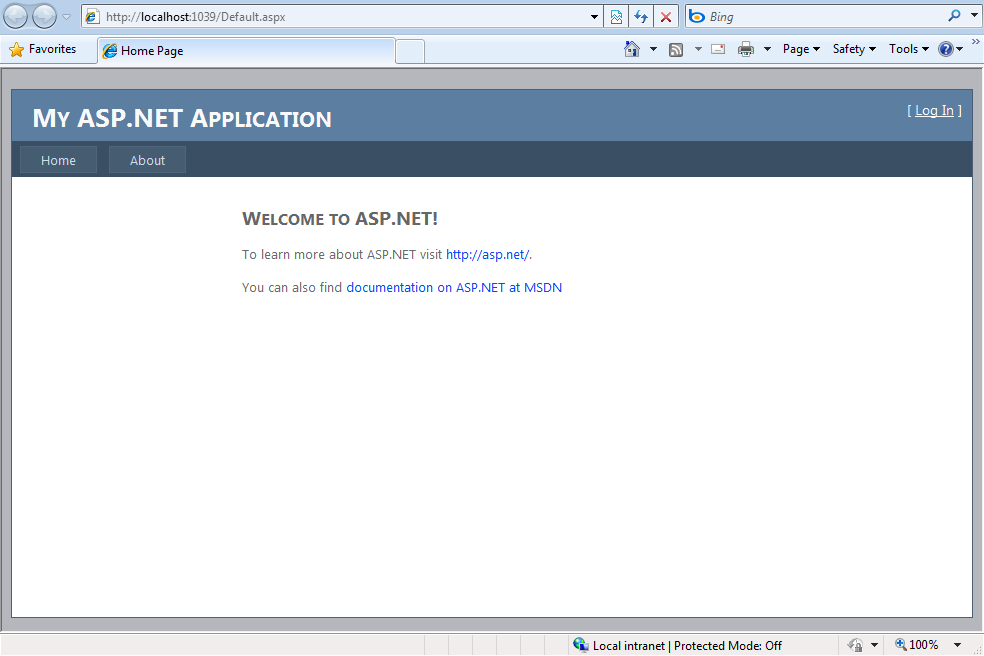
The most noticeable change though occurs when you select the ASP.NET Web Application template or build a new ASP.NET Web Site (File | New | Web Site**…).** Both of these templates now generate a functional Web site with a default page (based on a master page), a CSS file, and membership functionality already in place (Figure 1). The resulting application includes a Home page, About page, and complete set of membership pages including Login, Register, and Change Password pages (Figure 2).
Control Over Generated Client-Side IDs
JQuery, the open source JavaScript library, ships with Visual Studio 2010. This is significant for two reasons; one, Microsoft has never shipped an open source product with its own software, and two, this clearly validates the shift toward client-side development that has been occurring for the last few years. The shift toward providing rich Internet applications (RIAs) has steadily been increasing and there are two distinct approaches to implementing a RIA solution. The first involves utilizing HTML, CSS, and client-side JavaScript. The second involves utilizing a client-side plug in like Microsoft Silverlight or Adobe Flash. These are not mutually exclusive approaches and very often are combined to provide the visitor with a rich user experience. When using the first approach (HTML, CSS, and client-side JavaScript) very often you will want to identify specific controls on the page by their client-side ID. Have you ever needed to reference an ASP.NET Web control via client-side JavaScript? If you’ve realized that, you end up with a client-side ID something like this:
id ="ctl00_MainContent_TextBox1"
While there is a standard algorithm to this naming madness, it certainly does not make trying to reference a specific control easy via client-side JavaScript. The good news is that Visual Studio 2010 gives you control over how client-side IDs are generated with the addition of two new control properties, ClientIDMode and ClientID.
With ClientIDMode you specify how you want the client-side ID generated for the controls. You can set ClientIDMode for any control as well as for the page itself. The available settings are Inherit, Legacy, Predictable, and Static.
Inherit is the default and specifies that this control and its child controls will take on the ClientIDMode of the parent control. Child controls having the ClientIDMode explicitly set to Inherit or not set at all take on the settings of the parent control. This holds true for the page and all the way up to the configuration file. You can set the ClientIDMode property in the page directive like this.
<%@ Page Title="Home Page" Language="C#"
MasterPageFile="~/Site.master"
ClientIdMode="Inherit"
CodeBehind="<a href="http://Default.aspx.cs">Default.aspx.cs</a>"
Inherits="WhatsNew40._Default" %>
You can set the ClientIDMode property in the web.config in the pages element.
<pages clientIDMode="Inherit">
Using AutoID applies the same client ID naming technique as prior versions of ASP.NET. Static and Predictable are where the real power lies. Static lets you specify the ID to be used. Whatever you specify in the ID property of the Web control is the name assigned to the ID property of the HTML control rendered. Static is the “you set it, you get it” mode. What about controls that generate multiple controls on the client, like ListView? The Predictable setting applies to data controls that use repeating templates. A control’s client-side ID will be determined by its parent control’s naming container plus “idLabel” plus an incremental counter starting with 0. For example, you might see something like this in the source of a ListView using a ClientIDMode of Predictable.
<span id="ctl00_MainContent_lvBooks_idLabel_0">
bk101</span>
<span id="ctl00_MainContent_lvBooks_idLabel_1">
bk102</span>
You’ll often use the Predictable setting with another new property called ClientIDRowSuffix, which allows you to specify a field in the data source used in place of the incrementing values. Typically, you use the field containing the key value of an item. This results in the following client-side source.
<span
id      ="ctl00_MainContent_lvBooks_idLabel_bk101">
bk101</span>
<span
id      ="ctl00_MainContent_lvBooks_idLabel_bk102">
bk102</span>
As you can see, the client-side ID values for each item in the data source has a predictable name based on the parent containers, the client-side ID property, idLabel, plus the value in the data source’s ID field.
Selected Row Persistence for GridView and ListView
While we’re on the subject of data controls, let’s cover the next item, selected row persistence. A new EnablePersistedSelection property added to the GridView and ListView controls gives your GridView and ListView controls the ability to remember what row was selected when a user returns back to a page. Suppose you select the fourth item on a GridView control and move to the next page of data. You select the second item on the page and click the Back button. With EnablePersistedSelection set to true, the fourth item on page one remains selected.
Filtering On Data Source Controls
Let’s stay on the subject of data controls and discuss the new QueryExtender control. You can add this control to an EntityDataSource or LinqDataSource control to provide filtering capabilities to the data returned by these controls. This replaces you having to construct where clauses in the data source controls.
ListView Control Enhancements
The ListView control is a templated control that was added in ASP.NET 3.5. It required a Layout template containing a server control named itemPlaceholder to inject the content from the ItemTemplate.
<asp:ListView ID="ListView2" runat="server"
     DataSourceID="XmlDataSource1">
   <ItemTemplate>
       <asp:Label ID="idLabel" runat="server"
           Text='<%# Eval("id") %>' />
   </ItemTemplate>
   <LayoutTemplate>
       <asp:PlaceHolder ID="itemPlaceholder"
           runat="server" />
   </LayoutTemplate>
</asp:ListView>
ASP.NET 4.0 does away with the LayoutTemplate requirement, which makes it easier to apply CSS styles.
<asp:ListView ID="ListView1" runat="server"
      DataSourceID="XmlDataSource1">
   <ItemTemplate>
      <asp:Label ID="idLabel" runat="server"
          Text='<%# Eval("id") %>' />
      </ItemTemplate>
</asp:ListView>
Controlling HTML Rendered by Templated Controls
By default, the following controls use HTML tables to display their content.
- FormView
- Login
- ChangePassword
- PasswordRecovery
- Wizard
- CreateUserWizard
With the shift to using CSS to control page layout, the new RenderTable property gives you the ability to decide if you want those controls wrapped in an HTML table or not.
Ability to Work with HTML Meta Tags
Microsoft expanded the Page class with two new properties, MetaKeywords and MetaDescription. These two properties correspond to the meta tags of the same name on a page.
<meta name="description" content="Aircooled VWs
Rock!" />
<meta name="keywords" content="Beetle, Karman
Ghia, Thing, Microbus" /></head>
Obviously, the advantage to being able to programmatically work with the keywords and description meta tags is that they can be set from values stored in a database or other data storage locations.
protected void Page_Load(object sender,
          EventArgs e)
{
   this.MetaKeywords = "Beetle, Karman Ghia,
        Thing, Microbus";
   this.MetaDescription = "Aircooled VWs Rock!";
}
Enhanced ViewState Control
I think you will find few ASP.NET developers who will disagree with the statement that ViewState is possibly the most mismanaged feature in ASP.NET. Imagine how much unnecessary bandwidth has been chewed up over the years by poorly managed ViewState data. The heart of the issue centers on the fact that ViewState is on by default for the entire page. Sure, you can turn off ViewState for controls but you have to do that individually for every control. Now let’s talk about an enhancement to ASP.NET 4.0, the ViewStateMode property.
The ViewStateMode property supports one of three settings: Enabled, Disabled, and Inherit. Enabled turns ViewState on for the selected control and for any child controls that have their ViewStateMode Property set to Inherit or left empty. Disabled turns ViewState off for the selected control. Inherit, the default when you add a new control, allows the selected control to inherit the ViewStateMode setting from the parent control.
You can set ViewStateMode at the page level in the @Page directive so you can selectively decide which controls will have ViewState enabled.
<%@ Page Title="Home Page" Language="C#"
MasterPageFile="~/Site.master"
ViewStateMode="Disabled"
CodeBehind="<a href="http://Default.aspx.cs">Default.aspx.cs</a>"
Inherits="WhatsNew40._Default" %>
Viewstate for all the controls on this page would be disabled if their ViewStateMode property is set to Inherit or is left empty.
You can also set ViewStateMode at the ContentPlaceHolder level on a Master page to selectively control the ViewState settings for controls contained on pages based on a MasterPage.
<asp:Content ID="Content2"
ContentPlaceHolderID="MainContent"
runat="Server"
ViewStateMode=Disabled>
The existing control property, EnableViewState, still plays a role in how the ViewStateMode property functions. EnableViewState must be set to true for ViewStateMode to work. If EnableViewState is false then a control’s view state will not be maintained regardless of the setting in ViewStateMode.
Enhanced Support for Routing
If you have taken a look at ASP.NET MVC then this section is going to look very familiar. ASP.NET MVC implements a pattern-based URL routing mechanism that does not map to physical files. Instead, it uses a much cleaner, easier to read, and more descriptive URL for the user and search engines to work with. For example, this URL http://server/application/parts.aspx?make=vw&year=1967&model=beetle might look like this, http://server/application/parts/vw/1967/Beetle.
The primary advantage of going with this approach is better search engine optimization and indexing.
Routes are the URL patterns you define. Routes specify the placeholders that get mapped to values from a URL request. These placeholders are known as URL parameters and are enclosed in brackets { }. Additional information in the URL is treated as a constant. Constants and URL parameters are delimited by the / character. Defining routes in the Application_Start method ensure they are available application wide.
protected void Application_Start(object sender,
          EventArgs e)

   RouteTable.Routes.Add(
      "ProductRoute",
      new Route("product/{id}",
      new PageRouteHandler("~/products.aspx")));
}
In the sample code, a definition named ProductRoute is defined with a route of product/{id} that maps to the products.aspx file. A URL such as http://server/application/product/15 would route the request to the products.aspx page.
Inside the parts.aspx page, using the RouteData.Values collection, you can grab the values from the URL using, 15, in this example.
var id = RouteData.Values["id"];
The order in which you add routes matters since route matching is done from the first route to the last route defined. You will want to add routes in order from the most specific to the least specific. Additional route matching stops once a route match occurs. Table 1 lists a few more routes for you to review.
There is much more to learn about the routing features such as defining default values for route parameters, adding constraints to routes, and when you might not want routing to occur.
ASP.NET Chart Control
The phrase “a picture is worth a thousand words” directly applies to the new charting capabilities added to ASP.NET 4.0. Using the Chart control you can add charts that help visitors to your site to quickly understand complex statistical or financial data. The Chart control was initially an add-on to SP1 of the .NET 3.5 Framework and it is included in the .NET 4.0 Framework.
Menu Enhancements
Prior to ASP.NET 4.0, the menu control generated menu items as HTML tables. This made it difficult to apply CSS styles, not to mention that it was not accessibility standards compliant. With ASP.NET 4.0, the menu control now renders HTML unordered list and list elements with CSS class assignments as well (Listing 1).
RadioButtonList and CheckBoxList Enhancements
The RepeatLayout property supports two new values, OrderedList and UnorderedList. OrderedList causes the items to be rendered as <li> elements within an <ol> element while UnorderedList causes the items to be rendered as <li> elements within an <ul> element. These new values make these controls more accessibility standards compliant and easier to style with CSS.
Web Forms Wrap Up
That should give you a pretty good idea of what has been added to Web Forms in ASP.NET 4.0. You’ll no doubt agree that the rumors of Web Forms’s demise were greatly exaggerated.
Server-side developers using ASP.NET will feel at home with declarative style syntax, as it mimics the declarative style found in the ASP.NET server controls set.
ASP.NET AJAX 4
ASP.NET AJAX 4 gives you a chance to do 100% client-side development if you so choose. ASP.NET AJAX 4 also boasts a robust set of server-side controls found in the AJAX Control Toolkit. Many developers are familiar with the AJAX control toolkit; it’s been around for some time now and gives an easy way to enable client-side functionality to your ASP.NET server-side Web pages. However, there is currently a complete AJAX client-side library available with many new features. Some features are available now in an out-of-band release and you can download them from CodePlex (http://www.codeplex.com/aspnet). ASP.NET 4 will include other great new AJAX features as well.
- Declarative syntax
- Client templates
- Data services for AJAX
- Live bindings
- More…
We’ll focus on the client-side features in this article.
Declarative Syntax
ASP.NET AJAX Client Templates give you the ability to use declarative data binding syntax in client-side code. Server-side developers using ASP.NET will feel at home with style syntax, as it mimics the declarative style found in the ASP.NET server controls set. The following code demonstrates a short example of what the declarative syntax looks like:
<ul id="products"
  sys:attach="dataview"
  dataview:datasource="{{ new
      Sys.Data.AdoNetDataSource() }}"
  dataview:serviceuri="../AdventureWorksAdo.svc"
  dataview:query="Product?">
  <li>
   {{ Name }}
   {{ parseFloat(ListPrice).localeFormat("C") }}
  </li>
</ul>
You can see this isn’t your mother’s AJAX. The sys and dataview attributes of the <ul> tag denote the Sys and DataView namespaces found in the AJAX libraries. Each portion of the attribute after the colon (:) denotes values, some of which the attribute uses to instantiate objects declaratively. For example, the datasource value creates a new instance of the AdoNetDataSource object and returns it for use in the <ul> tag. ASP.NET AJAX 4 also supports WPF-style declarative data binding syntax.
Client Templates
The ASP.NET AJAX 4 Client Templates provide a way for you to bind data whether using the declarative syntax or a more traditional script-based syntax.
Client templates also support a new feature called live bindings, which allow changes to elements in one area of the page to synchronize with other elements on the page immediately. This is perfect for the multitude of Web sites that combine master-detail displays into a single Web page. Client templates mimic the WPF data binding syntax, using either single or double curly braces (as demonstrated in the above sample). Client templates use JavaScript as their expression language so you can wrap the curly brackets around any valid field name returned from an AdoNetDataSource object or any valid JavaScript expression to get the results you need. Using an expression such as {{ columnName }} makes it very easy to perform client-side data binding.
Data Services for ASP.NET AJAX
ASP.NET AJAX 4 presents a complete library in the Sys.Data namespace that you can use for all data operations. You can retrieve, bind, update, and send the changed results back to an ADO.NET Data Service. The following code demonstrates an example showing AJAX 4 retrieving and binding data.
<script type="text/javascript">
function pageLoad() {
   $create(Sys.UI.DataView, {
      dataSource: new Sys.Data.AdoNetDataSource(),
      serviceUri: "../AdventureWorksAdo.svc",
      query: "Product?"
    }, {}, {}, $get("prodTbl"));
}
</script>
This next code snippet demonstrates using the Sys.Data.AdoNetDataSource object during the pageLoad() event to retrieve all product information as denoted in the query argument. It passes the results over to an element with an ID of prodTbl for data binding. Inside the prodTbl element (which can be any valid HTML element) lives the data binding syntax to display columns returned from the data source, as shown below:
<table id="prodTbl">
<tr>
    <td>{{ Name }}</td>
    <td>{{ ListPrice }}</td>
</tr>
</table>
This is straightforward HTML with only the Name and ListPrice columns bound using the {{ }} delimiters for data binding. Client-side data binding and access using Sys.Data is one of the premiere highlights of ASP.NET AJAX 4.
Live Bindings
ASP.NET AJAX 4 carries the client templates continuum into the realm of synchronized element binding called live bindings. Live bindings allow you to display elements that will stay in synch with each other automatically after a user changes data in only one of the elements. The only difference between standard bindings and live bindings are a few attributes applied to elements that associate them together plus slightly modified bracket syntax. To use live bindings, we should start with a master set of elements (Listing 2).
Live bindings allow you to display elements that will stay in synch with each other automatically after a user changes data in only one of the elements.
The important thing to see in Listing 2 is the sys-key attribute, which signifies this as the key to be linked for live bindings and the { binding fieldname } syntax. The single bracket syntax using the binding keyword allows this binding to participate in the binding synchronization. Moving on to the detail record, you can see that it associates itself to the master <div> element by using the dataview attribute and specifying the source.
<div id="prodDetail" sys:attach="dataview"
    dataview:data="{binding selectedData,
                    source={{master}} }">
<!-product fields -->
</div>
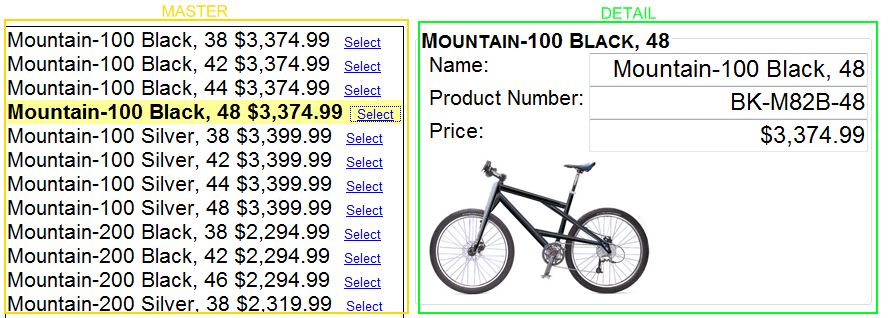
Any fields bound within this <div> element that use the live binding syntax will automatically synchronize their updates with that of the <div id=”prodMaster”> element. Figure 3 shows the output of this code with the master and detail sections highlighted.
Changes made to the details section of the page automatically synchronize with the master portion of the page, and the data is always up to date. The page can also send the data back to the server as an update, insert, or delete.
ASP.NET AJAX 4 Summary
ASP.NET 4 AJAX promises to be an extremely efficient way to handle client-side interactions. Finally, AJAX 4 provides all the tools necessary for some of the most requested features-retrieving, displaying, and binding data to page elements.
ASP.NET Dynamic Data
Microsoft’s ASP.NET Dynamic Data is a new framework for delivering data-driven applications in less time while keeping maintenance tasks simple. Traditional ASP.NET applications based on CRUD operations (create, retrieve, update, delete) bring common difficulties to the development table. Developers have been hoping for an easier way to create and maintain ASP.NET applications since regular Web Forms development has forced them into a repetitive cycle of creating separate pages for each data entity multiplied by each CRUD operation. This process adds to the sheer volume of pages needed for an application and additionally those pages often contain code that’s so similar that it’s easier for developers to copy them than reuse them, yet copying code causes more harm than good. Dynamic Data sets out to solve these issues by allowing you to create templates based on data rather than templates just based on a UI layout, which promotes the DRY (don’t repeat yourself) principle. In the following prose, we’ll show you just that.
By taking advantage of these Dynamic Data template types, you can quickly create maintainable applications.
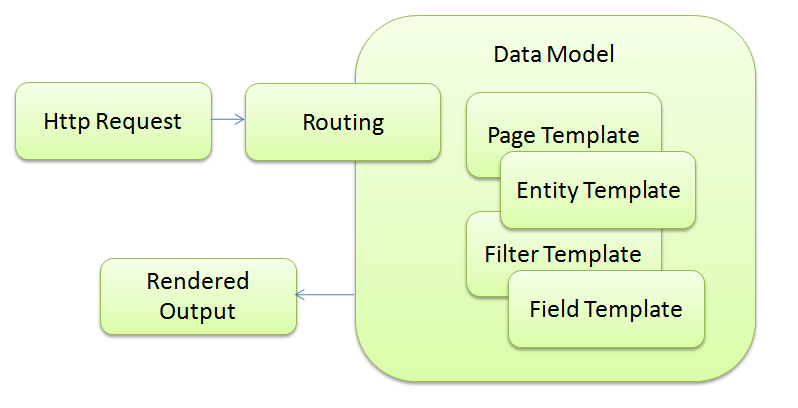
It’s All About the Templates
The Dynamic Data templates are what make it all tick. Dynamic Data boasts the following template types: Page, Entity, Field, and Filter. By taking advantage of these template types, you can quickly create maintainable applications. Figure 4 demonstrates the overall process.
A user creates a request via HTTP to a Dynamic Data URL, at which point the routing engine kicks in to determine which entity is the main attraction to render. Dynamic Data then merges the entity with several different templates to construct the output. Each of the templates plays a specific role to provide a granular approach to combining data and a UI shell, and each template displays data specific to a mode (e.g., read only, edit or insert).
Page templates are actual ASP.NET pages sporting the .aspx extension. However, the rest of the templates live as .ascx files.
Field Templates
Field templates combine data based on the data type, which is a novel approach in the ASP.NET world. That is to say, the template that you’ve setup for the DateTime data type will be used for each and every instance of a DateTime in your site (unless you modify it). If you wanted to add in an AJAX calendar control, you could easily add it to just the DateTime edit mode template. Then every time a user edits any DateTime field for any entity, they will see the AJAX calendar. In traditional ASP.NET development, you would need to set up an AJAX calendar control in each page for each DateTime field. Creating one template for all fields of a data type is an excellent way to ease maintenance tasks and promote reusability. Field templates bring simplicity to Web application development, which is demonstrated below in the following Boolean template sample for edit mode.
<%@ Control Language="C#"
CodeBehind      ="Boolean_Edit.ascx.cs"
Inherits      ="DynamicDataProject.Boolean_EditField" %>

<asp:CheckBox runat="server" ID="CheckBox1" />
Listing 3 contains the code for the Boolean template listed above.
There isn’t anything in the content or code-behind file that denotes a specific field since templates are based on the data type. This makes it easy to maintain a loose coupling with the actual fields, whereas traditional ASP.NET development forces you to hard code column names into GridView, DetailsView, and other controls by using the Eval method.
Page and Entity Templates
Page and entity templates give you a way to define a UI layout for read only, edit and insert display modes of data. Entity templates combine field templates into their control set and layout, and they in turn are incorporated inside of page templates. Each template type plays an important role in creating an overall templating scheme.
Page templates give developers a way to customize pages based on individual modes of operation. Table 2 lists the four templates you can use.
Page templates define the overall look and layout of a page and provide a skeleton for individual data entities, but the engine displays the entities for a specific mode such as read only or insert. When displaying data for any particular mode, routing kicks in to equip the ASP.NET engine with the information needed to display the data in the correct mode of data (read only, edit, or insert) by rendering the corresponding page. You can also create custom pages for individual entities if you wish to break away from the common look and feel of the site.
The new auto-start feature solves the problem of making sure your Web application is ready to accept requests before the first visitor arrives.
Entity templates, on the other hand, give you the option of customizing entities without the need to create a custom page. Since entity templates are based on the entity itself rather than the entity plus the operational mode, customizing them means you are customizing behavior specific to the table itself. Entity templates also give you the ability to control the rendered output HTML more granularly and apply separate styles to separate tables.
Filtering and Filter Templates
Dynamic Data supports first class filtering scenarios via filter templates. Baked into the product is all the filtering you should need, but you can customize filters as well if you’d like. The filters available include filtering by foreign key, cascading dropdowns, auto-complete textboxes, Boolean, range and enumeration filters. Inside each page template, you’ll notice that the filters are automatically included.
The Metadata Model
The metadata model supported by Dynamic Data provides a customizable layer for validation and other data related logic. The current models supported by Dynamic Data as of this writing are LINQ to SQL, Entity Framework, and ADO.NET Data Services with future support to include POCOs (Plain Old CLR Objects), ORMs (Object Relational Mapper) and other data sources.
Validation and the Data Model
Assuming you’re using LINQ to SQL or Entity Framework, Dynamic Data will automatically pick up validation information from the database. The data models can also use validation and extended information from attributes applied to any entity’s properties such as range, regular expression, required, filter, and others. The following code shows a sample of attribute-based validation.
[FilterUIHint("Range")]
[Range(0,150)]
public object UnitsInStock { get; set; }

[FilterUIHint("Autocomplete")]
public object Supplier { get; set; }

[EnumDataType(typeof(ReorderLevelEnum))]
public object ReorderLevel { get; set; }
You can also support validation methods and business logic by using extension methods of the LINQ to SQL or Entity Framework data models. Several extension methods available take the form of OnEntityEvent such as OnProductsUpdated or OnProductsUpdating. These are familiar to ASP.NET developers who’ve used the grid controls with DataSets that supply similar events such as OnDataBinding or OnRowUpdated.
Summarizing Dynamic Data Enhancements in ASP.NET 4
Dynamic Data helps mitigate maintenance and development tasks by providing a framework and set of templates that make it easy to build data-driven applications rapidly.
Core Services
The Core Services space has a list of new features as well including simplifying the web.config file, permanent page redirection, session state size reduction, expanding the range of allowable URLs, auto-start Web applications, and the list goes on. We’ll touch on a few here.
Auto-Start Web Applications
Some Web applications have extensive initialization code in the Application_Load method in the Global.asax file that needs to be executed before a site can process its first request. The new Auto-Start scalability featured is aimed at resolving this problem when running ASP.NET 4.0 on IIS 7.5 and Windows Server 2008 R2. Cold-starting IIS 7.5 or recycling an application pool causes IIS 7.5 to reference the applicationHost.config file to determine which applications to restart. Marking an application as auto-start informs IIS 7.5 that ASP.NET 4.0 needs to be notified to start the application.
Adding the following to the applicationHost.config file configures the TakeNoteAppPool application pool for auto-startup.
<applicationPools>
  <add name="TakeNoteAppPool"
       startMode="AlwaysRunning"  />
</applicationPools>
If your application pool contains more than a single application, you can specify which applications get auto-started with the applicationHost.config file in Listing 4. When ASP.NET is in the pre-start state, the type defined in the preloadProvider section of the applicationHost.config file has its Preload method fired.
namespace WhatsNew40
{
  public class MyInitializationCode:
     System.Web.Hosting.IProcessHostPreloadClient
    {
        public void Preload(string[] parameters)
        {
            // Code to run on app start up
        }
    }
}
When the PreLoad method completes, the application is ready to process incoming requests. The new auto-start feature solves the problem of making sure your Web application is ready to accept requests before the first visitor arrives.
Shrinking Session State
Session state can be stored out of process on another server or within SQL Server. Both of these approaches require that the session state information be transmitted across the network to the receiving server. ASP.NET 4.0 introduces a way to reduce the size of that session data by compressing and uncompressing it with the System.IO.Compression.GZipStream class with the compressionEnabled setting.
<sessionState
  mode="SqlServer"
  sqlConnectionString="connection string here"
  allowCustomerSqlDatabase="true"
  compressionEnabled="true" />
Permanently Redirecting a Page
When you permanently relocate a Web page, you should return a HTTP 301 status code as well as a location header in the HTTP response of the relocated page. The HTTP 301 code will inform search engines and other user-agents that the page has permanently moved.
The new RedirectPermanent feature makes it easy to issue HTTP 301 status codes for permanently moved pages.
Response.RedirectPermanent("deadpage.aspx");
Extensible Output Caching
In its simplest forms, caching allows you to store generated HTML pages in memory. This speeds up response time when cache pages are requested since the entire page lifecycle for the page does not have to be processed. The problem with this approach is that all these items are being stored in your Web server’s memory-memory that may be at a premium for sites with heavy traffic volume.
This new feature provides a way for storing those cached HTML assets in any storage mechanism you choose. A custom output cache provider is created as a class deriving from System.Web.Caching.OutputCacheProvider. A web.config entry in the new providers section of the outputCache element contains the details for your new class.
Web.config Goes on a Diet
With all the features that have been added to ASP.NET over the years, it was inevitable that the web.config would swell in size. Add in the new features in ASP.NET 4.0 such as routing, AJAX, outputCaching Providers and so on, and the swelling continues. New to ASP.NET 4.0 is the moving of major configuration settings into the machine.config file with applications inheriting these settings.
This allows an application to simply not have a web.config file or to have a very simple one like this one specifying the framework version being targeted.
<?xml version="1.0"?>
<configuration>
    <system.web>
      <compilation targetFramework="4.0" />
   </system.web>
</configuration>
Summary
Hopefully, between the two of us, we have given you enough information to peak your interest and jump-start your learning process.
Listing 1: HTML rendered by Menu control
<div id="Menu1">
   <ul class="level1">
      <li><a class="level1" href="#">Home</a></li>
      <li><a class="level1" href="#">Auto Parts</a>
         <ul class="level2">
            <li><a class="level2" href="#">Domestic</a>
               <ul class="level3">
                  <li><a class="level3" href="#">GM</a></li>
                <li><a class="level3" href="#">Ford</a></li>
             </ul>
      </li>
      <li><a class="level2" href="#">Import</a>
          <ul class="level3">
            <li><a class="level3" href="#">Audi</a></li>
            <li><a class="level3" href="#">VW</a></li>
          </ul>
      </li>
      </ul>
   </li>
   </ul>
</div>
Listing 2: AJAX live bindings
<div id="prodMaster"
    sys:attach="dataview"
    dataview:sys-key="master"
    dataview:datasource="{{ new Sys.Data.AdoNetDataSource() }}"
    dataview:serviceuri="../AdventureWorksAdo.svc"
    dataview:query="Product?">
  <ul sys:command="select">
    <li>{binding Name}</li>
    <li>{binding ListPrice,convert=formatCurrency}</li>
    <li><input type="button" sys:command="select"
        value="Select"/></li>
  </ul>
</div>
Listing 3: Edit mode Boolean template code
namespace DynamicDataProject {
    public partial class Boolean_EditField :
        System.Web.DynamicData.FieldTemplateUserControl {

        protected override void OnDataBinding(EventArgs e) {
            base.OnDataBinding(e);

            object val = FieldValue;
            if (val != null)
                CheckBox1.Checked = (bool) val;
        }

        protected override void ExtractValues
            (IOrderedDictionary dictionary) {
            dictionary[Column.Name] = CheckBox1.Checked;
        }

        public override Control DataControl {
            get {
                return CheckBox1;
            }
        }
    }
}
Listing 4: applicationHost.config file settings for Auto-Start
<sites>
  <site name="MainSite" id="1">
    <application path="/"
       preloadEnabled="true"
       preloadProvider="AutoLoadData" >
       <!--  //Additional application settings here// -->
    </application>
  </site>
</sites>

  <!-- //Additional settings here// -->

<preloadProviders>
   <add name="AutoLoadData "
        type="WhatsNew40.MyInitialzationCode, WhatsNew40" />
</preloadProviders>
Table 1: Routing patterns and matching URLs.
| Route | Matching URL Example |
|---|---|
| parts/{category} | parts/electrical |
| parts/{category}/{id} | parts/electrical/14 |
| parts/{category}/{partname} | parts/suspension/shocks |
| parts/maintenance/{action}/{category} | parts/maintenance/add/electrical |
Table 2: Available Dynamic Data templates to use.
| Template | Purpose |
|---|---|
| List.aspx | Read only mode |
| Details.aspx | Read only mode for a single row of data |
| Edit.aspx | Edit mode |
| Insert.aspx | Insert mode |
