


In today’s world of fast food, fast cars, and instant gratification, people expect to be in touch at all times.
We have become conditioned to staying in touch with businesses, friends, and families. Because of this desire for instant data, we have the Internet, cell phones, Wi-Fi, MP3 players, and DVD players. As the equipment needed to drive this thirst has become smaller and smaller, we find ourselves looking for portable replacements for our bulky desktop computers.
This article will guide you into the exciting world of mobile development so you can take advantage of an expanding opportunity to supply software to this burgeoning market.
Getting Started
There are currently two choices for producing mobile software using a Windows operating system: XP using ActiveSync and Vista using a new interface built upon ActiveSync technology called the Windows Mobile Device Center (WMDC).
In the recent CoDe Focus issue on Mobile PC Development (2007, Volume 4, Issue 2), Nick Landry’s article entitled “Windows Vista Mobility: Why Should You Care?” provides a good review and tutorial on using WMDC with Vista. If you’re going to use WMDC, you’ll definitely want to read this article.
If you are using Vista, download the WMDC from the Microsoft site; otherwise, download ActiveSync for use with XP. The remaining software requirements are not operating system dependent. When you install Visual Studio 2008, the .NET Compact Framework and SQL Server Mobile Edition are also installed. Visual Studio 2008 is required to use the latest version of the different frameworks. If you plan to develop for earlier versions of the Compact Framework, you can use either Visual Studio 2008 or 2005.
The Compact Framework
The Compact Framework is the vehicle for mobile development. How does the Compact Framework differ from the full version? For starters, Microsoft removed most of the nice-to-have method overloads and non-essential functionality. As a result, the Compact Framework has a much smaller footprint. Distilling the regular framework to a size easily installed onto a device with limited memory and disk capacity must have been no easy task. The Compact Framework provides nearly everything you need to develop for Smartphones and Pocket PCs. However, the Compact Framework does not provide support for:
- Click once deployment
- Remoting
- Printing
- Web Forms
- Configuration files
- Binary serialization
You can easily replace most of the missing functionality with your custom code or solutions available from third-party solution providers.
SQL Server Mobile Edition (SQLme)
Although SQLme is a subset of regular SQL Server, which works with both SQL Server 2005/2008 and the Express versions of each product, the majority of necessary functionality is there. You can use the SQL Server Management console to manage your SQL Server mobile database on the desktop or on the PPC through a direct connection.
There are a few limitations to using SQLme:
- No stored procedures
- No batch queries
- Limited table design
The lack of stored procedures is not a big problem to overcome. It is easy to simulate stored procedures using TableAdapters. Create as many methods on the TableAdapter as needed. When I need to make a data call, I can refer to the method name instead of a stored procedure. If I choose not to use TableAdapters, I can simply add methods to my data layer to accomplish the same task
Missing batch query capability is again not much of a hassle with disconnected data. You are not doing massive amounts of data munging or extraction on the mobile platform. Most basic data operations on a mobile platform are data retrieval for display and updating. Since these retrieval requests are through a data layer, it makes no difference if the commands are processed together or one at a time.
Limited table design is not a real problem either. The most frustrating thing about using the table editor in the management studio is that you cannot move columns around in your design without deleting them and redoing them in order. Make sure your design is what you want before you create a number of tables. Other than the easy manipulation of table design, the rest is like the regular version so you have a wide range of data types to support your requirements.
Mobile Data
Mobile data differs from desktop applications mainly by:
- Form factor
- Memory restrictions
- Processor speed
- Bandwidth
- Disconnected nature
Form factor is probably the most serious restriction in the world of mobile development. Mobile screen sizes run the gamut from 2 x 3 inches up to 5 x 7 inches; resolutions from 240 x 320 pixels up to 640 x 480 pixels; and shapes from square to vertical or horizontal rectangles.
When designing screen use for a mobile application, you must consider the restrictions on space and plan accordingly. There are a number of issues that you must face when designing forms for the mobile device. I will tackle these at length in the section dealing with compact controls later in this article.
Memory restrictions are another design factor. On mobile devices, memory is measured in megabytes not gigabytes. While you can use mini plug-in cards to increase storage space, they don’t increase the amount of memory available to programs. Because of limited resources, you don’t want to hold lots of data in memory leaving little for system use. Mobile operating systems will shut down programs running in the background to provide resources to the foreground application.
Processor speed requires you to be cognizant of the time certain operations take or the length of queries in the database. Device manufacturers are aware of the need for speed and are pushing chip manufacturers to release faster and faster processors. PPCs being released later this year will use the newest 700 MHz processors.
Bandwidth is smaller than cabled systems or internal networks so the access of data, in today’s world, is slower than desktops and laptops. Great strides are being made in this arena, but it is still on the cutting edge and you will have to wait until the infrastructure catches up to the technology.
The disconnected nature of the data presents some challenges. SQLme provides a number of ways to manage the data on the mobile device: Remote Data Access, Merge Replication, and a new service called Microsoft Access Database Synchronizer. These capabilities allow you to move data to/from the mobile device; however, these services are not compatible with SQL Server Express editions.
All in all, it is fairly simple to work around these limitations by using good simple design and efficient data retrieval mechanisms.
Visual Studio Integration
Compact Framework development like Windows Forms or Web Forms is directly integrated into Visual Studio. With this coupling, you can develop your application, control Emulators, test SQL replication, write unit tests, and cradle the device to test synchronization using WMDC or ActiveSync.
You have two options when writing/testing your mobile application:
Developing with the actual device is a common practice when you want to test program speed, ease of physical use, etc. However, this can be an expensive proposition if you want to test many devices.
Emulators are virtual devices built on the same hardware platform as the original device. Emulators make it much easier to develop for many different devices with varying form factors and capabilities. Microsoft provides a number of emulators, with both the Windows Mobile 5.0 SDK and Windows Mobile 6 SDK, giving you the capability to test multiple form factors and device requirements.
Most mobile technology manufacturers today also provide emulators for their devices to aid in your development effort. So if you need a specific emulator, the Treo 750 for example, you can download it from the manufacturer’s Web site.
Mobile Development
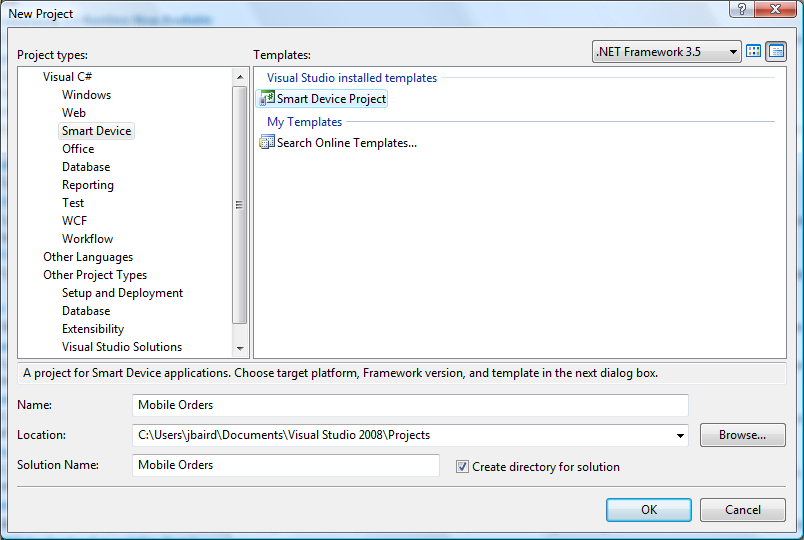
You create your mobile application projects in the same way that you create regular desktop applications: From the File menu choose New and then choose Project.
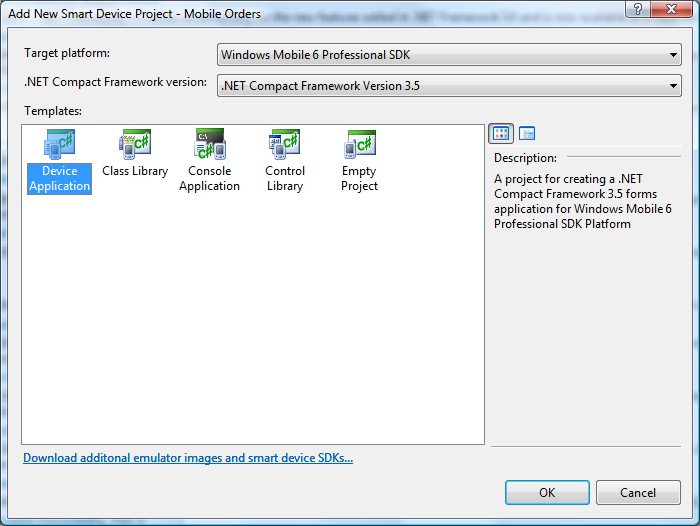
Within Visual Studio 2008, you select Smart Device Project (Figure 1). You indicate the project name at the bottom and set the target Compact Framework edition using the drop-down list in the upper-portion of the screen. Clicking OK on this screen leads to a subsequent form where you choose the target project type (Figure 2). Visual Studio will then create your solution and add a default program and form.
You will want to rename the form and program to give them meaningful names. Now you can build your solution as you normally would with a desktop application. As you need class libraries or other forms, you simply right-click the solution or project and add the desired item.
Best practice for normal application design is to use a three-tier approach: a UI layer, a business layer, and a data layer. It is common practice in application development to separate these specific application functionalities into individual classes. If my intention was to use the mobile application as a consumer of Web services or use the same back-end classes as Web or PC applications, the three-tier approach would still apply.
However, in the mobile orders application accompanying this article, I am only using two tiers. Since I will be using strongly typed datasets and the table adapters included with them, it doesn’t make sense to have another data layer with duplicate method calls just to separate the functionality. The mobile orders program will have a UI layer and a business layer.
The Database
You can create your compact database using either Visual Studio or SQL Server. For this example, you will create the tables you need using the built-in functionality of Visual Studio:


Now that you have the database created, you can start creating the tables you need for the application by right-clicking the new data connection and choosing “Create table”. For the mobile orders application, I created these tables: customer, order, orderitem, inventory, supplier, and manufacturer.
With the database structure in place, you can create strongly typed datasets by dragging each table from the server explorer to the dataset designer. The designer will then create all of the necessary code for you when you close it.
Windows Forms vs. Mobile Forms
Much of the mobile forms development is the same as Windows Forms; however, there are some distinct differences. These differences include:
- Data binding
- Data grid/custom controls
- Events
- Data entry
With Windows Forms, data binding is the accepted best practice; with mobile forms, manual binding is sometimes better. Manual binding is faster than data binding. Since you are only dealing with a handful of controls on any given form, the effort necessary to bind the controls to the data is more trouble than it is worth. Data binding makes sense if you need:
- Master/detail binding
- Navigation
- Currency Manager/BindingSource
Here is a sample of how I use manual binding in the accompanying project. To populate the controls:
private void FillOrderHeaderControls(
         OrderDataSet.OrderRow dr)
{
  this.txtCustomer.Text = dr.CustomerName;
  this.dtgOrderDate.Value = dr.OrderDate;
}
private void FillOrderItemControls(
      OrderItemDataSet.OrderItemRow dr)
{
 this.txtManPartNo = _dr.ManPartNo;
 this.cboInventory.SelectedValue =_dr.fkInventory;
 this.txtQuantity.Text = (string)dr.quantity;
 this.txtPrice.Text = _dr.price;

 _dtItem.AddOrderItemRow(_dr);
}
To gather control values to row:
private void FillOrderHeaderRow()
{
  _drOrder = _dtOrder.NewOrderRow();
  _drOrder.fkCustomer = _cBiz.GetCustomerKey(
           this.txtCustomer.Text);
  _drOrder.OrderDate = this.dtgOrderDate.Value;

  _dtOrder.AddOrderRow(_drOrder);
}
private void FillOrderItemsRow()
{
  _drItem = _dtItem.NewOrderItemRow();
  _drItem.ManPartNo = _iBiz.GetManPartNo(value);
  _drItem.fkOrder = 0;
  _drItem.fkInventory = this.GetInventoryKey
          (this.cboInventory.Text);
  _drItem.Description =
        this.cboInventory.Text.Trim();
  _drItem.quantity = (int)this.txtQuantity.Text;
  _drItem.price = (decimal)this.txtPrice.Text

  _dtItem.AddOrderItemRow(_drItem);
}
One of the most common questions on the Compact Framework forum deals with adding custom controls to grid columns. Out of the box, the DataGrid control does not support custom columns without some extra work unlike the regular framework DataGrid control.
With the release of .NET CF 2.0 SP1, the team exposed the Paint method on the Grid column, which allows for custom control creation. Due to the number of requests for help with it, they created a package available for download that packages a number of controls for you, including the ComboBox, the CheckBbox, and a DateTimePicker. You can download it from:
blogs.msdn.com/netcfteam/attachment/583542.ashx
Once referenced in your project, you can include custom columns with ease:
//TextBox Column
DataGridCustomTextBoxColumn colOrdNo = new
         DataGridCustomTextBoxColumn();
colOrdNo.Owner = this.grdSearch;
colOrdNo.HeaderText = "No";
colOrdNo.MappingName = "OrderNo";
colOrdNo.Alignment = HorizontalAlignment.Left;

//CheckBox Colum
DataGridCustomCheckBoxColumn colTaxable = new
         DataGridCustomCheckBoxColumn();
colTaxable.Owner = this.grdSearch;
colTaxable.HeaderText = "Taxable";
colTaxable.MappingName = "Taxable";
colTaxable.Alignment = HorizontalAlignment.Center;
Mobile devices don’t allow easy entry of data into form controls. Text entry is done either by a built-in hardware mini QWERTY keyboard or by a pop-up software keyboard called a SIP (software input panel). On older Smartphones without the hardware keyboard, you must press the numbers on the keypad to select your text. In any case, text entry is difficult, time consuming, and tedious.
A mobile forms designer must limit the amount of data entry required through the use of judiciously planned controls. Use drop-down lists prepopulated with the most common choices, check boxes, and lists to limit the amount of typing necessary.
Events are another distinct difference. In a typical Windows Form, there are more than 75 events that you can pick from; whereas, a mobile form has 23. A regular button has 60 events; a CF button has 11.
Because of this disparity in events, you will need to put more thought into program flow and the creation and design of your mobile forms and projects than your Windows Forms applications.
Creating the Order Form
The functionality of the order form will show the main techniques when creating forms for mobile applications. When designing mobile forms, you must remember that form real estate is minimal and that form factor changes can affect your layout and data entry. You solve this problem by using a TabControl or panel on each form as a container for the objects within it. With a TabControl, you can extend the availability of screen space by adding tab pages and more controls as needed.
The order form in the next example will have the following functionality:
- Search for an order.
- View a specific order.
- Edit the selected order.
- Delete the selected order.
- Add a new order.
- To create the form design, I dragged a TabControl from the ToolBox, and then added various controls to the TabPages to display what I wanted. Each Form when added to the project has an empty MainMenu control added to it. To create your menu actions, simply click the menu bar (Figure 5) and type. You can add as many menu items horizontally and vertically as you need.
-
Figure 6 and Figure 7 show the completed order form with its TabControl in place and the MainMenu items added.


To search for a given order, you will use the customer key and a date range. I’ve set the default date range to the hundred year period from 1950-2050. The code for the search is as follows (in this example, _rowNumber is set in a method that determines the row number of the selected DataGrid row in a grid hit method):
private void SearchMenuItem_Click(
         object sender,
         EventArgs e)
{
 OrderBiz biz = new OrderBiz();
 _dtOrder = biz.Find(
    this.cboCustomer.Text.Trim(),
    this.dtgStartDate.Value,
    this.dtgEndDate.Value);

 this.grdSearch.Select(_rowNumber);
 if (_dtOrder.Rows.Count > 0)
 {
   this.ViewMenuItem.Enabled = true;
   this.DeleteMenuItem.Enabled = true;
 }
}
In this code sample, you make a call to the order business object to perform the search and return a strongly typed dataset containing the matching orders. The business object’s Find() method is shown here:
public OrderDataSet.OrderDataTable Find(
                            string customerName,
                            DateTime startDate,
                            DateTime endDate)
{
 OrderDataSet.OrderDataTable dt = new
    OrderDataSet.OrderDataTable();
 OrderTableAdapter ta = new OrderTableAdapter();

 if (customerName.Equals("ANY"))
 {
  customerName = string.Empty;
 }

 ta.FillBy(dt,
              startDate,
              endDate,
              "%"+customerName+"%");

 return dt;
}
The main form’s grid then displays the orders returned by the search. By selecting an item in this grid and pressing the View menu item, the selected order and its order items will be displayed in the view mode. The view mode displays the order’s subtotal, tax, and total, which requires an instance of the inventory business object in addition to the order and order item business objects (Listing 1 and Listing 2 respectively).
Another item to consider is data entry in your forms. If your target device supports both a hardware QWERTY keyboard and a SIP, you need to worry about the SIP covering text boxes when it is enabled, preventing you from entering text into the hidden fields. In this case, you need to trap an event and resize your TabControl so no fields get covered over.
The SIP includes a property called VisibleDesktop, which lets you know how much real estate is visible once the SIP is open. If necessary, scroll bars will be added to the TabControl so that you can enter text into all available fields. This is the code:
private void inputPanel_EnabledChanged(
         object sender,
         EventArgs e)
{
 if (inputPanel.Enabled)
 {
  //get the height of the TabControl
  _originalHeight = this.tcTab.Height;

  //adjust the TabControl for the SIP's space
  this.tcTab.Height =
     inputPanel.VisibleDesktop.Height;
 }
 else
 {
  this.tcTab.Height = _originalHeight;
  this.tcTab.Dock = DockStyle.Fill;
 }
}
Running and Debugging the Code
Using Visual Studio, you have two choices for setting the target device for deployment. The first is to set the active Target Device in the Properties page for your main Project and the second option is to use the Device Toolbar’s drop-down list to select the target device or emulator.
If your code compiles, deployment to the emulator/target device begins. The requisite CABs are transferred to the target and run to install the DLLs needed by your application. If you are using an emulator, deploying these CABs is a slow process. To prevent waiting each time you compile and deploy your application, you should save the state of the emulator by either choosing Save State from the File menu or closing the form and answering yes to the resulting dialog box.
If you set breakpoints in your code, you can stop program execution on the emulator/target device and step through the code as in a desktop application. However, there are a few limitations: Edit and Continue is not supported and there are no DataSet visualizers, so you can’t look at the state of the data at any given point. You can use QuickWatch to display the object and drill down into the object hierarchy to look at the column and row collections.
Packaging the Code for Distribution
Once you have finished your code and are satisfied with its functionality, you are ready to create the distribution CAB. There is a special project available from the Other Projects/Setup and Deployment page in the New Projects wizard. There are a couple of steps needed to package your application as a CAB file for deployment:
When you add the primary output to the CAB project, Visual Studio determines the required dependencies for you and adds them to your project automatically. If there are any additional files needed, you can add them manually. You need to add a reference to the compact database you created. Since the dependencies have now been added, you can finish the deployment project:
This completes the creation of the deployment project. Build the project just like any other project and the output will be your package application CAB.
You can add program icons and registry entries using the CAB project. For a more detailed explanation covering this deployment process, see the article at: http://msdn2.microsoft.com/en-us/library/zcebx8f8(VS.90).aspx
One of the usual requirements of deploying your applications is to package multiple CABs into one package. This would include your application CAB, the .NET Compact Framework CAB, the SQLme CAB, and any others your program requires. Since you have included any requisite CABs, program installation can proceed without error. Any necessary programs are automatically installed prior to installing your application. This requires a great deal of effort to package correctly; however, there is a relatively painless solution: Pocket PC Installer which is available from: http://www.pocketpctoolkit.com.
This inexpensive, wizard-driven program is well worth the investment. It includes options for most installer features including license agreements and background images. You create the install by simply dragging and dropping files on the file listing screen (Figure 8).

The major benefit of this program is that once you have compiled your installation files, you have created two executable files: a PC executable to copy to your PC and from there to a connected device and a second PPC executable to copy directly to the device.
Conclusion
Compact Framework development has the potential for explosive growth. Conservative estimates indicate that there are over two billion cell phones worldwide. Many citizens of third-world countries can’t afford and will never own a desktop computer, but will use their cell phones to access the Internet. By employing the ideas and techniques in this article you can become proficient in developing for mobile markets and take advantage of this growth opportunity.
Listing 1: OrderBiz-The order business object
using System;
using System.Data;
using System.Linq;
using System.Collections.Generic;
using System.Text;

using Quay.MobileOrders.DataSets;
using Quay.MobileOrders.DataSets.OrderDataSetTableAdapters;

namespace Quay.MobileOrders.Business
{
    public class OrderBiz
    {
        public OrderBiz()
        {
        }

        /// <summary>
        /// Has Changes
        ///     are there any changes to the data?
        /// </summary>
        /// <returns>True/False</returns>
        public bool HasChanges(OrderDataSet.OrderDataTable dt)
        {
            bool retVal = false;

            DataTable dtChanged = dt.GetChanges();
            if (dtChanged != null && dtChanged.Rows.Count > 0)
            {
                retVal = true;
            }

            return retVal;

        }


        /// <summary>
        /// Find
        ///     returns all orders matching the search criteria.
        /// </summary>
        /// <param name="customerName">Customer name</param>
        /// <param name="startDate">Order start date</param>
        /// <param name="endDate">Order end date</param>
        /// <returns>Order Table</returns>
        public OrderDataSet.OrderDataTable Find(string
                                           customerName,
                                           DateTime startDate,
                                           DateTime endDate)
        {
            OrderDataSet.OrderDataTable dt = new
            OrderDataSet.OrderDataTable();
            OrderTableAdapter ta = new OrderTableAdapter();
            if (customerName.Equals("ANY"))
            {
                customerName = string.Empty;
            }

            ta.FillBy(dt, startDate, endDate,
            "%"+customerName+"%");

            return dt;
        }


        /// <summary>
        /// Insert new order
        ///     returns the newly added key.
        /// </summary>
        /// <param name="dr">data row</param>
        /// <returns>primary key of new record</returns>
        public int InsertNewOrder(OrderDataSet.OrderRow dr)
        {
            OrderTableAdapter ta = new OrderTableAdapter();
            return (int)ta.InsertOrderRecord(dr.fkCustomer,
                                             dr.OrderDate);
        }


        /// <summary>
        /// Get Inserted key
        /// return the last key assigned by the insert clause
        /// </summary>
        /// <returns>order id</returns>
        public long GetInsertedKey()
        {
            OrderTableAdapter ta = new OrderTableAdapter();
            return (long)ta.GetInsertedKey();
        }


        /// <summary>
        /// Update order table
        /// </summary>
        /// <param name="dt">datatable to update</param>
        /// <returns>number of records updated</returns>
        public int UpdateOrderTable(OrderDataSet.OrderDataTable dt)
        {
            OrderTableAdapter ta = new OrderTableAdapter();
            return ta.Update(dt);
        }


        /// <summary>
        /// Get Order by Order Key
        /// </summary>
        /// <param name="orderKey">Order key</param>
        /// <returns>Order Table</returns>
        public OrderDataSet.OrderDataTable
                            GetOrderByOrderKey(long orderKey)
        {
            OrderTableAdapter ta = new OrderTableAdapter();
            return ta.GetOrderByOrderKey(orderKey);
        }
    }
}
Listing 2: OrderItemBiz-the order item business object
using System;
using System.Data;
using System.Linq;
using System.Collections.Generic;
using System.Text;

using Quay.MobileOrders.DataSets;
using Quay.MobileOrders.DataSets.OrderItemDataSetTableAdapters;

namespace Quay.MobileOrders.Business
{
    public class OrderItemBiz
    {
        public OrderItemBiz()
        {
        }

        /// <summary>
        /// Has Changes
        ///     are there any changes to the data?
        /// </summary>
        /// <returns></returns>
        public bool HasChanges(OrderItemDataSet.
                               OrderItemDataTable dt)
        {
            bool retVal = false;

            DataTable dtChanged = dt.GetChanges();
            if (dtChanged != null && dtChanged.Rows.Count > 0)
            {
                retVal = true;
            }

            return retVal;
        }


        /// <summary>
        /// Get Order Item By Order Key
        /// </summary>
        /// <param name="orderKey">Order Key</param>
        /// <returns>Order Item table</returns>
        public OrderItemDataSet.OrderItemDataTable
                                GetOrderItemByOrderKey(long
                                                       orderKey)
        {
            OrderItemTableAdapter ta = new OrderItemTableAdapter();
            return ta.GetOrderItemByOrderKey(orderKey);
        }


        /// <summary>
        /// Update OrderItem Table
        /// </summary>
        /// <param name="dt">Order Item DataTable</param>
        /// <returns>number of rows updated</returns>
        public int UpdateOrderItemTable(
                   OrderItemDataSet.OrderItemDataTable dt)
        {
            OrderItemTableAdapter ta = new
                                    OrderItemTableAdapter();
        return ta.Update(dt);
        }


        /// <summary>
        /// Get Order Subtotal
        ///   Returns the subtotal of all items in a given order
        /// </summary>
        /// <param name="dt">Order Item DataTable</param>
        /// <returns>Subtotal for the order</returns>
        public decimal GetOrderSubTotal(
                       OrderItemDataSet.OrderItemDataTable dt)
        {
            decimal subtotal = 0.00M;
            foreach (OrderItemDataSet.OrderItemRow dr in dt.Rows)
            {
                if (!dr.RowState.Equals(DataRowState.Deleted) ||
                    !dr.RowState.Equals(DataRowState.Detached))
                {
                    subtotal += (dr.quantity * (decimal)dr.price);
                }
            }

            return subtotal;
        }


        /// <summary>
        /// Get Order Tax
        ///   Returns the tax applied to the subtotal of
        ///   all items in a given order.
        /// </summary>
        /// <param name="subtotal">Order SubTotal</param>
        /// <returns>Tax for the order</returns>
        public decimal GetTax(decimal subtotal)
        {
            decimal tax = 0.075M;
            return ((decimal)subtotal) * ((decimal)tax);
        }


        /// <summary>
        /// Delete items
        /// </summary>
        /// <param name="orderKey"></param>
        public void DeleteItemByItemKey(long orderItemKey)
        {
            OrderItemTableAdapter ta = new
                                       OrderItemTableAdapter();
            ta.DeleteItemByItemKey(orderItemKey);
        }


        /// <summary>
        /// Delete items
        /// </summary>
        /// <param name="orderKey"></param>
        public void DeleteItemsByOrderKey(long orderKey)
        {
            OrderItemTableAdapter ta = new
                                       OrderItemTableAdapter();
            ta.DeleteItemsByOrderKey(orderKey);
        }
    }
}
