


Visual Studio provides one of the most powerful IDEs on the market.
One under-exploited aspect of this IDE is the extensibility model. Programming IDE’s are not static development tools. Development techniques, tools, and concepts change. Extensibility has been built into Visual Studio from its early inceptions. The great thing about Microsoft’s foresight is that you can augment functionality of Visual Studio yourself. This article will demonstrate how to extend the Visual Studio IDE using Visual Studio, the .NET Framework, and the Visual Studio add-in and automation models.
The Visual Studio IDE has a number of built in extensibility models.
- Macros/automation model
- Add-Ins
- Templates
- Packages
This article will mash the first three together to create a robust solution creation platform. You will learn how to create a basic add-in, how to extend that add-in using the automation model, and finally how to combine solution templates into the mix to make yourself much more productive. See Claudio Lassala’s article, “Creating and Distributing Packages with the Visual Studio SDK” in this CoDe Focus issue to learn more about how to extend Visual Studio 2008 using VSPackages.
The Add-In Defined
Developers choose to automate the Visual Studio IDE to increase their productivity. How many times have you found yourself performing the same tasks for your projects? You create a new project, make standard settings changes, you add the same folder structure, you add the same programs, add the same references, etc. As you develop more and more applications you may find yourself spending more time doing redundant project setup and configuration. Add-ins help you cut out redundancy and allow you to focus on core development tasks. You can take this mundane set of steps out of the process by using a combination of add-ins, macros, and templates.
Creating the Basic Add-In
As your first step you want to create the basic shell of your add-in. To create an add-in in Visual Studio, do the following:
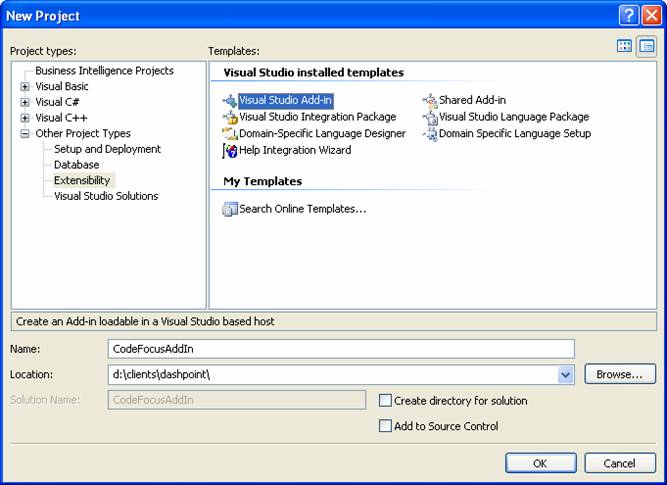
- From the Visual Studio menu select File and choose New Project.
- In the New Project dialog box (Figure 1) in the left pane, select Other Project Types, expand the Extensibility type, and in the right pane choose Visual Studio Add-In and then click OK.
- Name your project. For this example I’ll use CodeFocusAddIn.
- The Add-In Wizard will then start up. On page 1 you need to specify the language you will use to develop your add-in. You can choose from Visual Basic, C#, J# and two styles of C++ development. In the add-in for this article, I’ll use Visual Basic.
- Page 2 allows you to specify the host(s) for your add-in. By default the hosts are Visual Studio 2005 and Visual Studio 2005 Macros. Choose the host(s) you wish to support.
- On page 3 you’ll provide the name and description of your add-in.
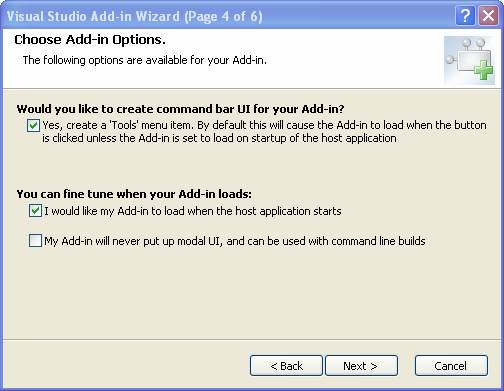
- Now you’ll specify some options for your add-in (Figure 2). On page 4, specify whether your add-in will be called from the toolbar, whether you want the add-in to load when the Visual Studio Shell starts, and whether the add-in will activate any modal forms. In the project for this article, I’ll choose to add an option to the toolbar.
- Page 5 allows you to provide information in the “About” box for your add-in.
- Finally on page 6 click Finish. The wizard will create your add-in project and all supporting files.
At this point you want to look at two specific files: <your-project-name>.AddIn and Connect.VB. The .AddIn file contains XML information that is used to register your add-in with the Visual Studio shell. Listing 1 contains the contents of this XML.
The Connect.VB file contains the guts of your add-in. This code implements two interfaces: IDTExtensibility2 and IDTCommandTarget, which the Visual Studio IDE uses to communicate with your add-in. To add custom code to your add-in you’ll use the Connect.VB. file.
Modifying Your Add-In Code
You’ll use one of two methods to modify your add-in code: OnConnection and OnExec. The OnConnection method contains code that integrates your add-in into the Visual Studio menu. The most common thing to change in this method is the icon for your add-in that the Visual Studio menu will display.
The add-in wizard specifies a “smiley face” icon by default. I’ll bet that might not go over too well in a professional environment. To change the icon on the toolbar, look for the line containing the AddNamedCommand2 function.
Dim command As Command _
= commands.AddNamedCommand2_
(_addInInstance, "CodeFocusAddIn",
 "CodeFocusAddIn", _
 "Executes the command for CodeFocusAddIn", True,
 59, Nothing, _
 CType(vsCommandStatus.vsCommandStatusSupported,
       Integer) +
 CType(vsCommandStatus.vsCommandStatusEnabled,
       Integer),
 vsCommandStyle.vsCommandStylePictAndText,
 vsCommandControlType.vsCommandControlTypeButton)
The 6th parameter (59 in the example) is the ordinal for the icon you want to use. You can find a complete list of the default icons in the book, Working with Microsoft Visual Studio 2005, by Craig Skibo, Marc Young, and Brian Johnson (see the sidebar: Recommended Reading). Changing the ordinal value from 59 to 212 will show a “design mode” icon instead of a “smile face”.
Now you can go to work making this add-in do something. The purpose of this application is to create new solutions. To do this the add-in will contain a Windows Form that will give the developer the opportunity to specify the name and location of the solution. To add these features, perform the following steps:
- Add a new Windows Form to your application. Name this form frmSolutionProperties.
- Add two labels (lblPath and lblSolutionName), two Textboxes (txtPath and txtSolutionName) and a button (cmdCreateSolution) to your form. Set the size and text properties of each object accordingly.
- In the Exec method of the Connect.VB file add the following code snippet: (see below #5)
- This code goes right before the handled=True statement.
- Press F5 to run your add-in.
Dim oForm As New frmSolutionProperties
oForm.Show()
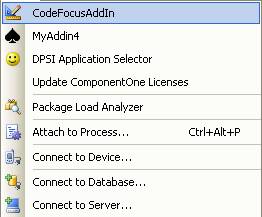
Visual Studio will open another copy of Visual Studio with your add-in populated on the toolbar (Figure 3). Choose your add-in from the Visual Studio menu to open the frmSolutionProperties form (Figure 4).

Integrating Macros
Now that you have created the basic structure for your add-in you’ll now make it do something useful. You’ll attach your add-in to the Visual Studio IDE thereby giving you the ability to use many functions already built into the Visual Studio Shell. You can use the Visual Studio object model to do things like:
- Create/modify solutions
- Create/modify projects
- Create/modify project files
In this section you will create a new empty solution using the Visual Studio Object mode. In the first step you want to connect the Visual Studio IDE to your form via a method and a reference variable.
1. Add the following Imports statements to your form code:
Imports Extensibility
Imports EnvDTE
Imports EnvDTE80
2. Next, add a method and property for your IDE handle by adding the following code to your form:
Dim _applicationObject As DTE
Sub AttachDTE(ByVal PassedDTE As DTE)
  Me._applicationObject = PassedDTE
End Sub
3. Now return to your Connect.VB file and add the following line to your Exec method.
oForm.AttachDTE(CType(Me._applicationObject, DTE))
4. Now add code to your add-in to create a new solution.
Sub CreateSolution()
With Me._applicationObject.Solution
 .Create(Me.txtPath.Text, Me.txtSolutionName.Text)
 .SaveAs(Me.txtPath.Text + Me.txtSolutionName.Text
         + ".sln")
 .Open(Me.txtPath.Text + Me.txtSolutionName.Text
        + ".sln")
End With
End Sub
5. Open the button and add a call to the CreateSolution subroutine.
6. Now run your add-in by pressing F5.
Note: When you run your add-in, make sure you fill in valid solution names and an already available path for your Path and Soliution name elements. Figure 5 shows a solution created by the new add-in.

Creating Project Templates
Creating a solution with no projects doesn’t really make any sense. One of the cool features of Visual Studio is it gives developers the ability to take any open project and create a reusable project template from it. In this next section you’ll create two project templates that you will later incorporate into your add-in.
1. Create a new Class Project. From the File menu choose New Project. Select Visual Basic-Class Library from the New Project dialog box and name your project MiddleTier.
2. Rename the default Class1.VB file to MiddleTier.VB
3. Select File > Export Template from the Visual Studio IDE.
This will create a new template from the project you already have open. For this example choose the default options when exporting your template.
4. Now create your front-end project. From the File menu choose New Project. In the New Project dialog box, select Visual-Basic > Windows Application. Name this project WindowsFrontEnd.
5. Rename the default Form1.VB file to frmFrontEnd. Change the Caption property of the form to Front End Form
6. Now from the Visual Studio IDE, select File > Export Template.
This will create a new template from the already opened project.
7. For this example choose the default options when exporting your template.
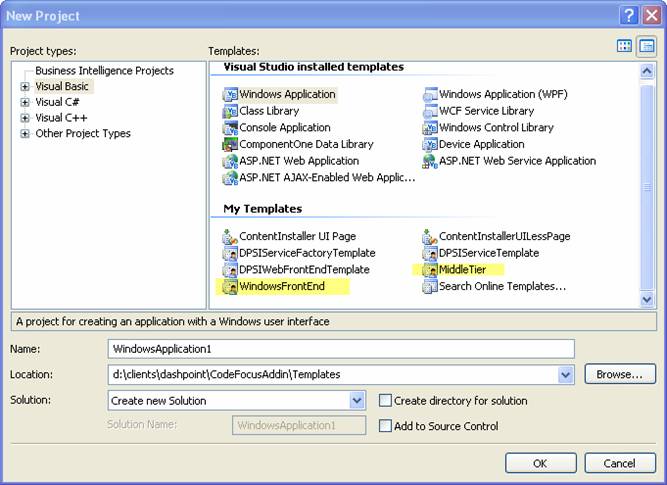
8. To make sure your templates were exported properly, from the Visual Studio IDE select File and then choose New Project. Your projects should show up in the New Project dialog box (Figure 6).
Incorporating Your Templates
Now that you have created a new set of project templates you can incorporate them into your add-in. You need to find the path to your templates and then add them to your project using the AddFromTemplate method.
You use the GetProjectTemplate function of the Visual Studio object model to find the path to your template The following code demonstrates finding the path to the MiddleTier template.
Dim cMiddleTierPath As String _
= CType(Me._applicationObject.Solution,
Solution2).GetProjectTemplate_
("MiddleTier.zip",
 "vbproj")
This returns the path where Visual Studio stored the cached versions of your templates.
Now you can add a new project to your solution using the AddFromTemplate method, using syntax such as the following:
Me._applicationObject.Solution._
AddFromTemplate(cMiddleTierPath, _
Me.txtPath.Text+"MiddleTier\", _
Me.txtSolutionName.Text+"MiddleTier", False)
The parameters to this method are:
- The path to your template.
- The path where you want your project created.
- The name of your project.
- Whether to create a new solution from your project template.
You’ll set this last parameter to False as you are adding a project to an existing solution.
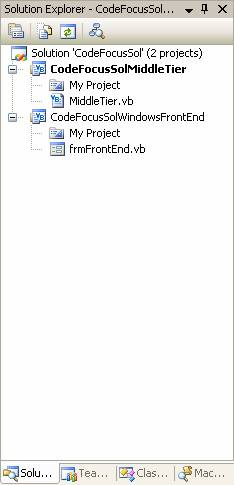
Figure 7 shows a newly created solution using the MiddleTier and Windows Front-end templates created in the last section.
Modifying a Project File
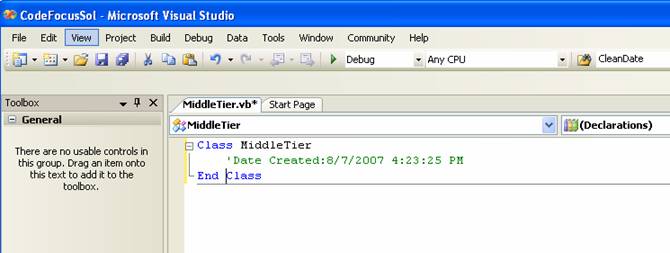
Now you’ll add the last feature of this project which will manipulate a file found on one of your projects. This example will search all projects for a file named “middletier.vb” Upon finding this project, the add-in will open that file and insert a small set of code.
The first step to modifying a project file is to find that project file in your solution. Listing 2 performs the following logic:
- Iterate through every project.
- Iterate through all files in every project looking for a file named “middletier.vb”.
- When it finds that file, the add-in opens it in an editor.
- Selects all the text in that document and replaces it with custom code.
Figure 8 demonstrates the results of this operation.
Conclusion
If you want to increase your produtivity you should take a good look at creating add-ins to extend the Visual Studio IDE. Add-ins by themselves are not overly useful but when combined with the Visual Studio object model and templates, the real value of add-ins shines.
