


Sedna’s reporting features have made both the designing and rendering of a VFP report more extensible.
In this article you’ll learn about a few of the new rendering objects that Sedna includes such as rotation and hyperlinks. You will also learn how to create your own custom rendering object and how to include a custom Builder interface element for it in the Report Designer.
Visual FoxPro 9 introduced many new reporting enhancements. The most exciting aspect of these enhancements was that you could extend both the Report Designer and the Report Output engines using xBase code. Sedna will introduce even more ways to extend the VFP Reporting Engine.
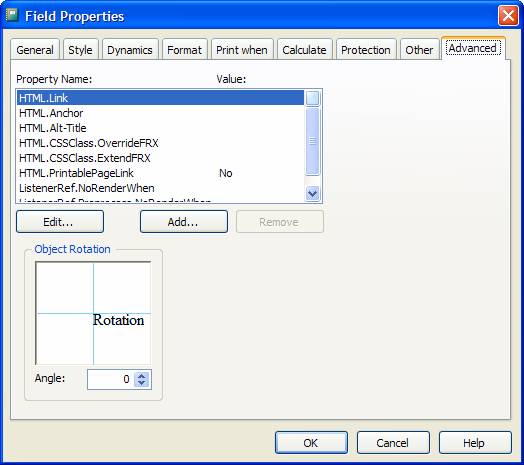
A new Advanced tab has been added to each of the Control Properties dialog boxes.
The Report Designer now has the ability to add custom tabs to the Report Designer’s Properties dialog boxes. Prior to Sedna developers could not extend the existing Properties dialogs but they could replace them using the Event Handler Registry. This was problematic because creating a custom Properties dialog is not an easy task and different Properties dialogs, created by different developers, could not be used at the same time. Sedna’s enhancement is a welcome addition for anyone who wants to provide a user interface element in the Report Designer to accompany a custom Report rendering object they have created.
Sedna also makes it easier to extend the Report Output process. REPORTOUTPUT.APP, included with Sedna, provides a way to hook into the report output using custom classes. The new classes are called Handlers and consist of two types: FX and GFX. The FX Handlers provide extended functionality to the report run but do not handle any drawing or rendering to the report canvas. A progress meter would be an example of an FX Handler. The GFX Handlers actually render to the report canvas and provide the ability to either extend the current rendering or replace it all together.
Enhanced Properties Dialogs
Sedna includes several new FX and GFX Handlers as well as new tabs, added to the Control Properties dialog boxes, to accompany these handlers. This provides a user interface for these Handlers at design time.
The next few sections briefly discuss the new tabs included with Sedna.
Document Properties Tab
The FoxPro team added a new tab to the Report Properties dialog called “Document Properties” that shows a list of custom properties that you can set to either store additional information about the document or to control the report rendering into a document. Table 1 provides a brief description of the extended properties included with Sedna.
The property names beginning with “HTML” are specific to HTML output and are currently only supported by the HTMLListener (included in the _ReportListener.vcx FFC library). Any ReportListener that generates documents can use the other property names.
For example, if you set the custom document properties shown in Figure 1, the following text will be included with the generated HTML file if a report is rendered using the HTML Report Listener:
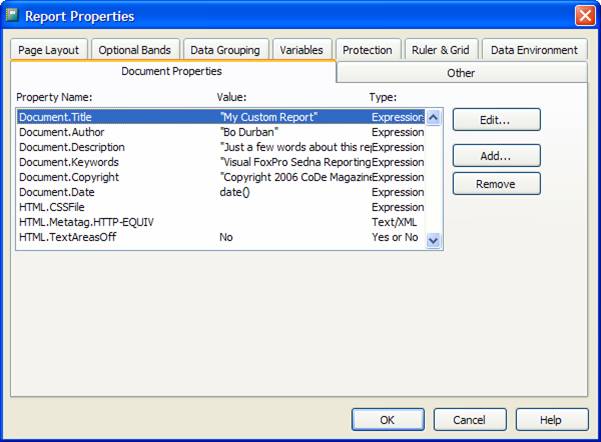
<title>My Custom Report</title>
<META name="description" content="Just a few words about this report">
<META name="author" content="Bo Durban">
<META name="copyright" content="Copyright 2006 CoDe Magazine">
<META name="keywords" content="Visual FoxPro Sedna Reporting">
While this data is not visible on a Web page, this can be useful information when creating document indexes for search engines. Prior to Sedna, there wasn’t a convenient way to include this information in an HTML report document.
You can add custom properties to the property list, but they won’t be recognized by the standard ReportListener. Any new custom properties must be handled by a new custom ReportListener or a custom FX or GFX Handler.
Advanced Properties Tab
Microsoft added a new Advanced tab to each of the Control Properties dialog boxes; Label, Field, Rectangle, Line, and Picture. This tab provides a list of properties that a developer can customize for each object on the report. Table 2 includes a description of each of the default properties. Note that the property names prefixed with HTML are used by the HTMLListener only, by default.
A new Advanced tab has been added to each of the Control Properties dialog boxes.
The Advanced tab also includes an “Object Rotation” control (Figure 2). Use this control to specify a rotation angle for the current object. Use this to render text or shapes at any angle, similar to the functionality provided in Excel. The rotation occurs during rendering only, so the rotation will not be visible in the Report Designer. Also note that the HTMLListener does not support rotation so the rotation angle will be ignored when outputting to HTML.
Dynamics Properties Tab
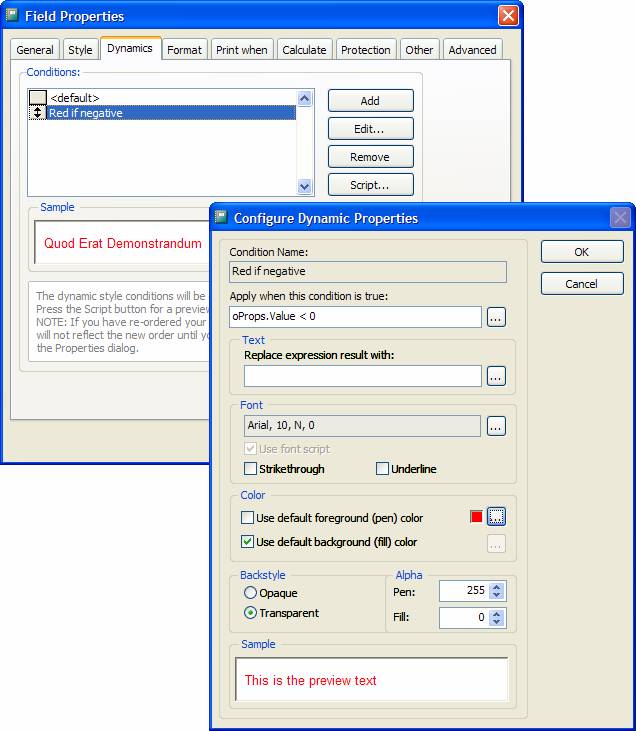
The Sedna team added a new Dynamics tab to the Field, Rectangle, and Picture Controls Properties dialog boxes. This tab specifies a list of named conditions for dynamically changing the attributes of the report object during the report run.
If you click the Add button, Senda will provide a dialog to enter the name of a new condition. Click the Edit… button to display the Configure Dynamic Properties dialog box. Here you can set a condition expression and a set of control attributes that you can override if the condition evaluates to true.
For Field controls, this allows for overriding the field’s text, font, font style, colors, back style, and alpha (transparency) level. Notice that these are the same attributes than can be overridden by the EvaluateContents event in the ReportListener. Figure 3 shows the sample dynamic you could use to force a number to display as red if its value is negative.
For Rectangle and Picture controls, the Dynamics tab allows for overriding the width and height of the control. These are the same attributes that can be overridden by the AdjustObjectSize event in the ReportListener.
The ReportListener evaluates the dynamic conditions sequentially and handles them similar to using a CASE statement. The first condition that evaluates to True is the only dynamic override to occur so the order of the conditions is very important. The conditions listbox provides mover bars to adjust the order of the conditions.
Viewing MemberData
These new tabs require that extra attributes are stored in the FRX for each object. If an object requires attributes that have no corresponding field in the FRX, you should store the extra attributes in the object’s MemberData.
MemberData is an XML string that is stored in the style column of the FRX. Microsoft introduced MemberData in VFP 9.0 as a way to extend the FRX while maintaining backwards compatibility.
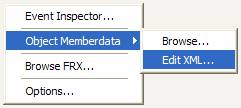
At design time you can view or edit the MemberData via a context menu on the Control Properties dialog box. Right-click on the dialog box to display the context menu and select either “Browse…” or “Edit XML…” from the “Object MemberData” submenu (Figure 4).
The code snippet below shows the XML MemberData for the field control shown in Figure 3, for displaying negative numbers as red.
<VFPData>
<memberdata
name="Microsoft.VFP.Reporting.Builder
.EvaluateContents"
type="R"
script=""
execute="Red if negative"
execwhen="oProps.Value < 0"
class=""
classlib=""
declass=""
declasslib=""
penrgb="255"
fillrgb="-1"
pena="255"
filla="0"
fname="Arial"
fsize="10"
fstyle="0"/>
</VFPData>
The “Report XML MemberData Extensions” topic of the VFP 9 Help file describes MemberData as it applies to reports in detail.
Where’s the Handler?
The FX and GFX Handler classes in _REPORTLISTENER.VCX (located in VFP9’s FFC folder) contain all of the rendering functionality behind these new tabs. The class names are prefixed with either FX or GFX. The REPORTOUTPUT.APP instantiates these, as appropriate and the report runs and handles all of the processing for the custom attributes specified in the designer.
Adding New Report Functionality
Now that you’ve seen some of the new functionality included with Sedna, this next section will show you techniques for adding your own custom functionality to the VFP 9.0 report engine and report designer.
Basic Custom Properties Tab
VFP 9.0 introduced the Handler Registry Table for the Report Designer. Sedna extends the functionality of this table by letting you add custom tabs to the Control Properties dialog boxes.
Custom Properties tabs are relatively easy to create.
Custom Properties tabs are relatively easy to create. You base a custom Properties tab on VFP’s Page class and it must contain at least one VFP Container object. The Container object must have two methods: LoadFromFRX and SaveToFRX. VFP calls these methods as it loads and closes the Control Properties dialog box. VFP then uses these methods to insert code to read and update the underlying FRX record for the report object being edited. Listing 1 shows the basic class definition of a custom tab and its container.
In the load and save methods of Listing 1 you’ll see a reference to frx. This is a copy of the report, opened as a table, in a private datasession. Any updates made to frx will get updated in the report on save. For convenience the code positions the current record pointer on the object that is currently being edited.
To add this custom page tab to a Control Properties dialog box you must add an entry need to the registry table, which you can edit by first opening the Report Builder Options dialog box. To display this dialog enter the following command into the VFP Command window:
DO (_REPORTBUILDER)
With the dialog box open (Figure 5) verify that the current registry table is not referring to the internal version (the one compiled into REPORTBUILDER.APP). Select the “Use alternative lookup table” option and click “Create Copy” to create a new table. Now click the “…” (ellipsis) button and navigate to the new table. By default the external registry table would be located in the same directory as REPORTBUILDER.APP, typically the VFP9.EXE home directory.
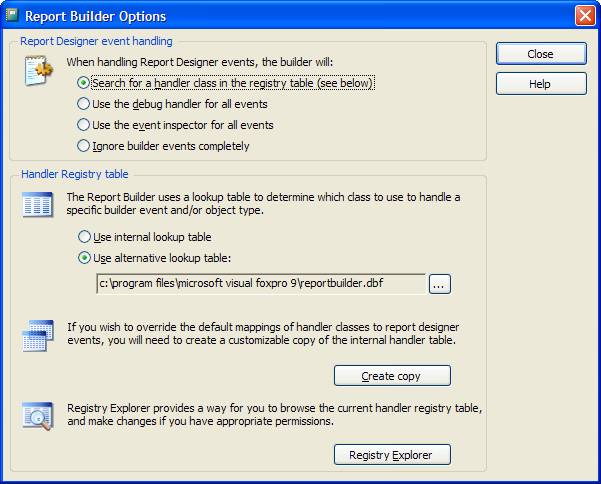
Once you’ve selected the external table, click “Registry Explorer” to display the Event Registry Handler dialog box. This dialog box contains a list of all the classes that are currently registered as custom Handlers for the Report Designer.
To add a new record, click “Add New”. To register the custom tab defined in Listing 1, enter the values shown in the highlighted record in Figure 6:
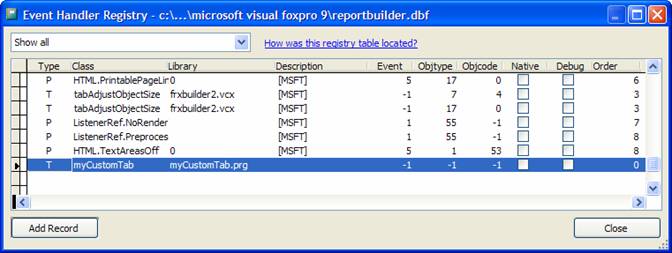
Type: T (for tab)
Class: myCustomTab
Library: myCustomTab.prg
Event: -1 (all events)
Objtype: -1 (all objects)
Objcode: -1 (all object variations)
This article will not go into complete detail of the Handler Registry Table. But, for more information about each column in the table, just click on the column header. A quick reference dialog will appear describing each value type for that column. See Figure 7.

Once you’ve made your registry entries close both Report Builder dialog boxes. Next, open any report in the Report Designer. Open a Control Properties dialog box for any object or band in the report. The dialog box should have a new custom tab called “My Custom Tab” (Figure 8). The editbox in the custom tab will display and update the “user” column of the FRX for the currently selected control or band.

If the tab does not appear or an error occurs, double check the myCustomTab.prg file and registry settings. Also make sure the prg is located within the application’s search path.
Advanced Custom Properties Tab
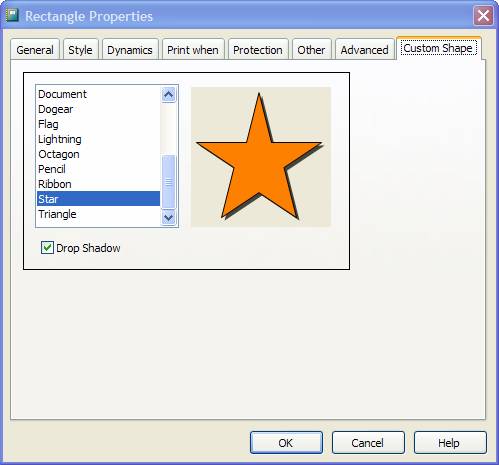
My previous sample showed you the basics involved in adding a custom tab to the Control Properties dialog box. The next sample shows a more advanced and practical use for a custom tab; a designer for rendering custom shapes.
Visual FoxPro 9 introduced PolyPoints for the Shape and Line objects used in forms. However, VFP 9’s reports do not share this functionality. This next sample will provide PolyPoint-type functionality to a report object while taking PolyPoints a step further; instead of just specifying an array for the PolyPoints, the designer will allow the user to pick a shape from a predefined list of named shapes.
Figure 9 shows the custom tab as it will appear in the Rectangle Control Properties dialog box. It provides a list of shape names to choose from and shows a sample of the shape as it should appear on the report. The “Drop Shadow” checkbox adds a drop shadow effect to the selected custom shape.
Listing 2 shows the code required to create the custom tab. Note the required methods: SaveToFRX and LoadFromFRX. These methods are responsible for retrieving and storing the attributes of the custom shape. I chose to use the MemberData XML for this example because there is not an appropriate field in the FRX to store the custom shape’s attributes.
For convenience, the MemberData XML is provided as a cursor during the save and load methods. This makes it much easier to set and retrieve the attributes for the custom shape. The cursor’s alias name is memberdata and it is open in the same DataSession as the frx cursor. The column names used in the memberdata cursor are based on the attribute names contained in the MemberData XML. You can add additional column names to the memberdata cursor by either using the ALTER TABLE command or by adding attribute name value pairs to the MemberData XML. If you choose to add columns using the ALTER TABLE command, make sure to set the type as memo and allow nulls:
ALTER TABLE memberdata ;
  ADD COLUMN myAttribute Memo NULL
When Visual FoxPro renders the sample shape on the tab, it utilizes the pen and fill colors that were defined on the Style tab. When sharing information between tabs, it is important to set the AutoRefreshOnPageChange property to true. By default, VFP only calls the SaveToFRX and LoadToFRX methods when it opens or closes the Control Properties dialog box. So if a user changes the background color on the Style tab, the color change will not be reflected in the Shapes tab until the Control Properties dialog box is closed and reopened. Setting this property will force a call to the SaveToFRX and LoadToFRX methods when navigating between tabs. This will ensure the that each tab reflects the latest changes.
The rendering for the sample shape uses the imgCanvas class of the GDIPlusX class library. The GDIPlusX class library is an open source project to provide graphics rendering functionality using the GDIPlus API. This library provides some additional functionality over the _GDIPlus.vcx library that ships with VFP 9. My code also uses the GDIPlusX library because of its support for the GraphicsPath and Matrix classes. You can download the GDIPlusX class library from the VFPX Project on CodePlex.com:
http://www.codeplex.com/VFPX/Wiki/View.aspx?title=GDIPlusX">http://www.codeplex.com/VFPX/Wiki/View.aspx?title=GDIPlusX.
As with the previous sample, to display this tab in the designer you must make an entry need in the Event Handler Registry. Add a new record to the registry (similar to Figure 5) using the following values:
Type: T (for tab)
Class: tabShapes
Library: tabShapes.prg
Event: -1 (all events)
Objtype: 7 (rectangle)
Objcode: 4 (rectangle)
Now the Rectangle Control Properties dialog box should contain the custom “Shape” tab shown in Figure 9.
The GFX Handler
Now I’ll show you how to create a GFX Handler to render the custom shape onto the report canvas. Listing 3 contains the code to accomplish this.
FX and GFX Handlers consist of a class definition with an ApplyFX method. Once you’ve registered a Handler class you call the ApplyFX method from the fxlistener ReportListener class, during the report run, for the following events:
- LoadReport
- BeforeReport
- BeforeBand
- EvaluateContents
- AdjustObjectSize
- Render
- AfterBand
- AfterReport
- UnloadReport
- CancelReport
- DoStatus
- UpdateStatus
- ClearStatus
The ApplyFX method has the following prototype:
DEFINE CLASS ...

  FUNCTION ApplyFX(toListener AS ReportListener, ;
            tcMethodToken,;
            tP1, tP2, tP3, tP4, tP5, tP6, ;
            tP7, tP8, tP9, tP10, tP11, tP12)
  ...

ENDDEFINE
In this example, toListener is a reference to the current ReportListener object, tcMethodToken is the name of the event or method that called the ApplyFX method (in upper case), and tP1 through tP12 represent the parameters that were passed to the event named in tcMethodToken.
This single entry point for all events makes it easy to provide setup and rendering code for the Handler. For the purpose of this example the gfxShape Handler needs to take action only for the BeforeReport, AfterReport, and Render methods. The BeforeReport and AfterReport events are used to provide setup and cleanup code primarily for the GDIPlus graphics objects needed to draw the custom shape. The Render event does the actual drawing of the custom shape.
Once you’ve defined the Handler you need to add it to the Report Output engine using the addCollectionMember method. The Report Output engine does not use a registry table like the Report Builder so your code must specify the class before issuing the REPORT FORM command and you must specifiy the class for each ReportListener output type that it supports or is required. The following snippet shows the code required to add the gfxShapes Handler class to the Print and Preview ReportListeners:
* Get a reference to the Print ReportListener
DO (_REPORTOUTPUT) WITH 0
* Add the gfxHandler class to the collection
_oReportOutput["0"].addCollectionMember( ;
       "gfxShapes", ;
       "gfxShapes.prg", ;
       "",.F.,.T.,.T.)

* Get a reference to the Preview ReportListener
DO (_REPORTOUTPUT) WITH 1
* Add the gfxHandler class to the collection
_oReportOutput["1"].addCollectionMember( ;
       "gfxShapes", ;
       "gfxShapes.prg", ;
       "",.F.,.T.,.T.)
Table 3 shows the parameters for the addCollectionMember method.
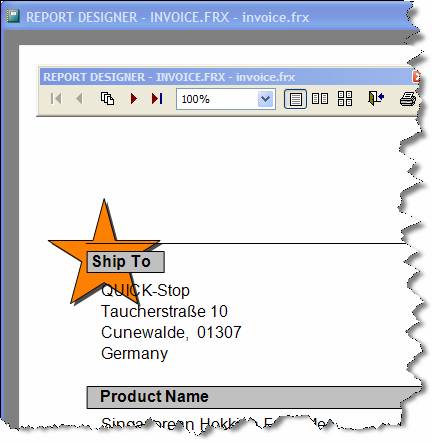
Once you’ve registered the gfxShapes Handler class you can print or preview the report showing the custom shape. (Figure 10)
I Gotta Get Me Some of That!
It is interesting to note that while Microsoft built this new reporting functionality into Sedna, you can use the report engine files REPORTBUILDER.APP, REPORTOUTPUT.APP, and REPORTPREVIEW.APP, included with Sedna, with VFP9 SP1. Just replace the current APP files in the VFP9 installation folder or change the location of the files using the _REPORTBUILDER, _REPORTOUTPUT and _REPORTPREVIEW system variables.
While backwards compatible with SP1, the Sedna APPs are designed to take advantage of two new ReportListener properties included in VFP 9 SP2: CallAdjustObjectSize and CallEvaluateContents. These properties are used to tweak the performance of the ReportListener when utilizing code in the AdjustObjectSize and EvaluateContents events.
Summary
While this article covers only part of the reporting changes included with Sedna, these new features really showcase the Reporting Engine changes introduced in VFP9. These changes make it more practical than ever to add your own custom enhancements to the ReportListener while providing a design surface for the user.
