


The Class Designer feature of Visual Studio 2005 allows you to visually manipulate your classes.
A picture is worth a thousand words, as the saying goes. The new Visual Studio 2005 (Whidbey) Class Designer provides a visual design environment that allows you to visualize and manipulate your classes. Being able to see your classes and work with them using a visual designer can significantly increase your productivity.
Using the Class Designer
You can use the new Visual Studio 2005 Class Designer feature to visualize your code. You can also use it to create new classes, update existing classes, or easily refactor your application.
The Class Designer does not perform a round trip. It does not actually "trip" at all. Rather, it is simply another view of the same data.
If you have access to a Community Technology Preview (I used the May 2004 edition), you can work through the examples in this article and try out the Class Designer. If not, just follow along with the examples for an overview of the Class Designer's features.
Visual Studio provides the Class Designer as a project item. To create a class designer, right-click a project and select Class Diagram from the Add New Item dialog box. Then specify the name of the diagram. Visual Studio creates the item with the defined name and a .cd extension.
When you have a Class Designer open, the toolbox displays the items that you can insert onto the designer as shown in Figure 1. Drag an item from the toolbox to the design surface to add the item to the designer.

There are several different types of items that you can add to the designer including a class, structure, interface, and enumeration. You can also add relationships and comments.
As an example, let's create the class diagram for an application that processes orders. To keep the diagrams simple for this article, the application will have a Customer class, an Order class, and an OrderDetail class.
To show that this feature works with multiple languages, I'll create the Order and OrderDetail classes using VB and I'll create the Customer class using C#.
Begin by creating a VB project. Then add a Class Designer project item using the Add New Item dialog box and name it Order. Visual Studio displays an empty design surface for the class diagram. Drag the Class item from the toolbox and drop it onto the design surface. The New Class dialog box prompts you to enter the class name, file name, and desired class accessibility (public, private, and so on). For the Order class, name the class Order and give it Public accessibility.
Drag another Class item from the toolbox and drop it onto the design surface. In the New Class dialog box, name this class OrderDetail and give it Internal accessibility. The OrderDetail class will only be accessible from within the other classes of this project.
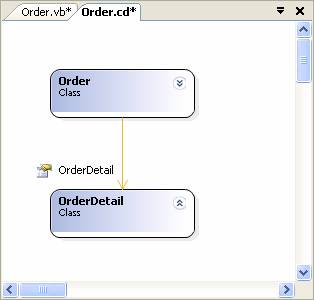
Because the two classes are related, the next step is to draw the association between the classes. Click on the Association item in the toolbar. The cursor changes to an association symbol. Click on the Order class first and then click on the OrderDetail class to define the association. The result is shown in Figure 2.
For a class to have any usefulness, it needs to have some functionality. You can add methods, properties, fields, or events to the classes. Add a CalculateTotal method to the Order class that will calculate the total cost of the order. Right-click on the class and select the Add context menu or use the Class Details window that appears at the bottom of the Visual Studio editor when a class is active on the design surface as shown in Figure 3.
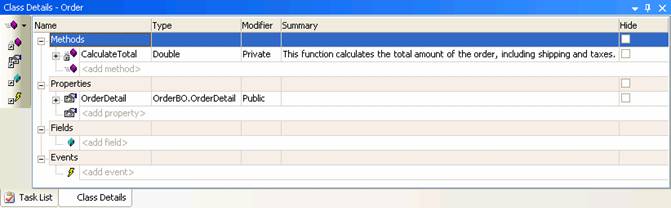
Notice that the Class Details window displays an OrderDetail property in the Order class. The Class Designer automatically created this property when you defined the association between the Order and OrderDetail classes.
Now let's create a C# project in the same solution as the VB project. Follow the same process for creating a Class Designer and name it Customer. Drag the Class item from the toolbox and drop it onto the design surface to create the Customer class.
NOTE: When using C# with the May preview, Visual Studio generates an exception when attempting to use the Class Details window to add properties or methods or when you attempt to use the Association item.
You can use the resulting class diagrams as a way to communicate your application's design. You can print them, you can save them as an image and post them on your developer Web page, or you can include them in a presentation.
Viewing the Associated Code
When you create a class in the Class Designer, Visual Studio automatically creates the associated code file. As you make changes in the Class Designer, the changes are immediately reflected in the code. This makes it easy for you to go back and forth between the designer view and the code view.
If you are using C#, the Class Designer provides many features to assist you with refactoring your application.
In the past, most visual tools performed a round trip to keep your diagrams in synch with your code. The tool would perform one trip to convert a diagram into code. If changes were then made to the code, the tool would require a return trip to convert the code back to a diagram, hence the term round trip. But these conversions often resulted in loss of detail as the tool converted back and forth between code and the diagram.
The Class Designer does not perform a round trip. It does not actually "trip" at all. Rather, it is simply another view of the same data. This means that you don't lose any detail as you go from code to designer and back to code.
As an example, the code view for the Order class created in the Class Designer is as follows:
Public Class Order

 Public Property OrderDetail() _
                            As OrderBO.OrderDetail
   Get

   End Get
   Set(ByVal value As OrderBO.OrderDetail)

   End Set
 End Property

 ''' <summary>
 ''' This function calculates the total amount of
 '''  the order, including shipping and taxes.
 ''' </summary>
 Private Function CalculateTotal() As Double

 End Function
End Class
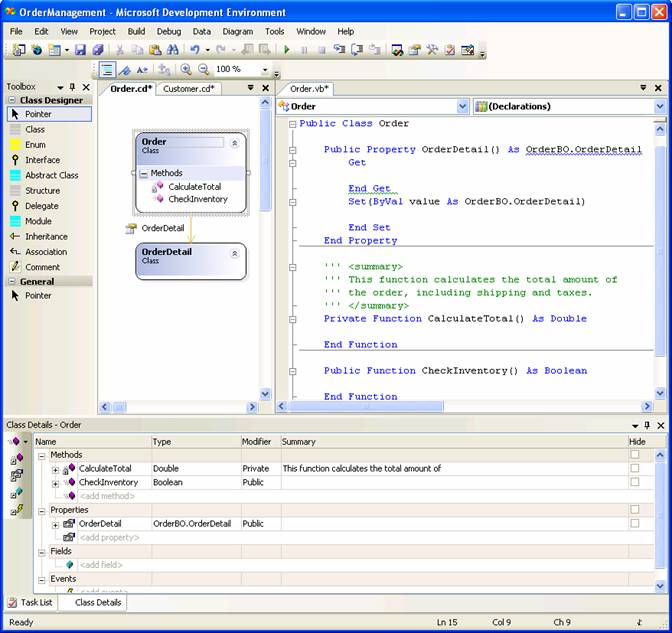
If you change this code?the diagram will change accordingly. For example, you can add a new method to the class in the code view as follows:
Private Function CheckInventory() As Boolean

End Function
The new method is immediately shown in the diagram as illustrated in Figure 4.
So you can use whichever view is best for you. For example, you can create the classes with the Class Designer and then edit them in the Code Editor. Either way, the code will be correct in both views.
Working with Existing Code
In many cases, you spend a large portion of your time working with existing code?not creating new code. The Class Designer has features to help you with that as well.
You can open any project with Visual Studio 2005, create a Class Designer, and then drag classes from the Solution Explorer or the Class View window to the designer surface. Try this with an existing project. Be sure to create a backup of it first if you are converting from an existing Visual Studio 2003 project.
You can also refactor existing code with the Class Designer. Refactoring is the process of changing your application in such a way that it does not change how it works, but rather it improves the internal structure of the application. Refactoring is often necessary if a section of the application has been changed frequently and is no longer easy to understand or maintain.
If you are using C#, the Class Designer provides many features to assist you with refactoring your application. You can rename identifiers, extract interfaces, and convert simple fields to properties.
Conclusion
The Class Designer is a great tool for visualizing your application. Use it when working with existing code to view the class structure and their relationships. Use it to graphically create new classes or edit existing classes. Or use it to refactor your application. The only down side is that we have to wait for Visual Studio 2005 to see all of these benefits.
Note that the Class Designer is part of Visual Studio Team System for architects and developers. Team System is expected to be available in the Enterprise edition of Visual Studio only.
