


Pocket PC devices, such as the Compaq iPaq, present both an opportunity and a challenge for software developers.
While there are many standard applications available, what tools can you use to develop custom applications? Don't despair, because the Microsoft eMbedded Visual Tools Development Kit will get you off to a great start.
I bought a Compaq iPaq 3850 and was immediately smitten by the power of these machines and the myriad of things that you can do with them. As a software developer, I started looking into ways of programming my new toy.
A little search turned up Microsoft's free SDK called the Microsoft eMbedded Visual Tools Development Kit. You can download the Toolkit for free from: http://www.microsoft.com/mobile/developer/downloads/emvt30 (note that this is a 304 Mb download).
The Pocket PC 2002 SDK final version came out in March 2002 and is a free download from: http://www.microsoft.com/mobile/developer/downloads/ppcsdk2002.asp
The iPaq ships with Pocket Windows 2002, which includes applications like Pocket Word, Pocket Excel, Pocket Outlook® and databases applications Pocket Access and Microsoft® SQL Server™ CE.
With an optional jacket, the Pocket PC can use most CF and PCMCIA cards, including memory, pocket hard drives, modems, LAN adapters, GPS units and Bar Code Scanners. Wouldn't it be fun to try a sample application and show the database capabilities while doing something useful?
To show a few programming concepts using the Microsoft eMbedded Visual Tools Development Kit, this article will detail the development of a database application using Embedded Visual Basic (eVB) and Pocket Access. The requirements for this application are:
If you are kicked out of the supermarket for scanning merchandise, don't call me. It's only a sample!
This article assumes that you have some experience with databases and ADO (ActiveX Data Objects). To keep things simple, this article will use Pocket Access. Using the concepts explored in this article you could easily write the program with SQL Server CE for a more robust application.
Installation
Your first step is to download the eVB Development Toolkit from the URL mentioned above. It is a straightforward installation. In the Installation Wizard, be sure to check “eMbedded Visual Tools 3.0” and “Microsoft Windows Platform SDK for Pocket PC” to install the common components. The eVB development kit also includes a version of C++ (which is beyond the scope of this article).
Once you have installed eVB, you will notice that it has an interface very similar to Visual Basic 6.0. Even if you are not a full-time VB developer, it should be easy to get comfortable with it. It is important to point out that, although it looks very similar to VB 6, eVB is based more on VBS (Visual Basic Script). It can create 32-bit applications using forms, modules and ActiveX controls. Unlike VB6, it cannot create class modules, COM DLLs, or ActiveX components. It does include ADOCE, so we can access both local and remote data using methods already familiar to us.
Connection Test
The first step in developing eVB applications is to make sure you can connect to your PDA. To perform this test using ActiveSync, go to the eMbedded Visual Basic menu and select Tools, Remote Tools, Configure Platform Manager. This activates the Windows CE Platform Manager Configuration screen, as shown in Figure 1.

Select the Pocket PC (Default Device) and click Properties, select Microsoft ActiveSync and click Test. If you configured ActiveSync correctly when you installed your Pocket PC device, the test should report success. If it does not succeed, ensure that your Pocket PC is connected to its cradle/cable, is plugged in and powered up. Another item to check is your ActiveSync program (in your system tray). The circle should be green and running.
How ADOCE Differs from ADO
Before getting into the sample application, you need to understand ADOCE. With ADOCE, you can develop applications using the same ADO syntax you use in your desktop applications. ADOCE requires minimal work to port existing ADO-based applications. Whenever possible, ADOCE returns the same error values and error strings as ADO.
ADOCE supports the following ADO objects:
RecordsetobjectFieldobject- Fields collection
- Connection object
- Error object and errors collection
ADOCE does not support the following standard ADO features:
Commandobject (all commands are sent using the Execute on the connection object)
*Propertyobject and properties collection (the ADOCE provider supplies no additional properties)
If you are familiar with ADO from previous work with Visual Basic, Access or Visual FoxPro, you should have no problems with ADOCE.
The application built here uses Pocket Access. Note that unlike Microsoft Access, Pocket Access is not a running application in the Pocket PC, but a database that you can query that is compatible with Microsoft Access databases.
Converting Desktop Data to a Windows CE device
When you import an existing Access .MDB file to a Windows CE device, it is converted to a format that ADOCE can understand. Because the internal Windows CE database system is less robust than Microsoft Access, this conversion sometimes results in a loss of information. Table 1 shows how data types are mapped from Microsoft Access to ADOCE.
Table 1: Mapping data types from Microsoft Access to ADOCE
During conversion, table names are truncated to 31 characters. If you choose not to overwrite tables, and if a table exists with the truncated name, the last character is deleted and replaced with the numeric character 0. If this renaming would result in a duplicate table name, the conversion process appends digits from 1 through 9. Duplicate table names beyond 10 will not be copied.
Converting Data to a Desktop
When an ADOCE database is exported from a Windows CE device, it is converted to an Access database (.MDB).
Table 2 shows how data types are mapped from ADOCE to an .MDB file.
Because the desktop computer name length (64 characters) is larger than the device name length (31 characters), no table name conversion is required.
How SQL CE 1.0 Differs from T-SQL
As mentioned before, you can also use SQL Server CE 1.0 as your database. It is important to understand the details of how this SQL Server implementation works and some of its limitations.
Pocket SQL has both a Data Definition Language (DDL) and a Data Manipulation Language (DML). There are differences with its bigger cousin. To fit in the smaller space provided in handheld and pocket devices, you get a subset of the SQL language used in SQL Server.
You have the standard CREATE DATABASE, DROP DATABASE, CREATE TABLE, ALTER TABLE, DROP TABLE, CREATE INDEX and DROP INDEX.
The DML also has familiar statements such as INSERT INTO, SELECT FROM and UPDATE. It is important to know that the SELECT statement has some limitations, especially in the WHERE statement:
- When used, no type conversion is performed.
- BETWEEN is not supported.
- IN is not supported.
- LIKE works only against varchar data types.
- WHERE clauses against unsigned data are not supported.
- The varbinary data types are supported only with the IS [NOT]
NULLoperator. - Floating point comparisons are approximate. Testing for equality against floating point values is not supported and returns an invalid field comparison error.
Transferring Data to and from SQL Server CE
In SQL Server CE, there are two ways to move data from and to your PC/Pocket Device: data replication and remote data access.
Data Replication
Microsoft SQL Server CE replication is based on Microsoft® SQL Server™ 2000 merge replication. Replication is ideally suited to portable devices because it allows data to be updated autonomously on the portable device and the server. The data can later be merged when the device is connected to SQL Server.
Replication is Internet based, which means that SQL Server CE synchronizes with SQL Server by establishing an HTTP connection to the SQL Server publisher. It uses Microsoft Internet Information Services (IIS) by taking advantage of IIS authentication and authorization. Replication can be performed over local area networks (LANs) and wide area networks (WANs). It can also be configured to use your ActiveSync connection, thereby eliminating the requirement of a network card or modem.
Remote Data Access (RDA)
RDA is a simple way for a Windows CE application to update a remote SQL Server database or to transfer data back and forth between a remote SQL Server and a SQL Server CE database. RDA is appropriate when the full power of SQL Server CE merge replication is not required.
Creating the Program
Once you have installed eVB and tested your connection to your device, you can begin building an application. First, create a new project by selecting Windows CE for the Pocket PC project and naming the project Supermarket.
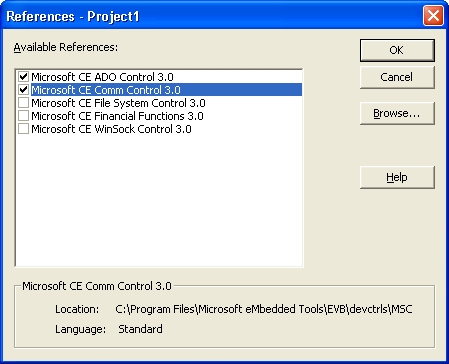
Second, add a reference to the components you will use. To do this, select Project, References from the eVB menu. Check ADOCE, as in Figure 2.
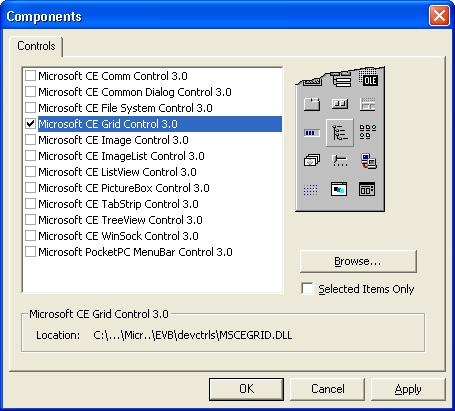
The next step is to add the ActiveX components for the application. To add an ActiveX control, select Project, Components from the eVB menu and then select the Grid ActiveX Control, as shown in Figure 3.
You can now begin creating your first eVB form. By default, eVB adds a new form to your application. Size your form to a height of 4365 and a width of 3600.
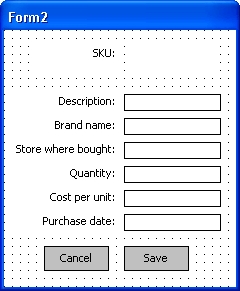
Now create another form of the same size and add a label at the top left. Adjust the width to cover the left half of the screen. Set the alignment property to vbRightJustify. Copy the same label six more times and position them below each other. Make their captions SKU*:, Description**:, Brand Name**:, Store where bought**:, Quantity**:, Cost per unit:* and Purchase date*:.*
Add another label on the top right half, in the same row as SKU: with an Alignment property setting of vbLeftJustify.
Add a textbox on the top right half in the same row as Description*:.* Copy and paste down to the same rows as the existing labels. Name the textboxes txtItem, txtBrand, txtStore, txtQty, txtAmt and txtPurDate, respectively. Add two buttons named cmdCancel and cmdSave, as shown in Figure 5.
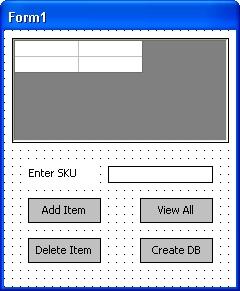
Add a grid and set the name property to grdItems. Add four command buttons and call them cmdAdd, cmdDelete, cmdView and cmdCreate. Add a label and a textbox called txtItem. The form should look something like Figure 4.
Now that you have created your forms, you can begin writing code. To add code to your form, simply double-click on the form itself. If you don't want to type all of this code, you can download it from:
http://www.code-magazine/downloads/july2002feldstein.zip
First, add a few global settings to the form's object properties, in case we do not set them in the properties window at design time, as shown in Listing 1.
Listing 1: Code in Form 1
Option Explicit

cmdAdd.Caption = "Add Item"
cmdCreate.Caption = "Create DB"
cmdDelete.Caption = "Delete Item"
cmdView.Caption = "View All"
Setup Code
The next set of code is your setup code. Setup code for a form typically goes in the Load method of the form. Listing 2 demonstrates changing default properties of the form and grdItems control.
Listing 2: Code in Click methods of objects
Private Sub Form_Load()
  ' set the form's title
  Me.Caption = "Supermarket"

  grdItems.SelectionMode = flexSelectionByRow
  grdItems.Enabled = True
  grdItems.Visible = False
  grdItems.Clear

  ' disable scrollbars
  grdItems.ScrollBars = flexScrollBarNone

  ' refresh grid info
  Call ViewItems
End Sub
Private Sub cmdCreate_Click()
   ' create the database and table
   Dim objConn As ADOCE.Connection
   Dim objRS As ADOCE.Recordset
   Dim e As Variant
   Dim strSQL As String
   Dim intYesNo As Integer

   Set objConn = _
   CreateObject("ADOCE.Connection.3.0")
   objConn.ConnectionString = _
   "Provider=CEDB"
   objConn.Open

   If Not IsObject(objConn) Then
     ' clean up memory
     CleanUp

     MsgBox "Could not connect to ADOCE!", _
       vbCritical, "ADOCE Connection Error"
     Exit Sub
   End If

   ' catch error in case DB already exists,
   ' else create it
   On Error Resume Next
   Set objRS = _
    objConn.Execute("CREATE DATABASE " & _
    "'Supermarket.cdb'")
   On Error GoTo 0

   objConn.Errors.Clear

   intYesNo = _
    MsgBox("Warning! You are about to " & _
    "delete the Items table" & _
    " and lose any information in it." & _
    vbCr & vbCr & _
    "Are you sure you want to delete all?", _
     vbExclamation + vbYesNo, _
     "WARNING: Delete All!")

   If intYesNo <> vbYes Then
     MsgBox "Operation Cancelled", _
     vbInformation, "Delete"
     Exit Sub
   End If

   On Error Resume Next
   Set objRS = _
     objConn.Execute("drop table Items")
   On Error GoTo 0

   ' Note: we should also add a
   ' Primary Key field
   ' ADOCE does not have an autoincrement
   ' field (also known as autonumber),
   ' so we would have to device a
   ' routine to calculate those numbers.
   ' There are several ways to do that,
   ' such as keeping a lookup table as a
   ' counter for each PrimaryKey needed,
   ' but that is beyond the scope of
   ' this article.

   strSQL = "Create Table Items (" & _
     "SKU Varchar(15)," & _
     "Item Varchar(30)," & _
     "Brand Varchar(30)," & _
     "Qty Integer," & _
     "UnitAmount Float," & _
     "Store Varchar(30)," & _
     "PurDate Datetime)"

  On Error Resume Next
  Set objRS = objConn.Execute(strSQL)
  On Error GoTo 0
  If objConn.Errors.Count > 0 Then
    For Each e In objConn.Errors
      MsgBox e.Description, _
        vbInformation, _
        "ADOCE create table"
    Next
  End If

  ' clean up memory
  CleanUp

  grdItems.Clear

  ' disable scrollbars
  grdItems.ScrollBars = flexScrollBarNone

  ' show grid
  grdItems.Visible = True

End Sub
Private Sub cmdAdd_Click()
  ' add record
  Dim objConn As ADOCE.Connection
  Dim objRS As ADOCE.Recordset
  Dim strSQL As String
  Dim strSKU As String
  Dim strItem As String
  Dim strBrand As String
  Dim IntQty As Integer
  Dim fltAmt As Float
  Dim strStore As String
  Dim DtePurDate As String

  strSKU = Trim(txtItem.Text)
  If strSKU = "" Then
    Exit Sub
  End If

  ' call the data entry form
  ' normally you would instantiate
  ' this form as vbModal, but
  ' unfortunately vbModal does
  ' not work in eVB, contrary to
  ' what the manual says.
  Form2.Show

  ' set horizontal & vertical scrollbars
  grdItems.ScrollBars = flexScrollBarBoth

  ' show Grid
  grdItems.Visible = True

  grdItems.AddItem strSKU & vbTab & _
    strItem & vbTab & _
    strBrand & vbTab & _
    IntQty & vbTab & _
    fltAmt & vbTab & _
    strStore & vbTab & _
    DtePurDate

  ' clean up the screen
  txtItem.Text = ""
  cmdView.Caption = "View All"

  grdItems.Refresh

  ' clean up memory
  CleanUp
End Sub
Private Sub cmdDelete_Click()
  Dim strMsg As String
  Dim intYesNo As Integer
  Dim objConn As ADOCE.Connection
  Dim objRS As ADOCE.Recordset
  Dim strSQL As String

  If txtItem.Text = "" Then
    MsgBox "Must select an " & _
      "Item to delete!", _
      vbExclamation, "Delete"
    Exit Sub
  End If

  strMsg = "Sure to delete entry " & _
     "for SKU:" & txtItem.Tet & "?"
  intYesNo = MsgBox(strMsg, _
    vbQuestion + vbYesNo, "Delete")
  If intYesNo = vbYes Then
    Set objConn = _
    CreateObject("ADOCE.Connection.3.0")
    objConn.ConnectionString = _
    "Provider=CEDB"
    objConn.Open

    strSQL = "Delete from Items " & _
      "where SKU=" & txtItem.Text
    Set objRS = objConn.Execute(strSQL)

    ' clean up memory
    CleanUp

    ' clean up the screen
    txtItem.Text = ""
    cmdView.Caption = "View All"

    ' remove it from grid
    grdItems.RemoveItem 0
    grdItems.Refresh
    MsgBox "Items deleted.", _
      vbInformation, _
      "Supermaket Database"
  End If
End Sub

Private Sub cmdView_Click()
  ' refresh grid info
  Call ViewItems
End Sub
Creating the Database
Because this is a new database application, you need to create your database from code. Listing 3 illustrates how to create a Pocket Access database.
Adding Records
Once you have a database, you can begin adding records. Listing 4 initializes a number of default variables, shows the secondary editing form and adds the new item to the grid. Later examples demonstrate saving to the database.
Deleting Data
The next step is to provide a mechanism for deleting data. Listing 5 prompts the user for deletion, creates a connection to the database and deletes the data specified by the user.
When a SKU is entered by keyboard or scanner, I change the caption of the cmdView button and do the same when the button gets focus, as shown in Listing 6.
Listing 6: Code for “txtItem” textbox
Private Sub txtItem_Change()
    If txtItem.Text = "" Then
        cmdView.Caption = "View All"
    Else
        cmdView.Caption = "View " & _
        txtItem.Text
    End If

    ' search for item
    ' show if exists
    ' ask for info to add if not
End Sub

Private Sub txtItem_GotFocus()
    cmdView.Caption = "View All"
    txtItem.Text = ""
End Sub
Write the methods to handle housekeeping chores for the form and the rest of the objects, as shown in Listing 7.
Listing 7: grdItems_Click()
Private Sub grdItems_Click()
    ' select 1st column in grid (SKU)
    ' note that columns collection is
    ' zero-based
    grdItems.Col = 0

    ' show SKU in text box
    txtItem.Text = grdItems.Text
End Sub
When you click the grid control, copy the current item to the text box. Note that as you select the whole row, the value returned is controlled by the Col property of the grid object. This is a zero-based column counter. Although it defaults to 0 (the first column), we may want to document the fact and allow for changes in the code.
The code in Listing 8 runs when the form is closed. This is the last place to make sure everything is clean and tidy.
Listing 8: Sub Form_OKClick()
Private Sub Form_OKClick()
    ' clean up memory
    CleanUp

    App.End
End Sub
Now that you have the main form and supporting procedures completed, you can create a second form to handle the data entry.
Note that although eMbedded Visual Basic supports the use of multiple forms using the Show and Hide methods, the Unload statement and the Unload event are not supported. This means that whatever forms get loaded stay resident until the application closes. All of them are global and take memory so you should try to keep your forms small and few.
Open the VB editor for Form2 (created earlier) and enter the following Global Declaration to read data from Form1. Remember that in a Pocket PC, everything is in RAM at all times, so it is easy to read information from another form even if it is not visible.
strSKU = Trim(Form1.txtItem.Text)
When the data entry form loads, we want to set the controls to default values, reading the current SKU and setting today's date. The remaining controls are set to blank values. You can also change this code to load data from a previously entered item. The code for this is found in Listing 9.
Listing 9: Form_Load()
Private Sub Form_Load()
  '  set the form's title
  Me.Caption = "Data Entry"

  ' preload current date and SKU
  lblSKU.Caption = strSKU
  txtItem.Text = ""
  txtBrand.Text = ""
  txtQty.Text = ""
  txtAmt.Text = ""
  txtStore.Text = ""
  txtPurDate.Text = Date
End Sub
Double-click on each of the buttons to enter their event code. For the Cancel button, you want to clean the entries for later use and hide the form, therefore showing Form1 (the main form), as shown in Listing 10.
Listing 10: cmdCancel_Click()
Private Sub cmdCancel_Click()
  strItem = ""
  strBrand = ""
  IntQty = 0
  fltAmt = 0
  strStore = ""
  DtePurDate = Date
  ' hide this form
  Me.Hide
End Sub
The next step is to code the Save button. The first thing to do is to validate the data entered. The first item to verify is that a SKU was entered. The code should exit immediately if a SKU was not entered. We would typically not get to this point without a SKU, but a little defensive programming never hurts.
The next step is to assign the control values to variables, open a database connection and prepare the data for saving. The idea is to collect new records for every purchase so we do not update existing records.
Before inserting the new record, you should trap for errors and display them to the screen. As you have seen, we have not given much attention to validating entered data. The following code gives you a measure of safety when attempting to save data that has not been validated.
  On Error Resume Next
  Set objRS = _
    objConn.Execute(strSQL)
  On Error GoTo 0
  If objConn.Errors.Count > 0 Then
    For Each e In objConn.Errors
       MsgBox e.Description, _
        vbExclamation, "ADOCE"
     Next
  End If
After you have saved the data, you can now inform the user that the record was entered, hide the form and refresh the grid. Listing 11 demonstrates the completed save routine.
Listing 11: cmdSave_Click ()
Private Sub cmdSave_Click()
  ' Save values to variables

  If strSKU = "" Then
     MsgBox ("Cannot save an empty SKU!")
     Exit Sub
  End If

  strItem = txtItem.Text
  strBrand = txtBrand.Text
  IntQty = txtQty.Text
  fltAmt = txtAmt.Text
  strStore = txtStore.Text
  DtePurDate = txtPurDate.Text

  Set objConn = _
    CreateObject("ADOCE.Connection.3.0")
  objConn.ConnectionString = _
    "Provider=CEDB"
  objConn.Open

  strSQL = "Insert Into Items (" & _
      "SKU, Item, Brand, Qty, " & _
      "UnitAmount, Store, PurDate) " & _
      "Values (" & strSKU & ", """ & _
      strItem & """, """ & _
      strBrand & """, " & _
      IntQty & ", " & _
      fltAmt & ", """ & _
      strStore & """, '" & _
      DtePurDate & "')"

  ' trap any possible errors
  On Error Resume Next
  Set objRS = objConn.Execute(strSQL)
  On Error GoTo 0
  If objConn.Errors.Count > 0 Then
    For Each e In objConn.Errors
       MsgBox e.Description, _
        vbExclamation, "ADOCE"
     Next
  End If

  MsgBox "Item recorded.", _
    vbInformation, _
    "Supermaket Database"

  ' hide form
  Me.Hide

  ' refresh grid info
  Call ViewItems
End Sub
To further protect data integrity, you can limit the types of entries done in text boxes. For example, you could limit Quantity and Cost to be only numeric, trapping keystrokes and rejecting any non-numeric entries, but allowing dots and backspaces.
Function NumKeysOnly(nAscii As Integer)
  ' accept only numbers
  Select Case nAscii
  Case 8, 46, 48, 49, 50, 51, 52, 53, 54, 55, 56, 57
  Case Else
     ' reject everything else
     nAscii = 0
  End Select
  NumKeysOnly = KeyAscii
End Function
Listing 12 contains the complete code to limit numeric entries into the controls.
Listing 12: Limit data entry
Function NumKeysOnly(nAscii As Integer)
 ' accept only numbers
 Select Case nAscii
   Case 8, 46, 48, 49, 50, 51, 52, 53, 54, 55, 56, 57
   Case Else
      nAscii = 0 'Reject everything else
   End Select
   NumKeysOnly = KeyAscii
End Function

Private Sub Label2_Click()

End Sub

Private Sub txtQty_KeyPress(nAscii As Integer)
   KeyAscii = NumKeysOnly(nAscii)
End Sub

Private Sub txtAmt_KeyPress(nAscii As Integer)
   KeyAscii = NumKeysOnly(nAscii)
End Sub
Finally, you can create a separate module to contain global procedures or functions that are called from anywhere in the application. Create a new module by clicking Add Module in the Project menu. This activates the code editor. Listing 13 demonstrates code that refreshes the grid on Form1 with your application data.
Listing 13: Module1.Bas
Option Explicit

Sub ViewItems()
  Dim objConn As ADOCE.Connection
  Dim objRS As ADOCE.Recordset
  Dim i As Integer
  Dim intRecCount As Integer
  Dim fltAmt As Float
  Dim strSQL As String
  Dim strSKU As String
  Dim strColumnNames As String
  strColumnNames = ""
  fltAmt = 0

  Set objConn = _
    CreateObject("ADOCE.Connection.3.0")
  objConn.ConnectionString = _
    "Provider=CEDB"
  objConn.Open

  ' remove existing data from grid
  For i = 1 To Form1.grdItems.Rows
    Form1.grdItems.RemoveItem 0
  Next

  If Form1.txtItem.Text = "" Then
    strSQL = _
    "Select * From Items Order By SKU"
  Else
    strSQL = _
      "Select * From Items " & _
       "where SKU=" & _
       Trim(Form1.txtItem.Text)
    End If
    Set objRS = objConn.Execute(strSQL)

    If objRS.EOF Then
      Form1.grdItems.Clear

      ' disable scrollbars
      Form1.grdItems.ScrollBars = _
        flexScrollBarNone

      ' show grid
      Form1.grdItems.Visible = True
        intRecCount = 0
      MsgBox "No items found.", _
        vbInformation + vbOKOnly, _
        "Search"
    Else
      intRecCount = objRS.RecordCount

      ' set the grid's columns equal _
      ' to field count
      Form1.grdItems.Cols = _
         objRS.Fields.Count

      ' add column names from field names
      For i = 0 To objRS.Fields.Count - 1
        strColumnNames = _
          strColumnNames & _
          objRS.Fields(i).Name & vbTab
      Next

      Form1.grdItems.AddItem strColumnNames

      ' populate grid
      While Not objRS.EOF
      Form1.grdItems.AddItem objRS("SKU") & _
        vbTab & _
        objRS("Item") & vbTab & _
        objRS("Brand") & vbTab & _
        objRS("Qty") & vbTab & _
        objRS("UnitAmount") & vbTab & _
        objRS("Store") & vbTab & _
        objRS("PurDate")

        fltAmt = fltAmt + _
          objRS("UnitAmount")
        objRS.MoveNext
      Wend

      ' set horizontal & vertical
      ' scrollbars
      Form1.grdItems.ScrollBars = _
        flexScrollBarBoth

      ' show Grid
      Form1.grdItems.Visible = True
  End If      ' objRS.EOF

  ' clean up memory
  CleanUp

  If (intRecCount > 0) And _
  (Form1.cmdView.Caption <> "View All") Then
    MsgBox "Items shown: " & _
      intRecCount & vbCr & _
      "Average price: " & _
      FormatNumber(fltAmt / _
      intRecCount, _
      2, vbFalse, vbTrue, vbTrue), _
      vbInformation + vbOKOnly, _
      "Supermarket Database"
  End If
End Sub

Sub CleanUp()
  ' clean up

  ' trap any errors in case
  ' an object was not instantiated
  On Error Resume Next
  objRS.Close
  Set objRS = Nothing
  objConn.Close
  Set objConn = Nothing
  On Error GoTo 0
End Sub
Due to magazine column formatting considerations, the code listings are narrow. Lines are normally broken with the continuation character (Underscore) but be aware that there is a known bug in eVB where these do not always get recognized properly.
See Microsoft's Knowledge Base article Q266125: “Device Does Not Recognize Line Continuation Characters in eVB Code” (http://support.microsoft.com/default.aspx?scid=kb;EN-US;Q266125).
This example is a simple program. It lacks features like strong error handling and contains only some error prevention. In a real-world application, you would add more defensive programming measures, including a more robust error handling scheme.
Distributing an ADOCE Application
When you are ready to distribute your ADOCE application, use the Application Install Wizard provided with eMbedded Visual Basic to create an installation application. The wizard collects all the necessary components used by your application and bundles them into one package. When the installation application runs on a target device, it automatically installs and registers all the components needed by the application. For more information about the Application Installation Wizard, see the eMbedded Visual Basic 3.0 documentation.
Conclusion
The Pocket PC is a wonderful addition to the devices running under the Windows CE platform. Using the power of ADOCE, a database like Pocket Access, SQL Server CE and a programming language like eVB or eVC++, users can be truly mobile.
The uses of this technology are unlimited. Coupled with wireless modems or ActiveSync connections to a desktop system, you can write programs for a sales force on the field. Doctors can download a patient case history and take notes when making their rounds. They can then upload to the main database. Adding some ActiveX-like image controls, you can create a real estate application that highlights a property, complete with full color pictures and statistics.
Now get busy and create truly mobile applications!
| Access type | ODBC type | Device type | Sent to device |
|---|---|---|---|
| Text | sql_varchar | Varchar | Yes |
| Memo | sql_longvarchar | Text | Yes |
| LongInt | sql_integer | Integer | Yes |
| sql_bigint | Integer | Yes | |
| Byte | sql_tinyint | Smallint | Yes |
| Int | sql_smallint | Smallint | Yes |
| Single | sql_real | Double | Yes |
| Double | sql_double | Double | Yes |
| sql_float | Float | Yes | |
| ReplID | sql_varbinary | Varbinary | Yes |
| Date/Time | sql_timestamp | Datetime | Yes |
| Currency | sql_numeric | Double | Yes |
| AutoNumber | sql_integer | Integer | Yes |
| YesNo | sql_bit | Boolean | Yes |
| OleObject | sql_longvarbinary | Varbinary | Yes, if field is selected by user; unselected is default |
| HyperLink | sql_longvarchar | Text | Yes |
| Lookup | sql_varchar | Varchar | Yes |
Table 2: Mapping data types from ADOCE to an .MDB file
| Device type | Access type | ODBC type | Sent to desktop computer |
|---|---|---|---|
| datetime | Date/Time | sql_timestamp | Yes |
| Float | Double | sql_double | Yes |
| Double | Double | sql_float | Yes |
| integer | LongInt | sql_integer | Yes |
| smallint | Int | sql_smallint | Yes |
| Boolean | YesNo | sql_bit | Yes |
| varbinary | Binary | sql_varbinary | Yes, including length |
| long varbinary | OLEObject | sql_longvarbinary | Yes |
| varchar | Text | sql_varchar | Yes, including length |
| Text | Memo | sql_longvarchar | Yes |
