


Create Bulletproof Components with COM+ Security
COM+ gives the developer a way to build a flexible and powerful security system into applications without having to write a lot of custom code.
This article will examine how to leverage the power of the COM+ security model.
Providing adequate security for a software system is often one of those tasks that is the least interesting to the developer, ranking at about the same level as writing documentation. Sometimes it is left until the final stages of the development process, or in some cases it is overlooked entirely. As COM and COM+ applications become more common, adequate security is rapidly becoming an even more important consideration. In today's world of components and distributed systems, security means more than whether a user can run an individual application, but is instead a vital element that should be integrated throughout the entire system.
In distributed applications, the COM+ Security model provides platform independence. Because security is implemented on the server side, the system can be used by clients of different platforms. This allows the component developer to program to the security interface instead of worrying about the underlying implementation. Windows 2000 provides a standard interface called the Security Support Provider Interface (SSPI), which allows security vendors to create their own security systems that are tailored to various business needs. The design and architecture of SSPI is similar to that of ODBC. ODBC provided a standard way of retrieving data from various databases by using different ODBC drivers that implemented a standard ODBC API.
In the same way, SSPI provides the developer with a common interface to the system security, but at the same time allows security providers to internally implement their own security enforcement mechanisms. Windows 2000 ships with both NTLMSSP (NT LAN Manager Security Support Provider) and Kerberos. NTLMSSP is primarily provided for backward compatibility, while the default Kerberos is a more sophisticated and feature-rich authentication package.
Security Basics
The term security is a bit ambiguous, and means different things to different people. From a software point of view, security specifies and enforces WHO can perform WHAT action in WHAT part of the system. Authentication is the process that determines WHO is trying to perform the task, and makes sure that she is who she claims to be. Authorization is the process that then determines whether or not the user is allowed to perform the task she is requesting.
COM+ Features
COM+ security consists of the following features:
- Declarative role-based security
- Programmatic role-based security
- Authentication services
- Impersonation and delegation
First let's examine role-based security. A role is a symbolic name that identifies a group of users specific to a certain COM+ application. Conceptually, this is very similar to that of a “user group” in Windows 2000. Let's say, for example, that we are building an application for an organization that has managers, administrators and employees. The managers may have permission to instantiate a customer object and to change information, while the administrators may only be able to instantiate and view existing information. Perhaps employees are not allowed to do anything at all with the customer object. Individual users can simply be assigned to roles, according to the type of security desired for them. This approach gives us an easy and flexible method for creating and maintaining security.
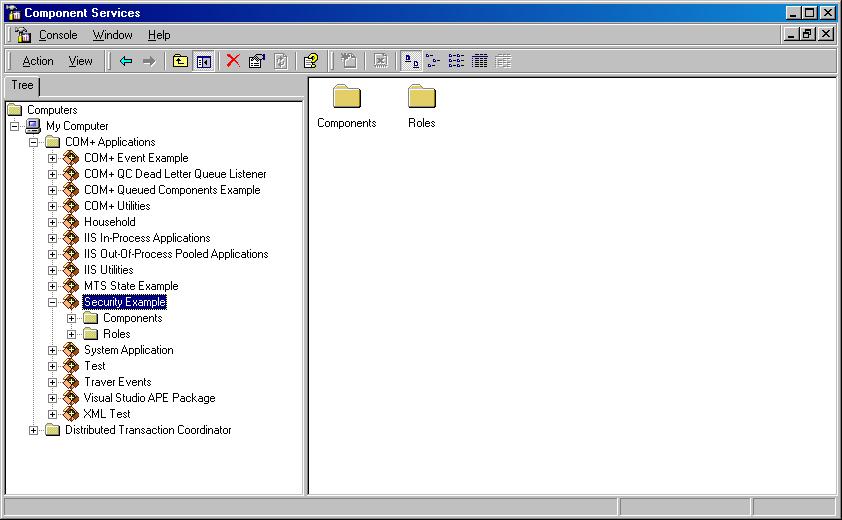
There are two types of role-based security - declarative and programmatic. For each COM+ application, the system administrator can utilize the Component Services Administrative Tool snap-in to set up the security (See Figure 1). Declarative security has the advantage that it is extremely easy to set up and requires no added code in the component. It is quite flexible because it allows roles to be defined not only at the component level, but also at the individual method levels.
However, if a finer degree of granularity is required, declarative security can also be used to provide total control and flexibility from within the components, in a programmatic fashion.
Our first secure component
Let's create a small component and secure it using the COM+ security features. Our example is a very simple customer business object. The object itself doesn't provide many features, so that we can keep this example simple. Here's the Visual FoxPro version:
Define CLASS Customer AS Session OLEPublic
    Protected CreditLimit, City, Company

    Function SetCity( City )
        This.City = City
    Endfunc

    Function GetCity
        Return THIS.City
    Endfunc

    Function GetTotalSales
        Return 500000
    Endfunc

    Function SetCreditLimit(Limit)
        This.CreditLimit = Limit
    Endfunc

    Function GetCreditLimit
        Return THIS.CreditLimit
    Endfunc

    Function SetCompany(Company)
        This.Company = Company
    Endfunc

    Function GetCompany
        Return THIS.Company
    Endfunc
Enddefine
As you can see, some of the values in this component are hard-coded for example purposes.
We compile this code into a multi-threaded COM DLL (create a project named “VFPSecure”, add the PRG that holds the above code, and build the project as a multi-threaded COM server).
We can also create the functional equivalent of this component with Visual Basic. Here's the code for this:
Dim cCity As String
Dim nCreditLimit As Integer
Dim cCompany As String

Public Sub SetCity(City As String)
    cCity = City
End Sub

Public Function GetCity() As String
    GetCity = cCity
End Function

Public Function GetTotalSales() As Long
    GetTotalSales = 500000
End Function

Public Sub SetCreditLimit(CreditLimit As Integer)
    nCreditLimit = CreditLimit
End Sub

Public Function GetCreditLimit() As Integer
    GetCreditLimit = nCreditLimit
End Function

Public Sub SetCompany(Company As String)
    cCompany = Company
End Sub

Public Function GetCompany() As String
    GetCompany = cCompany
End Function
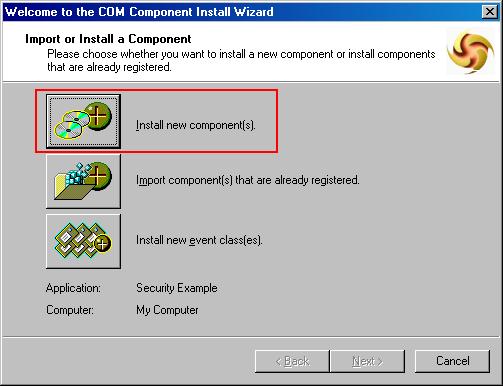
Once we have built the component, we can install it in the COM+ system. To do so, open the Component Services MMC snap-in from the Windows start menu (Programs/Administrative Tools/Component Services). Drill down into the COM+ applications of the current computer (My Computer), right-click on the COM+ Applications item, and add a new COM+ application (see Figure 1). In the wizard, specify a name for your application, and accept all the defaults.
Now that we have a new COM+ Application, we can add our components to it. Depending on whether you build the Visual FoxPro or the Visual Basic version, you will use the VFPSecure.DLL or VBSecure.DLL in the following example.
Right-click on the “Components” item in your new COM+ Application, and select “New/Component” to launch the component setup wizard. Make sure you choose to install a new component (Figure 2) and don't select to import a previously registered component. If you select to import a preregistered component, the COM+ Catalog will not read the type library properly and the component's interfaces will not be displayed, limiting our ability to define security for them.
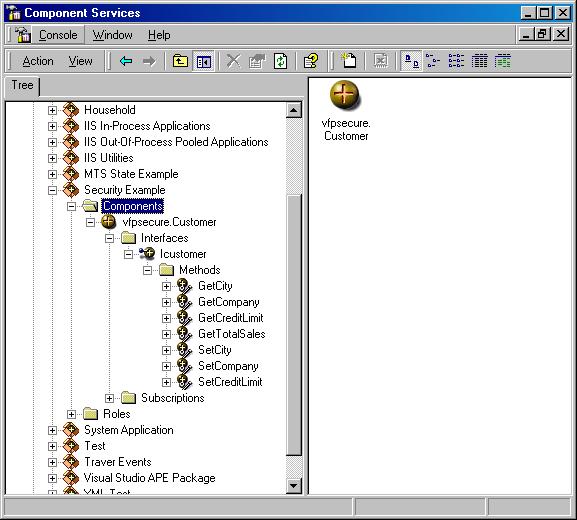
In the next step, pick the DLL file you want to register. Depending on whether you use VFP or VB, you will pick either VFPSecure.DLL or VBSecure.DLL. Figure 3 shows the VFP component registered, with all of its interfaces and methods. The VB component looks almost identical.
So far, there is nothing special about this component, and we could go ahead and instantiate it from any COM-enabled client. So, let's now add some security!
Enabling Application Security
The first step is to enable security for the entire COM+ Application. Right-click the application you created, select “Properties,” and pick the “Security” page (Figure 4). To activate security in general, simply check the checkbox entitled “Enforce access checks for this application”. This turns on the COM+ security checking.
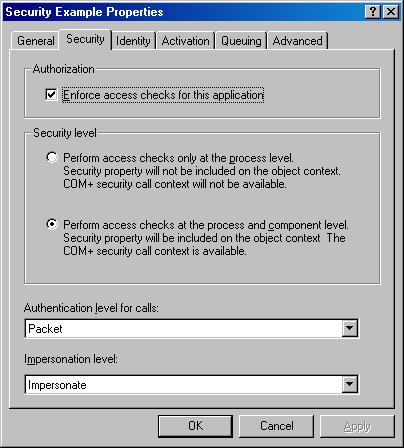
There are a number of other settings on this page, and the defaults are what we want for our little example, so don't touch any of those. But, let's investigate some of the settings anyway:
The Security Level option lets us specify whether or not we want security context information inside our component. This is turned on by default, and we will need it further down when we discuss programmatic security. This setting determines whether the system provides detailed security information throughout component execution, or checks security only on initial access.
The Authentication Level setting specifies when and how often the system verifies whether the user accessing the system is who he claims to be.
Finally, the Impersonation Level setting defines what user ID is to be used to access the application. We will discuss this in more detail below.
So, let's get back to our example: At this point, we have locked everyone out of our application. When you try to instantiate the COM component, you will get an “Access denied” error. That's because we haven't specified access rights for anyone.
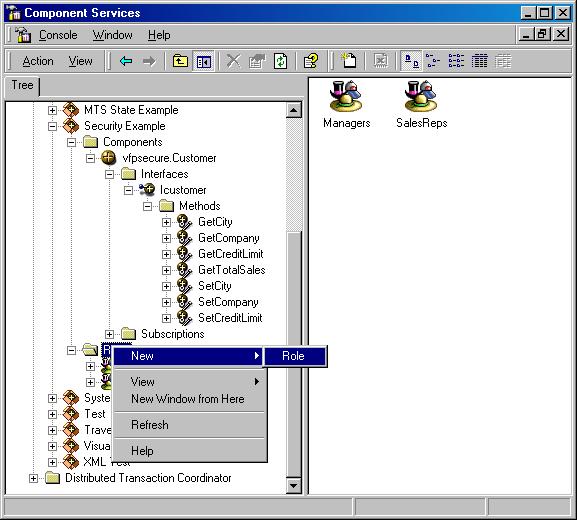
Setting Up Roles
In COM+, access is permitted based on roles. Roles are groups of users specific to a COM+ Application. For our example, we'll set up “Customers,” “SalesReps” and “Managers” roles. We do so in the Component Services snap-in (Figure 5). Setting up roles is straightforward, but doesn't provide much functionality. In order to put our roles to work, we have to add users to those roles. To do so, expand the role to which you want to add users, and right-click the “Users” item. Users are selected using the standard Windows 2000 user dialog (Figure 6). To make our example work, I add myself to the “Managers” group and click “OK”.
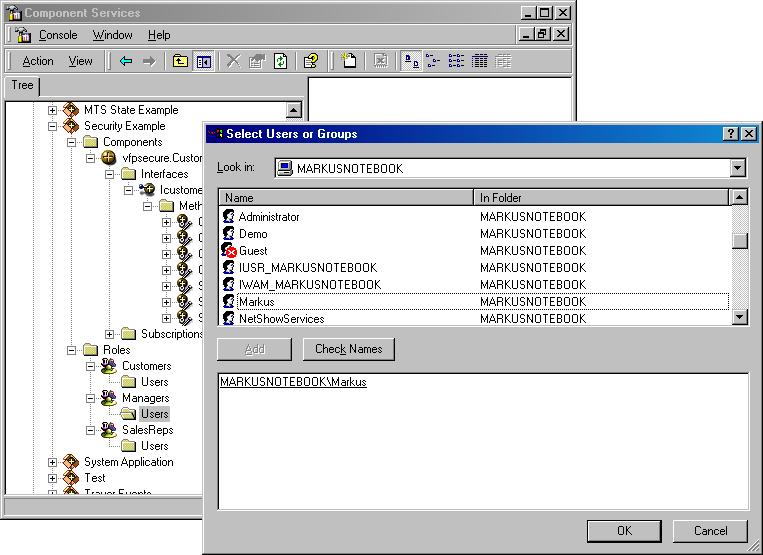
At this point, I have access to the COM+ Application. I can instantiate the secure customer component without causing any access violations. However, I am not able to access any of the methods of that component because the “Managers” role doesn't have sufficient access rights for this specific component. We can easily fix this in the properties of the component (Figure 7).
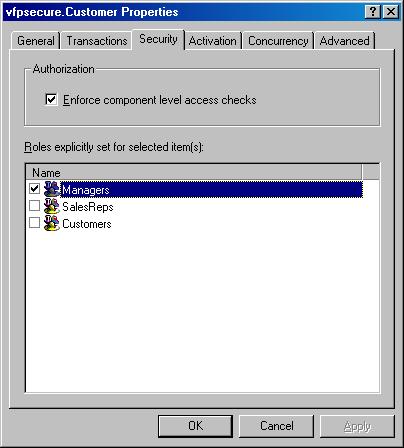
In the security tab, set the Managers role to have access to this component. At this point, we have access to all methods of that component. Note that we can also set access rights at a higher level of granularity. We can allow access based on a specific interface (which wouldn't make a whole lot of sense in our example, since we only have the default interface) and even at the component level. A good example for that is the SalesReps role. I would like to allow sales reps to see a customer's credit limit, but allow only managers to set the limit. For this reason, I activate the SalesReps role for the GetCreditLimit() method only.
A very important point to note here is that all of these security features are purely administrative. No code is required to make these things work (although an error handler on the client side might be beneficial). However, this kind of security may not be good enough for all purposes. Let's assume we want sales reps to be able to set the credit limit, but only up to $5000. Everything beyond that has to be set by a manager. Administrative security won't do that for us, but programmatic security will.
Programmatic Security
COM+ Security is exposed to programmers as a security context. The security context delivers a vast amount of information regarding the user of the component, and the way that he was authenticated. Checking whether a user belongs to a certain role is relatively easy. Here's the Visual Basic version of the SetCreditLimit() method (which is slightly simpler than the Visual FoxPro version, because VB automatically exposes the security context):
Public Function SetCreditLimit(CreditLimit As Long) As Boolean
    Dim oContext As ObjectContext
    Dim oSecContext As SecurityCallContext
    Set oContext = GetObjectContext()
    Set oSecContext = GetSecurityCallContext()

    If Not oContext.IsSecurityEnabled() Then
        SetCreditLimit = False
        Exit Function
    End If

    If CreditLimit > 5000 Then
        If oSecContext.IsCallerInRole("Managers") Then
            nCreditLimit = CreditLimit
            SetCreditLimit = True
        Else
            SetCreditLimit = False
        End If
    Else
        nCreditLimit = CreditLimit
        SetCreditLimit = True
    End If
End Function
Here is the Visual FoxPro version. Note that it isn't necessary to set up any references in Visual FoxPro (make sure to add the COM+ Services Type Library to your Project References in VB!), but on the other hand, security context objects need to be instantiated manually:
Function SetCreditLimit(CreditLimit)
    Local oCOMp, oContext, oSec, oSecContext
    oCOMp = CreateObject("MTXAS.APPSERVER.1")
    oContext = loCOMp.GetObjectContext()

    If Not oContext.IsSecurityEnabled()
        Return .F.
    Endif

    oSec = CreateObject("COMSVCSLib.GetSecCallCtx.1")
    oSecContext = oSec.GetSecurityCallContext()
    If CreditLimit > 5000
        If oSecContext.IsCallerInRole("Managers")
            This.CreditLimit = CreditLimit
        Else
            Return .F.
        Endif
    Else
        This.CreditLimit = CreditLimit
    Endif
    Return .T.
Endfunc
Rebuild your Visual FoxPro project (you may need to shut down your COM+ Application to avoid sharing violations).
When you instantiate the recompiled component, you can set credit limits up to $5000 without a problem, but beyond that amount, it will depend on whether or not the current user is assigned the Managers role. For test purposes, I recommend creating several user accounts so you can log on as different users and see the effects of your security settings.
Note: Make sure that the test users actually have file access rights to the DLL that the component lives in, or you will see error messages very similar to COM+ Security violations, which can be very confusing.
The role is only one possible setting to check programmatically. The security context exposes a great deal of information about the user, as well as the enforced level of security, authentication, and more. Listing all of those settings is beyond the scope of this article. For further information, we recommend reading one of the many COM+ books or the COM+ documentation at http://msdn.microsoft.com.
Authentication and Authorization
Monolithic applications usually provide their own login dialog and apply a more or less (usually less) sophisticated authentication mechanism. For component-based applications (possibly of distributed nature), this approach is no longer viable. Since components are available throughout the system, a security mechanism sitting on top of those components - perhaps a global application object - just won't work. Also, there are usability reasons that make this approach appear old-fashioned.
Modern systems don't differentiate between different applications. They simply provide a digital desktop with all kinds of tools, and once the user is logged on to that digital desktop, he should keep that identity and shouldn't be asked to log on again. Plus, what are the chances for the average developer to write a security system that outperforms the Windows 2000 security system?
So, there are compelling reasons to use the standard Windows 2000 user account for your security purposes. Besides, it is simply easier to use that mechanism than coding your own. Just consider all the features that come with that security system! The scale ranges from simple local logins, to distributed access using smart-cards.
The focus of this article isn't how to verify someone's identity or how to set up a sophisticated distributed environment. Although interesting, those topics are beyond the scope of this article. We will investigate these scenarios in future issues of CoDe Magazine. What is within the scope of the current article is a quick look at the account used by the system to access a component.
In all of the examples so far, we have used the “Interactive User” to access our components. The interactive user is the user currently logged on to the system. This setting works well for components running locally, but may not be sufficient in distributed scenarios. In the latter case, the component would always execute with the identity of whatever user happens to be logged on. If the server just sits there without having a user logged on, the system won't work at all, since no authenticated user is present.
There are two ways around this dilemma. For one, we can specify a user account to be used when executing a COM+ Application (Figure 8). In this scenario, the specified user is logged on in the background (a new, invisible Windows station is instantiated), resulting in some overhead. However, this shouldn't be too significant if most of your COM+ Applications utilize the same account. A typical example is an Internet user account used to restrict certain access to your system over the Internet, yet provide the functionality you want to make available to the public.

The second option is to impersonate the user who logs on. This will result in significant overhead, because a new Windows station has to be launched for every user. This scenario is not very scalable. However, it represents the cleanest approach from a system design perspective. When security is of high priority but you expect a small number of users, this is the preferable method.
Impersonation is a very interesting topic when all the details are considered. Imagine a distributed scenario where the user, logged on at her workstation, accesses a business object on a server, that accesses another component on another server, that accesses SQL Server on a third server. The first step is straightforward. The business object will use the security credentials of the client. But what happens to the second component? Depending on the configuration, it can use the credentials of the business object or those of the client.
If we use an “Impersonate” or “Delegate” setting, the component will use the credentials of the client. Now, what happens to the SQL Server backend? It could use the client's credentials, those of the business object, or those of the component. Again, this depends on the settings. “Impersonate” only allows for one “hop”, so SQL Server would not see the credentials of the client (which may very well be the desired behavior). “Delegate” is a little more powerful. It can carry credentials over an unlimited number of hops, so SQL Server could in fact see the credentials of the client.
So, this mainly becomes a question of system design. How secure does an application have to be? Do users have to be set up again on SQL Server, or can we assume that a call is secure if the business object is happy with the credentials?
Conclusion
Security is a growing concern, even for developers who haven't been exposed to the subject so far. Distributed environments and component-based applications are great productivity tools, but they are also more vulnerable to attacks and mistakes. COM+ Security provides an extremely flexible and extensible way to create a secure environment for your components. We think that once you explore its capabilities, you will never write a custom security system again.
