


Mastery of mobile platforms makes you a better developer and can really give you more job opportunities. But let's face it: The list of mobile platforms that offer more healthy prospects doesn't yet include Windows Phone and Windows 8. Your outlook is just plain better if you can code for iOS or Android.
Your outlook is just plain better if you can code for iOS or Android.
As a seasoned .NET developer with a strong background in C#, what's the easiest approach you can take to become a better mobile developer? In this article, I'll show you the way to Android programming.
In many ways, the Android is an easy catch for .NET developers. First and foremost, the programming language is either C#, if you opt for writing apps through the Mono platform, or Java – a close relative to C# – if you take the classic route of the standard Android SDK. Second, you don't need to buy a Mac in order to develop for Android. Whatever IDE you choose to use is available for Windows too. Finally, the user interface of Android apps is laid out using an XML schema that doesn't look foreign to people who know XAML.
Compared to developing for iOS or even Windows Phone, Android programming is challenging for one notable reason: the huge number of significantly different devices that may be running your application. You can find Android on an $80 cell phone as well as on a high-end $500 smartphone. The difference in terms of power, battery, resources, and screen size can be huge. These variables add more work to the schedule and, even more than that, it adds forethought: you must plan your Android effort well for it to result in a success story.
Compared to developing for iOS or even Windows Phone, Android programming is challenging for one notable reason: the huge number of significantly different devices that may be running your application.
Far from the ultimate resource for all aspects of Android programming, this article aims modestly at providing practical information to get you started and creating functional test applications.
Options for Android Development
The primary approach to Android programming consists of downloading the Android SDK and writing your apps using the Java programming language. This approach guarantees the fastest and most compact apps, and this is the approach presented in the rest of this article.
If you're a .NET developer, though, you might want to consider another option: Xamarin Studio from Xamarin. Note that Xamarin Studio (formerly MonoDroid) is a commercial product and may require you to buy a license. (For more information, have a look at http://www.xamarin.com.) Editor's note: Xamarin was acquired by Microsoft a few years after this article was written.
You can use the Xamarin Studio IDE (formerly MonoDevelop) on a Windows computer or you can install an extension to Visual Studio and keep using all of your favorite plug-ins.
An Android application built with Xamarin Studio executes within an instance of a Mono-based virtual computer. The Mono virtual computer, in turn, lives side-by-side with the Android's virtual computer. To access native Android functionalities, you use a bunch of classes that look like classes in the .NET Framework except that they bind to the Android API under the hood.
To access native Android functionalities, you use a bunch of classes that look like classes in the .NET Framework except that they bind to the Android API under the hood.
The build of a Mono-based Android application passes through four steps: processing resources from Android resource files into .NET-compatible resource files; creation of the .NET code; processing of the .NET code to create Java wrappers; and final packaging of the Android executable.
In my opinion, the primary reason for using Mono for Android resides in the possibility of a quicker startup time as you can stay in Visual Studio and write in C#. However, the final application is a bit larger because of the extra Mono runtime. For an Android application, size may be an issue much more than for an iOS or Windows Phone application because of the wide range of different devices out there with very limited memory capabilities.
Another good reason for going Mono is that you can reuse some code across multiple mobile platforms. If you need to have an app for iOS, Android, and even Windows Phone, it's likely that you can reuse some code.
Note, though, that this last point, while remarkable, is actually much less appealing than it may sound at first. The code you can reasonably reuse in a Mono-based set of mobile apps is only the business logic code you run on a device. The presentation layer of Mono-based Android applications must still closely reflect the philosophy and behavior of Android activities. You must know this in order to effectively write Mono-based Android applications. (And the same holds true for Mono-based iOS apps.) Making sense of the presentation logic of mobile platforms is the hardest part of writing mobile apps.
The code you can reasonably reuse in a Mono-based set of mobile apps is only the business logic code you run on a device.
Another option for writing Android applications is PhoneGap (see http://phonegap.com) from Adobe. Editor's note: Adobe discontinued support for PhoneGap on October 1, 2020. An app built against the PhoneGap framework is a classic client-side Web application made of HTML5 pages using CSS and JavaScript. You write and test the application within your favorite development platform, and using your favorite tools. For example, you can use Visual Studio or perhaps JetBrains's WebStorm or any other text editor for the HTML pages and JavaScript logic. Once the Web core is ready, though, you have the problem of packaging that into a real Android application. You need an IDE for that like Eclipse or JetBrains's IntelliJ IDEA. eOr, you can leverage the PhoneGap Build service (see http://build.phonegap.com Editor's note: Link is no longer valid.) and upload your app to the service for packaging.
If you opt for doing it all by yourself, then you end up with a plain Android project in an IDE that supports Android development. Because the entire application is HTML and JavaScript, though, in this case, your exposure to Java and manifest files is minimal, although not null.
Choosing the IDE
All-in-all, I prefer writing Android apps the hard (not really) way, using Java, Android SDK, and an IDE of choice. But which IDE? There are two principal IDEs for Android: Eclipse and JetBrains's IntelliJ IDEA.
Eclipse is the official IDE for Android development and you can get Eclipse when you download the Android SDK. Eclipse is a community-driven IDE cross-language and cross-platform tool that has been extended with an Android plug-in. Eclipse provides nearly all of the features an IDE is expected to have: code completion, VCS integration, syntax coloring, and a UI designer for Android. Curiously, Eclipse comes with its own Java compiler with two notable features: incremental builds and compile with errors. That means that sources are compiled as long as you code piecemeal. You get an executable even if the sources contain errors. The executable runs just fine until the broken segment is reached.
Curiously, Eclipse comes with its own Java compiler with two notable features: incremental builds and compile with errors. That means that sources are compiled as long as you code piecemeal.
IntelliJ IDEA is a commercial IDE for Java with a plug-in for Android development. Overall, IntelliJ IDEA provides a better experience than Eclipse as far as usability is concerned. It offers richer code completion as well as VCS integration and static analysis of the code. Nicely, IntelliJ IDEA has a Community Edition, which is free and includes the Android plug-in.
If you're coming from .NET and Visual Studio, IntelliJ IDEA Community Edition is probably the ideal choice-and it's free. For more information, check out http://www.jetbrains.com/idea.
In this article, I'll be using Java, Android SDK, and IntelliJ IDEA to build my examples.
Preparing the Environment
Even before you install the IDE, you should download and install the Java SDK and the Android SDK. You can get the latest Java SDK from https://www.oracle.com/java/technologies/. The Java Standard Edition is fine.
You get the Android Development Tools (ADT) bundle from https://developer.android.com/studio. The default ADT bundle for Windows, as well as for other platforms, includes the Eclipse and Android plug-ins. If you intend to use IntelliJ IDEA as your Android IDE, you might want to opt for a smaller download and just pick up the Android SDK and platform tools. If you're downloading the Android SDK for Windows, you can get a convenient installer that silently copies all required files.
If you're downloading the Android SDK for Windows, you can get a convenient installer that silently copies all required files.
Right after the successful completion of the setup wizard, install all basic Android SDK tools, but none of the platform specific tooling. You are not yet ready to build Android applications within IntelliJ IDEA or any other IDE.
The next step consists of launching the SDK Manager. The Windows installer offers to do just that from the final page of the wizard. The SDK Manager allows you to choose from a number of Android platforms to install. (See Figure 1.)
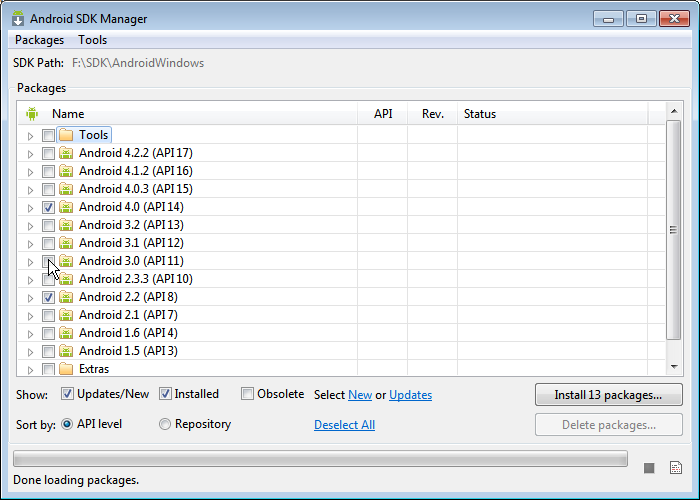
You can add new platforms at any time by launching the SDK Manager from the installation folder or from the menu of the IDE of choice. You also use the SDK Manager tool to uninstall one or more Android packages.
Ready? Code!
With Java and Android SDK in place and the IDE available, you're all set for a “hello-world” application. Assuming that you're using IntelliJ IDEA Community Edition as the IDE, the first step toward an Android application takes you to the dialog box of Figure 2.
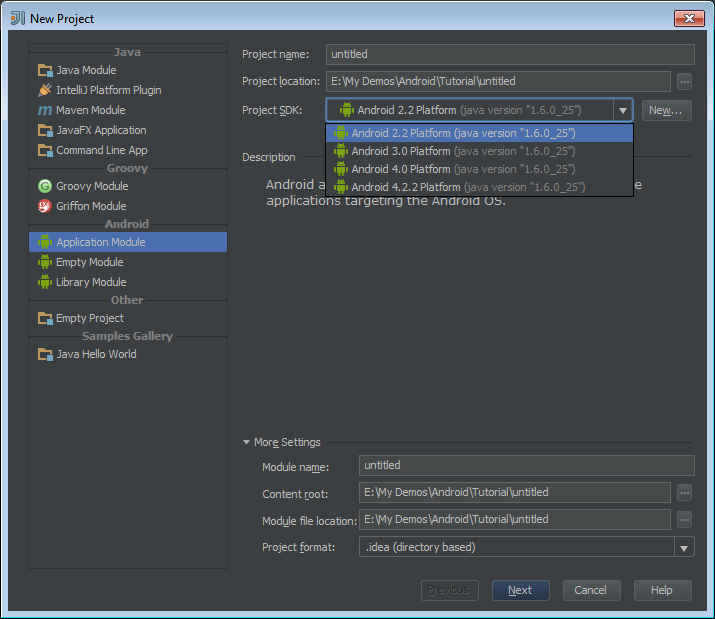
In addition to the name and location of the project, indicate the minimum SDK required to run the application. The content in the drop-down list of Figure 2 depends on the platforms installed through the SDK Manager.
In the next of the wizard, IntelliJ IDEA asks you to indicate the package name and how you want to debug the application. (See Figure 3.)
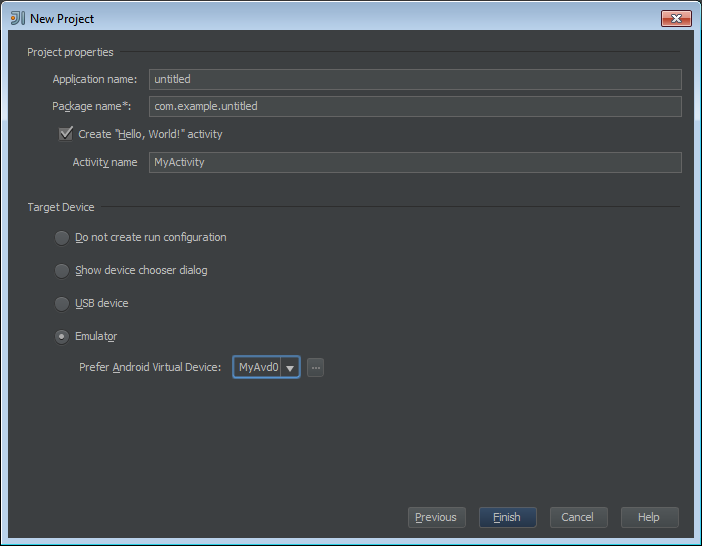
The package name should be in the form com.xxx.yyy, where the xxx placeholder stands for the company name and yyy is for the application name.The com.xxx.yyy pattern is a common naming convention that was introduced to reduce the risk of name conflicts with other applications. It's not mandatory though.
To test the application, you have two equally good options: the emulator or real devices. You might want to start with the emulator and move to one particular device as the app gets stable and richer in functions. Ideally, before releasing any product, you should test it on multiple devices with different characteristics.
You might want to start with the emulator and move to one particular device as the app gets stable and richer in functions.
From the perspective of an IDE, this means having two build configurations ready, one where the target device is the emulator and one where the target device is any compatible device connected through a USB port.
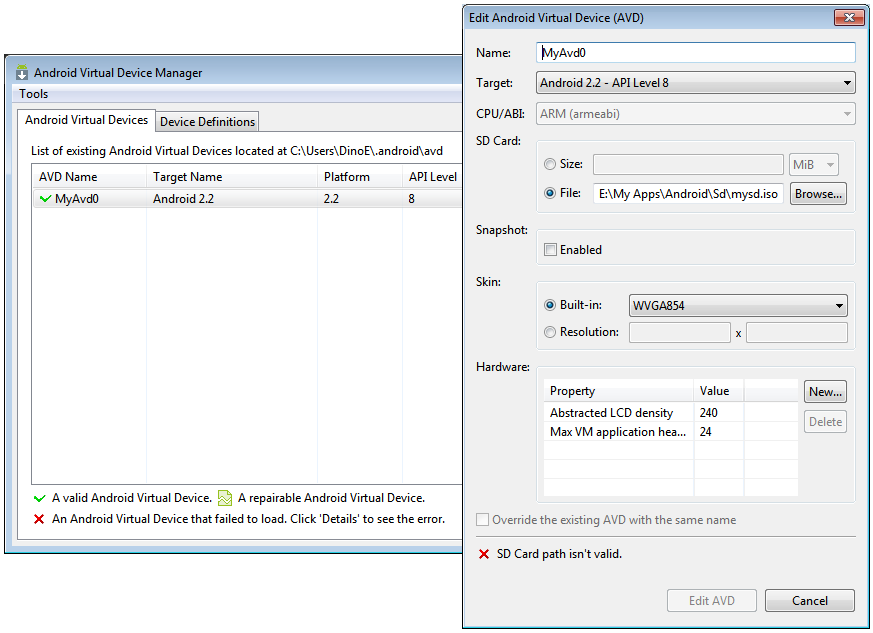
In order to test on the emulator, you also need to set up an Android Virtual Device (AVD). An AVD is just a configuration file through which you define hardware and software options for the emulator to mimic. You create an AVD using the AVD Manager-one of the Android SDK tools that IntelliJ IDEA and other IDEs map to their menus.
In addition to the AVD settings, IntelliJ also offers a few parameters through the Emulator tab of the dialog box used for editing build configurations. For example, you can set the network latency parameter to simulate a 3G connection to the Internet from within the phone emulator.
A Look at the Project
An Android project is primarily a Java project, so it shares many of the classic folders you find in a Java project such as src, libs, and res. The src folder contains the source code whereas the libs folder lists external libraries. The res folder contains all external resources used by the application, such as images, layout files, strings, and menus. The res folder usually contains subfolders for drawable, layout, values, and menu.
The drawable folder contains all of the images referenced from the application. This includes the application's icon, the splash-screen image, as well as any other images you use in the user interface.
The layout folder contains files used to define the structure of views. A UI layout file is an XML file that you can edit through the UI designer that is integrated in IntelliJ IDEA. You can also edit manually in a text editor.
A UI layout file is an XML file that you can edit through the UI designer that is integrated in IntelliJ IDEA.
The values folder contains XML files that declare strings, graphical styles, and colors. Usually, data stored in such XML files is expressed in the form of name/value pairs. The menu folder contains the definition of menus to be used by the application. A menu is expressed as an XML file and consists of a list of items, each of which indicates a unique ID, a reference to a string in the values folder and reference to an icon in the drawable folder.
In an Android application, you may also find an optional folder named assets for storing resources. The main difference between the assets and the res folder is that any content placed in assets is not going to be pre-processed by the Android framework. The benefit of resource pre-processing is that the resource is abstracted to a generic ID, which enables the underlying Android platform to serve the most appropriate version of that resource based on languages, OS versions, and screen size or orientation. The content in assets is provided as-is and the developer is responsible for reading it programmatically.
Android resources can be grouped together on a per-device basis so that you can have different resources selected for different classes of devices. In Figure 5, you see several drawable-xxx and values-xxx folders. The xxx suffix indicates the range of devices that the drawables and values are for. For example, drawable-hdpi indicates that the content will only be used for devices that Android determines to have a high density. Android defines four generalized density values: ldpi (low), mdpi (medium), hdpi (high), and xhdpi (extra high).
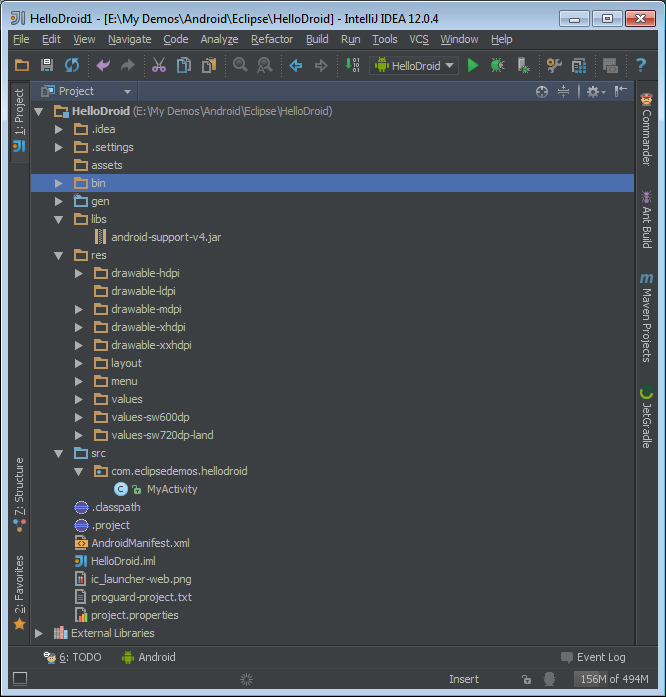
If that doesn't work for you, you can group by screen width. In this case, Android offers four generalized sizes: small, normal, large, and xlarge. Note that with Android 3.2, generalized sizes are deprecated in favor of more specific and flexible sizes. An example is the values-sw720dp-land folder in Figure 5. The folder contains values to be used on devices with a minimum screen width of 720 pixels and in landscape mode. For more information about the delicate art of dealing with multiple Android devices, check out official documentation: https://developer.android.com/guide/practices/screens_support.html.
Note that with Android 3.2, generalized sizes are deprecated in favor of more specific and flexible sizes.
As mentioned, in the src folder, you can find all of the Java classes that make up the application. During the New Project wizard, IntelliJ IDEA offers to create a sample activity that works as the entry point to the application. In Android development, an activity is a plain Java class and an essential component of any Android application. Here's the basic code that gives life to an Android app.
public class HelloWorldActivity extends Activity {
    @Override
    public void onCreate(Bundle savedInstanceState) {
        super.onCreate(savedInstanceState);
        setContentView(R.layout.main);
    }
}
In Android development, an activity is a plain Java class and an essential component of any Android application.
The class extends the base Activity class and overrides the method onCreate that is called when the activity is first created. The setContentView method sets the user interface of the activity. The expression R.layout.main results from a dynamically generated class conceptually similar to resource classes in .NET that are built out of RESX files. The expression points to the content of the main.xml file located under res/layout.
In an Android application, you will have one activity for each screen presented by the application. So far, the application consists of a single activity, but some settings in the manifest file mark this activity as the entry point of the app.
The Android Application Manifest
A manifest file is required for every Android application. It must be an XML file named AndroidManifest.xml and located in the project root folder. The manifest presents information about the application to the Android operating system, including the entry point in the code required to launch the app, and permissions the user must have in order to run the app (e.g., access to the network or the local storage).
As a developer, you take the manifest file as it comes out of the initial wizard and edit it. First, you need to access programmatic functions that require permissions from the user, such as local storage, sensors, and Internet. Another edit to make is when you add a new activity to your codebase. Any activity class, in fact, must be declared in the manifest. The following code snippet shows the declaration that turns an activity into the entry point in the code:
<uses-sdk android:minSdkVersion="8"/>
<application android:label="@string/app_name">
    <activity android:name="HelloWorldActivity"
          android:label="@string/app_name">
        <intent-filter>
            <action android:name="android.intent.action.MAIN"/>
            <category android:name="android.intent.category.LAUNCHER"/>
        </intent-filter>
    </activity>
</application>
You declare the activity through the <activity> element and in doing so, you specify the label and the icon. The <intent-filter> attribute turns it into the entry point (action MAIN). LAUNCHER is an attribute that causes the entry point to be listed in the application launcher pad with its own icon and label.
In the manifest, you also need to have an explicit indication of the minimum Android SDK required to run the app.
In the manifest, you also need to have an explicit indication of the minimum Android SDK required to run the app. You use an integer to indicate an Android SDK. In the example, the number 8 refers to Android 2.2.
Working on the Graphical Layout
At this stage, the user interface (UI) of the sample application is based on a very simple layout. The UI layout is defined in the main.xml file that is located in the res/layout folder. The code snippet below shows the XML used to define the layout: it contains only a label of text.
<LinearLayout xmlns:android="http://schemas.android.../android"
              android:orientation="vertical"
              android:layout_width="fill_parent"
              android:layout_height="fill_parent"
>
    <TextView android:layout_width="fill_parent"
              android:layout_height="wrap_content"
              android:text="Hello World"
    />
</LinearLayout>
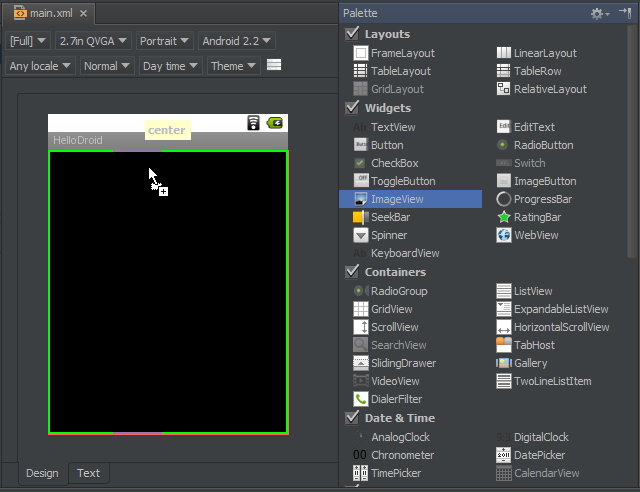
By default, IntelliJ IDEA provides a graphical view of a layout file, but also lets you switch to a text-based view where you edit the layout by typing XML manually. Unless you're using custom controls or need to format the XML in a special way, you may have no need to ever turn on text mode.
The UI designer is like many other graphical editors: it allows you to drag widgets from a list onto the drawing surface. The palette of widgets offered by IntelliJ IDEA covers basic and custom widgets and is good for most common activities.
Through the UI editor, you can add an image view and a label. Each widget can have a long list of properties. In particular, Android requires that every visual element has width and height explicitly specified. Here's the markup for an horizontal ruler that is five pixels thick.
<View android:layout_width="fill_parent"
      android:layout_height="5dp"
      : />
Note the layout_width and layout_height attributes. They are mandatory and should not be set to explicit numbers unless it's strictly required, as in the case of a horizontal bar. You can use two relative measurements, such as fill_parent and wrap_content, that indicate the same extension as the parent and what's enough for your content respectively.
When working on an Android UI, another key rule to remember is that you should always use “dp” as the unit for any explicit size that you express in numbers. The string “dp” (or “dip”) stands for density-independent pixel. A density-independent pixel is an abstract unit calculated from the physical density of the device user's screen.
When working on an Android UI, another key rule to remember is that you should always use “dp” as the unit for any explicit size that you express in numbers.
Two common topics related to the graphical layout are images and localizable text. Images should be added to the any of the drawable folders; you add multiple images if you are using multiple resolutions. Localizable text goes in a strings.xml file located under the values folder. Here's some content from strings.xml:
<resources>
    <string name="app_name">Hello, world</string>
</resources>
To localize the text, you add a values-xx folder where xx is the two-letter code of the culture, for example, values-es.
Finalizing the “Hello, World” App
Let's assume that you have edited the UI to give it an image widget and a couple of labels. To add a bit of action, you first need to be able to reference widgets programmatically and add event handlers. Unlike what you see in Visual Studio and .NET, in Android, there's no magic that automatically turns the ID of a graphical component into a usable and programmable object. You need to ask the activity class for a reference for any widget behind a specific ID. Listing 1 shows how to do this.
Listing 1: Basic extensions to the activity class
public class HelloWorldActivity extends Activity {
    private TextView message;
    private ImageView droid;
    private View.OnClickListener droidTapListener;
    private int counter = 0;

    @Override
    public void onCreate(Bundle savedInstanceState) {
        super.onCreate(savedInstanceState);
        setContentView(R.layout.main);

        initializeApp();
    }

    private void initializeApp() {
        message = (TextView) findViewById(R.id.message);
        droid = (ImageView) findViewById(R.id.imageView);

        // Define and attach listeners
        droidTapListener =  new View.OnClickListener() {
            public void onClick(View v) {
                tapDroid();
            }
        };
        droid.setOnClickListener(droidTapListener);
    }

    private void tapDroid() {
        counter ++;
        String temp = getStringForDisplay(counter);
        message.setText(String.format(
                          "You touched the droid %s", temp));
    }

    // More code goes here
    :
}
You start by defining a private member for each of the widgets you intend to command programmatically. The initializeApp method is an internal utility that groups initialization steps. You call the findViewById method on the activity class to retrieve the widget by ID; you use the auto-generated ID property to identify the widget by name in a strongly typed manner.
In Java, attaching an event to a widget is a bit more convoluted than in .NET. You need to define a listener, which is a wrapper class around the code that handles the event.
Attaching an event to a widget is only a bit more convoluted than in .NET. In Java, you need to define a listener, which is a wrapper class around the code that handles the event. The View class has an interface defined for each known event. A good example is View.OnClickListener. Being an interface, you can't call it directly but need to create a class that implements it. Java provides a shortcut to this in the form of anonymous classes.
droidTapListener =  new View.OnClickListener() {
    public void onClick(View v) {
        tapDroid();
    }
};
Using the new operator on an interface means that you need an instance of an unnamed class that supports the interface. Providing the implementation of the interface is, of course, up to you. In the code snippet above, the method tapDroid represents the action being taken when the listener is triggered. This is only the first step, however. You still need to link a generic click listener to the click event of a particular widget.
droid.setOnClickListener(droidTapListener);
Note that in C#, it would have been as simple as:
droid.Click += tapDroid;
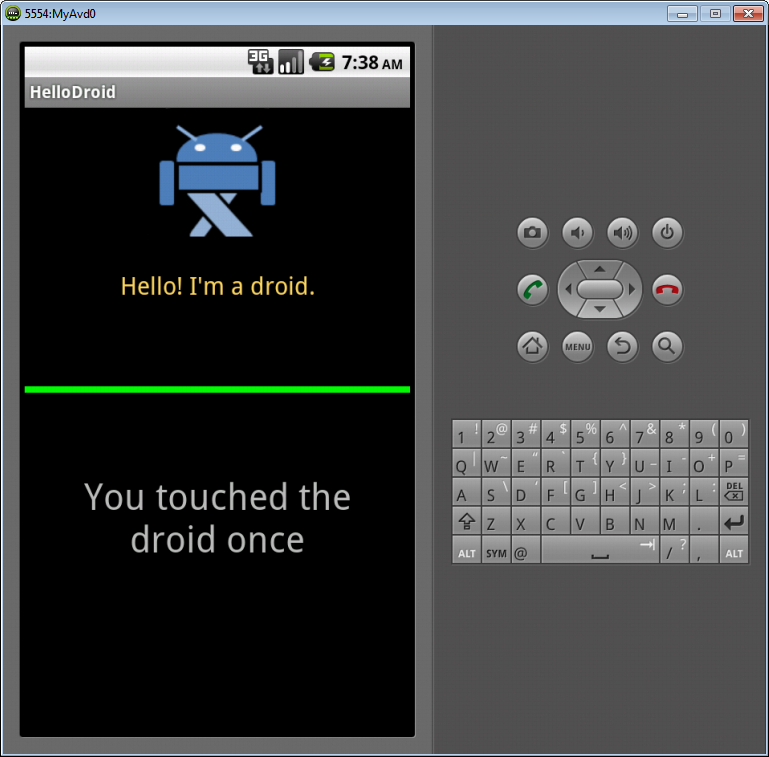
In the sample implementation seen in Listing 1, every time you touch the image, a counter is increased and some friendly text is displayed. (See Figure 7.)
Handling Multiple Activities
Let's rework the main screen layout to add a button that brings users to a second page. The class for the second activity must be declared in the manifest:
<activity android:name=".RssFeedListActivity" />
The RssFeedListActivity is a class that displays a list of items-specifically, articles from an RSS feed. Such activities are better created starting from the ListActivity base class. This ensures that a bit of work is done by the infrastructure. In particular, by deriving from ListActivity, you have ready-made overrides to handle clicks and some binding facilities. The layout of a list activity can be expressed through a user-defined XML file with the (reasonable) constraint that it must include a ListView widget named listview. Everything else in the layout is up to you:
<LinearLayout xmlns:android="http://schemas.android.com/.../android"
              android:orientation="vertical"
              android:layout_width="match_parent"
              android:layout_height="match_parent">
    <ImageView android:layout_width="wrap_content"
               android:layout_height="wrap_content"
               android:id="@+id/imageView"
               android:layout_gravity="center_horizontal"
               android:src="@drawable/eme"
               android:background="#ffffff"/>

    <ListView android:layout_height="fill_parent"
              android:layout_width="fill_parent"
              android:layout_marginTop="20dp"
              android:id="@android:id/list">
    </ListView>
</LinearLayout>
To jump from the current activity to another activity, you need the following code:
Intent i = new Intent(this, RssFeedListActivity.class);
startActivity(i);
The parameter in the code indicates the current activity. To navigate back, in Android, users use the Back button. If you want to do that programmatically, then you call the method finish on running the activity, which causes Android to remove the top activity on the stack so that the previous one is shown.
If you want to do that programmatically, then you call the method
finishon running the activity, which causes Android to remove the top activity on the stack so that the previous one is shown.
To favor a quick jump to a particular screen, you can add ad hoc navigation buttons starting a new instance of the target activity. To avoid proliferation of activities, you use the following trick:
Intent i = new Intent(this, YourActivity.class);
intent.addFlags(Intent.FLAG_ACTIVITY_CLEAR_TOP);
startActivity(i);
The flag clears all of the activities currently on top of the given one; in this way, the desired activity is brought back to the top.
Retrieving Data from the Internet
In Android, your code won't access the Internet if the following permission is missing from the manifest:
<uses-permission android:name="android.permission.INTERNET" />
<uses-permission
      android:name="android.permission.ACCESS_NETWORK_STATE">
</uses-permission>
To be precise, you only need the first permission in order to make a successful call to an HTTP endpoint. The second permission is required only if you also want to check whether connectivity is available-a check you want to make anyway, though.
The following code snippet shows how to download some RSS content as a plain string:
public static String DownloadRss(String url)
{
    String text = "";
    try {
        DefaultHttpClient client = new DefaultHttpClient();
        HttpGet request = new HttpGet(url);
        HttpResponse response = client.execute(request);
        HttpEntity entity = response.getEntity();
        text = EntityUtils.toString(entity);
    }
    catch(IOException ioException)
    {
    }
    return text;
}
Although RSS is a widely supported format, it is not really easy to bind to user interface components. You need to parse XML nodes to a collection of more bindable objects. The Java SDK comes with a variety of APIs to work with XML, but still a bit of work is required on your end. The following code governs the download of the RSS feed and its parsing to a collection of custom article types:
IArticleProvider provider;
provider = new eTennisArticleProvider();
ArrayList <ArticleInfo> articles;
articles = provider.getArticles();
Bind(articles);
Here, an interface for a component that provides article information is defined. All the logic about parsing is encapsulated in the article provider component and all the logic about data binding is encapsulated in the Bind method. Let's focus on parsing RSS to objects first. (See Listing 2.)
Listing 2: Parsing RSS feed to a custom collection
private static ArrayList<ArticleInfo> ParseToArticles(String rss)
{
    ArrayList<ArticleInfo> articles;
    articles = new ArrayList<ArticleInfo>();
    Document doc = DomFromString(rss);
    NodeList nodes = doc.getElementsByTagName("entry");
    int size = Math.min(nodes.getLength(), 20);

    // Loop through <entry> nodes
    for (int i=0; i<size; i++) {
        Node rssEntry = nodes.item(i);
        NodeList entryNodes = rssEntry.getChildNodes();

        ArticleInfo a = new ArticleInfo();
        Node title = entryNodes.item(1);
        a.Title = title.getTextContent();
        Node summary = entryNodes.item(2);
        a.Abstract = summary.getTextContent();

        articles.add(a);
    }

    return articles;
}
The key thing that is going on in Listing 2 is the building of an XML DOM tree out of the RSS content. After that, it's all a matter of navigating through nodes to extract title and summary nodes typical of the RSS schema. Content read from the RSS elements is copied into a collection of custom types. To build an XML DOM tree, you need the following code instead:
Document doc = null;
DocumentBuilderFactory dbf;
dbf = DocumentBuilderFactory.newInstance();
try {
    DocumentBuilder db = dbf.newDocumentBuilder();
    InputSource is = new InputSource();
    is.setCharacterStream(new StringReader(xml));
    doc = db.parse(is);
}
catch (ParserConfigurationException e) {
}
In .NET, once you've got a collection of data, you're pretty much done. In Android, data binding is a bit more convoluted and requires more work.
Binding Data to a ListView
In Android, data binding requires the services of an adapter object. The adapter knows about the ListView, data items, and the template of individual cells. To populate a list, all you need to do is assign a proper adapter to the list.
private void Bind(ArrayList<ArticleInfo> articles)
{
    ArrayAdapter<ArticleInfo> adapter;
    adapter = new ArticleAdapter(this, articles);
    setListAdapter(adapter);
}
A few predefined adapters exist in the Android SDK. If you're binding your own objects, though, you need your own adapter class. Here's how to create one that binds elements programmatically into the collection of controls in the list template.
A few predefined adapters exist in the Android SDK. If you're binding your own objects, though, you need your own adapter class.
A custom adapter is a class derived from an ArrayAdapter in which you override the method getView and do some work in the constructor.
public ArticleAdapter(Activity context, ArrayList<ArticleInfo> articles)
{
    super(context, R.layout.listitem, articles);
    this.context = context;
    this.articles = articles;
}
By calling the parent constructor, you set the layout of list items. In this case, it is a listitem.xml file made of two labels vertically stacked:
<LinearLayout xmlns:android="http://schemas.android.com/...android"
              android:layout_width="fill_parent"
              android:layout_height="fill_parent"
              android:orientation="vertical">
    <TextView android:id="@+id/title"
              android:layout_width="fill_parent"
              android:layout_height="wrap_content"
              android:padding="2dp"
              android:textColor="#eeeeee"
              android:gravity="center_vertical"
              android:textSize="16dp" >
    </TextView>
    <TextView android:id="@+id/summary"
              android:layout_width="fill_parent"
              android:layout_height="wrap_content"
              android:padding="5dp"
              android:gravity="center_vertical"
              android:textSize="10dp" >
    </TextView>
</LinearLayout>
In getView, a common implementation pattern suggests that you build a pool of layout cells and try to reuse them as much as possible. If not null, the parameter convertView refers to a reusable cell. In this case, you extract cached information from the cell.
public View getView(int position, View convertView, ViewGroup parent)
{
    ViewHolder holder;
    View itemView;
    :

    if (convertView != null)
        holder = (ViewHolder) convertView.getTag();
    :

    // Set the text to display
    ArticleInfo info = articles.get(position);
    holder.Title.setText(info.Title);
    holder.Summary.setText(info.Abstract);
    return itemView;
}
The ViewHolder is a private and user-defined class that stores references to the widgets found in the cell.
static class ViewHolder
{
    public TextView Title;
    public TextView Summary;
}
You create a new cell (and cache its references to a view holder) every time the convertView parameter is null.
if (convertView == null)
{
    LayoutInflater inf;
    inf = context.getLayoutInflater();
    itemView = inf.inflate(R.layout.listitem, null);
     holder = new ViewHolder();
        holder.Title = (TextView)
            itemView.findViewById(R.id.title);
        holder.Summary = (TextView)
            itemView.findViewById(R.id.summary);
       listItemView.setTag(holder);
}
else
{
    holder = (ViewHolder) convertView.getTag();
}
The actual assignment of data to the visual elements takes place as the final step of getView.
Finalizing the Sample App
Two more steps are required to finalize the demo: checking for Internet state and displaying a progress bar while a feed is downloaded. Here's the code you need to check the connectivity:
public static Boolean isInternetAvailable()
{
    ConnectivityManager cm;
    cm = _context.getSystemService(Context.CONNECTIVITY_SERVICE);
    NetworkInfo ni = cm.getActiveNetworkInfo();
    if (ni != null &&
        ni.isAvailable() &&
        ni.isConnected())
        return true;
    return false;
}
To display a progress bar, you need to resort to the ProgressDialog class, create a new instance of it and then show and hide it as required. Here's a helper class that does most of the work for you.
public class Common {
    public static ProgressDialog ProgressBar;

    public static void initializeProgressBar(Activity parent)
    {
        final ProgressDialog dialog;
        dialog = new ProgressDialog(parent);
        dialog.setMessage(parent.getString(R.string.loading));
        dialog.setCancelable(false);
        ProgressBar = dialog;
        ProgressBar.show();
    }

    public static void closeProgressBar()
    {
        ProgressBar.hide();
    }
}
Figure 8 shows the app in action on a sample RSS feed.

Summary
The source code available for download contains even more features than discussed in this article. For example, it shows what to do when the user clicks on an item in the list.
For a .NET developer, Android programming is not as easy as whatever aspect of .NET programming you want to consider. It's a matter of tooling but also – if not especially – a matter of design of the Android SDK and the Java language.
For these reasons, choosing the best tools available for coding is essential. I firmly believe that using IntelliJ IDEA Community Edition over Eclipse makes development a bit easier and faster. You have a lot of refactoring facilities and code completion options that are close to what you find in Visual Studio with ReSharper installed.
Another aspect that I invite you to look at is Kotlin. Kotlin is a new language currently being developed at JetBrains that promises to be something in between Java and C#. It can really help cut down many of the convoluted aspects of Java programming that impact on Android apps. Finally, don't think that jumping on the Xamarin bandwagon and sticking to C# for Android really saves you from everything. It's definitely something to consider, though, and if you end up choosing Xamarin Studio, well, you're not certainly alone. However, not even Mono can save you from deep understanding of UI patterns and things like adapter-based data binding.
